Use chart on first
page to
measure screws.
A-1 Drawer frame: 4 Pieces as follows
(1) PLAIN PIECE (R#7) - back of drawer frame 37" x 17⁄4" x 5⁄8"
(2) SIDE PIECES - Right side piece (R#8) and left side piece (R#9)
26 9⁄16" x 2 9⁄16" x 5⁄8"
(1) FRONT PIECE (R#10) - pre-drilled holes, front of frame 37" x 2 9⁄16" x 5⁄8"
A-2 Drawer top/back and bottom: 2 Pieces as follows
(1) BACK SUPPORT on drawer (R#11) - Hardboard board 31⁄2" x 383⁄8"
(1) BOTTOM of drawer (R#12) - Hardboard board 261⁄8" x 375⁄8"
A-3 Drawer front: 1 Piece as follows
(1) FINISHED FACE PIECE (R#13) - 31⁄2" x 39"
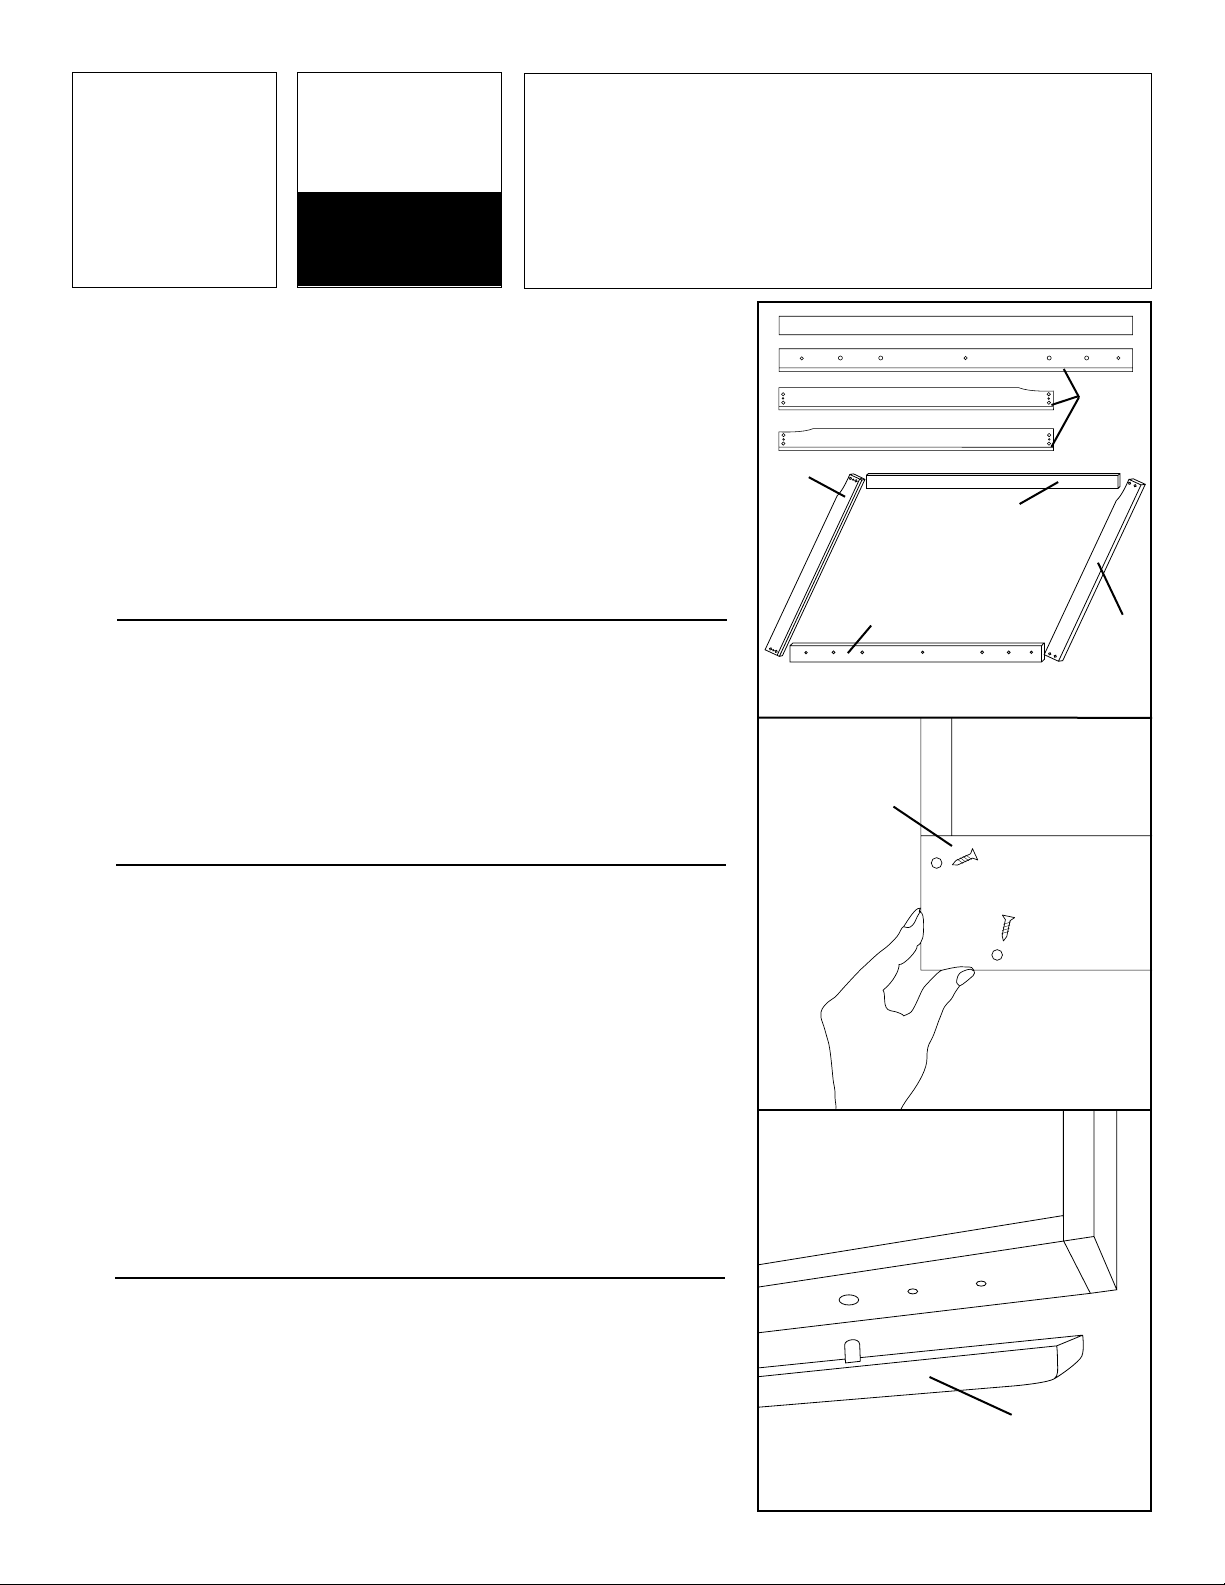
A-1
1. Locate plain piece. This will be the back of your drawer.
2. Find 2 side pieces. There will be a right and a left. When pieces are laid
down parallel, pre-cut slots will face in toward each other. There will be a
grooved section on the top of each piece, these have to be on the same end
and will be closest to the back piece of your drawer.
3. Find front piece. Pre-drilled holes face out, pre-cut slot will face in.
4. Insert plastic dowels into the ends of the front and back pieces. Align all 4
pieces on the floor. Using the 4-11⁄2" wood screws, secure on all four corners.
A-2
5. Locate 31⁄2" x 383⁄8" piece of hardboard board and 7 - 5⁄8" wood screws.
Find grooved area on side pieces on back of drawer frame. Lay hardboard
piece on top of back of frame, pre-drilled holes in hardboard will face out.
BEGIN SECURING ON THE CORNERS FIRST! Snug hardboard piece up
to one edge squaring it up with the frame. There will be no pre-drilled holes
in frame. If using an electric screw driver, slow your drill speed down and
apply a slight pressure. Align screw with pre-drilled hole in hardboard,
secure to frame. Do both corners first, then the middle.
6. Find large hardboard piece with pre-drilled holes. Thread large piece of
hardboard in pre-cut slot, smooth finish up and pre-drilled holes to the back
of drawer (they will slide in last). Make sure hardboard board is snug to
bottom. *Note: If corners of hardboard get damaged, trim flat with a razor. Turn drawer over on a
flat surface. Locate 5 - 3⁄4" wood screws to attach large hardboard piece to
drawer frame. Align screws with pre-drilled holes in hardboard board. There
will be no pre-drilled holes on frame. Secure with wood screws.
A-3
7. Locate finished face piece. To attach face piece to front of drawer take 2
wooden dowels and insert on the back of the finished face piece. Stand drawer
on end, back of drawer to floor. Align dowels with pre-drilled holes and tap on
to frame. On carpet or soft surface turn drawer so finished face piece is down.
Locate 3 - 13⁄8" wood screws. secure in 3 pre-drilled holes on front inside
piece of drawer frame.
8. To attach handles to drawer, thread 2 - 1" gold bolts from inside to out. Using
a flathead screwdriver to secure bolts to handle on front. Repeat other side.
9. Once you are sure you have successfully assembled one drawer and it fits
into the flat file frame, you may proceed with other drawers gluing as
you assemble.
Check and Organize all Parts
Bag contents:
Drawer Assembly
8 - Plastic dowels
2 - Wooden dowels
7 - 5/8" Wood screws
5 - 3/4" Wood screws
3 - 13/8" Wood screws
4 - 11/2" Wood screws
Bag contents:
Handles
4 - Gold bolts
2 - Gold handles
It is recommended to dry fit the 1st drawer as a pattern. Then, for best
results and maximum stability, secure all wood dowels with wood glue.
Be careful to lay out and identify all parts before gluing.
We also recommend laying out all hardware as you take it out of the bags.
Separate into exact lengths. Several of the screws are similar in length.
FAILURE TO USE THE PROPER SCREW LENGTH COULD RESULT
IN DAMAGE TO DRAWER FRONT!!!
A-2
A-3
A-3
A-1
Plain piece
Back of drawer
Plain piece - Back of drawer
Front piece
Left Side piece
Right Side piece
Right
side piece
pre-cut
slot faces in,
grooved end faces
up and to back
Left side piece
pre-cut
slot faces
in, grooved
end faces
up and
to back
Front piece
Pre-cut slot faces in
Top/Back of drawer
hardboard piece
Finished piece
Front of drawer
Pre-cut
slots


