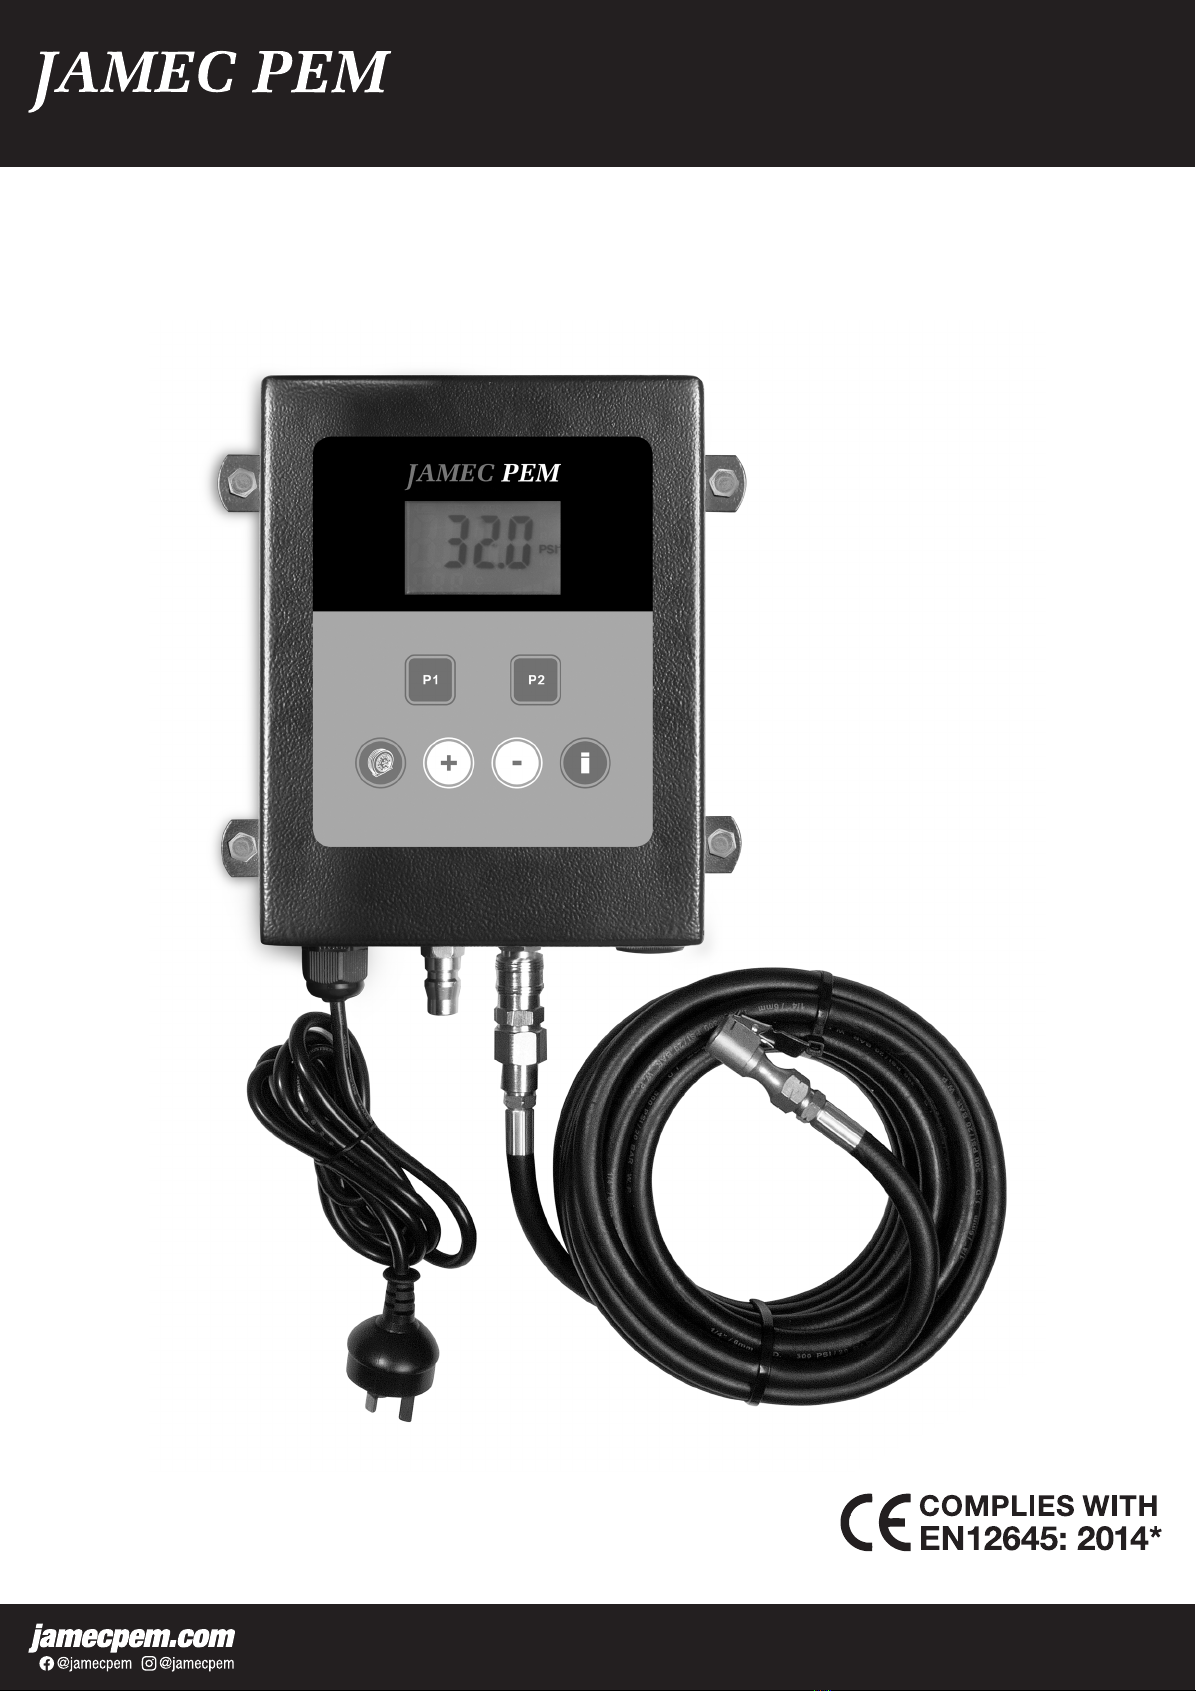
JAMEC PEM 11.0578 User manual

TYRE INFLATOR
DIGITAL AUTOMATIC
OPERATING INSTRUCTIONS
PRODUCT NO. 11.0578

TYRE INFLATOR
DIGITAL AUTOMATIC
The Jamec Pem Digital Automatic Tyre Inator represent quality and
guaranteed accuracy. The classic handheld, slimline design is easy to hold
and is designed to last in rugged workshop environments, utilised in a
majority of Australian service stations.
FEATURES
Includes Certicate of calibration
Two programmable pre-set buttons
Multi-scale gauge
Large LCD backlit digital display
Accuracy exceeds EC Standards
Auto on upon pressure sensing
OPS (Over Pressure Setting) function that allows the tyre to be inated
to a certain pressure then deates automatically to a normal operating
pressure,
used for seating tyres on rims
Tough metal housing
Includes NITTO equivalent adaptor
SPECIFICATIONS
Operation Auto inate / deate / measure
Supply pressure max. 182 psi
Max. ination 174 psi
Chuck type Clip on
Chuck style Single straight
Scale psi, kPa, bar
Inlet size 1/8" BSP
Hose length 10m
Accuracy ± 2 psi @ 25 - 75 psi
Ination volume L/min 2500 L/min @ 182 psi
IP rating 240V AC
Weight 2.3 kg
Advised application Industrial, workshops
MAINTENANCE
DAILY MAINTENANCE
The device does not require a particular maintenance routine but a check of
the pneumatic connections is suggested frequently to make sure of correct
air supply, the use of an air pre-lter is mandatory for this unit to operate
properly.
SPECIAL MAINTENANCE
This is a sensitive piece of equipment if you have an error that cannot easily
be xed please contact an authorised service agent.
NOTE: All faulty PCBs that are within the warranty period are to be returned
to factory for assessment and repairs. PCBs that are found to be burnt due to
water damage will not be covered under any warranty.
IMPORTANT
This tyre inator must only be connected to air line systems which have
clean dry air. Any moisture in the air line system may cause damage to
the operation of this tyre inator and void warranty.
Air pre-lters must be used with this inator to ensure product accuracy
and longevity.
COMPONENTS LIST
PLEASE CHECK AND MAKE SURE THAT THE FOLLOWING COMPONENTS
ARE COMPLETE IN THE PACKAGE.
Automatic Tyre Inator with power cord
7.6 m (25 ’) Air Hose
Hook and M6 x 38 screw kit (1pc)
User manual
M6 x 38 screw 4pcs for wall mounting
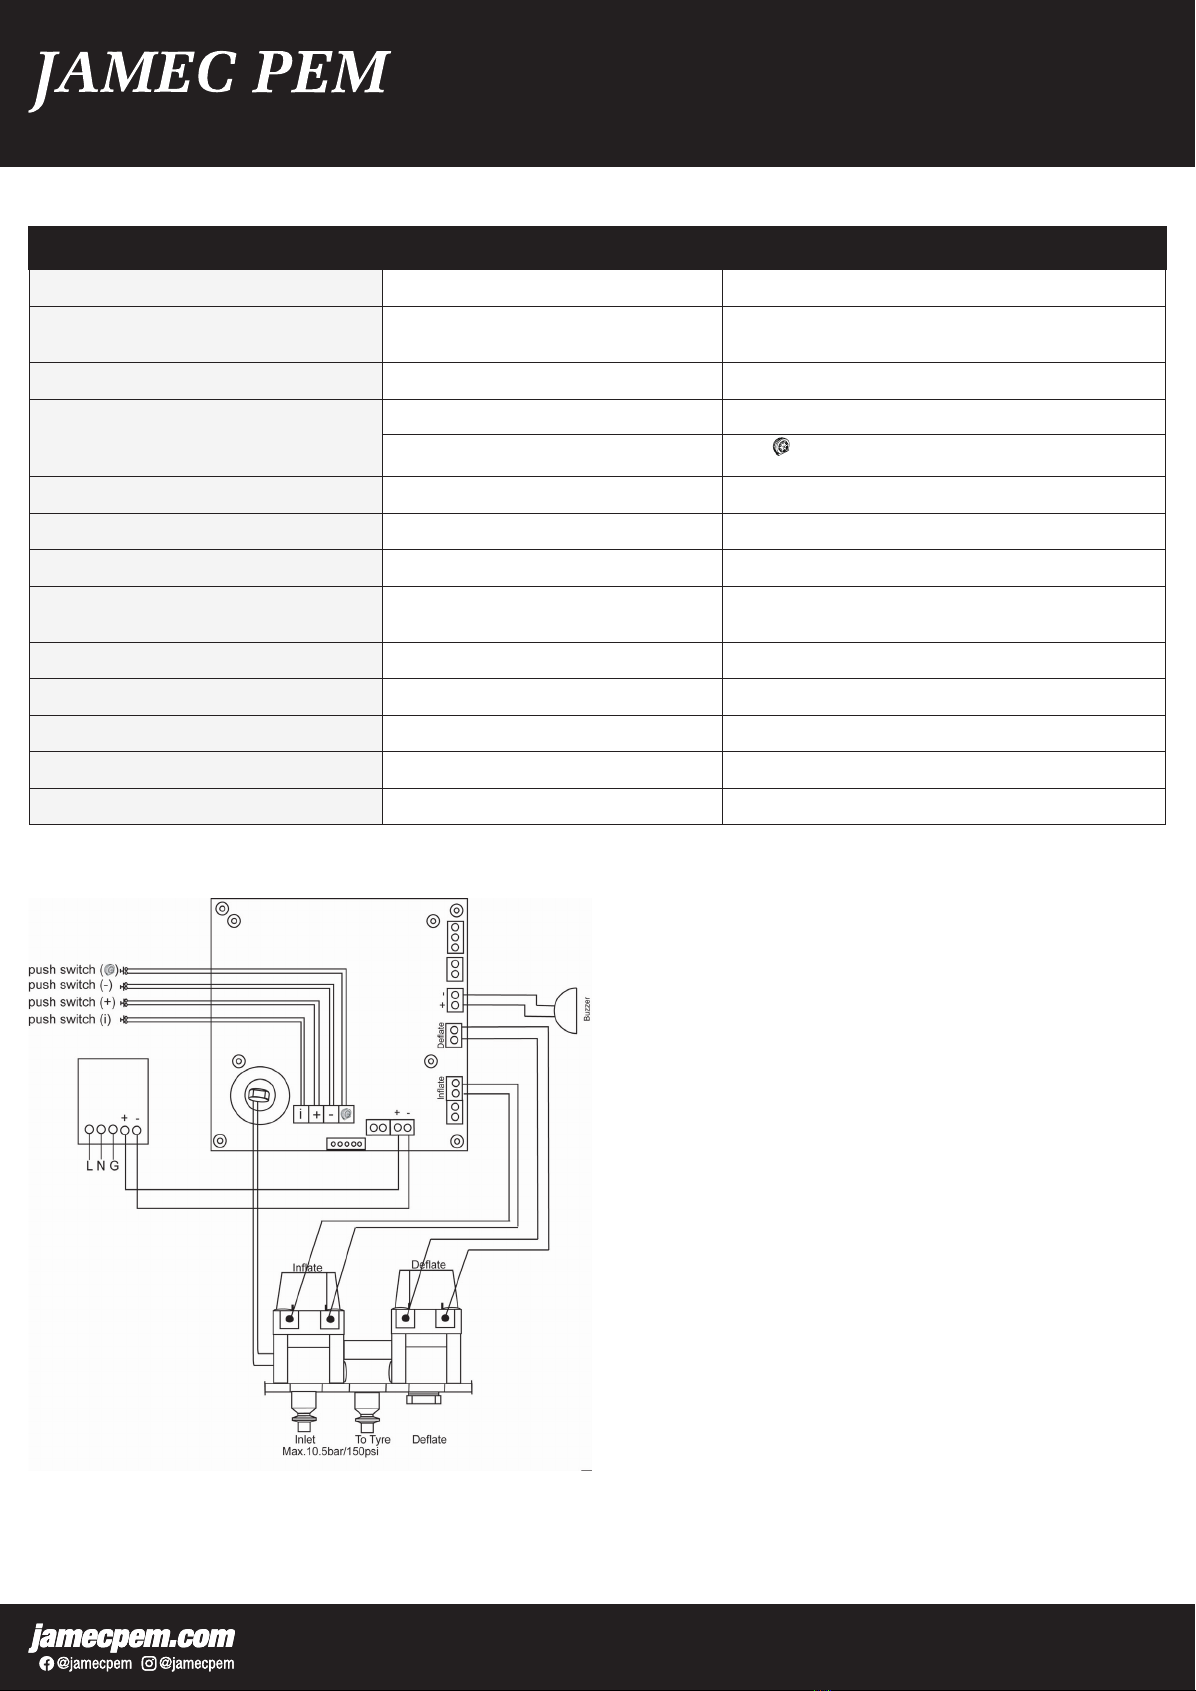
INSTALLATION
1. Unpack the unit.
2. Hold the unit up on the wall and mark where the four (4) holes are
to be drilled.
3. Secure the unit using suitable fastener.
4. Connect the air supply to the unit.
5. Connect the rubber hose as air outlet
6. Connect the power supply.
WARNING
To avoid risk of personal injury, especially to the eyes, face and skin
DONOT direct the air stream at any person, or any part of the body.
Thisequipment is not intended for use by children without adult
supervision. The manufacturer reserves the right to change product
features at any time with out notice. When using the OPS function,
the sum pressure must not exceed the tyre manufacturer’s maximum
ination pressure.
This unit is connected directly to compressed air and this air contains oil
and water. Water is from condensation and oil is from the compressor.
Water and oil will destroy this device, so it is important to lter them out
rst from the system, this means you must attach a lter prior to this
devices air connection.
YOU MUST USE AN AIR PRE-FILTER WITH THIS INFLATOR OTHERWISE
WARRANTY WILL BE VOIDED
Electrical connections should be carried out by a qualied person strictly
according to the related regulation applicable at the location where the
inator is used.
To avoid equipment damage, never exceed the maximum inlet pressure
of 182 psi
To avoid the risk of personal injury, especially to the eyes, face or skin,
DO NOT direct the air stream at any person.
This equipment is not intended for use by children without adult
supervision.
When using the OPS function, the sum pressure must not exceed the tyre
manufacturers maximum ination pressure.
GENERAL NOTES
During extended inactivity, please package the inator and keep it away
from damp, heat or impact, etc.
After unpacking the inator, the packing materials should be disposed
of according to the laws and regulations applicable to the country being
used.
Please check carefully to ensure that no part is damaged, so to ensure
safe and normal operation.
The Automatic Tyre Inator can be installed outside, but a shelter is
suggested, so to protect the equipment from the weather and extend the
service life.

OPERATION
The device includes the OPS (Over Pressure Setting) function which allows
for the tyre’s pressure to be set very high and then reduced to the
pre-determined pressure. This is very handy for use when a new tyre is
tted to a rim.
SETTING THE UNIT OF MEASURE:
This device has four units of measure that can be chosen by the user:
kpa - kilopascals
bar
psi. - pounds per square inch
kg / cm2 - kilograms per square centimetre
Once the unit is set, it will become the default unit for following usage.
1. Press (i
) once the unit of measure starts to ash.
2. Press (+) or ( -) to choose the unit.
3. Press Flat tyre/Conrm button to set the unit of measure.
SETTING OPS:
1. Press (i
) twice, OPS will be ashing on the LCD screen.
2. Press (+) or ( -) to choose the OPS value.
3. Press Flat tyre/Conrm button. If OPS value is not zero, OPS will be
displayed on the LCD screen.
INFLATION AND DEFLATION:
1. Press (+) or ( -) to select target pressure.
2. Connect with tyre valve, ensure there are no air leaks and inator will
start automatically.
3. When ination is nished, the tyre inator will stop automatically and
BEEP to notify that ination has nished.
4. Disconnect the air hose from tyre valve.
PROGRAMMABLE BUTTONS:
1. Press P1 or P2 buttons once. Press (+) or (-) to select pressure desired.
2. Press the Flat tyre/Conrm button once and there will be a beep to
conrm the programmable button has been set to the desired pressure.
3. You can set each programmable button to a different pressure.
4. If the unit is turned off the programmable buttons will have to be
re-programmed.
FUNCTIONS:
1. Press (i
) to enter the function setting mode. After selecting the unit of
measure, press (i
)again to enter the OPS setting. Pressing the (i
)button
three times and the device exit out of the function setting mode without
saving the selection.
2. When OPS function is on, the device will inate to target pressure plus
OPS value rst, then deate to tyre pressure desired, for example: A nal
target of 32 psi or 2.2bar with an OPS setting of 16 psi or 1.1bar gives
a sum of 48 psi or 3.3 bar. This sum of 48 psi or 3.3 bar is the Over
Pressure setting for the tyre. The tyre will inate to the sum value and
deate to the nal target pressure.
3. If tyre pressure is lower than 3 psi or 0.2 bar, the device will not start
automatically. Press Flat tyre/Conrm button for 2 seconds to start
the inator manually. And will inate to the target pressure on the
LCD display.
4. During ination, the device will check tyre pressure automatically, the
rolling bar shows ination/deation in progress and left to right means
inating, right to left means deating.
CONTROL PANEL
Reduce nal target pressure
Increase nal target pressure
Function Select: Unit change/OPS set
Flat tyre/Conrm button. Use this button to start the ination process
when the pressure in the tyre is less than 3psi.
P1 Programmable preset button
P2 Programmable preset button
Fig. 1 Control panel
CONNECTIONS
1. Power cable
2. Air inlet
3. Air hose outlet
4. Exhaust
5. Buzzer (Audible warning)
DISPLAY
1. Unit of measure
2. Pressure display
3. Function selection
4. Rolling bar
23
4
5
Fig. 3 Display
PRODUCT IDENTIFICATION
Fig. 2 Connections
42
3 1

TROUBLESHOOTING
PROBLEM POSSIBLE CAUSE SOLUTION
Air leak Leak in the connection Check the pneumatic connection
The inator works, but no air inated Obstruction in the lters or
in air system
Clean the lters and check the air tube
No display Check power supply Reconnect
Ination does not start, although
the pressure is set and the hose is
connected with tyre
Air hose improperly connected connection Check the hose connection, make sure that no air leaks
Tyre pressure is below 0.2bar (3psi) Press
The unit deates very slowly The exhaust is blocked Make sure exhaust hole is clean
Er1 Pressure sensor broken Power off, change pressure sensor
Er2 Unstable pressure, faulty hose connector Replace hose connector or re-connect hose to the tyre
Er3 Connected Tyre pressure is too high pressure>
13bar (188.5psi)
Stop inating this tyre
Er4 Wrong connections at air inlet and outlet Refer to wiring diagram and connect magnetic valve accordingly
Er5 Low voltage Check the power supply
Er6 Calibration error Unit requires calibration
Er7 Calibration error Unit requires calibration
Er8 Air supply lower than set inate pressure Increase air supply pressure or stop inating this tyre
WIRING DIAGRAM

Distributed by
TRADEPEM INDUSTRIAL PTY LTD.
CALIBRATION CERTIFICATE
This Tyre Inator Part Number: 11.0578 has been calibrated in its normal
working position on test equipment with an accuracy that is traceable to
standards according to: EN12645: 2014
Serial Number:
Date:
ALLOWABLE TOLERANCE
PSI
± 1.2 Up to and including 58 psi
± 2.3 Between 58 & 145 psi inclusive
± 3.6 Greater than 145 psi
TEST RESULTS
REFERENCE PRESSURE PSI 29.0 58.0 87.0 116.0
DISPLAY PRESSURE PSI
* Tyre pressure measuring Instruments, devices for Inspection of pressure and/or
Ination/Deation of tyres for motor vehicles.
IMPORTANT
No responsibility is accepted for incorrect use of this product.
Table of contents
Other JAMEC PEM Power Tools manuals