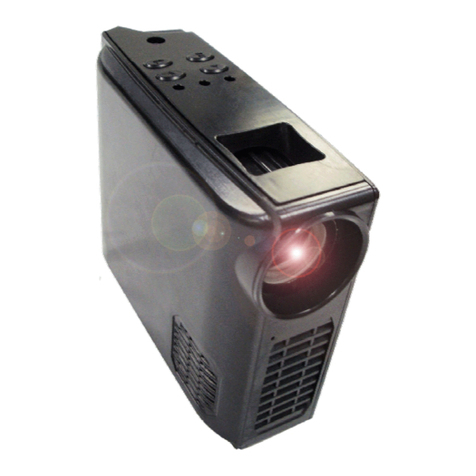
Javes NSK-1080P User manual

0
NSK
NSK NSK
NSK –
––
– 1080P
1080P 1080P
1080P
User Manual
User ManualUser Manual
User Manual

1
Table of Contents
Operation Caution _____________________________________________________ 1
Safety Information _____________________________________________________ 1
Product Introduction ___________________________________________________ 1
Features___________________________________________________________1
Product Overview ___________________________________________________ 2
IR Remote Control _____________________________________________________ 4
Remote Control Overview ____________________________________________ 4
Battery Caution _____________________________________________________ 6
Projector height Adjustment _____________________________________________6
Setting Projector & Screen_______________________________________________ 7
Basic Operation________________________________________________________ 8
Power O /OFF _____________________________________________________ 8
Source Selection ____________________________________________________ 9
TV Menu__________________________________________________________ 9
Image Menu _______________________________________________________ 10
Voice Menu ________________________________________________________ 11
Menu _____________________________________________________________ 12
Geometry Menu ____________________________________________________ 13
System Menu ______________________________________________________ 14
aintenance and Safety _________________________________________________ 15
Projection Lamp ____________________________________________________ 15
Dust filter _________________________________________________________ 16
Lens______________________________________________________________ 17
Projector and remote control___________________________________________ 17
Troubleshooting________________________________________________________ 18

- 1 -
Operation Caution
Warning Do not open the projector cover. There are no replacement parts in the unit.
For servicing, contact qualified service personnel.
Warning Avoid using the system in hot, humid, dusty environments and continually
transfer. The operation temperature should be in between 5℃ to 35℃.
Warning For good images,please use in dark environments, avoid under direct
sunlight.
Warning To avoid damage to eyes, do not look into the lens when the lamp is on.
Warning Please don’t unplug the power cord before cooling fan stop.
Warning Don’t turn on & off projector continually, on & off interval is required min
10mins.
Warning When projector is on, don’t block the ventilation intake for prevent the
projector become too hot .
Warning Lamp change should be done by authorized technician.
Safety Information
In order to keep well of the projector, following are required to be noted:
The right way:
1、 Be sure to turn off and unplug the projector before cleaning.
2、 Please unplug the projector, if the projector is not being used.
The wrong way:
1、 Block the Ventilation intake
2、 Use corrosive agents or abrasive cleaners for projector cleaning.
Don’t place the product in the following place:
1、 Too hot, too cool or humid environment.
2、 Dusty room.
3、 Strong electromagnetism field area.
4、 Under direct sunlight
Product Introduction
I. Features
This is a front projection projector, for used at home entertainment, it generates saturated
reproduction, high brightness, long life, low noise, short show lens, and low power
consumption, value added outstanding features. It’s good output device for PC, HD player
and game. Comprehensive I/O and multi language.
Aspect Ratio: 16:9 (native) support 4:3 format.
Projection method: Front, Front rear, Ceiling and Ceiling Rear.
- 2 -
II. Product overview

- 3 -
I/O Port:

- 4 -
IR Remote Control Overview
I. Remote Control Parts
1. POWER: System power on/off.
2. MUTE: System mutes.
3. 0-9: Change the channel in the TV mode.
4. VOL+, VOL-: Increase or decrease volume.
5. PICTURE: Image mode. Image quality control by: “standard”, “brightness”, “softness” and
“user-defined”.
6. SOU D: Audio mode. Sound effects environment standard, music and cinema.
7. CH+, CH-: In TV mode, change the channel next or back.
8. OSD menu operation(up、down、left、right):
Up/Down: Cursor up/down moving.
Left/Right: Switch left or right the menu; the numerical index decrease or increase; right
key enter。
9. ME U: Shown or exit OSD menu.
10. DISPLAY: Display the signal source name and mode on the screen of side above.
11. TV/VIDEO: Shown or exit signal source menu.
12. SLEEP: Setup sleeping mode from 0 to 120mins.
13. SELECT: Signal source selection button.
14. FREEZE: Image freeze.
15. AUTO: Auto adjustment for computer image optimization.
16. COM: YPbPr shortcut key.
17. AV: AV shortcut key.
18. TV: TV shortcut key.
19. PC: VGA shortcut key.
20. HDMI 1:HDMI #1 shortcut key
21. HDMI 2:HDMI #2 shortcut key
22. SVIDEO:S-VIDEO shortcut key.

- 5 -

- 6 -
II. Battery Caution
1、
Insert the batteries correctly of the polarity (+/-) as shown in the remote control.
2、Keep away from child, baby and pets.
3、Use only AAA batteries (Alkaline batteries are recommended).
4、Remove the battery out when the projector not being used for prolonged periods.
5、Dispose of used batteries according to local ordinance regulations.
Adjusting the Projector Level
If the projection image & the screen are not in parallel, adjust the height adjuster.

- 7 -
Projector & Screen Setting
Image Size Projection Distance
Diagonal Width Height Maximum Minimum
The distance of
lens axis to the
image bottom line
inch/mm inch/mm inch/mm inch/mm inch/mm inch/mm
30
762 26.1 664.1
14.7 373.5 36.9 936.4
30.7 780 0.7 18.7
40
1016
34.9 885.4
19.6 498.0 49.2 1248.5
40.9 1040
1.0 24.9
50
1270
43.6 1106.8
24.5 622.5 61.4 1560.6
51.2 1300
1.2 31.1
60
1524
52.3 1328.1
29.4 747.1 73.7 1872.7
61.4 1560
1.5 37.4
70
1778
61.0 1549.5
34.3 871.6 86.0 2184.9
71.7 1820
1.7 43.6
80
2032
69.7 1770.8
39.2 996.1 98.3 2497.0
81.9 2080
2.0 49.8
90
2286
78.4 1992.2
44.1 1120.6
110.6
2809.1
92.1 2340
2.2 56.0
100
2540
87.1 2213.5
49.0 1245.1
122.9
3121.2
102.4
2600
2.5 62.3
120
3048
104.6
2656.2
58.8 1494.1
147.5
3745.5
122.8
3120
2.9 74.7
150
3810
130.7
3320.3
73.5 1867.6
184.3
4681.9
153.5
3900
3.7 93.4
200
5080
174.3
4427.0
98.0 2490.2
245.8
6242.5
204.7
5200
4.9 124.5
250
6350
217.9
5533.8
122.5
3112.7
307.2
7803.1
255.9
6500
6.1 155.6
300
7620
261.4
6640.5
147.1
3735.3
368.7
9363.7
307.1
7800
7.4 186.8
Note:1、Zoom, adjust image size;
2、Focus, adjust image definition.

- 8 -
Basic Operation ( Base on IR remote control )
Power on/off
(1) Connect projector to power source, make sure the AC power is correct voltage and
frequency & match with the projector requirement.
(2) When the projector is switch on, the LED light on the control panel is on & enter into
standby mode.
Press the POWER key on the remote control, the system go into operation, the red
LED on the control panel is off & the green LED light is on, then, the start up page is
shown, and the projector enter into working status.
(3) When projection is finish, press the POWER key to switch off. Re- switch off by one
more press of the POWER key. Then, the green LED will blinking, the projector will
enter into standby mode after 90secs. The green LED will off & the red LED is on.
(4) Turn off power switch.
(5) Unplug the power cord.
Important notice:
Before switch off the main power switch, make sure the projector is in standby mode, as the
cooling fan require 90secs for cooling down the projector after switch off. Then the LED
change to red color, projector enters into standby mode, then switch off the main power
switch.
Please follow the above procedure accordingly.

- 9 -
II
IIII
II TV Menu
TV MenuTV Menu
TV Menu
2.2 manual search and manual inching
1、Press ENU key, show menu.
2、Press key, TV setting menu will be show.
3、Press key, enter into TV setting menu.
4、Choice manual search, press key start manual search; or choice manual inching,
press key, start manual inching
2.3 TV System
In individual cases, if the TV color or sound is abnormality, please switch to a different
color models or audio formats.
1、Press ENU key, show menu.
2、Press key, TV setting menu will be show.
3、Press key, enter into TV setting menu.
Important information:
In switching the input signal, the system will process a few seconds,
now the setting background will be show, it’s a normal phenomenon.
I Choice Input Signal
Shortcut key: TV/VIDEO:
Please make sure the signal source have been
connected.
(1)On the normal play state, press TV/VIDEO
key, the right menu will be show, press key,
up and down choice, press SELCET key, enter
into play state.
(2)o signal, a blue screen will be show, after
several minutes, enter into standby state.
2.1 Auto search
1、Press ENU
key, show menu.
2、Press
key, TV setting menu
will be show.
3、Press key, enter into TV setting
menu.
4、Choice auto search, press key,
start auto search
.
5、Press ME U key stop searching.

- 10 -
4、Press key, switch color models or audio formats.
5、Press key, enter the color models or audio formats.
III Image menu
3.2 Setting brightness, contrast, saturation and definition.
1、Press ENU key, show menu.
2、Press key, image setting menu will be show.
3、Press key, enter into image setting menu.
4、Press key to move up and down in the Image menu,
choice brightness, contrast, saturation and definition.
5、Press key, adjust the brightness, contrast, saturation
and definition.
6、Press ENU exit
3.1 setting image model.
1、Press ENU key, show menu.
2、Press key, image setting menu will be
show.
3、Press key, enter into image setting menu.
4、Press key, switch image model menu.
5、Press key, choice standard, brightness,
softness or user-defined.
6、Press ENU exit.
3.3 Setting color temperature
1、Press ENU key, show menu.
2、Press key, image setting menu will be
show.
3、Press key, enter into color temperature
setting menu.
4、Press key, enter into color temperature
setting menu.
5、Press key, five mode can be choiced:
standard, cool, warm, primary and
user-defined.
6、Press ENU exit, press again, exit main
menu.

- 11 -
IV
IVIV
IV Voice menu
Voice menuVoice menu
Voice menu
.
4.2 Setting voice mode
1、Press ENU key, display menu.
2、Press key, choice voice menu, the right image will be show.
3、Press key, enter into voice mode setting.
4、Press key, three mode will be show: standard, movie and music.
5、Press ENU exit.
4.3 Setting subwoofer, auto volume control
1、Press ENU key, display menu.
2、Press key, choice voice menu, the right image will be show.
3、Press key, enter into subwoofer, auto volume control mode setting.
4、Press key, control on-off of the subwoofer and auto volume control.
5、Press ENU exit.
Balance, voice mode, alt, auto
volume control show in this menu, all
the adjusting will store in user mode.
4.1 Setting balance
1、Press ENU key, display menu.
2、Press key, choice voice
menu, the right image will be
show.
3、Press key, enter into balance
setting.
4、Press key, adjust the balance
value.

- 12 -
V enu
5.2 Setting OSD horizontal、
、、
、vertical、
、、
、show time and diaphaneity
1、Press ENU key, display menu.
2、Press key, choice menu.
3、Press key, enter into setting.
4、Press key, display OSD horizontal、vertical、show time and diaphaneity, press
key, adjust the value
5、Press ENU exit.
5.1 Setting OSD language
Include two languages:
Chinese and English.
The factory setting is Chinese.
1、Press ENU key, display menu.
2、Press key, choice menu. The
right image will be show.
3、Press key, enter into menu.
4、Press key, language submenu
will be show, Press key,
switch Chinese and English.
5、Press ENU exit.

- 13 -
VI Geometry menu
6.3 setting auto adjusting
When the input signal is VGA, the best display effect can be get from auto adjust the phase
and sampling frequency.
6.1 Setting horizontal、
、、
、vertical、
、、
、
sampling frequency、
、、
、phase.
1、Press ENU key, display menu.
2、Press key, choice geometry
menu. The right image will be show.
3、Press key, enter into geometry
menu.
4、Press key, setting horizontal、
vertical、sampling frequency、phase.
5、Press key, Setting horizontal、
vertical、sampling frequency、phase.
6、Press ENU exit.
6.2 Projection mode
1、Press ENU key, display menu.
2、Press key, choice geometry
menu. The right image will be show.
3、Press key, enter into geometry menu.
4、Press key, choice the projection
mode, press key enter into the right
image.
5、Press key, desk front, desk rear,
ceiling front and ceiling rear can be
choice.
6、Press ENU exit the geometry menu,
press ENU again, exit menu.

- 14 -
VII
VIIVII
VII System menu
System menuSystem menu
System menu
7.2 Information and system initialization
1、Press ME U key, display menu.
2、Press key, choice system menu, the right image will be show.
3、Press key, enter system menu.
4、Press key, choice information or system initialization.
5、Press key, look over the system information or initialize system.
6、Press ENU exit.
7.1 Setting sleeping mode and 3d noise
reduction
1、Press ME U key, display menu.
2、Press key, choice system menu,
the right image will be show.
3、Press key, enter system menu.
4、Press key, choice sleeping mode
or 3d noise reduction.
5、Press key, switch on-off.
6、Press ENU exit.

- 15 -
Maintenance and Security
Maintenance and SecurityMaintenance and Security
Maintenance and Security
I
II
I Lamp
LampLamp
Lamp
The LCD projector lamp is made of mercury vapor within glass, the internal is high pressure.
This high-pressure mercury lamp, experience the impact, scratches, or long-term use and
aging, it may rupture and accompanied by loud voices, or can not continue to light up. At the
same time, when the lamp burst, the fragments may be flying into the shade, the lamp contain
mercury gas may also escape from the Ventilation filter.
▲ In use, if the lamp is strike or scratched, it’s likely to break, so please be used with care.
▲ When the lamp's life draws to a close, please replace the lamp as soon as possible.
Ultra-term use, then increase the likelihood of rupture. Please don’t re-use old lamp,
otherwise it may lead to broken.
▲ The lamp ruptured after use in a short time, it may be accompanied by other electrical
failure. Please contact qualified service personnel or company.
▲ If the lamp ruptured, please give full ventilation, and notice that don’t inhale the exhaust
gas from the projector or enter the eyes and mouth.
▲ If the lamp ruptured, please unplug the power plug, and contact qualified service
personnel or company, prohibit the unauthorized users to clean or replacement the lamp.
▲ Dispose of used lamp according to local ordinance regulations.
▲ When remove the lamp cover, please do not use the projector.
Careful in
electric shock
Careful in heat
Careful in break

- 16 -
II
IIII
II Ventilation filter
aintenance
Please periodically clean the ventilation filter, the general interval is about 100 hours.
1、 Switch off the power switch, unplug the power cord.
2、 Clean the ventilation filter from the cover by dust catcher.
Rinse
When the
ventilation filter is dirtier
, affect the normal running:
1、 Switch off the power switch, unplug the power cord.
2、 Remove the ventilation filter, use water clean, after drying, re-installation.
Caution:
▲ Before maintaining, please switch off the power switch and unplug the power cord.
Please carefully read the book "notice information", using the right method for
maintenance.
▲ When removed the ventilation filter, please don’t use the projector.
▲ When the ventilation filter blocked by dust, the internal temperature will rise, and
may make work error and damage the optical components, please maintain and
clean the ventilation filter accurately and in time.

- 17 -
III Lens
You can purchase optic lens cleaner from most camera stores. Refer to the following to clean
the projector lens.
1. Apply a little optic lens cleaner to a clean soft cloth. (Do not apply the cleaner directly to
the lens.)
2. Lightly wipe the lens in a circular motion.
Caution:
1. Do not use abrasive cleaners or solvents.
2. To prevent discoloration or fading, avoid getting cleaner on the projector case.
IV
IVIV
IV Projector and remote control
1. Wipe off dust with a clean dampened cloth.
2. Moisten the cloth with warm water and mild detergent (such as used to wash dishes), and
then wipe the case.
3. Rinse all detergent from the cloth and wipe the projector again.
Caution:
To prevent discoloration or fading of the case, do not use abrasive alcohol-based cleaners.

- 18 -
Troubleshooting
If you are unable to solve the problem, you should have the projector serviced. Pack the
projector in the original carton. Include a description of the problem and a checklist of the steps
you took when trying to fix the problem: The information may be useful to service personnel.
For servicing, return the projector to the place you purchased it.
Phenomenon Check content
o voice or no
image
1、 Check the power cord.
2、 Check the power switch.
3、 Check the image brightness and contrast setting.
4、 Check the volume.
ormal image
but no voice
1、 Check the volume.
2、 Check the remote control key: MUTE.
o image or
Black and white
image
1、 Adjust the color setting.
2、 Check the color format.
Sound and
picture
interference
1、 Try to keep away from other electrical equipment.
2、 Try to change a power supply socket.
The image is
blurred in TV
function
Check the direction, location and connection of the TV antenna.
Remote Control
Problems
1、 Clean the remote control.
2、 Check the battery polarity.
3、 Replace the batteries.
The image is
blurred
1、 Adjust the focus.
2、 Ensure the projector-to-screen distance.
Image darkle 1、 Adjust the image, for example: brightness and contrast.
2、 The lamp’s life end, replacing.
Caution:
Don’t presume to open the projector case and repair.
Table of contents
Other Javes Projector manuals

Javes
Javes PMP-N70 User manual

Javes
Javes TLX-928 User manual

Javes
Javes LSE-530 User manual

Javes
Javes TOY-550 User manual

Javes
Javes HLT-102 User manual

Javes
Javes XPL-520 User manual

Javes
Javes BTS-M420 User manual

Javes
Javes VPT-681 User manual

Javes
Javes IMD-440 User manual

Javes
Javes JCD-720P User manual