Javes LSE-530 User manual

Micro projector
User Manual
LSE-530

2
IMPORTANT
• This product is a micro projector with MP4 player
function and a VGA connector that can connect
to PC/Noteboo directly and mobile/iPhone,
MP4/iPod, PSP, PDA, DVD, and other digital
products which have video/audio or RGB output
for small business presentation and personal
entertainment.
• Before using the product, please read the manual
carefully.
• This product has 4GB memory, and can receive
an additional TF/Micro SD card with bigger
memory.
• You have to leave 30 MB of free space in the
memory of the player for the O.S.
• Do NOT use the projector in wet or very hot
place.
• The projection resolution is 800x600 pixels.
Separately, the MP4 module recognizes that the
video is 800x600.
• When you turn off the MP4 module, please wait 3
seconds before turning it bac on repeatedly.
• Contents in this user manual may change for
better service.
• For the latest setting information of your product,
please visit our website.
• If you need to play a large number of files in MP4
player, please recompress those files into a

3
single file which can save the start up time, the
MP4 module will also respond faster.
INDEX
Product List 4
Overview 4
General Speci ication o Projector 5
Basic Functions 5
MP4 key unctions description 7
MP4 eatures 8
Access to MP4 Menu 8
MP4 Function Descriptions 10
1. Music Mode 10
2. Video Mode 11
3. Photo Mode 12
4. Explorer Mode 12
5. Settings Mode 13
Troubleshooting 14

4
Product List
Projector 1
AC Adapter 1
A/V Cable 1
Overview
Controlling Keypad
Vo lu me
Output

5
General Speci ication o Projector
Parameters Normal Unit Remarks
Resolution 800x600 Pixel
Aspect ratio 4:3
Projection lens type
Manual focus
Projection angle 30 Degree
Recommended
projection size 30-40 Diagonal Inch
Light source LED
Lifetime 20000 Hour
Input RGB, A/V NTSC/PAL
Weight 290 Gram
Basic Functions
1. Focus adjustment
To achieve the best quality projection image at different
projection distances, please manually turn the focus nob.
The focus mechanism is designed for projection distance
from 0.5m to infinity.

6
2. Power Input
3. C
onnects to computer by VGA connector
4. C
onnects to digital products (A/V input) by A/V
cable

7
5. MP4 player
MP4 key unctions description
M: Key interface or short-press to go bac to previous
menu
VOL+ : V+ volume up
VOL+ : V- volume down
: Select next trac or fast forward
: Select previous trac or fast reverse
: Play and Pause or short press enter sub-menu.
Power on, power off: pressed and hold for over 3
seconds.

8
MP4 eatures
Explorer: Internal Media, Recorded List, All Audio
Trac s, All Video Trac s, All Image Files.
System Settings: System Setting, Des top,
Language, System Information.
Browsing Pictures: Browsing pictures one by one or
Slide show or Thumbnail (supports JPEG, BMP and
GIF format).
Video Playback: Compatible with AVI, MPEG1,
MPEG2, MPEG4 3G, WMV9/VC1, ASF, RM/RMVB
and FLV formats (must use software to compress the
size of files to 640x480 before playing).
Audio Playback: Compatible with MP3, WMA, WAV,
APE, FLAC AAC/AAC+ and MPEG1/2/2.5 formats.
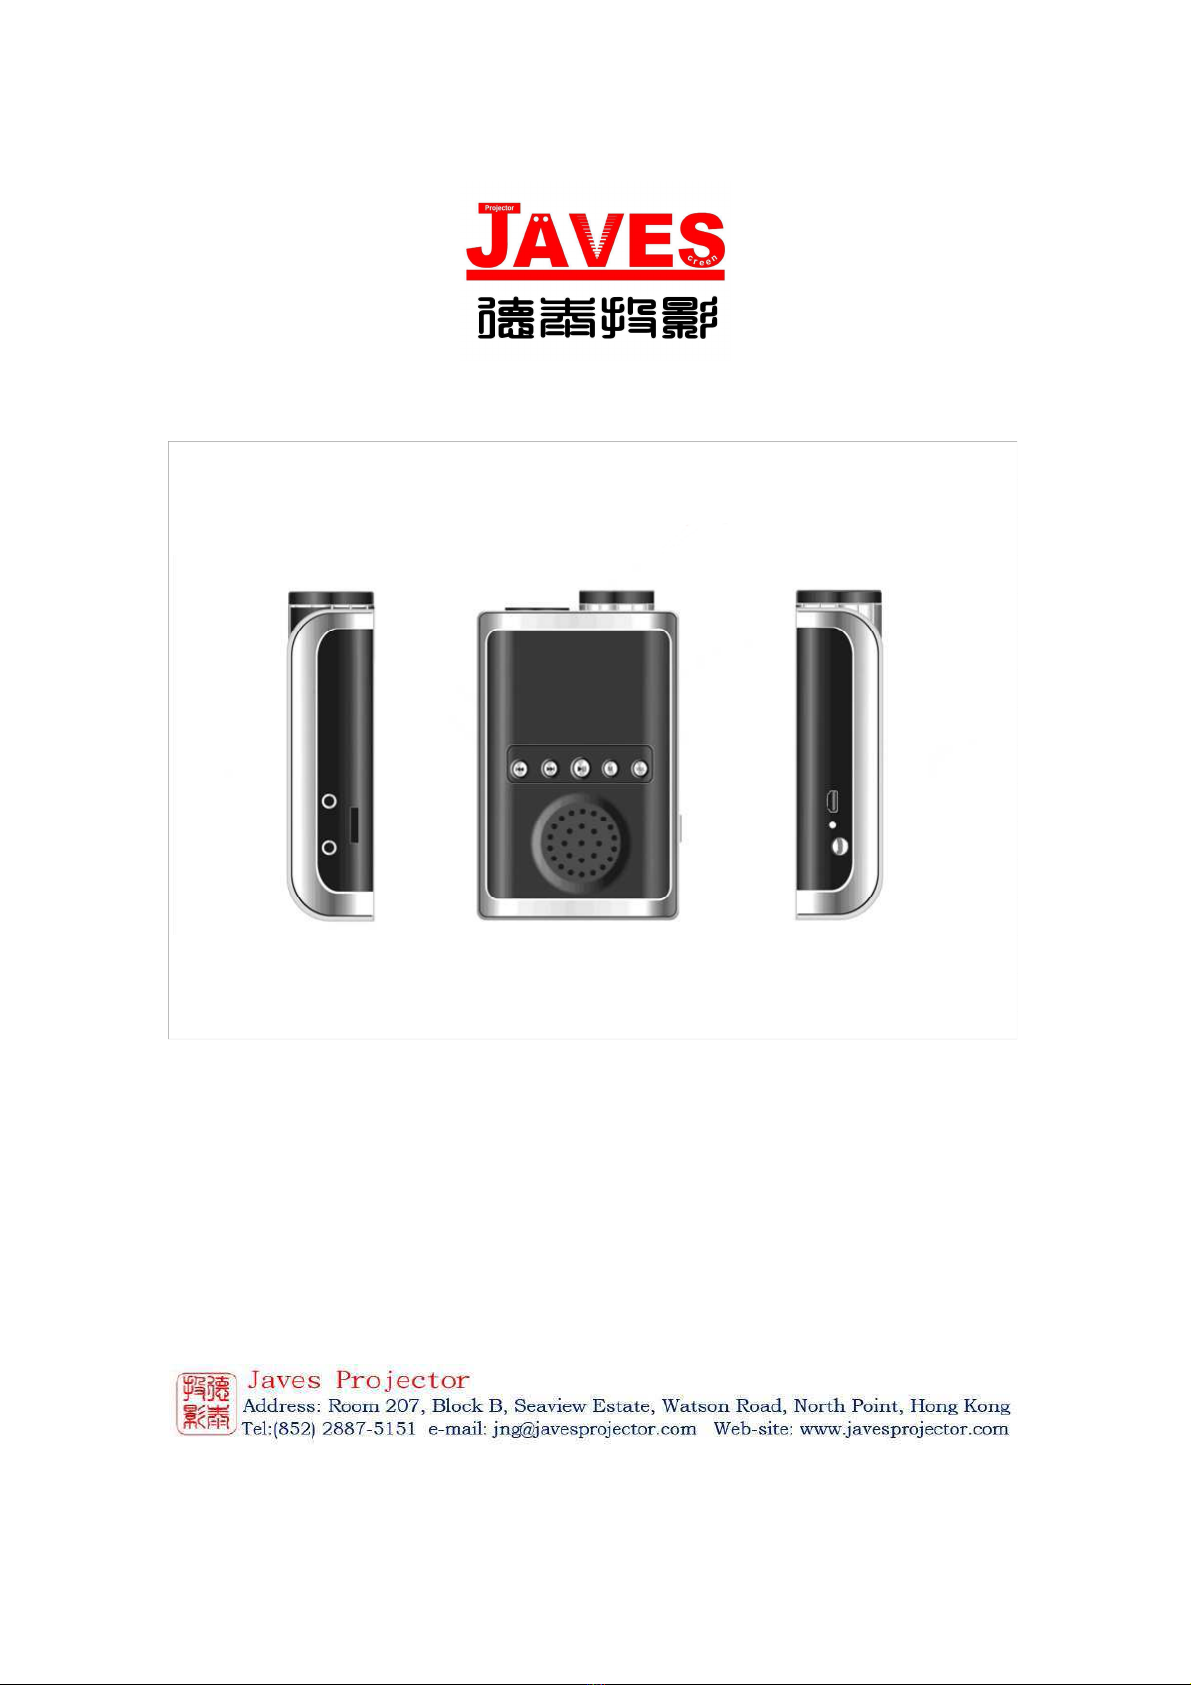
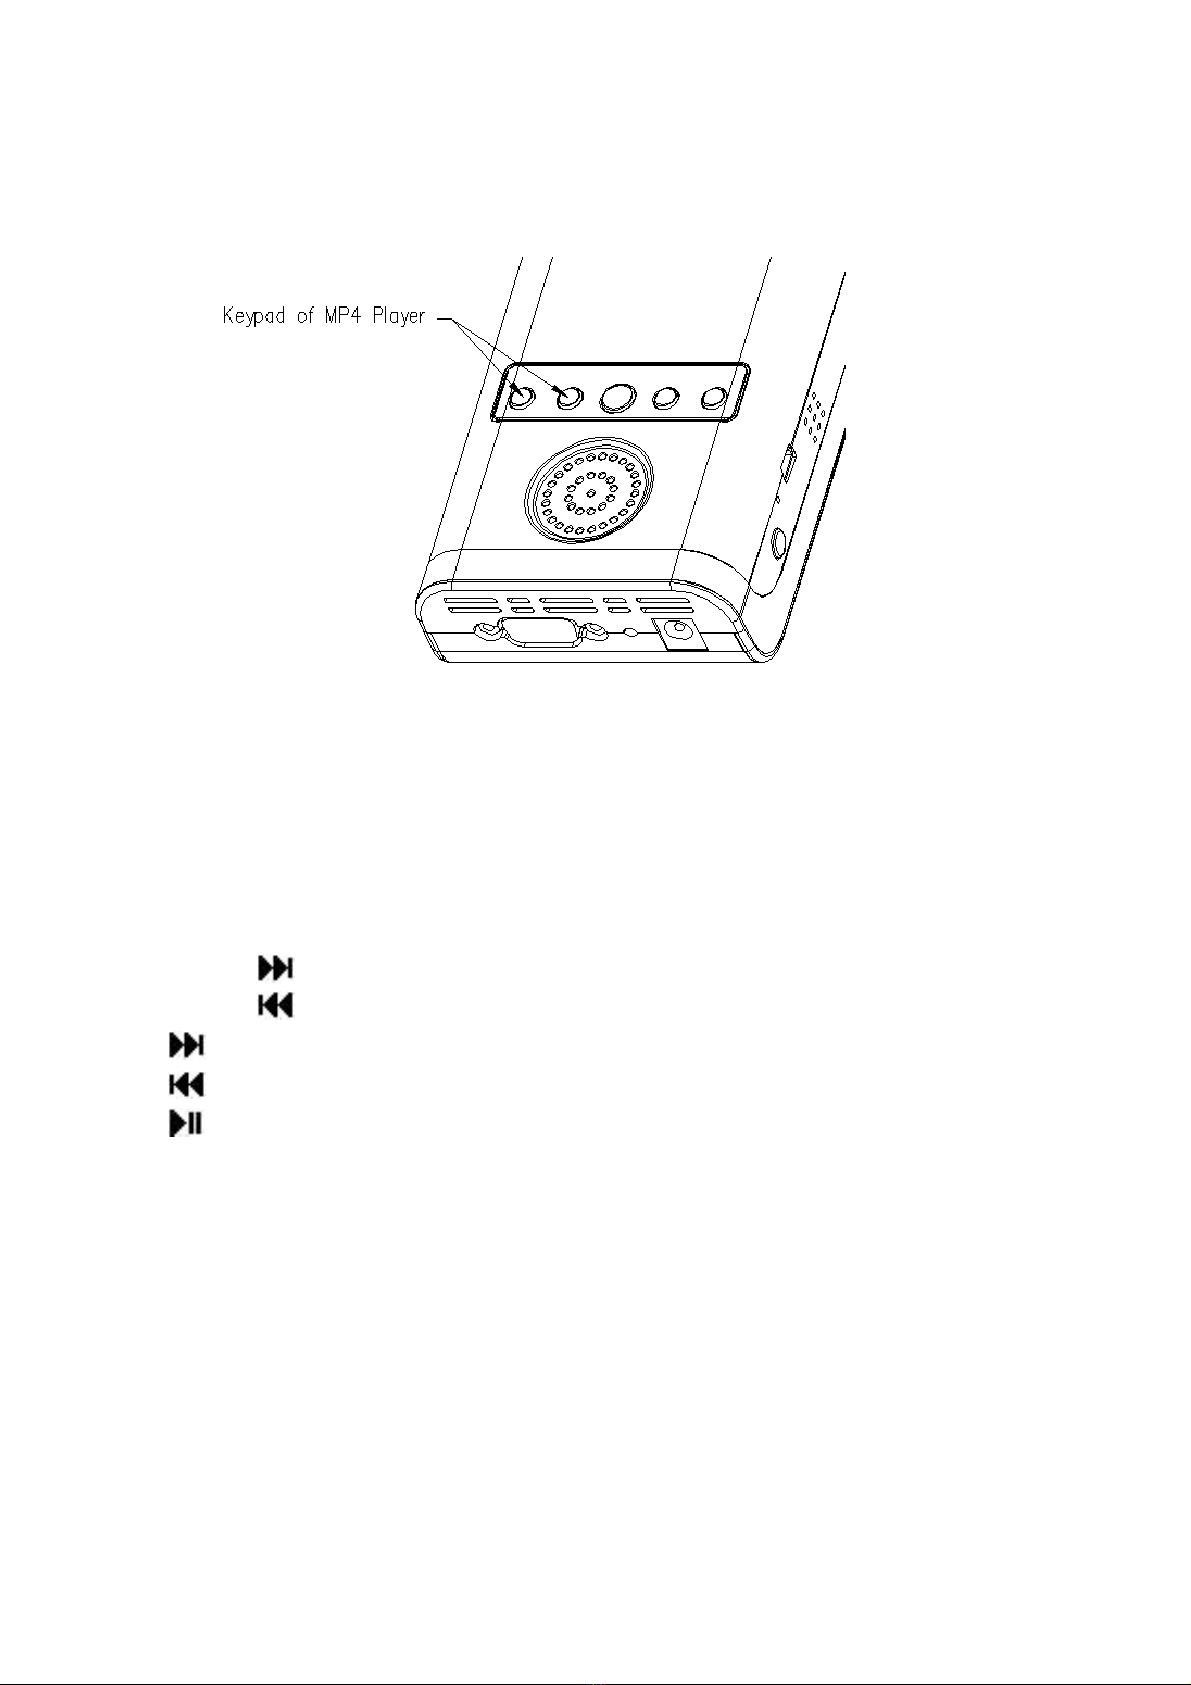
Access to MP4 Menu
*Please ensure there is no A/V input before
starting up the MP4 player.
Press [Play] and hold for 3 seconds, blue LED is
light, MP4 is power on and 3 seconds later the start
up logo displays.
Press / ey to select the Menu mode and the
different menus from the main menu.
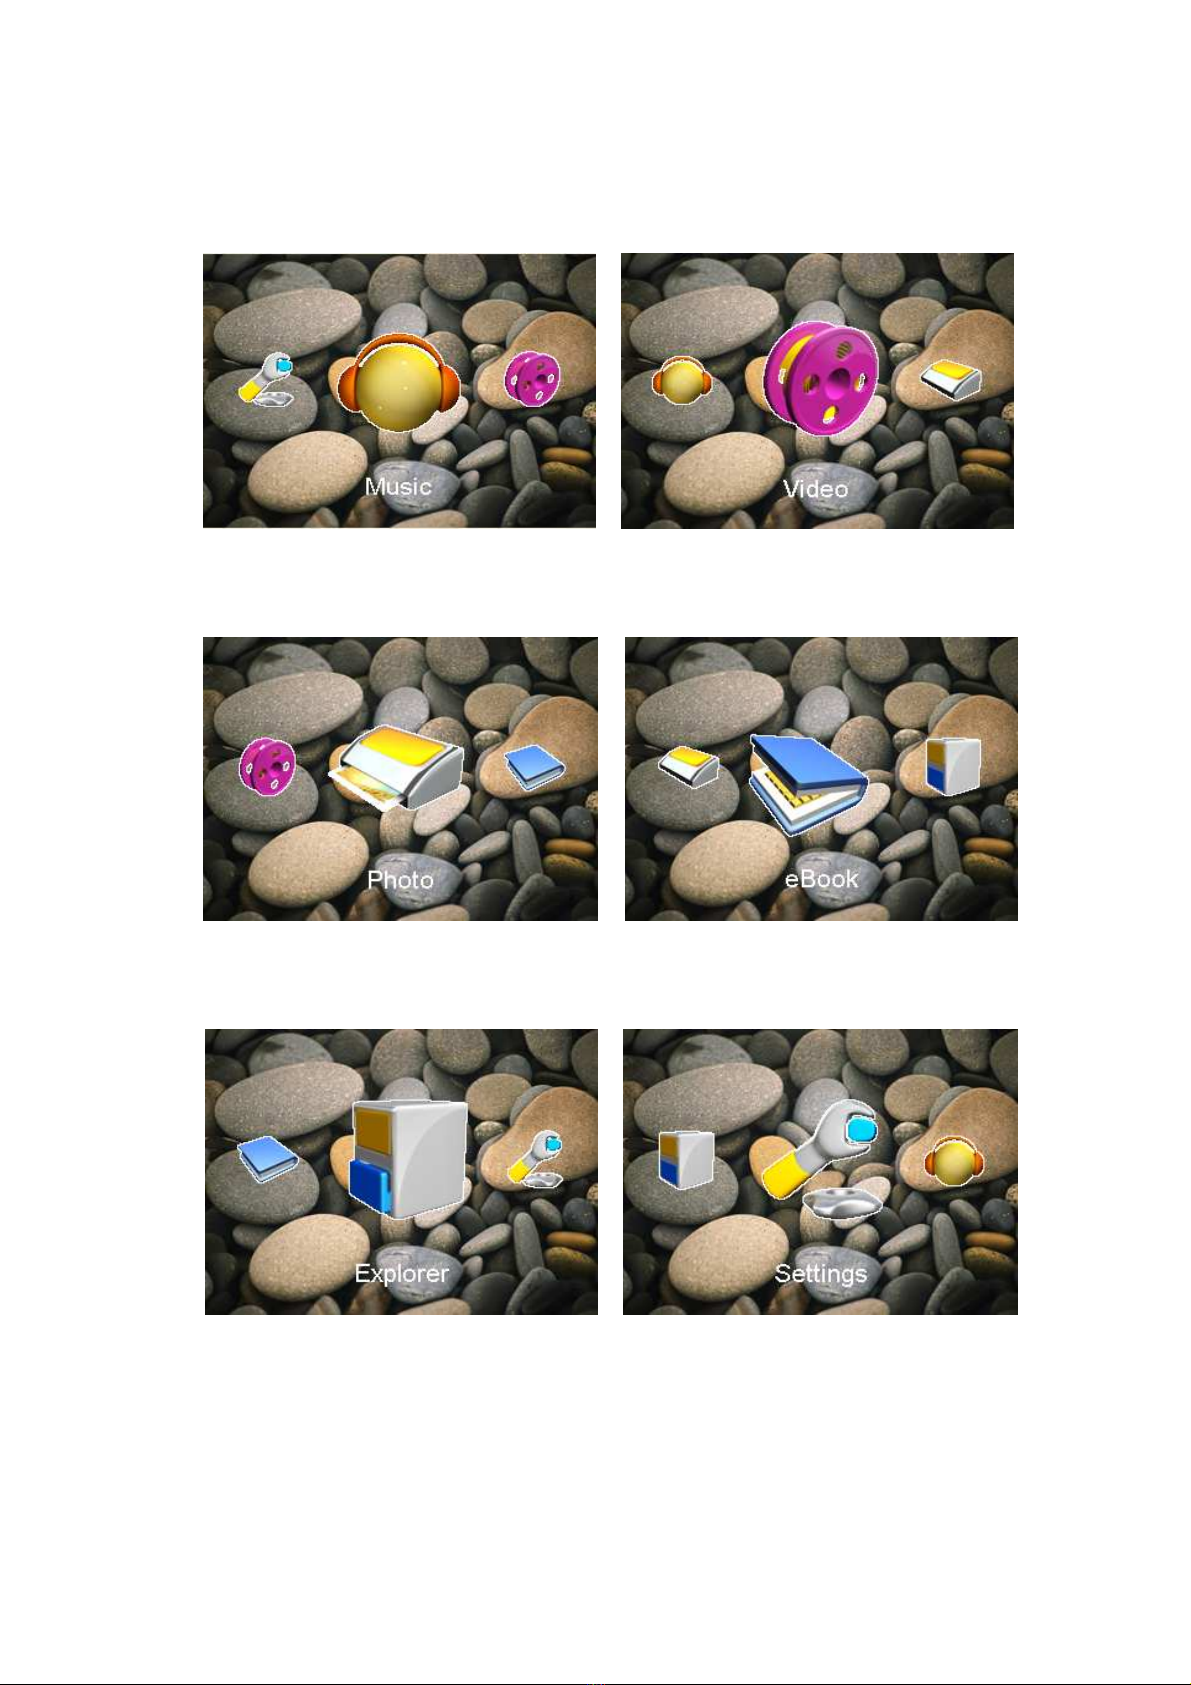
1. Music Mode
2.
Video Mode
3. Photo Mode
4. eBoo Mode
5. Explorer Mode

9
6. Settings Mode
Music Mode Video Mode
Photo Mode eBoo Mode
Explorer Mode Settings Mode

10
MP4 Function Descriptions
1. Music Mode
A.Switch on the player, then select Music Mode and
press [Play] to enter sub-menu, then select and
press [Resume Play] and press [Play] to play the
music. Press to pause.
B. Select music:
: Select previous song
: Select next song
C. Volume Adjust: Press [VOL] ey and
V+: Increase volume
V- : Decrease volume
D. Press / ey over 1 second to do FR/FF
function when playing the music.
E. After entering Music mode, short press [Play]
and you can view the following sub-menus:
Resume play, All Music, Artist, Album, Genre, My
Fa orite, Medialib Update
In Resume play option, when the play list is
displayed:
Press / to select the music, then press [Play]
to start the playbac .

11
When all songs (traces) are displayed:
Press / ey to select the song, then press
[Play] to play.
2. Video Mode
Select [Video] mode and press [Play] to enter the
menu.
Press / to enter the video play queue in order to
select the video which you want to play. Then press
ey to play the video file. When playing the video,
you can press / ey to increase/decrease the
volume, or press ey to pause or press [M] ey to
go bac to the previous menu.
Note 1: The RM/RMVB video only supports the video file which
is below 720 576. The bigger the volume file is, longer
will be the time to start the playing.. The volume of the
file must be changed.
Note 2: AVI video only supports the video file which is below
800 480. The bigger the volume file is, longer will be the
time to start the playing. The volume of the file must be
changed.

12
3. Photo Mode
Select [Photo] mode and press to enter the
following menu:
In this mode, you can press or ey to select a
picture and then press [Play] to view the picture.
You can press and to view the next/previous
picture.
You can press [M] ey once to go bac to the
previous menu.
4. Explorer Mode
Select [Explorer Mode] and press [Play] ey. The
Explorer mode window will be displayed.
Press / to view related information about the
following menu:
Internal Media, All Audio Tracks, All Video Tracks,
All Image Files.
After selecting the sub-menu, press ey once to
enter and view the related information. You can also
press [M] ey once to go bac to the previous menu.

13
In Internal Media mode you can view all files,
including recorded files and image files.
In All Audio Tracks mode you can only view audio
files.
In All Video Tracks mode you can only view video
files.
In All Image iles mode you can view all images
information.
5. Settings Mode
Select [Settings] mode and press to enter the
menu:
Press / ey to select next/previous item, and
press ey once to enter the sub-menu.
You can press [M] ey once to go bac to the
previous menu.
System Setting:
1: Upgrade: Spring out a dialog frame, warning if
firmware need to be updated. If not, will exit.
2: Restorable: Spring out a dialog frame, warning
whether to return the system to default value. If not,
will exit.
Desktop:
Under the setting menu, select Des top, press to
enter, and then press / to select Des top 1,
Des top2, Des top3, Des top4, Des top5, Des top6,
Des top7, Des top8.

14
Language:
Under the settings menu, select Language, press
to enter, and then press / ey to select the
next/previous language.
In ormation:
Under the setting menu, select Information, press
to enter, and you will see the company information,
product number, flash memory, software version, card
memory.
Troubleshooting
No power: Chec AC adapter’s connecting and
confirm press PWR ey
No sound: Chec if volume is in a neutral position
and if the headphone plug is well connected.
Corrupted media file may also cause static noise.
OSD Scrambled Code: Chec if the right display
language has been selected.
Failure of downloading media files: Check
hether USB cable is in a healthy condition
and connected properly. Check if driver is
installed correctly on the computer. Check if
there is enough free space.
Table of contents
Other Javes Projector manuals

Javes
Javes HDX-520 User manual

Javes
Javes XPL-520 User manual

Javes
Javes PMP-N70 User manual

Javes
Javes ADX-525 User manual

Javes
Javes NSK-1080P User manual

Javes
Javes TLX-928 User manual

Javes
Javes TOY-550 User manual

Javes
Javes IMD-440 User manual

Javes
Javes VPT-681 User manual

Javes
Javes OLX-730 User manual