Javes BTS-M420 User manual

Micro projector
User Manual
BTS-M420

II
IMPORTANT
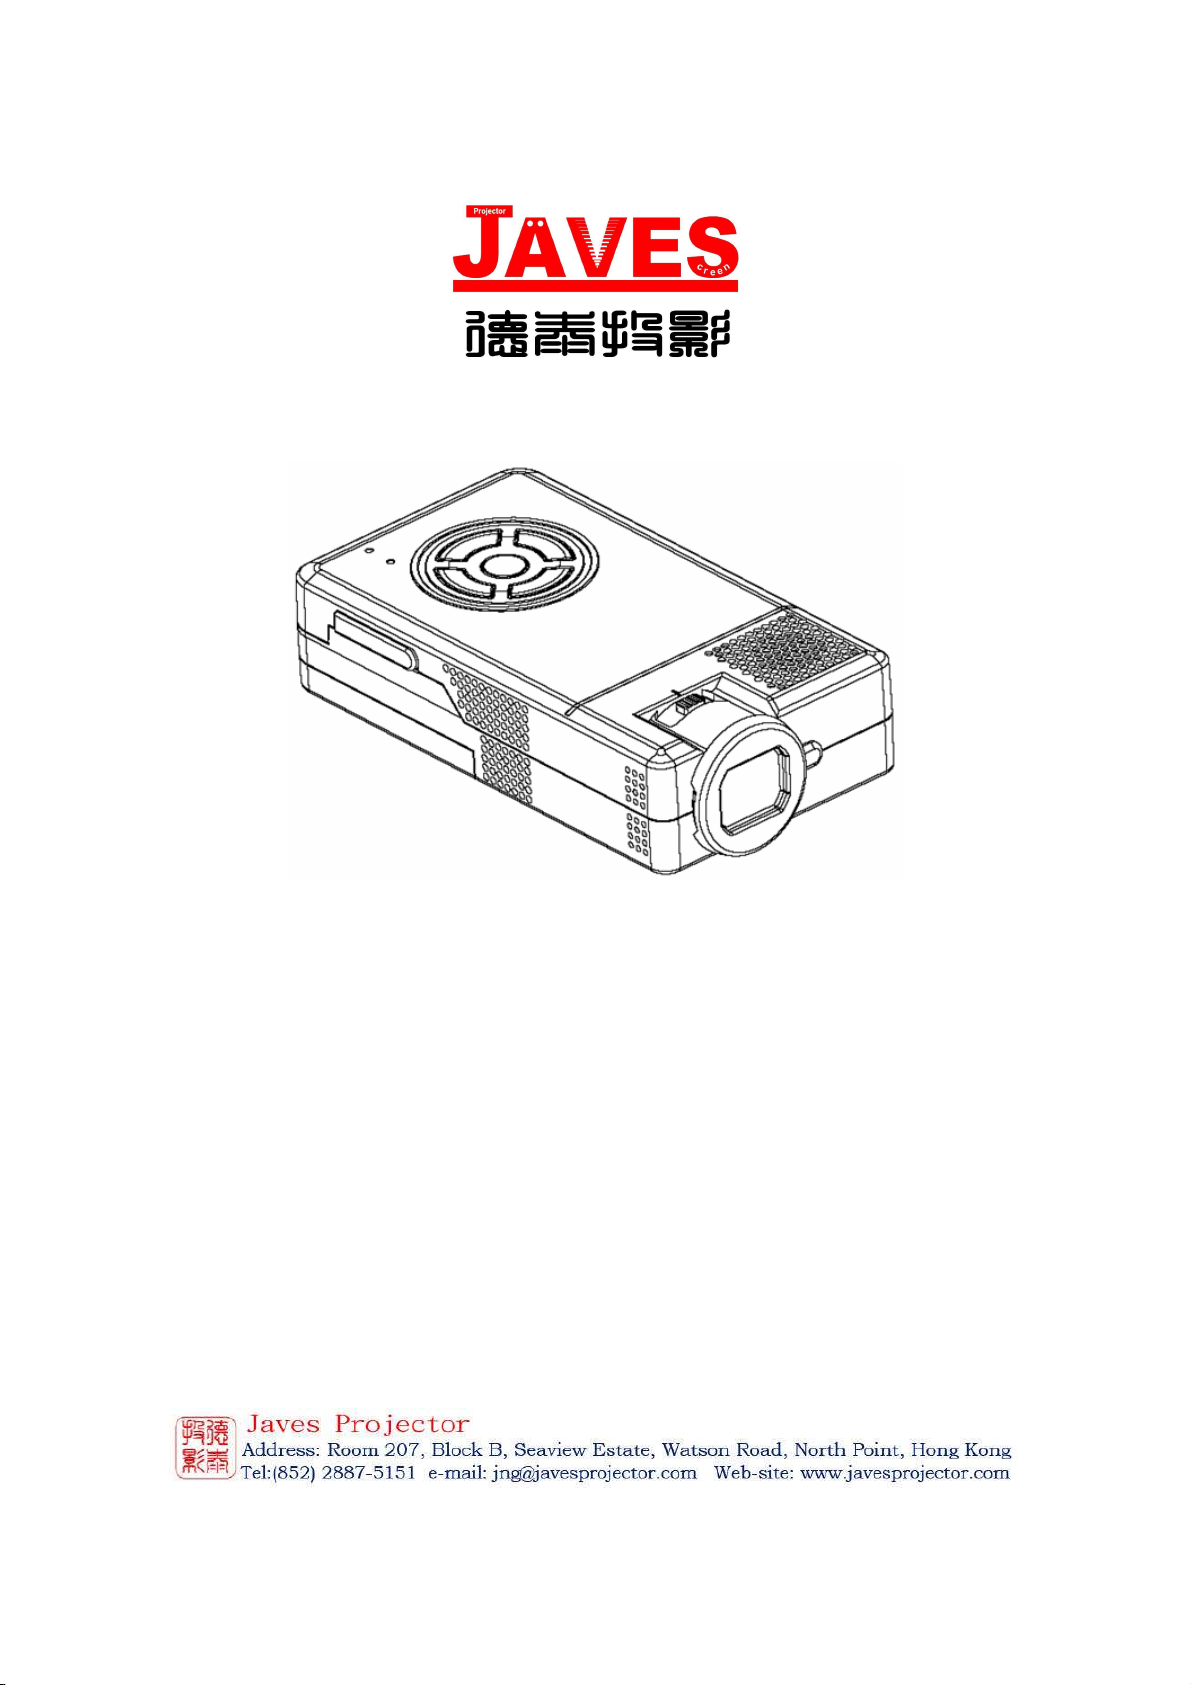
• This product is a micro projector with MP4 player function
that can connect to mobile/iPhone, MP4/iPod, PSP, PDA,
DVD, P /Notebook and other digital products which have
video and audio output for personal entertainment and small
business presentation.
• Before using the product, please read the manual carefully.
• Please charge for 10 minutes before using battery.
• This product has 1GB memory, and can receive an
additional TF/Micro SD card with bigger memory.
• You have to leave 30 MB of free space in the memory of the
player for the O.S.
• If MP4 function is not responding, please press the RESET
button to reset the MP4 player.
• Do NOT use the projector in wet or very hot place.
• The projection resolution is 640x480 pixels. Separately, the
MP4 module recognizes that the video is 640 x 480.
• When you turn off the MP4 module, please wait 3 seconds
before turning it back on repeatedly.
• ontents in this user manual may change for better service.
• For the latest setting information of your product, please visit
our website.
• If the player is unable to start up, please charge the player
with the battery charger at first, and check whether the
battery has been run out.
• If you need to play a large number of files in MP4 player,
please recompress those files into a single file which can
save the start up time, the MP4 module will also respond
faster.

III
INDEX
Product List 1
Overview 1
Projector Specification 2
Basic unctions: 2
MP4 key functions description: 4
MP4 features: 4
Access to MP4 Menu 5
MP4 unction Descriptions 6
1. Music Mode 6
2. Video Mode 8
3. Photo Mode 8
4. Explorer Mode 9
5. Settings Mode 10
Troubleshooting 11

-
1
-
Product List
Projector 1
A Adapter 1
A/V able 1
Overview
Reset
Focus
Keypad of MP4 Player
Battery charge
Green: Power is available
Red: Battery isn't available
ound Tuner
U B
+5DC
A/V
Earphone
Power witch
Controlling Keypad
Volume
Output

-
2
-
peaker
D(TF) Card
Projector Specification
Parameters Normal Unit Remarks
Resolution 640x480 Pixel
Aspect ratio 4:3
Projection lens type
Manual focus
Projection angle 51 Degree
Recommended
projection size 15-30 Diagonal Inch
Light source LED
Lifetime 30000 Hour
Input A/V NT C/PAL
Weight 175 Gram Include battery
Basic unctions
1. Focus adjustment
To achieve the best quality projection image at different projection
distances, please manually turn the focus knob. The focus mechanism
is designed for projection distance from 0.2m to infinity.
Micro

-
3
-
Focus
2.
onnects to digital products (A/V input) by A/V cable
BATOFFDC
Audio/Video
Cable
+5VDC
A/V
Power witch
3. onnects to P /Notebook products (A/V input) by S-Video/A/V
able
4. MP4 player

-
4
-
RE ETCHARGE
G
R
MP4 key functions description
MENU: Key interface or short-press to go back to previous menu
VOL+ : V+ volume up
VOL+ : V- volume down
: Select next track or fast forward
: Select previous track or fast reverse
: Play and Pause or short press enter sub-menu.
Power on, power off: pressed and hold for over 3 seconds.
MP4 features
Explorer: Internal Media, Recorded List, All Audio Tracks, All
Video Tracks, All Image Files.
System Settings: System Setting, Desktop, Language, System
Information.
Browsing Pictures: Browsing pictures one by one or Slide show
or Thumbnail (supports JPEG, BMP and GIF format).

-
5
-
Video Playback: ompatible with AVI, MPEG1, MPEG2, MPEG4
3G, WMV9/V 1, ASF, RM/RMVB and FLV formats (must use
software to compress the size of files to 640x480 before playing).
Audio Playback: ompatible with MP3, WMA, WAV, APE, FLA
AA /AA + and MPEG1/2/2.5 formats.
Access to MP4 Menu
*Please ensure there is no A/V input before starting up the
MP4 player.
Press [Play] and hold for 3 seconds, blue LED is light, MP4 is
power on and 3 seconds later the start up logo displays.
Press [MENU] key to access the Menu mode and the different
menus from the main menu.
1. Music Mode
2.
Video Mode
3. Photo Mode
4. EBook Mode
5. Explorer Mode
6. Settings Mode
Music Mode Video Mode

-
6
-
MP4 unction Descriptions
1. Music Mode
A. Switch on the player, then select Music Mode and press
[Play] to enter sub-menu, then select and press [Resume
Play] and press [Play] to play the music. Press to
pause.
B. Select music:
: Select previous song
: Select next song
Photo Mode EBook Mode
Explorer Mode Settings Mode

-
7
-
C. Volume Adjust: Press [VOL] key and
V+: Increase volume
V- : Decrease volume
D. Press / key over 1 second to do FR/FF function when
playing the music.
E. After entering Music mode, short press [Play] and you
can view the following sub-menus:
Resume play, All Music, Artist, Album, Genre, My Fa orite,
Medialib Update
In Resume play option, when the play list is displayed:
Press / to select the music, then press [Play] to start
the playback.
When all songs (traces) are displayed:
Press / key to select the song, then press [Play] to
play.
When you press and hold [MENU] key, the following window will
be displayed:
Repeat Mode—Repeat to play the selected music.
Play Mode— an set playing in order and shuffle. Press
“Last” or “Next” key to select.
MSEQ— an select: 3D, Bass IEQ . Press “Last” or “Next”
key to select.
EQ Sel— an select: Normal, MSEQ, Rock, Pop, lassic,
Bass, Jazz, User EQ. Press “Last” or “Next” key to
select.
Display— an set the Lyric, Freq hart and lose.

-
8
-
You can also find songs by:
• Artist: View each songs artist’s information.
• Album: View each songs album’s information.
• Genre: View each songs genre’s information.
2. Video Mode
Select [Video] mode and press [Play] to enter the menu.
Press / to enter the video play queue in order to select the
video which you want to play. Then press key to play the
video file. When playing the video, you can press / key to
increase/decrease the volume, or press key to pause or
press [MENU] key to go back to the previous menu.
Note 1: The RM/RMVB video only supports the video file which is
below 720 576. The bigger the volume file is, longer will
be the time to start the playing.. The volume of the fle
must be changed.
Note 2: AVI video only supports the video file which is below 800
480. The bigger the volume file is, longer will be the
time to start the playing. The volume of the file must be
changed.
3. Photo Mode
Select [Photo] mode and press to enter the following menu:
All Photos: You can view all image files. In this mode, you can
press or key to select a picture and then press [Play]

-
9
-
to view the picture. You can press and to view the
next/previous picture.
Manual: To view picture one by one through pressing /
key.
Thumbnail: You can view several pictures in one display.
When browsing the pictures, you can press / key to select
next/previous picture, and press play to view the picture.
You can press [MENU] key once to go back to the previous
menu.
4. Explorer Mode
Select [Explorer Mode] and press [Play] key. The Explorer
mode window will be displayed.
Press / to view related information about the following
menu:
Internal Media, All Audio Tracks, All Video Tracks, All Image
Files.
After selecting the sub-menu, press key once to enter and
view the related information. You can also press [Menu] key once
to go back to the previous menu.
In Internal Media mode you can view all files, including recorded
files and image files.
In All Audio Tracks mode you can only view audio files.

-
10
-
In All Video Tracks mode you can only view video files.
In All Image files mode you can view all images information.
5. Settings Mode
Select [Settings] mode and press to enter the menu:
Press / key to select next/previous item, and press
key once to enter the sub-menu.
You can press [Menu] key once to go back to the previous menu.
System Setting:
1: Upgrade: Spring out a dialog frame, warning if firmware
need to be updated. If not, will exit.
2: Restorable: Spring out a dialog frame, warning whether to
return the system to default value. If not, will exit.
Desktop:
Under the setting menu, select Desktop, press to enter,
and then press / to select Desktop 1, Desktop2, Desktop3,
Desktop4, Desktop5, Desktop6, Desktop7, Desktop8.
Language:
Under the settings menu, select Language, press to enter,
and then press / key to select the next/previous language.
Information:
Under the setting menu, select Information, press to enter,
and you will see the company information, product number, flash
memory, software version, card memory.

-
11
-
Troubleshooting
No power: heck battery level. heck if switch is turned on.
No sound: heck if volume is in a neutral position and if the
headphone plug is well connected. orrupted media file may also
cause static noise.
OSD Scrambled Code: heck if the right display language has
been selected.
ailure of downloading media files: heck whether USB cable
is in a healthy condition and connected properly. heck if driver is
installed correctly on the computer. heck if there is enough free
space.
Table of contents
Other Javes Projector manuals

Javes
Javes VPT-681 User manual

Javes
Javes LSE-530 User manual

Javes
Javes TOY-550 User manual

Javes
Javes NSK-1080P User manual

Javes
Javes IMD-440 User manual

Javes
Javes JCD-720P User manual

Javes
Javes HLT-102 User manual

Javes
Javes TLX-928 User manual

Javes
Javes OLX-730 User manual

Javes
Javes XPL-520 User manual