JBL Harman BAR 500 User manual

BAR 500
OWNER’S MANUAL

22
IMPORTANT SAFETY INSTRUCTIONS
Verify Line Voltage Before Use
The JBL BAR 500 (soundbar and subwoofer) has been designed
for use with 100-240 volt, 50/60 Hz AC current. Connection to
a line voltage other than that for which your product is intended
can create a safety and re hazard and may damage the unit. If
you have any questions about the voltage requirements for your
specic model or about the line voltage in your area, contact your
retailer or customer service representative before plugging the
unit into a wall outlet.
Do Not Use Extension Cords
To avoid safety hazards, use only the power cord supplied
with your unit. We do not recommend that extension cords be
used with this product. As with all electrical devices, do not run
power cords under rugs or carpets, or place heavy objects on
them. Damaged power cords should be replaced immediately
by an authorized service center with a cord that meets factory
specications.
Handle the AC Power Cord Gently
When disconnecting the power cord from an AC outlet, always
pull the plug; never pull the cord. If you do not intend to use this
speaker for any considerable length of time, disconnect the plug
from the AC outlet.
Do Not Open the Cabinet
There are no user-serviceable components inside this product.
Opening the cabinet may present a shock hazard, and any
modication to the product will void your warranty. If water
accidentally falls inside the unit, disconnect it from the AC power
source immediately, and consult an authorized service center.

www.jbl.com
English
33
TABLE OF CONTENTS
IMPORTANT SAFETY INSTRUCTIONS 2
1. INTRODUCTION 4
2. WHAT’S IN THE BOX 5
3. PRODUCT OVERVIEW 6
3.1 SOUNDBAR 6
3.2 SUBWOOFER 6
3.3 REMOTE CONTROL 7
4. PLACE 8
4.1 DESKTOP PLACEMENT 8
4.2 WALL-MOUNTING 8
5. CONNECT 9
5.1 CONNECTION WITH YOUR TV AND DIGITAL DEVICES 9
5.2 BLUETOOTH CONNECTION 11
5.3 CONNECTION WITH YOUR HOME NETWORK 11
6. SETUP 12
6.1 CONNECT THE SUBWOOFER 12
6.2 3D SURROUND SOUND 13
7. PLAY 14
7.1 POWER-ON/AUTO STANDBY/AUTO WAKEUP 14
7.2 PLAY FROM THE TV SOURCE 15
7.3 PLAY FROM THE HDMI IN SOURCE 15
7.4 PLAY FROM THE BLUETOOTH SOURCE 16
7.5 PLAY THROUGH THE JBL ONE APP 16
7.6 PLAY THROUGH CHROMECAST BUILT-IN 17
7.7 PLAY THROUGH AIRPLAY 17
7.8 PLAY THROUGH AMAZON MUSIC 17
7.9 MULTI-ROOM PLAYBACK 18
8. SOUND SETTINGS 19
8.1 AUDIO SYNC 19
8.2 SMART MODE 19
8.3 PUREVOICE DIALOGUE ENHANCEMENT TECHNOLOGY 19
9. RESTORE FACTORY SETTINGS 20
10. SOFTWARE UPDATE 20
11. RE-CONNECT THE SUBWOOFER 21
12. PRODUCT SPECIFICATIONS 22
13. TROUBLESHOOTING 23
14. TRADEMARKS 25
15. OPEN SOURCE LICENSE NOTICE 26

44
1. INTRODUCTION
Thank you for purchasing the JBL BAR 500 (soundbar and
subwoofer) which is designed to bring an extraordinary 3D sound
experience to your home entertainment system. We encourage
you to take a few minutes to read through this manual, which
describes the product and includes step-by-step instructions for
setting up and getting started.
To make the most of product features and support, you may
need to update the product software through the Internet
or the USB connector in the future. Refer to the software
update section in this manual to ensure that your product
has the latest software.
Designs and specications are subject to change without notice.
If you have any questions about the soundbar, installation or
operation, please contact your retailer or customer service
representative, or visit our website: www.jbl.com.
JBL One app
With the JBL One app, you can
• easily complete product setup;
• connect *music streaming services;
• discover new music with integrated music services;
• use one button to access your preset playlist and speaker
settings;
• access software updates when they are available.
JBL One
JBL One
For more information, see “5.3 Connection with your home
network” and “7.5 Play through the JBL One app”.
NOTES:
– *Subscription may be needed and not provided by the JBL One app.

www.jbl.com
English
55
2. WHAT’S IN THE BOX
Unpack the box carefully and ensure that the following parts are
included. If any part is damaged or missing, do not use it and
contact your retailer or customer service representative.
Soundbar
Subwoofer
Remote control (with 2 AAA batteries)
(AAA)
Power cord*
x 2
* Power cord quantity and plug type vary region.
HDMI cable (1.2 m/3.9 ft.)
Wall-mounting kit
x 2
x 2
x 2
x 2
x 2
Product information & wall-mounting template

66
3. PRODUCT OVERVIEW
3.1 Soundbar
3.1.1 Controls
5
34 12
1) (Source)
• Switch on
• Select a sound source: TV (default, for audio input
from TV connection where the HDMI OUT (TV ARC/
TV eARC) connector is prioritized over the OPTICAL
connector), Bluetooth or HDMI IN
2) /(Volume)
• Switch on
• Decrease or increase the volume
• Press and hold to decrease or increase the volume
continuously
• Press the two buttons together to mute or unmute
3) Status indicator
System:
Regular flashing (white) System startup
Fast flashing (white) Software updating in progress
Solid (amber) Restoring factory settings
Network connection:
Slow breathing (white) Entering Wi-Fi setup mode, or
network disconnected
Solid (green) Soundbar discovered by the
JBL One app
Solid (white) Network connected
Solid (yellow) Weak Wi-Fi connection
4) Microphone
• For sound calibration
5) Status display
3.1.2 Rear connectors
1 2 3 4
5
1) POWER
• Connect to power (with the supplied power cord)
2) USB
• USB connector for software update
• Connect to a USB storage device for MP3 le playback
(for US version only)
3) ETHERNET
• Connect to your home network through an Ethernet
cable
4) HDMI IN
• Connect to the HDMI output on your digital device
5) TV connectors
HDMI OUT (TV ARC/ TV eARC)
• Connect to the HDMI ARC / HDMI eARC input on
your TV
OPTICAL
• Connect to the optical output on your TV or digital device
3.2 Subwoofer
1
2
1)
• Connection status indicator
Solid (white) Connected to the soundbar
Fast flashing (white) Pairing mode
Slow flashing (white) Reconnecting or exiting the
pairing mode
Solid (amber) Standby mode
2) Power connector
• Connect to power (with the supplied power cord)

www.jbl.com
English
77
3.3 Remote control
8
7
6
5
4
1
2
3
1)
• Switch on or to standby
2) Source selectors
TV
• Select the TV source (default, for audio input from TV
connection where the HDMI OUT (TV ARC/ TV eARC)
connector is prioritized over the OPTICAL connector)
(Bluetooth)
• Select the Bluetooth source
• Press and hold to connect a Bluetooth device
HDMI
• Select the HDMI IN source
3) Sound effect buttons
• Switch the virtual Dolby Atmos®sound effects on or off
(Default: on)
• Select the bass level for subwoofer: 1/2/3 (default)/4/5
4) CALIBR
• Press to start sound calibration
5) (Moment)
• Press to directly access the playlist or speaker settings
that you have personalized in the JBL One app
6) (Playback controls during the music streaming over
JBL One app, Chromecast built-in™, AirPlay, Alexa or
Bluetooth)
• Single press: Pause or resume playback
• Double press: Next track
• Triple press: Previous track
7) /
• Increase or decrease the volume
• Press and hold to increase or decrease the volume
continuously.
8) (Mute)
• Mute/unmute
3.3.1 App-enabled control
With the JBL One app on your Android and iOS device, you can
do the following:
• Wi-Fi setup;
• Audio calibration & demo;
• Personalize audio settings;
• Manage and control device;
• Music service integration;
• Additional features.

88
4. PLACE
4.1 Desktop placement
Place the soundbar and subwoofer on a at and stable surface.
Make sure that the subwoofer is at least 3 ft (1 m) away from the
soundbar, and 4” (10 cm) away from a wall.
>10 cm / 4”
2.5-3.0 m / 8.2-9.8 ft
> 4 m / 13 ft
>5cm / 2”
1-6 m/3-20 ft
NOTES:
– The power cord shall be properly connected to power.
–Do not place any objects on the top of the soundbar or subwoofer.
– Make sure that the distance between the subwoofer and the
soundbar is less than 20 ft (6 m).
4.2 Wall-mounting
1
1a)
1b)
1c)
> 50 mm/2’’
4
2
≤8 mm/0.31"
4mm/0.16"
≥30 mm/1.18"
4
3
708 mm/27.87’’
1. Preparation:
a) With a minimum distance of 2” (50mm) from your TV, stick
the supplied wall-mounting template to a wall by using
adhesive tapes.
b) Use your ballpen tip to mark the screw holder location.
Remove the template.
c) On the marked location, drill a 4 mm/0.16” hole.
2. Install the support for wall-mounting bracket.
3. With the screw, fasten the wall-mounting bracket onto the
bottom of the soundbar.
4. Mount the soundbar.
NOTES:
– Make sure that the wall can support the weight of the soundbar.
–Install on a vertical wall only.
–Avoid a location under high temperature or humidity.
–Before wall-mounting, make sure that cables can be properly
connected between the soundbar and external devices.
–Before wall-mounting, make sure that the soundbar is unplugged
from power. Otherwise, it may cause an electric shock.

www.jbl.com
English
99
5. CONNECT
5.1 Connection with your TV and digital
devices
For audio playback through the soundbar, connect the soundbar
with your TV through the supplied HDMI cable or an optical cable
(sold separately).
An HDMI connection supports digital audio and video with a
single connection. HDMI connectivity is the best option for your
soundbar.
5.1.1 TV (HDMI ARC / eARC)
(Recommended connection for the best Dolby Atmos experience)
HDMI (ARC)
HDMI OUT
*
HDMI IN
HDMI OUT
(TV ARC/TV eARC)
HDMI IN
1. Connect the soundbar with the HDMI IN (ARC / eARC)
connector on your TV by using the supplied HDMI cable.
• On your TV, check that HDMI-CEC and HDMI ARC have
been enabled. Refer to the owner’s manual of your TV for
more information.
2. Use an HDMI cable (V2.0 or later) to connect the soundbar
with your digital device, such as a set-top box, DVD/Blu-ray
player or game console.
• On your digital device, check that HDMI-CEC has been
enabled. Refer to the owner’s manual of your digital
device for more information.
• On your digital device, select “Bitstream” or “Raw data”
in the audio output settings for the best Dolby Atmos
experience.
3. To play audio from the digital device connected to the
soundbar, select HDMI on the remote control.
NOTES:
–If your TV does not support HDMI eARC, make sure that you
connect your digital device through the HDMI IN connector on
the soundbar instead of your TV. Otherwise, the Dolby Atmos
information cannot pass through the HDMI (ARC) connectors from
the TV to the soundbar.

1010
5.1.2 TV (HDMI eARC)
HDMI OUT
(TV ARC/TV eARC)
HDMI OUT
*
HDMI (eARC)
HDMI IN
TV
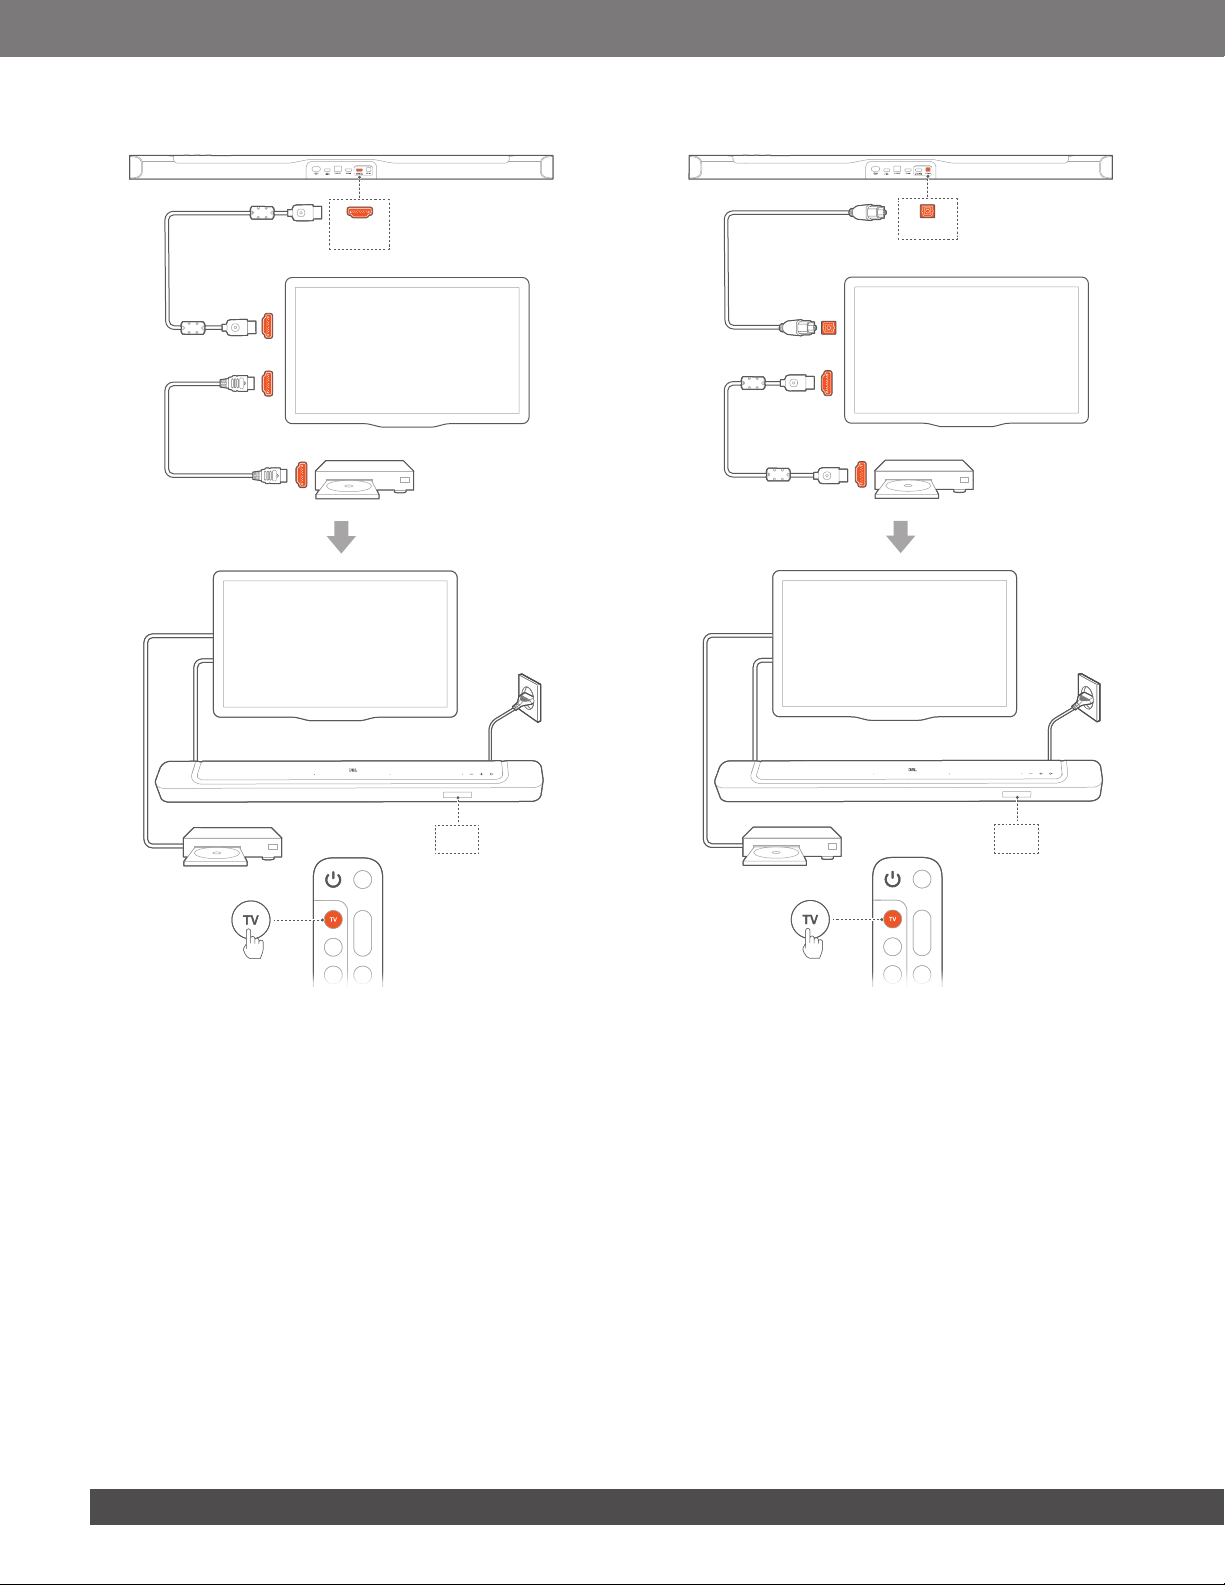
1. Connect the soundbar with the HDMI IN (eARC) connector
on your TV by using the supplied HDMI cable.
• On your TV, check that HDMI-CEC and HDMI eARC have
been enabled. Refer to the owner’s manual of your TV for
more information.
2. Use an HDMI cable (eARC compatible, V2.0 or later) to connect
your TV with your digital device, such as a streaming device,
set-top box, DVD/Blu-ray player or game console.
• On your digital device, check that HDMI-CEC has been
enabled. Refer to the owner’s manual of your digital
device for more information.
• On your TV and digital device, select “Bitstream” or “Raw
data” in the audio output settings for the best Dolby
Atmos experience.
3. To play audio from the digital device connected to your TV,
select TV on the remote control.
5.1.3 OPTICAL
HDMI OUT
*
OPTICAL
HDMI IN
OPTICAL
TV
NOTES:
–With the Virtual Dolby Atmos design, the Dolby surround upmixer
of the soundbar can expand the legacy channel-based audio of
Dolby Digital format, including 5.1 and 7.1 content, and provide an
immersive 3D Atmos experience.
1. Connect the soundbar with your TV by using an optical cable.
2. Use an HDMI cable (V2.0 or later) to connect your TV with your
digital device, such as a streaming device, set-top box, DVD/
Blu-ray player or game console.
3. To play audio through the optical cable, select TV on the
remote control.
NOTES:
–* The HDMI cable (for digital device connection) and the optical cable
are sold separately.
–Full compatibility with all HDMI-CEC devices is not guaranteed.
–When both HDMI ARC and optical cables are connected to the
soundbar for audio input from TV connection, the HDMI ARC
connection is prioritized.

www.jbl.com
English
1111
5.2 Bluetooth connection
Through Bluetooth, connect the soundbar with your Bluetooth
device, such as a smartphone, tablet and laptop.
Settings Bluetooth
Bluetooth
DEVICES
JBL Bar 500_xxxx
Now Discoverable
Connected
< 10 m / 33 ft
BT PAIRING
5.2.1 Connect a Bluetooth device
1. To select Bluetooth source, press on the soundbar or on
the remote control.
→“BT PAIRING”: Ready for BT pairing
2. On your Bluetooth device, enable Bluetooth and search for
“JBL BAR 500_xxxx” within three minutes.
→Successful connection: The device name is displayed
if your device is named in English. A conrmation tone
is heard.
5.2.2 To reconnect the last paired device
Your Bluetooth device is retained as a paired device when the
soundbar goes to standby mode. Next time you switch to the
Bluetooth source, the soundbar reconnects the last paired
device automatically.
5.2.3 To connect to another Bluetooth device
3S
1. In the Bluetooth source, press and hold on the soundbar
or on the remote control until “BT PAIRING”is displayed.
→The soundbar enters the Bluetooth pairing mode.
2. Follow the Step 2 under “5.2.1 Connect a Bluetooth device”.
• If the device has ever been paired with the soundbar, rst
unpair “JBL BAR 500_xxxx” on the device.
NOTES:
– The Bluetooth connection will be lost if the distance between the
soundbar and Bluetooth device exceeds 33 ft (10 m).
–Electronic devices may cause radio interference. Devices that
generate electromagnetic waves must be kept away from the
Soundbar, such as microwaves and wireless LAN devices.
5.3 Connection with your home network
Through Wi-Fi or an Ethernet cable, connect the soundbar to
your home network. With the JBL One app and the supported
streaming services (Chromecast built-in, AirPlay and Alexa), the
soundbar allows you to stream audio on smartphones or tablets
through the soundbar speakers.
1. On the soundbar, enter the Wi-Fi setup mode:
• Press any button to switch on (See “7.1 Power-on/Auto
standby/Auto wakeup”).
→If the soundbar has not been connected to a network,
the screen shows “HELLO”and then, “SETUP WIFI”.
→To re-enter the Wi-Fi setup mode, press and hold
and until “SETUP WIFI”is displayed.
2. On your Android or iOS device, add the soundbar to your
home Wi-Fi network.
a) Connect your Android or iOS device to your home Wi-Fi
network. Download the JBL One app.
b) Follow the app instructions to complete setup.
< 10 m / 33 ft
SETUP WIFI
JBL One
JBL One
JBL BAR 500_xxxx
SETUP WIFI

1212
3. If necessary, use an Ethernet cable to connect the soundbar
to your home network.
• Make sure that you connect to the same network as you
did during the setup.
NOTES:
–On your Android or iOS device, you can name the soundbar in the
JBL One app.
–On your iOS device, add the soundbar to the Apple Home app and
manage it together with other AirPlay 2-compatible speakers.
–On your iOS device, if the soundbar has been added to your home
Wi-Fi network, you can start AirPlay streaming from an AirPlay-
compatible app (See “7.7 Play through AirPlay”).
–Availability of online music streaming services varies by country.
–Some features require subscriptions or services not available in all
countries.
6. SETUP
6.1 Connect the subwoofer
1
2
4
3
LOAD
HELLO
1. Connect the soundbar to power by using the supplied power
cord.
→The screen on the soundbar shows “LOAD”and then,
“HELLO”.
2. Connect the subwoofer to power by using the supplied power
cord.
→The subwoofer is connected to the soundbar automatically.
Connected: turns solid white.
NOTES:
– Use the supplied power cords only.
–Before connecting to power, make sure that you have completed
all other connections (See “5.1 Connection with your TV and digital
devices”).

www.jbl.com
English
1313
6.2 3D surround sound
6.2.1 Sound calibration
Optimize your 3D surround sound experience for your unique
listening environment.
1
CALIBRATION
2
CALIBRATING
PRESS AGAIN TO CONFIRM
DONE
1. On the remote control, press CALIBR to start calibration.
→“CALIBRATION”is displayed on the soundbar.
2. When “PRESS AGAIN TO CONFIRM”is displayed, press
CALIBR again.
→Countdown starts from 5 to 1.
→Calibration tone is heard. Audio calibration starts.
“CALIBRATING”: Calibration in progress
“DONE”: Calibration completed successfully
NOTES:
–During sound calibration, all buttons on the remote control are
disabled except for .
6.2.2 Dolby Atmos®
With the virtual Dolby Atmos, enjoy height sound effects when
you play movies in the TV/HDMI IN source.
ON ATMOS
OFF ATMOS
1. Connect and play your Blu-ray player or streaming device
through the HDMI ARC/HDMI eARC connector and the HDMI
connector. (See “5.1 Connection with your TV and digital
devices”).
2. Press on the remote control to switch on or off the height
sound effects (Default: on).
→The screen on the soundbar shows “ON ATMOS”or
“OFF ATMOS”.
NOTES:
– Switch off the ATMOS effects, if you prefer not to have any height
sound effects during your viewing or listening.
–The ATMOS effects are available in Dolby audio content only.

1414
6.2.3 Bass adjustment
You can make bass adjustment as needed.
LVL3
LVL5
LVL4
LVL1
LVL2
• On the remote control, press to switch between bass
levels.
→“LVL1”to “LVL5” is displayed (Default: “LVL3”).
7. PLAY
7.1 Power-on/Auto standby/Auto wakeup
HELLO
7.1.1 Switch on
• To switch on, press any button on the soundbar, or on the
remote control.
→“HELLO”is displayed.
→The subwoofer is reconnected to the soundbar
automatically. Connected: turns solid white.
7.1.2 Auto standby
If the soundbar is inactive for more than 10 minutes, it will switch
to standby mode automatically. “STDBY”is displayed. The
subwoofer also goes to standby, and turns solid amber.
Next time you switch on the soundbar, it returns to the last
selected source.
7.1.3 Auto wakeup
In standby mode, the soundbar will wake up automatically when
• the soundbar is connected to your TV through the HDMI
ARC/eARC connection and your TV is switched on;
• the soundbar is connected to your TV through the HDMI
ARC/eARC connection and through the HDMI connection, is
also connected to your digital device such as a set-top box,
DVD/Blu-ray player or game console, and your digital device
is switched on;
• the soundbar is connected to your home network and audio
is streamed to the soundbar through the music streaming
services over JBL One app, Chromecast built-in, AirPlay or
Alexa.

www.jbl.com
English
1515
7.2 Play from the TV source
With the soundbar connected, you can enjoy TV audio from the
soundbar speakers.
OPTICAL
HDMI eARC/
HDMI ARC
TV
1. Make sure that your TV is set to support external speakers
and the built-in TV speakers are muted. Refer to the owner’s
manual of your TV for more information.
2. Make sure that the soundbar has been properly connected
to your TV (See “5.1 Connection with your TV and digital
devices”).
3. To select the TV source, press on the soundbar or TV on
the remote control.
→“TV”: The TV source is selected.
• In the factory settings, the TV source is selected by default.
NOTES:
–If the soundbar is connected to your TV through both an HDMI cable
and an optical cable, the HDMI cable source is selected for the TV
connection.
7.2.1 TV remote control setup
To use your TV remote control for both your TV and the soundbar,
check that your TV supports HDMI-CEC. If your TV does not
support HDMI-CEC, follow the steps under “TV remote control IR
learning”.
HDMI-CEC
If your TV supports HDMI-CEC, enable the functions as instructed
in your TV user manual. You can control the volume +/-, mute/
unmute, and power on/standby functions on your soundbar
through the TV remote control.
TV remote control IR learning
Through IR learning, your Infra-red TV remote control can learn
some commands of the soundbar.
1. On the soundbar, press and hold and until
“LEARNING” is displayed.
→You enter the TV remote control learning mode.
2. Point your TV remote control at the soundbar. Follow the
screen instructions to operate the buttons on your TV remote
control:
• When any one of “POWER”, “VOL+”, “VOL-”, or
“MUTE” is displayed on the soundbar, press the desired
button on your TV remote control.
→“DONE”: The functions of the soundbar button are
learnt by your TV remote control buttons.
→The soundbar returns to the last selected source.
• To stop and exit the TV remote control learning mode,
press and hold and on the soundbar until “EXIT
LEARNING” is displayed.
→The learnt functions are discarded.
NOTES:
–The soundbar will exit the TV remote control learning mode
automatically if no action is taken for 30 seconds. The learnt
functions are discarded.
7.3 Play from the HDMI IN source
With the soundbar connected as shown, your digital device can
play video on your TV and audio from the soundbar speakers.
HDMI (ARC)
1
HDMI IN
HDMI OUT
(TV ARC/TV eARC)
HDMI OUT
2
.
.
.
1. Make sure that the soundbar has been properly connected to
your TV and digital device (See “5.1 Connection with your TV
and digital devices”).
2. Switch on your digital device.
→Your TV and the soundbar wake up from standby mode
and switch to the input source automatically.
• To select the HDMI IN source on the soundbar, press
on the soundbar or HDMI on the remote control.
3. Switch your TV to standby mode.
→The soundbar and source device are switched to standby mode.
NOTES:
–Full compatibility with all HDMI-CEC devices is not guaranteed.

1616
7.4 Play from the Bluetooth source
Through Bluetooth, stream audio play on your Bluetooth device
to the soundbar.
.
< 10 m / 33 ft
× 1
×2
×3
1. Check that the soundbar has been properly connected to your
Bluetooth device (See “5.2 Bluetooth connection”).
2. To select the Bluetooth source, press on the soundbar or
on the remote control.
3. Start audio play on your Bluetooth device.
• Alternatively, press on the remote control to control
playback.
4. Adjust the volume on the soundbar, remote control or your
Bluetooth device.
7.5 Play through the JBL One app
Through the JBL One app, stream audio from online music
services to the soundbar.
1. On the soundbar,
• Check that the soundbar has been properly connected to
your home network (See “5.3 Connection with your home
network”).
2. On your Android or iOS device,
a) Check that your Android or iOS device has been
connected to the same network as the soundbar.
b) Launch the JBL One app, browse available *music
streaming services to select music, and then, start music
streaming to the connected soundbar.
• Use the search box to discover music with the
integrated music library of available music services.
JBL One
MUSIC SERVICE
JBL BAR 500_xxxx
3. To exit from the music playback, switch to other sources.
NOTES:
– *Subscription may be needed and not provided by the JBL One app.
Access your presets with the (Moment) button
By pressing on the remote control, you can access the playlist
and speaker settings that you have personalized on the JBL One
app.
1. On the JBL One app,
• personalize the (Moment) feature.
JBL One
JBL BAR 500_xxxx
JBL BAR 500_xxxx

www.jbl.com
English
1717
2. On the soundbar,
• Press on the remote control to access the
personalized playlist and speaker settings.
MOMENT
7.6 Play through Chromecast built-in
Through Chromecast built-in, stream audio on your Android or
iOS device to the soundbar.
1. On the soundbar,
• Check that the soundbar has been properly connected to
your home network (See “5.3 Connection with your home
network”).
2. On your Android or iOS device,
a) Check that your Android or iOS device has been
connected to the same network as the soundbar.
b) Launch the JBL One app, and check that you have
enabled the streaming service of Chromecast built-in.
JBL One
JBL BAR 500_xxxx
c) On a Chromecast-enabled app, play music, tap the cast
icon and select the connected soundbar.
CHROMECAST
3. To exit from the music playback, switch to other sources.
7.7 Play through AirPlay
Through AirPlay, stream audio on your iOS device to the soundbar.
1. On the soundbar,
• Check that the soundbar has been properly connected to
your home network (See “5.3 Connection with your home
network”).
2. On your iOS device,
a) Check that your iOS device has been connected to the
same network as the soundbar.
b) To enter the Control Center on an iOS device, swipe
down from the upper right corner. Tap to select the
connected soundbar and then, start audio streaming
from an app.
AIRPLAY
JBL Bar 500_xxxx
3. To exit from the music playback, switch to other sources.
7.8 Play through Amazon Music
With the soundbar connected to Alexa, you can stream music
from the Amazon Music library to the soundbar.
1. On the soundbar,
• Check that the soundbar has been properly connected to
your home network (See “5.3 Connection with your home
network”).

1818
2. On your Android or iOS device,
a) Check that your Android or iOS device has been
connected to the same network as the soundbar.
b) Launch the JBL One app, and check that you have
enabled the streaming service of Amazon Alexa.
JBL One
JBL BAR 500_xxxx
3. Launch the Amazon Alexa app to start music playback.
ALEXA MRM
Play
• Open the Amazon Music app to access the Amazon
Music library.
• Make sure that you start music playback from the same
Alexa account that you have enabled in the JBL One app.
Refer to the Amazon Alexa app for more details.
NOTES:
–The soundbar can support audio streaming and cannot support
video streaming.
–During playback through Chromecast built-in, AirPlay or Alexa, music
playback pauses on the current connected device when you start
music playback on a second connected device.
–When the soundbar switches between your home Wi-Fi and wired
network during AirPlay, music playback pauses and will resume in a
few minutes, depending on the bandwidth condition of broadband.
For the connection to your home wired network, see “5.3
Connection with your home network”.
7.9 Multi-room playback
With the multi-room playback, you can stream music on your
Android or iOS device to multiple Chromecast-enabled/ AirPlay /
Alexa speakers.
7.9.1 Chromecast built-in
1. Through the Google Home app, connect multiple Chromecast-
enabled speakers to the same network, assign them to multiple
rooms, and create groups as needed.
2. Run a Chromecast-enabled app on your smartphone or tablet.
3. Play music. Press and select the grouped speakers.
NOTES:
–To create a multi-room speaker group in the Google Home app,
make sure that you have connected all the speakers to the same
home network and have used the same Google login account. Refer
to the Google Home app for more details.
–Depending on the bandwidth of your local network, you can stream
music to up to 6 Chromecast-enabled speakers.
7.9.2 AirPlay
JBL Bar 300_xxxx
JBL Bar 500_xxxx
1. On an iOS device, enter the Control Center.
2. Tap to select multiple connected speakers as needed.
3. Start music streaming from an app.

www.jbl.com
English
1919
7.9.3 Alexa MRM: Multi-Room Music
1. Check that you have enabled the streaming service of Amazon
Alexa on the soundbar through the JBL One app.
JBL One
JBL BAR 500_xxxx
2. Through the Amazon Alexa app, create a Multi-room Music
group for the soundbar. Refer to the Amazon Alexa app for
more information.
Amazon Echo device ALEXA MRM
DevicesDevices
DEVICES
Combine speakers
NOTES:
–To create a multi-room music group in the Amazon Alexa app, make
sure that you have connected all the devices to the same home
network and have used the same Alexa login account. Refer to the
Amazon Alexa app for more details.
8. SOUND SETTINGS
8.1 Audio sync
With the audio sync function, you can synchronize audio and
video to make sure that no delay is heard from your video content.
1. On the remote control, press and hold TV for more than three
seconds and then, press .
→“SYNC”is displayed.
2. Within ve seconds, press or on the remote control to
adjust the audio delay and match with video.
→The audio sync timing is displayed.
8.2 Smart mode
With the smart mode enabled by default, you can enjoy TV
programs with rich sound effects. For TV programs such as
news and weather forecasts, you can reduce sound effects by
disabling the smart mode and switching to the standard mode.
Smart mode: EQ settings and JBL Surround Sound are applied
for rich sound effects.
Standard mode: The preset EQ settings are applied for standard
sound effects.
To disable the smart mode, do the following:
• On the remote control, press and hold for more than three
seconds and then, press .
→You switch to another mode. “OFF SMART MODE”: The
standard mode is enabled.
→Next time you switch on the soundbar, the smart mode is
enabled again automatically.
8.3 PureVoice dialogue enhancement
technology
By taking advantage of the PureVoice dialogue enhancement
technology, the PureVoice allows you to enhance vocal clarity
and easily hear and understand speech.
By default, the PureVoice is enabled if you play movies from the
TV/ HDMI IN source; and the PureVoice is disabled if you stream
music over Bluetooth, Chromecast built-in, Alexa and AirPlay.
To disable or enable the PureVoice mode,
• On the remote control, press and hold for more than ve
seconds and then, press .
→“OFF PUREVOICE”: The Purevoice is disabled.
→“ON PUREVOICE”: The PureVoice is enabled.
→Next time you switch on the soundbar, the Purevoice is
enabled again automatically.

2020
9. RESTORE FACTORY SETTINGS
By restoring the default settings dened at factories, you remove
all your personalized settings from the soundbar.
• On the soundbar, press and hold , and for more than
5 seconds.
→“RESET” is displayed.
→The soundbar restarts.
10. SOFTWARE UPDATE
For optimal product performance and your best user experience,
JBL may offer software updates for the soundbar system in the
future. Please visit www.jbl.com or contact JBL call center to
receive more information about downloading update les.
Updating online
• Connect the soundbar to your home network. Updating
online happens automatically if software updates are
available.
→“WAIT”: Software updating in progress
→“DONE”: Software updating completed
Updating through a USB storage device
Software update files
USB
CHECKING UPDATE
1. Check that you have saved the software update le to the root
directory of a USB storage device.
• Make sure that your USB storage device meets the
following requirements:
- Maximum capacity: 64 GB
- File system: FAT32
2. Connect the USB device.
→“USB”is displayed.
Table of contents
Other JBL Speakers System manuals