Jenn-Air Overlay BEVERAGE CENTER User manual

JENN-AIR®BEVERAGE CENTER/
REFRIGERADOR PARA BEBIDAS/
RÉFRIGÉRATEUR POUR BOISSONS
Overlay Model/Modelo recubierto/Modèle à panneau décoratif
W10549547B
USE & CARE GUIDE
For questions about features, operation/performance, parts, accessories, or service, call:
1-800-JENNAIR (1-800-536-6247) or visit our website at www.jennair.com.
In Canada, call: 1-800-JENNAIR (1-800-536-6247), or visit our website at www.jennair.ca.
MANUAL DE USO Y CUIDADO
Si tiene preguntas respecto a las características, funcionamiento, rendimiento, partes, accesorios o servicio técnico, llame al:
1-800-JENNAIR (1-800-536-6247) o visite nuestro sitio de internet en www.jennair.com.
En Canadá, llame al: 1-800-JENNAIR (1-800-536-6247), o visite nuestro sitio de internet en www.jennair.ca.
GUIDE D’UTILISATION ET D’ENTRETIEN
Au Canada, pour assistance, installation ou service, composez le 1-800-JENNAIR (1-800-536-6247)
ou visitez notre site web à www.jennair.ca.
Table of Contents/Índice/Table des matières ......................................................................................2

2
TABLE OF CONTENTS
BEVERAGE CENTER SAFETY ................................................................... 3
Proper Disposal of Your Old Refrigerated Appliance .............................. 3
INSTALLATION REQUIREMENTS ............................................................. 4
Tools and Parts......................................................................................... 4
Location Requirements............................................................................. 4
Electrical Requirements............................................................................ 5
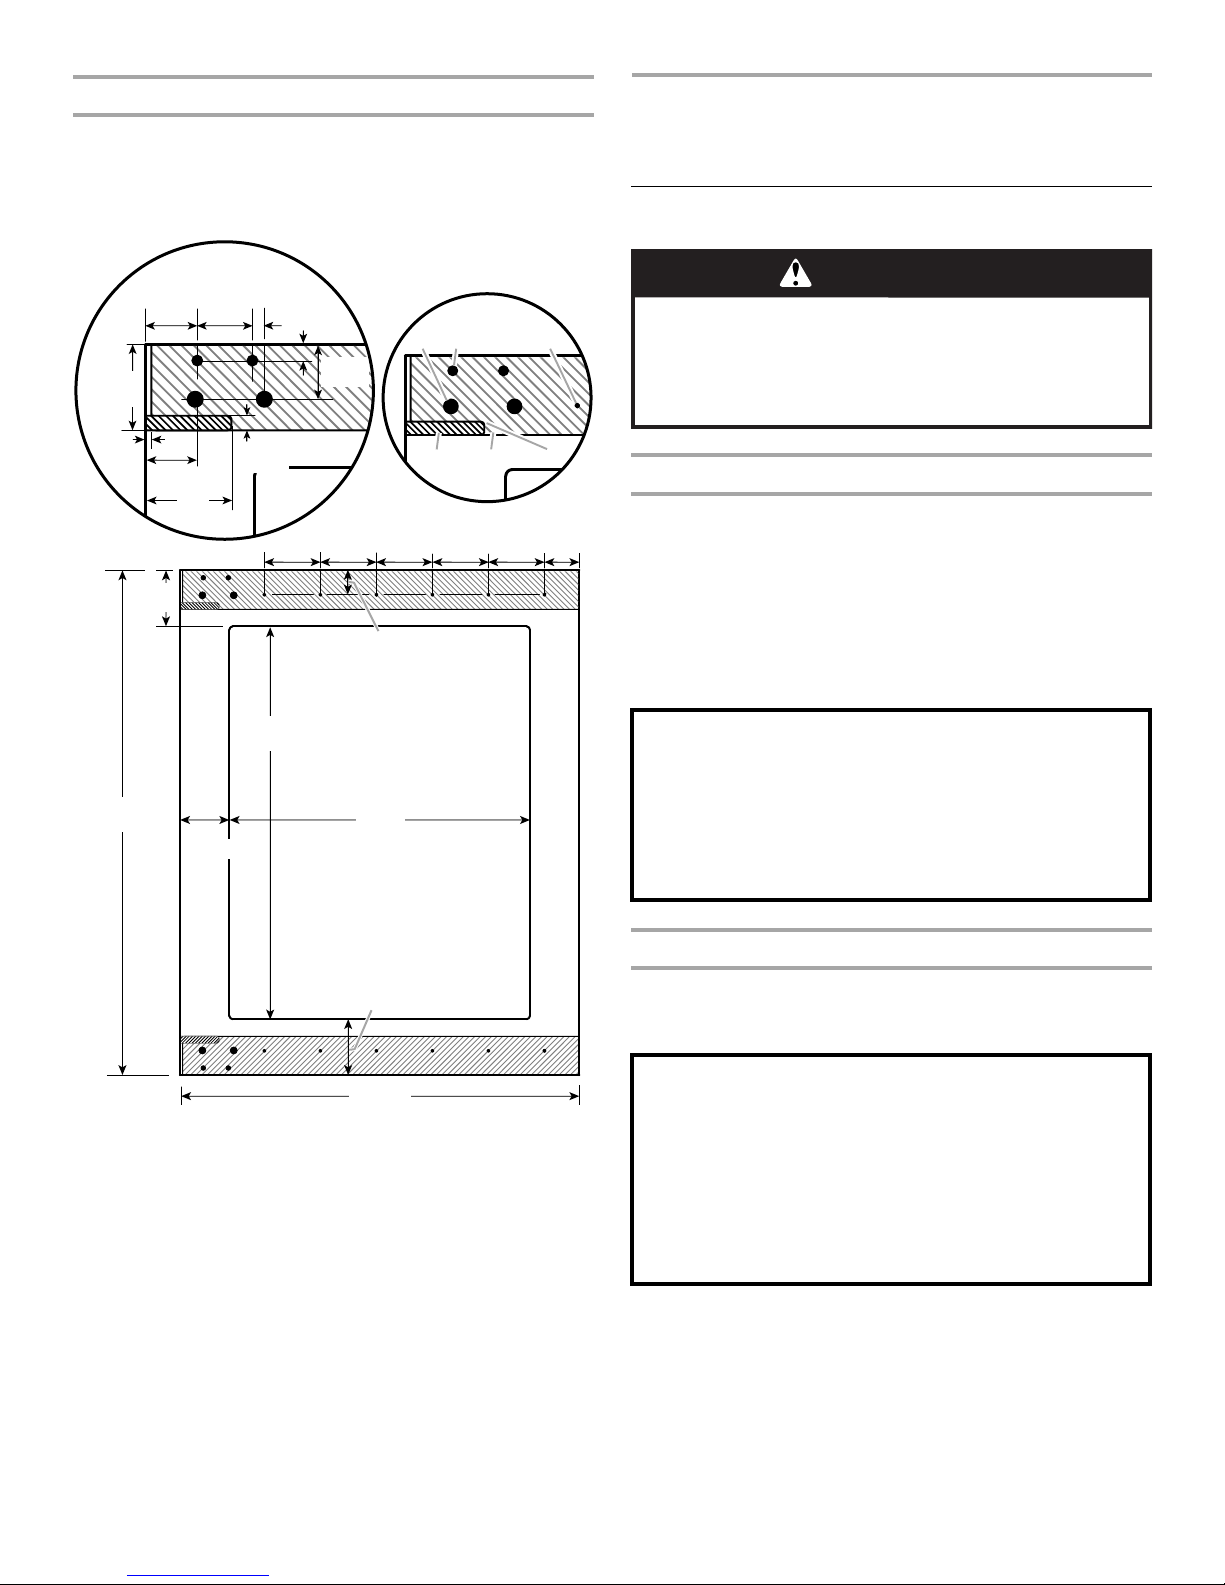
Product Dimensions ................................................................................. 5
Custom Overlay Frame.............................................................................5
INSTALLATION INSTRUCTIONS ............................................................... 6
Unpack the Beverage Center ................................................................... 6
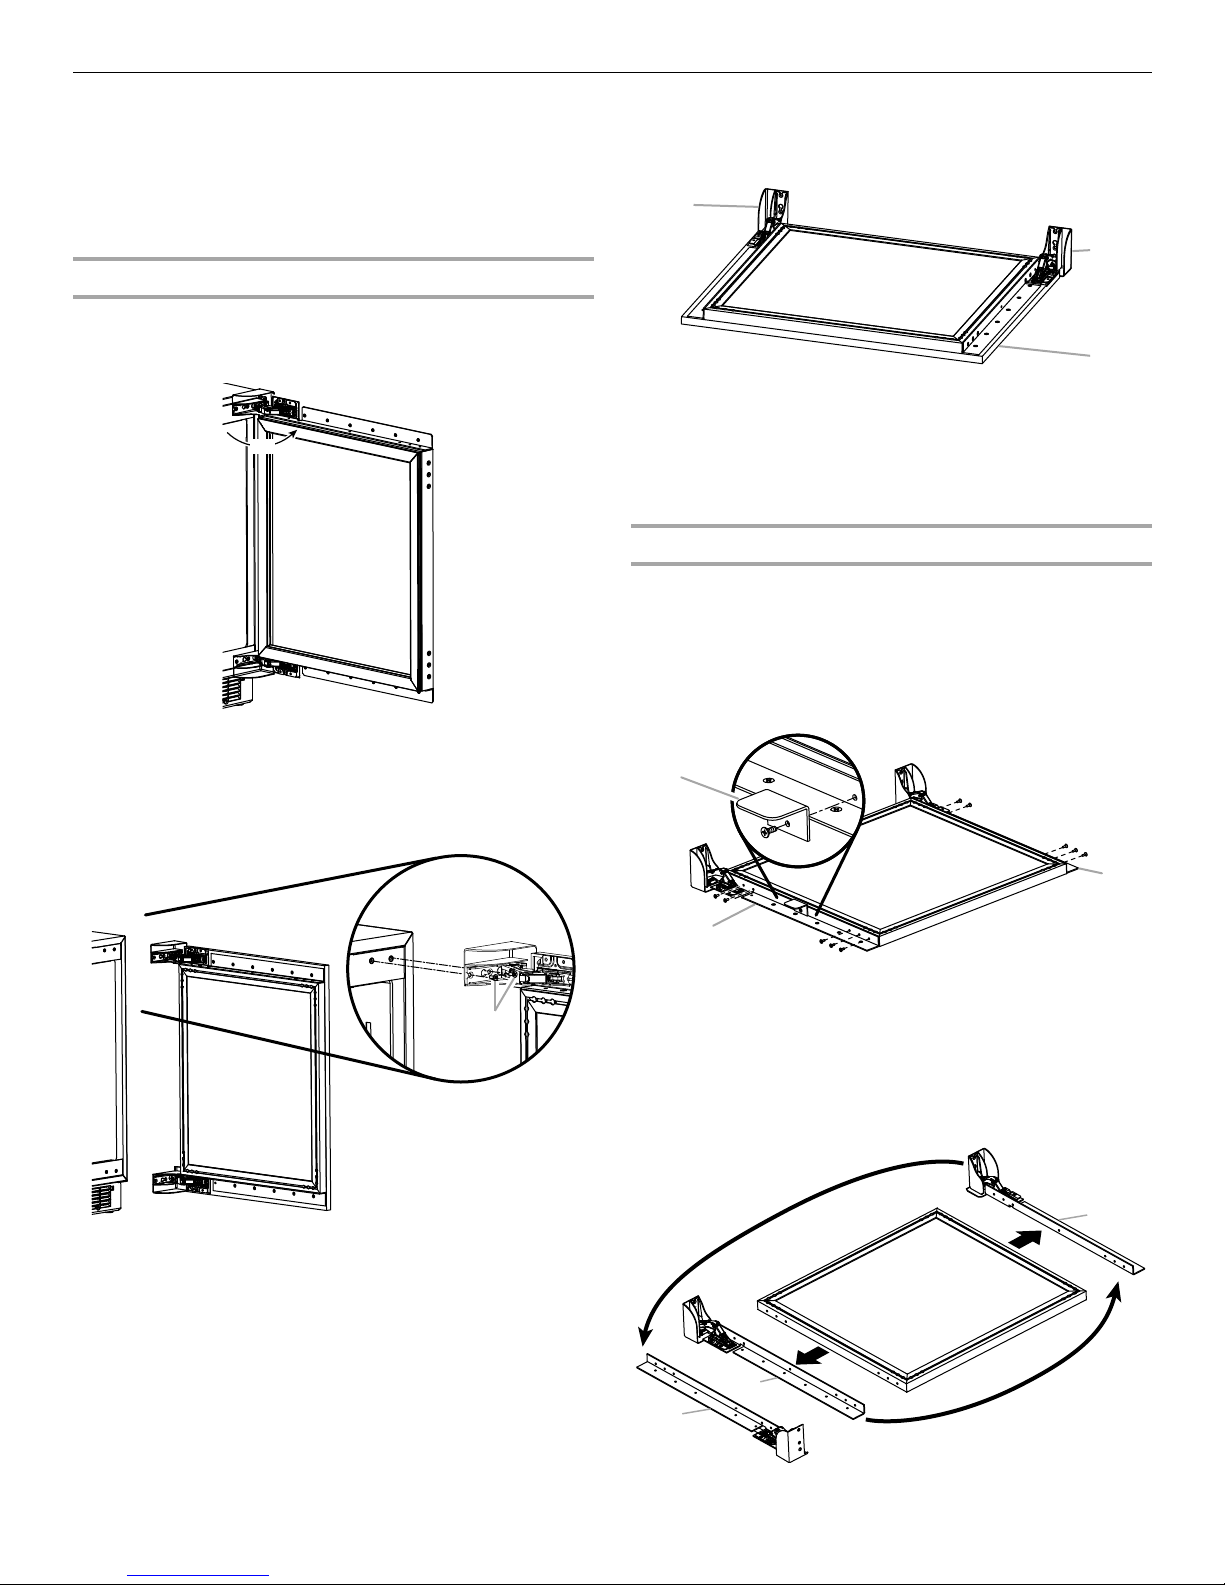
Reverse Door Swing (optional) .................................................................7
Install Custom Overlay Frame .................................................................. 8
Door Closing ............................................................................................. 9
BEVERAGE CENTER USE.......................................................................... 9
Normal Sounds......................................................................................... 9
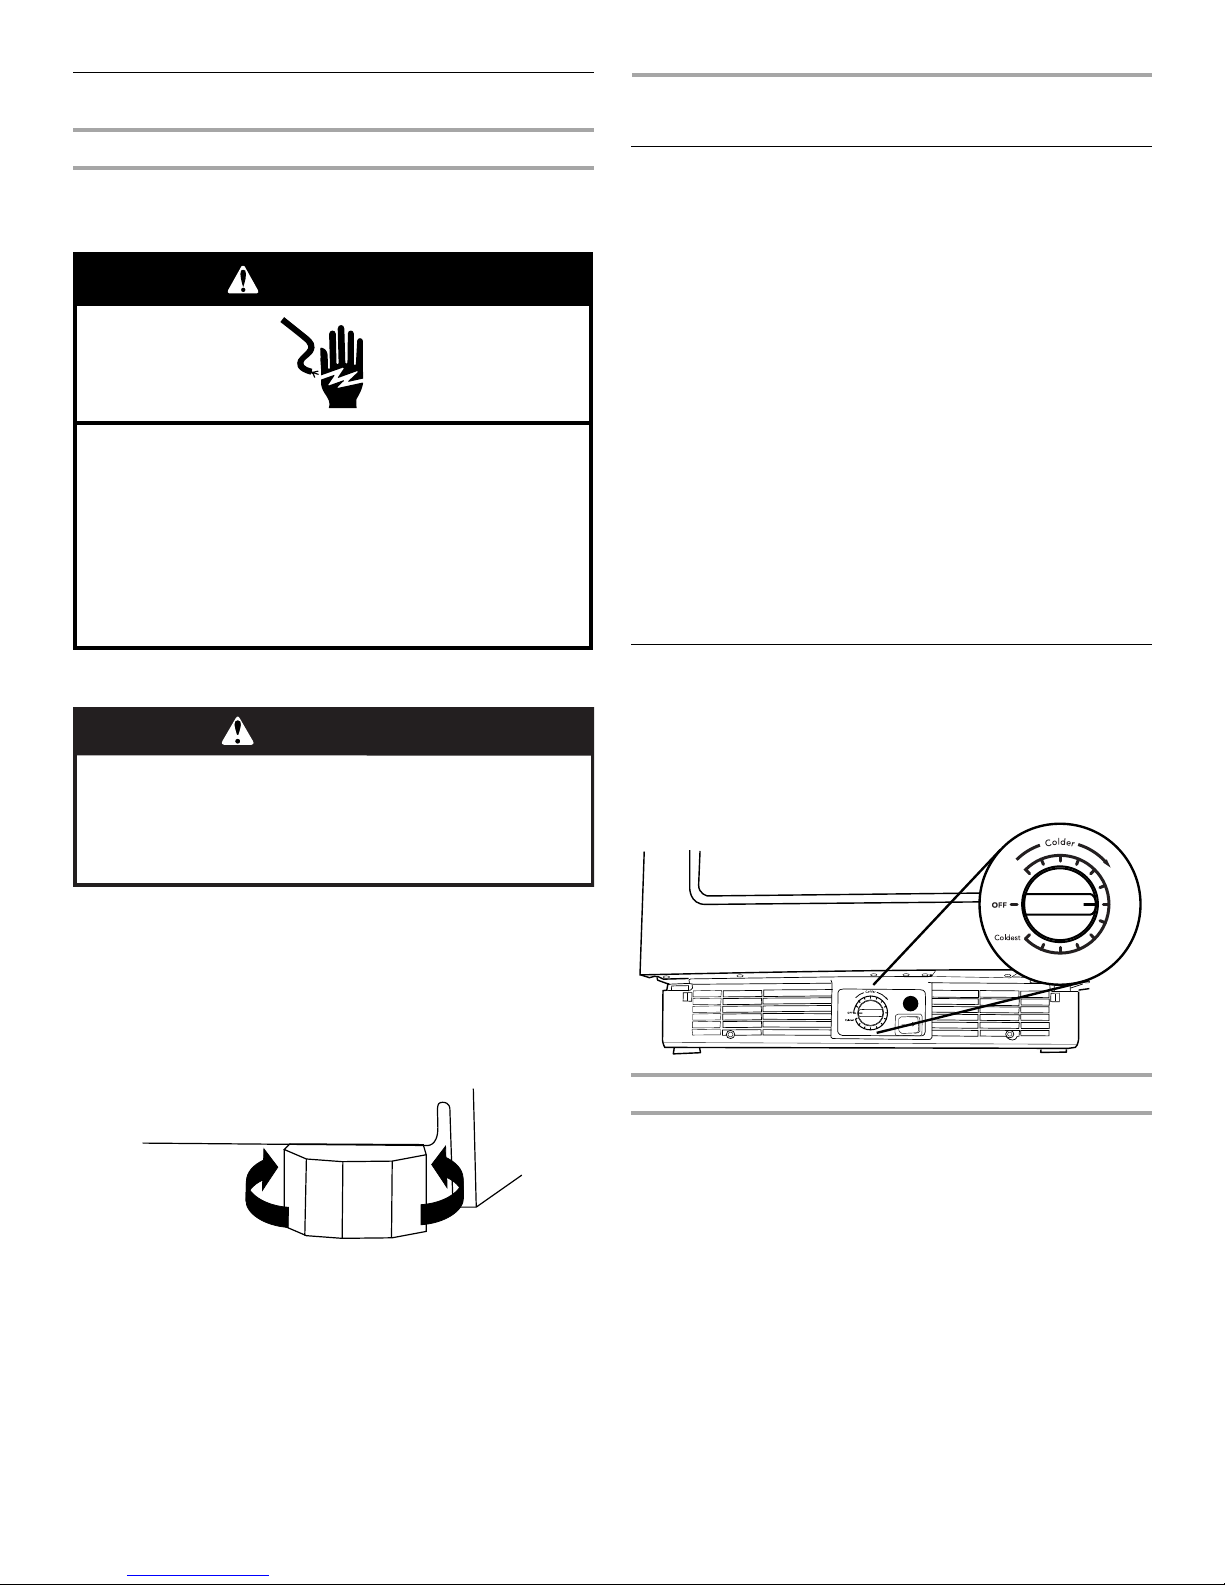
Using the Control...................................................................................... 9
Beverage/Wine Racks ............................................................................ 10
Stocking the Beverage Center ............................................................... 10
Lighting the Beverage Center................................................................. 11
BEVERAGE CENTER CARE..................................................................... 11
Base Grille............................................................................................... 11
Cleaning.................................................................................................. 11
Vacation and Moving Care..................................................................... 12
TROUBLESHOOTING ............................................................................... 12
ASSISTANCE OR SERVICE...................................................................... 13
In the U.S.A............................................................................................. 13
In Canada................................................................................................ 13
WARRANTY ............................................................................................... 14
ÍNDICE
SEGURIDAD DEL REFRIGERADOR PARA BEBIDAS............................16
Cómo deshacerse adecuadamente de su aparato refrigerado viejo ....17
REQUISITOS DE INSTALACIÓN..............................................................17
Piezas y herramientas.............................................................................17
Requisitos de ubicación .........................................................................17
Requisitos eléctricos...............................................................................18
Medidas del producto............................................................................. 18
Marco recubierto a la medida.................................................................19
INSTRUCCIONES DE INSTALACIÓN......................................................20
Desempaque del refrigerador para bebidas ..........................................20
Cómo invertir el cierre de la puerta ........................................................20
Cómo instalar el marco recubierto a la medida .....................................22
Cierre de la puerta ..................................................................................22
USO DEL REFRIGERADOR PARA BEBIDAS ......................................... 23
Sonidos normales................................................................................... 23
Uso del control ....................................................................................... 23
Portabebidas/portabotellas.................................................................... 23
Cómo almacenar en el refrigerador para bebidas ................................. 24
Cómo iluminar el refrigerador para bebidas .......................................... 24
CUIDADO DEL REFRIGERADOR PARA BEBIDAS................................ 25
Rejilla de la base..................................................................................... 25
Limpieza.................................................................................................. 25
Cuidado durante las vacaciones y mudanzas ....................................... 25
SOLUCIÓN DE PROBLEMAS................................................................... 26
AYUDA O SERVICIO TÉCNICO................................................................ 27
En los EE.UU........................................................................................... 27
En Canadá .............................................................................................. 27
GARANTÍA ................................................................................................. 28
TABLE DES MATIÈRES
SÉCURITÉ DU RÉFRIGÉRATEUR POUR BOISSONS ...........................30
Mise au rebut de votre vieil appareil réfrigéré ........................................ 31
EXIGENCES D’INSTALLATION................................................................31
Outillage et pièces ..................................................................................31
Exigences d'emplacement .....................................................................31
Spécifications électriques.......................................................................32
Dimensions du produit............................................................................32
Cadre décoratif personnalisé .................................................................33
INSTRUCTIONS D’INSTALLATION .........................................................34
Déballage du réfrigérateur pour boissons..............................................34
Inversion du sens d'ouverture de la porte..............................................34
Installation du cadre décoratif personnalisé ..........................................36
Fermeture de la porte .............................................................................36
UTILISATION DU RÉFRIGÉRATEUR POUR BOISSONS....................... 37
Sons normaux......................................................................................... 37
Utilisation de la commande.................................................................... 37
Grilles pour le remisage des boissons et du vin .................................... 38
Stockage dans le réfrigérateur pour boissons....................................... 38
Éclairage du réfrigérateur pour boissons ............................................... 39
ENTRETIEN DU RÉFRIGÉRATEUR POUR BOISSONS ......................... 39
Grille de la base ...................................................................................... 39
Nettoyage ............................................................................................... 39
Précautions à prendre pour les vacances
et avant un déménagement.................................................................... 40
DÉPANNAGE ............................................................................................. 40
ASSISTANCE OU SERVICE...................................................................... 42
Aux États-Unis........................................................................................ 42
Au Canada .............................................................................................. 42
GARANTIE.................................................................................................. 43

3
BEVERAGE CENTER SAFETY
Proper Disposal of Your Old
Refrigerated Appliance
IMPORTANT: Child entrapment and suffocation are not problems
of the past. Junked or abandoned beverage centers are still
dangerous – even if they will sit for “just a few days.” If you are
getting rid of your old beverage center, please follow these
instructions to help prevent accidents.
Before You Throw Away Your Old Refrigerated Appliance:
■Take off the door.
■Leave the racks and shelves in place so that children may not
easily climb inside.
You can be killed or seriously injured if you don't immediately
You can be killed or seriously injured if you don't follow
All safety messages will tell you what the potential hazard is, tell you how to reduce the chance of injury, and tell you what can
happen if the instructions are not followed.
Your safety and the safety of others are very important.
We have provided many important safety messages in this manual and on your appliance. Always read and obey all safety
messages.
This is the safety alert symbol.
This symbol alerts you to potential hazards that can kill or hurt you and others.
All safety messages will follow the safety alert symbol and either the word “DANGER” or “WARNING.”
These words mean:
follow instructions.
instructions.
DANGER
WARNING
IMPORTANT SAFETY INSTRUCTIONS
WARNING: To reduce the risk of fire, electric shock, or injury when using your beverage center, follow these basic
SAVE THESE INSTRUCTIONS
■Plug into a grounded 3 prong outlet.
■Do not remove ground prong.
■Do not use an adapter.
■Do not use an extension cord.
■Disconnect power before servicing.
■Replace all parts and panels before operating.
■Remove door or drawer(s) from your old refrigerated
appliance.
■Use nonflammable cleaner.
■Keep flammable materials and vapors, such as gasoline,
away from beverage center.
■Use two or more people to move and install beverage
center.
precautions:
State of California Proposition 65 Warnings:
WARNING: This product contains one or more chemicals known to the State of California to cause cancer.
WARNING: This product contains one or more chemicals known to the State of California to cause birth defects or other
reproductive harm.
WARNING
Suffocation Hazard
Remove door or drawer(s) from your old refrigerated
appliance.
Failure to do so can result in death or brain damage.
Important information to know about disposal of
refrigerants:
Dispose of refrigerator in accordance with Federal and Local
regulations. Refrigerants must be evacuated by a licensed,
EPA certified refrigerant technician in accordance with
established procedures.

4
INSTALLATION REQUIREMENTS
Tools and Parts
Gather the required tools and parts before starting installation.
TOOLS NEEDED:
PARTS NEEDED:
Custom Overlay Frame—See “Overlay Frame—Rear View.”
Hardware (Optional)
PARTS SUPPLIED:
Location Requirements
NOTES:
■For the beverage center to be flush with the front of the base
cabinets remove any baseboards or moldings from the rear of
the opening. See “Product Dimensions” and later in this
section “Opening Dimensions.”
■It is recommended that you do not install the beverage center
near an oven, radiator, or other heat source.
■Do not install in a location where the temperature will fall
below 55°F (13°C). For best performance, do not install the
beverage center behind a cabinet door or block the base
grille.
Opening Dimensions
■Height dimensions are shown with the leveling legs extended
to the minimum height.
NOTE: When leveling legs are fully extended, add ⁵⁄₈"
(15.9 mm) to the height dimensions. See “Product
Dimensions.”
■If the floor of the opening is not level with the kitchen floor,
shim the opening to make it level with the kitchen floor.
■Phillips screwdriver
■M4 x 14 wood screws (12)
WARNING
Explosion Hazard
Keep flammable materials and vapors, such as
gasoline, away from beverage center.
Failure to do so can result in death, explosion, or fire.
Critical Dimensions:
A. 14
³⁄₄
" (37.5 cm) utility opening
B. 24" (60.96 cm) minimum opening width
¹⁄₂"
(1.3 cm)
A
14³⁄₄"
(37.5 cm)
24"
(60.96 cm)
min.
24" (60.96 cm) min.
34³⁄₈" (87.3 cm) min.
35" (88.9 cm) max.
B

5
Electrical Requirements
Before you move your beverage center into its final location, it is
important to make sure you have the proper electrical connection.
Recommended grounding method
A 115 Volt, 60 Hz., AC only, 15– or 20–amp fused, grounded
electrical supply is required. It is recommended that a separate
circuit serving only your beverage center be provided. Use an
outlet that cannot be turned off by a switch. Do not use an
extension cord.
NOTE: Before performing any type of installation, cleaning, or
removing a light bulb, unplug beverage center or disconnect
power.
Product Dimensions
■Height dimensions are shown with the leveling legs NOT
extended.
■The power cord is 60" (152.4 cm) long.
Front View
Side View (door open 90°)
Top View
Custom Overlay Frame
If you plan to install a custom overlay frame, you will need to
create the frame yourself or consult a qualified cabinetmaker or
carpenter. See dimension drawings for frame specifications.
IMPORTANT:
■The thickness of the overlay frame must be ³⁄₄" (1.91 cm).
■Overlay frame must not weigh more than 10 lbs (4.54 kg).
■Overlay frames weighing more than recommended may
cause damage to your appliance.
Electrical Shock Hazard
Plug into a grounded 3 prong outlet.
Do not remove ground prong.
Do not use an adapter.
Do not use an extension cord.
Failure to follow these instructions can result in death,
fire, or electrical shock.
WARNING
30¹⁄₈"
(76.6 cm) 34¹⁄₈"
(86.8 cm)
34³⁄₈"
(87.4 cm)
*Dimension includes
³⁄₄
" thick custom door panel
26¹⁄₈"
(66.4 cm)
47³⁄₄"
(121.4 cm)
23⁷⁄₈"
(60.6 cm)
21⁵⁄₈"
(55.0 cm)
23⁷⁄₈" *
(60.7 cm)

6
Overlay Frame - Rear View
Create the custom overlay frame using the dimensions shown.
IMPORTANT: The following graphic shows a custom frame for a
door with the hinges installed on the right-hand side. If your
refrigerator has the hinges installed on the left-hand side, rotate
the custom frame 180° so the hinge markings will be on the left.
INSTALLATION
INSTRUCTIONS
Unpack the Beverage Center
Remove the Packaging
■Remove tape and glue residue from surfaces before turning
on the beverage center. Rub a small amount of liquid dish
soap over the adhesive with your fingers. Wipe with warm
water and dry.
■Do not use sharp instruments, rubbing alcohol, flammable
fluids, or abrasive cleaners to remove tape or glue. These
products can damage the surface of your beverage center.
For more information, see “Beverage Center Safety.”
■Dispose of/recycle all packaging materials.
Clean Before Using
After you remove all of the packaging materials, clean the inside of
your beverage center before using it. See the cleaning instructions
in “Beverage Center Care.”
A. Drill holes using a
¹⁵⁄₃₂
" (12 mm) drill bit to a depth of approximately
¹⁄₂
" (13 mm) before routing. (4 holes total)
B. Drill holes using a
⁵⁄₁₆
" (8 mm) drill bit to a depth of approximately
¹⁄₂
" (13 mm) before routing. (4 holes total)
C. Drill holes using a
⁷⁄₆₄
" (2.8 mm) drill bit to a depth of approximately
¹⁄₂
" (13 mm). (12 holes total)
D. Rout shaded areas for hinges to a
¹⁹⁄₃₂
" (15 mm) depth.
E. Rout shaded areas for hinges to a
¹⁄₄
" (4 mm) depth.
F. Corn e r radi u s o f
¹⁄₈
" (3 mm) using a
¹⁄₄
" drill bit when routing
(5 radiuses total)
23
³⁄₄
"
(60.3 cm)
18"
(45.6 cm)
23
¹⁄₂
"
(59.6 cm)
30
³⁄₁₆
"
(76.6 cm)
3
³⁄₈
"
(8.5 cm)
2
⁷⁄₈
"
(7.4 cm)
3
³⁄₈
"
(8.5 cm) 3
³⁄₈
"
(8.5 cm) 3
³⁄₈
"
(8.5 cm) 3
³⁄₈
"
(8.5 cm) 3
³⁄₈
"
(8.5 cm) 2
¹⁄₈
"
(5.2 cm)
3
³⁄₈
"
(8.5 cm)
1
¹⁄₂
"
(3.7 cm)
¹⁄₂
"
(1.1 cm)
1
⁷⁄₁₆
"
(3.55 cm) 1
¹⁄₂
"
(3.8 cm)
³⁄₈
"
(8.2 mm)
⁵⁄₃₂
"
(4.0 mm)
2
¹⁄₄
"
(5.7 cm)
1
³⁄₈
"
(3.42 cm)
2
⁵⁄₁₆
"
(5.9 cm)
1
¹⁄₂
"
(3.8 cm)
¹⁄₂
"
(1.0 cm)
A CB
DEF
WARNING
Excessive Weight Hazard
Use two or more people to move and install
beverage center.
Failure to do so can result in back or other injury.
When MovingYour Beverage Center:
Your beverage center is heavy. When moving the appliance
for cleaning and service, be sure to cover the floor with
cardboard or hardboard to avoid floor damage. Always pull
the appliance straight out when moving it. Do not wiggle or
“walk” the appliance when trying to move it, as floor
damage could occur.
Important information to know about glass shelves
and covers:
Do not clean glass shelves or covers with warm water when
they are cold. Shelves and covers may break if exposed to
sudden temperature changes or impact, such as bumping.
Tempered glass is designed to shatter into many small,
pebble-size pieces. This is normal. Glass shelves and covers
are heavy. Use both hands when removing them to avoid
dropping.

7
Reverse Door Swing (optional)
The door hinges are factory installed on the right-hand side. If you
want the door to open from the opposite direction, you must
reverse the door.
IMPORTANT: To avoid strain on the hinges, it is recommended
that you use two people to remove the door.
Tools Needed: Phillips screwdriver and a ¹⁄₈" hex key wrench.
Remove the Door
1. Unplug or disconnect power and remove any items that might
be stored inside.
2. Open the door completely to 90°.
3. While one person supports the door, remove the screws
attaching both the top and bottom hinges to the cabinet.
NOTE: After the screws are removed and the door is pulled
away from the cabinet, a plastic spacer, located behind the
bottom hinge, will become free. Set the spacer aside. You will
need this spacer when you reinstall the door.
4. Remove the door from the cabinet and gently lay it on a flat
surface to avoid damaging the covers attached to the top and
bottom hinges.
5. Reinstall the screws into the holes remaining after the hinges
are removed from the cabinet.
6. If a wooden overlay panel has been previously installed,
remove the panel. See “Install Custom Overlay Frame.”
Reverse the Door
1. Remove the screws attaching the black, metal L-beams to the
top and bottom of the door.
2. Remove the screw attaching the metal light switch plate to the
center of the bottom L-beam. Remove the light switch plate.
NOTE: The light switch plate is attached with both a screw
and adhesive tape. It may require some force to remove it
from the L-beam.
3. Remove the two metal, L-beams from the door noting which
L-beam was on the top and which was on the bottom.
4. Move the L-beams to the opposite ends of the door with the
hinges now on the left-hand side (as you are facing the front of
the door).
90˚
A
A. Hinge cover
B. Custom overlay door frame
A. Light switch plate
B. Bottom L-beam
C. Top L-beam
A. Bottom L-beam
B. Top L-beam
B
A
A
C
B
A
A
A
B

8
5. Using the screws removed in Step 1, reinstall the L-beams, to
their new location on the door.
6. Using the screw removed in Step 2 and the adhesive tape
included in the door installation kit, reinstall the light switch
plate onto the bottom of the door.
7. Reinstall the overlay panel, if removed earlier. See “Install
Custom Overlay Frame.”
Replace the Door
1. Make sure the hinge covers are still attached to the L-beams.
2. Remove the screws from the both the top and bottom of the
opposite side of the cabinet.
3. Align the holes in the hinges with the holes in the cabinet.
4. Using the screws removed in Step 2, loosely fasten the door
to the left-hand side of the cabinet.
5. For the bottom hinge only, slide the plastic spacer, with the
slots facing downward, between the bottom hinge and the
cabinet.
NOTE: The slots in the spacer go around the screws.
6. Fully tighten the screws.
Install Custom Overlay Frame
IMPORTANT:
■Create custom overlay frame according to the specifications
in the “Custom Overlay Frame” section.
■Jenn-Air is not responsible for the removal or addition of
molding or decorative panels that would not allow access to
the appliance for service.
Install Custom Frame
1. Open the door completely to 90°.
2. Using two people, hold the wooden frame so that the holes in
the frame align with the holes at the top and bottom of the
door. Then, fasten the custom frame to the door using six
wood screws at the top and six wood screws at the bottom.
3. Check that the custom frame is aligned with the door and
completely tighten the 12 screws.
A. Hinge screws removed in Step 2
B. Holes in cabinet
A. Bottom hinge spacer
A
AB
A
A. M4 x 14 wood screws
90˚
AA
AA

9
Door Closing
Door Closing
Your beverage center has four leveling legs. If your beverage
center seems unsteady or you want the door to close more easily,
adjust the beverage center’s tilt using the instructions below.
1. Plug into a grounded 3 prong outlet.
2. Move the beverage center into its final location.
3. Turn the leveling legs to the right to lower the beverage center
or turn the leveling legs to the left to raise it. It may take
several turns of the leveling legs to adjust the tilt of the
beverage center.
NOTE: Having someone push against the top of the beverage
center takes some weight off the leveling legs. This makes it
easier to adjust the leveling legs.
4. Make sure that the door closes as easily as you like. If not, tilt
the beverage center slightly more to the rear by turning both
front leveling screws to the left. It may take several more turns,
and you should turn both leveling legs the same amount.
BEVERAGE CENTER USE
Normal Sounds
Your new beverage center may make sounds that your old one
didn’t make. Because the sounds are new to you, you might be
concerned about them. Most of the new sounds are normal. Hard
surfaces, such as the flooring and surrounding structures, can
make the sounds seem louder. The following describes the kinds
of sounds and what may be making them.
■Your beverage center is designed to run more efficiently to
keep your food items at the desired temperatures and to
minimize energy usage. The high efficiency compressor and
fans may cause your beverage center to run longer than your
old one. You may also hear a pulsating or high-pitched sound
from the compressor or fans adjusting to optimize
performance.
■Rattling noises may come from the flow of refrigerant or items
stored inside the beverage center.
■As each cycle ends, you may hear a gurgling sound due to the
refrigerant flowing in your beverage center.
■You may hear water running into the drain pan when the
beverage center is defrosting.
■You may hear clicking sounds when the beverage center
starts or stops running.
Using the Control
The control is located behind the base grille. Lift up on the door in
the center of the grille to access the control.
For your convenience, your beverage center temperature control
is preset at the factory. When you first install your beverage center,
make sure that the control is still preset to the mid-setting as
shown.
Adjusting the Control
The mid-setting should be correct for normal usage. The control is
set correctly when beverages are as cold as you like.
If you need to adjust the temperature, wait at least 24 hours
between adjustments and then recheck the temperature.
To make the beverage center colder, adjust the control to the next
higher setting. To make the beverage center less cold, adjust the
control to the next lower setting.
NOTE: Adjusting the temperature control raises or lowers the
temperature in both the upper and lower zones (compartments).
Electrical Shock Hazard
Plug into a grounded 3 prong outlet.
Do not remove ground prong.
Do not use an adapter.
Do not use an extension cord.
Failure to follow these instructions can result in death,
fire, or electrical shock.
WARNING
WARNING
Excessive Weight Hazard
Use two or more people to move and install
beverage center.
Failure to do so can result in back or other injury.

10
Temperature Separator (Temperature Display)
The temperature separator displays the current temperatures
(Fahrenheit or Celsius) for the upper and lower zones
(compartments) of the beverage center. To adjust the temperature
settings, see “Adjusting the Control” earlier in this section.
Beverage/Wine Racks
Remove and Replace the Top and Middle Racks
1. Pull the rack forward until it stops.
2. Lift up on the left-hand lever while pressing down on the right-
hand lever to release the rack. Pull the rack forward and lift it
up and out of the rack supports.
3. Replace the rack by inserting the rack into the supports and
sliding it toward the rear of the beverage center.
Remove and Replace the Bottom Rack
1. Lift the rack (front and back) up and pull straight out to
remove.
2. Replace the rack by pushing it straight back and over the
stop. Continue pushing the rack evenly until it is in place.
Stocking the Beverage Center
NOTES:
■For optimum wine storage, place white wines on the upper
rack of the beverage center and place red wines on the lower
rack of the beverage center.
■The wine racks can be stocked with the bottles facing either
direction, however, to optimize storage adjacent bottles
should be facing in opposite directions.
To stock the beverage center:
1. Starting on the left-hand side of the bottom rack, place the
first bottle with the neck of the bottle facing the front of the
beverage center.
2. Place the next bottle on the rack with the neck of the bottle
facing the back of the beverage center. Alternate the direction
of the bottles, in this manner, until the display rack is full.
3. Slide the bottom rack into place and pull the next rack
forward. Stock the remaining rack as described In the
previous steps.
4. Place juices, sodas or other canned beverages on the glass
shelves.
A. Dimmer
B. Upper zone display
C. Lower zone display
D. Fahrenheit/Celsius
A. Lever
Dimmer Upper Lower F
ABCD
A

11
To remove or adjust the upper glass shelves:
NOTE: The very bottom glass shelf is fixed in place and is not
removable.
1. Remove the shelf by lifting it up and out of the shelf brackets.
2. Remove the two shelf brackets and reposition them in the
desired location.
3. Replace the shelf by inserting it into the shelf brackets.
NOTE: Be sure the shelf is level.
Lighting the Beverage Center
The beverage center has an interior light that comes on anytime
the door is opened. You may also choose to keep the light on at
all times by pressing the left side of the switch, located next to the
temperature control, on the base grille.
NOTES:
■Leaving the light on for an extended period of time will slightly
increase the temperature of the beverage center.
■The light is an LED which does not need to be replaced. If the
LED does not illuminate when the door is opened, call Service
to replace the light. See Assistance or Service for contact
information.
BEVERAGE CENTER CARE
Base Grille
You must remove the base grille to access the condenser coils for
cleaning.
To remove the base grille:
1. Open the beverage center door to access the base grille.
2. Using a Phillips screwdriver, remove the two screws.
3. Push both tabs in toward the center to release the base grille
from the cabinet and remove.
To replace the base grille:
1. Open the beverage center door.
2. Position the base grille so that both tabs align and the base
grille snaps into place. Replace the two screws. Tighten the
screws.
Cleaning
Clean the beverage center about once a month to avoid buildup
of odors. Wipe up spills immediately.
To clean your beverage center:
1. Unplug beverage center or disconnect power.
2. Remove all racks and shelves from inside the beverage center.
3. Hand wash, rinse, and dry removable parts and interior
surfaces thoroughly. Use a clean sponge or soft cloth and a
mild detergent in warm water.
■To avoid damaging wooden tines and trim pieces, wipe
them off with a clean sponge or soft cloth and warm water.
Do not use detergent or immerse the entire rack into water
when cleaning.
■Do not use abrasive or harsh cleaners such as window
sprays, scouring cleansers, flammable fluids, cleaning
waxes, concentrated detergents, bleaches or cleansers
containing petroleum products on plastic parts, interior
and door liners or gaskets. Do not use paper towels,
scouring pads, or other harsh cleaning tools. These can
scratch or damage materials.
■To help remove odors, you can wash interior walls with a
mixture of warm water and baking soda (2 tbs to 1 qt
[26 g to 0.95 L] of water).
4. Wash stainless steel and painted metal exteriors with a clean
sponge or soft cloth and a mild detergent in warm water. Do
not use abrasive or harsh cleaners, or cleaners containing
chlorine. These can scratch or damage materials. Dry
thoroughly with a soft cloth.
NOTE: To keep your stainless steel beverage center looking
like new and to remove minor scuffs or marks, it is suggested
that you use the manufacturer’s approved Stainless Steel
Cleaner and Polish. To order the cleaner, see “Accessories.”
IMPORTANT: This cleaner is for stainless steel parts only!
Do not allow the Stainless Steel Cleaner and Polish to come
into contact with any plastic parts such as the trim pieces,
dispenser covers or door gaskets. If unintentional contact
does occur, clean plastic part with a sponge and mild
detergent in warm water. Dry thoroughly with a soft cloth.
5. Replace the racks and shelves.
6. Clean the condenser coils regularly. They are located behind
the base grille. Coils may need to be cleaned as often as every
other month. This may help save energy.
■Remove the base grille. See “Base Grille.”
■Use a vacuum cleaner with an extended attachment to
clean the condenser coils when they are dusty or dirty.
■Replace the base grille.
7. Plug in beverage center or reconnect power.
A. Tabs
B. Screws
BAA
WARNING
Explosion Hazard
Use nonflammable cleaner.
Failure to do so can result in death, explosion, or fire.

12
Vacation and Moving Care
Vacations
If you choose to turn the beverage center off before you leave,
follow these steps.
1. Remove all wine bottles from the beverage center.
2. Unplug the beverage center.
3. Clean the beverage center. See “Cleaning.”
4. Tape a rubber or wood block to the top of the door to prop it
open far enough for air to get in. This stops odor and mold
from building up.
Moving
When you are moving your beverage center to a new home, follow
these steps to prepare it for the move.
1. Remove all wine bottles from the beverage center.
2. Unplug the beverage center.
3. Clean, wipe, and dry it thoroughly.
4. Take out all removable parts, wrap them well, and tape them
together so they don’t shift and rattle during the move.
5. Tape the doors shut and tape the power cord to the beverage
center.
When you get to your new home, put everything back and refer to
the “Installation Instructions” section for preparation instructions.
TROUBLESHOOTING
Try the solutions suggested here first in order to avoid the cost of an unnecessary service call.
Your beverage center will not operate
■Is the power supply cord unplugged? Plug into a grounded
3 prong outlet.
■Has a household fuse blown, or has a circuit breaker
tripped? Replace the fuse or reset the circuit.
■Is the Beverage Center Control turned to the OFF
position? See “Using the Control.”
The motor seems to run too much
■Is the temperature outside hotter than normal? Expect the
motor to run longer under warm conditions. At normal
temperatures, expect your motor to run about 40% to 80% of
the time. Under warmer conditions, expect it to run even more
of the time.
■Is the door opened often? Expect the motor to run longer
when this occurs. In order to conserve energy, try to get
everything you need out of the beverage center at once, keep
wine bottles positioned label side up so that they are easy to
find, and close the door as soon as the wine is removed.
■Is the control set correctly for the surrounding conditions?
See “Using the Control.”
■Is the door closed completely? Push the door firmly shut. If
it will not shut all the way, see “The door will not close
completely” later in this section.
■Are the condenser coils dirty? This obstructs air transfer and
makes the motor work harder. Clean the condenser coils. See
“Cleaning.”
Temperature is too warm
■Is the door opened often? Be aware that the beverage
center will warm when this occurs. In order to keep the
beverage center cool, try to get everything you need out of the
beverage center at once, keep wine bottles positioned label
side up so that they are easy to find, and close the door as
soon as the wine is removed.
■Is the control set correctly for the surrounding conditions?
See “Using the Control.”
■Is the base grille blocked? For best performance, do not
install the beverage center behind a cabinet door or block the
base grille.
There is interior moisture buildup
■Is the door opened often? To avoid humidity buildup, try to
get everything you need out of the beverage center at once,
keep wine bottles positioned label side up so that they are
easy to find, and close the door as soon as the wine is
removed. When the door is opened, humidity from the room
air enters the beverage center. The more often the door is
opened, the faster humidity builds up, especially when the
room itself is very humid.
■Is it humid? It is normal for moisture to build up inside the
beverage center when the air is humid.
■Is the control set correctly for the surrounding conditions?
See “Using the Control.”
Electrical Shock Hazard
Plug into a grounded 3 prong outlet.
Do not remove ground prong.
Do not use an adapter.
Do not use an extension cord.
Failure to follow these instructions can result in death,
fire, or electrical shock.
WARNING

13
The door is difficult to open
■Is the gasket dirty or sticky? Clean the gasket and the
surface that it touches. Rub a thin coat of paraffin wax on the
gasket following cleaning.
The door will not close completely
■Are the racks or shelves out of position? Put the racks or
shelves back into their correct positions. See “Beverage
Center Use” for more information.
■Is the gasket sticking? Clean the gasket and the surface that
it touches. Rub a thin coat of paraffin wax on the gasket
following cleaning.
ASSISTANCE OR SERVICE
Before calling for assistance or service, please check
“Troubleshooting.” It may save you the cost of a service call. If you
still need help, follow the instructions below.
When calling, please know the purchase date and the complete
model and serial number of your appliance. This information will
help us to better respond to your request.
If you need replacement parts
If you need to order replacement parts, we recommend that you
only use factory specified replacement parts. Factory specified
replacement parts will fit right and work right because they are
made with the same precision used to build every new Jenn-Air®
appliance.
To locate factory specified replacement parts in your area, call us
or your nearest designated service center.
In the U.S.A.
Call the Jenn-Air Customer eXperience Center
toll free: 1-800-JENNAIR (1-800-536-6247).
Our consultants provide assistance with:
■Features and specifications on our full line of appliances.
■Installation information.
■Use and maintenance procedures.
■Accessory and repair parts sales.
■Specialized customer assistance (Spanish speaking, hearing
impaired, limited vision, etc.).
■Referrals to local dealers, repair parts distributors, and service
companies. Jenn-Air designated service technicians are
trained to fulfill the product warranty and provide after-
warranty service, anywhere in the United States.
To locate the Jenn-Air designated service company in your area,
you can also look in your telephone directory Yellow Pages.
For further assistance
If you need further assistance, you can write to Jenn-Air with any
questions or concerns at:
Jenn-Air Brand Home Appliances
Customer eXperience Center
553 Benson Road
Benton Harbor, MI 49022-2692
Please include a daytime phone number in your correspondence.
In Canada
Call the Jenn-Air Canada Customer eXperience Centre toll free:
1-800-JENNAIR (1-800-536-6247).
Our consultants provide assistance with:
■Features and specifications on our full line of appliances.
■Use and maintenance procedures.
■Accessory and repair parts sales.
■Referrals to local dealers, repair parts distributors, and
services companies. Jenn-Air Canada designated service
technicians are trained to fulfill the product warranty and
provide after-warranty service, anywhere in Canada.
For further assistance
If you need further assistance, you can write to Jenn-Air Canada
with any questions or concerns at:
Jenn-Air Canada
Customer eXperience Centre
200 – 6750 Century Ave.
Mississauga, Ontario L5N 0B7
Please include a daytime phone number in your correspondence.
WARNING
Explosion Hazard
Use nonflammable cleaner.
Failure to do so can result in death, explosion, or fire.
WARNING
Explosion Hazard
Use nonflammable cleaner.
Failure to do so can result in death, explosion, or fire.

14
JENN-AIR®REFRIGERATOR WARRANTY
FIRST YEAR LIMITED WARRANTY
For one year from the date of purchase, when this major appliance is installed, operated and maintained according to instructions attached
to or furnished with the product, Jenn-Air brand of Whirlpool Corporation or Whirlpool Canada LP (hereafter “Jenn-Air”) will pay for factory
specified replacement parts and repair labor to correct defects in materials or workmanship that existed when this major appliance was
purchased.
SECOND THROUGH FIFTH YEAR LIMITED WARRANTY ON CAVITY LINER AND SEALED REFRIGERATION SYSTEM
In the second through fifth years from the date of purchase, when this major appliance is installed, operated and maintained according to
the instructions attached to or furnished with the product, Jenn-Air brand will pay for factory specified replacement parts and repair labor
for the following components to correct non-cosmetic defects in materials and workmanship in this part that prevent function of the
refrigerator and that existed when this major appliance was purchased:
YOUR SOLE AND EXCLUSIVE REMEDY UNDER THE LIMITED WARRANTY SHALL BE PRODUCT REPAIR AS PROVIDED HEREIN.
Service must be provided by a designated Jenn-Air service company. This limited warranty is valid in the United States or Canada and
applies only when the major appliance is used in the country in which it was purchased. This limited warranty is effective from the date of
the original consumer purchase. Proof of original purchase date is required to obtain service under this limited warranty.
ITEMS EXCLUDED FROM WARRANTY
This limited warranty does not cover:
1. Replacement parts or repair labor if this major appliance is used for other than normal, single-family household use or when it is used in
a manner that is inconsistent to published user or operator instructions and/or installation instructions.
2. Service calls to correct the installation of your major appliance, to instruct you on how to use your major appliance, to replace or repair
house fuses, or to correct house wiring or plumbing.
3. Service calls to repair or replace appliance light bulbs, air filters or water filters. Consumable parts are excluded from warranty
coverage.
4. Damage resulting from accident, alteration, misuse, abuse, fire, flood, acts of God, improper installation, installation not in accordance
with electrical or plumbing codes, or use of products not approved by Jenn-Air.
5. Cosmetic damage, including scratches, dents, chips or other damage to the finish of your major appliance, unless such damage results
from defects in materials or workmanship and is reported to Jenn-Air within 30 days from the date of purchase.
6. Any food or medicine loss due to refrigerator or freezer product failures.
7. Pickup and delivery. This major appliance is intended to be repaired in your home.
8. Repairs to parts or systems resulting from unauthorized modifications made to the appliance.
9. Expenses for travel and transportation for product service if your major appliance is located in a remote area where service by an
authorized Jenn-Air servicer is not available.
10. The removal and reinstallation of your major appliance if it is installed in an inaccessible location or is not installed in accordance with
Jenn-Air's published installation instructions.
11. Replacement parts or repair labor on major appliances with original model/serial numbers that have been removed, altered or cannot
be easily determined.
12. Discoloration, rust or oxidation of stainless steel surfaces.
The cost of repair or replacement under these excluded circumstances shall be borne by the customer.
DISCLAIMER OF IMPLIED WARRANTIES
IMPLIED WARRANTIES, INCLUDING ANY IMPLIED WARRANTY OF MERCHANTABILITY OR IMPLIED WARRANTY OF FITNESS FOR A
PARTICULAR PURPOSE, ARE LIMITED TO ONE YEAR OR THE SHORTEST PERIOD ALLOWED BY LAW. Some states and provinces do
not allow limitations on the duration of implied warranties of merchantability or fitness, so this limitation may not apply to you. This warranty
gives you specific legal rights, and you also may have other rights that vary from state to state or province to province.
DISCLAIMER OF REPRESENTATIONS OUTSIDE OF WARRANTY
Jenn-Air makes no representations about the quality, durability, or need for service or repair of this major appliance other than the
representations contained in this Warranty. If you want a longer or more comprehensive warranty than the limited warranty that comes with
this major appliance, you should ask Jenn-Air or your retailer about buying an extended warranty.
LIMITATION OF REMEDIES; EXCLUSION OF INCIDENTAL AND CONSEQUENTIAL DAMAGES
YOUR SOLE AND EXCLUSIVE REMEDY UNDER THIS LIMITED WARRANTY SHALL BE PRODUCT REPAIR AS PROVIDED HEREIN.
JENN-AIR SHALL NOT BE LIABLE FOR INCIDENTAL OR CONSEQUENTIAL DAMAGES. Some states and provinces do not allow the
exclusion or limitation of incidental or consequential damages, so these limitations and exclusions may not apply to you. This warranty
gives you specific legal rights, and you also may have other rights that vary from state to state or province to province.
If outside the 50 United States and Canada, contact your authorized Jenn-Air dealer to determine if another warranty applies.
If you think you need repair service, first see the “Troubleshooting” section of the Use & Care Guide. If you are unable to resolve the problem
after checking “Troubleshooting,” additional help can be found by checking the “Assistance or Service” section or by calling us at
1-800-JENNAIR (1-800-536-6247).4/13
■Refrigerator/freezer cavity liner if the part cracks due to defective materials or workmanship.
■Sealed Refrigeration system (includes compressor, evaporator, condenser, dryer and connecting tubing).

15
Keep this book and your sales slip together for future
reference. You must provide proof of purchase or installation
date for in-warranty service.
Write down the following information about your major appliance
to better help you obtain assistance or service if you ever need it.
You will need to know your complete model number and serial
number. You can find this information on the model and serial
number label located on the product.
Dealer name____________________________________________________
Address ________________________________________________________
Phone number__________________________________________________
Model number __________________________________________________
Serial number __________________________________________________
Purchase date __________________________________________________

16
SEGURIDAD DEL REFRIGERADOR PARA BEBIDAS
Si no sigue las instrucciones de inmediato, usted puede
morir o sufrir una lesión grave.
Si no sigue las instrucciones, usted puede morir o sufrir
una lesión grave.
Todos los mensajes de seguridad le dirán el peligro potencial, le dirán cómo reducir las posibilidades de sufrir una lesión y lo que
puede suceder si no se siguen las instrucciones.
Su seguridad y la seguridad de los demás es muy importante.
Hemos incluido muchos mensajes importantes de seguridad en este manual y en su electrodoméstico. Lea y obedezca siempre
todos los mensajes de seguridad.
ADVERTENCIA
PELIGRO
Este es el símbolo de advertencia de seguridad.
Este símbolo le llama la atención sobre peligros potenciales que pueden ocasionar la muerte o una lesión a
usted y a los demás.
Todos los mensajes de seguridad irán a continuación del símbolo de advertencia de seguridad y de la palabra
“PELIGRO” o “ADVERTENCIA”. Estas palabras significan:
INSTRUCCIONES IMPORTANTES DE SEGURIDAD
ADVERTENCIA: Para reducir el riesgo de incendio, choque eléctrico, o lesiones personales al usar su refrigerador para
GUARDE ESTAS INSTRUCCIONES
■Conecte a un contacto de pared de conexión a tierra de
3 terminales.
■No quite la terminal de conexión a tierra.
■No use un adaptador.
■No use un cable eléctrico de extensión.
■Desconecte el suministro de energía antes de darle servicio.
■Vuelva a colocar todos los componentes y paneles antes de
hacerlo funcionar.
■Remueva la puerta o el(los) cajón(cajones) de su aparato
refrigerado viejo.
■Use un limpiador no inflamable.
■Mantenga los materiales y vapores inflamables, tales como
gasolina, alejados del refrigerador para bebidas.
■Use dos o más personas para mover e instalar el
refrigerador para bebidas.
bebidas, siga estas precauciones básicas:
Advertencias de la Proposición 65 del estado de California:
ADVERTENCIA: Este producto contiene una o más sustancias químicas identificadas por el estado de California como
causantes de cáncer.
ADVERTENCIA: Este producto contiene una o más sustancias químicas identificadas por el estado de California como
causantes de defectos congénitos o algún otro tipo de daños en la función reproductora.

17
Cómo deshacerse
adecuadamente de su aparato
refrigerado viejo
IMPORTANTE: El atrapamiento y asfixia de niños no es un
problema del pasado. Los refrigeradores para bebidas tirados y
abandonados son un peligro, aún si van a quedar ahí “por unos
pocos días”. Si Ud. está por deshacerse de su refrigerador para
bebidas viejo, por favor siga las instrucciones que se dan a
continuación para prevenir accidentes.
Antes de descartar su viejo aparato refrigerado:
■Saque la puerta.
■Deje las rejillas y los estantes en su lugar así los niños no
pueden meterse adentro con facilidad.
REQUISITOS DE INSTALACIÓN
Piezas y herramientas
Reúna las herramientas y piezas necesarias antes de comenzar la
instalación.
HERRAMIENTAS NECESARIAS:
PIEZAS NECESARIAS:
Marco recubierto a la medida - Vea “Marco recubierto - Vista
posterior”.
Piezas de ferretería (opcionales)
PIEZAS SUMINISTRADAS:
Requisitos de ubicación
NOTAS:
■Para que el refrigerador para bebidas esté al ras con el frente
de los armarios de base, quite los zócalos o molduras de la
parte posterior de la abertura. Consulte “Medidas del
producto” y “Medidas de la abertura”, más adelante en esta
sección.
■No se recomienda instalar el refrigerador para bebidas cerca
de un horno, radiador u otra fuente de calor.
ADVERTENCIA
Peligro de Asfixia
Remueva la puerta o el(los) cajón(cajones) de su
aparato refrigerado viejo.
No seguir esta instrucción puede ocasionar la muerte
o daño al cerebro.
Información importante para saber acerca del desecho
de refrigerantes:
Deshágase del refrigerador siguiendo los reglamentos
federales y locales. Los refrigerantes deberán ser evacuados
por un técnico certificado en refrigeración por EPA (Agencia
de protección del medioambiente) según los procedimientos
establecidos.
■Destornillador Phillips
■Tornillos M4 x 14 (12)
ADVERTENCIA
Peligro de Explosión
Mantenga los materiales y vapores inflamables,
tales como gasolina, alejados del refrigerador para
bebidas.
No seguir esta instrucción puede ocasionar la muerte,
explosión, o incendio.

18
■No lo instale en un lugar donde la temperatura puede ser
menor de 55 °F (13 °C). Para obtener un funcionamiento
óptimo, no instale el refrigerador para bebidas detrás de una
puerta de un armario ni bloquee la rejilla de la base.
Medidas de la abertura
■Las medidas de altura indicadas consideran las patas
niveladoras extendidas a una altura mínima.
NOTA: Si las patas niveladoras están totalmente extendidas,
agregue ⁵⁄₈" (15,9 mm) a las medidas de altura. Vea “Medidas
del producto.”
■Si el piso de la abertura no está nivelado con el piso de la
cocina, ponga calzas en la abertura para que quede nivelado
con el piso de la cocina.
Requisitos eléctricos
Antes de mover el refrigerador para bebidas a su ubicación final,
es importante asegurarse de que tiene la conexión eléctrica
adecuada.
Método de conexión a tierra recomendado
Se requiere una fuente de energía eléctrica de 115 Voltios, 60 Hz.,
CA solamente y con fusibles de 15 ó 20 amperios, debidamente
conectada a tierra. Se recomienda que use un circuito separado
sólo para su refrigerador para bebidas. Use un tomacorriente que
no se pueda apagar con un interruptor. No use un cable eléctrico
de extensión.
NOTA: Antes de realizar cualquier tipo de instalación, limpieza o
de quitar un foco de luz, desenchufe el refrigerador para bebidas
o desconecte el suministro de energía.
Medidas del producto
■Las medidas de altura se muestran con las patas niveladoras
SIN extender.
■El cable de suministro de energía es de 60" (152,4 cm) de
largo.
Vista delantera
Dimensiones fundamentales:
A. Abertura de uso general de 14¾" (37,5 cm)
B. Ancho mínimo de la abertura de 24" (60,96 cm)
¹⁄₂"
(1,3 cm)
14³⁄₄"
(37,5 cm)
24"
(60,96 cm)
min.
24" (60,96 cm) min.
34³⁄₈" (87,3 cm) min.
35" (88,9 cm) max.
A
B
ADVERTENCIA
Peligro de Choque Eléctrico
Conecte a un contacto de pared de conexión a tierra de
3 terminales.
No quite la terminal de conexión a tierra.
No use un adaptador.
No use un cable eléctrico de extensión.
No seguir estas instrucciones puede ocasionar
la muerte, incendio o choque eléctrico.
30¹⁄₈"
(76,6 cm) 34¹⁄₈"
(86,8 cm)
34³⁄₈"
(87,4 cm)

19
Vista lateral (puerta abierta a 90°)
Vista superior
Marco recubierto a la medida
Si va a instalar un marco recubierto a la medida, deberá hacerlo
usted mismo o consultar con un carpintero o fabricante de
gabinetes calificado. Para obtener información acerca de las
especificaciones del marco, vea los gráficos dimensionales.
IMPORTANTE:
■El grosor del marco recubierto debe ser de ³⁄₄" (1,91 cm).
■El marco recubierto no debe pesar más de 10 lbs
(4,54 kg).
■Los marcos recubiertos que pesan más de lo
recomendado pueden dañar su electrodoméstico.
Marco recubierto - Vista posterior
Cree su marco recubierto a la medida utilizando las medidas que
se muestran.
IMPORTANTE: El siguiente gráfico muestra un marco a la medida
para una puerta con las bisagras instaladas del lado derecho. Si
su refrigerador tiene las bisagras instaladas del lado izquierdo,
rote el marco a la medida 180º para que las marcas de las
bisagras queden a la izquierda.
*Las dimensiones abarcan el panel de la puerta a la medida
grueso de
³⁄₄
" (1,9 cm).
26¹⁄₈"
(66,4 cm)
47³⁄₄"
(121,4 cm)
23⁷⁄₈"
(60,6 cm)
21⁵⁄₈"
(55,0 cm)
23⁷⁄₈" *
(60,7 cm)
A. Taladre los orificios con una broca de
¹⁵⁄₃₂
" (12 mm) hasta
una profundidad de aproximadamente
¹⁄₂
" (13 mm) antes
de contornearlos. (4 orificios en total)
B. Taladre los orificios con una broca de
⁵⁄₁₆
" (8 mm) hasta
una profundidad de aproximadamente
¹⁄₂
" (13 mm) antes
de contornearlos. (4 orificios en total)
C. Taladre los orificios con una broca de
⁷⁄₆₄
" (2,8 mm) hasta
una profundidad de aproximadamente
¹⁄₂
" (13 mm) antes
de contornearlos. (12 orificios en total)
D. Contornee las áreas sombreadas para las bisagras hasta
una profundidad de
¹⁹⁄₃₂
" (15 mm).
E. Contornee las áreas sombreadas para las bisagras hasta
una profundidad de
¹⁄₄
" (4 mm).
F. Contornee un ángulo con un radio de
¹⁄₈
" (3 mm) con una
broca de
¹⁄₄
". (5 radios en total)
23
³⁄₄
"
(60,3 cm)
18"
(45,6 cm)
23
¹⁄₂
"
(59,6 cm)
30
³⁄₁₆
"
(76,6 cm)
3
³⁄₈
"
(8,5 cm)
2
⁷⁄₈
"
(7,4 cm)
3
³⁄₈
"
(8,5 cm) 3
³⁄₈
"
(8,5 cm) 3
³⁄₈
"
(8,5 cm) 3
³⁄₈
"
(8,5 cm) 3
³⁄₈
"
(8,5 cm) 2
¹⁄₈
"
(5,2 cm)
3
³⁄₈
"
(8,5 cm)
1
¹⁄₂
"
(3,7 cm)
¹⁄₂
"
(1,1 cm)
1
⁷⁄₁₆
"
(3,55 cm) 1
¹⁄₂
"
(3,8 cm)
³⁄₈
"
(8,2 mm)
⁵⁄₃₂
"
(4,0 mm)
2
¹⁄₄
"
(5,7 cm)
1
³⁄₈
"
(3,42 cm)
2
⁵⁄₁₆
"
(5,9 cm)
1
¹⁄₂
"
(3,8 cm)
¹⁄₂
"
(1,0 cm)
A CB
DEF

20
INSTRUCCIONES DE INSTALACIÓN
Desempaque del refrigerador
para bebidas
Cómo quitar los materiales de empaque
■Quite los residuos de cinta y goma de las superficies antes de
encender el refrigerador para bebidas. Frote un poco de
detergente líquido para vajillas sobre el adhesivo con los
dedos. Limpie con agua tibia y seque.
■No use instrumentos filosos, alcohol para fricciones, líquidos
inflamables o productos de limpieza abrasivos para eliminar
los restos de cinta o goma. Estos productos pueden dañar la
superficie de su refrigerador para bebidas. Para obtener más
información, vea “Seguridad del refrigerador para bebidas”.
■Deshágase de todos los materiales de embalaje o recíclelos.
Limpieza antes del uso
Una vez que usted haya quitado todos los materiales de
empaque, limpie el interior de su refrigerador para bebidas antes
de usarlo. Vea las instrucciones de limpieza en “Cuidado del
refrigerador para bebidas”.
Cómo invertir el cierre
de la puerta
(opcional)
Las bisagras de la puerta vienen instaladas de fábrica a la
derecha. Si desea que la puerta se abra en sentido opuesto, debe
invertirle el sentido de apertura.
IMPORTANTE: Para evitar tensionar las bisagras, se recomienda
que quite la puerta con la ayuda de dos personas.
Herramientas necesarias: Destornillador Phillips y llave
hexagonal en L de ¹⁄₈".
Cómo quitar la puerta
1. Desenchufe o desconecte el suministro de energía y quite
todos los elementos que haya dentro.
2. Abra la puerta por completo a 90°.
3. Mientras una persona sostiene la puerta, quite los tornillos
que sujetan las bisagras de la parte superior e inferior del
armario.
NOTA: después de quitar los tornillos y retirar la puerta del
armario, se desprenderá un espaciador de plástico ubicado
detrás de la bisagra inferior. Ponga el espaciador a un lado. Lo
necesitará cuando vuelva a instalar la puerta.
ADVERTENCIA
Peligro de Peso Excesivo
Use dos o más personas para mover e instalar
el refrigerador para bebidas.
No seguir esta instrucción puede ocasionar una
lesión en la espalda u otro tipo de lesiones.
Cuando mueva su refrigerador para bebidas:
Su refrigerador para bebidas es muy pesado. Cuando
mueva el electrodoméstico para limpiarlo y darle servicio,
cerciórese de cubrir el piso con cartón o madera para evitar
daños en el mismo. Al mover el electrodoméstico, siempre
tire directamente hacia afuera. No menee el
electrodoméstico de lado a lado ni lo haga “caminar”
cuando lo trate de mover ya que podría dañar el piso.
Información importante para saber acerca de los estantes
y tapas de vidrio:
No limpie los estantes y tapas de vidrio con agua caliente
mientras están fríos. Los estantes y tapas pueden romperse
si se exponen a cambios bruscos de temperatura o impacto,
como sería un golpe brusco. El vidrio templado se ha
diseñado para hacerse añicos. Esto es normal. Los estantes
y tapas de vidrio son muy pesados. Use ambas manos al
sacarlos para evitar que se caigan.
90˚
A
Table of contents
Languages:
Other Jenn-Air Kitchen Appliance manuals

Jenn-Air
Jenn-Air BEVERAGE CENTER User manual

Jenn-Air
Jenn-Air JUB248LBCX00 User manual

Jenn-Air
Jenn-Air JUBFL242HX User manual

Jenn-Air
Jenn-Air JUB24FRACX User manual

Jenn-Air
Jenn-Air Expressions JEA7000ADB User manual

Jenn-Air
Jenn-Air BEVERAGE CENTER User manual

Jenn-Air
Jenn-Air JUBFR242HM User manual

Jenn-Air
Jenn-Air W10549547A User manual

Jenn-Air
Jenn-Air JBC7624BS Technical manual

Jenn-Air
Jenn-Air JUBFL242HL01 User manual