Jensen CD-565 User manual

Portable Stereo Bluetooth
Music System with CD
USER MANUAL
CD-565
PLEASE READ THIS USER MANUAL COMPLETELY BEFORE OPERATING
THIS UNIT AND RETAIN THIS BOOKLET FOR FUTURE REFERENCE.

E1
WARNING
TO PREVENT FIRE OF SHOCK HAZARD, DO NOT USE THIS PLUG WITH AN
EXTENSION CORD, RECEPTACLE OR OTHER OUTLET UNLESS THE BLADES CAN BE
FULLY INSERTED TO PREVENT BLADE EXPOSURE. TO PREVENT FIRE OR SHOCK
HAZARD, DO NOT EXPOSE THIS APPLIANCE TO RAIN OR MOISTURE.
The Caution Marking is located at the bottom enclosure of the apparatus.
The Rating plate is located at the bottom enclosure of the apparatus
IMPORTANT SAFETY INSTRUCTIONS
1. Read these instructions.
2. Keep these instructions.
3. Heed all warnings.
4. Follow all instructions.
5. Do not use this apparatus near water.
6. Clean only with dry cloth.
7. Do not block any ventilation openings. Install in accordance with the manufacturer’s
instructions.
8. Do not install near any heat sources such as radiators, heat registers, stoves, or other
apparatus (including amplifiers) that product heat.
9. Do not defeat the safety purpose of the polarized or grounding-type plug. A polarized plug
has two blades with one wider than the other. A grounding type plug has two blades and a
third grounding prong. The wide blade or the third prong is provided for your safety. If the
provided plug does not fit into your outlet, consult an electrician for replacement of the
obsolete outlet.
10. Protect the power cord from being walked on or pinched particularly at plugs, convenience
receptacles, and the point where they exit from the apparatus.
11. Only use attachments/accessories specified by the manufacturer.
12. Use only with a cart, stand, tripod, bracket, or table recommended by the
manufacturer, or sold with the product. When a cart is used, use caution
when moving the cart/apparatus combination to avoid injury from tip-over.
13. Unplug this apparatus during lightning storms or when unused for a long
period of time.
14. Refer all servicing to qualified service personnel. Servicing is required when the apparatus
has been damaged in any way, such as power-supply cord or plug is damaged, liquid has
been spilled or objects have fallen into the apparatus, the apparatus has been exposed to
rain or moisture, does not operate normally, or has been dropped.

E2
15. This appliance shall not be exposed to dripping or splashing water and that no object filled
with liquids such as vases shall be placed on the apparatus.
16. Do not overload wall outlet. Use only power source as indicated.
17. Use replacement part as specified by the manufacturer.
18. Upon completion of any service or repairs to this product, ask the service technician to
perform safety checks.
19. Power Sources - This product should be operated only from the type of power source
indicated on the marking label. If you are not sure of the type of power supply to your
home, consult your product dealer or local power company. For products intended to
operate from battery power, or other sources, refer to the operating instruction.
20. Object and Liquid Entry - Never push objects of any kind into this product through
openings as they may touch dangerous voltage points or short-out parts that could result
in a fire or electric shock. Never spill liquid of any kind on the product.
21. Damage Requiring Service - Unplug this product from the wall outlet and refer servicing to
qualified service personnel under the following conditions:
a) When the power-supply cord or plug is damaged,
b) If liquid has been spilled, or objects have fallen into the product,
c) If the product has been exposed to rain or water,
d) If the product does not operate normally by following the operating instructions. Adjust
only those controls that are covered by the operating instructions as an improper
adjustment of other controls may result in damage and will often require extensive
work by a qualified technician to restore the product to its normal operation.
e) If the product has been dropped or damaged in any way, and
f) When the product exhibits a distinct change in performance - this indicates a need for
service.
22. Mains plug is used as disconnect device and it should remain readily operable during
intended use. In order to disconnect the apparatus from the mains completely, the mains
plug should be disconnected from the mains socket outlet completely.
23. Battery shall not be exposed to excessive heat such as sunshine, fire or the like.
24. Excessive sound pressure from earphones and headphone can cause hearing loss.
25. Minimum distances of 4 inches around the apparatus for sufficient ventilation.
26. The ventilation should not be impeded by covering the ventilation openings with items,
such as newspapers, table-cloths, curtains, etc.
27. No naked flame sources, such as lighted candles, should be placed on the apparatus.
28. The use of apparatus in moderate climates.
29. Attention should be drawn to the environmental aspects of battery disposal.
This symbol indicates that this product incorporates double insulation
between hazardous mains voltage and user accessible parts.
SAVE THESE INSTRUCTIONS

E3
COMPLIANCE WITH FCC REGULATIONS
FCC ID: 2ASQA6961448
This device complies with Part 15 of the FCC Rules. Operation is subject to the following two
conditions:
(1) This device may not cause harmful interference, and
(2) This device must accept any interference received, including interference that may
cause undesired operation.
This equipment has been tested and found to comply with the limits for a Class B Digital
Device, pursuant to Part 15 of the FCC Rules. These limits are designed to provide
reasonable protection against harmful interference in a residential installation. This equipment
generates, uses and can radiate radio frequency energy and, if not installed and used in
accordance with the instructions, may cause harmful interference to radio communications.
However, there is no guarantee that interference will not occur in a particular installation. If
this equipment does cause harmful interference to radio or television reception, which can be
determined by turning the equipment off and on, the user is encouraged to try to correct the
interference by one or more of the following measures:
- Reorient or relocate the receiving antenna.
- Increase the separation between the equipment and receiver.
- Connect the equipment into an outlet on a circuit different from that to which the receiver
is connected.
- Consult the dealer or an experienced radio/TV technician for help.
WARNING
Changes or modifications to this unit not expressly approved by the party responsible
for compliance could void the user's authority to operate the equipment.
CAUTION
Follow the advice below for safe operations.
ON PROTECTION AGAINST LASER ENERGY EXPOSURE
As the laser beam used in this compact disc player is harmful to the eyes, do not attempt to
disassemble the casing.
Stop operation immediately if any liquid or solid object should fall into the cabinet.
Do not touch the lens or poke at it. If you do, you may damage the lens and the player may
not operate properly.

E4
Do not put anything in the safety slot. If you do, the laser diode will be ON when the CD
door is still open.
If the unit is not to be used for a long period of time, make sure that all power sources are
disconnected from the unit. Remove all batteries from the battery compartment.
This unit employs a laser. The use of controls or adjustment or performance of procedures
other than those specified here may result in exposure to hazardous radiation.
ON CONDENSATION
When left in a heated room where it is warm and damp, water droplets or condensation may
form inside the unit.
When there is condensation inside the unit, the unit may not function normally. Let it stand
for 1 to 2 hours before turning the power on, or gradually heat the room up and dry the unit before
use.
Should any trouble occur, disconnect the AC Adapter and refer servicing to qualified
personnel.
PROTECT YOUR FURNITURE
This system is equipped with non-skid rubber ‘feet’ to prevent the product from moving
when
you
operate the controls. These ‘feet’ are made from non-migrating rubber material
specially
formulated
to avoid leaving any marks or stains on your furniture. However certain
types of oil based
furniture
polishes, wood preservatives, or cleaning sprays may cause the
rubber ‘feet’ to soften, and
leave
marks or a rubber residue on the
furniture.
To prevent any damage to your furniture we strongly recommend that you purchase small
self-
adhesive felt pads, available at hardware stores and home improvement centers
everywhere
and
apply these pads to the bottom of the rubber ‘feet’ before you place the
product on fine
wooden furniture.

E5
DEAR JENSEN® CUSTOMER
Selecting fine audio equipment such as the unit you've just purchased is only the start of your
musical enjoyment. Now it's time to consider how you can maximize the fun and excitement your
equipment offers. This manufacturer and the Electronic Industries Association's Consumer
Electronics Group want you to get the most out of your equipment by playing it at a safe level. One
that lets the sound come through loud and clear without annoying blaring or distortion and, most
importantly, without affecting your sensitive hearing. Sound can be deceiving. Over time your
hearing "comfort level" adapts to higher volumes of sound. So what sounds "normal" can actually
be loud and harmful to your hearing. Guard against this by setting your equipment at a safe level
BEFORE your hearing adapts.
To establish a safe level:
Start your volume control at a low setting.
Slowly increase the sound until you can hear it comfortably and clearly, and without
distortion.
Once you have established a comfortable sound level:
%Set the dial and leave it there.
Taking a minute to do this now will help to prevent hearing damage or loss in the future. After
all, we want you listening for a lifetime.
We Want You Listening For a Lifetime
Used wisely, your new sound equipment will provide a lifetime of
fun and enjoyment. Since hearing damage from loud noise is
often undetectable until it is too late, this manufacturer and the
Electronic Industries Association's Consumer Electronics Group
recommend you avoid prolonged exposure to excessive noise.
Customer's Record:
The serial number of this product is found on its bottom cover. You should note the serial
number of this unit in the space provided as a permanent record of your purchase to aid in
identification in the event of theft of loss.
Model Number: CD-565 Serial Number:

E6
LOCATION OF CONTROLS
/PAIR
PROG/
M+/M
MEM
REPEAT
RANDOM
SOURCE
VOLUME
TUN+
MAXMIN
MEM
PROG
AUX
1ALL
RAND MHz
CD
FM
FM ST.
15
16
1
2679
12
14
18
17
3458
Top View
Rear View
Front View
10
DC 5V1.2A
AUX IN
OPEN OPEN
11
13
19

E7
1 VOLUME CONTROL 11 SOURCE BUTTON
2 POWER BUTTON 12 TUNING CONTROL KNOB
3 MEMORY- BUTTON 13 TELESCOPIC ANTENNA
4 MEMORY+ / RANDOM PLAY BUTTON 14 CD DOOR OPEN
5 REPEAT BUTTON 15 AUX IN JACK
6 FM STEREO INDICATOR 16 HEADPHONE JACK
7 LCD DISPLAY 17 BATTERY DOOR
8 PROGRAM/MEMORY BUTTON 18 DC IN JACK
9 STOP BUTTON 19 BUILT-IN HANDLE
10 PLAY/PAUSE / PAIR BUTTON
POWER SOURCE
This unit operates using the included AC Adaptor or using 6 x 1.5VDC “C” (UM-2) batteries (not
included). Do not attempt to operate the unit on any other power source. You could cause damage to
the unit and void your warranty. Please be sure the power outlet you plug this unit into is working and
receives constant (unswitched) power.
AC OPERATION
An AC Adaptor with 5V DC, 1000 mA output voltage is included and is required for operating
this in AC power mode”
1. Securely insert the DC plug of the adaptor cord into the DC Jack located on the back of
the unit.
2. Plug the AC Adaptor into a 120V AC wall outlet.
3. Connecting this unit to any other power source may cause damage to the unit.
4. Press the POWER button located on the top of the unit to turn the unit ON.
5. The LCD display will light.
Note: Unplug the AC adaptor from the unit and the wall outlet if you’re not going to be using it
for an extended period of time.
BATTERY OPERATION
Unplug the AC adapter from the wall and from the unit prior to installing the batteries (not
included).
1. Remove the battery door located on the back of the unit.
2. Following the polarity diagram located inside the battery compartment, install the 6 x 1.5VDC “C”
(UM-2) batteries (not included).
Note: For best performance, alkaline-type batteries are recommended.
DC 5V1.2A
AUX IN
OPEN OPEN
REAR VIEW

E8
3. Reattach the battery door and make sure it’s securely locked in place.
IMPORTANT: Be sure that the batteries are installed correctly. Wrong polarity may damage the unit
and void the warranty.
BATTERY NOTE AND CARE
1. Danger of explosion if the battery is replaced incorrectly. Replace only with the same or equivalent
type
2. Do not mix old and new batteries.
3. Do not mix alkaline, standard (carbon-zinc) or rechargeable (nickel-cadmium) batteries.
4. If the unit is not to be used for an extended period of time, remove the batteries. Old or leaking
batteries can cause damage to the unit and may void the warranty.
5. Do not try to recharge batteries not intended to be recharged; they can overheat and rupture.
(Follow battery manufacturer’s directions).
6. Do not dispose of batteries in fire, batteries may leak or explode.
BATTERY REPLACEMENT
When the output sound of this unit becomes distorted or the CD player operation appears unstable,
the batteries are weak. You need to replace all the exhausted batteries at the same time as soon as
possible to avoid battery leakage.
RADIO OPERATION
1. Press the POWER button to turn the unit ON. The LCD display will light.
2. The unit defaults to FM radio mode when you power the unit up for the first time. If not,
press the SOURCE button repeatedly to select FM mode.
3. The “FM” indicator and frequency will show on the LCD display.
4. To tune the radio manually, slightly rotate the TUNING CONTROL KNOB counterclockwise
(TUN- ) or clockwise (TUN+ ) until you hear a “click” sound.
5. Rotate the TUNING CONTROL KNOB counterclockwise (TUN- ) to go DOWN in
frequency, and clockwise (TUN+ ) to go UP in frequency.
6. Rotate and hold the TUNING CONTROL KNOB counterclockwise to search DOWN to the
next lower station available, or clockwise to search UP to the next available station.
7. Adjust the VOLUME CONTROL to obtain the desired sound level.
DC 5V1.2A
AUX IN
OPEN
OPEN
Install batteries
REAR VIEW
SWITCHING FROM BATTERY OPERATION TO AC OPERATION
Insert the DC plug of the AC adaptor cord into the DC Jack located on the back of the unit. The
batteries will automatically be disconnected once the plug is inserted. Plug the AC Adaptor into a
120V AC wall outlet.
NOTE: To avoid losing any preset radio stations saved in memory, it’s important that you plug the AC
Adaptor into a 120V AC wall outlet within 30 seconds from the time the DC plug is inserted into the
CD-565.

TIPS FOR BEST RADIO RECEPTION
%If a stereo broadcast program is being received, the FM STEREO INDCATOR will automatically
light.
%Always keep the FM TELESCOPIC ANTENNA fully extended for best performance.
E9
%If the FM reception is weak, try rotating the antenna or reposition the unit closer to a window until
the reception improves.
SETTING THE RADIO STATION PRESETS
The unit allows you to store up to 20 FM stations for easy recall at any time.
1. Press the SOURCE button repeatedly to select FM radio mode. The “FM” indicator and
frequency will show on the LCD display.
2. Tune to the radio station you want to store in memory.
3. Tap the PROG/MEM button. The preset channel number “P01” will begin flashing for 10
seconds on the LCD DISPLAY.
4. Tap the M– button or M+ / RANDOM button to select the preset location (P01 – P20).
5. Tap the PROG/MEM button to confirm.
6. Repeat steps 2 - 5 above to fill the remaining 19 memory locations if needed.
RECALLING THE PRESET RADIO STATIONS
In FM mode, tap the M– button or M+ / RANDOM button to select the preset channel.
CD OPERATION
PLEASE READ THIS IMPORTANT INFORMATION:
CD mechanisms used in devices like this are designed to fully read all commercial CDs. They
will also read self-compiled CD-R/CD-RW discs but it may take up to 10 seconds for playback
to start. If playback does not start, it is likely due to the quality of the CD-R/RW disc and/or
the compatibility of the CD compilation software. Manufacturer is not responsible for the
playback quality of CD-R/RW discs.
Do not attach a label or seal to either side of the CD-R/RW disc. It may cause a malfunction.
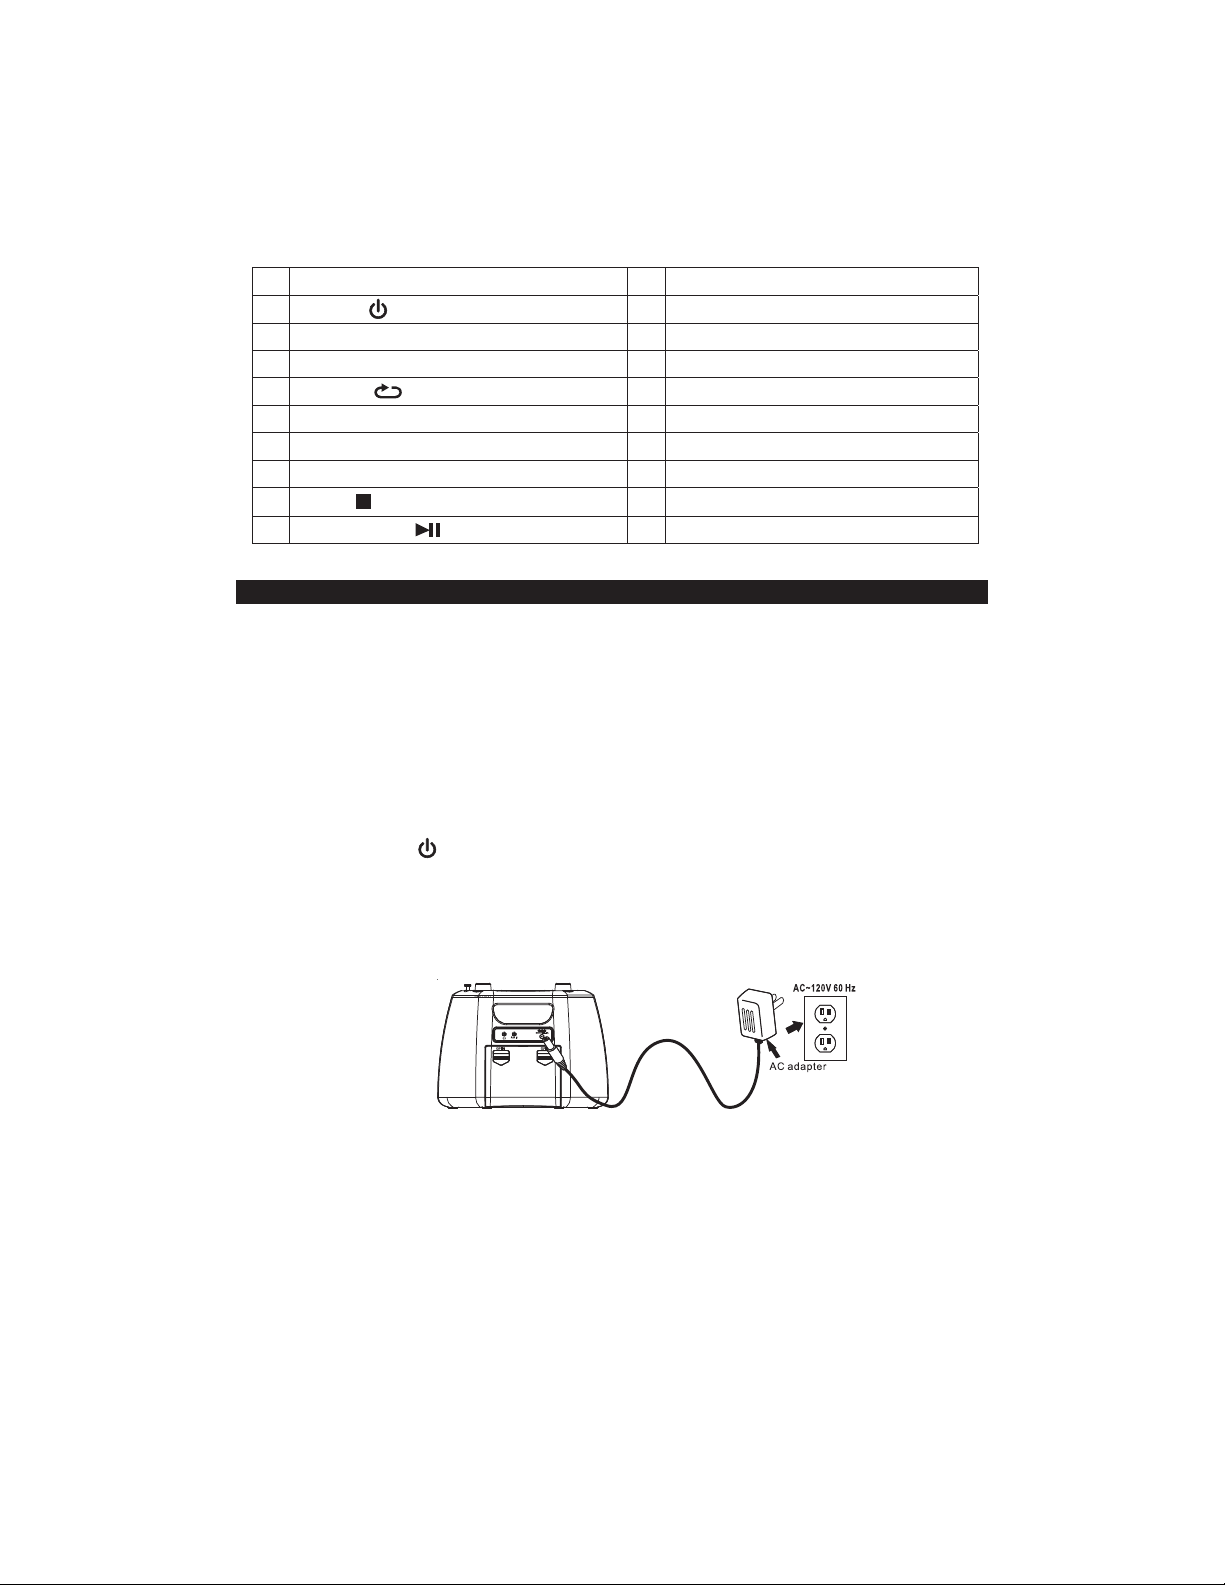
1. Press the POWER button to turn on the unit power.
2. Press the SOURCE button repeatedly to select CD mode. The “CD” indicator will light and
the display will show “- - -“ briefly on the display.
3. If no CD is loaded in the CD compartment, the LCD display will change to show “no”.
4. Open the CD door and carefully place an audio CD onto the spindle in the CD
compartment and close the CD door. Make sure the CD label is facing outwards.
5. The player will start reading the TOC (table of contents) of the disc, and the total number
of tracks on the CD will appear on the LCD DISPLAY after a few seconds.
6. Tap the PLAY/PAUSE / PAIR button to start to playing the CD.
7. Adjust the VOLUME CONTROL to obtain the desired sound.
8. To pause, tap the PLAY/PAUSE / PAIR button. To resume playing, tap the
PLAY/PAUSE / PAIR button again.
9. To select a specific track on the CD, slightly rotate the TUNING CONTROL KNOB
counterclockwise (TUN- ) or clockwise (TUN+ ) until you hear a “click” sound.
10.Rotate the TUNING CONTROL KNOB counterclockwise (TUN- ) to go DOWN a track,
or clockwise (TUN+ ) to go UP a track.The LCD Display will indicate the track
selected.
11.To locate a particular section of a song within a track playing, rotate and hold the TUNING
CONTROL KNOB counterclockwise to search BACK within the track playing, or
clockwise to search FORWARD within the track playing.

12.To repeat a particular track, tap the REPEAT button once, the Repeat 1 indicator “ ”
lights on the LCD DISPLAY.
E10
13.To repeat the entire CD, tap the REPEAT button twice, the Repeat all indicator “ ALL”
lights on the LCD DISPLAY.
14.To cancel Repeat Function, tap the REPEAT button until REPEAT indicator goes off from
LCD display.
15. To shuffle play the entire CD, tap the M+/RANDOM button, the random play indicator
“RAND” lights on the LCD DISPLAY. Tap the RAMDOM button again to cancel the shuffle
play if necessary.
16.To stop playing, tap the STOP button.
17.Tap the Button to turn the unit OFF.
PROGRAM OPERATION
This function allows the tracks to be played in a programmed sequence. Programs can be set
in STOP mode.
1. Tap the PROG/MEM button once. The “PROG” Indicator will flash and program Channel
Number "P01" will show briefly and then “00” flashing on the LCD DISPLAY.
2. Slightly rotate the TUNING CONTROL KNOB counterclockwise (TUN- ) or clockwise
(TUN+ ) until you hear a “click” sound.
3. Rotate the TUNING CONTROL KNOB counterclockwise (TUN- ) to go DOWN a
track, or clockwise (TUN+ ) to go UP a track.The LCD Display will indicate the track
selected to be programmed.
4. Tap the PROG/MEM button again to store selection. The program Channel Number will
change to “P02” briefly on the LCD DISPLAY and then “00” flashing to prompt for input
next program track.
5. Repeat steps 2 - 3 to program as many as 20 tracks.
6. Tap the PLAY/PAUSE button to start the programmed play.
7. You may tap the REPEAT button repeatedly to select repeat 1 or all programmed tracks.
8. Tap STOP button once to stop playback.
9. Tap the PLAY/PAUSE button to resume programmed play.
10.To cancel programmed play, press the STOP button twice.
BLUETOOTH OPERATION
PAIRING A SMARTPHONE OR BLUETOOTH ENABLED DEVICE
The Bluetooth feature enables you to stream and play the digital music on your Bluetooth
enabled device to your unit.
1. With the power ON, tap the SOURCE button repeatedly to select Bluetooth mode. The
Bluetooth indicator will light and “bt” will be flashing on the LCD display.
2. The unit will go into auto connection mode and search for a previously paired device that
is still active and in range (30 feet/10 meters). If found, a brief welcome melody will be
heard and “bt” indicator will stop flashing and remain on. If no active Bluetooth device is
found, the unit will switch to interactive pairing mode and the “bt” indicator will continue
flashing.
3. To establish a new link, turn on the Bluetooth function of your Bluetooth enabled device
and enable the search or scan feature to find “CD-565” in the list of discoverable
Bluetooth devices. Select the “CD-565” from your available device list when it appears on
its screen and a brief welcome melody will be heard if pairing and connection is
successful. If you are asked for a password, enter “0000”.

4. After successfully pairing and connecting your device with CD-565, the unit will emit a
brief welcome melody and the Bluetooth indicator will change to solid on. You can now
play music from your Bluetooth enabled device wirelessly to the CD-565.
E11
5. If you want to connect the CD-565 to another new external Bluetooth enabled device
while paired with another device, press and hold the /PAIR button for few seconds to
disconnect the existing connection. The unit will emit two short beeps and Bluetooth
connection indicator “bt” will change to flash. Repeat steps #3 to #4 above to make a new
link.
6. Rotate the VOLUME CONTROL on the top panel to increase the listening volume
gradually until a comfortable listening level is reached.
7. Press the PLAY/PAUSE button to control play/pause.
8. Slightly rotate the TUNING CONTROL KNOB counterclockwise (TUN- ) or clockwise
(TUN+ ) until you hear a “click” sound.
9. Rotate the TUNING CONTROL KNOB counterclockwise (TUN- ) to go BACK a song,
or clockwise (TUN+ ) to go FORWARD to the next song.
Notes:
%If you cannot pair the unit with your Bluetooth enabled device, try solving the problem by
turning the unit power off, then power on, and then starting the pairing process again.
%The Bluetooth function of the unit will remain paired unless the paired device goes out of
range of 30 feet (10 meters). If the broken link is re-established within 10 minutes, the
CD-565 will reconnect to the current paired device automatically. Otherwise you will need
to make a manual connection again later.
%You may need to turn off the Bluetooth function of the paired external device first before
making a new link.
%Refer to manual of your smartphone or external Bluetooth enabled device for correct
Bluetooth operation instructions since it may vary from model to model.
%If your Bluetooth enabled device does not support A2DP, it will not play the music through
the CD-565 system even after it is paired and connected successfully.
%If you are pairing and connecting your personal computer to the CD-565 using Bluetooth,
you may need to set the CD-565 as your computer’s default sound device.
RE-LINKING TO A SMARTPHONE OR BLUETOOTH ENABLED DEVICE
Even if your smartphone or Bluetooth device is already paired with the CD-565 and with both
Bluetooth functions turned on, they can become unlinked at some point due to intentional
manual disconnection or undesirable external signal interferences or over-range for more
than 3 seconds. If this happens, the unit will emit two short beeps. You can re-link them and
resume play by:
1. Select “CD-565” from the device list on your smartphone or Bluetooth device. The CD-
565 should re-link to your Bluetooth enabled device within 5 seconds.
2. Tap the play button of the music player on your Bluetooth enabled device to resume
playback.
AUX IN OPERATION
You can play other music sources (iPod, MP3 or other digital audio players) through the
speakers of the unit by connecting the AUX IN JACK to your external player’s audio out jack or
headphone jack.
1. Plug one end of an audio cable (not included) into the AUX IN JACK and the other end of
the cable to the headphone jack of your digital audio player.

2. Tap the SOURCE button repeatedly to select AUX mode.
E12
3. AUX indicator and “AUH” will show on the LCD DISPLAY.
4. Turn on and start playing the external device you plugged into the AUX IN JACK.
5. Slowly adjust both the volume controls of your unit and the external device until you reach
a comfortable listening level.
Notes:
• If you connect the unit to the Line-Out Jack of your external device, you only need to
adjust the VOLUME CONTROL of your unit. If you connect to the Headphone Jack of
your external device, you may need to adjust both the volume controls of your external
device and the unit to obtain the desirable listening level.
• Remember to turn off the unit when you have finished listening. Don't forget to switch off
the power of your external audio device as well.
USE HEADPHONES (NOT INCLUDED)
Connect the plug of the stereo headphone (not included) into the HEADPHONE JACK .
CAUTION
%Avoid excessive volume levels for long period of time when using the headphones.
Prolonged use at high levels may impair your hearing.
%Do not use earphones while operating a motorized vehicle, as it may create a traffic
hazard and is illegal in many areas
RREESSEETTTTIINNGG TTHHEE UUNNIITT
In case of malfunction due to electrostatic discharge, reset the unit by unplug the DC IN power
jack from the back of the unit and also remove all the batteries from the battery compartment.
Wait for 3 minutes before reconnecting the power and turning the unit back on.
CARE AND MAINTENANCE
1. Do not subject the unit to excessive force, shock, dust or extreme temperature.
2. Do not tamper the internal components of the unit.
3. Clean your unit with a dry cloth. Solvent or detergent should never be used.
4. Avoid leaving your unit in direct sunlight or in hot, humid or dusty places.
5. Keep your unit away from heating appliances and sources of electrical noise such as
fluorescent lamps or motors.
6. If drop-outs or interruptions occur in the music during CD play, or if the
CD fails to play at all, its bottom surface may require cleaning. Before
playing, wipe the disc from the center outwards with a good soft cleaning
cloth.
CLEANING THE UNIT
%To prevent fire or shock hazard, disconnect your unit from the AC power source when
cleaning.
%The finish on the unit may be cleaned with a dust cloth and cared for as other furniture,
Use caution when cleaning and wiping the plastic parts.
%If the cabinet becomes dusty wipe it with a soft dry dust cloth. Do not use any wax or
polish sprays on the cabinet.
%If the front panel becomes dirty or smudged with fingerprints it may be cleaned with a soft
cloth slightly dampened with a mild soap and water solution. Never use abrasive cloths or
polishes as these will damage the finish of your unit.
CAUTION: Never allow any water or other liquids to get inside the unit while cleaning.

E13
TROUBLE SHOOTING GUIDE
If you experience difficulties in the use of this unit, please check the following or call
1-800-777-5331 for Customer Service and support.
Symptom
Noise or sound
distorted on FM
broadcast
FM no sound
Bluetooth No
Sound
CD player will not
play
CD skips while
playing
Intermittent sound
from CD Player
Possible Cause
Station not tuned properly for FM.
Telescopic antenna is not
fully extended.
Unit not in Radio mode.
Volume at minimum
Unit is not linked with your
Bluetooth enabled device
Unit placement out of range.
Your Bluetooth enabled
device Volume set too low.
Unit not in CD function mode.
CD is installed incorrectly.
If the CD is self-compiled, the
media used may not be compatible
with the player.
Disc is dirty or scratched.
Dirty or defective disc.
Dirty pick up lens.
Player is subject to excessive
shock or vibration
Solution
Fine tune the FM broadcast
station.
Fully extend the FM Telescopic
antenna.
Press the SOURCE button
repeatedly until to RADIO mode.
Increase Volume level.
Go through “Bluetooth Operations”
process to link the speakers.
Relocate the unit within Bluetooth
operating range (30 feet) from
the unit.
Increase Volume level of your
Bluetooth enabled device.
Press the SOURCE button
repeatedly until to CD mode.
Insert CD with label side outward.
Use better quality blank media
and retest.
Wipe CD with clean cloth or use
another disc.
Clean or replace the defective
disc.
Use a CD-lens cleaning disc to
clean the lens.
Relocate the player away from
shock or vibration

E14
SPECIFICATION
Power requirement:
AC adaptor for main unit AC input: 120V ~ 60Hz
DC output: 5V 1000 mA
Battery: 6 x "C"(UM-2) batteries (not included)
Frequency Range
Radio Band: FM 87.5 ~ 108 MHz
At Spectra, environmental and social responsibility is a core
value of our business. We are dedicated to continuous
implementation of responsible initiatives with an aim to
conserve and maintain the environment through responsible
recycling.
Please visit us at http://www.spectraintl.com/green.htm for more information on Spectra’s
green initiatives or to find a recycler in your area.
The Bluetooth® word mark and logos are registered trademarks owned by Bluetooth SIG, Inc.
and any use of such marks by Spectra Merchandising Intl, Inc. is under license. Other
trademarks and trade names are those of their respective owners.
90 DAY LIMITED WARRANTY AND SERVICE
VALID IN THE U.S.A. ONLY
SPECTRA MERCHANDISING INTERNATIONAL, INC. warrants this unit to be free from defective
materials or factory workmanship for a period of 90 days from the date of original customer purchase
and provided the product is utilized within the U.S.A. This warranty is not assignable or transferable.
Our obligation under this warranty is the repair or replacement of the defective unit or any part thereof,
except batteries, when it is returned to the SPECTRA Service Department, accompanied by proof of
the date of original consumer purchase, such as a duplicate copy of a sales receipt.
You must pay all shipping charges required to ship the product to SPECTRA for warranty service. If
the product is repaired or replaced under warranty, the return charges will be at SPECTRA’s expense.
There are no other express warranties other than those stated herein.
This warranty is valid only in accordance with the conditions set forth below:
1. The warranty applies to the SPECTRA product only while:
a. It remains in the possession of the original purchaser and proof of purchase is demonstrated.
b. It has not been subjected to accident, misuse, abuse, improper service, usage outside the
descriptions and warnings covered within the user manual or non-SPECTRA approved
modifications.
c. Claims are made within the warranty period.
2. This warranty does not cover damage or equipment failure caused by electrical wiring not in
compliance with electrical codes or SPECTRA user manual specifications, or failure to provide
reasonable care and necessary maintenance as outlined in the user manual.
3. Warranty of all SPECTRA products applies to residential use only and is void when products are
used in a nonresidential environment or installed outside the united States.
This warranty gives you specific legal rights, and you may also have other rights which vary from state
to state. TO OBTAIN SERVICE please remove all batteries (if any) and pack the unit carefully and
send it freight prepaid to SPECTRA at the address shown below. IF THE UNIT IS RETURNED
WITHIN THE WARRANTY PERIOD shown above, please include a proof of purchase (dated cash

E15
register receipt) so that we may establish your eligibility for warranty service and repair of the unit
without cost. Also include a note with a description explaining how the unit is defective. A customer
service representative may need to contact you regarding the status of your repair, so please include
your name, address, phone number and email address to expedite the process.
IF THE UNIT IS OUTSIDE THE WARRANTY PERIOD, please include a check for $25.00 to cover the
cost of repair, handling and return postage. All out of warranty returns must be sent prepaid.
It is recommended that you contact SPECTRA first at 1-800-777-5331 or by email at
model you have may be discontinued, and SPECTRA reserves the right to offer alternative options for
repair or replacement.
SPECTRA MERCHANDISING INTERNATIONAL, INC.
4230 North Normandy Avenue,
Chicago, IL60634, USA.
1-800-777-5331
To register your product, visit the link on the website below to enter your information.
http://www.spectraintl.com/wform.htm
0519 Printed in China
Table of contents
Other Jensen Stereo System manuals

Jensen
Jensen JWM6A User manual

Jensen
Jensen JDH910BT User manual

Jensen
Jensen JWM990 User manual

Jensen
Jensen MS3A User manual

Jensen
Jensen MS3ABK User manual

Jensen
Jensen SMPS-628 User manual

Jensen
Jensen JWM40 Installation instructions

Jensen
Jensen AWM914 User manual

Jensen
Jensen JWM9A User manual

Jensen
Jensen JCR-390 User manual

Jensen
Jensen JWM10A User manual

Jensen
Jensen JiLS-525i User manual

Jensen
Jensen AWM965 User manual

Jensen
Jensen JWM6ABK User manual

Jensen
Jensen JMC-1000 User manual

Jensen
Jensen JWM60A Installation instructions

Jensen
Jensen JBS-230 User manual

Jensen
Jensen JBS-300 User manual

Jensen
Jensen JWM9ABK User manual

Jensen
Jensen Heavy Duty JHD40BT User manual