JENTNER DIGITAL II User manual


Side 2 –Operating Instructions DIGITAL II Version 2.0
Small-Size Electroplating Unit DIGITAL II Version 2.0
The universally compact electroplating units are applicable for all current plating solutions, such as
Electrolytic Degreasing, Gold-, Silver-, Rhodium-, Palladium and Ruthenium plating baths; as well as
for baths without precious metals like Copper and Nickel.
Dimensions and weight
Digital II: Width 700 mm, depth 320 mm, height 250 mm, weight 18 kg
The DIGITAL II Version 2.0 includes:
• 8 tanks, PP (4 working- and 4 rinsing tanks)
• Dimension: 150 x 100 x 150 mm, Volume 1,5 litre
• 1 safety protection cable
• 1 thermo couple with titanium holder
Available accessories/spare parts (not included)
• Thermo couple / level regulator for a second heater
• Working/rinsing tank, PP
• Tank lid, PP
• Jig for rings
• Jig for chains
• Immersion titanium heater, 200 Watt
• Titanium holder for heater
• Titanium holder for thermo couple
• Anodes of stainless steel, platinized titanium, mixed oxide (MOX), silver, copper and nickel
• Filter pump MINI
• plating pen for multicolour processing
• Copper wire
Side 3 –Operating Instructions DIGITAL II Version 2.0
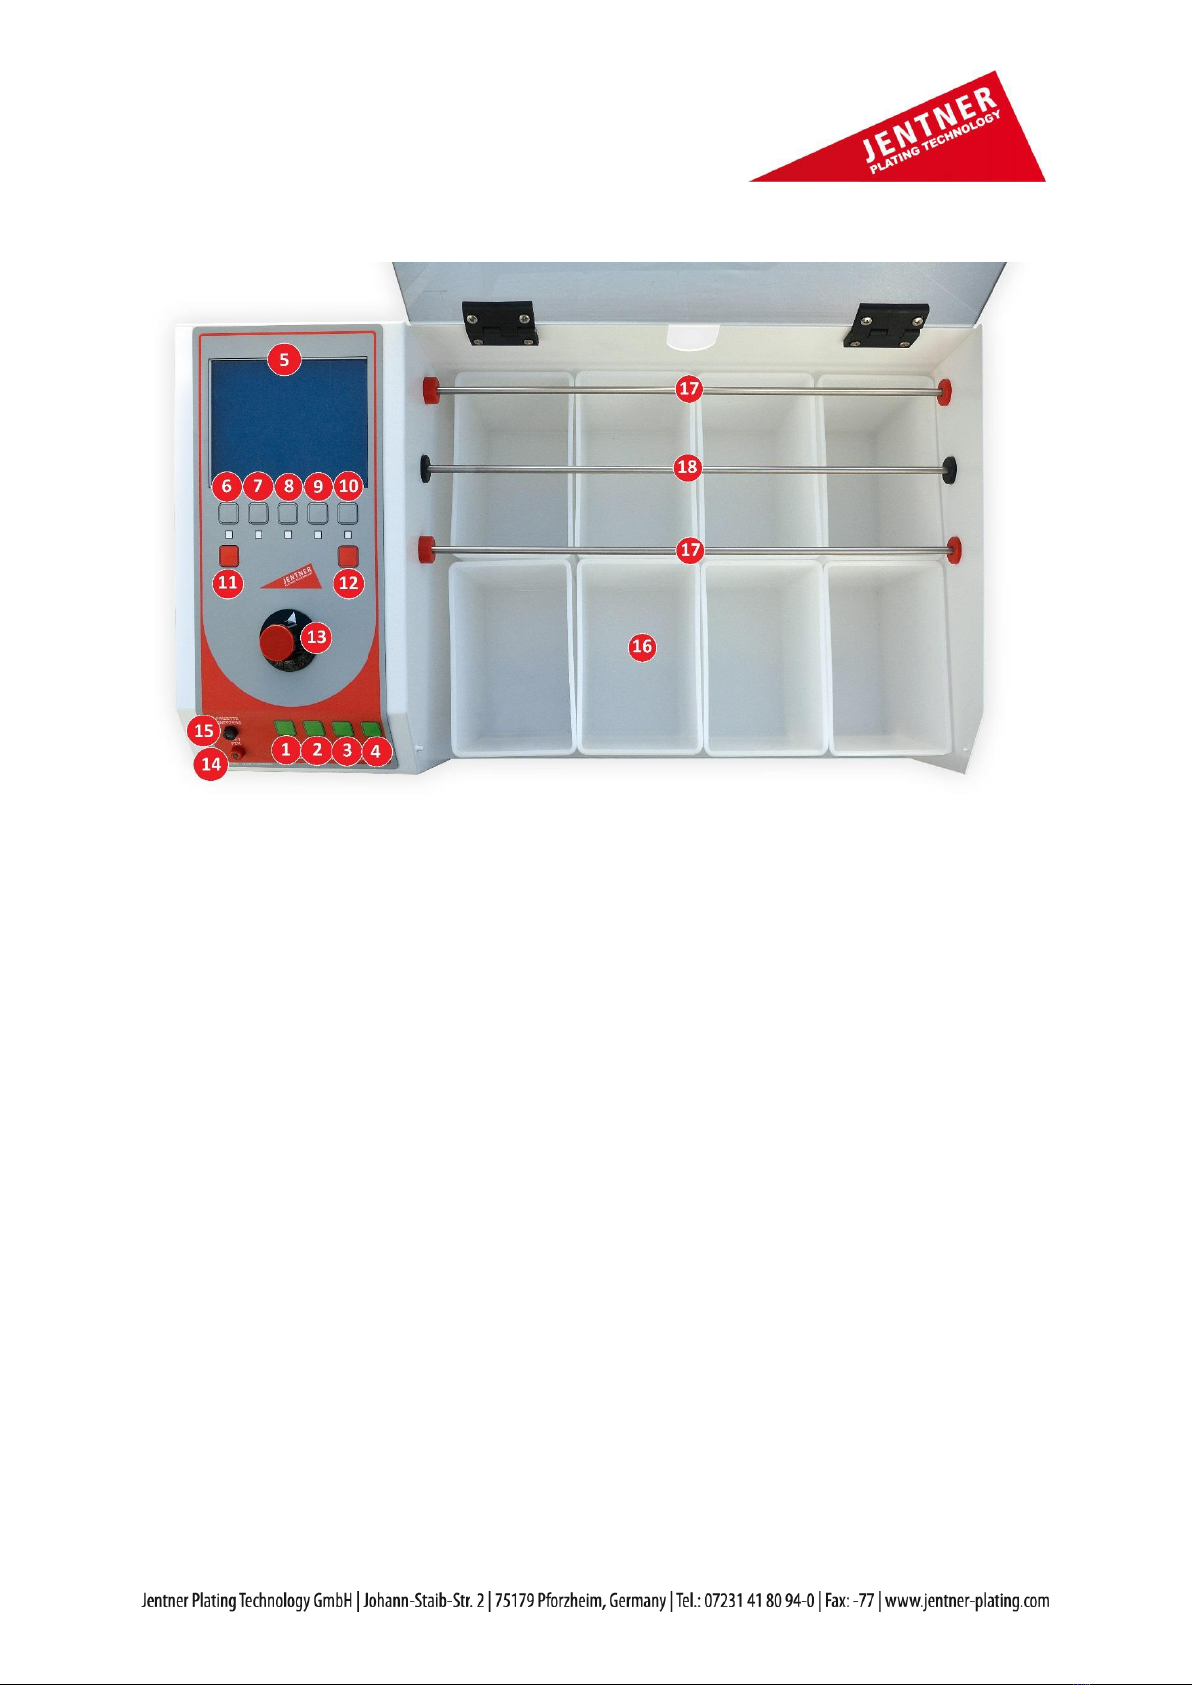
Operating elements
❶Button „Start/Standby “
❷Button “Motor/Movement “
❸Button „Heizung/Heater 1“
❹Button „Heizung/Heater 2“
❺Control panel / display
❻Button “Temp” – setting temperature
❼Button “Volt” – setting voltage
❽Button “Charge” – setting Amin (charge)
❾Button “Time” – setting of exposure time
❿Button “Basin” – selection of the working tank
⓫Button “OK” – save of the set values
⓬Button “Prog” – selection of the working program
⓭Rotary button for selection of parameters and values
⓮Connection socket “red” for plating pen (anode)
⓯Connection socket “blue” for tweezers/clamp (cathode)
⓰Tanks (8 pieces)
⓱Anode rods (2 x)
⓲Cathode rod

Side 4 –Operating Instructions DIGITAL II Version 2.0
The anode rods ⓱can be pulled out very easily, the cathode rod ⓲in the middle can be screwed
out (clockwise).
Agitation (cathode rod)
The movement is effected by a built-in driving motor. The movement can be started with the button
❷“Motor / Movement”.
Heating of the bath
The heater is fixed with a special holder in the corresponding galvanic bath. The temperature is
controlled continuously by an included temperature sensor (thermo couple / level regulator).
Attention! Heater and temperature sensor must always hang together in a tank. Only for intended
use! The immersion heater is inserted for operation on the case back to a socket. The immersion
heater can be turned on by a button on the control panel. The heating is regulated automatically.
Attention! The level regulator turns off the heater if the volume is too low! Nevertheless, the heater
must be turned on only when the working tank is filled with liquid. If the level is too low, or if the
immersion heater is outside the tank, there is the risk of fire and the destruction of working tank and
immersion heater. The holders of immersion heater and sensor must be fixed to the side of the tank
and not at the anode rod.
Anode materials
The anodes must be fixed on the outer anode rods ⓱. Attention! Pay attention for a good
conductive contact. The required anode material (for example stainless steel, MOX, fine-silver,
platinized titanium) depends on each plating bath. Please note the information in the data sheets of
the chemical producer. Our scope of delivery contains anodes in various dimensions.
Process parameter / course of process
The parts should be put on a jig (for example we deliver a special a jig for rings or for chains) and
fixed on the middle cathode rod ⓲. Pay always attention for a good conductive contact. Please
clean the cathode rod continuously.
The first step in the small-size-electroplating unit must be the electrolytic degreasing bath. Anything
else depends on your needs. Rinse well in distilled water after each step. Always follow the
information on the product data sheets.
Pen-plating
With this machine you have also the opportunity to galvanize partially. Therefore, you need the
galvanizing pen and tweezers. You have to connect both to the allowed ports ⓮and ⓯. These
ports are situated in the left front of the machine. The required voltage is set by the chosen program.
The special chemicals for the pen-plating process (rhodium, silver, gold electrolytes) can be delivered
by us or any other chemical producer.
Covering of the machine
The cover takes care of the sensitive and valuable plating solutions, it protects them against dust and
dirt whenever the machine is not in use. Attention! When working with heated bathes the cover has
to left open. If the cover is closed it is possible that the heat accumulation deforms the cover.

Side 5 –Operating Instructions DIGITAL II Version 2.0
Start up
The delivered power plug which is equipped with protective earth contacts has to be connected with
the power plug port situated on the backside of the machine. Then put the other end of the cable
into an electrical power point 230 V / 50 Hz (120 V / 60 Hz). The unit will be switched on with the
toggle switch at the backside. The power of the rectifier is 15 V / 20 A.
Maintenance
Anode and cathode rods must be regularly cleaned with a Scotch sponge. Experience has shown that
this should be done every 6-8 weeks.
Short-circuit proof / fuse
The unit is short-circuit-proof if there will be short-circuit between cathode and anode.
The fuse is located on the backside of the machine, situated in main connection socket inside fuse
holder. Only micro fuse 4 A (slow blow), 115-250 V ~, 5* 20 mm must be used.
Attention
Make sure there is good ventilation in the work area.
Rinse water and used chemicals must be disposed of properly. Please refer to the legal regulations.
Please observe the instructions of the Safety Data Sheets (MSDS). Your chemical supplier provides
these.
The unit must be turned off after work necessarily!
The heater should never be operated unattended!
Chemicals
The required bath chemicals are available from us or from special producers. Please read the product
information of the manufacturer carefully and follow the instructions.

Side 6 –Operating Instructions DIGITAL II Version 2.0
Example Charge Rhodium bath
Each plating bath uses a theoretical deposition value, eg Rhodium approximately 6 mg / Amin (value
see product description). You can now choose whether a deposition time should be selected, or a
charge is determined.

Side 7 –Operating Instructions DIGITAL II Version 2.0
By setting the charge, the metal weight is determined. For the Rhodiumbath a setting of 10 Amin
would be mathematically a deposition of 60 mg (10 Amin x 6 mg / Amin = 60 mg). Please note, these
are purely theoretical values, which may differ from the actual values.
Functions
• 15 programs can be saved
• Display in 4 different languages (GER, ENG, SP, and F) is possible. For the choice of language
press „OK“ button for 3 sec
• For the standby mode press button “start” for 3 sec
• The programs are flexible installable
15 programs can be used
EF Degreasing
Au Gold
Ag Silver
Rh Rhodium
Ru Ruthenium
Pd Palladium
Pt Platinum
Ni Nickel
Cu Copper
The programs from 1 to 6 are unnamed. For each tank up to 3 programs can be installed.
Approach to programming
1. Turn on main switch
2. Press button „progr“
3. Select with the rotary switch the desired program
4. Confirm with “ok” button
5. Now enter the working parameters. Press the respective button (time, voltage, etc. see below) and
select the value using the rotary switch. The entries in each case confirm with "ok":
„Temp“ Temperature (if the bath must be heated)
„Volt“ Voltage
„Time“ Choose between minute and second (or choose charge see above)
If no time is entered permanent mode is chosen automatically.
6. When all values are entered, press button „progr" for 3 seconds to save the settings. The display
shows the previously entered values
7. Press button „save“
8. Confirm with „OK“ and return to the actual values
9. Start the process with „start“

Side 8 –Operating Instructions DIGITAL II Version 2.0
Control functions
1. Heat protection / level regulator
If the level is too low in a heated bath the heater is switched off by the thermo couple. The display
shows a warning signal over the full area. The signal can be confirmed with “ok” but the heater
remains off. An overheating of heater or tank is avoided. When the bath is refilled the heater will be
automatically turned on.
2. Total charge
For each basin a total charge can be set. So a metal content is determined, which can be deposited.
When this value is exceeded a warning appears and the bath should be regenerated. To set the total
charge press button “Basin” for 3 sec and enter the desired value and (important!) basin. After this
the display shows the signal
If the total charge is matched with a desired program (by setting the number of the basin in that
program) the control is done for this process. Do as following:
1. Press button “basin” 3 seconds
2. Enter the desired value and basin
3. Press “save”
4. Leave with “OK”
5. Press button “progr” and choose the desired one
6. Set the same basin as in point 2
7. Leave with “OK”
8. Press “progr” for 3 seconds and save the process
9. Leave with “OK”
If basin number 0 is selected you can work manually (without control).
Example total charge Rhodiumbath
The deposition rate of the bath is 6 mg / Amin (see data sheet of the chemical supplier). For this the
total charge of 200 Amin can be set. That means that after receiving this value 1200 mg of rhodium
are deposited (6 mg/Amin x 200 Amin = 1200 mg Rh) and the bath can be regenerated accordingly. A
consisted quality is ensured. Rinsing losses are not taken into account!
Heaters
Up to max. two heaters can be connected with the corresponding sensors on the unit. These can be
used in any tank. The tanks where heater and sensor hang will be heated. The heaters can be turned
on at the control panel. The display shows a signal as soon as a heater is active.
Attention: Heaters only for intended use.

Side 9 –Operating Instructions DIGITAL II Version 2.0
Other manuals for DIGITAL II
1
Popular Laboratory Equipment manuals by other brands

Velp Scientifica
Velp Scientifica HSC F20500101 instruction manual

Gerber Instruments
Gerber Instruments Micro 3 operating instructions

INHECO
INHECO ODTC Verification Tool 96 user manual

Miele
Miele PG 8583 operating instructions

Helmer
Helmer QuickThaw DH2 Operation manual

J.P. SELECTA
J.P. SELECTA RS 3001-V manual


Air Vent
Air Vent UV-C FiltAir instruction manual

PerkinElmer
PerkinElmer LS 55 user guide

Thermo Forma
Thermo Forma 3911 Operating and maintenance manual

Isotech
Isotech LIBRA 785 User maintenance manual/handbook

3D Histech
3D Histech Pannoramic 250 user guide

J.P. SELECTA
J.P. SELECTA DE-1626 instruction manual