ASSEMBLY
• Perform Leak Checks outside, in a well-ventilated area.
• Operate at least 1m/3.3ft away from combustible
materials and ignition sources.
• Before each use: Keep stove area clear and free from
combustible materials, gasoline, and other flammable
vapors and liquids.
• Do not obstruct the flow of combustion and
ventilation air to the stove.
• Do not use windscreen or outback oven; this can
overheat the fuel canister, resulting in explosion.
• Do not use an appliance which is leaking, damaged
or which does not operate properly.
• Always change gas canisters in a well ventilated
location away from any sources of ignition, such as
naked flames, pilot, electric heaters/equipment and
away from other people.
WARNING
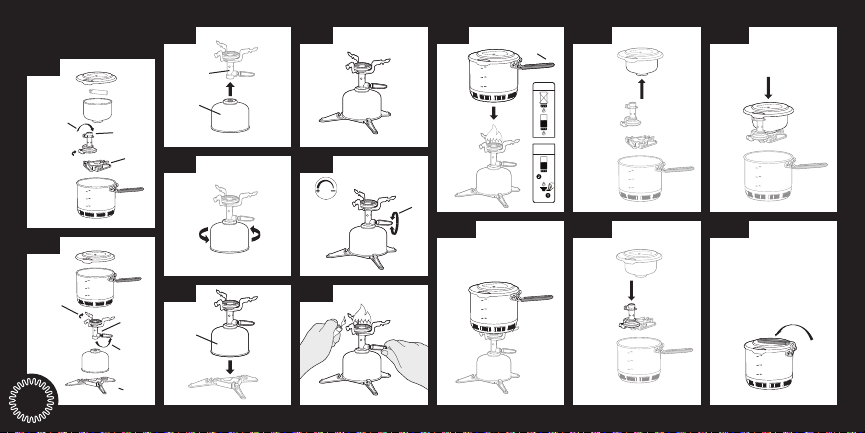
1. Remove packed contents from pot (Fig 1).
2. Unfold the bail (2.1) from the valve body (2.2).
3. Close the control valve (7.1) (turn clockwise).
4. Check for debris in the valve connection (1.1), and that the O-Ring
is in place and in good condition before connecting to the stove.
WARNING Do not use the appliance if it has damaged or worn seals,
this may result in gas leakage.
WARNING In temperatures below freezing, O-Rings may not seal
fully, resulting in a fuel leak.
5. To check that the gas canister is not empty, liquid fuel may be heard
and/or felt inside when the canister is shaken.
6. Connect fuel canister (3.1) to valve (3.2) by threading in the
orientation shown in Fig 4.
WARNING Hand tighten only, do not over-tighten or cross-thread.
May damage seals resulting in fuel leak.
7. Perform LEAK CHECK PROCEDURE (See Page 4).
8. Unfold stabilizer legs (2.3) and securely attach stabilizer to fuel
canister (Fig 5).
9. Unfold pot support legs fully (2.4).
WARNING Do not use the appliance if legs are damaged or
cannot be opened fully.
10. Place assembled stove on a flat, level surface, at least1m/3.3ft
away from any combustible materials or ignition sources.
WARNING Never use cookware larger than 1.5L capacity or
8in. [20cm] diameter. 6