manuals.online logo
Brands
  1. Home
  2. •
  3. Brands
  4. •
  5. Jobsite
  6. •
  7. Transmitter
  8. •
  9. Jobsite IR-E1 User manual

Jobsite IR-E1 User manual

Other Jobsite Transmitter manuals

Jobsite IR-E1HO Operation manual

Jobsite

Jobsite IR-E1HO Operation manual

Jobsite IR-E2 User manual

Jobsite

Jobsite IR-E2 User manual

Jobsite IR-E1 Operation manual

Jobsite

Jobsite IR-E1 Operation manual

Jobsite IR-E1HO User manual

Jobsite

Jobsite IR-E1HO User manual

Popular Transmitter manuals by other brands

Seneca K120RTD installation manual

Seneca

Seneca K120RTD installation manual

Nautel GV40 installation manual

Nautel

Nautel GV40 installation manual

HumanTechnik cm-light operating instructions

HumanTechnik

HumanTechnik cm-light operating instructions

INOR APAQ C130 TC User instructions

INOR

INOR APAQ C130 TC User instructions

Linear DXS-64 operating instructions

Linear

Linear DXS-64 operating instructions

FeinTech ABT00102 instruction manual

FeinTech

FeinTech ABT00102 instruction manual

Geo Web Pack quick start guide

Geo

Geo Web Pack quick start guide

Inovonics EchoStream EN1210W installation instructions

Inovonics

Inovonics EchoStream EN1210W installation instructions

IKONNIK KA-6 quick start guide

IKONNIK

IKONNIK KA-6 quick start guide

Rohde & Schwarz SR8000 Series System manual

Rohde & Schwarz

Rohde & Schwarz SR8000 Series System manual

Audio Technica UniPak ATW-T93 Installation and operation

Audio Technica

Audio Technica UniPak ATW-T93 Installation and operation

NIVELCO EasyTREK SCA-300 Series Programming manual

NIVELCO

NIVELCO EasyTREK SCA-300 Series Programming manual

Honeywell 5816WMBR installation instructions

Honeywell

Honeywell 5816WMBR installation instructions

Kamstrup READy MTU Installation and operation guide

Kamstrup

Kamstrup READy MTU Installation and operation guide

Omega ZW Series user guide

Omega

Omega ZW Series user guide

ABB Field 264H Instructions for installation

ABB

ABB Field 264H Instructions for installation

Dejero EnGo 3x manual

Dejero

Dejero EnGo 3x manual

Rosemount 4600 Reference manual

Rosemount

Rosemount 4600 Reference manual

manuals.online logo
manuals.online logoBrands
  • About & Mission
  • Contact us
  • Privacy Policy
  • Terms and Conditions

Copyright 2025 Manuals.Online. All Rights Reserved.

For Transmitting
Infrared Commands to
Audio/Video Components
SINGLE IR EMITTER IR-E1
DATA SHEET
IR-E1
SINGLE IR EMITTER
FEATURES
• Infrared pass through housing
• Miniature size and shapere size and shape
INSTALLATION FRIENDLY DESIGN:
• 10’ of cable with 3.5mm plug
• Reliable adhesive backing
SPECIFICATIONS
• IR system: Works with practically all brands of IR remote controls
• IR transmitting: 4’ (line of sight)
• Emitter mounts directly to the IR window of a component
WIRING REQUIREMENTS:
•10” of 2-conductor
•24-gauge wire with a 3.5mm plug is supplied
• Use 18 gauge for distances up to 20’ and 16 gauge for up to 200’
MOUNTING:
•Self-adhesive, surface mount
DIMENSIONS:
•5/16” wide x 3/16” high x 1/2” deep
WARRANTY:
• 2 year limited
SINGLE IR EMITTER IR-E1
JOBSITE SYSTEMS
12331 SW 130 STREET
MIAMI, FL 33186
P866.4JB.SITE (866.452.7483)
F305.238.0185
WWW.JOBSITESYSTEMS.COM
SINGLE IR EMITTER IR-E1
PREPARING FOR INSTALLATION:
The IR-E1 is typically mounted to the infrared remote receiver windows of an
audio/video component, using the attached self-adhesive tape. The emitter
directs its infrared output toward the component, not out into the room. If the
component has a tray or door that opens, you may have to route the wire from
the top or the bottom of the component. Make sure the mounting surface is
cleaned and degreased before installation.
INSTALLATION:
1. Locate the IR remote receiver window of the component to control. The
receiver is usually located behind its own plastic window, on the front of
the component.
2. Make sure the mounting surface is clean.
3. Attach the IR-E1 directly over the IR remote receiver window of the
component using its self-adhesive tape.
4. Route the connecting two-conductor wire to the IR Connecting Block and
plug it into an Emitter output.
5. Coil any excess wire and tie it in place.
6. On IR Connecting Blocks with selectable Emitter outputs, make certain the
HI-LOW SWITCH is placed in the LOW position.
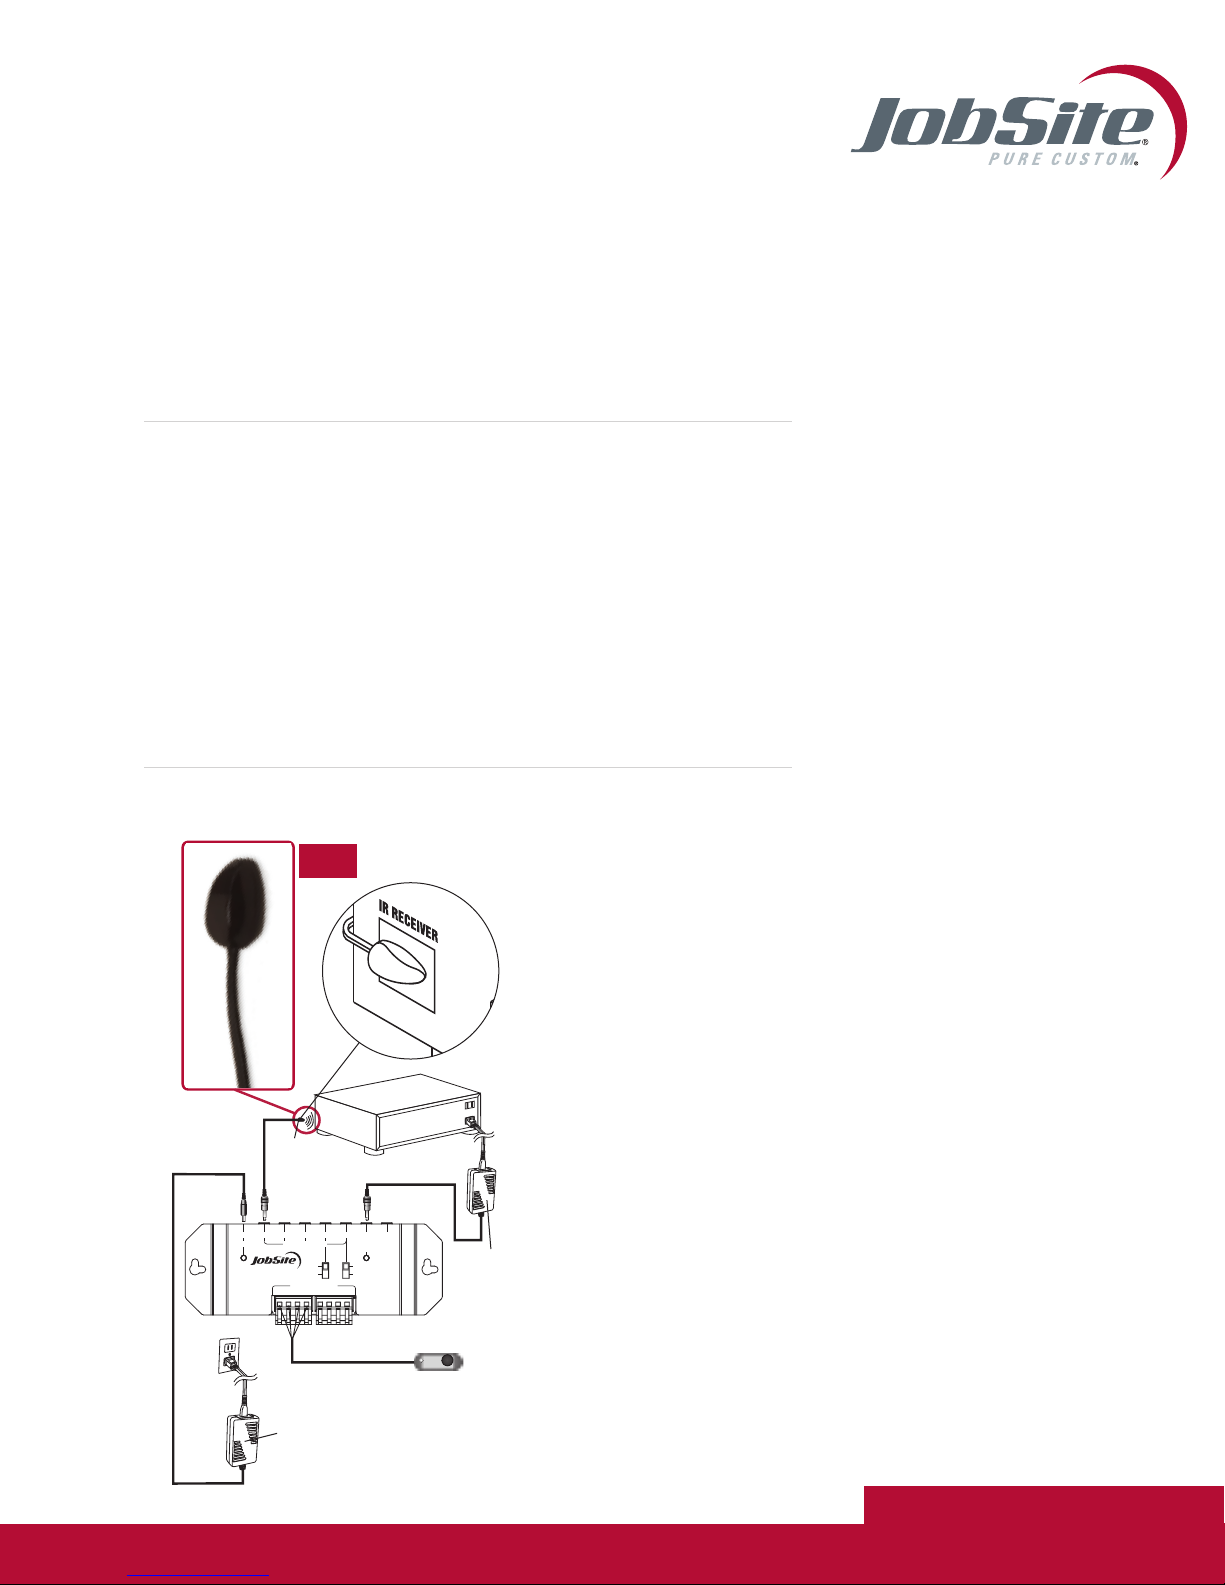
IR-E1 INSTALLATION DIAGRAM
12V DC Power
Supply
(Not Supplied)
plugged into
the Switched
Outlet
12V DC Power Supply
Plugged into an Unswitched
AC Outlet Powers the System
IR-CB-2
JobSite
IR-E1
Emitter
12VDC/
OUTPUT
HI
LOW
HI
LOW
1
12
2 3 54
EMITTER OUTPUTS
POWER
+12V DC
IR RECEIVER INPUTS
3-30V
AC/DC
STATUS
IN
IR-CB2
IR CONNECTING BLOCK
IR-SMR
Stereo Receiver
IR-E1
JOBSITE SYSTEMS
12331 SW 130 STREET
MIAMI, FL 33186
P866.4JB.SITE (866.452.7483)
F305.238.0185
WWW.JOBSITESYSTEMS.COM
©2004 Niles Audio Corporation. JobSite,
Pure Custom and Niles are registered
trademarks of Niles Audio Corporation
and the JobSite Logo is a trademark of
Niles Audio Corporation. JSIRE1PDF
Specifications subject to change without notice.