John Lewis Corded roman blind kit User manual

2
4
finished
blind size
Recess fix
finished
blind size
Measure width
Measure drop
BOTTOM
TOP
FINISHED
BLIND SIZE
Fabric join
seam
Fabric join
seam
Width including
side seams
Drop including top
tape seam and bottom
bar pocket seam
1cm (3/8”)
1.5cm
(5/8”)
1.5cm
(5/8”)
Finished blind drop
5cm (2”)
1cm (3/8”)
0.5cm (3/16”) 0.5cm (3/16”)
1cm (3/8”)
1cm (3/8”)
4cm (15/8”)
1cm (3/8”)
B
0.5cm (3/16”)
Please check the contents
1. Fabric requirements for your window size
1. A Measure the width and drop of your window for
recess fixed headrail or if you have mounted your
blind headrail outside the recess, measure the width
of the blind headrail by the drop required.
1. B Add to the finished blind the measurements shown
in diagram B.
On wider blinds more than a fabric width wide, join
the fabric so the blind will have seams an equal
distance from the centre. Mark the blind size plus
seams with tailors chalk. Trim out the size.
2. Sewing the side seams
Working on the back of the fabric, fold the side fabric
under 0.5cm (3/16”) and then over 1cm (3/8”) to
form a seam and sew down the inner edge.
Repeat for the opposite side.
3. Stitching the loop tape to the top of the blind
Remove loop tape from headrail
3. AFold over the top of the fabric 1cm (3/8”).
3. B Place the loop tape over the fold leaving a
0.5cm (3/16”) gap between the tape and the
top of the fold. Sew the tape into place with
two rows of stiches - a row on top and a
row on the bottom of the tape.
4. Sewing the bottom bar pocket
Fold over and create a 4cm (15/8”) pocket with a
turn over of 1cm (3/8”) as shown in the diagram.
Stitch along the top edge hem/pocket.
headrail
headrail
Corded roman blind kit
Thank you for purchasing this product. Please read the
instructions and warnings carefully before use to ensure
safe and satisfactory operation of this product. It is
recommended that this blind should only be installed
by persons competent in DIY.
3AB
1A
with cord guides
headrail
length
headrail support cord guide
cord pulley
split cord
cord pull cord roman bottom
hook on
loop
pocket roman
screws &
(with end cap)
(with cords)
collector
cleat rods bar cord toggle tape
blind tape
wall plugs
60cm 1 2 2 1 1 1 1 5 1 2 0.61 Mtr 3.2 Mtr 4
90cm 1 2 3 1 1 1 1 5 1 3 0.91 Mtr 4.7 Mtr 4
120cm 1 3 3 1 1 1 1 5 1 3 1.21 Mtr 6.2 Mtr 5
150cm 1 4 4 1 1 1 1 5 1 4 1.51 Mtr 7.7 Mtr 6
180cm 1 4 4 1 1 1 1 5 1 4 1.81 Mtr 9.2 Mtr 6

5. Marking the tape positions
Divide the distance between the top and bottom of
the blind by 6 and mark at both sides the position.
With tailors chalk draw a faint line across the blind.
Note: Ensure the lines are parallel before sewing
blind in step 6.
6. Sewing the tape to the blind
6. A Rotate the tape so that it is in the upright position
with the rear pocket at the bottom of the tape as
shown opposite.
Trim rods and tapes only if required.
6. B Measure and trim the 5 lengths of tape to the
blind width plus 1cm (3/8”) at either end
for seams.
6. C Place the lengths onto the chalk marks made
previously and turn one side of each
length in
1cm (3/8”) to form a hem on the tape.
6. D Sew to the blind with a row of stitching above the
pocket area leaving one pocket end open on each
to be hemmed later.
7. Inserting the roman rods
7. A Remove cap and trim the roman rods 2cm (3/4”)
shorter than the blind width. Replace cap.
7. B Insert into the open ends of pockets on the
blind tape.
7. C Fold the end of the pocket under 1cm (3/8”)
and stitch down the side.
8. Inserting the bottom bar
Trim the bottom bar to the same width as the roman
rods cut previously (2cm (3/4”) shorter than the blind
width). Insert into the bottom pocket of the blind.
Place a tacking stitch at each end to hold in place.
9. Positioning the headrail
Please note: Additional fasteners other than those
sent with your blind may be required depending on
the mounting surface. Wallboard and plaster require
the use of
anchors such as expansion or toggle
bolts.
Brick, tile or stone need special plugs and drill bits.
Remember to always pre-drill holes in wood to
avoid splitting.
9. A Inside the recess
Decide the position of the headrail so that it will
be clear of any latches and window fixtures. If you
need to reduce the width of the headrail to fit the
recess, this should be done before assembling.
See ‘Trimming the headrail’ instruction on the
following page.
9. B Outside the recess
Decide the position of the headrail so that the
overlaps on both sides of the recess are equal.
It is advisable to allow a minimum of 5cm (2”)
overlap on each side.
7
8
Leave open
width minus 2cm (3/4” )
Stitch
1cm (3/8”)
Stitch
1cm
(3/8”) Stitch
-
6
.
.
headrail headrail
5
6 A
B
C
Pocket
Back
of tape
Stitch
Front of tape
D
A
9A B
B
C
Stitch
Cap Rod

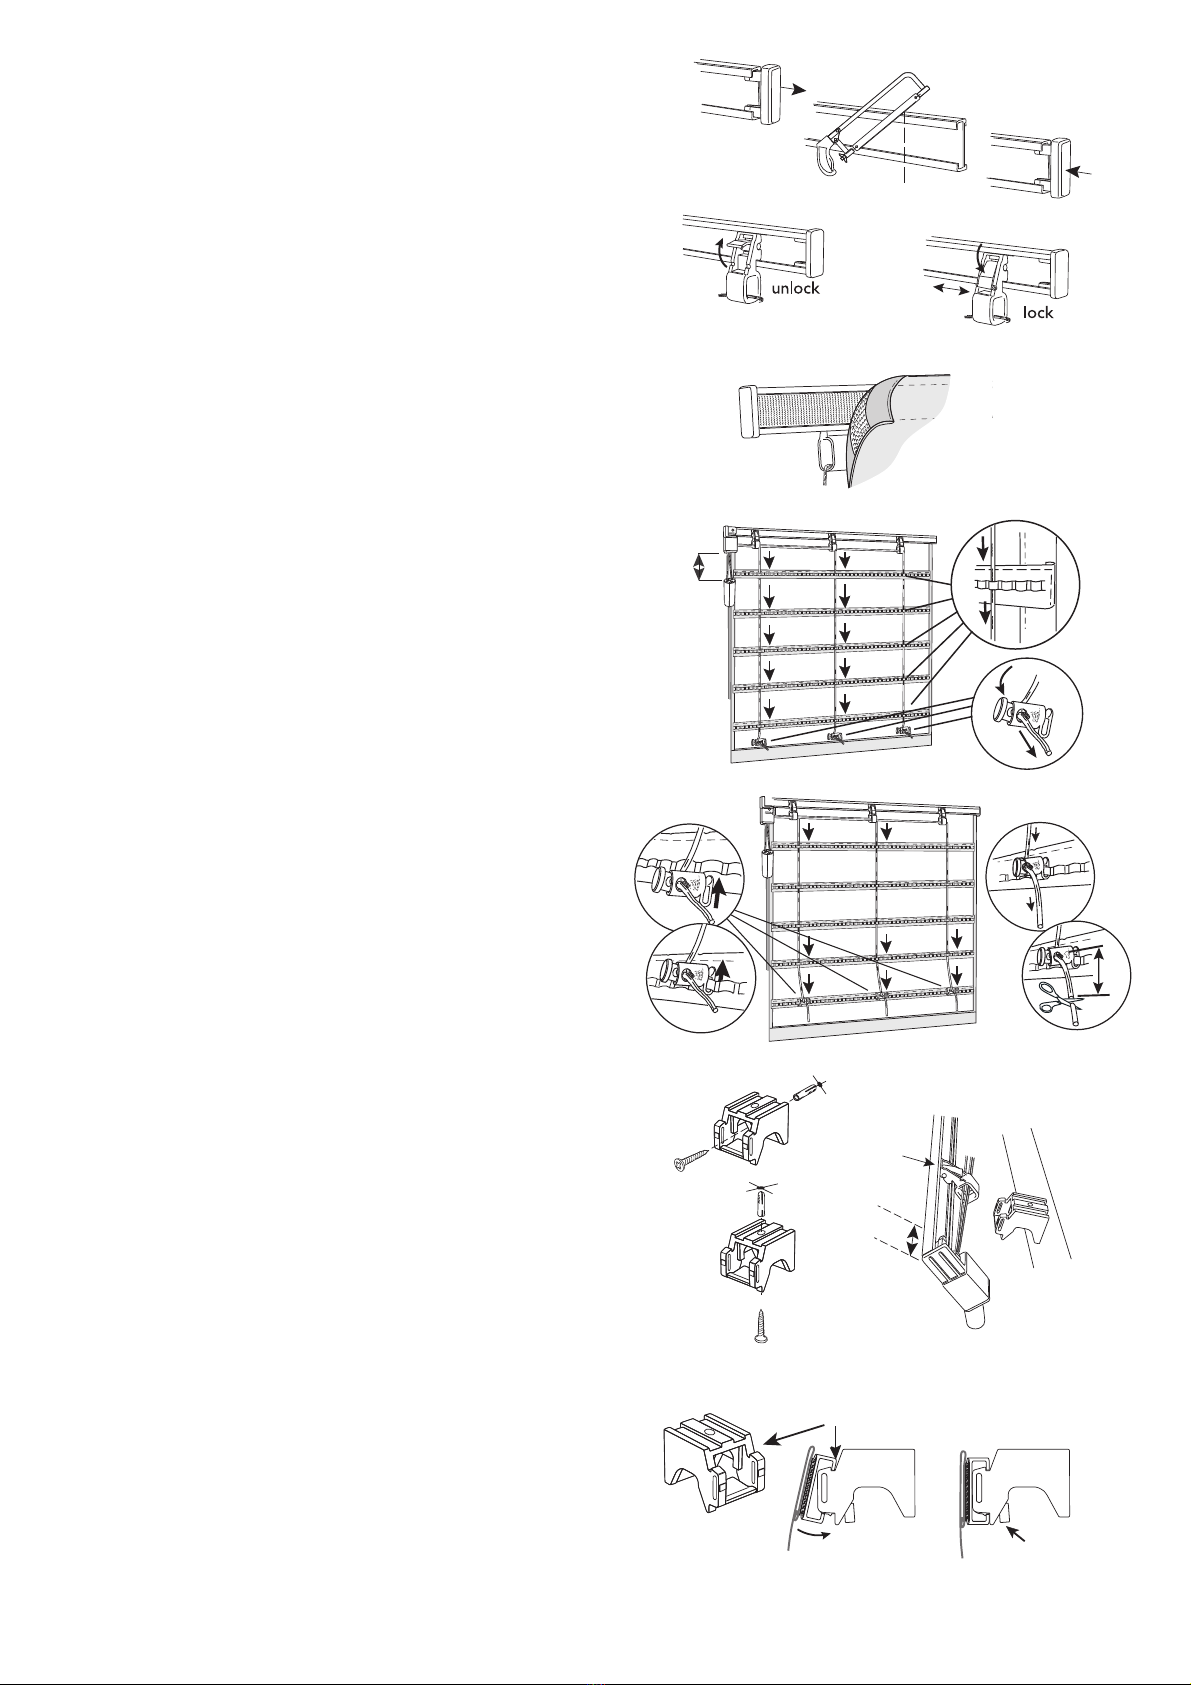
10.Trimming the headrail
Tool required is a hacksaw.
10. A Remove the headrail end cover.
10. B Trim the track with a fine hacksaw.
10. C Re-fit the the end cover.
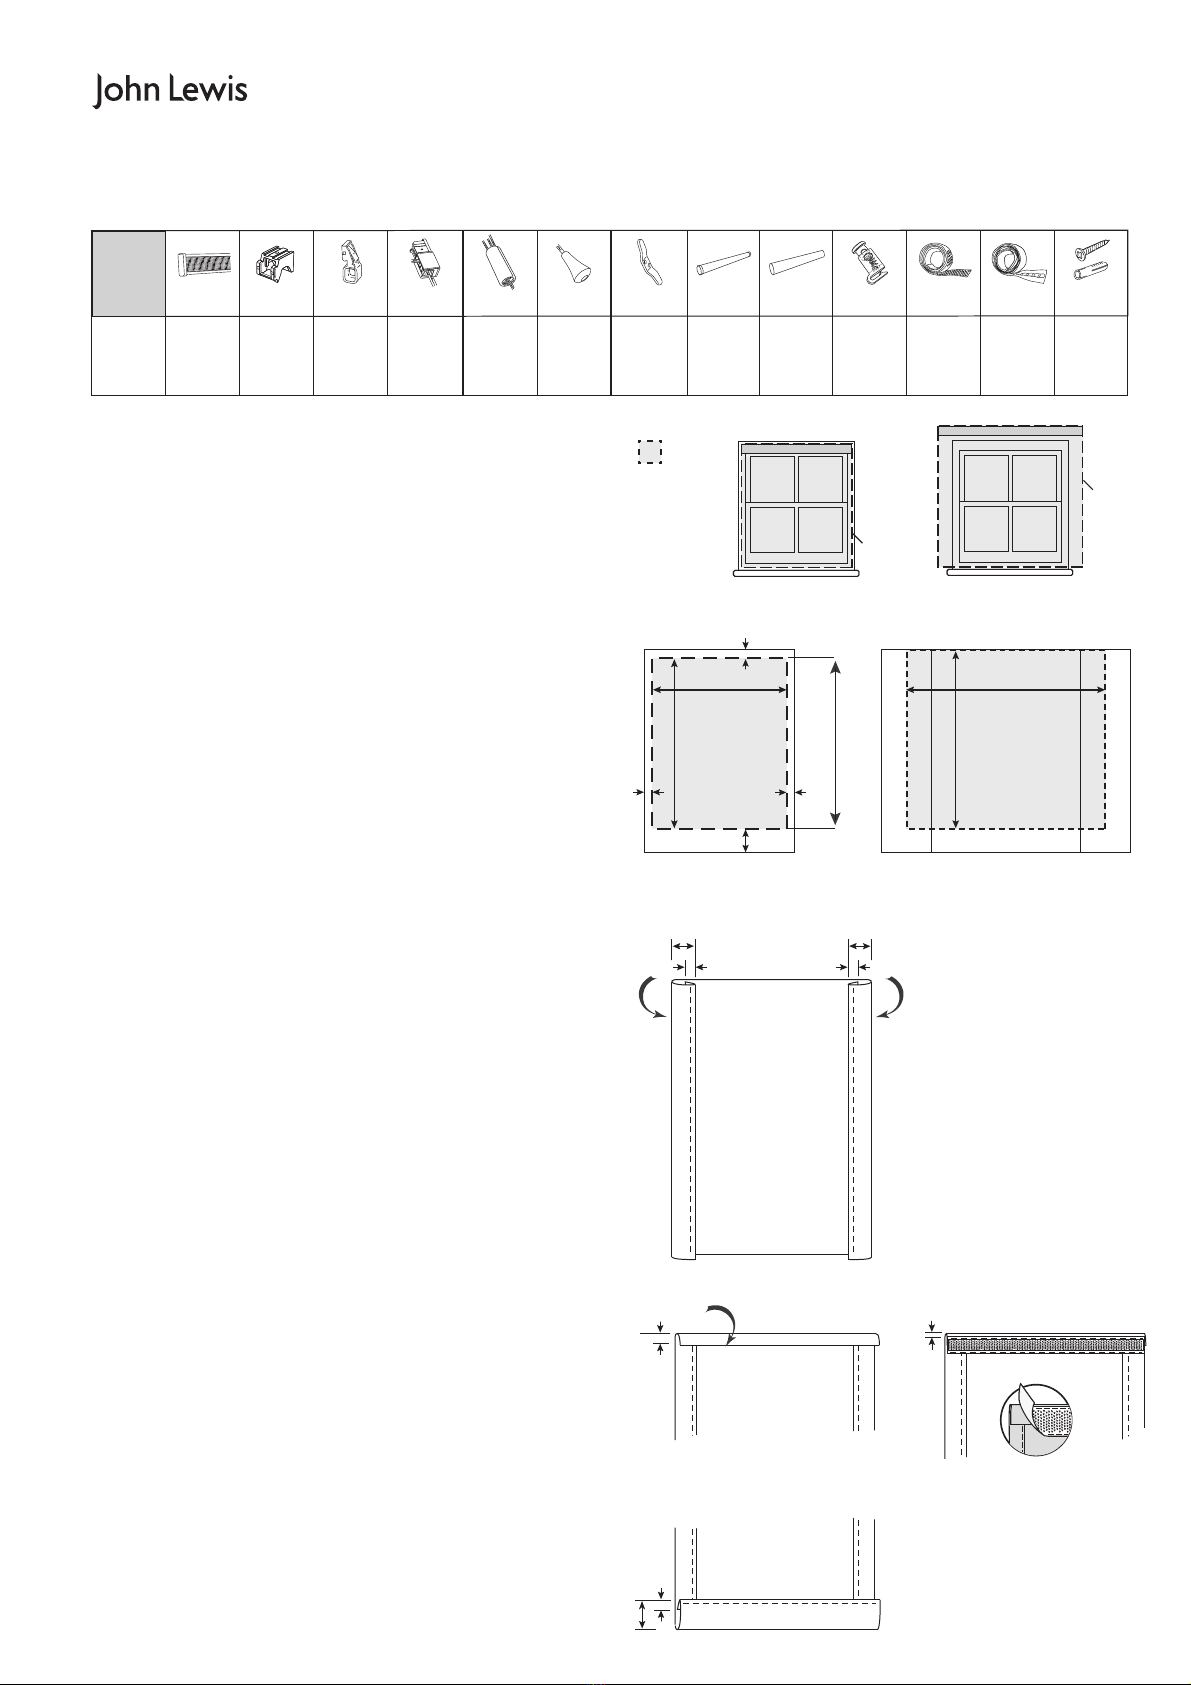
11.Positioning the cord guides along the back of
the headrail
Note: If you require a left hand draw see point 18
before repositioning the cord guides.
11 a. To position the cord guides push up release catch A,
slide to desired position, spaced equally and exactly
above a row of loops on the tape.
11 b. Lock by pressing the catch back down.
12.Attaching blind to the headrail
Line up the blind/loop tape with the hook tape on
the headrail and press firmly to secure the blind in place.
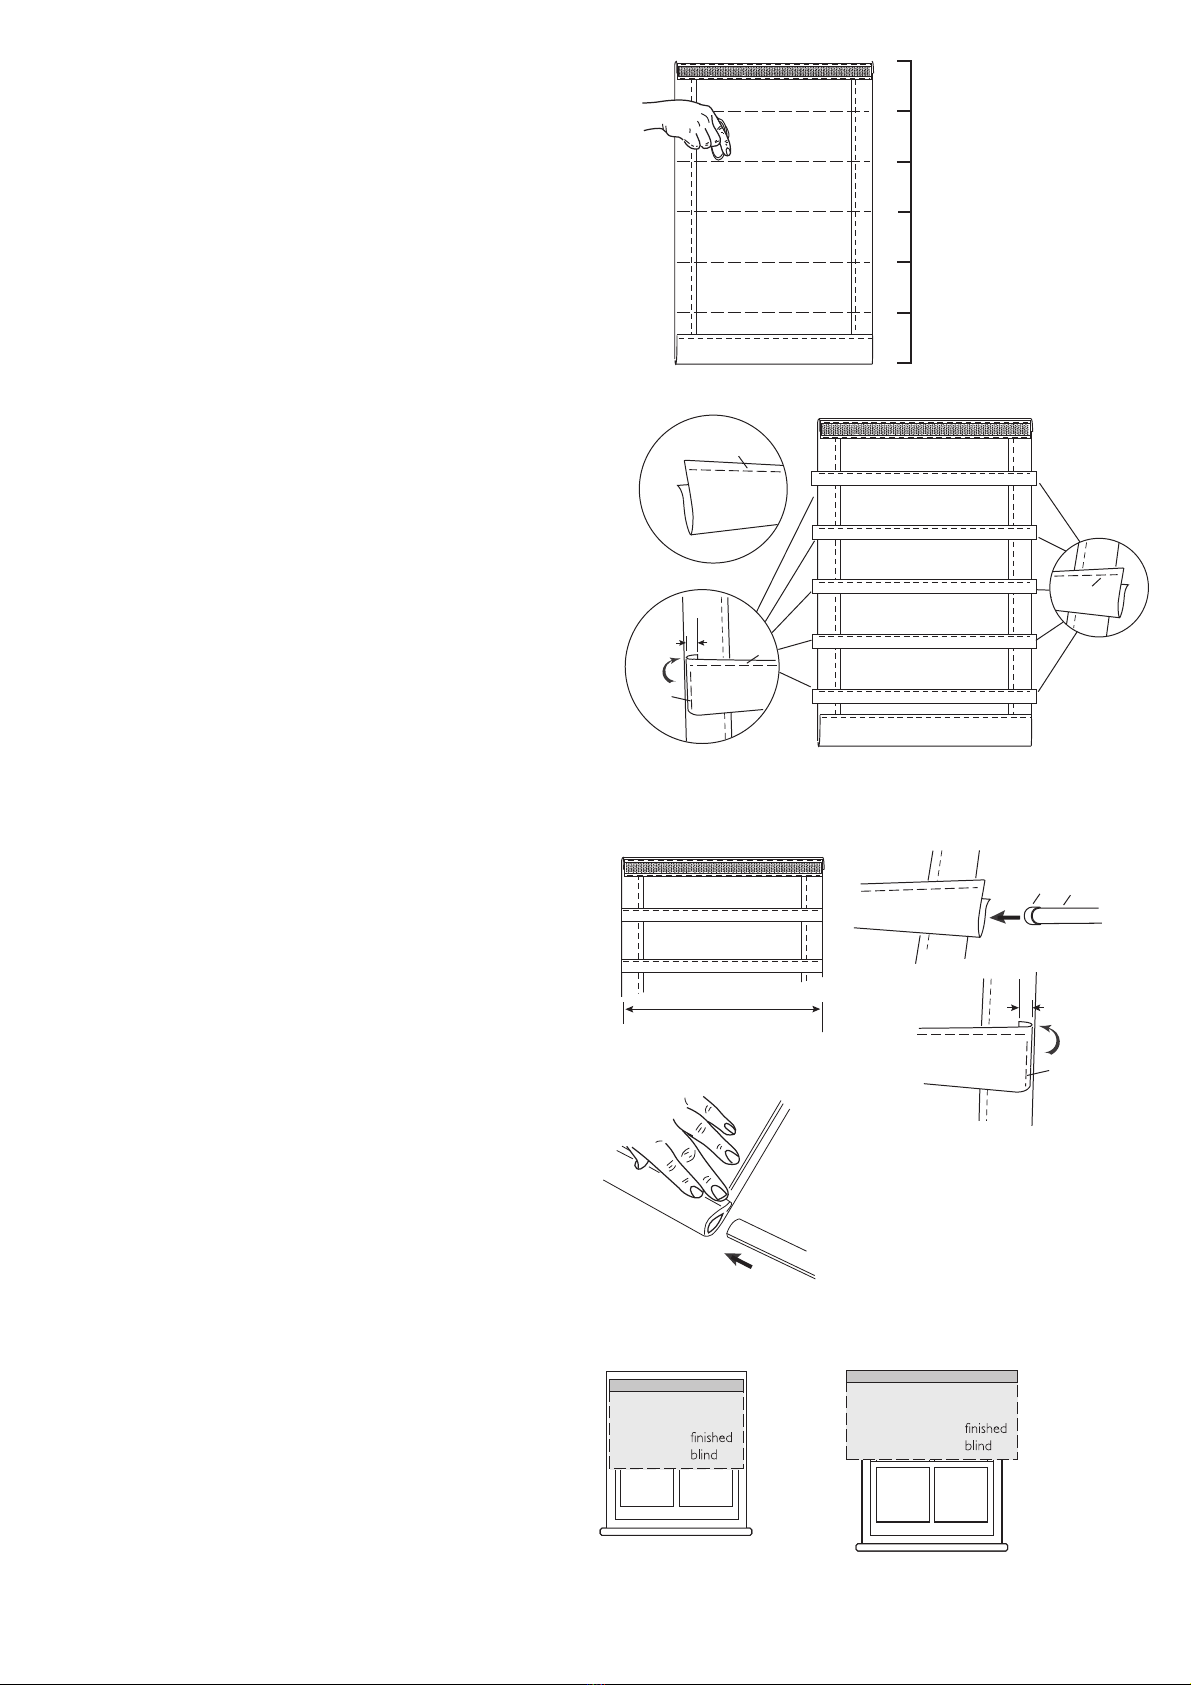
13.Cording the blind
For ease of assembling the rail is pre-corded.
13. A With the split cord collector no less than 20cm from
the cord pulley and the blind layed flat, work from the
blind top. Where each cord will drop from the cord
guides, thread the cord vertically through the pocket
tape. After the last row of pocket tape, thread a hook
on cord toggle onto each cord.
13. B Using an upward motion as shown, thread the hook on
cord toggle into the last row of pocket tape.
Do not allow the cords to become twisted.
With the blind held in a level, vertical position, adjust the
hook on cord toggles so that equal tension is held on each
and they are level. Trim any excess cord at a distance of 4cm
from the hook on cord toggles.
Do not Knot the cords.
Should the cords ever become detached please ensure when
replacing that they are aligned vertically and that the hook on
cord toggles have equal tension on each and they are level.
14.Fixing the wall support brackets
The brackets are designed for face or top fixing to
frame, wall or ceiling.
14. A Mark through the screw holes the position for the
brackets making sure they are level and in line, check
with a spirit level.
14. B Leave a gap of at least 2cm between the end
brackets and the end of the headrail to avoid clashing
with the end cover and the cord lock. Also make sure
the bracket positions will fall between the cord guides.
With the brackets removed, drill each bracket screw
position using a 6mm drill bit. Fix brackets into place
using screws provided, check alignment and level as
you go. Use the wall plugs provided for plaster and
masonary walls. We recommend for plaster walls a
wooden batten be secured first.
15.Installing the finished roman blind
15. A Clip the finished roman blind onto brackets by
resting the headrail on the top arrowed position and
pressing back until it rotates and clicks into place.
15. B. To remove the headrail depress and release the
underneath catch.
check bracket
will not clash
with ends or
cord guides
b.
B
C
10
11
12
13
A
B
A
A
14
15 A
B
4cm
20cm minimum
cord distance to
split cord collector

16.Installing the cord cleat
The cleat shall be installed as close to the headrail
as possible and in all cases not
less than 1.5m
from the floor
. Cut any excess cord and thread
on the cord pull supplied. Knot to hold in place.
Children can strangle if this safety device is not
installed. Always use this device to keep cords or
chains out of reach of children.
17.Using the cord lock
17. A To unlock the cords and allow the blind to rise
and fall, angle the cord to the left and pull.
17. B To lock the blind in place, angle the cords to the
right and release.
18.Converting to left hand draw
18. A Remove the cord lock by unscrewing the
retaining screw and sliding from the track with the
attached cords.
18. B Slide and remove the end cover from the left side
opposite end of the track.
18. C Slide the cord lock and the end cover into the
track at the opposite ends from before. Screw the
cord lock into place. Re-dress the cords through
the cord guides from left to right.
The cords are various lengths, please ensure the
longest cord is through the furthest cord guide
from the cord lock, and the shortest nearest the
cord lock. Make sure the cords do not become
twisted as this will inhibit the blinds function.
19.CBA Split Cord Collector care
19. A IIf the split cord collector becomes detached simply
press back into the closed position making sure that
the number of cords and cord positions correspond
to the diagram opposite.
19. B Do not put the cords back in a twisted position and
never allow the cords to become twisted when in use.
end cover
cord pull
longest
cord shortest
cord
cord lock
A
B
WARNING!
Please read all safety warnings and installation information fully before installation.
Young children can be strangled by loops in pull cords, chains, tapes and inner cords
that operate the product.
To avoid strangulation and entanglement, keep cords out of the reach of young children.
Cords may become wrapped around a child’s neck.
Move beds, cots and furniture away from window covering cords.
Do not tie cords together. Make sure cords do not twist and create a loop.
The safety cleat should be positioned high enough to be out of reach of small
children yet accessible to adults.
All safety cleats for blinds need to be fixed to a solid surface using a screw and
fixing suitable for the wall or surface material.These items should not be glued
or stuck in place.
The head rail shall not be installed less than 1.5m from the floor.
For further information go to: www.makeitsafe.org.uk
Keep out of the reach of young children.
Small parts - choking hazard.
John Lewis Partnership
171 Victoria Street
London SW1E 5NN
johnlewis.com
Retain these instructions for future reference.
Batch code:
16
17
18
A
19
Cleat for use with Roman Blinds
B
split cord
collector
2 cords 3 cords 4 cords
press to
close
slide out cords
c
LBJLCB06
Other John Lewis Window Blind manuals

John Lewis
John Lewis Sheraton Roman Blind User manual

John Lewis
John Lewis Roman blind User manual

John Lewis
John Lewis Sidewinder roman blind kit User manual

John Lewis
John Lewis FAUX WOOD CORDLESS VENETIAN BLIND User manual

John Lewis
John Lewis DAY & NIGHT ROLLER BLIND User manual

John Lewis
John Lewis Roman blind User manual

John Lewis
John Lewis FAUX WOOD VENETIAN BLIND User manual

John Lewis
John Lewis VELVET ROMAN User manual