Joie stages C0925 User manual

0+/I/Ⅱ
(0–25kg)
使用說明書
本產品符合國家標準CNS 11497
及歐盟標準ECE R44測試和認證
組裝及使用本產品前
請先閱讀說明書全文
成長兒童安全座椅0~7歲
stages

2
恭喜您
您剛買了一台通過國家標準和歐盟安全標準檢測的高品質巧兒宜兒
童安全座椅,這台兒童安全座椅適用於體重25公斤(約7歲)以下
的寶寶。
請仔細研讀並依照本說明書的指示操作,如此才能保障並提供您的
寶寶一個安全又舒適的行車旅程。
請保存好本說明書,以利正確使用本產品。
請確定
您的汽車有三點式安全帶裝置
依照各種汽車的廠牌、年份和型號,安全帶可以有不同的設計和長
度,本兒童安全座椅僅適用於符合國家標準CNS 3972和歐盟安
全標準ECE R16的三點式安全帶的汽車,因為本兒童安全座椅是
依國家標準CNS 11497及歐盟標準ECE R44去做測試和認證
的。
本兒童安全座椅不適用於裝置有二點式安全帶的汽車。
! 請將本說明書妥善存放在背蓋中。
目錄
參照圖示 1-9
中文
產品資訊 10
警告 11
緊急情況處理 13
產品組件及各部位名稱 13
安裝模式選擇 14
使用小座墊 15
安裝注意事項 15
背靠角度調整 16
頭靠及肩帶高度調整 16
嬰兒模式
(後向使用/未滿18公斤/新生兒-4歲的寶寶) 17
i 座椅安裝方法 17
ii 寶寶乘坐 18
幼童模式
(前向使用/9-18公斤/1- 4歲的寶寶)19
i 座椅安裝方法 19
ii寶寶乘坐 20
學童模式
(前向使用/15-25公斤/3-7歲的寶寶)21
座布拆卸 22
清潔方法 22
English 24-42

12
FIGURE 1 - 3
FIGURE 1 - 3
16
18 17
19
11
12
13
14
15
32
1
4
1
FIGURE 1 - 3
2
FIGURE 4 - 6
1
1
3
2
2
4
1
3
2
1
2
3
4
5
678
9
10
1
3
2
4
56
2
11

34
FIGURE 1 - 3
FIGURE 1 - 3
3
FIGURE 7 - 10
4
FIGURE 11 - 15
910
3
2
2
1
1
11 12
13
14 15
81
7
123
1
1
2
3

56
FIGURE 1 - 3
FIGURE 1 - 3
5
FIGURE 16 - 20
6
FIGURE 21 - 25
21 22
19
18
20
23
16 17
1
2
3
25
24
1

78
FIGURE 1 - 3
FIGURE 1 - 3
7
FIGURE 26 - 29
8
FIGURE 30 - 33
31
32 33
30
1
2
26 27
3
29
1
45
3
2
1
28

10
9
FIGURE 1 - 3
9
FIGURE 34 - 36
34 1
3
2
4
產品資訊
1.此為「通用型」兒童保護裝置,符合國
家標準C NS 11497及歐盟標準ECE R44。
其適用大部分(並非全部)之車輛座椅。
2.若車輛製造商在車主使用手冊中述明其
可適用此質量等級之「通用型」兒童保護
裝置,則本裝置可安裝於該車輛上。
3.此兒童保護裝置歸類為「通用型」,比其他無標示此注意事項之兒
童 保 護 裝 置 可 適 用 於 較 多 車 輛。
4.若有疑問,請洽兒童保護裝置代理商或撥0800-001-256/
02-25781188
041504
11
R38 5 4 6
檢 驗 標 識
通過CNS國家標準
Joie Children's Products (UK) Ltd,
Venture Point, Towers Business Park,
Rugeley, Staffordshire, WS15 1UZ
www.joiebaby.com
產品名稱 Joie 成長兒童安全座椅0 ~7歲
產品型號C0925
適用範圍25公斤(約7歲 )以 下 的 寶 寶
主 要材質 塑 膠、五 金、布
質量等級0+/
I
/
Ⅱ
淨 重 8.55公斤
產品尺寸 550mmx480mmx620mm
製造日期 詳見產品上貼紙日期(年/月/日)
專利號碼專利申請中
產 地 中國
委製商英商巧兒宜實業有限公司台灣分公司
進口商巧兒宜國際股份有限公司
地 址 台北市內湖區瑞光路431號2樓
電 話 02-27973000
統一編號 52603333
代理商奇哥股份有限公司Chickabiddy Co., Ltd
地址台北市南京東路四段186號5樓
服務專線0800-001-256 / 02-25781188
統一編號04222671
網 址www.chick.com.tw
36 1
1
2
35

11 12
!不可使用繩子等其他物件代替汽車安全帶,以避免兒童被粗細繩索
意 外 勒 住。
!請 勿 把 本 兒 童 安 全 座 椅 當 作 平 常 的 椅 子 使 用 , 會 容 易 翻 倒 和 造 成
傷 害。
!請讓座椅遠離日光,以免產品溫度過高對兒童的皮膚造成傷害。
!當本兒童安全座椅沒有座布時,請勿使用。
! 請勿使用非本製造商推薦的座布,否則會影響兒童安全座椅的總體
性 能。
!
請勿在兒童安全座椅內放置其他墊子。
!
請勿搬運乘坐着兒童的安全座椅。
!任何行李或其他可能在碰撞中造成傷害之物品應適當牢固。
!請勿讓汽車車門卡住兒童安全座椅的任何組件。
!本兒童安全座椅若於意外中遭受劇烈撞擊後,不可繼續使用,
應立即更換兒童安全座椅。意外可能導致兒童安全座椅產生
潛 在 危 險。
! 使用本產品前,請取掉PE袋和包裝材料,並放到嬰兒和兒童觸摸
不 到 的 地 方。
!長期不使用兒童安全座椅時,請將其搬離汽車座椅。
!有關零件更換或維修問題,請向代理商查詢。
!不 要 使 用 非 說 明 書 中 所 述 以 及 兒 童 保 護 裝 置 中 所 標 示 的 承 載 觸 點 。
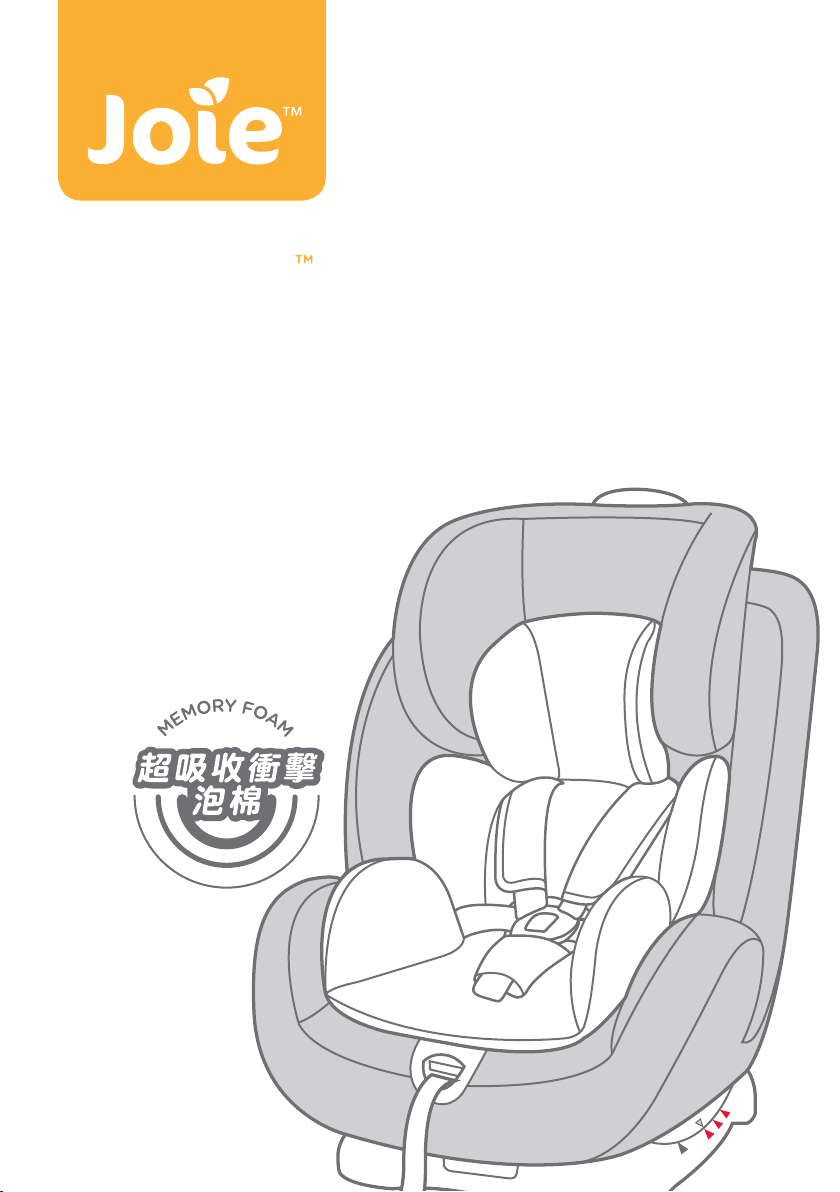
!以下汽車座椅不能安裝本兒童安全座椅:
1. 二點式安全帶的汽車座椅。
2. 相對於汽車的行駛方向,橫向或後向的汽車座椅。
3. 安裝時不穩定的汽車座椅。
警告
!沒有任何兒童安全座椅可以保證100%遠離傷亡,然而正確的使用本
兒童安全座椅可以降低寶寶傷亡的機率。
!本兒童安全座椅適用於體重25公斤(約7歲)以下的兒童。
!重要-在寶寶體重超過9kg之 前,不 要 前 向 使 用。
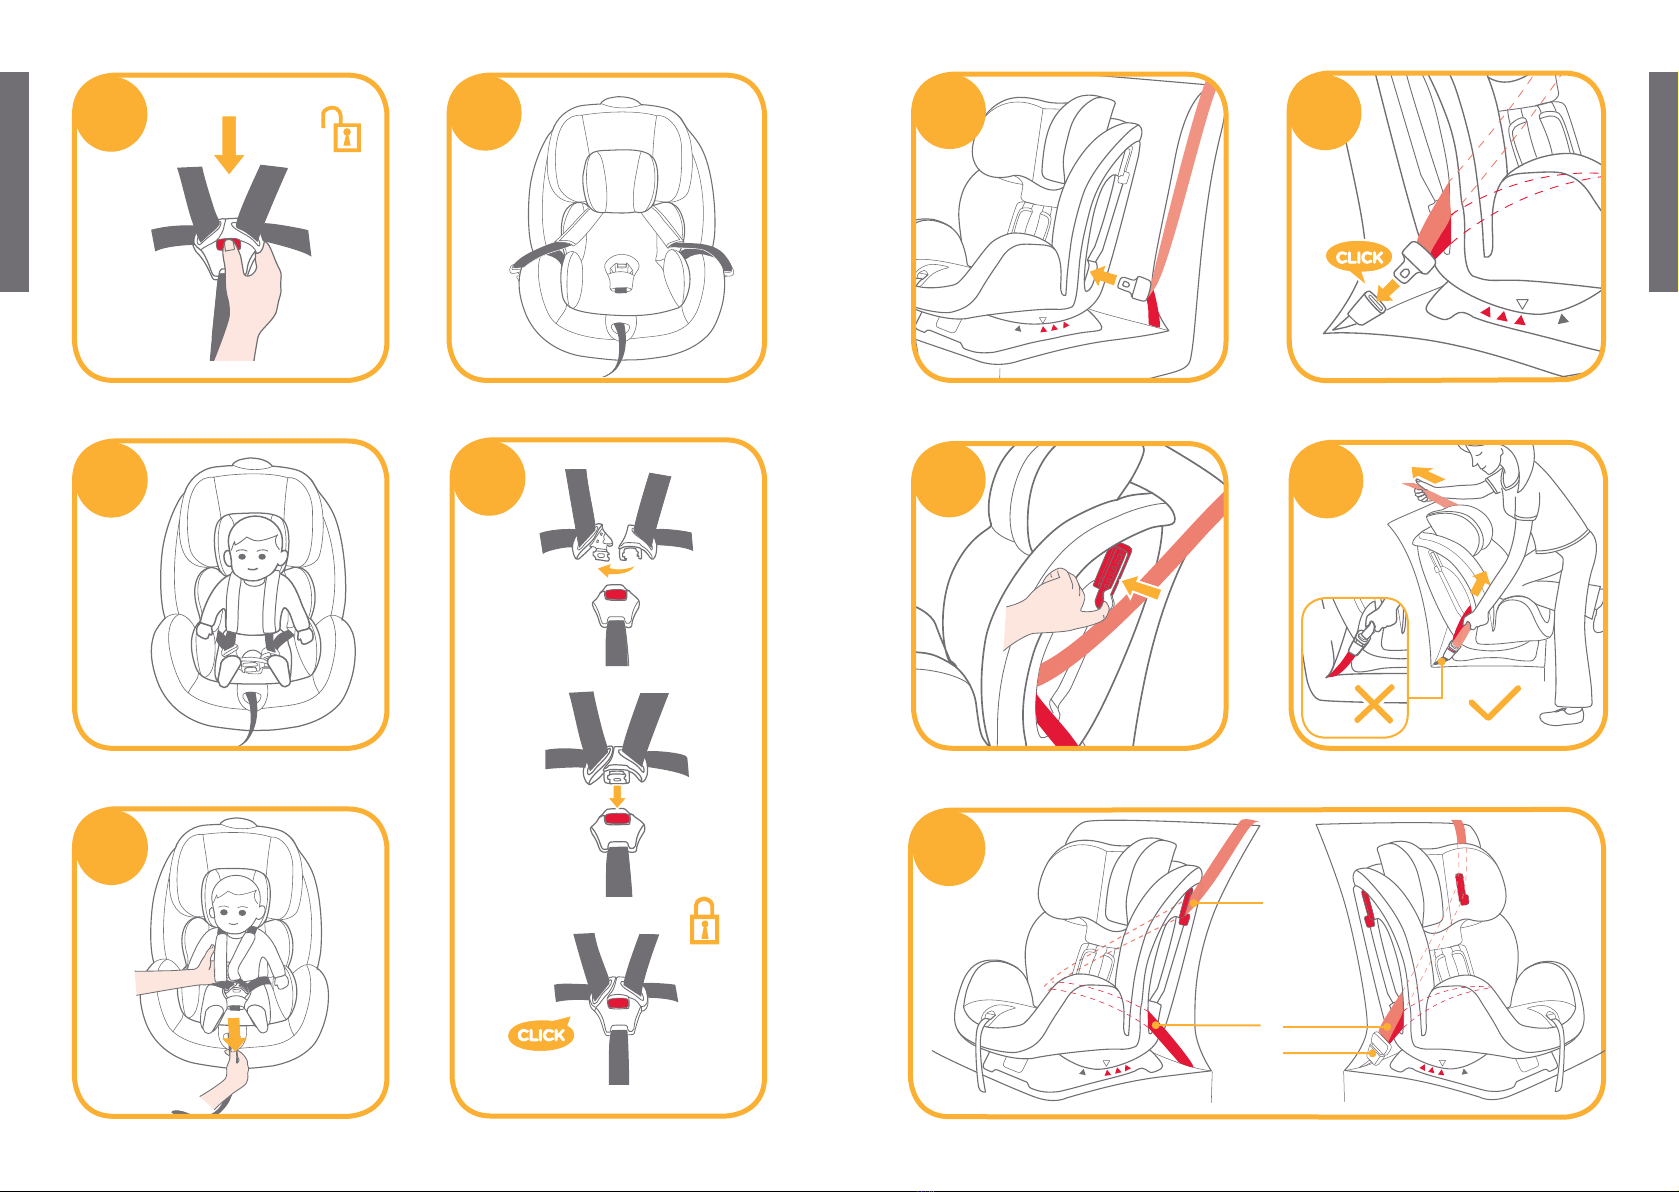
!任何束縛兒童保護裝置至車輛之織帶應束緊,且織帶不應扭曲。
!請勿在未閱讀或了解本兒童安全座椅說明書及汽車說明書之前,使用
或安裝本兒童安全座椅。
!
為保證使用安全,請嚴格按照警告和安裝指示操作,否則可能導致
傷 亡。
!請勿擅自改造本兒童安全座椅,或使用其他廠商生產的零件來配合本
兒童安全座椅使用,會對寶寶造成危險。
!本兒童安全座椅如有任何損壞或零件缺失時,請勿繼續使用。
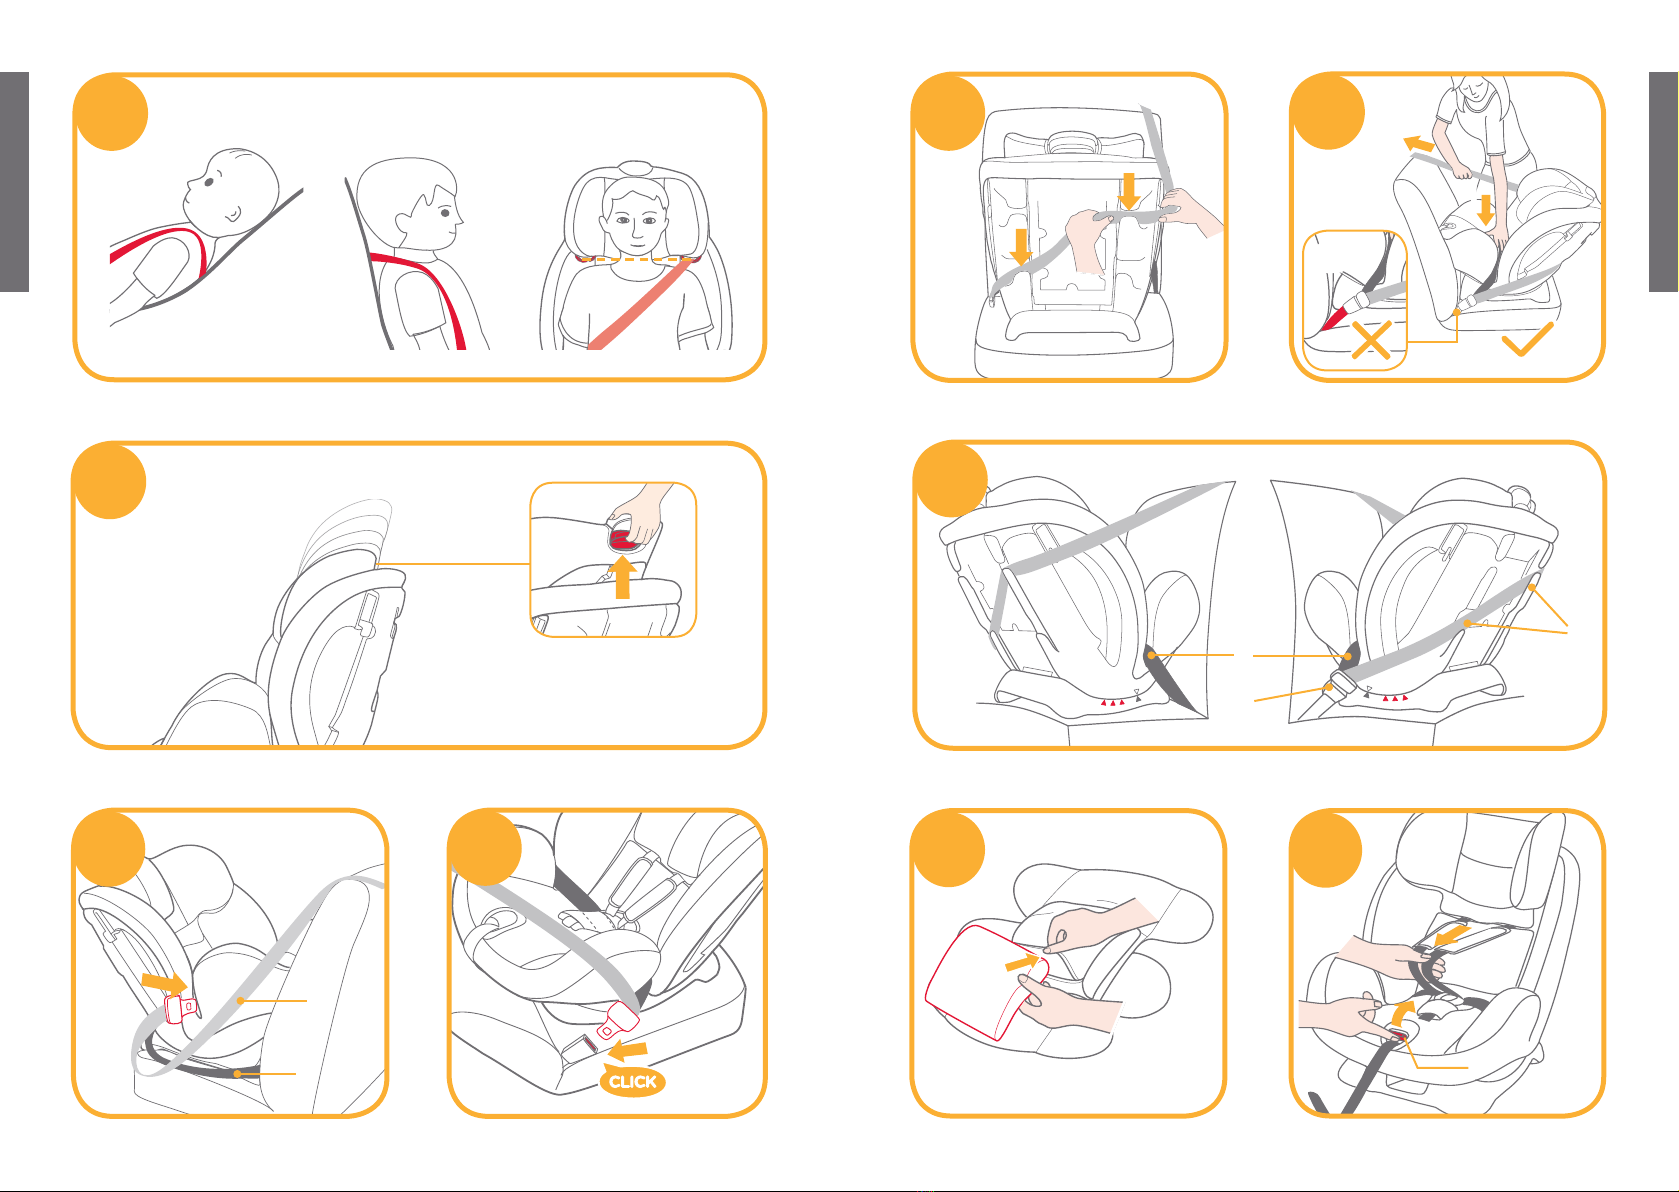
!以嬰兒模式和幼童模式使用時,請勿讓您的寶寶穿着過 大 的 衣 物 ,
所穿的衣物必須能讓兒童安全座椅的安全帶適當而安全地扣在
寶寶兩腿之間。
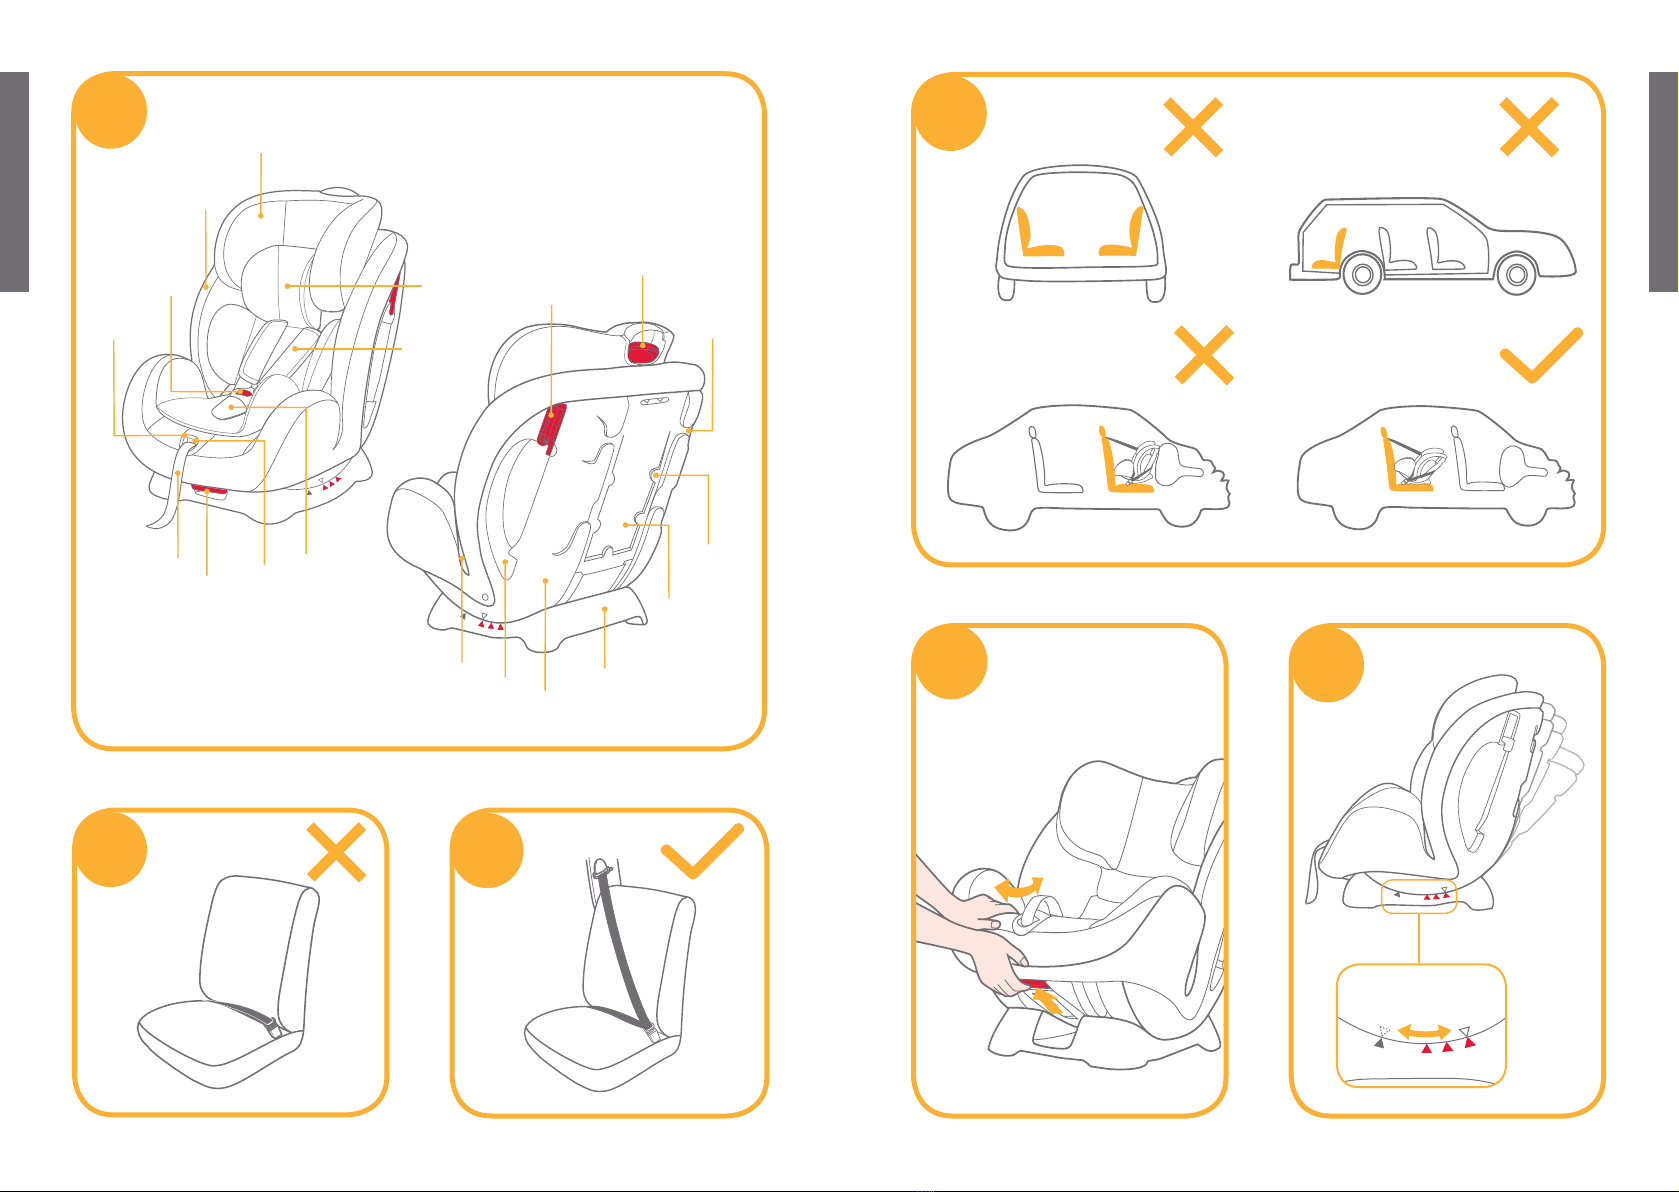
!以嬰兒模式和幼童模式使用時,必須正確的扣合及使用兒童安全座椅
安全帶,並確保腰部織帶能有效束縛骨盆部位。
!請勿將未使用汽車安全帶固定住的兒童安全座椅留在車內,以免緊急
煞 車 時,傷 害 到 其 他 乘 客。若 不 經 常 使 用 兒 童 安 全 座 椅 時,請 將 其
搬離汽車座椅。
!請勿讓您的寶寶單獨留在兒童安全座椅內而無人照顧。
!
後向使用時,嚴禁將本兒童安全座椅裝置於有空氣囊的 座 位 上 使 用 。
!請勿使用二手兒童安全座椅或來歷不明的兒童安全座椅,因為它們
可能有會危害寶寶安全的潛在危險。

13 14
重要事項
1.在寶寶體重未滿9公斤前,不要前向使用,過小的寶寶前向使用是非常
危 險 的。
2.若寶寶體重同時可適用嬰兒及幼童模式,建議使用嬰兒模式,此種模式
對 寶 寶 比 較 安 全。
安裝模式選擇緊急情況處理
遇緊急事故時,需將安全帶剪斷,迅速將乘坐的兒童移離現場。
產品組件
及各部位名稱
圖1.1 頭靠 圖1.11 汽車安全帶固定夾器
圖1.2 座墊 圖1.12 調整拉桿
圖1.3 安全扣 圖1.13 汽車肩帶卡槽
圖1.4 織帶長度調整器固定座 圖1.14 背蓋
圖1.5 調整織帶 圖1.15 說明書存放處
圖1.6 角度調整手把 圖1.16 底座
圖1.7 織帶長度調整器 圖1.17 本體
圖1.8 胯帶護片 圖1.18 背靠卡槽
圖1.9 肩帶護片 圖1.19 座椅卡槽
圖1.10 小座墊
頭靠、座墊、肩帶護片、胯帶護片、小座墊一起合稱座布。
請確認產品組件是否有遺漏,如有遺漏,請聯繫代理商。
寶寶
體重 安裝模式安裝圖示參考年齡 座椅段位小座墊使用說明
未滿
18
公斤
嬰兒模式
幼童模式
學童模式
未滿
4歲
第4段
第1-3段
第1-2段
小座墊可輔助安全
帶綁緊寶寶
並讓寶寶
背部躺平,避免
脊椎彎曲
9 -18
公斤 1 - 4 歲 拆除小座墊
15 -25
公斤 3 - 7歲 拆除小座墊
Child's
Weig ht
Installation
Mode
Figure for
Installation
Reference
Age
Seat Child insert
Position Instructions
<18kg
9 - 18 kg
15 - 25 kg
+
Baby mode
Toddler
mode
Junior mode
Small
child insert
<4 years
Small child insert
is used to
help restrain
the child tightly
and level the
child's back to
avoid cyrtosis
1 year
to
4 years
3 years
to
7 years
Position 1 -3
Position 1 -2
Position 4
Disassemble the
Small child insert
Disassemble the
Small child insert
4
3
2
2
1
1
4
3
2
2
1
1
小座墊適用於
0-6個月的寶寶
Small child insert
must be used for
children 0-6 months.

15 16
頭靠及肩帶高度調整
請依照寶寶的身高,將頭靠或肩帶調整到適當高度,調整頭靠高度即可同時調
整肩帶高度。
! 以嬰兒模式使用時,肩帶高度需與寶寶的肩膀相同或略低於寶寶的肩膀
(圖7.1)
! 以幼童模式使用時,肩帶高度需與寶寶的肩膀相同或略高於寶寶的肩膀
(圖7.2)
! 以學童模式使用時,汽車肩帶導向器的位置需與寶寶的肩膀相同或略高於
寶寶的肩膀(圖7.3)
如果肩帶高度不合適,意外發生時,寶寶會有被拋出兒童安全座椅的潛在
危險。
按壓調整拉桿,同時上下滑動頭靠到合適高度(圖8.1),頭靠高度共有5個
段位,調整後如圖8所示。
安裝注意事項
!請勿將此兒童安全座椅安裝在二點式安全帶的汽車座椅上,由於此安全帶
功能不完善,使用是非常危險的(圖2)
!此兒童安全座椅只適合安裝在設置有三點式安全帶的汽車座椅上(圖3)
!
請勿將此兒童安全座椅安裝在相對於汽車的行駛方向橫向(圖4.1)或後向
(圖4.2)的汽車座椅上。
!
請勿將此兒童安全座椅安裝在前座上,防止意外發生時造成寶寶傷亡(圖4.3)
!
必須將此兒童安全座椅安裝於汽車後座(圖4.4)
!請勿將此兒童安全座椅安裝於可移動的汽車座椅或車門上。
背靠角度調整
按壓角度調整手把(圖5.1),即可滑動兒童安全座椅本體(圖5.2),將座椅角度
調整到合適段位,角度調整後如圖6所示。
嬰兒模式有一段,如角度標示第4段,以藍色三角標示(圖6.1)
幼童模式有三段角度調整,如角度標示第1-3段,以紅色三角標示(圖6.1)
學童模式有兩段角度調整,如角度標示第1-2段,以紅色三角標示(圖6.1)
角度標示︰上下三角標記對齊。
小座墊可以提供完整的側撞
保護功能。適用0-6個月的
寶寶,也可以依照寶寶的
體型調整使用方式
打開鈕扣可從
小座墊上移除頭靠
Detach the snaps on the head support to
remove the head portion of the insert.
We recommend using the full
infant insert while the baby
is 0-6 months or until they
outgrow the insert. The infant
insert increases side impact
protection.
使用小座墊

17
嬰兒 模式
18
嬰兒 模式
17 18
ii. 寶寶乘坐
1. 扳動織帶長度調整器,同時將肩帶拉出至適當長度(圖15)
圖15.1 織帶長度調整器
2. 按壓紅色按鈕,將安全扣打開(圖16)
3. 將小座墊放入兒童安全座椅後,將肩帶、腰帶和安全扣穿過小座墊(圖17)
4. 分離左右兩側的安全帶(圖17)
! 安裝小座墊前,請確認肩帶高度已調整到適當位置,
請參考P.16(頭靠及肩帶高度調整)。
5. 將寶寶兩臂穿過安全帶(圖18)
6. 扣好安全扣(圖19)
7. 下拉調整織帶,調整肩帶至適當長度,以配合寶寶身形,並注意寶寶
與肩帶之間可以放進一個手掌的厚度(圖20)
提示
1.小座墊設計是為了保護寶寶,0-6個月的寶寶必須使用小座墊。
2.請先將兒童安全座椅安裝到汽車後座,再讓寶寶乘坐。
3.當寶寶放入座椅後,請確認肩帶高度是否調整到適當位置,
請參考P.16(頭靠及肩帶高度調整)。
4.拆除小座墊中的泡棉後,請將泡棉存放於寶寶無法接觸到的地方。
5.使用小座墊時請確認已裝上填充物(圖14)
6.
解開頭靠上的鈕扣,然后可移除頭靠,相反的步驟可以安裝頭靠。
嬰兒模式
(後向使用/未滿18公斤/新生兒-4歲的寶寶)
參考年齡 新生兒-4歲左右
座椅段位 第4段(圖6.1)
! 請先將此兒童安全座椅安裝到汽車後座,再讓寶寶乘坐。
i. 座椅安裝方法
1. 拉出汽車安全帶,將汽車腰帶穿過座椅卡槽(圖9),再將插扣片插到插扣
座內(圖10)
圖9.1 汽車肩帶 圖9.2 汽車腰帶
2. 將汽車肩帶依次卡入本體背面的2個汽車肩帶卡槽內(圖11)
! 汽車肩帶須穿入汽車肩帶卡槽內。
3. 持續緊壓兒童安全座椅(圖12.1),並用力拉緊汽車安全帶(圖12.2),使汽車
安全帶緊實的繫住兒童安全座椅。
! 請將兒童安全座椅前後搖晃以作確認。
! 汽車安全帶母扣段若太長,汽車安全帶無法綁緊不能使用。(圖12.3)
汽車安全帶安裝好後如圖13所示︰
! 汽車腰帶穿入座椅卡槽(圖13.1)
! 汽車肩帶穿入汽車肩帶卡槽(圖13.2)
! 汽車插扣片和插扣座正確扣合(圖13.3)
提示
1.請先將兒童安全座椅角度調整至第4段,角度標示︰上方三角標記對齊
藍色三角標記(圖6.1),請參考P.16(背靠角度調整)
2.安裝兒童安全座椅前,請確認肩帶高低已調整至適當位置,請參考
P.16(頭靠及肩帶高度調整)
3.安裝和調整汽車安全帶時,須注意汽車安全帶肩帶和腰帶都不可以扭曲
或妨礙汽車安全帶的正常功能。

19
幼童 模式
20
幼童 模式
ii. 寶寶乘坐
1. 扳動織帶長度調整器,同時將肩帶拉出至適當長度(圖15)
圖15.1 織帶長度調整器
2. 按 壓紅色 按鈕(圖16),將 安 全 扣 打 開。
3. 分離左右兩側的安全帶(圖26)
4. 將寶寶放入兒童安全座椅中,並扣好安全扣(圖19)
5. 下拉調整織帶,調整肩帶至適當長度,以配合寶寶身形,並注意寶寶與
肩帶之間須可以放進一個手掌的厚度(圖27)
提示
1.幼童模式使用時,請勿使用小座墊。
2.請先將兒童安全座椅安裝到汽車上,再讓寶寶乘坐。
3.當寶寶放入座椅後,請確認肩帶高度是否調整在適當位置,請參考
P.16(頭靠及肩帶高度調整)
幼童模式
(前向使用/9-18公斤/1-4歲的寶寶)
參考年齡 1-4歲左右
座椅段位 1-3段(圖6.1)
! 請先將此兒童安全座椅安裝到汽車座椅上,再讓寶寶乘坐。
i. 座椅安裝方法
1. 拉出汽車安全帶後,將汽車安全帶依次穿入本體背面的2個背靠卡槽內
(圖21)
2. 將安全帶插扣片插到插扣座內(圖22)
3. 打開汽車安全帶固定夾器,將安全帶穿入汽車安全帶固定夾器中(圖23)
4. 持續緊壓兒童安全座椅,並用力拉緊汽車安全帶,使汽車安全帶緊實的
繫住兒童安全座椅(圖24)
! 請將兒童安全座椅前後搖晃以作確認。
! 汽車安全帶母扣段若太長, 汽車安全帶無法綁緊不能使用。(圖24.1)
汽車安全帶安裝好後如圖25所示
! 汽車肩帶穿過汽車安全帶固定夾器(圖25.1)
! 汽車腰帶穿過背靠卡槽(圖25.2)
! 汽車插扣片和插扣座正確扣合(圖25.3)
提示
1.請先調整好兒童安全座椅的角度,前向共有3段,角度標示︰上方三角標記
對齊紅色三角標記(圖6.1),請參考P.16(背靠角度調整)
2.安裝兒童安全座椅前,請確認肩帶高低已調整至適當位置,請參考P.16
(頭靠及肩帶高度調整)
3.安裝和調整汽車安全帶時,須注意汽車安全帶肩帶和腰帶都不可以扭曲
或妨礙汽車安全帶的正常功能。

22
學童 模式
21
! 請勿將汽車安全帶單獨穿過小朋友大腿上方(圖34.1)
! 請勿讓汽車肩帶鬆馳或將汽車肩帶置於小朋友手臂下方(圖34.2)
! 請勿將汽車肩帶置於小朋友背後(圖34.3)
! 小朋友乘坐於汽車椅上後,請勿讓他/她滑下,以免汽車安全帶勒住小
朋友頸部並造成窒息危險(圖34.4)
座布拆卸
1. 按壓紅色按鈕,將安全扣打開(圖16)
2. 將胯帶從胯帶護片內的鬆緊帶中穿出,移除胯帶護片(圖28)
3. 打開肩帶護片內側的鈕扣,然後解開黏扣帶,移除肩帶護片(圖35)
4. 移除小座墊。
5. 解開頭靠上的黏扣帶(圖36.1),移除頭靠。
6. 解開座墊上的鈕扣(圖36.2),並將安全扣拉到座墊背面,移除座墊。
! 拆卸座布時,請勿拆卸塑膠件上的連接件。
清潔方法
! 拆除小座墊中的泡棉後,請將泡棉存放於寶寶無法接觸到的地方。
! 請以30度以下水溫清洗。
! 請勿使用熨斗熨燙。
! 請勿使用漂白劑及乾洗。
! 請勿使用未經稀釋的中性清潔劑、汽油或其他有機溶劑清洗兒童安全
座椅,否則可能對兒童安全座椅造成損壞。
! 請勿大力扭乾,過分大力扭乾可能留下皺褶。
! 請於陰涼處鋪平晾乾。
! 當長時間不使用本兒童安全座椅時,請將本兒童安全座椅從汽車座椅上
拆除,並存放於陰涼處及寶寶不易接觸的地方。
學童模式
(前向使用/15-25公斤/3-7歲的寶寶)
參考年齡 3-7歲左右
座椅段位 1-2 段(圖6.1)
1. 按壓紅色按鈕,將安全扣打開(圖16)
2. 將胯帶從胯帶護片內的鬆緊帶中穿出,移除胯帶護片(圖28)
3. 移除小座墊。
4. 解開頭靠和座墊上的鈕扣(圖29.1)和黏扣帶(圖29.2)
5. 掀開座墊的座布,將肩帶護片存放到本體中的儲存格內(圖29.3)
6. 將扣具拉到座墊下面,並妥善放入儲存格內(圖29.4&29.5)
7. 確實蓋回儲存格蓋並扣回頭靠和座墊上的鈕扣(圖29.1)和黏扣帶
(圖29.2),確實恢復背靠座布(圖30)
8. 讓小朋友坐上座椅,並調整頭靠到適當高度,請參考P.16(頭靠&肩帶
高度調整)。
9. 將汽車肩帶穿過汽車肩帶導向器(圖31.1),汽車腰帶穿過座椅卡槽
(圖31.2),再將安全帶插扣片插到插扣座內並拉緊汽車安全帶。
圖 31.3 汽車肩帶導向器
! 汽車肩帶須穿過汽車肩帶導向器(圖32)
! 汽車腰帶須穿過座椅卡槽(圖33)
! 汽車安全帶母扣段若太長, 汽車安全帶無法綁緊不能使用(圖33.1)
提示
1.學童模式下僅需使用汽車安全帶,應移除小座墊和胯帶護片,且將肩帶
護片和五方向安全扣存放到本體內。
2.存放肩帶護片和五方向安全扣前,需將肩帶調節至適當長度(圖15)
3.請先調整好兒童安全座椅的角度,前向共有2段,角度標示︰上方三角標
記對齊紅色三角標記1和2(圖6.1),請參考P.16(背靠角度調整)。
4.安裝汽車安全帶時,須注意汽車安全帶肩帶和腰帶都不可以扭曲或妨礙
汽 車 安 全 帶 的 正 常 功 能。

Note 0+/I/Ⅱ
(0–25kg)
stages
This child restraint is approved to
Chinese National Standard 11497 and
UN ECE regulation 44, 04 series
of amendments.
Please read all the instructions
in this manual before installing
and using the product
child restraint
Instruction Manual

25 26
Contents
Reference Figures 1 - 9
English
Product Information 27
Warnings 29
Emergency 31
Parts List 31
Choose the Installation Mode 32
Use small child insert 33
Concerns on Installation 33
Recline Adjustment 34
Height Adjustment for Head Support and Shoulder Harnesses 34
Baby Mode (Rearward Facing Mode / for Child
under 18kg / Newborn -4 years old) 35
i Installation for Baby Mode 35
ii Securing your Child in the Child Restraint 36
Toddler Mode (Forward Facing Mode / for Child
between 9-18kg / 1– 4 years old) 38
i Installation for Toddler Mode 38
ii Securing your Child in the Child Restraint 39
Junior Mode (Forward Facing Mode / for Child
between 15 –25kg / 3 –7 years old) 40
Detach Soft Goods 42
Cleaning Method 42
Congratulations
You have purchased a high quality, fully certified child
safety child restraint. This product is suitable for the use
of children weighing UNDER 25kg (approximately 7years
old or under).
Carefully read this Instruction Manual and follow the
installing steps because this is the ONLY way to protect
your child from serious injury or death in case of an
accident, and to provide comfort to your child while
using this product.
Keep this instruction manual for future reference.
Please Confirm
Make sure that your vehicle is equipped with 3-point
retractor safety-belt.
Seat belts may be different in design and length
according to maker, manufacturing date, and type of
the vehicle. This child restraint is only suitable for use in
the listed vehicles fitted with 3-point retractor safety-
belts and approved to CNS 3972 and UN ECE regulation
16 or other equivalent standards. This child restraint is
approved to CNS 11497 and UN ECE regulation 44, 04
series of amendments.
This child restraint is not suitable for use in the vehicles
fitted with 2-point retractor safety-belts.
! Please keep the instruction manual in the storage
compartment of the rear cover for future reference.

27 28
Joie Children's Products (UK) Ltd,
Venture Point, Towers Business Park,
Rugeley, Staffordshire, WS15 1UZ
www.joiebaby.com
Product Child Restraint
Model C0925
Suitable for Child weighing under 25kg
(approximately 7 years old or under)
Materials Plastics, metal, fabrics
Mass Group 0+/
I
/
Ⅱ
Net Weight 8.55kg
Product Size 550mmx480mmx620mm
Date Please see detailed date on label (year / month / day)
Patent No. Patents pending
Made in China
Distributor Chickabiddy Co., Ltd
Address 5th FL, 186, Nanking E. Rd, Sec. 4, Taipei, Taiwan 10595
Tel. 0800-001-256 / 02-25781188
Website www.chick.com.tw
Product Information
1. This is a ‘Universal’ child restraint. It is approved to CNS 11497 and UN
ECE regulation 44, 04 series of amendments, for general use in vehicles
and it will fit most, but not all, car seats.
2. A correct fit is likely if the vehicle manufacturer has declared in the
vehicle handbook that the vehicle is capable of accepting a ‘Universal’
child restraint for this age group.
3. This child restraint has been classified as ‘Universal’ under more stringent
conditions than those which applied to earlier designs which do not
carry this notice.
4. If in doubt, please consult the child restraint distributor or call
0800-001-256 / 02-25781188 directly.
041504
11
R38 5 4 6
檢 驗 標 識
通過CNS國家標準

29 30
!NEVER use ropes or any other substitutes in place of seat belts in case
of injuries from restraint.
!DO NOT use this child restraint as a regular chair as it tends to fall
down and injure the child.
!DO NOT use this child restraint without the soft goods supplied.
!The soft goods should not be replaced with any besides the ones
recommended by the manufacturer﹐ because the soft goods constitute
an integral part of the child restraint performance.
!DO NOT put anything other than the recommended inner cushions in
this child restraint.
!DO NOT carry this child restraint with a child in it.
!Luggage or other things which may injury child in a crash would be
fixed appropriately.
!Make sure that no part of the child restraint become trapped by a
movable seat or in a door of the vehicle.
!DO NOT continue to use this child restraint after it has suffered any
violent crash. Replace immediately as there may be invisible structural
damage from the crash.
!Remove this child restraint from the vehicle seat when it is not in use for
a long period of time.
!To avoid suffocation﹐ remove plastic bag and packaging materials
before using this product. The plastic bag and packaging materials
should then be kept away from babies and children.
!Consult the distributor for issues concerning maintenance﹐ repair
and part replacement.
!DO NOT use any load bearing contact points other than those
described in the instructions and marked in the child restraint.
!DO NOT install this child restraint under the following conditions:
1. Vehicle seats with 2-point safety belts.
2. Vehicle seats facing sideward or rearward with respect to the
running direction of the vehicle.
3. Vehicle seats unstable during installation.
Warning
!NO child restraint can guarantee full protection from injury in an accident.
However﹐ proper use of this child restraint will reduce the risk of serious
injury or death to your child.
!This child restraint is designed ONLY for child weighing under 25kg
(approximately 7 years old or under).
!DO NOT use forward facing mode before the child’s weight exceeds 9kg.
!Any straps of child restraint and vehicle seat should be tightened and not
twisted.
!DO NOT use or install this child restraint until you read and understand
the instructions in this manual and in your vehicle owner's manual.
!DO NOT install or use this child restraint without following the
instructions and warnings in this manual or you may put your child in
serious risk of injury or death.
!DO NOT make any modification to this child restraint or use it along with
component parts from other manufacturers﹐ because they may
endanger your child's safety.
!DO NOT use this child restraint if it has damaged or missing parts.
!DO NOT have your child in unfitted clothes when use this child restraint in
baby or toddler mode﹐ because this may prevent your child from being
properly and securely fastened by the shoulder harnesses and the
harnesses between thighs.
!When use this child restraint in baby or toddler mode﹐ the safety belt must be
used correctly﹐ and ensure that any lap strap is worn low down﹐ so that the
pelvis is firmly engaged.
!DO NOT leave this child restraint unbelted or unsecured in your vehicle
because unsecured child restraint can be thrown around and may injure
occupants in a sharp turn﹐ sudden stop﹐ or collision. Remove it if not in
regular use.
!NEVER leave your child unattended with this child restraint at all times.
!NEVER install this child restraint on any vehicle seat equipped with safety
airbags when used with baby mode.
!NEVER use a second-hand child restraint or a child restraint whose
history you do not know because they may have structural damage that
endangers your child's safety.
!Please keep this child restraint away from sunlight﹐ otherwise it may be
too hot for the child's skin.

31 32
Important
1. DO NOT use forward facing mode before the child's weight exceeds 9kg.
2. When the child is suitable for both toddler and baby modes﹐ it is
recommended to install this child restraint in the baby mode as it is
relatively safer.
Choose the Installation Mode
Emergency
In case of emergency or accidents﹐ it is most important to have your child
taken care of with first aids and medical treatment immediately.
Parts List
Fig. 1.1 Head Support Fig. 1.11 Lock-off Device
Fig. 1.2 Seat Pad Fig. 1.12 Head Support
Fig. 1.3 Buckle Adjustment Lever
Fig. 1.4 Adjustment Adaptor Fig. 1.13 Shoulder-belt Slot
Fig. 1.5 Adjustment Webbing Fig. 1.14 Rear Cover
Fig. 1.6 Recline Adjustment Fig. 1.15 Instruction Manual Storage
Handle Compartment
Fig. 1.7 Webbing Adjuster Fig. 1.16 Base
Fig. 1.8 Crotch Strap Fig. 1.17 Body
Fig. 1.9 Shoulder Strap Fig. 1.18 Back Slot
Fig. 1.10 Small Child Insert Fig. 1.19 Seat Slot
Soft goods include Seat Pad, Shoulder Strap, Crotch Strap, Head Support and
Small Child Insert.
Please make sure there are no missing parts. Please contact the distributor
if anything is missing.
寶寶
體重 安裝模式安裝圖示參考年齡 座椅段位小座墊使用說明
未滿
18
公斤
嬰兒模式
幼童模式
學童模式
未滿
4歲
第4段
第1-3段
第1-2段
小座墊可輔助安全
帶綁緊寶寶
並讓寶寶
背部躺平,避免
脊椎彎曲
9 -18
公斤 1 - 4 歲 拆除小座墊
15 -25
公斤 3 - 7歲 拆除小座墊
Child's
Weig ht
Installation
Mode
Figure for
Installation
Reference
Age
Seat Child insert
Position Instructions
<18kg
9 - 18 kg
15 - 25 kg
+
Baby mode
Toddler
mode
Junior mode
Small
child insert
<4 years
Small child insert
is used to
help restrain
the child tightly
and level the
child's back to
avoid cyrtosis
1 year
to
4 years
3 years
to
7 years
Position 1 -3
Position 1 -2
Position 4
Disassemble the
Small child insert
Disassemble the
Small child insert
4
3
2
2
1
1
4
3
2
2
1
1
小座墊適用於
0-6個月的寶寶
Small child insert
must be used for
children 0-6 months.

33 3434
Height Adjustment
for Head Support and Shoulder Harnesses
Please adjust the head support and shoulder harnesses to proper height
according to the child's height.
!When used in baby mode, the shoulder harness slots must be even with or
just below the child’s shoulders. (Fig. 7.1)
!When used in toddler mode, the shoulder harness slots must be even with
or just above the child’s shoulders. (Fig. 7.2)
!When used in junior mode, the shoulder belt guides must be even with or
just above the child’s shoulders. (Fig. 7.3)
If the shoulder harnesses are not at proper height, the child may be thrown
from the child restraint when there is an accident.
Squeeze the head support adjustment lever (Fig. 8.1), meanwhile pull up or
push down the head support until it snaps into one of the five positions.
The head support positions are shown as Fig. 8.
33
Concerns on Installation
!DO NOT install this child restraint on vehicle seats with Lap Belts. (Fig. 2)
!This child restraint is only suitable for vehicle seats with 3-Point Retractor
Safety Belts. (Fig. 3)
!DO NOT install this child restraint on vehicle seats that face sideward
(Fig. 4.1) or rearward (Fig. 4.2) with respect to the moving direction of the
vehicle.
!DO NOT install this child restraint on the front vehicle seats in case injuries
might happen to the child when there is an accident. (Fig. 4.3)
!This child restraint must be installed on the rear vehicle seat. (Fig. 4.4)
!DO NOT install this child restraint on movable vehicle seats or vehicle doors
during installation.
Recline Adjustment
Press the recline adjustment handle (Fig. 5.1), and adjust the child restraint to
the proper position (Fig. 5.2). The recline angles are shown as Fig. 6.
The recline angle 4 is for baby mode, it is marked as blue triangles. (Fig. 6.1)
There are three recline angles 1-3 for toddler mode, they are marked as red
triangles. (Fig. 6.1)
There are two recline angles 1-2 for junior mode, they are marked as red
triangles. (Fig. 6.1)
Angle indication: with top and bottom triangles aligned.
Use small child insert
小座墊可以提供完整的側撞
保護功能。適用0-6個月的
寶寶,也可以依照寶寶的
體型調整使用方式
打開鈕扣可從
小座墊上移除頭靠
Detach the snaps on the head support to
remove the head portion of the insert.
We recommend using the full
infant insert while the baby
is 0-6 months or until they
outgrow the insert. The infant
insert increases side impact
protection.

35 36
BABY MODE
BABY MODE
3. While pressing the child restraint (Fig. 12.1), pull the belts to fasten the
child restraint tightly and securely. (Fig. 12.2)
! Please check by moving the child restraint back and forth.
!The child restraint can not be used if the vehicle safety belt with
female buckle is too long to tie the base. (Fig. 12.3)
Correctly assembled vehicle belt is shown as Fig. 13.
!Waist belt passes through the seat slots, as Fig. 13.1.
!Shoulder belt must passes through the shoulder-belt slots, as Fig. 13.2.
!The vehicle buckle tongue is engaged with the buckle correctly, as
Fig. 13.3.
ii. Securing your Child in the Child restraint
1. Pull up the webbing adjuster, while pulling out the shoulder harnesses
to the proper length. (Fig. 15)
Fig. 15.1 Webbing adjuster
2. Press the red button to disengage the buckle. (Fig. 16)
3. Place the small child insert in the child restraint, thread the shoulder
harnesses, waist harnesses. (Fig. 17)
1. Small child insert is for child's protection. Small child insert must be used
for children 0-6 months.
2. Please install the child restraint on the rear vehicle seat﹐ and then put the
child in the child restraint.
3. After the child is placed into the seat﹐ check whether the shoulder
harnesses are at proper height. Please refer to P. 34 (Height Adjustment
for Head support and Shoulder Harnesses).
4. After removing the foam from the small child insert﹐ please store it in a
place where the child can not access it.
5. Before using the small child insert﹐ please assemble the foam. (Fig. 14)
6. Detach the snaps on the head support﹐ and then remove the head
support. To assemble head support in reverse steps.
Note
Baby Mode
(Rearward Facing Mode/for Child under 18kg /
Newborn -4 years old)
Reference age Newborn - 4 years old
Seat position Position 4 (with top triangle and blue triangle aligned,
as Fig. 6.1)
!Please install the child restraint on the rear vehicle seat, and then put the
child in the child restraint.
i. Installation for Baby Mode
1. Pass the waist belt over seat slots (Fig. 9), and then engage the vehicle
buckle tongue into the buckle. (Fig. 10)
Fig. 9.1 Shoulder belt Fig. 9.2 Waist belt
2. Fasten the shoulder belt in the two shoulder-belt slots at the back of
the body. (Fig. 11)
! Shoulder belt must pass through the shoulder-belt slots.
1. First adjust the angle of the child restraint to the position 4. Angle
indication: With top triangle and blue triangle aligned (Fig. 6.1)﹐ please
refer to P. 34 (Recline Adjustment).
2. Make sure the shoulder harness is adjusted to proper height before
installing this child restraint. Please refer to P. 34 (Height Adjustment for
Head support and Shoulder Harnesses).
3. When installing and adjusting the safety belts﹐ make sure that both the
shoulder belt and the waist belt are not twisted and will not stop the
safety belts from functioning properly.
Note
Table of contents
Other Joie Automobile Accessories manuals
Popular Automobile Accessories manuals by other brands

COBI PLATEC
COBI PLATEC X-PLA mini user manual

SKS-Kinkel
SKS-Kinkel il vetro installation instructions

Safe Fleet
Safe Fleet PRIME DESIGN CBR 0011 quick start guide

Stinson
Stinson TC12-3060 user manual

travall
travall TDG 1623 Fitting instructions

Mennekes
Mennekes AMTRON Professional+ E 7,4 / 22 OPERATING AND INSTALLATION Manual