Joie gemm User manual

child restraint
gemm
™
0+ (0–13kg)
Instruction Manual
Manuel d’utilisateur
Bedienungsanleitung
Manual de instrucciones
Manual de Instruções
Instrukcja obstugi
Handleiding
Manuale di istruzioni
Kullanma kalvuzu
Bruksanvisningen
사용 설명서
GB
FR
DE
ES
PT
PL
NL
IT
TR
SE
KR
ﺕﺎﻤﻴﻠﻌﺘﻟﺍ ﻞﻴﻟﺩ
AR

18
19
20
21
22
2
1
3
4
5
6
7
8
910
11
14
15
16
17
12 13
or
GB Welcome to Joie™
Congratulations on becoming part of the Joie family! We are so
excited to be part of your journey with your little one. While traveling
with the Joie GEMM™ child restraint you are using a high quality, fully
certified safety Group 0+ infant child restraint. This product is suitable
for use with children weighing under 13kg (approximately 1.5 years old
or under). Please carefully read this manual and follow each step to
ensure a comfortable ride and best protection for your child.
Please Confirm
Make sure that your vehicle is equipped with 3-point retractable
safety-belt. Seat belts may be different in design and length according
to maker, manufacturing date, and type of the vehicle. This infant child
restraint is only suitable for use in the listed vehicles fitted with 3-point
retractor safety-belts and approved to European Regulation No. 16 or
other equivalent standards.
Base
These instructions show the use of the infant child restraint and the
base. Please note that the base is not always included in the purchase of
the product. The base may be sold separately.
! IMPORTANT: KEEP FOR FUTURE REFERENCE. PLEASE READ
CAREFULLY.
Keep this Instruction Manual always with the child restraint. If you own
a base, please keep the instruction manual in the storage compartment
at the bottom of the base.
This child restraint is approved to European Regulation No. 44, 04
series of amendments. Please read all the instructions in this manual
before installing and using the product.
Visit us at joiebaby.com to download manuals, see more
exciting Joie products and register your child restraint.
Fig. 1.1 Seat Pad
Fig. 1.2 Stroller Fix Release
Button A
Fig. 1.3 Side Guide
Fig. 1.4 Insert A
Fig. 1.5 Adjustment Webbing
Fig. 1.6 Harness Adjustment
Button
Fig. 1.7 Shoulder Harness
Fig. 1.8 Hood Mount
Fig. 1.9 Hood
Fig. 1.10 Harness Connectors
Fig. 1.11 Harness Buckle
Fig. 1.12 Insert A
Parts List
Fig. 1.13 Insert B
Fig. 1.14 Handle
Fig. 1.15 Handle Button
Fig. 1.16 Rear Guide
Fig. 1.17 Stroller Fix Release
Button B
Fig. 1.18 Lock-off
Fig. 1.19 Shell Indicator
Fig. 1.20 Load Leg Indicator
Fig. 1.21 Load Leg
Adjustment Button
Fig. 1.22 Child Restraint
Release Button
The insert is different for different model, one model has only
one insert. Make sure there are no missing parts, please
contact the distributor if anything is missing.

1 2
!NO Infant child restraint can guarantee full protection from
injury in an accident. However, proper use of this Infant
child restraint will reduce the risk of serious injury or death
to your child.
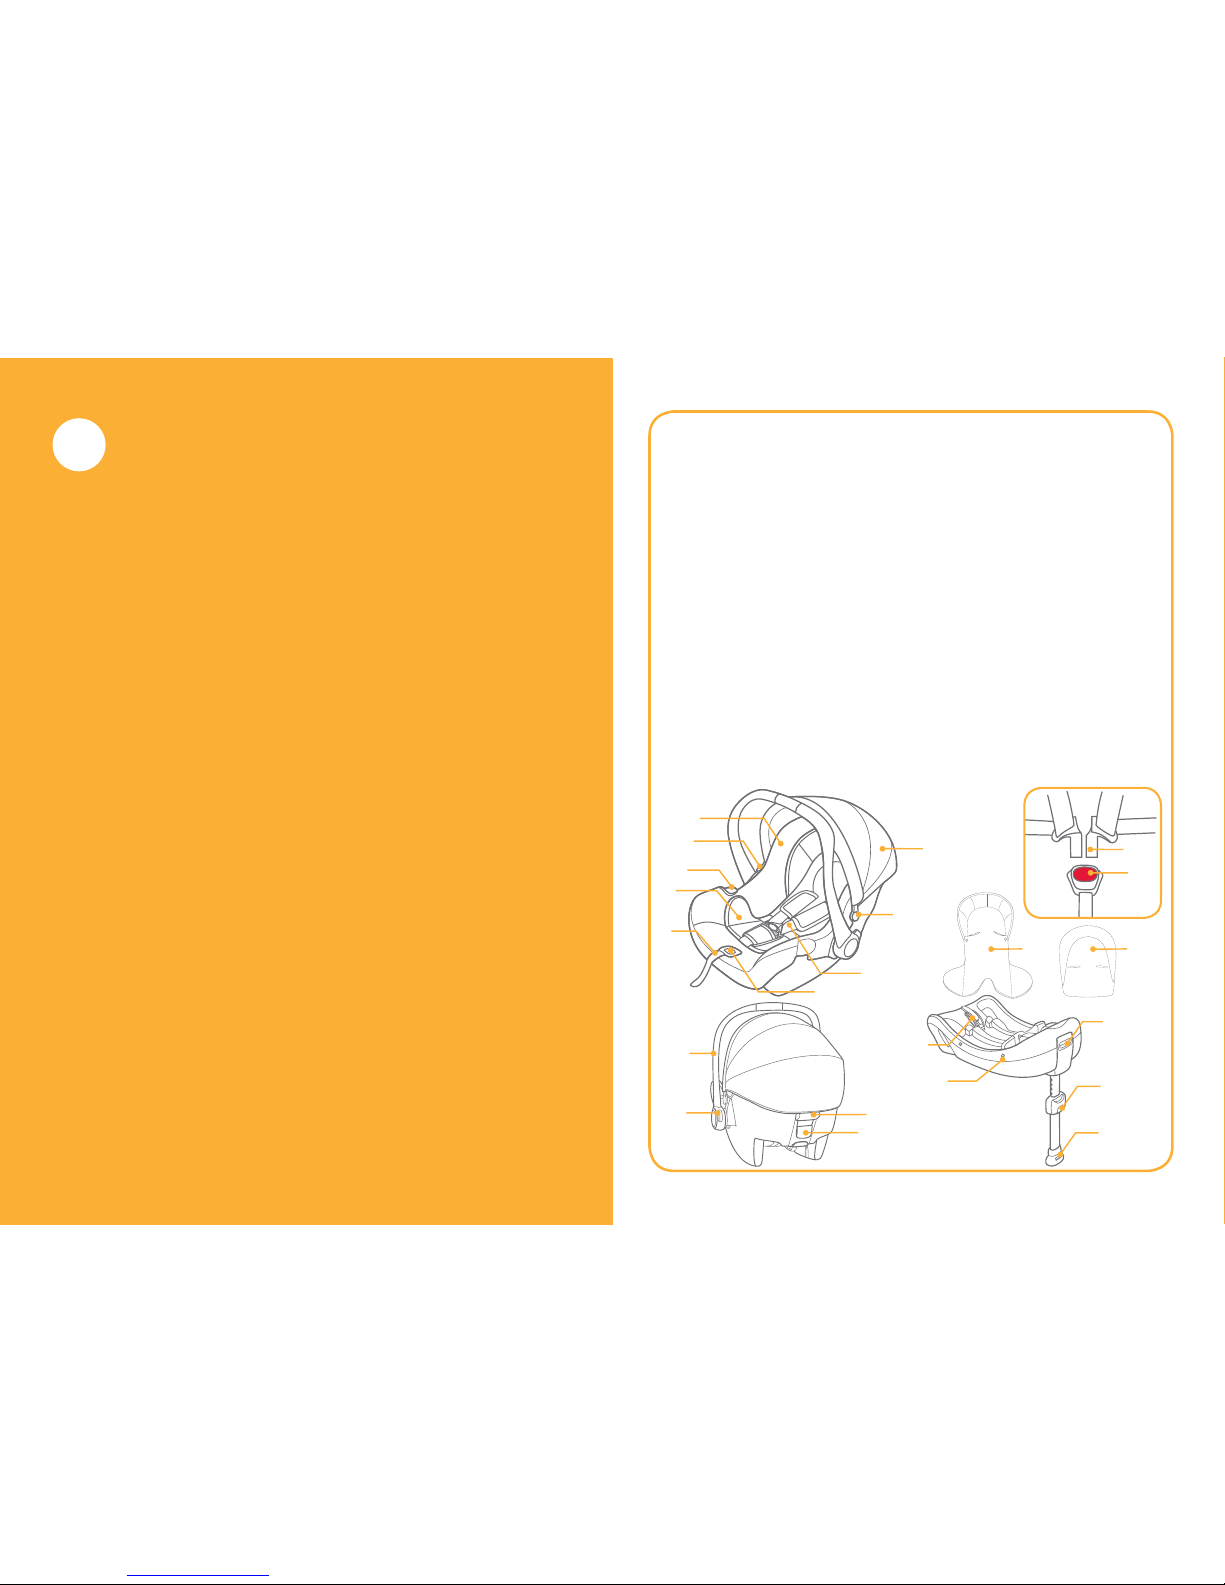
!This Infant child restraint is designed ONLY for child
weighing under 13kg.
!DO NOT use or install this Infant child restraint until you
read and understand the instructions in this manual and in
your vehicle owner's manual.
!DO NOT make any modification to this Infant child restraint
or use it along with component parts from other
manufacturers.
!DO NOT use this Infant child restraint if it has damaged or
missing parts.
!DO NOT have your child in unfitted clothes because this
may prevent your child from being properly and securely
fastened by the shoulder harnesses and the harnesses
between thighs.
!DO NOT leave your child restraint or base unsecured in a
car. Your child restraint or base must always be secured in
the car.
!NEVER leave your child unattended with this Infant child
restraint at all times.
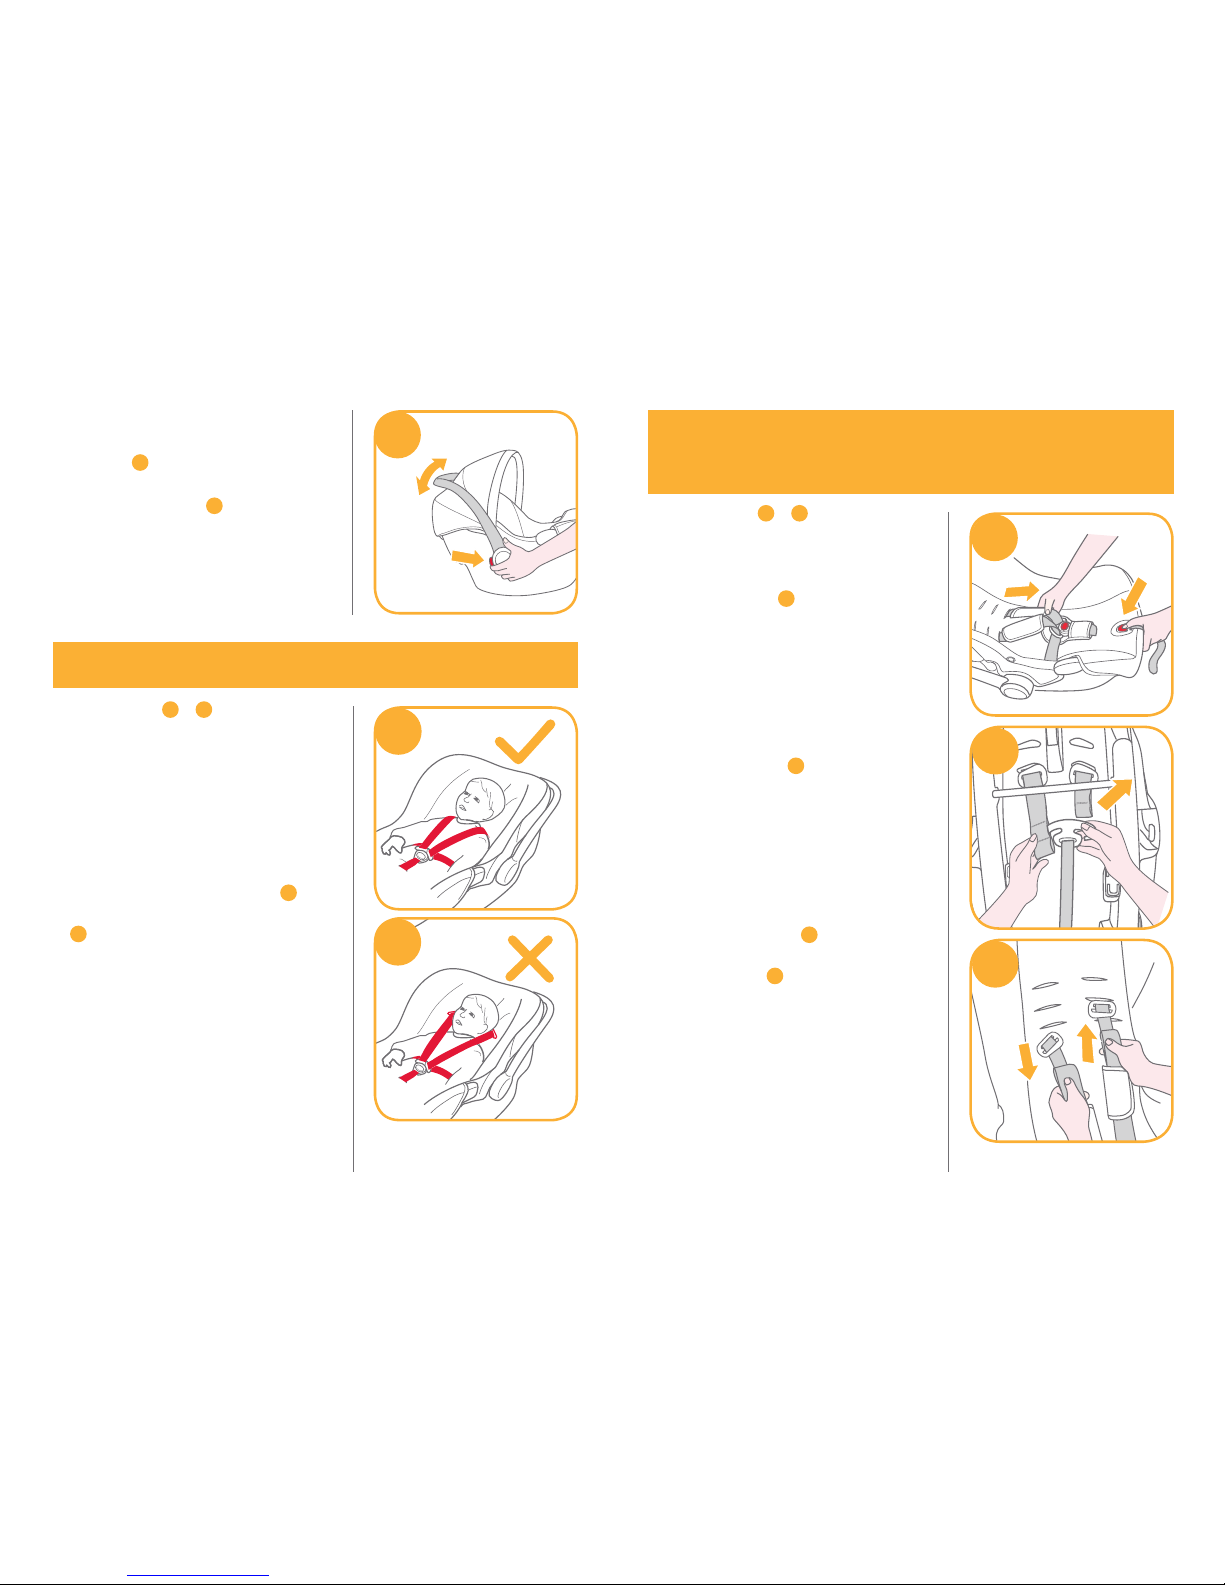
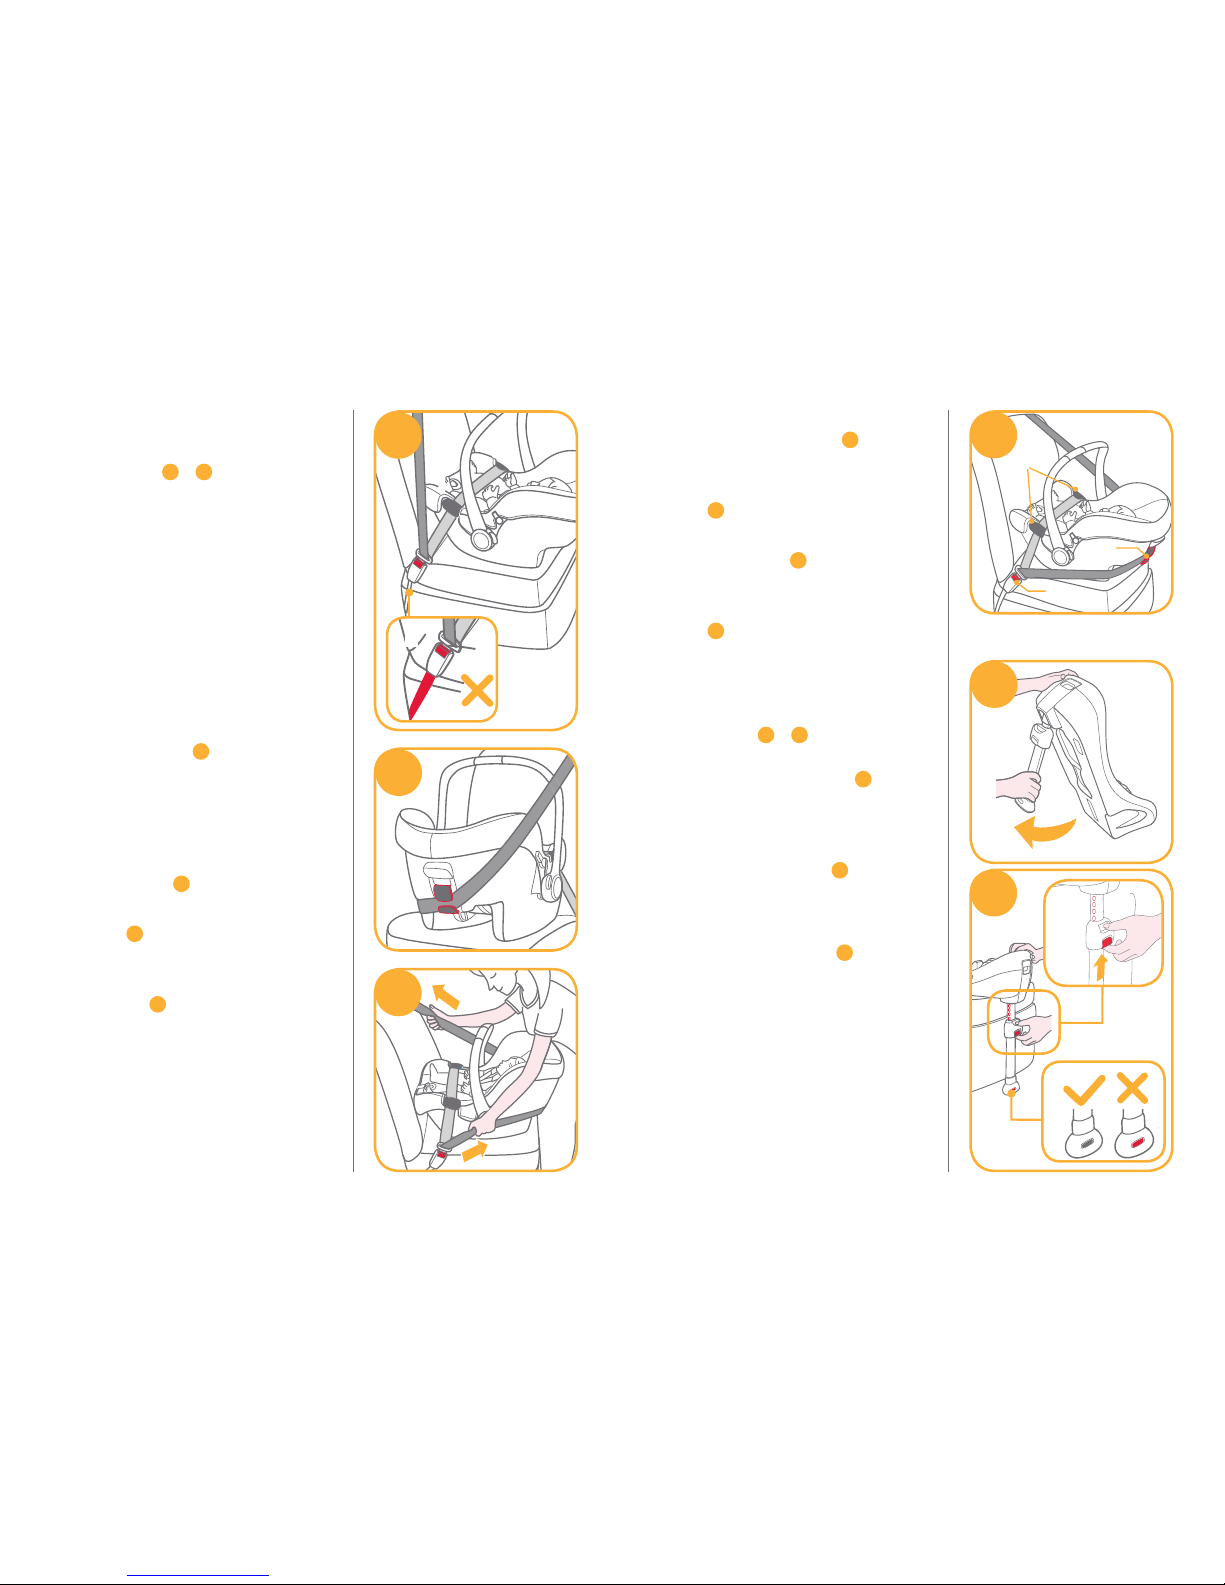
!After your child is placed in this Infant child restraint, the
safety belt must be used correctly, and make sure the lap
harnesses are right above the child’s pelvis portion.
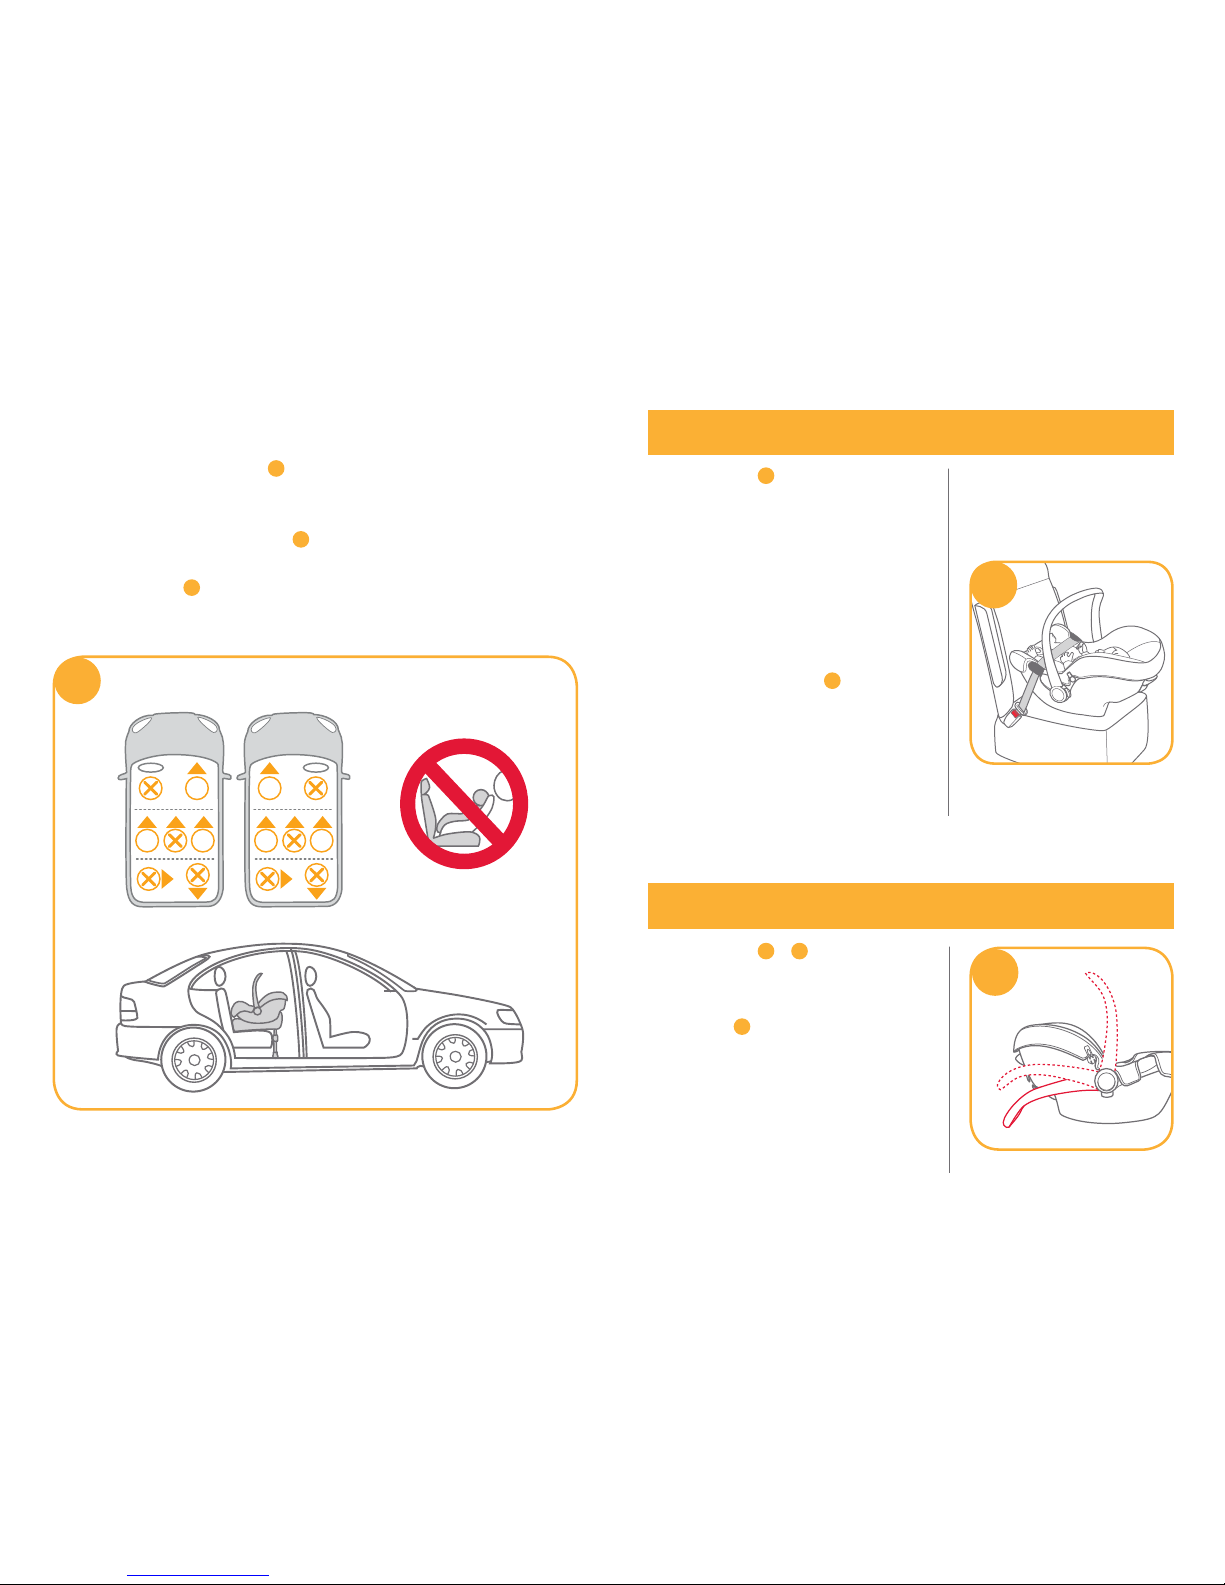
!Do not place this infant child restraint in seating positions
where an active frontal airbag is installed.
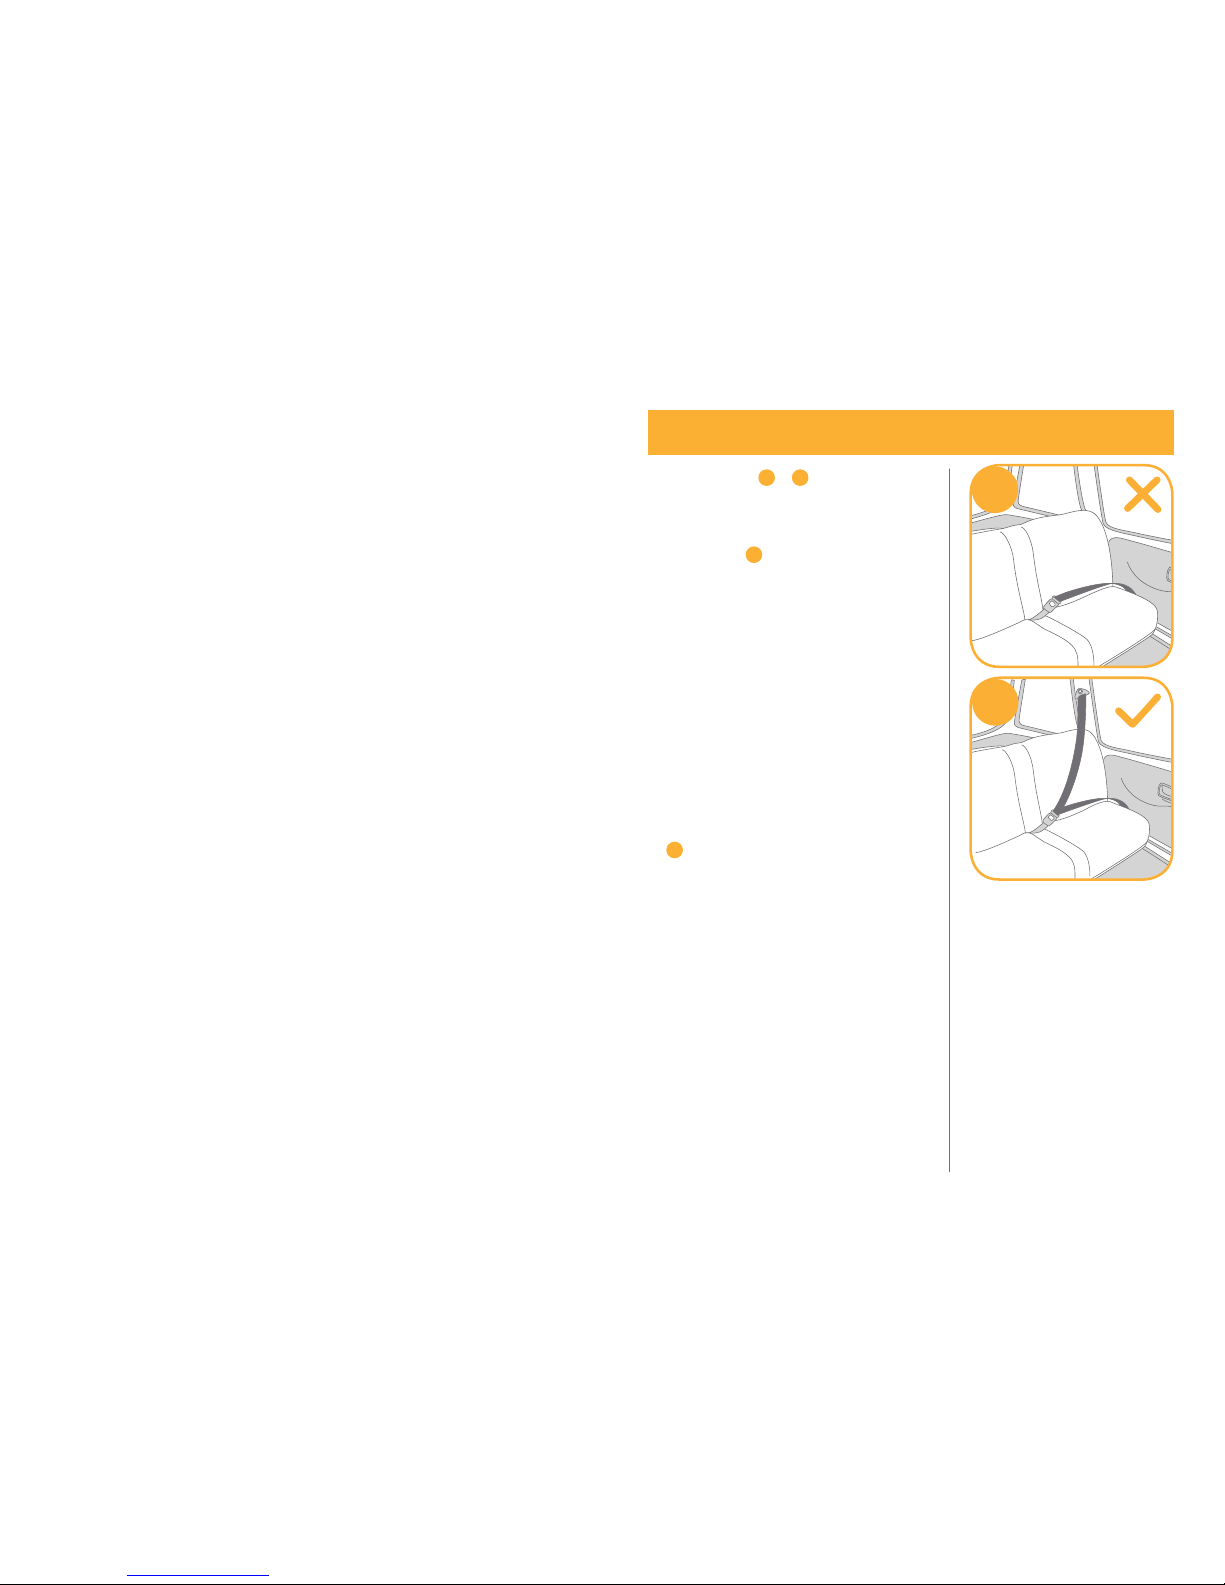
!Only use this child restraint on vehicle seats with seat
backs that lock in place. Vehicle seats without latches, that
fold forward or pivot freely should not be used.
!NEVER use a second-hand Infant child restraint or an
Infant child restraint whose history you do not know
because they may have structural damage that endangers
your child’s safety.
!NEVER use ropes or any other substitutes in place of
vehicle belt in case of injuries from restraint.
!Please keep this Infant child restraint away from sunlight,
otherwise it may be too hot for the child’s skin.
!DO NOT use this Infant child restraint without the soft goods.
!The soft goods should not be replaced with any besides
the ones recommended by the manufacturer, because the
soft goods constitute an integral part of the child restraint
performance.
!DO NOT make any alterations or additions to any part of
the child restraint or base. Do not use accessories or parts
supplied by other manufacturers. The function of the child
restraint could be altered, resulting in serious injury or death.
!DO NOT use another manufacturer’s insert or base with
this child restraint. See your retailer for Joie replacements
ONLY.
!DO NOT put unsecured items in the vehicle because they
can be thrown around and may injure occupants in
a sharp turn, sudden stop, or collision.
!DO NOT put anything underneath your infant child re-
straint. In a crash it could fly out, making the webbing slack
and creating a hazard for other passengers.
WARNING WARNING

3 4
!Only use this infant child restraint on vehicle seats that are
fully padded and are free of sharp objects.
!Note about parts getting caught in door.
!DO NOT continue to use this Infant child restraint or base
after they have suffered any violent crash. Replace
immediately as there may be invisible structural damage
from the crash.
!Remove this Infant child restraint from the vehicle seat
when it is not in use for a long period of time.
!Consult the distributor for issues concerning maintenance,
repair and part replacement.
!To avoid the risk that the child may fall, secure the child to
the Infant child restraint also when carrying the Infant child
restraint by hand.
!Before carrying the Infant child restraint by hand, ensure
that the child is fastened with the safety harness, and that
the handle is correctly locked in a vertical position.
!DO NOT use the Infant child restraint on the tables, chairs
or other elevated surfaces.
!DO NOT use any load bearing contact points other than
those described in the instructions and marked on the
child restraint.
Emergency
In case of emergency or accidents, it is most important to have
your child taken care of with first aid and medical treatment
immediately.
Product Information
i. for Seat Only
1. This infant child restraint is a ‘Universal’ child restraint. Itis
approved to European Regulation No. 44, 04 series of
amendments, for general use in vehicles and it will fit most,
but not all, car seats.
2. A correct fit is likely if the vehicle manufacturer has declared
in the vehicle handbook that the vehicle is capable of
accepting a ‘Universal’ child restraint for this age group.
3. This infant child restraint child restraint has been classified
as ‘Universal’ under more stringent conditions than those
which applied to earlier designs which do not carry this
notice.
4. If in doubt, please consult the child restraint manufacturer or
the retailer.
WARNING

5 6
ii. for Seat with Base
1.
The Joie child restraint with base are ‘Semi-universal’ child
restraint. They are approved to European Regulation No.
44, 04 series of amendments, for general use in vehicles and
they will fit most, but not all, car seats.
2. Read all the instructions in this manual before using the
product. If you have any further questions, consult the
distributor directly.
3. If in doubt, please consult the child restraint manufacturer or
the retailer.
Product Infant Child Restraint
Suitable for Child weighing under 13kg
Mass Group Group 0+
Materials Plastics, metal, fabrics
Patent No. Patents pending
see images 1- 3
!DO NOT install this infant child
restraint on vehicle seats with
Lap Belt. 1
!This infant child restraint is only
suitable for vehicle seats with
3-Point Retractor Safety Belts.
2
Concerns on Installation
1
2

7 8
!DO NOT install this infant child restraint on vehicle seats that
face sideward or rearward with respect to the moving
direction of the vehicle. 3-1
!DO NOT install this infant child restraint on the front vehicle
seat with airbag in case injuries might happen to the child
when there is an accident. 3-2
!This infant child restraint must be installed in the rearward
facing mode. 3-3
!
DO NOT install this infant child restraint on unstable vehicle
seats during installation.
312
3
A
I
R
B
A
G
see images 4
!The gemm can only be
installed using a lap belt if
being used in an aircraft
without the base. Do not install
in a vehicle using a lap belt.
! When being used in an aircraft,
the infant child restraint
must only be installed rear
facing on the seat. 4
! Gemm child restraint width is
435mm, but some aircraft
seat widths are 430mm. For
narrow seat, please place
padding under the seat to raise
the height and allow it to fit
between the arm rests.
see images 5- 6
The handle of the infant child
restraint can be adjusted to 3
positions. 5
Position 1 Position for car, hand
or stroller
transportation.
Position 2 Rocking position.
Position 3 Baby chair position.
Aeroplane lnstallation
Handle Adjustment
4
5
3
2
1
1
23
1
23

910
To adjust the handle, squeeze
handle buttons on both sides to
release it 6-1, and then rotate
the handle until it clicks into any
of the 3 positions. 6-2
see images 7- 8
Check that shoulder harnesses
are set at the proper height.
Please choose the proper pair of
shoulder harness slots according
to the child's height.
!Shoulder harnesses must go
into the harness slots nearest
to your baby’s shoulders 7,
but not above the shoulder line.
8
!If the shoulder harnesses are
not at proper height, the child
might be thrown from the
infant child restraint when
there is an accident.
6
1
2
see images 9- 12
1.Press the adjustment button at
the front of the seat and pull
the shoulder harnesses to
loosen them. 9
2.At the back of the seat, take
the harness ends off the metal
junction plate. 10
3.Pull the harnesses through the
slots in the seat 11 -1,insert
them into the appropriate
set of slots. 11 -2
a. Thread the shoulder strap
through shoulder harnesses.
b. Thread the shoulder harness
anchor through the shoulder
harness slot.
c. Thread the shoulder strap
through the shoulder harness
slot.
Shoulder Harness Position
7
8
Shoulder Harness Strap
Height Adjustment
10
11
12
9

11 12
4.Reassemble the harness ends
onto the junction plate. 12
! Thread the shoulder strap
through the shoulder
harness anchor. 12 -1
!The shoulder harnesses
must be placed in back of
the two iron tubes.
!During adjustment, make
sure the shoulder harnesses
are not twisted.
!Use extreme care in
threading the shoulder
harnesses according to the
figure. If the shoulder
harnesses are not secure,
they will not protect your
baby properly.
see images 13 - 20
12
1
1. While pressing the harness
adjustment button, pull
completely the two shoulder
harnesses of the infant child
restraint. 14
2. Unlock the buckle of the
harnesses by pressing the red
button. 15
3. There are 2 positions crotch
harness adjusted according to
different requirements.
Position 1 Smaller babies use
this position 16 -1
Position 2 Larger babies use
this position 16 -2
1. Insert is for infant's
protection. Infant weighing
under 10kg must use the
insert A or B.
2. Before using the insert A,
please assemble foam. 13
3. After child is placed into the
seat, check whether the
shoulder harnesses are at
proper height.
Note
Securing Child in the Infant Child
Restraint
13
14
15
16
1
2

13 14
i. Pull the crotch harness out
and place it to be level.
17 -1&17 -2&17 -3
ii. Rotate the crotch harness
anchor to make the short
side forwards, then thread it
through the crotch harness
slot. 17 -4
iii.Rethread it through the slot
that is closest to child's
crotch from the front of the
crotch harness. 16
4. Place child into the infant child
restraint and lock the buckle.
18 &19
1 2 3 4
17
18
19
20
5. Tighten the shoulder harnesses
by pulling adjustment
webbing. 20
!Make sure the space
between the child and the
shoulder harnesses is about
the thickness of one hand.
see images 21 - 32
The installation instructions vary
depending on whether or not you
are using the base. Please refer
to the proper section.
!Do not place the infant child
restraint on front vehicle seat
with airbag. Death or serious
injury can occur. 21
!When using the infant child
restraint in a vehicle seat,
please adjust the handle to
position 1. 5-1
!Face your child restraint or base
toward the rear of the vehicle.
!Ensure the vehicle safety belt is
not loose or twisted.
Infant Child Restraint
Installation
A
I
R
B
A
G
21

15 16
i. Installing without
Base
see images 22 - 25
After fitting the harness to your
child and determining which rear
vehicle seat location is best, you
are ready to install your infant
child restraint.
1.Place the infant child restraint
onto the vehicle seat where
you wish to put it. Pull the
vehicle safety belt out and lock
it into the vehicle buckle,
sliding the vehicle lap belt into
the side guides of the infant
child restraint. 22
!The child restraint can
not be used if the vehicle
safety belt buckle (female
buckle end) is too long to
anchor the child restraint
securely. 22 -1
2.Slide diagonal belt into the rear
guide.
23
3.Pull the belt to fasten the infant
child restraint tightly and
securely.
24
!Tension the vehicle safety
belt as much as possible,
check that it is not loose or
twisted.
!The vehicle safety belt shall
not cause pressure on any
part of the child.
!
!
22
1
Correctly assembled vehicle
safety belt is shown as 25 .
!Lap belt must pass through
the two side guides,
as
25 -1.
!The vehicle buckle is locked
correctly, as 25 -2.
!Diagonal belt must pass
through the rear guide,
as
25 -3.
ii. Installing with Base
see images 26 - 32
1.Unfold the load leg from
storage compartment. 26
2.After placing the base on the
vehicle seat, squeeze load leg
adjustment button to extend
the load leg to floor 27 -1,
the load leg indicator shows
green means it is installed
correctly, red means it is
installed incorrectly. 27 -2
!The load leg has 8 positions.
When the load leg indicator
shows red this means the
load leg is in the wrong
position.
!Make sure the load leg is
secure by pressing down on
the front of the base.
!
23
24
1
3
2
25
26
27
2
1

17 18
3.Open the lock-off and route the vehicle safety belt through
the belt path 28 -1, and lock it into the buckle 28 -2.
4.Tighten the vehicle safety belt as much as possible while
pushing down on the base, and check it is not loose or
twisted.Close the lock-off. 28 -3
!Check that the safety belt does not move by pulling and
pushing hard on base. If belt loosens or lengthens,
repeat procedure.
28 3
1
2
29 1
2
5.Push the child restraint down
into the base 30 , if the child
restraint is secure, the child
restraint indicator shows
green. If the child restraint is
not secure, the indicator
shows red. 31
!Pull up on the child restraint
to be sure it is securely
latched into the base.
!The child restraint can not
be used if the vehicle safety
belt buckle (female buckle
end) is too long to anchor
the base securely. 31 -1
6.To release the child restraint,
pull the child restraint up while
squeezing the child restraint
release button. 32
The installed base is shown as 29 .
!Please ensure that there is
no gap between the seat and
the bottom of the base.
!The safety belt must go
under the lock-off 29 -1,
not over the lock-off. 29 -2
30
32
1
2
31
1

19 20
see images 33 - 42
Your infant child restraint is designed to attach to certain Joie
stroller models featuring a special tray, armbar or calf support.
!Please make sure your stroller can fit the infant child
restraint before purchasing it.
!Never allow more than one baby in the travel system at
one time.
!Please brake your stroller before assembling the infant
child restraint.
!Check that the parts used to fix the infant child restraint
are securely fastened on the stroller.
!Recline the stroller seat back to the lowest position.
Use with Joie Strollers
To assemble the infant child restraint on Joie strollers, please
follow these steps:
1.Place child restraint into stroller so notches in rockers fit over
edge of armbar, tray or calf support. The child restraint will
then automatically click into place. 33 & 34 & 35 & 36
!If armbar has fabric cover, please detach the Velcro on
armbar cover first. 35 -1
!For the stroller with a special calf support, please adjust
the calf support to the vertical position, detach the
Velcro, and then lift the fabric cover. 36 -1
Use with Strollers
2.Use the straps on both sides of stroller to fix the child
restraint.
37 & 38 & 39
!Try pulling the child restraint upwards to check that it is
fitted correctly.
To remove the child restraint, release the straps from the child
restraint, pull up the stroller release handle to release the child
restraint from tray, armbar or calf support, and then lift child
restraint out of stroller. Please refer to 40 & 41 & 42 .
33 34
35
1
36
1

21 22
37 38
39 40
42
41
43
see images 43 - 46
To detach the hood, while
pressing the button in the
hood mount, pull the hood bow
out. 43
To detach the seat pad, you
should refer to the following
steps:
1. You must remove the insert
first. To do this simply unlock
the buckle, then unclip the
snaps on both sides of the
insert and pull out away from
the seat.
2. Remove the crotch pad by
detaching the Velcro.
3. You must remove the shoulder
harnesses and shoulder
pads. To do this please
refer to the section 'Shoulder
Harness Strap Height
Adjustment'.
4. Pull out the fastening pieces
underneath the edge of the
seat.
44
5. Detach the metal hook from
the edge of the child restraint,
and then lift it up to seperate
the seat pad from the stroller
fix release button A. 45
Detaching Hood and
Seat Pad
44
45

23
6. Detach the seat pad from
around the adjustment button
as shown in 46
To refit the seat pad simply
reverse the steps above, however
make sure that the shoulder
harnesses are not crossed over
and not twisted.
46
!After removing the foam of insert A, please store it some-
where that the child cannot access it.
!Please wash the soft goods with cold water under 30°C.
!Do not iron the soft goods.
!Do not bleach or dry clean the soft goods.
!Do not use undiluted neutral detergent, gasoline or other
organic solvent to wash the infant child restraint or base. It
may cause damage to the infant child restraint.
!Do not twist the soft goods to dry with great force. It may
leave the soft goods with wrinkles.
!Please hang dry the soft goods in the shade.
!Please remove the infant child restraint and base from the
vehicle seat if not in use for a long period of time. Put the
infant child restraint in a cool, dry place and somewhere your
child cannot access it.
Care and Maintenance
NOTE
Other manuals for gemm
6
Table of contents
Other Joie Automobile Accessories manuals