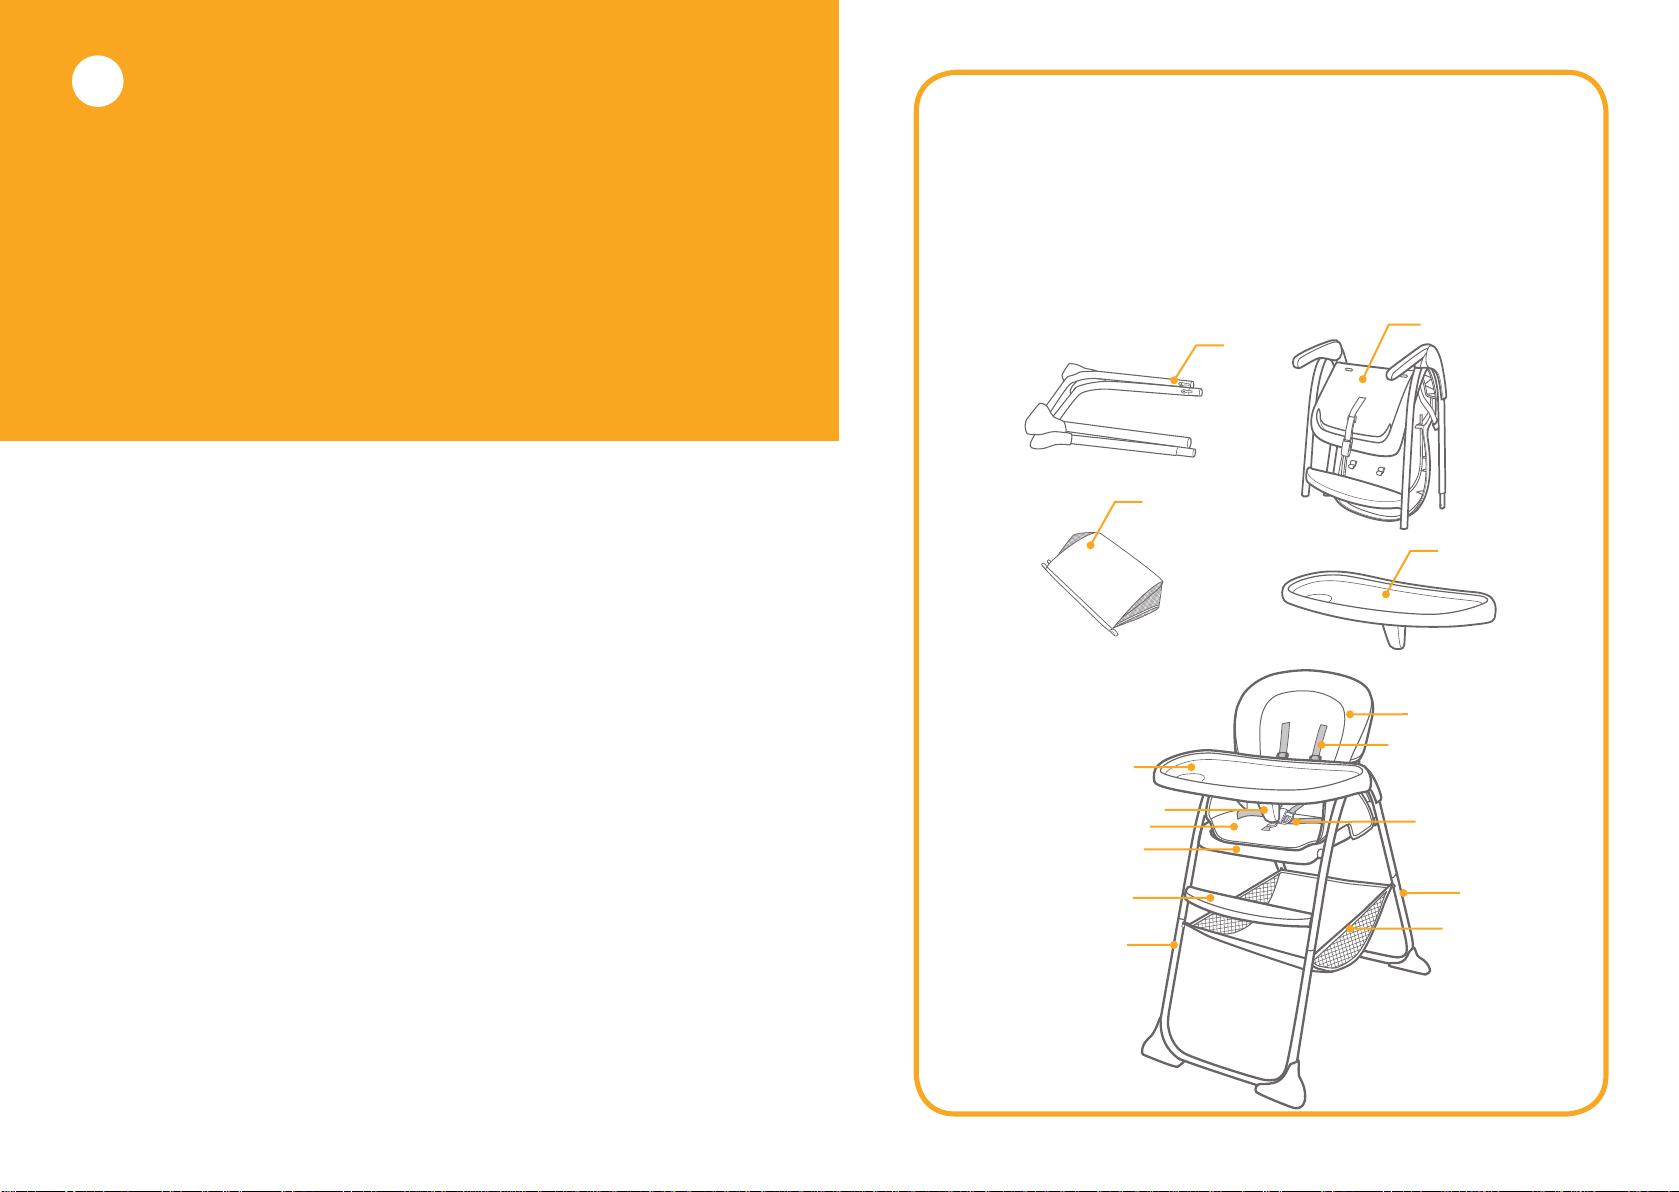
Jole mimzy snacker User manual

mimzy snacker™
highchair
gemm™
0+ (0–13kg)
6-36 months
Instruction Manual
Manual de Instruções
Manual de instrucciones
Manuel d’instructions
Bedienungsanleitung
Handleiding
Manuale di istruzioni
Kullanma klavuzu
GB
PT
ES
FR
IT
DE
NL
TR
사용 설명서
KR
Instruction Manual
Manual de Instruções
Manual de instrucciones
Manuel d’instructions
Bedienungsanleitung
Handleiding
Manuale di istruzioni
Kullanma klavuzu
GB
PT
ES
FR
IT
DE
NL
TR
사용 설명서
KR
ﺕﺎﻤﻴﻠﻌﺘﻟﺍ ﻞﻴﻟﺩ
AR

1 2
FIGURE 1 - 3
FIGURE 4 - 8
12
! !
1
1
3
5
2
1
3
6
4
78
2

3 4
FIGURE 1 - 3FIGURE 9 - 14
FIGURE 1 - 3FIGURE 15 - 17
10
12
9
11
1
2
3
13 14
15
1
16 17

FIGURE 21 - 22
6
5
FIGURE 18 - 20
18 21
22
2019
1
1
2
1
2
2
1
2
3
3

7 8
GB Welcome to Joie™
Congratulations on becoming part of the Joie family! We are so excited to be part of your life
with your little one. While using the Joie Mimzy Snacker™, your baby is enjoying a high quality,
fully certified highchair, approved to European safety standards EN14988-1/2:2006+A1:2012. This
product is suitable for use with children between 6-36 months of age (under 15 kg). Please care-
fully read this manual and follow each step to ensure a comfortable using and best protection for
your child.
Please keep the Instruction Manual handy for future reference.
Visit us at Joiebaby.com to download manuals and see more exciting Joie products.
! IMPORTANT
RETAIN FOR FUTURE REFERENCE:
READ CAREFULLY.
Contents
Figures 1-6
WARNINGS 9
Assemble Highchair 10
Use Buckle 10
Adjust Shoulder and Waister Harnesses 10
Use Tray 11
Adjust Recline 11
Fold Highchair 11
Detach Seat Pad 11
Care and Maintenance 12
Emergency
In case of emergency or accident, it is most important to have your child taken care of with first aid and
medical treatment immediately.
Product Information
Read all the instructions in this manual before using this product. If you have any further questions,
please consult the retailer. Some features may vary depending on model.
Product Mimzy Snacker
Suitable for 6-36 months (under 15kg)
Materials Plastics, metal, fabrics
Patent No. Patents pending
Made in China
Brand Name Joie
Website www.joiebaby.com
Manufacturer Joie Children's Products (UK) Limited
Parts List
Make sure all parts are available before assembly. If any part is missing, please contact local retailer.
No tools are required for assembly.
6
5
7
8
9
10
12
11
13
15
14
1 Leg Assembly
2 Seat Assembly
3 Basket
4 Tray
5 Tray
6 Tray Horn
7 Seat Pad
8 Seat
9 Footrest
10 Front Leg
11 Basket
12 Rear Leg
13 5-Point Buckle
14 Shoulder Harness
15 Backrest
1
4
2
3

10
9
WARNINGS
!Read all the instructions in this manual before using this product.
!Adult assembly required.
!Please keep instruction manual for future reference.
!This product is designed ONLY for child weighing under 15kg (6-36months).
!Failure to follow these warnings and the assembly instructions could result in danger.
!DO NOT make any modification to this highchair or use it along with component parts from other
manufacturers.
!DO NOT use the highchair if any parts are broken, torn or missing.
!Never leave your child unattended. Always keep your child in view.
!To prevent serious injury or death from falling or sliding out, always secure child in the restraint.
!Secure your child at all times with the restraint system provided, either in the reclining or upright
position. The tray is not designed to hold your child in the product.
!It is recommended that the product be used in the upright position only by children capable of sitting
upright unassisted.
!DO NOT allow your child to stand in or on the highchair.
!DO NOT lift and carry highchair while occupied.
!DO NOT allow children to play with or around highchair while occupied.
!DO NOT allow children to lean over sides of highchair. It may become unbalanced and tip over.
!DO NOT place any heavy bags, packages, or other items on the highchair tray. They may cause the chair
to tip over.
!Always use on a flat and level floor.
!Be aware of the risk of open fire and other sources of strong heat such as electric bar fires, gas fires etc.
in the vicinity of the highchair.
!To avoid strangulation hazard, DO NOT place product in any location where there are cords, such as
window blind cords, drapes, phone cords, etc.
!All assembly fittings should be unfolded completely and tightened properly before using the product.
!Regularly check the locks and fittings for security.
!Regularly inspect the product for damaged hardware, loose joints, missing parts or sharp edges.
!Remove your child from product before folding or adjusting the highchair.
!Make sure the product has been folded or unfolded completely before letting your child approach the
highchair.
!Consult the distributor for issues concerning maintenance, repair and part replacement.
!DO NOT place food that is hot enough to burn child's skin on the tray.
!Make sure that any harness is correctly fitted.
!Do not use the high chair unless all components are correctly fitted and adjusted.
!Do not use the high chair until the child can sit up unaided.
!To avoid suffocation, remove plastic bag and packaging materials before using this product. The plastic
bag and packaging materials should then be kept away from babies and children.
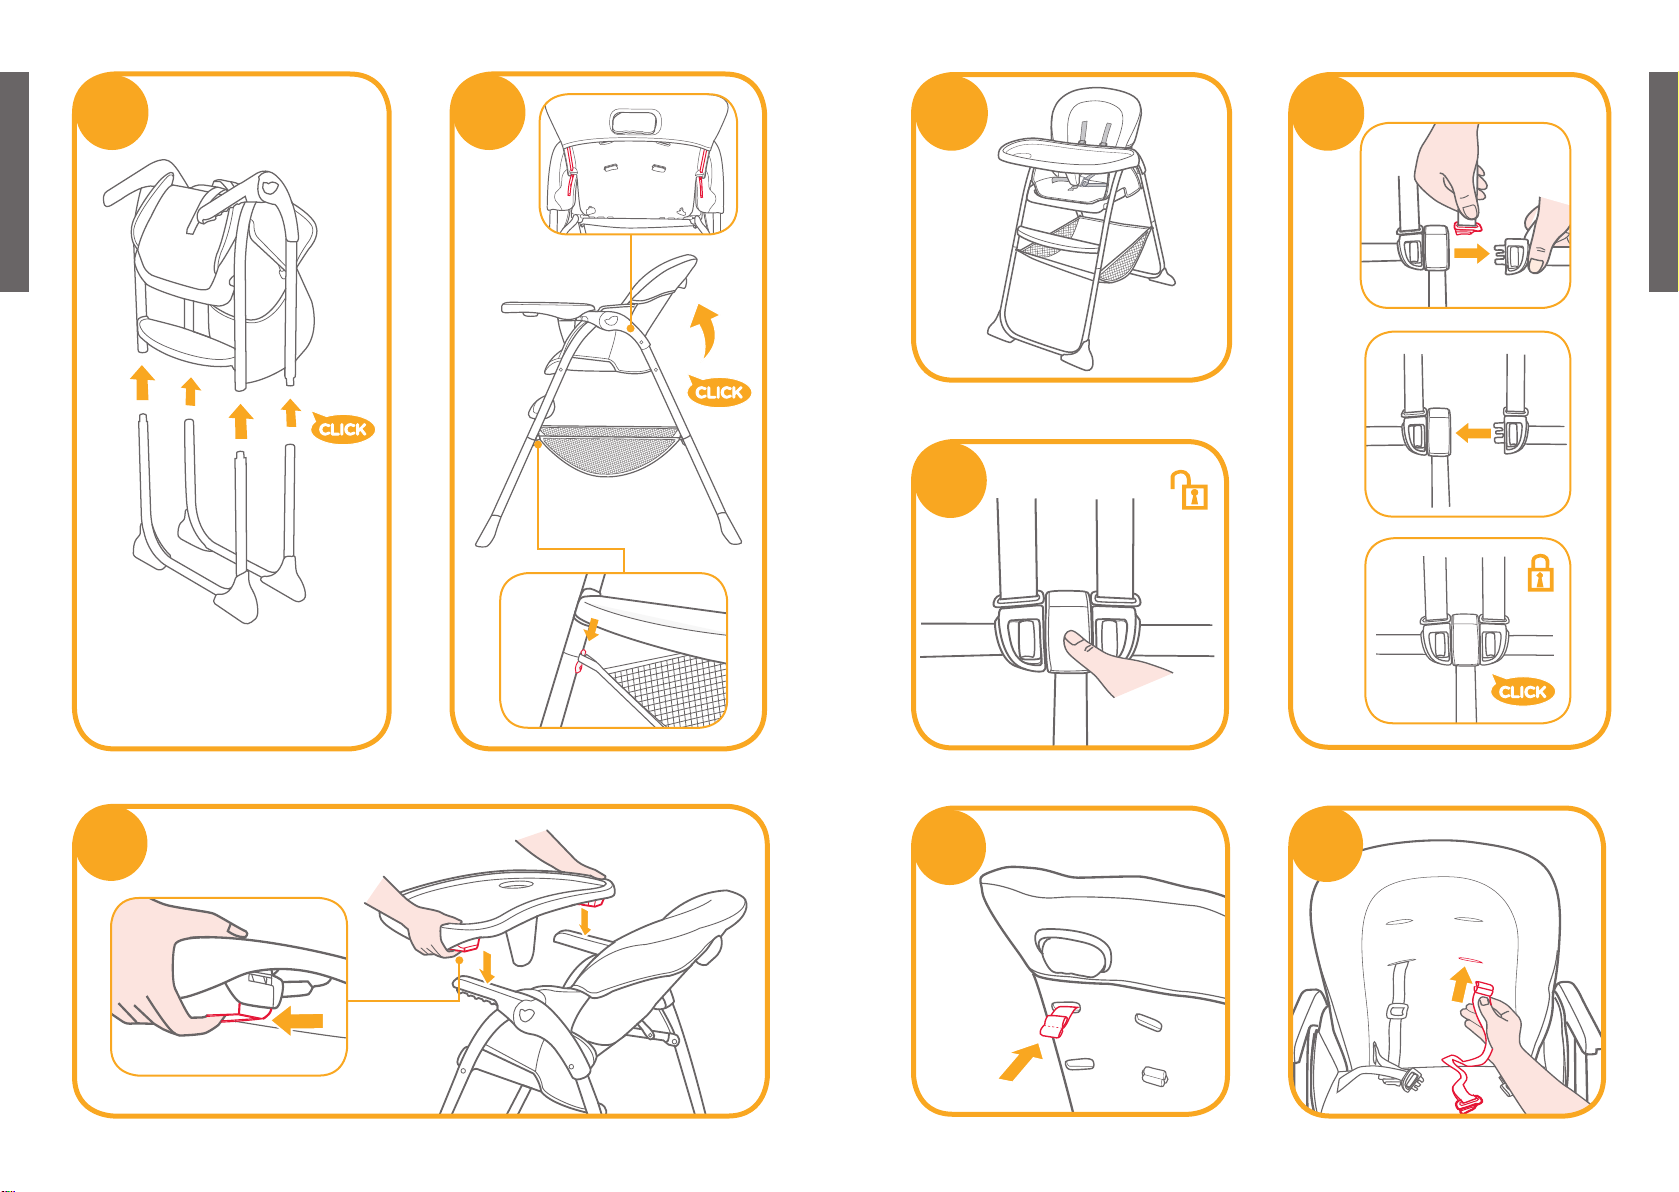
Assemble Highchair
Please read all the instructions in this manual before assembling and using this product.
1. Align the tubes of leg assembly with those of seat assembly, and then insert to assemble. A click means
both the two tubes are assembled properly. 1
!Please check the legs are assembled well by pulling them apart.
2. Open the highchair by rotating the backrest upwards 2 . a “click” means the backrest is locked completely.
! Please confirm the recline wire and seat latch slot are fully engaged before use. 2 -1
! If they are not correctly engaged, please fold the unit as 16 and repeat the above operation.
3. Please attach basket to the support leg by 4 pairs of webbings 2-2. Pull webbings upwords to remove
basket.
4. Place the tray over tray bar 3while pulling the button on both sides under the tray outward 3-1until a
“click” is heard. The assembled highchair is shown as 4
Use Buckle
Tip To avoid serious injury from falling or sliding out, always secure your child with harness.
Make sure your child is snugly secured, and that the space between the child and the shoulder
harness is about the thickness of one hand.
DO NOT cross the shoulder belts. This will cause pressure on child’s neck.
Lock Buckle
Match the waist belt buckle with the shoulder buckle 5-1, and “click” into the center buckle 5-2,
a “click” means the buckle is locked completely. 5-3
Release Buckle
Press the center button to release the buckle. 6
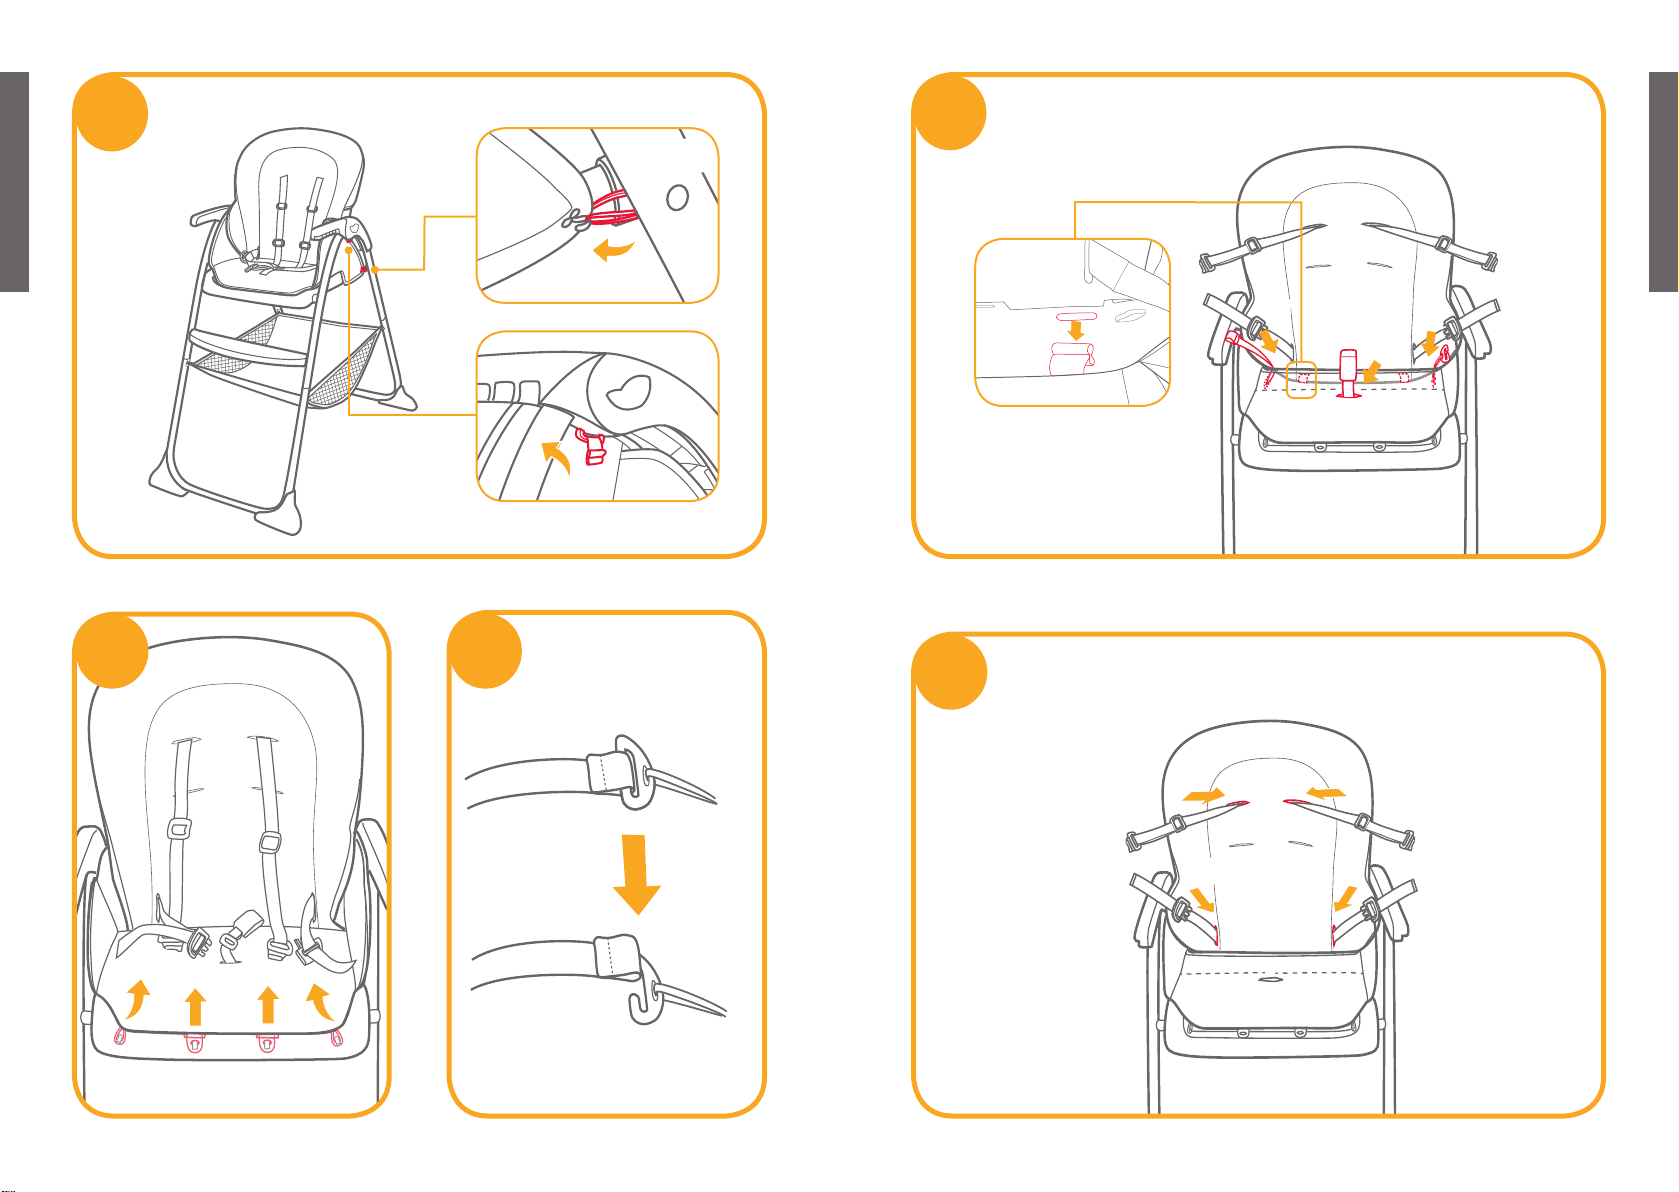
Adjust Shoulder and waister Harnesses
Tip The shoulder harness must go into the slot that is even with or slightly above the shoulders.
In order to protect your child from falling out, after your child is placed into the seat, check whether
the shoulder harnesses are at proper height.
For larger child, use the upper shoulder slots. For smaller child, use the lower shoulder slots.
Choose a pair of proper shoulder slots, thread shoulder harnesses out off previous slots 7, and then insert
into desired slots in seat pad and seat back. 89
!When changing shoulder harness slots, make sure shoulder harnesses are going through same
slots in seat pad and seat back.
Use slide adjuster to change the harness length 10 -1,press the button 10 -2, while pulling the waist harness
to proper length. 10 -3

11
Care and Maintenance
!Your seat pad can be spot cleaned with a sponge and soapy water. DO NOT use bleach.
!Drip dry the washed seat pad. DO NOT put in dryer.
!To clean the frame, wipe with a damp cloth then wipe out any traces of moisture on the frame with a dry cloth.
!DO NOT use undiluted neutral detergent, gasoline or other organic solvent to wash the highchair. It may
cause damage to the highchair.
!From time to time, check your highchair for worn parts, torn material or stitching. Replace or repair
the parts as needed.
!If the highchair is not in use for a long period of time, please put it in the shade and somewhere your child
can not access it.
Use Tray
Sliding the tray along the tray bar to a proper position 11 while pulling the button under the tray outward 3-1.
The tray has 3 positions for adjustment. 12
!Ensure both sides of tray are in matching positions.
!Pull tray backward to ensure both guides are secure.
When the tray is not in use, It can be stored on the rear legs.
Lift the tray from the tray bar, while pulling the button under the tray outward. 3-1
Place the tray over the rear legs and snap the tray guides into place. It will automatically slide to the end of
the rear legs 13 . The stored tray is shown as 14
Adjust Recline
There are 3 recline positions. 15
Squeeze button on the back of seat and push down or pull up to adjust the seat back to a desired
recline position. 15 -1
!It is recommended that the product be used in the upright position only by children capable of
sitting upright unassisted.
Fold Highchair
!DO NOT fold the highchair with child in it.
Fold the highchair by following these steps:
1. Remove tray before folding the highchair.
2. Pull the folding webbing upward, the back rest will automatically fold backward. 16
3. Store the tray on the rear legs. 17
Detach Seat Pad
1. Disassemble 2 pairs of webbings and 2 pairs of elastic straps on both sides of armrest. 18 -1 18 -2
2. Disassemble 2 pairs of fastening pieces and 2 pairs of elastic straps on the bottom of seat.19
3. Remove the clip from folding webbing. 20
4. Disassemble the webbing on the bottom of seat pad 21 -1. Remove crotch harness and folding webbing
from seat pad. 21 -2 21 -3
5. Remove shoulder harnesses and waist harnesses from seat pad 22 -1 22 -2,then remove seat pad from seat
back.
To assemble seat pad in reverse steps.
12
Other manuals for mimzy snacker
2
Table of contents
Other Jole High Chair manuals
Popular High Chair manuals by other brands

Fisher-Price
Fisher-Price FFJ02 manual

Infantino
Infantino Grow-With-Me 4-in-1 Convertible High Chair owner's manual

Martinelli
Martinelli SIESTA FOLLOW ME quick start guide

Kinderkraft
Kinderkraft Fini user manual

Kettler
Kettler Herlag 4883 Assembly and operating instructions

Mocka
Mocka Aiden Assembly instructions