Joovy Nook 22X User manual

Joovy • 2919 Canton Street • Dallas, TX 75226 • (877) 456-5049 • Fax (214) 761-1774 • Email: customerservice@joovy.com • Website: www.joovy.com
Nook
22X
EN
©joovy 2013 • Document Version 111813

Nook Instruction Manual
EN
Please read this instruction manual completely before using this product. Failure to follow these instructions and warnings could
result in serious injury or death. Keep these instructions for future reference.
• Prevent serious injury or death from falls or sliding out.
• Always secure child using the restraint system.
• Never leave child unattended.
• Alwaysusehighchaironaat,smoothsurface.
• Never use near stairs.
• Never allow child to use footrest to climb in or out of the high chair.
• The child should be secured in the high chair at all times by the restraint system. The tray is not designed to hold the child in the chair.
• It is recommended that the high chair be used only by children capable of sitting upright unassisted.
• Never use in any location where hanging cords can be reached by child.
• Always keep child in view while in high chair.
• The maximum weight for the high chair is 50 pounds. Excessive weight may result in a hazardous unstable condition.
• Donotusethehighchairunlessallcomponentsarecorrectlyttedand
adjusted.
• Checkyourhighchairforanypartsthatmaybebroken,tornormissingbeforeuseandonaregularbasis.Discontinueuseofthehighchair
should it malfunction or become damaged.
• Discard all packaging materials properly. Do not allow children to play with them.
• Maximum age: 4 years.
1 Unpacking the Product
• Remove everything from the box and identify the parts using Figure 1.1. (not to scale)
A: high chair, B: tray, C: tray insert and documents (not shown).
• Discard all packaging materials properly including plastic coverings.
• DO NOT allow children to play with any packaging materials.
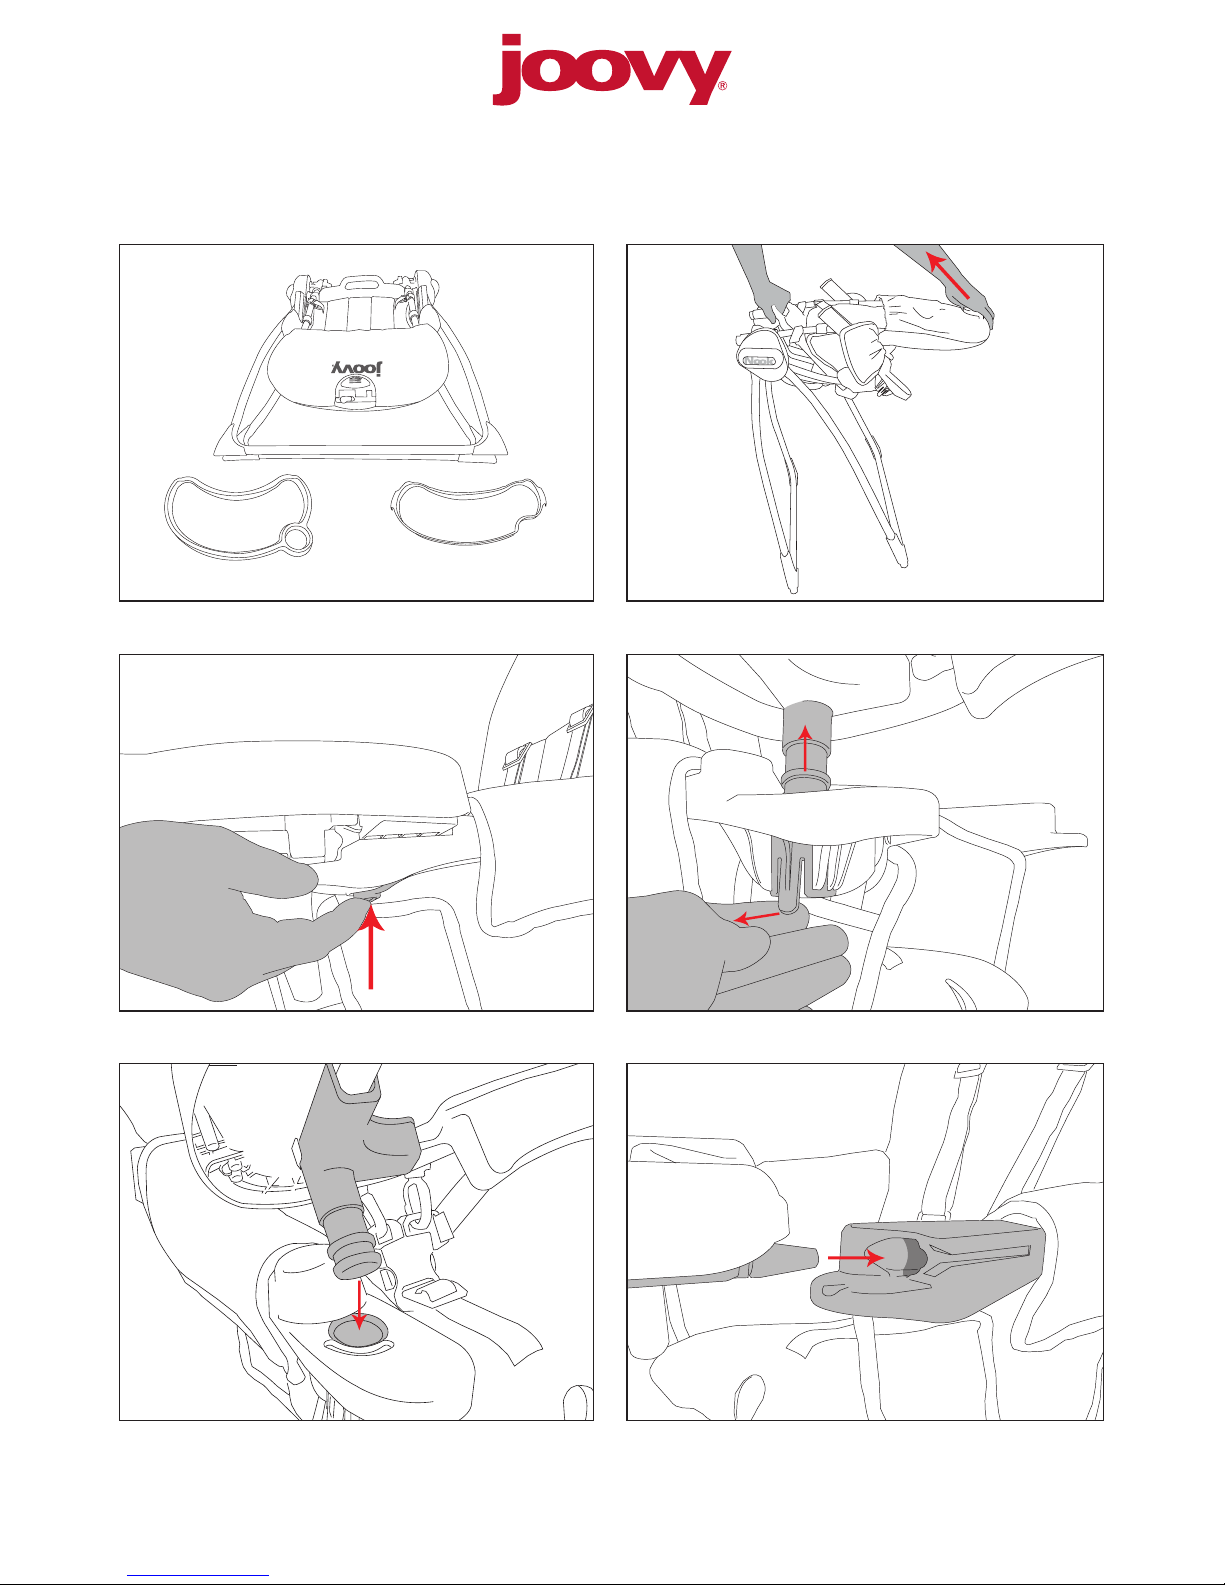
2 Unfolding the High Chair
• Keep children away from high chair while unfolding.
• Stand to the side of the folded high chair and while holding the handle, pull upward on the seatback until the high chair is fully erect and
locked into position. See Figure 2.1.
• With one foot on the rear cross tube, push forward on the rear of the seat back to ensure the high chair is fully locked into position.
3 Installing/Removing and Operating the Tray
• To swing the tray open, place your foot on the front cross tube and press the button on the underside of the tray while pulling the tray
horizontally away from the seat. See Figure 3.1.
• To completely remove the tray, swing the tray open. Then pull the release tab on the left underside of the tray while pulling upward on the
tray. See Figure 3.2.
• To install the tray, orient the tray with the cup holder towards you and insert the plastic post into the opening on the left side of the high chair
until it locks into position. See Figure 3.3.
• Gently pull upward on the tray to ensure it is installed properly.
• Swing the tray closed until the horizontal post on the right side locks into the opening in high chair arm. See Figure 3.4.
• Use caution when closing the tray with the child seated inside the high chair and always ensure that the crotch restraint below the tray is
positioned between the child’s legs.
!WARNING
!WARNING
Adult assembly is required for this product. No tools required.
!WARNING
The child should be secured in the restraint system at all times.
The tray is not designed to hold the child in the chair.
Please do not return this product to the store
If you experience any difculty with the assembly or use of this product, or if you have a question regarding these instructions, please
contact our Customer Service Department at (877) 456-5049 between the hours of 8:30 am and 5:00 pm Central Time.
Please note: Styles and colors may vary.

EN
EN
5 Securing the Child in the Seat
There are 2 height adjustment positions for the shoulder harness. Adjust the height to the closest height above your child’s shoulders.
• To remove the shoulder harness, turn the plastic ends sideways and push them through the slots in the seatback. Re-attach the harness at
the proper height by reinserting the plastic ends through the slots.
See Figure 5.1. Ensure both straps are the same height.
• To unlatch the buckle press the center button and remove the male ends of each buckle. See Figure 5.2.
• Carefully place the child in the seat with the shoulder straps over their shoulders and chest. Then place the crotch strap between the child’s
legs.
• Push the shoulder/waist latch posts into the crotch buckle until all parts snap into place. See Figure 5.3.
• Tighten the waist belt to be snug around the child’s waist.
• The shoulder, waist, and crotch straps may be adjusted using the sliding plastic rings on these straps.
4 Using the Tray Insert
The tray insert is removable and dishwasher safe.
• To remove the tray insert, pull outward and upward on the hook attachments on both sides of the tray insert. See Figure 4.1. Be sure to lift
straight up to avoid spilling anything on the tray insert.
• To attach the tray insert, t the tray insert into the tray until both sides snap into place.
!WARNING
Prevent serious injury from falls or sliding out.
Always secure child using the restraint system.
6 Folding the High Chair
NOTE: The high chair can be folded with the tray and tray insert attached. Be careful to keep your ngers from being pinched by moving parts.
• Keep children away from high chair while folding.
• Orient the high chair diagonally in front of you.
• Slide the secondary lock all the way across and lift up on the folding mechanism behind the top of the seat back. See Figure 6.1.
• Rotate the seatback down towards the ground until the high chair is completely folded. Note that the high chair does not lock into the folded
position.
• To carry the high chair, grab the handle on the rear of the seat bottom and go.
Maintenance
All of the ttings, snaps, locks, rivets, and other hardware and plastic parts on the high chair should be inspected periodically to ensure that
they are secured properly and not damaged or malfunctioning. The safety harness, as well as all other fabric items and their stitching should
also be inspected periodically to ensure that they are secured properly and not loose, torn or otherwise damaged. All moving parts, such as
the tray and hinges should also be checked periodically to ensure they are operating properly.
Any missing, broken, or worn components should be replaced immediately, and the high chair should not be used until they are replaced. Only
original manufacturer’s components should be used. If needed, please contact Joovy at our toll-free phone number.
Cleaning
The fabric material on the high chair can be cleaned using mild household soap or detergent and warm water on a sponge or clean cloth.
Always allow the fabric to completely air dry before using or storing the high chair.
SATISFACTION GUARANTEED
We want you to be completely satised with your purchase of this product. Should you experience any
difculty in assembling or using this product, or if you have any questions, please contact our Customer
Service Department at (877) 456-5049 between the hours of 8:30 am and 5:00 pm Central Time.
Please log onto www.joovy.com to register your new Joovy product.

Joovy • 2919 Canton Street • Dallas, TX 75226 • (877) 456-5049 • Fax (214) 761-1774 • Email: customerservice@joovy.com • Website: www.joovy.com
Nook
22X
1.1
3.1
3.3
2.1
3.2
3.4
A:
B: C:
©joovy 2013 • Document Version 111813

4.1
5.2
6.1
5.1
5.3
Table of contents
Other Joovy High Chair manuals


