Joovy Nook 22X Series User manual

Nook
Instruction Manual
22X Series
Joovy • 2919 Canton Street • Dallas, TX 75226 • (877) 456-5049 • Fax: (214) 761-1774
E-mail: customerservice@joovy.com • Website: www.joovy.com

Nook Instruction Manual
• Prevent serious injury or death from falls or sliding out.
• Always secure child using the restraint system.
• Never leave child unattended.
•Alwaysusehighchaironaat,smoothsurface.
• Never use near stairs.
• Never allow child to use footrest to climb in or out of the high chair.
• The child should be secured in the high chair at all times by the restraint
system. The tray is not designed to hold the child in the chair.
• It is recommended that the high chair be used only by children capable
of sitting upright unassisted.
• Never use in any location where hanging cords can be reached by child.
• Always keep child in view while in high chair.
• The maximum weight for the high chair is 50 pounds. Excessive weight
may result in a hazardous unstable condition.
•Donotusethehighchairunlessallcomponentsarecorrectlyttedand
adjusted.
• Check your high chair for any parts that may be broken, torn or miss-
ing before use and on a regular basis. Discontinue use of the high chair
should it malfunction or become damaged.
• Discard all packaging materials properly. Do not allow children to play
with them.
• Maximum age: 4 years.
Please do not return this product to the store
Ifyouexperienceanydifcultywiththeassemblyoruseofthisproduct,orifyouhavea
question regarding these instructions, please contact our Customer Service Department at
(877) 456-5049 between the hours of 8:30 am and 5:00 pm Central Time.
Please Note: Styles and colors may vary
! WARNINGS
Pg. 1
Please read this instruction manual completely before using
this product. Failure to follow these instructions and warnings
could result in serious injury or death. Keep these instructions
for future reference.

Nook Instruction Manual
!CAUTION
Adult assembly is required for this product. No Tools Required.
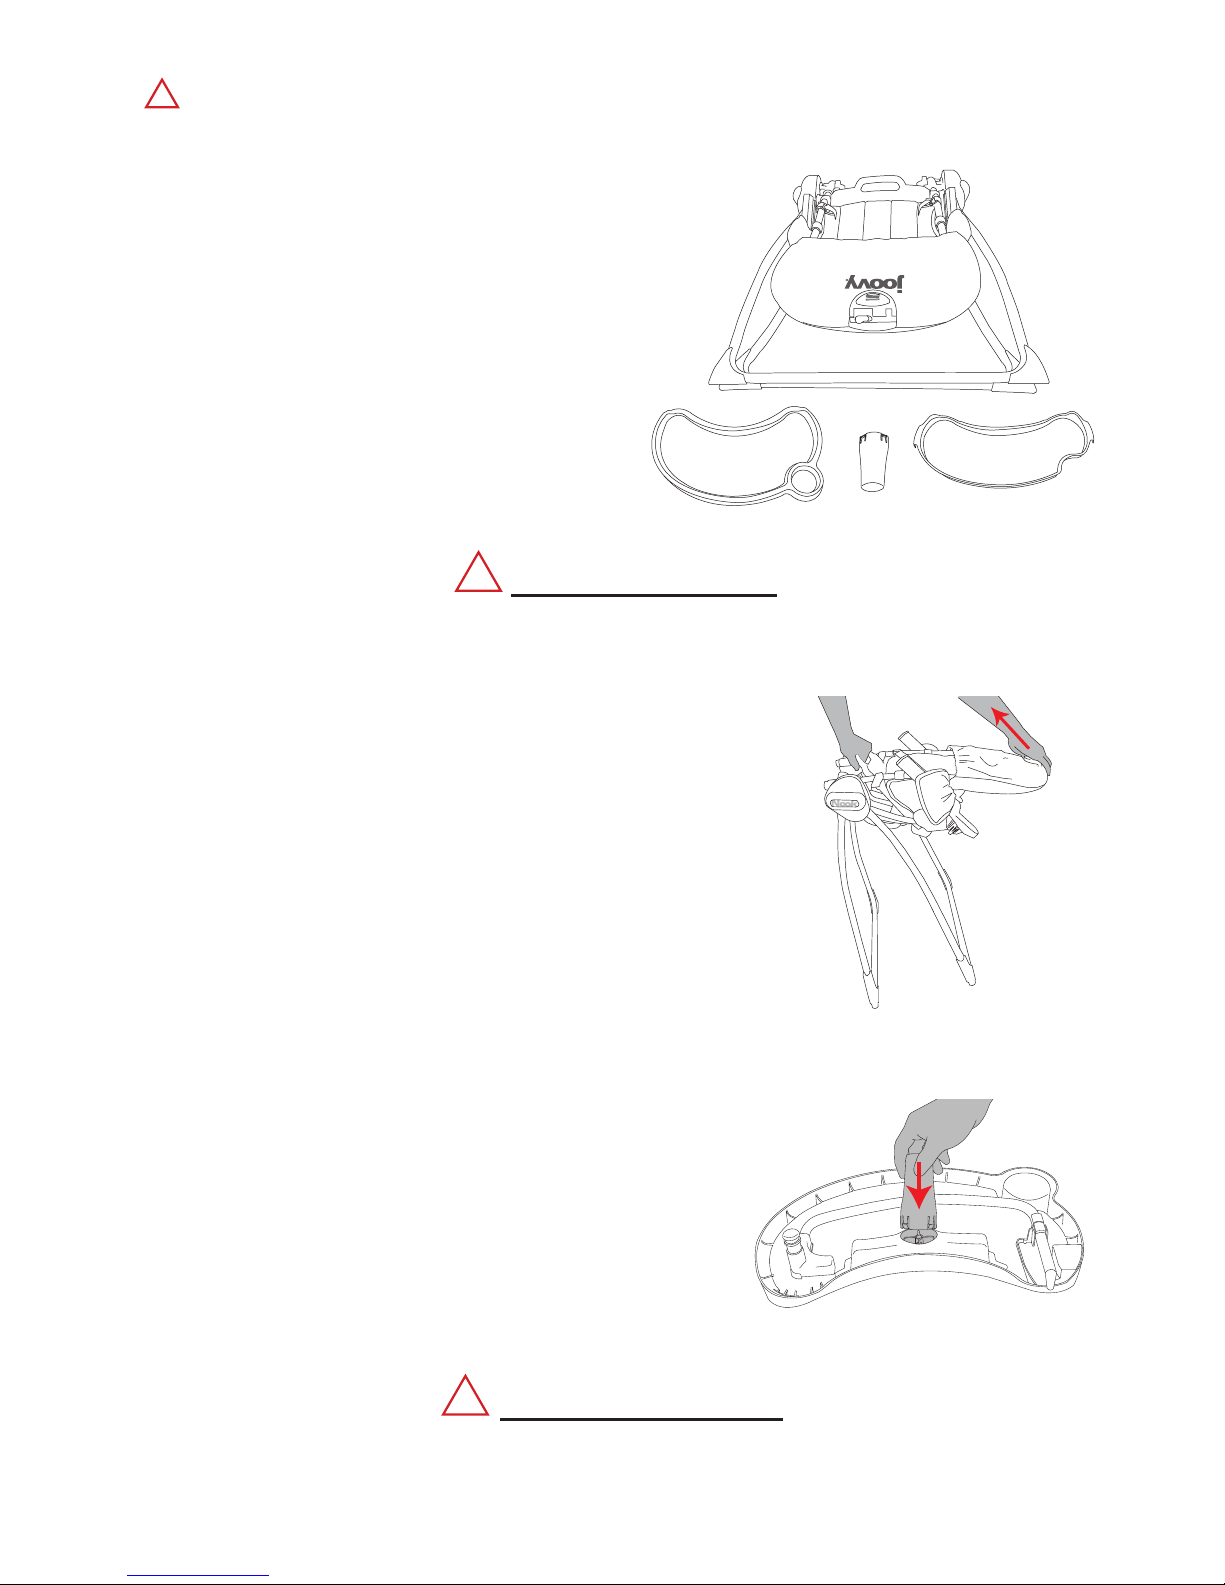
Unpacking the Product
• Carefully remove high chair from the box and plastic
bag.
• Remove any cardboard packing materials from the
product.
• Identify the parts (high chair, passive crotch restraint,
tray, tray insert) with the pictures in Figure 1.
NOTE: The tray and tray insert come fully assem-
bled on the product.
• Remove all plastic coverings from any areas of the
product and discard them properly. Do not allow
children to play with them. Figure 1
Unfolding the High Chair
• Keep children away from high chair while unfolding.
• Stand to the side of the folded high chair and while holding the
handle, pull upward on the seatback until the high chair is fully
erect and locked into position. See Figure 2.
• With one foot on the rear cross tube, push forward on the rear of
the seat back to ensure the high chair is fully locked into position.
Figure 2
Pg. 2
Assembling and Using your High Chair
!To ensure safe operation of your high chair, please follow these
instructions carefully.
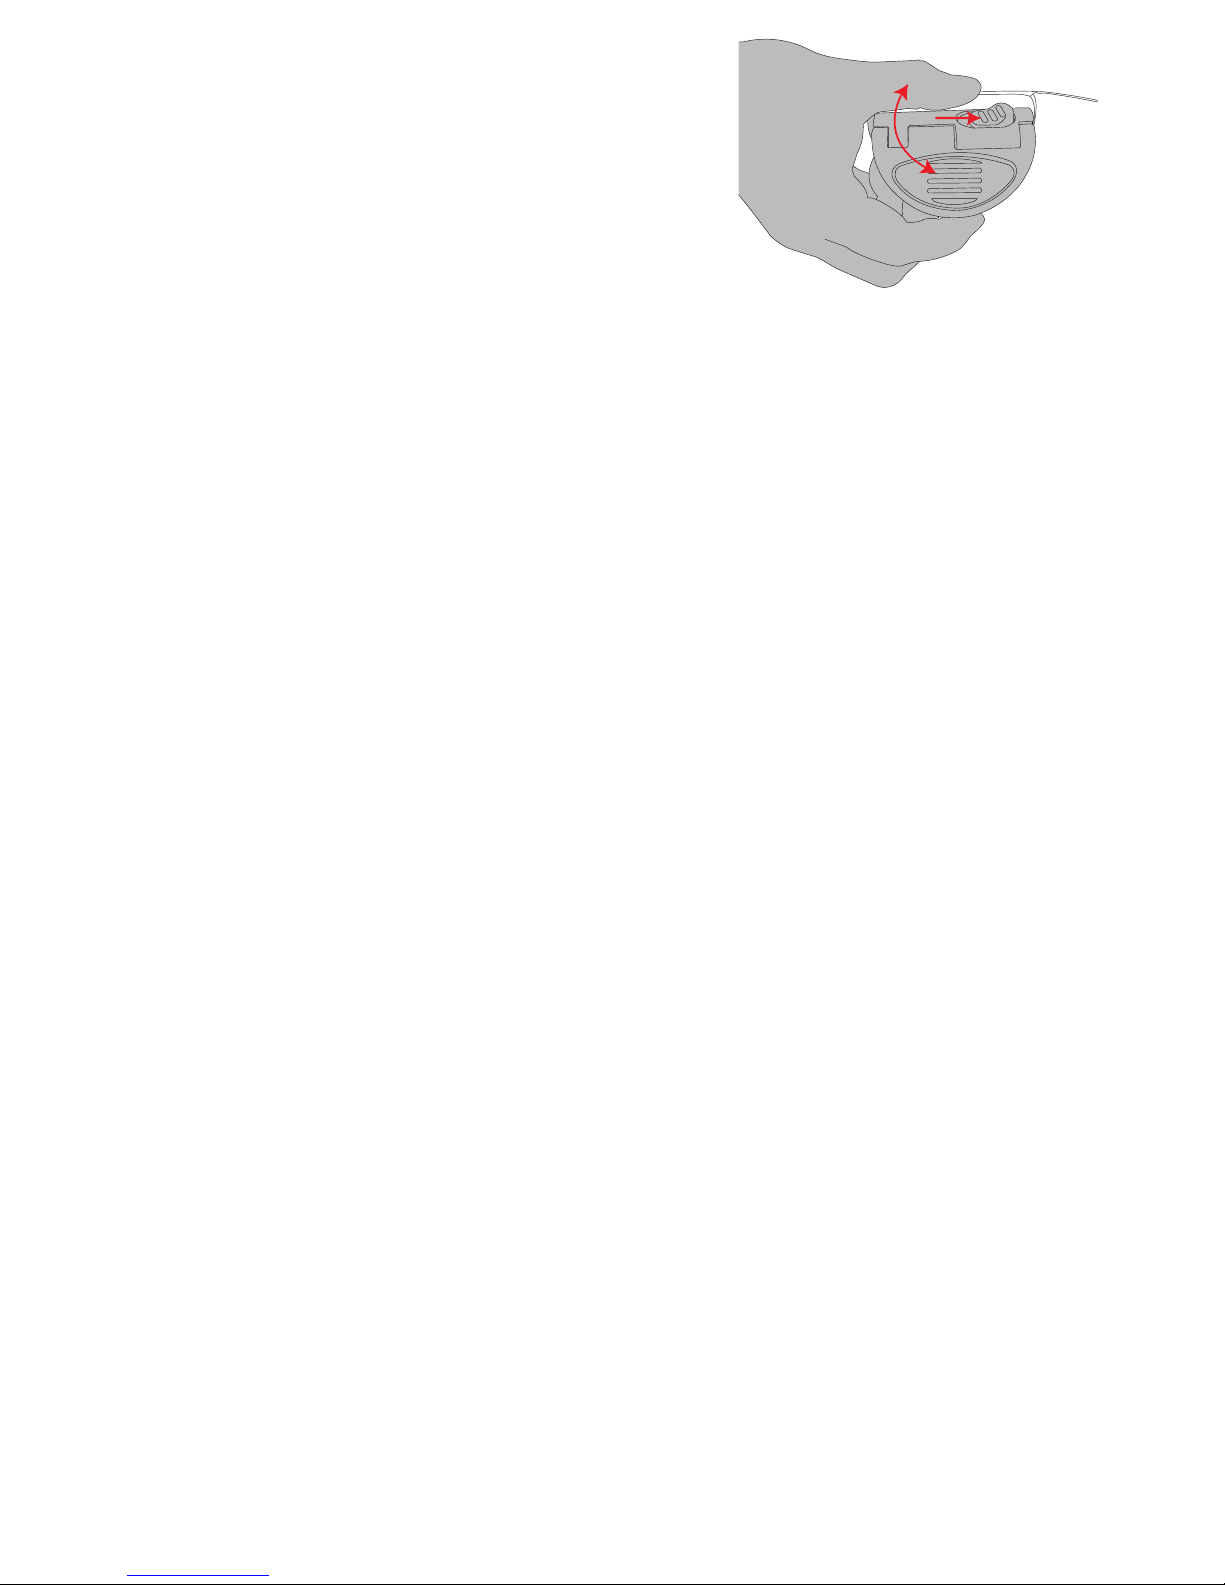
Installing the Passive Crotch Restraint
• Completely remove the tray from the high chair. (See “Installing/
Removing and Operating the Tray”)
• Remove the tray insert from the tray and set it aside. (See “Using
the Tray Insert”)
• Lay the tray upside down on a clean surface.
• Locate the passive crotch restraint and insert it into the opening
on the raised portion of the tray until you hear the restraint snap
into place. See Figure 3.
NOTE: The restraint can only be inserted in one direction. The
restraint should be inserted so the two ribs on the inside of the
restraint are on the opposite side of the T-shaped plastic in the
opening of the tray. Once you are sure the restraint is oriented
properly and it is partially inserted, you may need to push force-
fully to get the restraint to snap into place.
NOTE: Once the passive crotch restraint is installed it
cannot be removed. Figure 3
!WARNING
NEVER use the tray on the high chair without the crotch restraint
installed.

Nook Instruction Manual
Figure 6
Using the Tray Insert
The tray insert is removable and dishwasher safe.
• To remove the tray insert, pull outward and upward
on the hook attachments on both sides of the tray
insert. See Figure 8. Be sure to lift straight up to
avoid spilling anything on the tray insert.
• Toattachthetrayinsert,tthetrayinsertintothe
tray until both sides snap into place.
Figure 8
Installing/Removing and
Operating the Tray
• To swing the tray open, place your foot on the front
cross tube and press the button on the underside
of the tray while pulling the tray horizontally away
from the seat. See Figure 4.
• To completely remove the tray, swing the tray open.
Then pull the release tab on the left underside of
the tray while pulling upward on the tray.
See Figure 5.
• To install the tray, orient the tray with the cup holder
towards you and insert the plastic post into the
opening on the left side of the high chair until it
locks into position. See Figure 6.
• Gently pull upward on the tray to ensure it is
installed properly.
• Swing the tray closed until the horizontal post on
the right side locks into the opening in high chair
arm. See Figure 7.
• Use caution when closing the tray with the child
seated inside the high chair and always ensure that
the crotch restraint below the tray is positioned
between the child’s legs.
Figure 4
Figure 5
Pg. 3
Figure 7
!WARNING
The child should be secured in the
restraint system at all times.
The tray is not designed to hold the
child in the chair.

Nook Instruction Manual
Securing the Child in the Seat
Note that there are two height adjustment positions for
the shoulder harness straps. For a younger child, the
shoulder harness straps should be positioned through
the lower openings. For a taller child, the shoulder
straps should be positioned through the top openings
toensureagoodt.
• To change the positioning of the shoulder straps,
ndtheendsofeachstrapunderthecoverand
behind the seat back. Twist the buckle on the end
of each strap sideways and push it out toward the
front of the seat back through the slot. To
re-assemble into a different slot position, twist the
buckle sideways and push it through the slot in the
seat back from the front toward the back of the high
chair. Release the buckle and make sure each strap
is not twisted. Pull each strap toward the front of
the high chair to be sure it is secure. Be sure that
both shoulder straps are inserted through the slots
at the SAME height.
• Ensure that both shoulder straps are attached to the
waist strap buckles. See Figure 9.
• Unlatch the waist/shoulder buckle by squeezing in
on both sides of the buckle latch and removing the
male ends of each buckle. See Figure 10.
• Carefully place the child in the high chair with the
shoulder straps over their shoulders and chest.
Then, place the crotch strap between the child’s legs.
• Bring the seat belt around the child’s waist and
insert the male ends of the waist/shoulder buckle
into the female buckle. Ensure that they snap into
place. See Figure 11. Tighten the waist belt to be
snug around the child’s waist.
• Both the shoulder straps and the waist/crotch straps
may be adjusted using the sliding buckles on these
straps. See Figure 12.
Figure 9
Figure 10
Figure 11
Figure 12
Pg. 4
!WARNING
Prevent serious injury from falls or sliding out.
Always secure child using the restraint system.

Nook Instruction Manual
Folding the High Chair
NOTE: The high chair can be folded with the tray and
trayinsertattached.Becarefultokeepyourngers
from being pinched by moving parts.
• Keep children away from high chair while folding.
• Orient the high chair diagonally in front of you.
• Slide the secondary lock all the way across and lift
up on the folding mechanism behind the top of the
seat back. See Figure 13.
• Rotate the seatback down towards the ground until
the high chair is completely folded. Note that the
high chair does not lock into the folded position.
• To carry the high chair, grab the handle on the rear
of the seat bottom and go.
Figure 13
Pg. 5
Maintenance
Allofthettings,snaps,locks,rivets,andother
hardware and plastic parts on the high chair should be
inspected periodically to ensure that they are secured
properly and not damaged or malfunctioning. The
safety harness, as well as all other fabric items and
their stitching should also be inspected periodically to
ensure that they are secured properly and not loose,
torn or otherwise damaged. All moving parts, such as
the tray and hinges should also be checked periodi-
cally to ensure they are operating properly.
Any missing, broken, or worn components should be
replaced immediately, and the high chair should not be
used until they are replaced. Only original manufac-
turer’s components should be used. If needed, please
contact Joovy at our toll-free phone number.
Cleaning
The fabric material on the high chair can be cleaned
using mild household soap or detergent and warm
water on a sponge or clean cloth. Always allow the
fabric to completely air dry before using the high chair.

Nook Instruction Manual Pg. 6
SATISFACTION GUARANTEED
We want you to be completely satised with your purchase of this product.
Should you experience any difculty in assembling or using this product, or
if you have any questions, please contact our Customer Service Department
at (877) 456-5049 between the hours of 8:30 am and 5:00 pm Central Time.
Please log onto www.joovy.com to register your new Joovy product.

Joovy • 2919 Canton Street • Dallas, TX 75226 • (877) 456-5049 • Fax: (214) 761-1774
E-mail: customerservice@joovy.com • Website: www.joovy.com
©Joovy 2010 • Document Version 012710
Table of contents
Other Joovy High Chair manuals