JUKI MO-50e User manual

2-Needle,3/4-Thread Overlock Sewing Machine
Instruction Manual
MO-50e/51e
IMPORTANT:
Read all safety regulations carefully and
understand them before using your sewing
machine.
Retain this instruction manual for future reference.

110V~240V/15W.
20. Close cover before operating machine.

Replace bulb with same type rated 15Watts.
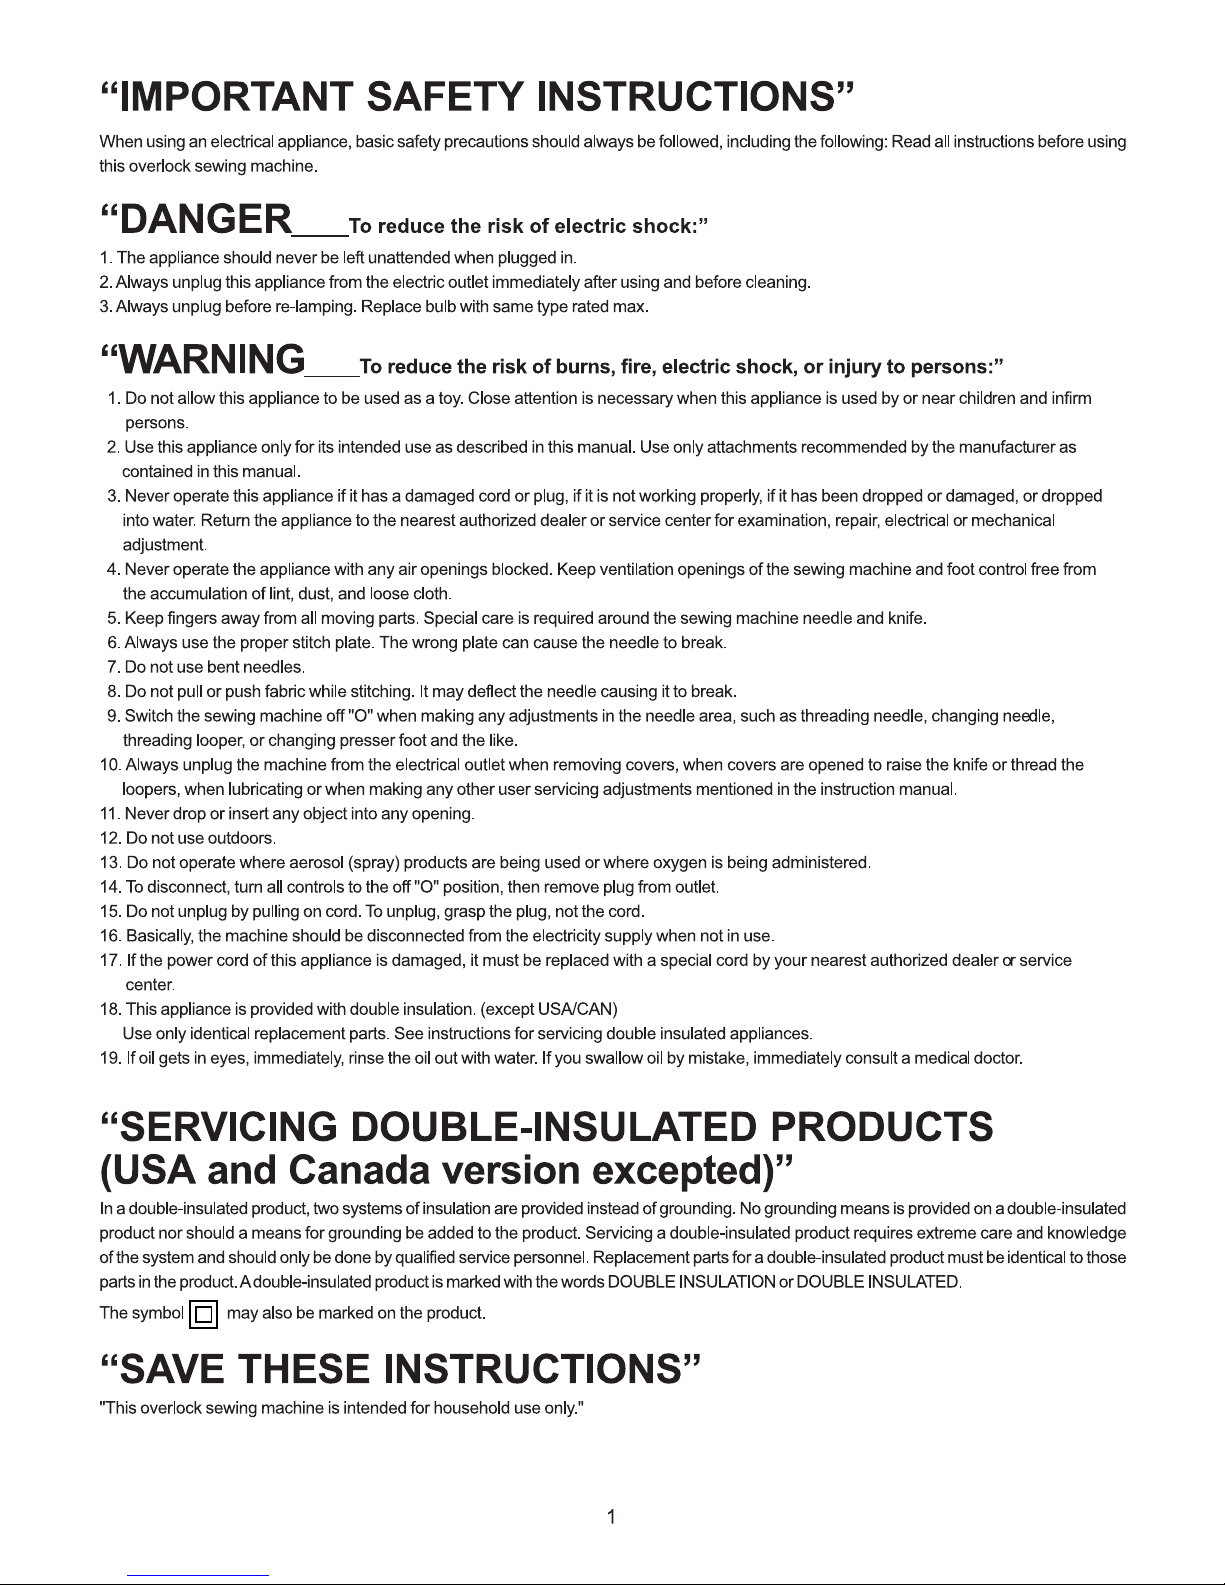
Use foot controller 7. - Details of the machine
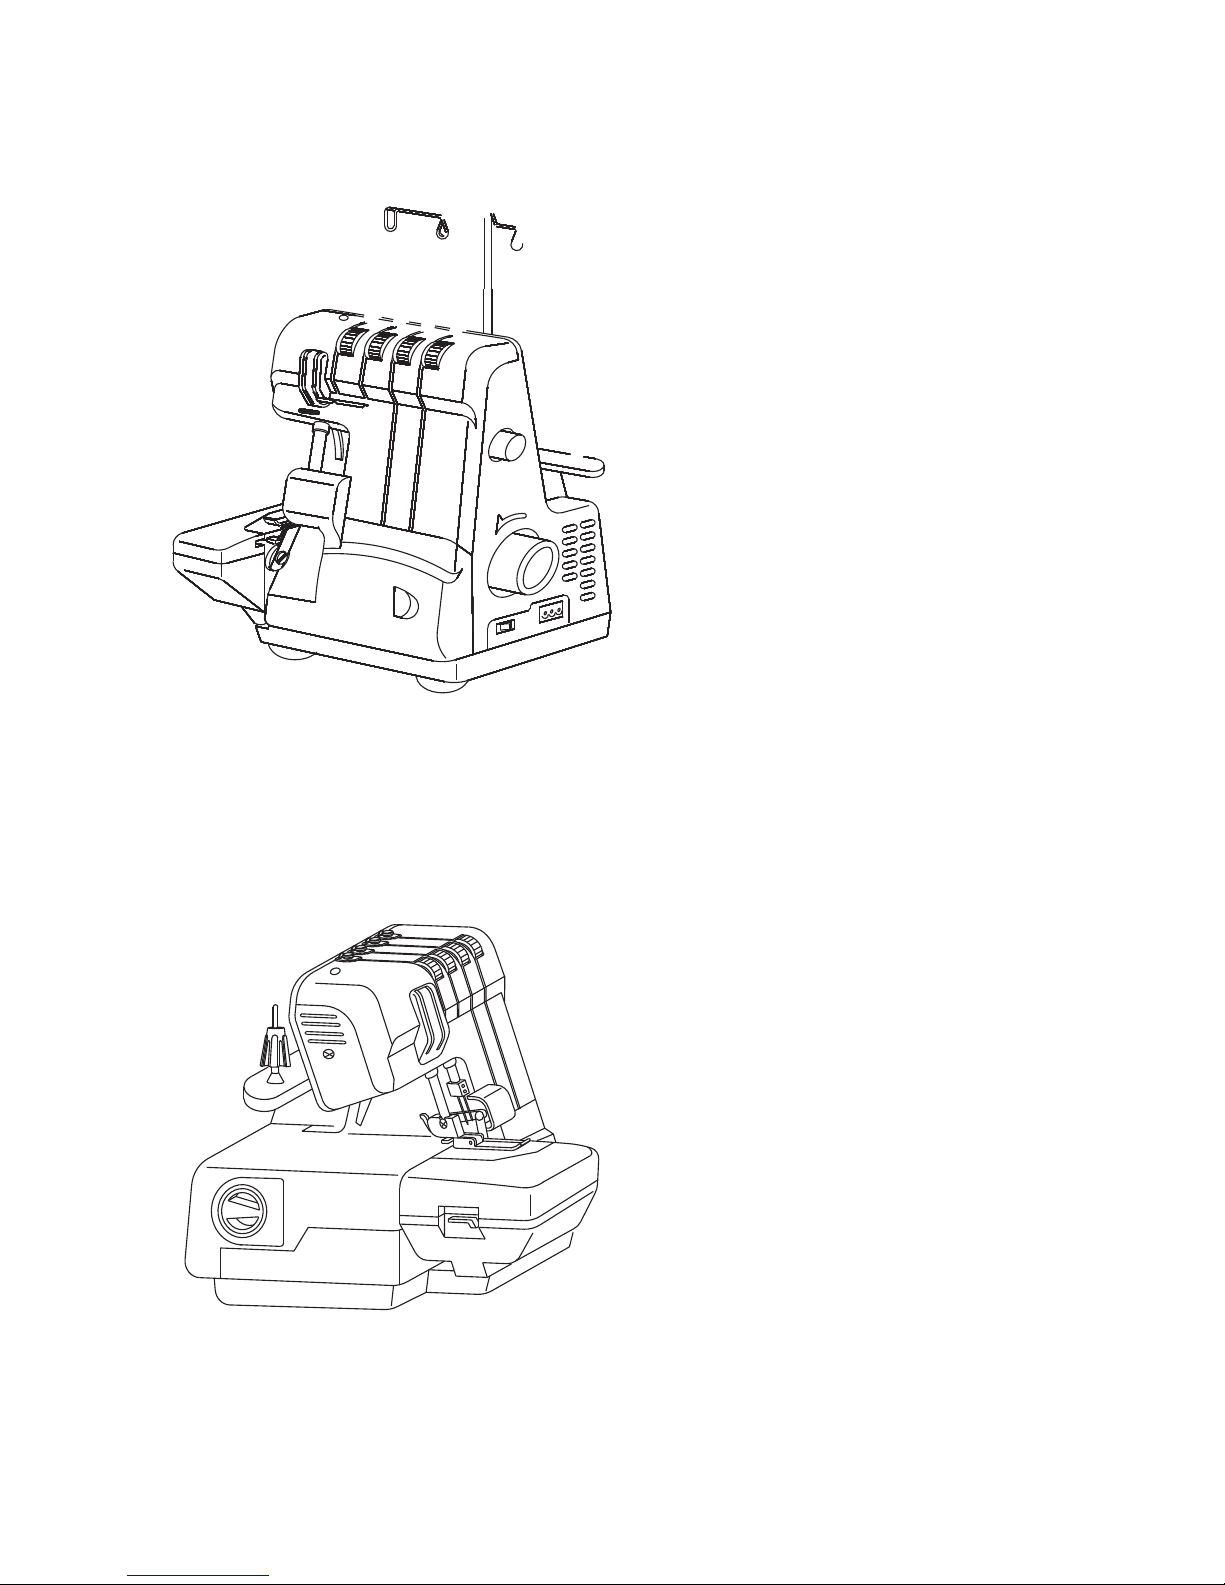
9. - Accessories
9. - Accessory Box
9. - Looper cover
9. - Waste collector
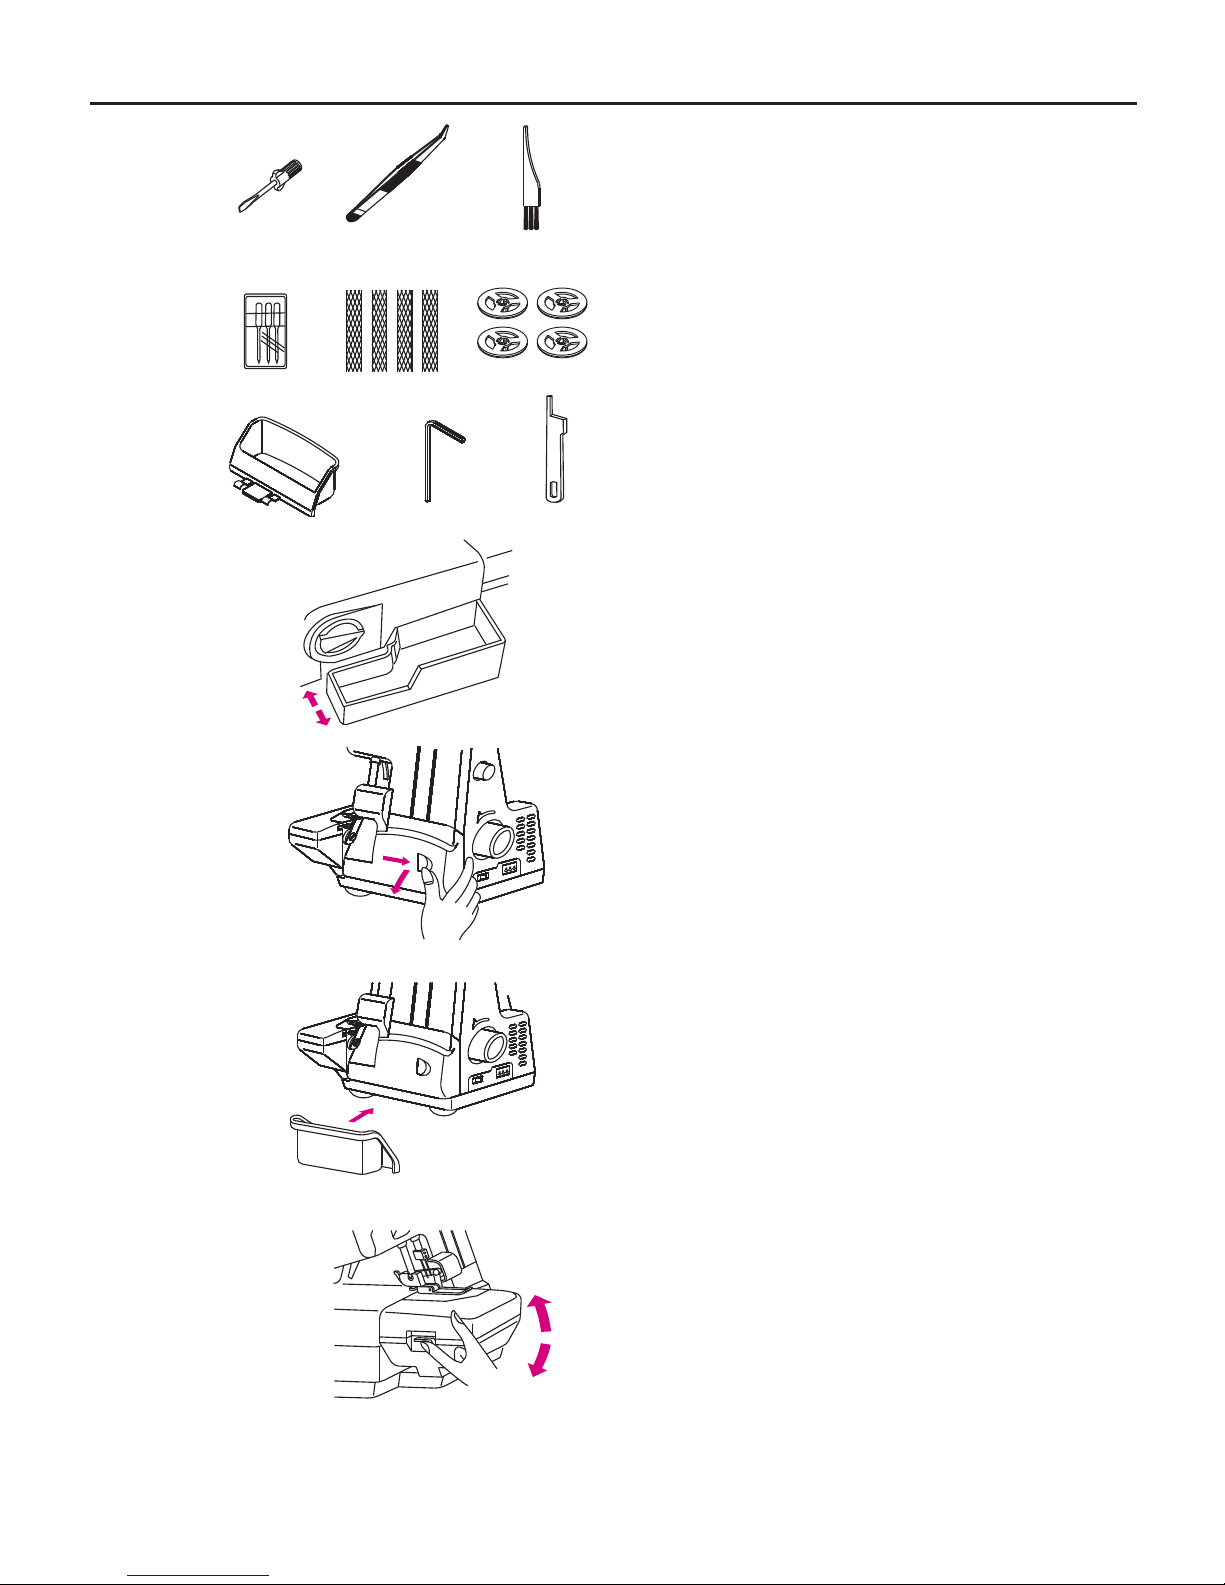
11. - Attaching the foot control
11. - Sewing speed
11. - Assembling the thread stand
11. - Thread cones
11. - Power/ light switch
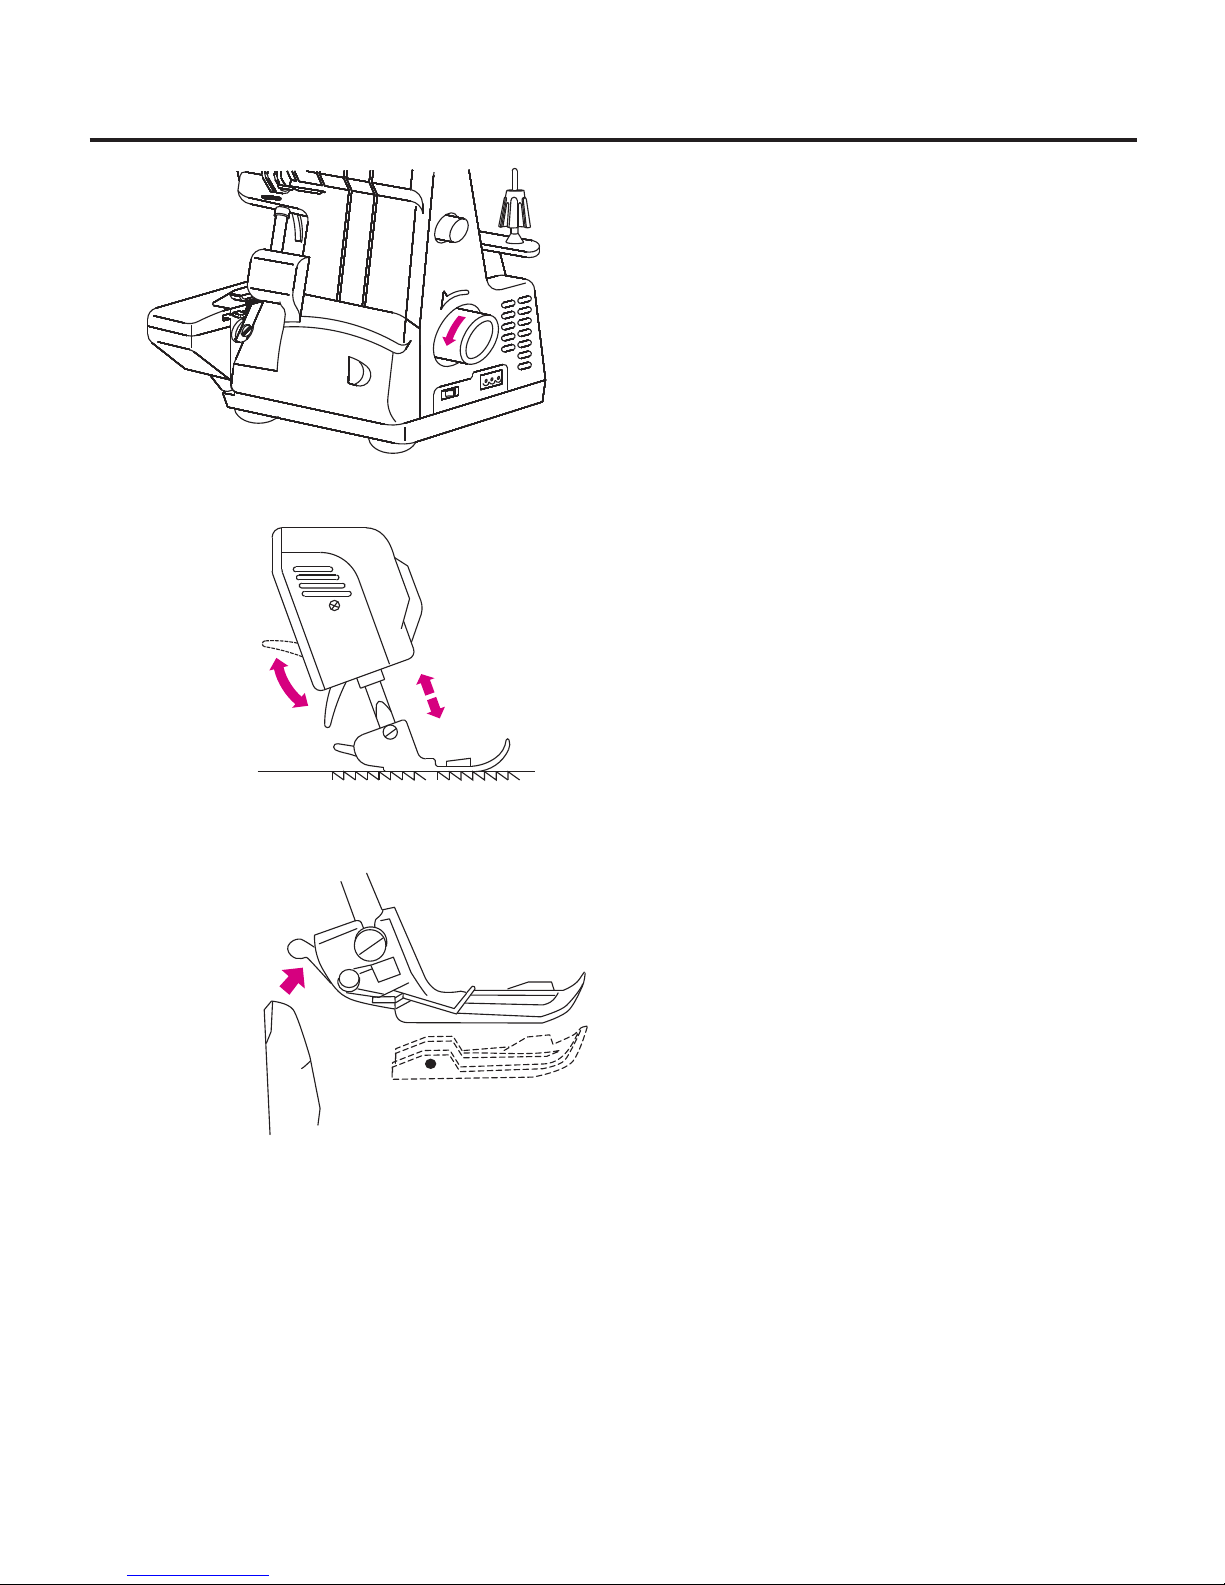
13. - Handwheel
13. - Presser foot lifter
13. - Changing the presser foot
15. - Inserting needles
15. - To lower the upper knife
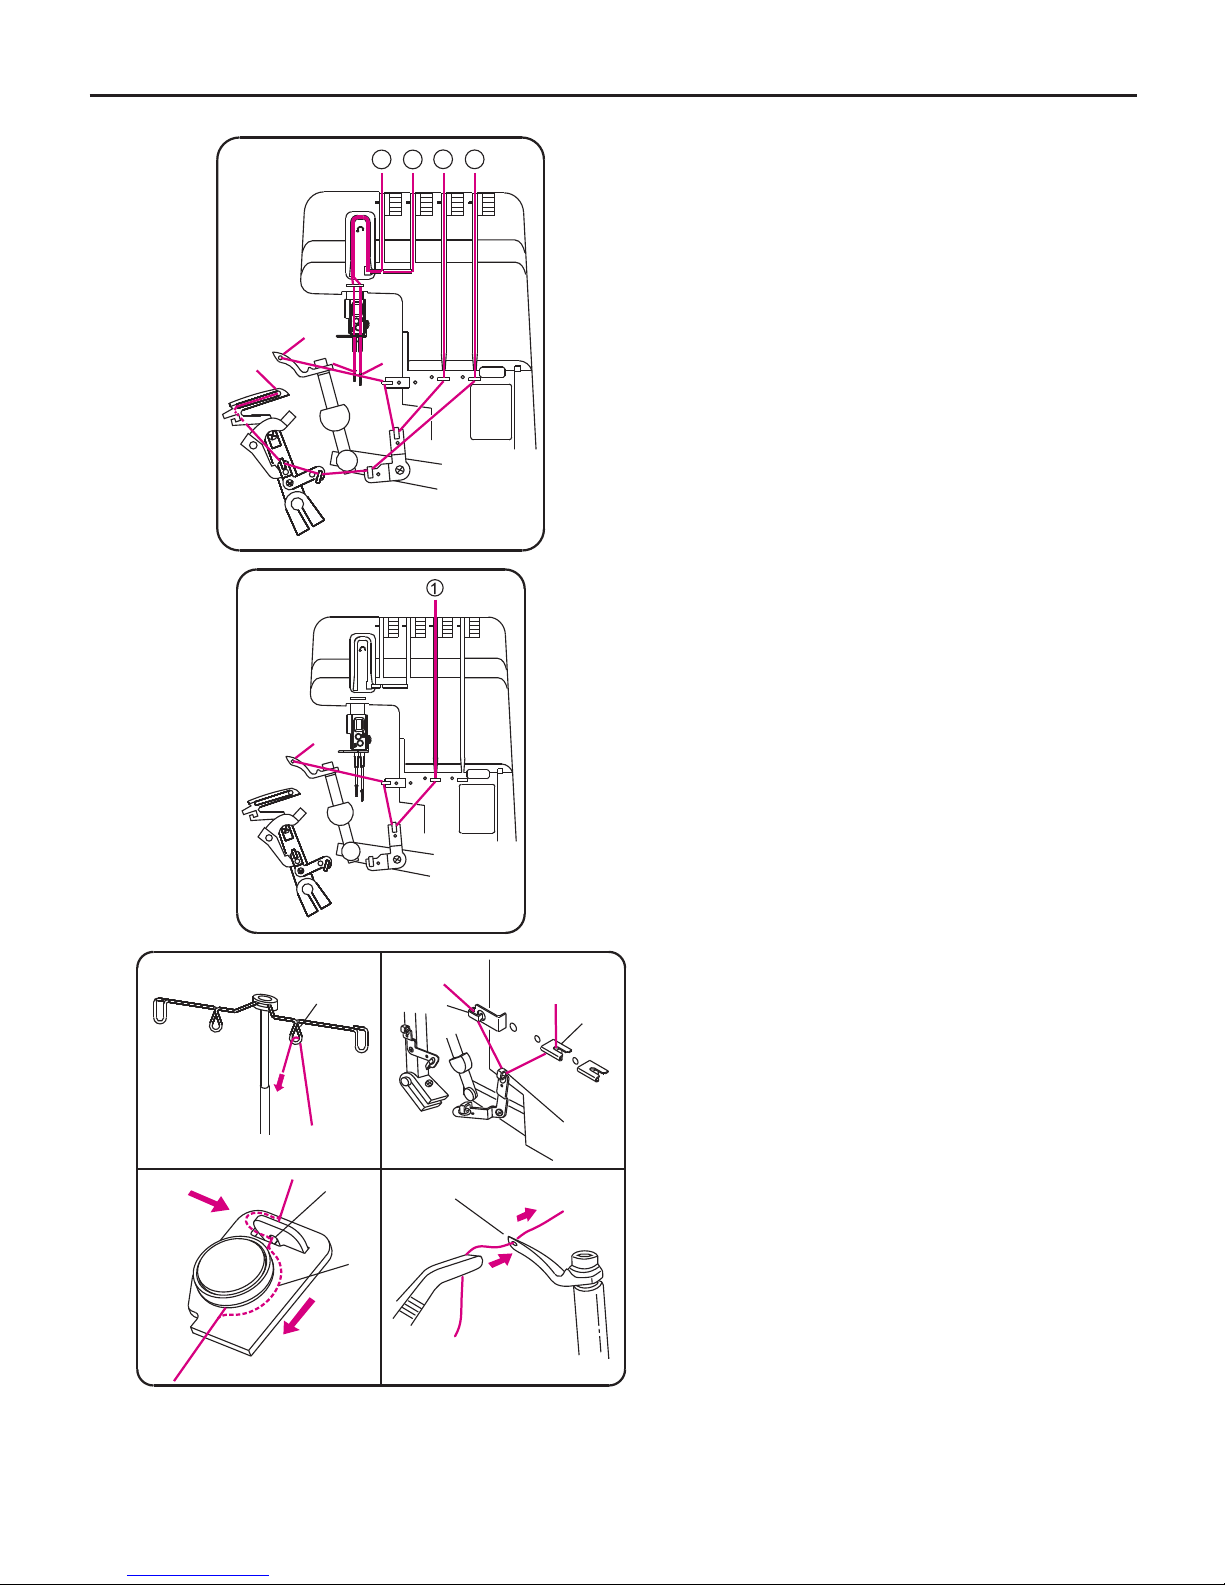
17. - Threading/ Preparation
17. - Upper looper ( )Blue
19. - Lower looper (Red)
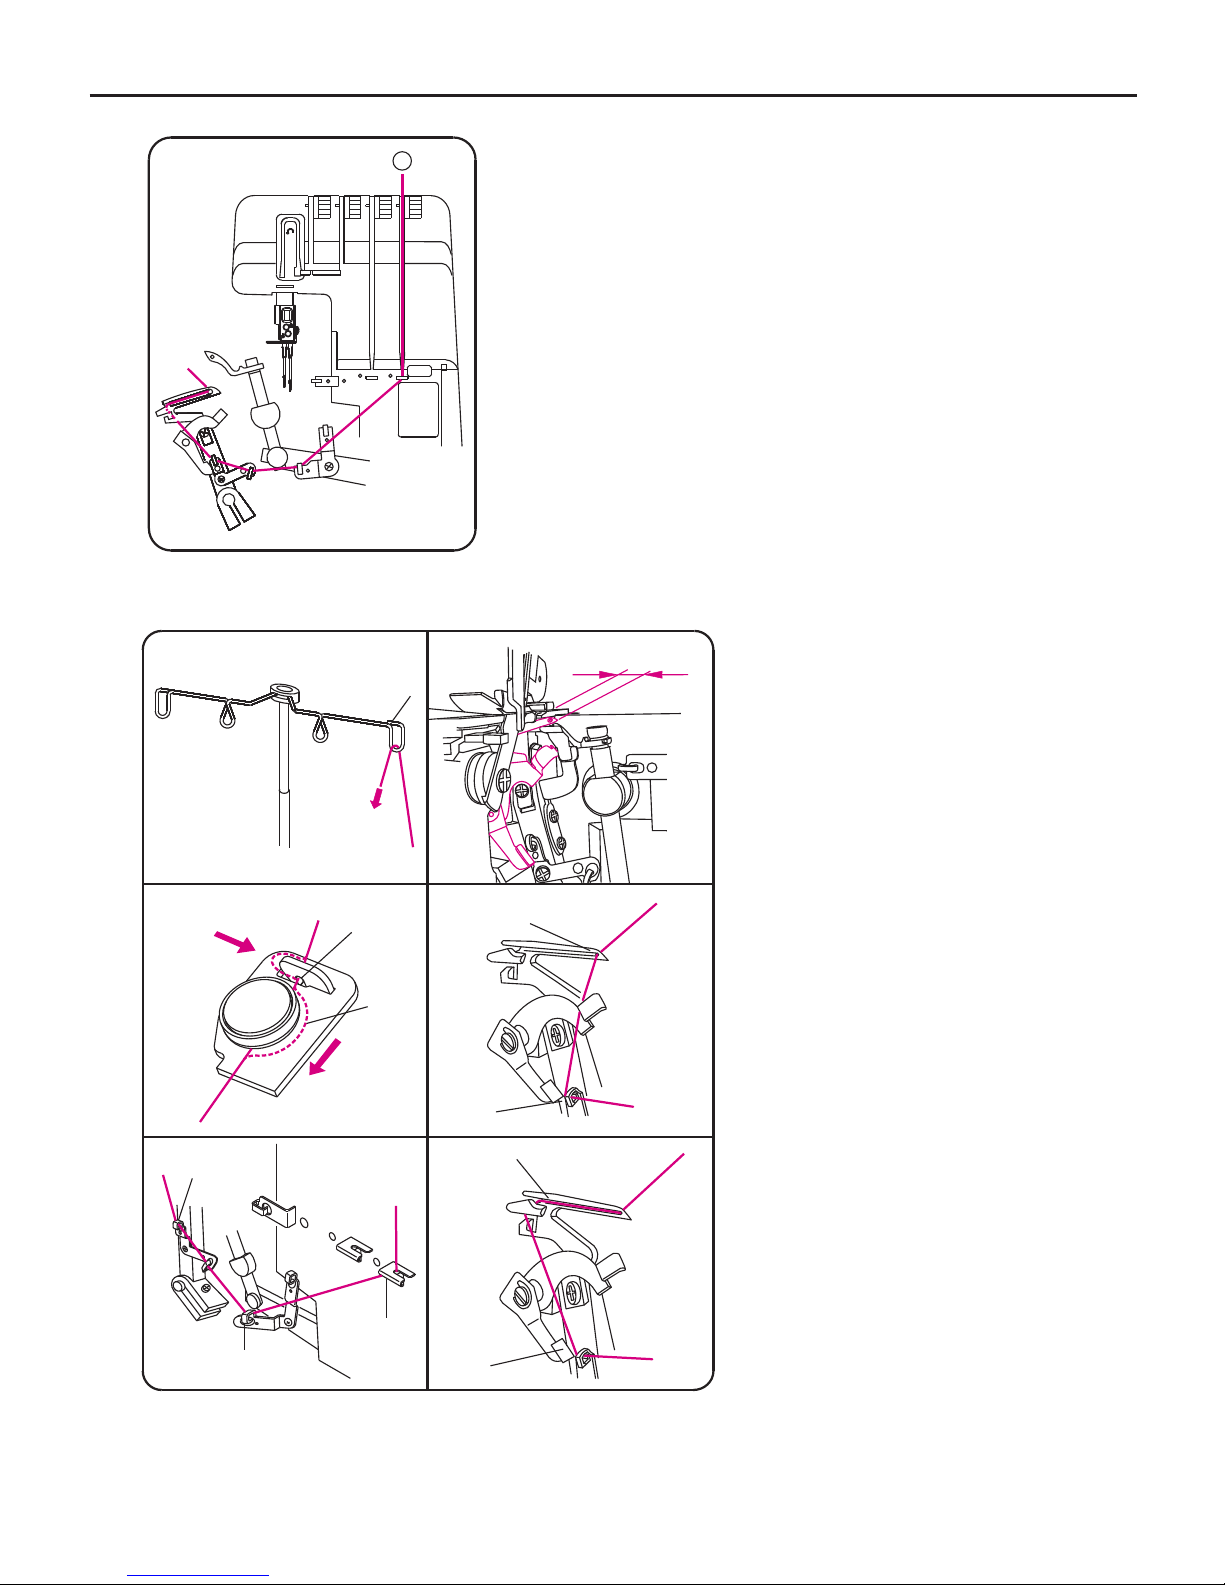
21. - Right needle (Green)
23. - Left needle (Yellow)
23. - After threading
25. - Sewing test
25. - Check your trial run
27. - Adjusting the thread tension
29. - Stitch length
29. - Cutting width
31. - Gathering*
- 3 thread overlock
- 3 thread rolled hem
- Unpicking seams
- Changing light bulb
- Cleaging and lubricating
31. - Differential feed*
13. Using the machine
17. Threading
Contents
25. Trial sewing, thread tension
27. Adjusting the thread tension
29. Adjustments and settings
31. Differential feed*
33. Practical sewing
35. Maintenance
37. Trouble shooting guide
41. Technical data
1. Safety regulations
5. Contents
7. Details of the machine
9. Preparing the machine
4C-315A221
4C-316B22
4C-326C22
4C-316C24
4C-316C26
4C-316C28
4C-326G22
4C-326C25
4C-326C23
Foot controller (100v) Japan
Foot controller (115v) U.S.A.
Foot controller (220v) South Africa
Foot controller (220v) Argentina
Foot controller (220v) Korea
Foot controller (220v) the Middle East
Foot controller (230v) Europe
Foot controller (240v) U.K.
Foot controller (240v) Australia
2

3
1
2
3
4
5
6
7
8
9
10
11
12
13
14
15
16
17
18
19
20
21
22
23
24
25
Looper cover
Looper cover opening indent
Knife guard
Cloth plate
Stitch plate
Presser foot
Upper looper tension dial
Lower looper tension dial
Right needle tension dial
Left needle tension dial
Thread take up cover
Thread guide plate
Accessory box
Bulb cover
Power / light switch
Handwheel
Machine socket
Thread stand
Anti-vibration cone
Spool holder pin
Retractable support rod
Open thread guide
Presser foot lifter
Stitch length dial
Differential feed dial
8
7
9
10
11
4
1
22
21
12
20
19
18
24
16
17
15
2
14
23
25
13
3
6
4
5
Details of the machine

4
Screwdriver
Tweezers
Cleaning brush
Set of needles ELX705
Net
Spool caps
Waste collector
Hexagon wrench
Upper knife
Oiler
All standard accessories are stored
in the box. Pull out to open.
Push in to close.
To open, push to the right with your thumb
in the indent and tilt towards you.
To close push it up and the cover engages
automatically.
Fabric waste will be collected as you sew.
Push the waste collector under the front of the
machine and slightly to the left towards the cloth
plate cover.
To open push the lever up.
To close push the cover up to the
right, it snaps into position
automatically.
1
2
3
4
5
6
7
8
9
10
Preparing the machine
Accessories
Accessory Box
Looper cover
Waste collector
Cloth plate cover
12
56
9
3
4
8

Raise the support rod fully, turning slightly
until the positioning catches engage.
The anti-vibration cone should be used with the
wider edge to the bottom on the spool holder
pin when sewing with cones.
When using household spools remove the
anti-vibration cones.
Place spool on spool holder pins and push
the spool caps on.
If threads slip and get twisted, cover the spools
with the nets supplied in the accessory box.
The power switch is conveniently placed on the
handwheel side of the machine.
"I"-ON
"O"-OFF
Plug foot control into machine socket (A)
and then into main socket (B).
The sewing speed can be adjusted by
increasing or decreasing the pressure
on the foot control (C).
5
Preparing the machine
Assembling the thread stand
Thread cones
Power/light switch
Attaching the foot control
Sewing speed
ON
I
O
OFF
B
A

6
To raise the presser foot, raise the lever
on the rear of the machine until it engages.
-Switch the machine off"O".
-Raise the presser foot.
Press the catch (A) to release the presser
foot from the clamp.
Raise the presser foot lifter to the highest
position and remove the presser foot sole
to the left.
To attach the presser foot sole, place it under
the shaft. The groove in the shaft should line
up exactly with the presser foot pin.
Lower the shank and the presser foot will
engage automatically.
The handwheel turns counterclockwise.
Using the machine
Handwheel
Presser foot lifter
Changing the presser foot
A

7
- Turn the handwheel to raise the needles.
- Open the looper cover.
- Press the upper knife holder to the right.
Turn the knob clockwise until the knife
engages.
- Close the looper cover.
- Switch the machine off"O".
Disconnect machine from electricity supply.
- Turn the handwheel until needles are fully
raised.
- Lower the presser foot.
- Use the hexagon wrench to loosen the
needle setscrew. Remove needle.
- Insert the needle flat side towards the back,
as far as possible into the needle clamp.
Tighten the screw.
- The left needle is set higher than the right
needle.
- Turn the knob anti-clockwise.
The knife snaps automatically into its
lower position. Close the looper cover.
Using the machine
Inserting needles
Raising the upper knife
To lower the upper knife:

16
4
5
7
4312
8
- Place the spool on the spool
holder pin.
- Bring thread up from back to front
through guide (1).
- Pull the thread under the
guider (2) up to go around the
pre-tension (3).
- Thread guide (4,5,6).
- Thread looper eye (7).
- Disconnect machine from
electricity supply.
- Support rod with thread guide
must be fully raised.
- Open the looper cover and the
cloth plate cover.
- Turn the handwheel towards you
until needles are fully raised.
- Thread the machine in the correct
sequence.
Threading
Threading / Preparation
Upper looper (Blue)
2
3

4
5
6
C
2
1
C
A
B
B
9
- Place the spool on the
spool holder pin.
- Bring thread up from back to front
through guide (1).
- Pull the thread under the
protector (2) and pass under the
guider up to go around the
pre-tension (3).
- Thread guide (4,5,6).
Threading
Lower looper (red)
- Turn the balance wheel
toward you until the lower
looper extending out
5-10mm from the needle
plate edge.
- Pull the thread
with tweezers to pass the
lower looper hole (A).
- Draw the thread with your left
hand tightly.
- Use your finger to push the
automatic threader (B) up to the
topmost, and then thread goes
through the lower looper ( )
automatically.
2
3
5~10mm

10
- Place the spool on the
spool holder pin.
- Bring thread up through
guide (1).
-
- Thread guide (4,5).
- Thread right needle eye (6)
- Place thread under presser foot.
Pull the thread under the
protector (2) and pass under the
guider up to go around the
pre-tension (3)
Threading
Right needle (Green)
6
1
3
4
5
2
3

11
- Place the spool on the
spool holder pin.
- Bring thread up through guide (1).
-
- Thread guide (4,5).
- Thread left needle eye (6)
- Place thread under presser foot.
Pull the thread under the
protector (2) and pass under the
guider up to go around the
pre-tension (3).
Note:
If the lower looper has to be re-
threaded, cut both needle threads off
at the needle eye and remove
surplus thread from below. Thread
the looper and then re-thread the
needles.
When threading is complete, lower
the presser foot and close the
looper cover and cloth plate.
Threading
Left needle (Yellow)
After threading
4
4
1
6
5
2
3

1
3
4
2
12
After threading make a trial run.
Always use a double layer of fabric
in order to be able to check the
stitch formation and thread tension
properly.
1 Upper looper thread (blue)
2 Lower looper thread (red)
3 Right needle thread (green)
4 Left needle thread (yellow)
- Switch the machine on "I".
- Set all tension dials to 3.
- Raise the front of the presser foot
slightly with your thumb and
position the fabric under the foot
just up to the knife.
- Sew.
- At the end of the seam continue
sewing a 8cm (4") long thread
chain.
- Cut the thread chain and remove
work.
Perfect stitch formation is when
both looper threads meet at the
fabric edge. The needle threads
form straight stitches for a stretchy
and durable seam.
Thread tension adjustments may
be required depending on the type
of fabric and thread being used.
Trial sewing, thread tension
Sewing test
Check your trial run

Adjusting the thread
tension
Adjusting the thread tension
The left needle thread forms
loops on the underside:
Tighten the left needle thread
tension (yellow).
The right needle thread forms
loops on the underside:
Tighten the right needle thread
tension (green).
The looper loops are formed on
the underside:
Tighten the upper looper tension
(blue), or loosen the lower looper
tension (red).
The looper loops are formed on
the upper side:
Tighten the lower looper
tension (red), or loosen the upper
looper tension (blue).
13

3
2
N
Adjusting the cutting width:
How to use the needle plate
14
- The stitch length can be adjusted
from 1 to 4 mm.
- Higher number = longer stitch,
lower number = shorter stitch.
- Basic stitch length = N.
- The cutting width should be
adjusted according to the type of
fabric being sewn. Check the seam
each time and adjust the cutting
width accordingly.
- Open cloth plate cover
- Turn cutting width dial:
- Clockwise to move knife to the left
(for heavier fabrics).
- Counter-clockwise to move the
knife to the right (for lighter fabrics).
Switch the lever to select the
regular or rolled hem and narrow
hem sewing. “N" for regular sewing.
"R" for rolled and narrow hem
sewing.
Adjustments and settings
Stitch length
Cutting width
lever
lever

N
1
2
4
5
6
7
8
3
1
2
3
4
5
15
There are two feed dogs: one front and one
rear. The two feed dogs move independently
and the distance each feed dog travels
during one complete movement can be
adjusted.
To stretch the fabric select a number
fromNto5inthe
section " ".
This prevents fine nylon jerseys or
closely woven fabrics from
puckering.
To prevent waving or to gather
select a number from N to 8 in the
section " ".
This prevents waving or fluting in
knits or puckers in fine woven
fabrics. It also can be used to
gather single layers of fine woven
fabric.
Use the differential feed to gather
a single layer of fabric. For example
sleeve heads, yokes, lace edging
or frills.
When sewing without differential
feed the dial should be on
position N.
Differential feed*
Differential feed*
Gathering*
Adjustment:
Stitch: 4-thread overlock
Differential
feed: 8
Stitch length: 3-4
Thread tension: 3-5
Note:
Pushing effect
Stretching effect

16
3 thread overlock
For a 3-5 mm wide 3 thread
overlock, remove the left needle.
Thread both loopers and then
the right needle.
Practical sewing
For a 5-7 mm wide 3 thread
overlock, remove the right
needle.
Thread both loopers and then
the left needle.
3 thread roll hem
Setting:
Unpicking seams
Switch the lever to "R". See
page 14.
the tensions may need to be
adjusted depending on the type
of fabric or thread being used.
Stitch:
Needle:
Tensions:
Needle:
Upper looper
Lower looper
Stitch length
Differential feed
3 thread roll hem
right
3-5
4-6
6-8
1.5-2
N (depending on fabric)
Cut the loops with sharp
scissors.
Pull the needle thread and the
stitches will come undone.
Note:

A
B
17
- Switch the machine off "O" and
disconnect it from electricity supply
by removing the mains plug.
- Loosen the bulb cover setscrew (A)
and remove the bulb cover.
- Unscrew the bulb and replace it with
a new one.
- Attach bulb cover and re-tighten the
setscrew.
Note:
Always use 110V/230V/240V/
15W bulbs. Bulbs are available
from your local dealer.
- Disconnect machine from electricity
supply.
During sewing dust and fluff collect in
and on the machine. This should be
removed regularly.
Your overlocker requires very little
lubrication but if used frequently,
lubricate the points illustrated (B) with
a drop of oil.
Changing light bulb
Cleaning and lubricating
ON
I
O
OFF
If voltage indicated on the electrical
rating plate of your machine is
220-240V, ask for light bulb conforming
to following specification.
If voltage indicated on the electrical
rating plate of your machine is 100V,
ask for light bulb conforming to
following specification.
If voltage indicated on the electrical
rating plate of your machine is
110-120V, ask for light bulb conforming
to following specification.
-Edison type (screw type):
220 ~240V, 15W
-Edison type (screw type):
100V, 12W
-Edison type (screw type):
110 ~120V, 15W
Glass shape: T-22
Glass shape: T-20
Glass shape: T-20
Lamp cap: E14
Lamp cap: E12
Lamp cap: E12
Overall length: 56mm
Overall length: 48mm

18
Needles break
Skipped stitches
Poor stitch formation
Seams flute or ware (knits)
Seams pucker
Fabric edges curl
Thread loops are loose
Machine does not sew
Thread tension is too tight
for thread used.
The machine is not threaded
correctly.
Needles are incorrectly
inserted.
Needles are bent, blunt or the
points are damaged.
Needles not inserted
correctly.
Fabric was pulled while sewing.
Needles are bent or blunt.
Wrong needles used.
Thread is not wound correctly
round tension dials.
Differential feed is set incorrectly.
Fabric was pulled while sewing.
Differential feed is set incorrectly.
Too much fabric in the stitch
formation.
Too little fabric in the stitch
formation.
Cord not plugged in correctly.
Main switch not on.
Thread breaks Reduce thread tension.
Check the threading.
Insert needles fully into needle
clamp with flat side to the back.
Replace the needles.
Insert needles fully into
needle clamp with flat side
to the back.
Guide fabric gently with both
hands.
Replace the needles.
Use system ELx705
needles.
Check threading.
Adjust differential feed
between N and 8 " "
Adjust differential feed
between N and 5 " "
Reduce cutting width, knife
to the left.
Increase the cutting width,
knife to the right.
Check plug.
Switch machine on"1".
13
8
9/10
7
7
7
12
7
8
9/10
15
15
14
14
5
Trouble shooting guide

19
- 2 needles, 4 thread overlock with integrated
safety seam
- 1 needle. 3-thread overlock, 3 thread rollhem.
ELX705
3-7mm
1-4mm
max. 6mm
rotates counter-clockwise
up to 1300 s.p.m.
7.4kg
292Wx295Dx290H mm
Dust cover
Blind stitch foot
Elasticator foot
Special accessories are
available from your dealer
Shirring foot
Bead/sequin foot
Cording foot
Taping foot
Technical data
Stitch types:
Needle system:
Seam width:
Stitch length:
Presser foot lift:
Handwheel:
Sewing speed:
Weight:
Dimensions:
Standard accessory:
Special accessories:
Other manuals for MO-50e
4
This manual suits for next models
1
Table of contents
Other JUKI Sewing Machine manuals

JUKI
JUKI HZL-E70 User manual

JUKI
JUKI HZL-E71 User manual

JUKI
JUKI MF-7000 Series Quick start guide

JUKI
JUKI MO-644DN User manual

JUKI
JUKI MO-654DE User manual

JUKI
JUKI MO-613V User manual

JUKI
JUKI DU-1181N User manual

JUKI
JUKI DDL-8000AS User manual

JUKI
JUKI MF-7700 Series Quick start guide

JUKI
JUKI AMS-210D User manual