JUKI HZL35Z-UL5 User manual

1
IMPORTANTES INSTRUCCIONES DE SEGURIDAD
Este instrumento se conforma con directivo de CEE 89/336/EEC
cubriendo supresión contra interferencia de radio.
Cuando se usa un aparato eléctrico, debe seguirse unas precauciones básicas y que vienen
incluidas a continuación.
"Leer las instrucciones antes de usar la máquina de coser."
PELIGRO
-
1. La máquina no debe dejarse nunca desatendida mientras esté conectada. Desconectar la máquina de la red
eléctrica inmediatamente después de su uso y antes de limpiarla.
2. Desconectar la máquina de la red antes de cambiar la bombilla.
Colocar una bombilla del mismo tipo con una potencia de 15 Watios.
CUIDADO
-
1. No usar la máquina como un juguete.
Prestar atención si fuese necesario cuando la máquina está siendo usada por niños o cerca de ellos.
2. Usar la máquina de coser solamente como se describe en este manual.
Usar únicamente los accesorios recomendados por el fabricante y que vienen especificados en este manual.
3. No trabajar nunca con la máquina en caso de que tenga el cable o el enchufe en malas condiciones, si no cose
correctamente, en caso de que se haya caído, haya sido dañada o se haya mojado.
4. No usar la máquina con los orificios de ventilación bloqueados. Mantener los orificios de ventilación de la
máquina de coser y el pedal sin acumulación de polvo, suciedad y restos de tejido.
5. No introducir no insertar objetos en los orificios de ventilación.
6. No usar al aire libre.
7. No usar mientras se estén utilizando productos aerosoles (spray) o en lugares donde se esté administrando
oxigeno.
8. Para desconectar, girar el interruptor hasta la posición Off ( "0" ), luego desconectar el enchufe de la red.
9. No desconectar el enchufe tirando del cable. Para desconectar, tirar de la clavija, no del cable.
10. Mantener los dedos alejados de todas las partes movibles de la máquina. Tener un cuidado especial con la
aguja.
11. Usar siempre la placa de agujas apropiada. Una placa de agujas impropia puede producir la rotura de la aguja.
12. No usar agujas despuntadas.
13. No presionar ni tirar del tejido mientras se está cosiendo. Esto podría doblar la aguja y romperla.
14. Situar el interruptor principal de la máquina en posición Off ( "0" ) cuando se realice algún ajuste en el área de la
aguja como enhebrar la aguja, cambiar la aguja, cambiar la canilla, cambiar el pie prensatelas y similares.
15. Desconectar siempre la máquina de la red eléctrica cuando se retiren las tapas, para lubricar, o cuando se
realice algún otro tipo de ajuste mecánico mencionado en el manual de instrucciones.
CONSERVE ESTE MANUAL DE
INSTRUCCIONES
Esta máquina de coser es para uso doméstico
Para reducir el riesgo de quemaduras, fuego, descargas
eléctricas o causar daños a personas.
Para reducir el riesgo de una descarga eléctrica.
Este equipo está etiquetado con el símbolo de reciclado que puede verse arriba. Esto quiere
decir que al final de la vida del equipo, éste debe ser llevado a un punto de recogida específico
para equipos electrónicos, y no a los contenedores normales de residuos domésticos. Esto
beneficiará al medio ambiente para todos. (Sólo Unión Europea)

2

3
Check chart ce .............................................. 72 - 73
1. KNOWING YOUR SEWING MACHINE
Machine identification ............................................. 6 - 9
Accessories ......................................................... 10 - 11
Setting up your machine ..................................... 12 - 13
Spool pins, Presser foot lever ............................. 14 - 15
Pressure regulator ............................................... 14 - 15
Drop feed lever .................................................... 16 - 17
Converting to free-arm sewing ............................ 16 - 17
Reverse stitch lever ............................................. 16 - 17
Stitch pattern dial and indicator .......................... 18 - 19
Stitch length/super (stretch) stitch control .......... 18 - 19
Zig zag width adjusting lever .............................. 18 - 19
Winding the bobbin ............................................. 20 - 21
Threading the bobbin thread ............................... 22 - 23
Needle, thread and fabric chart .......................... 24 - 25
Threading the top thread ..................................... 26 - 27
Using automatic needle threader ........................ 28 - 29
Picking up bobbin thread .................................... 30 - 31
2. STARTING TO SEW
Machine setting chart .......................................... 32 - 35
Straight stitch ....................................................... 36 - 45
Turning a square corner, Darning,
Inserting zips and piping, Sewing on heavy fabric,
Adjusting top thread tension
TABLE OF CONTENTS
Changing presser feet ......................................... 44 - 45
Zigzag stitch ........................................................ 46 - 47
Satin stitch
Blind stitch ........................................................... 48 - 49
Three-step zigzag ................................................ 50 - 51
Double-action stitch ............................................. 50 - 51
Shell hem ............................................................. 52 - 53
Faggoting ............................................................. 52 - 53
Stretch stitches .................................................... 54 - 59
Triple straight stitch, Ric-rac stitch, Overlock stitch,
Smocking stitch, Elastic overlock stitch, Fishbone stitch,
Stretch overlock stitch, Stretch patching stitch
Decorative embroidery designs .......................... 60 - 61
Tips on design stitching
Buttonhole making .............................................. 62 - 67
Corded buttonholes, Adjusting stitch balance
3. CARING FOR YOUR MACHINE
Cleaning the feed dogs and shuttle area ........... 68 - 69
Changing light bulb ............................................. 70 - 71
4. CHECK CHART FOR PERFORMANCE
PROBLEMS
Dimensions: 410 mm × 170 mm × 300 mm
Mass of the equipment: 7.3 kg
Rated Voltage: 230V ~
Rated Frequency: 50Hz
Rated input: 65W
Rated ambient temperature: 15 - 35°C
Acoustic noise level: less than 70db(A)
For European version

4
CONTENIDO
Dimensiones: 410 mm × 170 mm × 300 mm
Peso del equipo: 7,3 kg
Voltaje nominal: 230V ~
Frecuencia nominal: 50Hz
Consumo nominal: 65W
Temperatura ambiente nominal: 15 - 35°C
Nivel de ruido acústico: menos de 70db(A)
Para versión europea
Check chart ce c ........................................... 72 - 73
1. PRINCIPALES PARTES DE LA MAQUINA
Identificación de la máquina ................................... 6 - 9
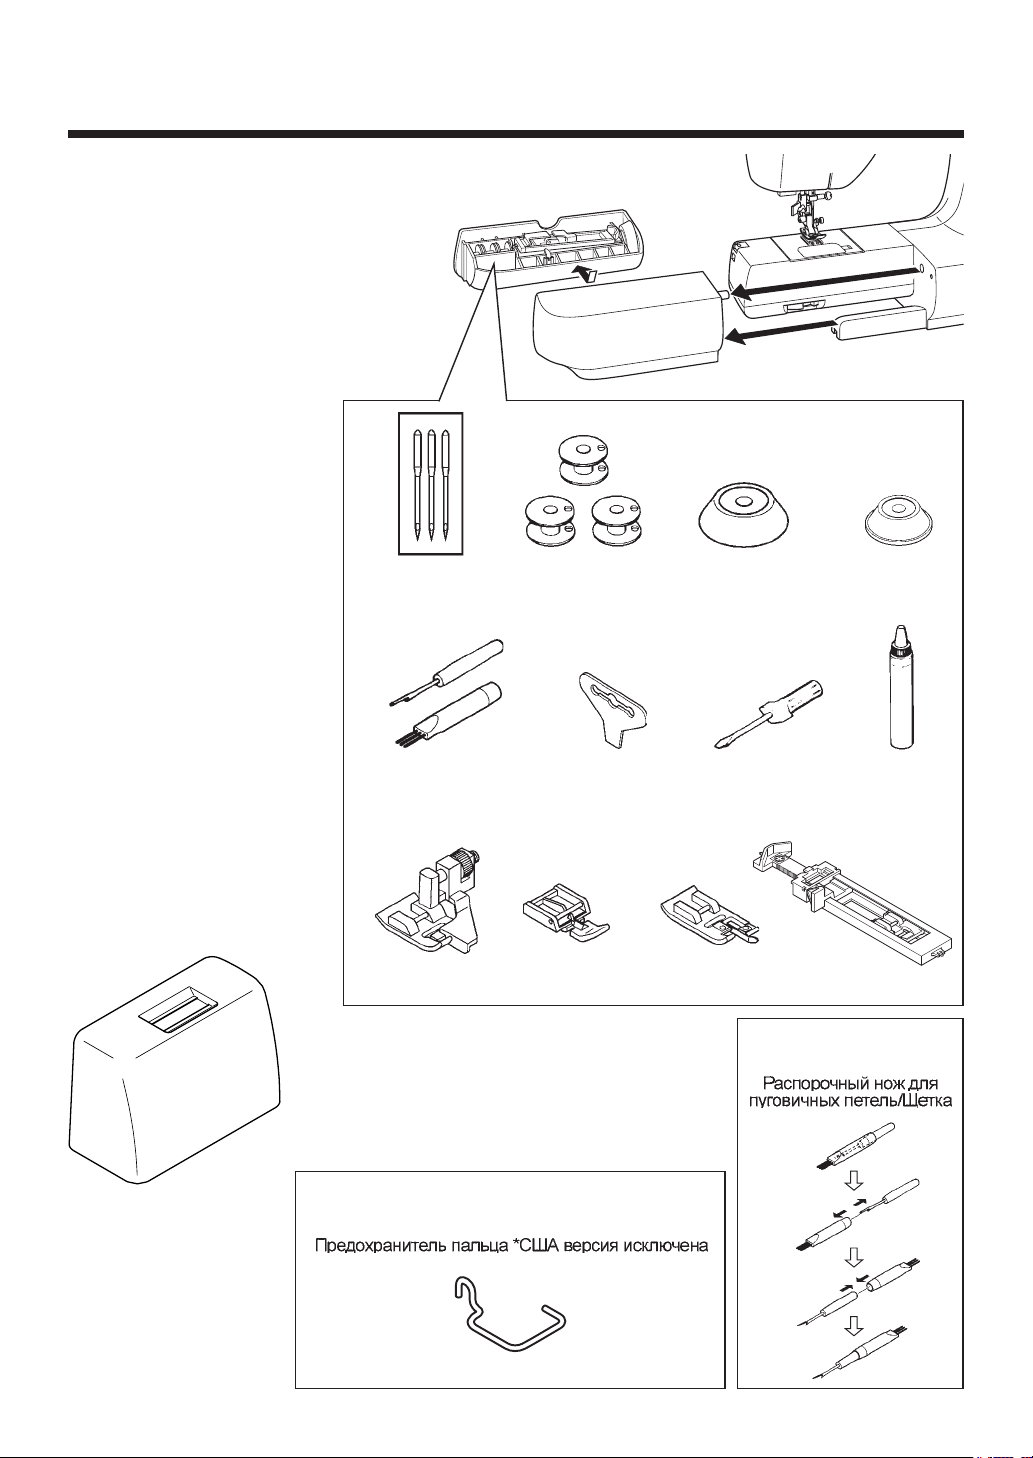
Accesorios ........................................................... 10 - 11
Preparación de la máquina ................................. 12 - 13
Porta carretes, Palanca pie prensatelas ............ 14 - 15
Regulador de presión .......................................... 14 - 15
Control de dientes ............................................... 16 - 17
Conversión para la costura con brazo ................ 16 - 17
Palanca de la puntada de retroceso ................... 16 - 17
Selector e indicador de puntadas ....................... 18 - 19
Control largo de puntada y puntada super (elástica) .. 18 - 19
Selector ancho puntada ...................................... 18 - 19
Devanado de la canilla ........................................ 20 - 21
Enhebrado del hilo de la canilla .......................... 22 - 23
Tabla de hilo, aguja y material ............................ 24 - 25
Enhebrado del hilo superior ................................ 26 - 27
Empleo del enhebrador aguja ............................. 28 - 29
Recogida del hilo de la canilla ............................ 30 - 31
2. EMPEZER A COSER
Esquema de ajuste de la máquina ..................... 32 - 35
Puntada recta ...................................................... 36 - 45
Giro en esquinas en ángulo recto, Zurcido,
Inserción de cremalleras y vivo,
Cosiendo materiales pesados,
Ajuste de la tensión del hilo superior
Cambio del pie prensatelas ................................ 44 - 45
Puntada zig-zag .................................................. 46 - 47
Puntada de relleno
Puntada invisible ................................................. 48 - 49
Zig-zag de tres puntadas .................................... 50 - 51
Puntada de acción doble .................................... 50 - 51
Dobladillo de concha ........................................... 52 - 53
Fagoting (Diente de rata) .................................... 52 - 53
Puntadas elásticas .............................................. 54 - 59
Puntada recta triple, Puntada zig-zag a dos agujas,
Puntada overlock, Puntada nido de abeja,
Puntada overlock elástica, Puntada raspa,
Puntada overlock elástica,
Puntadas elástica de parches
Diseños de bordados decorativos ...................... 60 - 61
Tipos de puntadas decorativas
Confección de ojales ........................................... 62 - 67
Ojales con cordón,
Ajuste de la compensación puntadas ojal
3. CUIDE SU MAQUINA
Limpiar el area del transportador y la lanzadera ........ 68 - 69
Cambio de la bombilla ........................................ 70 - 71
4. CUADRO DE EXAMEN PARA
LOS PROBLEMAS DE EJECUCION

55
Check chart ce c ........................................... 72 - 73
6 - 9
10 - 11
12 - 13
14 - 15
14 - 15
16 - 17
................................. 16 - 17
16 - 17
...................... 18 - 19
18 - 19
18 - 19
............................................... 20 - 21
..................................... 22 - 23
24 - 25
..................................... 26 - 27
28 - 29
30 - 31
32 - 35
.................................................. 36 - 45
................................... 44 - 45
.................................................... 46 - 47
48 - 49
50 - 51
......................................... 50 - 51
52 - 53
............................................... 52 - 53
.......................................... 54 - 59
60 - 61
............................. 62 - 67
68 - 69
............................................... 70 - 71
Dimensions: 410 mm × 170 mm × 300 mm
Mass of the equipment: 7.3 kg
Rated Voltage: 230V ~
Rated Frequency: 50Hz
Rated input: 65W
Rated ambient temperature: 15 - 35°C
Acoustic noise level: less than 70db(A)
For European version

6
2
1
3
4
5
6
1. KNOWING YOUR SEWING MACHINE
MACHINE IDENTIFICATION
7
8
9
15
10
11
12
13
14
1. Reverse stitch lever
2. Thread guide
3. Pressure regulator
4. Thread take-up
5. Thread tension dial
6. Face cover
7. Thread cutter
8. Auxiliary bed
(Accessory box)
9. Drop feed lever
10. Bobbin winder
11. Bobbin winding regulator
12. Stitch indicator
13. Stitch length adjusting dial
14. Stitch pattern dial
15. Zig zag width adjusting lever
16. Retractable spool pin
17. Hand wheel
18. Light switch
19. Speed controller receptacle
20. Identification plate
21. Handle
22. Spool pin
23. Buttonhole lever
24. Presser foot lever
25. Buttonhole stitch adjuster
17
16
18
19
20
21
22
23
24
25

1. PRINCIPALES PARTES DE
LA MAQUINA
IDENTIFICATION DE LA MAQUINA
1. Palanca puntada de retroceso
2. Guía hilo
3. Regulador de presión
4. Tria-hilos
5. Control tensión hilo
6. Cubierta frontal
7. Cortador de hilo
8. Base de extensión
(caja de accesorios)
9. Control de dientes
10. Eje devanador canilla
11. Tope devanador canilla
12. Indicador de puntadas
13. Control longitud puntada
14. Selector de puntadas
15. Selector ancho puntada
16. Pasador carrete
17. Volante
18. Interruptor corriente / luz
19. Enchufe del control por pedal
20. Placa de identificación
21. Asa para llevar
22. Pasador carrete
23. Palanca para ojales
24. Palanca pie prensatelas
25. Dispositivo de ajuste puntada ojal
7

8
26. Automatic needle threader
27. Presser foot screw
28. Needle
29. Hook cover
30. Needle bar
31. Needle clamp screw
32. Presser foot release lever
33. Presser foot
34. Feed dogs
35. Needle plate
36. Hook cover release button
37. Foot controller
38. Instruction manual
26
27
29
28
30
31
32
33
34
35
36
37 38

9
26. Enhebrador automatico aguja
27. Tornillo pie prensatelas
28. Aguja
29. Tapa de canilla
30. Barra de aguja
31. Tornillo de sujeción aguja
32. Palanca de desprendimiento
prensatelas
33. Pie prensatelas
34. Transporte de dientes
35. Plancha aguja
36. Botón de apertura tapacanilla
37. Control por pedal (Reostato)
38. Manual de instrucciones

10
12 34
5678
9101112
Seam ripper/Brush
Abridor de ojales/Cepillo
13
1. Needles
2. Bobbins
3. Spool pin cap (large)
4. Spool pin cap (small)
5. Seam ripper/Brush
6. Screwdriver (large)
7. Screwdriver (small)
8. Oiler
9. Blind stitch presser foot
10. Zipper foot
11. Overcasting foot
12. Buttonhole foot
13. Hard case
ACCESSORIES
Finger guard *Except USA version
Gard del dedo *Excepto la version de los E.E.U.U.

11
1. Agujas
2. Canillas
3. Tapa del pasador carrete
4. Tapa del pasador carrete
5. Abridor de ojales/Cepillo
6. Destornillador (grande)
7. Destornillador (pequeño)
8. Lubrificador (Aceitera)
9. Prensatelas de puntada invisible
10. Pata para cremalleras
11. Pata para overlocado
12. Pata para ojales
13. Caso duro
ACCESORIOS

12
SETTING UP YOUR MACHINE
Be sure to wipe off any surplus oil from needle
plate area before using your machine the first
time.
FOOT CONTROLLER
Connect the plug of the foot controller into the
machine socket (1) and your wall outlet (2) as
illustrated.
LIGHT SWITCH
Your machine will not operate until the light
switch is turned on. The same switch controls
both the power and the light.
When servicing the machine, or changing
needles, etc., machine must be disconnected
from the power supply.
Foot controller
Control por pedal
Always disconnect the machine from power supply by
removing the plug from the socket-outlet.
CAUTION
Poner el Interruptor de corriente/
luz de velocidad en “OFF”
Set light switch at “OFF”

13
PREPARACION DE LA MAQUINA
Asegurarse de limpiar cualquier aceite sobrante del área
de la plancha de aguja, antes de usar, por primera vez,
la máquina.
CONTROL POR PEDAL
Conecte el pedal a la máquina (1) y el enchufe a la
alimentación de corriente (2) tal como se ve en el dibujo.
INTERRUPTOR CORRIENTE/LUZ
La máquina no funcionará hasta que se conecte el
interruptor de corriente / luz. El mismo interruptor controla
la corriente y la luz. Cuando se está utilizando la máquina,
o se están cambiando agujas o bobillas, etc., la máquina
se debe desconectar de los suministros principales.
Siempre desconectar desenchufando el
cordón de la corriente eléctrica.
PRECAUCION

14
SPOOL PINS
Place a spool of thread on the spool pin. Secure it with
the spool cap (A) leaving a gap between the spool cap
and the reel of thread to allow the reel to rotate freely.
Pull up the spool pin (B) . This is used for bobbin winding
when the machine is already threaded.
A
B
PRESSER FOOT LEVER
There are three positions for your presser foot.
1. Lower the presser foot to sew.
2. Raise the lifter to the middle position to insert or
remove fabric.
3. Lift it to its highest position to change the presser foot
or to remove thick fabric.
PRESSURE REGULATOR
For most fabrics set the control at 3. For thicker ones
increase it to 4 and for finer ones decrease to a lower
number.

15
PORTA CARRETES
Coloque un carrete de hilo en el porta-carretes. Fijelo
con la tapa (A) asegurándose una salida fluida del hilo.
Tire de la barrita (B). Esta se utiliza para el llenado de
canilla cuando la máquina ya está enhebrada.
PALANCA PIE PRENSATELAS
REGULADOR DE PRESION
Este control regula la presión de la pata prensatelas sobre
el transporte de dientes. Una presión insuficiente puede
causar un pobre transporte del material, saltos de puntada
ó dificultades en guiar el tejido. Demasiada presión puede
producir marcas en el tejido, por causa de los dientes del
transporte o la pata prensatelas.
Para la mayoría de tejidos, poner el control al . 3. Para
tejidos gruesos poner al y para finos reducir un
número.
Su prensatelas tiene tres posiciones.
1. Bajar el prensatelas para coser.
2. Levantar la palanca a la posición media para insertar
o mover la tela.
3. Levantar a la posición más alta para cambiar el
prensatelas o para mover el material grueso.

16
DROP FEED LEVER
The drop feed lever the movement of the fabric that is
being sewn. They should be raised for all general sewing
purposes and lowered for darning, freehand embroidery
and monogramming so that you, and not the feed dogs,
are moving the fabric.
CONVERTING TO FREE-ARM SEWING
Your machine can be used either as a flat-bed, or as a
free-arm model.
With the auxiliary bed in position, it provides a large
working surface as a standard flat-bed model.
By removing the auxiliary bed (just pull it off to the left as
shown), the machine converts into a free-arm model.
REVERSE STITCH LEVER
It is recommended to begin, or end seams with several
stitches in reverse for reinforcement. As long as you are
pressing down this lever while sewing, the machine will
continue to feed the fabric backwards.
Reverse stitch lever
Palanca puntada de retroceso

17
CONTROL DE DIENTES
Los dientes controlan el movimiento del género que se
esta cosiendo. deben estar elevados durante las
operaciones de costura y bajados durante el remendado,
bordado con bastidor y colocación de anagramas de
modo que sea Vd. y no los dientes quien mueva el género.
La máquina tanto se puede utilizar como base plana o
una máquina de brazo libre.
Con la base de extensión en posición se consigue una
superficie de trabajo grande como la de un modelo normal
de base plana.
Sacando la base de extensión (estirándola hacia fuera
hacia la izquierda, tal como está mostrado), la máquina
se convierte en un modelo de brazo libre.
PALANCA DE LA PUNTADA DE
RETROCESO
Al empezar o finalizar las costuras se recomienda realizar
diversas puntadas con el retroceso para el refuerzo de la
costura. Mientras se está presionando hacia abajo esta
palanca durante la costura, la máquina seguirá
transportando hacia atrás el tejido.
CONVERSION PARA LA
COSTURA CON BRAZO

18
STITCH PATTERN DIAL AND INDICATOR
1. To select a stitch, be sure needle is out of fabric at its
highest position.
2. Then turn the dial until the required stitch is indicated
by the red symbol on the indicator panel.
STITCH LENGTH/SUPER (STRETCH) STITCH CONTROL
Stitch length can be selected easily according to thickness
and type of fabric.
Super (stretch) stitch patterns can be selected by turning
the same dial to
W
mark where fine adjustment can be
made.
ZIG ZAG WIDTH ADJUSTING LEVER
The width of all the stitches produced on this machine
can be made narrower or wider by adjusting the zig zag
width adjusting lever.
Stitch pattern dial
Selector de puntadas
Stitch indicator
Indicador de puntadas

19
CONTROL LARGO DE PUNTADA
Y PUNTADA SUPER (ELASTICA)
1. Para seleccionar una puntada asegurarse que la aguja
está fuera del tejido y en su posición más alta.
2. Entonces girar el selector hasta que el indicador rojo
aparezca en la puntada requerida.
El largo de puntada puede ser seleccionado fácilmente
de acuerdo con el tipo de material y su grosor.
El grupo de puntadas super (elásticas) pueden ser
seleccionadas girando el mismo dial hasta la marca
W
en donde se podrá hacer un ajuste más fino.
SELECTOR ANCHO PUNTADA
En esta máquina puede regularse el ancho de puntada
ajustando el "selector ancho puntada".
SELECTOR E INDICADOR DE
PUNTADAS
W

20
WINDING THE BOBBIN
1. Pass thread from spool through thread guides as
shown.
2. Pull end of thread through hole in bobbin as shown.
3. Push bobbin winder to far left position, if it is not already
there. Place bobbin onto shaft with end of thread
coming from top of bobbin. Push bobbin winder to right
until it clicks. Hold onto end of thread.
4. Start machine. The thread that is held will snap. Bobbin
will cease turning when completely filled. Push shaft
to left to remove bobbin.
2
3
4
1
Table of contents
Other JUKI Sewing Machine manuals

JUKI
JUKI MB-1800B User manual

JUKI
JUKI LK-1850 Series User manual

JUKI
JUKI TL-98QE User manual

JUKI
JUKI DSC-246 User manual

JUKI
JUKI DDL-8700-7 Quick start guide

JUKI
JUKI MEB-3810N Series User manual

JUKI
JUKI AMS-343B User manual

JUKI
JUKI HZL-T100 User manual

JUKI
JUKI MB-373N/BR10 User manual

JUKI
JUKI DMN-530-4 User manual

JUKI
JUKI PS-800SB-2850 Series User manual

JUKI
JUKI HZL-F series User manual

JUKI
JUKI LH-3128 User manual

JUKI
JUKI MO-735 User manual

JUKI
JUKI DDL-9000B User manual

JUKI
JUKI DDL-9000A User manual

JUKI
JUKI DLM-5200N User manual

JUKI
JUKI LK-1903BR35 User manual

JUKI
JUKI TL-2010Q User manual

JUKI
JUKI DU-140 User manual