Jura IMPRESSA S9 One Touch User manual

The IMPRESSA S9 One Touch Manual
The ‘IMPRESSA Manual’ has been awarded the seal of
approvalbytheindependentGermanTechnicalInspection
Agency, TÜV SÜD, due to its easy-to-understand style, its
thoroughness and coverage of safety aspects.

2
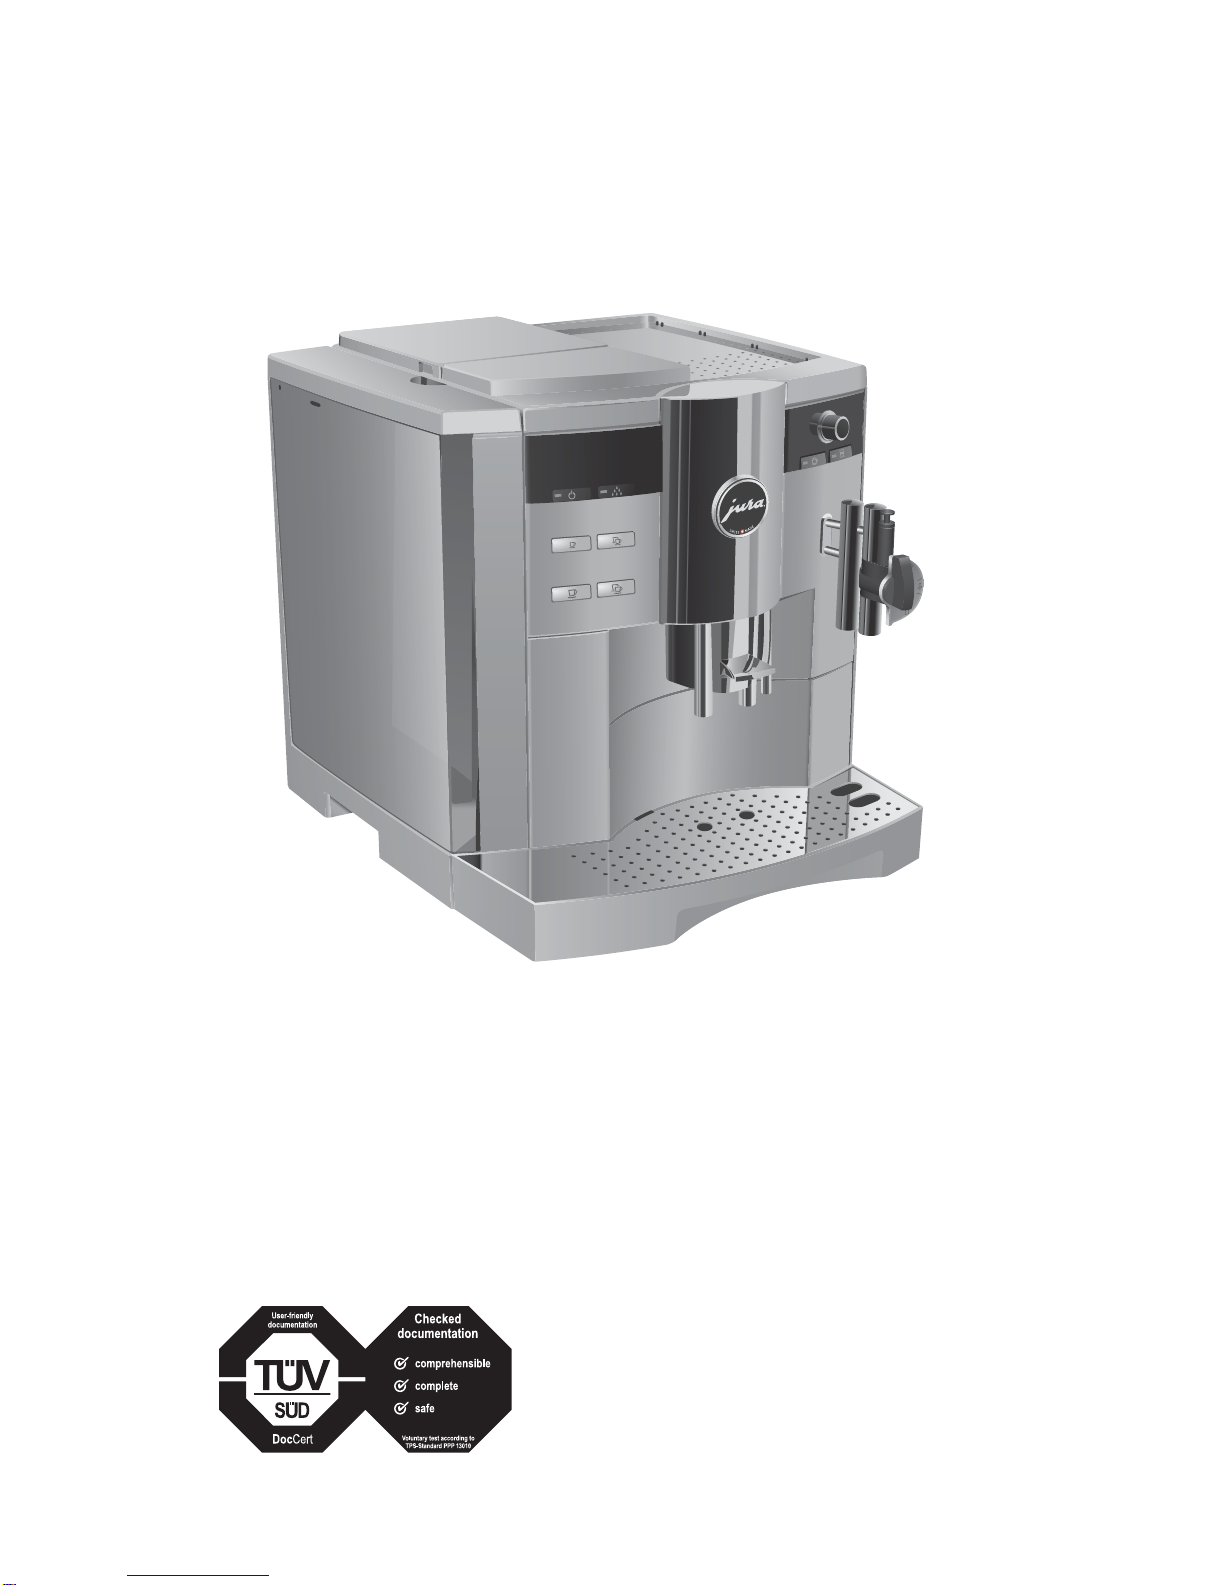
Your IMPRESSA S9 One Touch
IMPORTANT SAFEGUARDS 4
Control elements 8
Proper use 10
For your safety 10
The IMPRESSA S9 One Touch Manual 13
Symbol description......................................................................................................................................14
1 IMPRESSA S9 One Touch 15
Connector System©....................................................................................................................................16
JURA on the Internet....................................................................................................................................16
Knowledge Builder.......................................................................................................................................16
2 Preparing and using for the first time 17
Setting up......................................................................................................................................................17
Filling the water tank...................................................................................................................................17
Bean container filling...................................................................................................................................17
First-time use................................................................................................................................................18
Using and activating filter..........................................................................................................................19
Determining and adjusting the degree of water hardness..................................................................21
Adjusting grinder........................................................................................................................................22
Switching on................................................................................................................................................23
Switching off (Standby)..............................................................................................................................24
3 Familiarising yourself with the control options 25
Preparation at the touch of a button.......................................................................................................26
One-off settings before and during preparation...................................................................................26
Entering a permanent setting for the amount of water for a cup size..............................................27
Permanent settings in programming mode..........................................................................................28
Viewing information and maintenance status.......................................................................................31
4 Preparation at the touch of a button 32
Espresso........................................................................................................................................................32
Coffee............................................................................................................................................................33
Coffee à la Carte..........................................................................................................................................33
Cappuccino...................................................................................................................................................34
Latte macchiato...........................................................................................................................................35
Pre-ground coffee.......................................................................................................................................37
Hot milk and milk foam.............................................................................................................................37
Hot water .....................................................................................................................................................39
Table of contents

3
Table of contents
5 Permanent settings in programming mode 41
Products.........................................................................................................................................................41
Energy-saving mode (Energy Save Mode, E.S.M.©)..............................................................................44
Time and weekday......................................................................................................................................45
Programmable switch-on and switch-off time......................................................................................45
Automatic switch-off..................................................................................................................................47
Rinses............................................................................................................................................................48
Unit amount of water / time format........................................................................................................48
Language......................................................................................................................................................49
6 Maintenance 51
Maintenance tips..........................................................................................................................................51
Rinsing the machine....................................................................................................................................51
Changing the filter......................................................................................................................................52
Cleaning the machine................................................................................................................................54
Descaling the machine...............................................................................................................................56
Rinsing the cappuccino frother................................................................................................................58
Cleaning the cappuccino frother..............................................................................................................60
Disassembling and rinsing the Professional Cappuccino Frother.......................................................61
Disassembling and rinsing the Easy Cappuccino Frother....................................................................62
Cleaning the bean container.....................................................................................................................62
Descaling the water tank...........................................................................................................................63
7 Display messages 64
8 Troubleshooting 66
9 Transport and environmentally neutral disposal 68
Transport/Emptying the system...............................................................................................................68
Disposal.........................................................................................................................................................68
10 Technical data 69
Index 70
JURA contact details / Legal information 72

4
Important Safeguards
These safeguards apply for machines with UL safety test (see rating
plate and chapter 10, ‘Technical data’).
When using electrical appliances, basic safety precautions should
always be followed, to reduce the risk of fire, electric shock, and/or
injury to persons, including the following:
ZRead all instructions.
ZDo not touch hot surfaces. Use handles or knobs.
ZToprotectagainstfire,electricshockandinjurytopersons,do
notimmersecord,plugs,orbodyofmachineinwaterorother
liquid.
ZClose supervision is necessary when any appliance is used by
or near children.
ZUnplug from outlet when not in use and before cleaning.
Allow to cool before putting or taking off parts, and before
cleaning the appliance.
ZDonotoperateanyappliancewithadamaged cordor plugor
aftertheappliancemalfunctions,orhasbeendamagedinany
manner. Return appliance to the nearest authorized service
facility for examination, repair or adjustment.
ZThe use of accessory attachement not recommended by the
appliance manufacturer may result in fire, electric shock, or
injury to persons.
ZDo not use outdoors.
ZDo not let the cord hang over the edge of a table or counter,
or touch hot surfaces.
ZDo not place on or near a hot gas or electric burner, or in a
heated oven.
ZAlways attach plug to appliance first, then plug cord into the
wall outlet. To disconnect, turn any control to ‘OFF’ then
remove plug from wall outlet.
ZDo not use appliance for other than intented use.
ZUse extreme caution when dispensing hot steam.
ZFor household use only.
Follow the basic safety
precautions
IMPORTANT SAFEGUARDS
SAVE THESE INSTRUCTIONS

5
Important Safeguards
a. A short power supply cord is provided to reduce the risk
resulting from becoming entangled in or tripping over a long
cord.
Your IMPRESSA has a 3-pin grounded plug.
b. Longer extension cords are available and may be used if care
is exercised in their use.
c. If an extension cord is used,
1. themarkedelectricalratingoftheextensioncordshouldbe
at least as great as the electrical rating of the appliance,
and
2. if the appliance is of the grounded type, the extension
courd should be a grounding type 3-wire cord, and
3. the longer cord shall be arranged so that it will not drape
over the counter top or tabletop where it can be pulled on
by children of tripped over.
ZAs a safety feature, this plug will fit in a polarized outlet only
one way.
ZIfthe plug doesnot fit fullyin the outlet,reversethe plug. Ifit
still does not fit, contact a qualified electrician.
ZDo not modify the plug in any way or attempt to defeat this
safety feature.
Toreducetheriskoffireorelectricshock,donotremoveanyservice
covers. No user serviceable parts inside. Repair should be done by
authorized personnel only.
This appliance is for household use. Any servicing other than clean-
ing and user maintenance should be performed by an authorized
service representative:
ZDo not immerse base in water or try to disassemble.
ZTo reduce the risk of fire or electric shock, do not remove the
base. No user serviceable parts inside. Repair should be done
by authorized service personnel only.
ZCheck voltage to be sure that the voltage indicated on the
name plate agreees with your voltage.
ZNever use warm or hot water to fill the water container! Use
cold water only.
Special cord set instructions
Warning
Caution

6
Important Safeguards
ZKeep your hands and the cord away from hot parts of the
appliance during operation.
ZNever clean with scouring powders or hard implements.
ZNever fill instant coffee, chocolate mix etc. into the grinder or
ground coffee funnel (grunder by-pass). It will damage the
functioning of the brewing chamber
ZNever fill sugar coated coffee beans into the bean hopper. In
case of doubt, call your dealer.
ZNeverfill anythingother thancoffeebeansintothe beancon-
tainer(nochocolate,norice,nonuts,nospices,nothingother
than roasted coffee beans).
ZNeverdoanythingwiththemachinewhichisnotdescribedin
the User‘s Manual. In case of doubt, call your dealer.
NEVER DO
(or you will void your
warranty protection):

7
Important Safeguards

8
Control elements
Figure: IMPRESSA S9 Platinum
Control elements
1 Bean container cover
2 Bean container with aroma preservation
cover
3 Water tank with handle
4 Power switch and power cable
(back of machine)
5 Coffee grounds container
6 Drip tray
7 Cup platform
8 Fineness of grind switch
9 Cup tray
10 Cover of filler funnel for pre-ground coffee
11 Filler funnel for pre-ground coffee
12 Connector System©for removable
frothers
13 Professional Cappuccino Frother
14 Height-adjustable coffee spout
15 Hot water spout
12
1
2
3
5
13
14
4
6
8
11
7
10
15
9

9
Control elements
2
3
4
1
5
Front left
1Display
2Rotary Switch cover
3f Rotary switch
Q On/off button
c Maintenance button
i 1 Espresso button
4 2 Espressi button
o 1 Coffee button
d 2 Coffees button
e Coffee à la Carte button
vPre-ground coffee button
Front right
4 öSelector switch
5 Professional Cappuccino Frother
6 Easy Cappuccino Frother
a Hot water portion symbol
m Hot water symbol
p Cappuccino button
z Milk portion symbol
n Milk symbol
qLatte Macchiato button
The Connector System©permits the use of different frothers. These are available from stockists.
56

10
Important information
Themachinehasbeendesignedandbuiltfordomesticuse.Itshould
only be used to prepare coffee and to heat milk and water. Use for
any other purpose will be deemed improper. JURA Elektroapparate
AG cannot accept any responsibility for the consequences of
improper use.
Before using the machine always carefully read and comply with all
these instructions. Keep this manual close to the IMPRESSA and, if
appropriate, pass it on to the next user.
Please read and note carefully the following important safety infor-
mation.
By doing this, you can avoid the life-threatening danger of electric
shock:
ZNever use a machine which has been damaged or with a
defective power cable.
ZForinformationonwhattodoincaseofdamage,forexample
ifthereisasmellofburning,unplugthemachineimmediately
from the mains supply and contact the JURA service centre.
ZIf the power cable for this machine is damaged, it must be
repairedeitherdirectlybyJURAorbyaJURA approvedservice
centre.
ZMake sure that the IMPRESSA and the power cable are not
located close to hot surfaces.
ZBecarefultoensurethat thepowercable doesnotgetcaught
and does not rub against sharp edges.
ZNever open and repair the machine yourself. Do not modify
themachineinanywaythatisnotdescribedinthe IMPRESSA
Manual. The machine contains live parts. If opened, there is a
danger of serious injury. Repairs may only be carried out by
JURA approved service centres, using original spare parts and
accessories.
There is a risk of scalds or burns on the spouts or in the nozzle:
ZPlace the machine out of the reach of children.
ZDo not touch any hot parts. Use the handles provided.
Proper use
For your safety

11
Important information
ZBe careful to ensure that the appropriate nozzle is installed
and clean. The nozzle or parts of the nozzle might come off if
the parts are not assembled correctly or a blockage occurs.
A defective machine is not safe and could cause injury or fire. To
avoid damage and any associated risk of injury or fire:
ZNeverallowthepowercabletolooselyhangdown.Thepower
cable can be tripped over or damaged.
ZProtect your IMPRESSA from environmental influences such
as rain, frost and direct sunlight.
ZDo not put the IMPRESSA, cable or connections in water.
ZDo not put the IMPRESSA or any individual parts in the dish-
washer.
ZTurn your IMPRESSA off at the power switch before starting
any cleaning operation. Always wipe your IMPRESSA with a
damp cloth rather than a wet one, and protect it from pro-
longed water splash.
ZOnly connect the machine to a power supply in accordance
with the information on the rating plate. The rating plate is
locatedonthe undersideof yourIMPRESSA. Furthertechnical
data is given in Chapter 10 ‘Technical Data’.
ZUse only original JURA care products. Use of accessories that
are not explicitly recommended by JURA could damage the
IMPRESSA.
ZDonotuseanycoffeebeanstreatedwithadditivesorcaramel-
ised coffee beans.
ZAlways fill the water tank with cold, fresh mains water.
ZIfyouwill beabsentforanextendedperiod,turnthemachine
off and unplug.
Risk to children and persons with limited capabilities in operating
machines:
ZThe machine is not designed to be operated by children and
persons with limited capabilities.
ZThe machine may only be used by persons who are able to
operate the machine safely.

12
Important information
Safe handling of the CLARIS filter cartridges:
ZFilter cartridges should be kept out of the reach of children.
ZStore them dry in the sealed package.
ZProtect them from heat and direct sunlight.
ZDo NOT use damaged filter cartridges.
ZDo NOT open filter cartridges.

13
The IMPRESSA S9 One Touch Manual
You are holding the manual for your IMPRESSA S9 One Touch in
yourhand.ItwillhelpyoutofamiliarizeyourselfwithyourIMPRESSA
safely and quickly and teach you the full range of facilities it offers.
Chapter 2, ‘Preparing and using your IMPRESSA for the first time’,
explains step-by-step how to set up and prepare the IMPRESSA.
Chapter 3, ‘Familiarising yourself with the control options’ is impor-
tant for you to read as you are familiarising yourself with your
IMPRESSA. It invites you to actively explore all the different coffee
experiences that it offers.
All the other chapters are intended to help you when you have a
specific query.
If you use the IMPRESSA S9 One Touch Manual, you will become
a master at preparing exciting coffee specialities, you will be a
Barista!
Youcandownloadtheshortoperatinginstructionsforyourmachine
from the JURA website (www.jura.com).
The IMPRESSA S9 One Touch Manual

14
The IMPRESSA S9 One Touch Manual
Warnings
CAUTION
Always take note of any information marked
with the CAUTION or WARNING symbol. The
signalwordWARNINGpointsoutpotentialrisk
ofseriousinjury,andthesignalwordCAUTION
potential risk of slight injury.
CAUTION TheCAUTIONsymbolisusedtodrawattention
to circumstances which could cause the
machine to become damaged.
Symbol description
Symbols used
EInformation and tips to make things easier for
you as you use your IMPRESSA.
@References to the online JURA website, where
you can find interesting further information:
www.jura.com.
TPrompttotakeaction.Thissymbolmeansthat
you are being prompted to perform some
action.

15
1 IMPRESSAS9 One Touch
With the new flagship of the IMPRESSA S range, cappuccino and
latte macchiato are prepared at the touch of a button without you
having to move the cup. With its elegant platinum styling and
upgraded design, this high-quality product is fully in keeping with
contemporary trends and exudes superiority, solidity and compe-
tence.Itimpressivelydemonstratestheseattributeswitheachcoffee
speciality that you enjoy.
ZOne Touch Cappuccino/Latte Macchiato: Your IMPRESSA S9
makes a cup of cappuccino at the touch of a button, without
you having to move the cup. Hot milk foam, flowing into the
cupandslowlystartingtofill it.Steamwhichrises, awakening
the anticipation of a delicious speciality. Aromatic coffee,
blending with the milk, pushing up the milk foam topping.
These are the protagonists in a sensuous drama – the drama
of perfect coffee preparation. A latte macchiato can also be
made equally easily and sensuously at the touch of a button.
ZEnergy-saving mode (Energy Save Mode, E.S.M.©): The IM-
PRESSA S9 One Touch actively assists you in saving energy.
With the various stages of the energy-saving mode, you can
adjust the energy saving potential to suit the way you like to
enjoyyourbeverages.Themachinecanbecompletelydiscon-
nected from the power supply at the main switch – for in-
stance if you are going to be absent for some time.
ZControl philosophy: You can ‘navigate’ reliably through all
operating and programming steps simply by turning and
pressing the switch. The information on the plain text and
graphic display is in full view at all times. The focus is on your
personal taste. Simply select the coffee strength, amount of
water and temperature according to your individual prefe-
rences.
1 IMPRESSA S9 One Touch
Coffee that fulfils your
wildest dreams

16
1 IMPRESSAS9 One Touch
ZProfessionaltechnologyforthehome:Theactivebeanmon-
itoring feature of your IMPRESSA S9 banishes the sound of
empty rotating coffee grinders and the inconvenience of
half-full cups once and for all. It always shows you in good
timewhenthecoffeebeansneedreplenishing.Thefillinglevel
of the 280 gram bean container is continuously optically
monitored.
The Connector System©permits the use of different cappuccino
frothers:
ZProfessional Cappuccino Frother
UCappuccino/latte macchiato
UHot milk
ZEasy Cappuccino Frother
UCappuccino/latte macchiato
Visit us on the Internet.
@ At www.jura.com you will find interesting and up-to-date
informationonyourIMPRESSAand on every aspectof coffee.
You can familiarize yourself with your IMPRESSA S9 in a fun way on
the PC.
@ The Knowledge Builder awaits you at www.jura.com. The
interactive assistant, LEO, will support you and explain the
benefits of and how to use your IMPRESSA.
Connector System©
JURA on the Internet
Knowledge Builder

17
2 Preparing and using your IMPRESSA for the first time
Thischapterprovidesyouwiththeinformationyouneedtouseyour
IMPRESSA without any problems. You will prepare your IMPRESSA
step-by-step for your first coffee experience.
When setting up your IMPRESSA, please note the following:
ZSet the IMPRESSA down on a horizontal surface that is not
sensitive to water.
ZChoose a spot for your IMPRESSA which is protected against
overheating.
To enjoy perfect coffee we recommend changing the the water
every day.
Milk, mineral water or other liquids can damage the water tank or
the machine.
TOnly fill the water tank with fresh, cold water.
TRemove the water tank and rinse it with cold water.
TFill the water tank with fresh, cold water and reinsert.
Thebeancontainerhasanaromapreservationcover.Thiswillensure
that your coffee beans retain their aroma for longer.
Coffee beans which have been treated with additives (e.g. sugar),
pre-ground or freeze-dried coffee will damage the grinder.
TOnly use untreated coffee beans to refill the bean container.
TOpenthecoverofthebeancontainerandremovethearoma
preservation cover.
TRemove any dirt or foreign objects inside the bean con-
tainer.
TFill the bean container with coffee beans, then close the
aroma preservation cover and the bean container cover.
2 Preparing and using for the first time
Setting up
Filling the water tank
CAUTION
Bean container filling
CAUTION

18
2 Preparing and using your IMPRESSA for the first time
If the machine is operated with a defective power cable, there is a
danger of electric shock.
TNever use a machine which has a defective power cable.
Precondition: The water tank and bean container are full.
TInsert the mains plug into a power socket.
3 T SwitchontheIMPRESSAusingthepowerswitchontheback
of the machine.
The on/off button Qlights up (standby).
Q T Press the on/off button to switch the IMPRESSA on.
The pre-set language appears on the display.
TOpen the cover of the Rotary Switch.
g T Turn the Rotary Switch until the desired language is dis-
played. For Example: LANGUAGE ENGLISH
k T Press the Rotary Switch to confirm the language.
CONFIRMED √ appears briefly on the display to confirm
the setting.
TIME --:--
g T Turn the Rotary Switch to set the hour.
TIME 12:00 (Example)
k T Press the Rotary Switch to confirm the hour setting.
TIME 12:00
g T Turn the Rotary Switch to set the minutes.
TIME 12:45 (Example)
k T Press the Rotary Switch to confirm the minute setting.
CONFIRMED √ appears briefly on the display.
WEEKDAY MONDAY
g T Turn the Rotary Switch to set the weekday.
WEEKDAY WEDNESDAY (Example)
k T Press the Rotary Switch to confirm the setting.
CONFIRMED √ appears briefly on the display.
FILL SYSTEM / PRESS RINSE, the maintenance
button clights up.
First-time use
WARNING

19
2 Preparing and using your IMPRESSA for the first time
TPlace a receptacle under the hot water spout and another
under the frother.
c T Press the maintenance button.
SYSTEM FILLS, the system fills up with water and the
maintenance button flashes. A small amount of water flows
from the frother and the hot water spout.
This operation stops automatically. WELCOME TO JURA
appears on the display.
HEATING UP
PRESS RINSE, the maintenance button clights up.
TPlace a receptacle under the coffee spout.
c T Press the maintenance button.
The machine rinses itself, stopping automatically.
COFFEE READY appears on the display. Your IMPRESSA
is ready to use.
EAfter first-timeuse do notdisconnectthe IMPRESSA fromthe
power supply for 24 hours to ensure that it is in the optimum
operating condition.
EWhen a coffee speciality has been prepared for the first time,
it is possible that FILL BEANS is shown on the display as
the grinder has not yet been completely filled with coffee
beans. In this case prepare a different coffee speciality.
EIfyouhavenotbeenabletousethemachineforthefirst time
correctlyand fully,contactCustomerSupportin yourcountry
(see ‘JURA contact details / Legal information’).
YourIMPRESSAnolongerhastobedescaledifyouareusingCLARIS
filter cartridges.
@ Youcanalsotryoutthe‘Insertfilter’operationonline.Visitthe
Knowledge Builder at www.jura.com.
EPerformthe‘Insertfilter’operationwithoutinterruptions.This
will ensure that your IMPRESSA always produces its best.
Using and
activating filter

20
2 Preparing and using your IMPRESSA for the first time
Precondition: COFFEE READY is displayed.
TOpen the cover of the Rotary Switch.
k T Keep the Rotary Switch pressed until MAINTENANCE
appears on the display.
g T Turn the Rotary Switch until FILTER NO is displayed.
k T Press the Rotary Switch to enter the programme item.
FILTER NO
g T Turn the Rotary Switch until FILTER YES is displayed.
k T Press the Rotary Switch to confirm the setting.
CONFIRMED w appears briefly on the display to confirm
the setting.
INSERT FILTER / PRESS RINSE, the maintenance
button clights up.
TRemove a CLARIS filter cartridge and the filter cartridge ex-
tension from the Welcome Pack.
TFit the extension on top of the filter cartridge.
TRemove the water tank and empty it.
TLift the cartridge holder and insert the filter cartridge into
the water tank, applying slight pressure.
TClose the cartridge holder. It will click into place audibly.
TFill the water tank with fresh, cold water and reinsert.
TPlace a receptacle (at least 500 ml) under the frother.
EIfyouareusingtheProfessionalCappuccinoFrother,setthe
selection lever of the frother to the steam position n.
c T Press the maintenance button.
FILTER RINSING, water flows out of the frother.
EYou can interrupt rinsing of the filter at any time by pressing
any button.
EThe water may be slightly discoloured. This is not harmful to
health and does not affect the taste.
Other manuals for IMPRESSA S9 One Touch
4
Table of contents
Other Jura Coffee Maker manuals

Jura
Jura Z6 User manual

Jura
Jura ENA 7 User manual

Jura
Jura IMPRESSA X7-S User manual

Jura
Jura IMPRESSA S85 User manual

Jura
Jura GIGA 5 User manual

Jura
Jura S8 User manual

Jura
Jura IMPRESSA S9 One Touch User manual

Jura
Jura IMPRESSA F70 User manual

Jura
Jura IMPRESSA XF50 Classic User manual

Jura
Jura IMPRESSA J9.3 One Touch TFT User manual

Jura
Jura E6 User manual

Jura
Jura cool control User manual

Jura
Jura IMPRESSA F505 User manual

Jura
Jura Giga X3 Professional User manual

Jura
Jura X7 User manual

Jura
Jura X7 Instruction Manual

Jura
Jura Z6 One Touch TFT Manual

Jura
Jura IMPRESSA S9 One Touch User manual

Jura
Jura IMPRESSA F55 User manual

Jura
Jura D4 User manual