4
Compact Payment Box
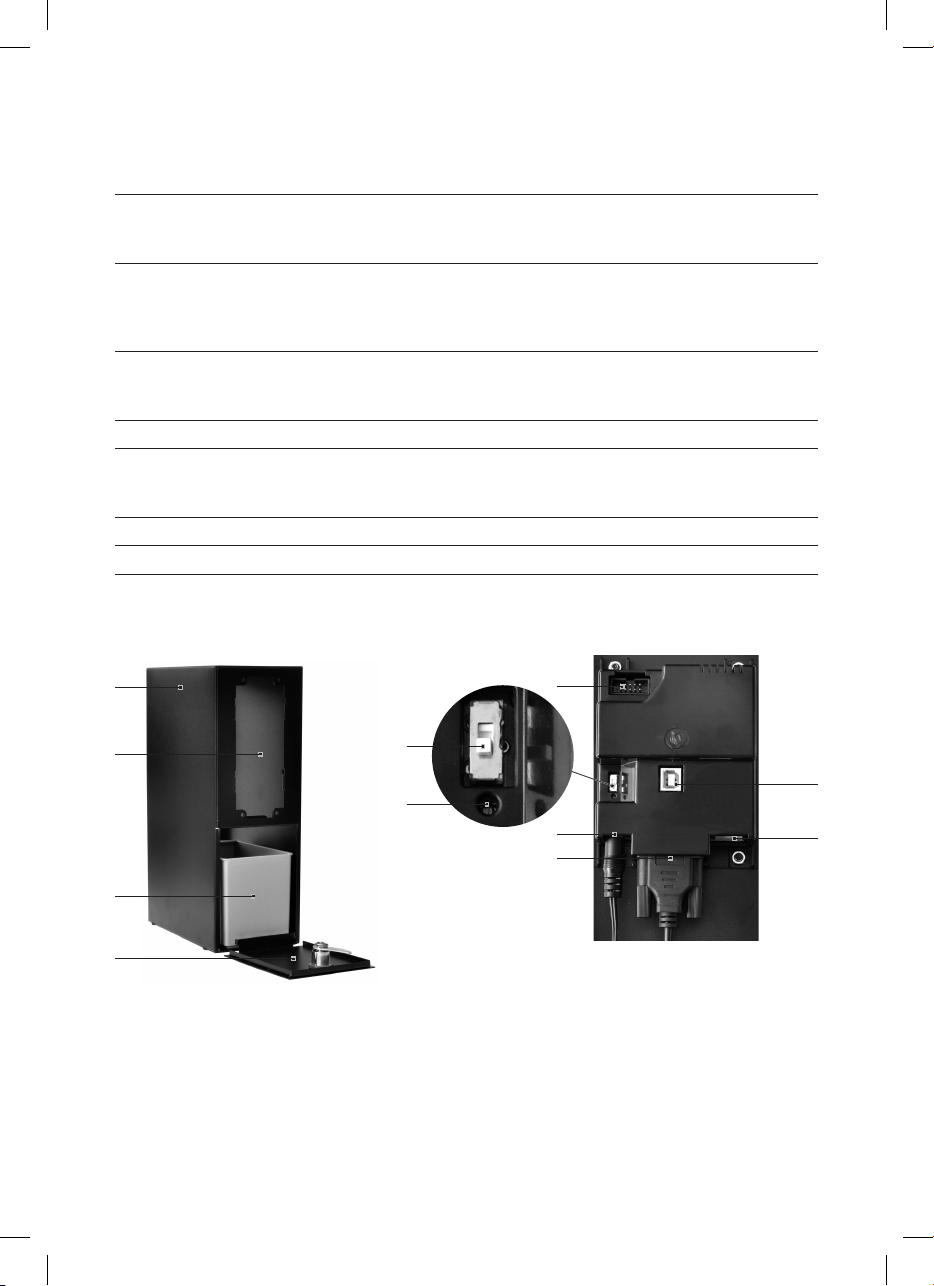
1 Ihre Compact Payment Box
Lieferumfang
ZGehäuse (mit integrierter MDB-Schnittstelle)
Z2 Schlüssel
ZMünzbox
ZNetzadapter
ZNetzkabel mit Netzstecker
ZRS232-Kabel
ZUSB-Kabel
ZPC-Software
Kompatibilität
Die Compact Payment Box ist kompatibel mit allen
Professional-Geräten der GIGA- und IMPRESSA-X-
Linie (außer IMPRESSA X30/X7/X70/X95/X90 und
X
95/X
90 avantgarde).
Beachten Sie bitte, dass nicht alle erhältlichen
Abrechnungssysteme mit der Compact Payment
Box kompatibel sind. Die Compact Payment Box ist
mit folgenden Abrechnungssystemen getestet:
ZNRI G-13 Münzprüfer
ZHug-Witschi DIVA2
ZPBV Kaufmann Mifare-Vending-Reader VR1
ZMicrotronic Mlight5-Leser
Pflege
Verwenden Sie zur Reinigung des Geräts keine
scharfen, scheuernden Reinigungsmittel oder
harten Gegenstände. Dies kann die Beschichtung
des Gehäuses beschädigen.
2 Compact Payment Box installieren
EUm die Compact Payment Box am Kaffee-
vollautomaten anzuschließen, muss ein
funktionierendes Abrechnungssystem
installiert sein.
EDie Installation am Kaffeevollautomaten
unterscheidet sich je nachdem, ob Sie das
intelligente Frischwasser-Kit einsetzen oder
nicht.
EEntfernen Sie die Rückwand der Compact
Payment Box, um die verschiedenen Kabel
an der MDB-Schnittstelle anzuschließen. Im
Lieferumfang finden Sie Schrauben, um die
Rückwand nach dem Anschließen der Kabel
von innen festzuschrauben.
Anschließen an Gerät ohne intelligentes
Frischwasser-Kit
TKaffeevollautomat am Netzschalter ausschal-
ten.
TSchalter für Abrechnungsmodus auf untere
Position (Bezahlmodus) stellen.
TRS232-Kabel am Kaffeevollautomaten
anschließen.
TNetzstecker in Netzsteckdose stecken.
TKaffeevollautomat einschalten.
Das Compact Payment System und der
Kaffeevollautomat sind betriebsbereit.
Anschließen an Gerät mit intelligentem
Frischwasser-Kit
TKaffeevollautomat am Netzschalter ausschal-
ten.
TSchalter für Abrechnungsmodus auf untere
Position (Bezahlmodus) stellen.
TRS232-Kabel am Mini-Hub des intelligenten
Frischwasser-Kits anschließen.
TNetzstecker in Netzsteckdose stecken.
TKaffeevollautomat einschalten.
Das Compact Payment System und der
Kaffeevollautomat sind betriebsbereit.
3 Compact Payment Box konfigurieren
Der folgende Ablauf zeigt die Konfiguration der
Compact Payment Box (z.B. Geräteauswahl).
Voraussetzung: PC-Software der Compact Pay-
ment Box ist installiert.
TKaffeevollautomat am Netzschalter ausschal-
ten.
TNetzstecker der Compact Payment Box aus
Netzsteckdose ziehen.
TRS232-Kabel entfernen.
TCompact Payment Box mit dem USB-Kabel
am PC anschließen.
TNetzstecker der Compact Payment Box in
Netzsteckdose stecken.
Die Compact Payment Box schaltet sich ein.
TCompact Payment Box mit der PC-Software
konfigurieren.