JVC KD-PDR61 User manual

ENGLISH
CD RECEIVER
KD-PDR61
For installation and connections, refer to the separate manual.
INSTRUCTIONS
GET0524-003A
[EX]
For canceling the display demonstration, see page 4.

ENGLISH
2
Thank you for purchasing a JVC product.
Please read all instructions carefully before operation, to ensure your complete understanding and to obtain the best
possible performance from the unit.
IMPORTANT FOR LASER PRODUCTS
1. CLA 1 LA ER PRODUCT
2. CAUTION: Do not open the top cover. There are no user serviceable parts inside the unit; leave all servicing to
qualified service personnel.
3. CAUTION: Visible and/or invisible class 1M laser radiation when open. Do not view directly with optical
instruments.
4. REPRODUCTION OF LABEL: CAUTION LABEL, PLACED OUT IDE THE UNIT.
Information for Users on Disposal of Old
Eq ipment
This symbol indicates that the product with
this symbol should not be disposed as general
household waste at its end-of-life. If you wish to
dispose of this product, please do so in accordance
with applicable national legislation or other rules in
your country and municipality. By disposing of this
product correctly, you will help to conserve natural
resources and will help prevent potential negative
effects on the environment and human health.
Warning:
If you need to operate the unit while driving, be sure to
look around carefully or you may be involved in a traffic
accident.
How to se the M MODE and SEL
b ttons
If you use M MODE or EL (select), the display and some
controls (such as the number buttons,
4 /¢ buttons, 5/∞ buttons, and the
control dial) enter the corresponding control mode.
Ex.: When you press number button 1 after pressing
M MODE, to operate the FM tuner.
To use these controls for original functions, press
M MODE again.
• However, pressing EL makes the unit enters a
different mode.
• Waiting for about 15 seconds (or 30 seconds for
Bluetooth sources) without pressing any of these
buttons will automatically cancels the control.
This symbol is only valid in
the European Union.
EN02-07_PDR61_003A_4.indd 2EN02-07_PDR61_003A_4.indd 2 12/31/07 11:09:28 AM12/31/07 11:09:28 AM

ENGLISH
3
How to reset yo r nit
• Your preset adjustments will also be erased (except the
registered Bluetooth device, see pages 14 and 15).
How to forcibly eject a disc
“Please Eject” appears on the display.
• Be care ul not to drop the disc when it ejects.
• I this does not work, reset your unit.
For security reasons, a numbered ID card is provided
with this unit, and the same ID number is imprinted on
the unit’s chassis. Keep the card in a safe place, as it will
help the authorities to identify your unit if stolen.
For safety...
• Do not raise the volume level too much, as this will
block outside sounds, making driving dangerous.
• top the car before performing any complicated
operations.
Temperat re inside the car...
If you have parked the car for a long time in hot or cold
weather, wait until the temperature in the car becomes
normal before operating the unit.
CONTENTS
INTRODUCTIONS
Preparation .................................................. 4
OPERATIONS
Basic operations ........................................... 5
• Using the control panel ............................... 5
• Using the remote controller (RM-RK50) ...... 6
Listening to the radio ................................... 7
Disc operations ............................................. 11
Listening to the U B device .......................... 13
EXTERNAL DEVICES
Using the Bluetooth
® devices ....................... 14
• Using the Bluetooth cellular phone ............ 16
• Using the Bluetooth audio player ............... 18
Listening to the CD changer ......................... 19
Listening to the iPod .................................... 20
Listening to the DAB tuner ........................... 22
Listening to the other external
components .............................................. 25
SETTINGS
electing a preset sound mode .................... 26
General settings — P M .............................. 28
Bluetooth settings ....................................... 33
REFERENCES
More about this unit .................................... 34
Troubleshooting ........................................... 38
Maintenance ................................................ 43
pecifications ............................................... 44
For detaching/attaching the control panel, see
page 42.
EN02-07_PDR61_003A_4.indd 3EN02-07_PDR61_003A_4.indd 3 12/31/07 11:09:32 AM12/31/07 11:09:32 AM

ENGLISH
4INTRODUCTIONS
Preparation
Cancel the display demonstration and set the clock
• ee also pages 28 and 29.
1T rn on the power.
2Enter the PSM settings.
3Cancel the display demonstrations
elect “Demo,” then “Off.”
Set the clock
elect “Clock Hr” (hour), then adjust the hour.
elect “Clock Min” (minute), then adjust the minute.
elect “24H/12H,” then “24Hours” or “12Hours.”
4Finish the proced re.
Changing the display information and pattern
When the power is turned off: Check the current clock time
Ex.: When tuner is selected as the source
Audio level meter display
(see “LevelMeter” on page 28)
This unit is equipped with the steering wheel remote control function.
• ee the Installation/Connection Manual (separate volume) for connection.
ource operation display
Ca tion on vol me setting:
Digital devices (CD/U B) produce very little noise
compared with other sources. Lower the volume before
playing these digital sources to avoid damaging the
speakers by sudden increase of the output level.
Ca tion:
If the temperature inside the car is below 0°C, the
movement of animation and text scroll will be halted
on the display to prevent the display from being
blurred. appears on the display.
When the temperature increases, and the operating
temperature is resumed, these functions will start
working again.
EN02-07_PDR61_003A_4.indd 4EN02-07_PDR61_003A_4.indd 4 12/31/07 11:09:33 AM12/31/07 11:09:33 AM

ENGLISH
5OPERATIONS
Basic operations
Using the control panel
9 • Volume control [Turn].
• Select the source [Press] *1.
TUNER = DAB *2 =CD *2 = USB *2 (or USB-
iPod) *2 = CD-CH *2/iPod *2 (or EXT IN) =
BT-PH NE *2 = BT-AUDI *2 = AUX IN =
(back to the beginning)
p • Select/adjust the sound mode.
• Enter the PS settings [Hold].
q • TUNER: Select preset station.
• DAB: Select preset DAB service.
• CD/USB/CD-CH: Select folder/track/disc (for
CD changer).
• USB-iPod: Select preset top menu items.
• BT-PH NE: Dial preset phone number *3.
w • Enter functions mode.
• BT-PH NE: Activate Voice Dialing [Hold].
e Change the display information and pattern.
r • TUNER: Select the bands.
• USB-iPod/BT-AUDI : Start/pause playback.
*1 Holding SOURCE will enter the Bluetooth menu.
*2 You cannot select these sources if they are not ready
or not connected.
*3 For storing preset phone num er, see page 18.
1 • DAB: Select DAB service
• CD/USB/CD-CH: Select folder.
• USB-iPod: Enter the main menu [Hold].
• iPod: Enter the main menu/Pause playback/
Confirm selection.
• BT-PH NE/BT-AUDI : Select a registered
device.
2 • Turn on the power.
• Turn off the power [Hold].
• Attenuate the sound (if the power is on).
3 Display window
4 USB (Universal Serial Bus) input jack
5 • Activate/deactivate TA Standby Reception.
• Enter programme type searching mode [Hold].
6 Flip down the control panel.
• To eject the disc, flip down the control panel
then press 0 on the unit.
7 AUX (auxiliary) input jack
8 • TUNER: Search for station.
• DAB: Search for DAB ensemble.
• CD/USB/CD-CH/USB-iPod/iPod: Select track.
• BT-AUDI : Reverse skip/forward skip.
EN02-07_PDR61_003A_f.indd 5EN02-07_PDR61_003A_f.indd 5 1/7/08 9:59:08 AM1/7/08 9:59:08 AM

ENGLISH
6
Installing the lithi m coin battery (CR2025)
Before sing the remote controller:
• Aim the remote controller directly at the remote
sensor on the unit.
• DO NOT expose the remote sensor to bright light
(direct sunlight or artificial lighting).
Warning (to prevent accidents and damage):
• Do not install any battery other than CR2025 or its
equivalent.
• Do not leave the remote controller in a place (such
as dashboards) exposed to direct sunlight for a long
time.
• tore the battery in a place where children cannot
reach.
• Do not recharge, short, disassemble, heat the battery,
or dispose of it in a fire.
• Do not leave the battery with other metallic
materials.
• Do not poke the battery with tweezers or similar
tools.
• Wrap the battery with tape and insulate when
throwing away or saving it.
Using the remote controller (RM-RK50)
Remote sensor
1 • Turns the power on if pressed briefly or
attenuates the sound when the power is on.
• Turns the power off if pressed and held.
2 • Changes the FM/AM/DAB bands with 5 U.
• Changes the preset stations with D ∞.
• Changes the folder of the MP3/WMA/WAV.
• While playing an MP3 disc on an
MP3-compatible CD changer:
– Changes the disc if pressed briefly.
– Changes the folder if pressed and held.
• While listening to an Apple iPod:
Connected to KS-PD100:
– Pauses or resumes playback with D ∞.
– Enters the main menu with 5 U.
(Now 5 U/D ∞/2 R/F 3 work as the menu
selecting buttons.)*
* 5 U : Returns to the previous menu.
D ∞ : Con irms the selection.
Connected to the USB inp t jack:
– Enter the main menu if pressed and held.
– elect the desired menu if pressed briefly.
– Fast skip in every layer of the main menu if
pressed and held.
3 Adjusts the volume level.
4 elects the sound mode (iEQ: intelligent equalizer).
5 elects the source.
6 For Bluetooth cellular phone:
– Answers calls if pressed briefly.
– Rejects calls if pressed and held.
7 • earches for stations if pressed briefly.
• Fast-forwards or reverses the track if pressed and
held.
• Changes the tracks if pressed briefly.
EN02-07_PDR61_003A_4.indd 6EN02-07_PDR61_003A_4.indd 6 12/31/07 11:09:36 AM12/31/07 11:09:36 AM

ENGLISH
7OPERATIONS
When an FM stereo broadcast is
hard to receive
1
2
Reception improves, but stereo effect will be lost.
• lights up on the display.
3 Exit from the setting.
Listening to the radio
1Select “TUNER.”
2Select the bands.
3Search for a station to listen—A to Search.
Manual earch: Hold either one of the buttons until “M” lights up on the display, then
press it repeatedly.
• When receiving an FM stereo broadcast with sufficient signal strength, lights up
on the display.
FM station a tomatic presetting
— SSM (Strong-station Seq ential
Memory)
You can preset up to six stations for each band.
1 While listening to a station...
2
3
Local FM stations with the strongest signals are
searched and stored automatically in the selected
FM band.
Continued on the next page
• While listening to an iPod (in menu selecting
mode):
Connected to KS-PD100:
– elects an item if pressed briefly. (Then, press
D ∞ to confirm the selection.)
– kips 10 items at a time if pressed and held.
Connected to the USB inp t jack:
– tart play back the selected folder directly if
pressed and held.
• Reverse skip/forward skip for Bluetooth audio.
EN02-07_PDR61_003A_4.indd 7EN02-07_PDR61_003A_4.indd 7 12/31/07 11:09:37 AM12/31/07 11:09:37 AM

ENGLISH
8
Manual presetting
Ex.: Storing FM station of 92.5 MHz into preset number
4 of the FM1 band.
Using the number buttons
1
2
3
Using the Preset Station list
When is shown on the display, you can
move back to the previous screen by pressing number
button 3.
1 Follow steps 1 and 2 of “Using the number
buttons” above.
By holding 5 / ∞, the Preset Station List will
also appear (go to step 4).
2
3 Display the Preset Station List.
4 Sele t the preset number you want to store
into.
You can move to the lists of the other FM bands
by pressing number button 5 ( ) or
6 ( ) repeatedly.
5 Store the station.
Listening to the preset station on
the Preset Station List
1 Display the Preset Station List, then sele t
the preset station you want to listen to.
2 Change to the sele ted station.
The following features are available only for FM RDS
stations.
Sear hing for FM RDS programme
— PTY Sear h
You can search for your favorite programmes being
broadcast by selecting the PTY code for your favorite
programmes.
When appears on the display, you can move
back to the previous display by pressing number
button 3.
Preset number flashes for a while.
EN08-15_PDR61_003A_4.indd 8EN08-15_PDR61_003A_4.indd 8 12/31/07 11:09:53 AM12/31/07 11:09:53 AM

ENGLISH
9OPERATIONS
When / appears on the display,
you can move to the other lists by pressing number
button 5 or 6 repeatedly.
1
2 Sele t “Sear h.”
The three preset PTY codes appears on the display.
3 Sele t a PTY ode.
You can select a PTY code from the
29 preset PTY codes or from the six
stored PTY codes.
To store your favorite programme types, see the
following.
4 Start sear hing for your favorite programme.
If there is a station broadcasting a programme
of the same PTY code as you have selected, that
station is tuned in.
Storing your favorite programme types
You can store six favorite programme types.
When appears on the display, you can move
back to the previous display by pressing number
button 3.
1
2 Sele t “Memory.”
3 Sele t a preset number (“Preset1”–
“Preset6”) you want to store into.
4 Sele t one of the PTY odes.
5 Store the sele ted PTY ode.
6 Repeat steps 3 to 5 to store other PTY odes
into other preset numbers.
7 Exit from the setting.
A tivating TA/PTY Standby
Re eption
TA Standby Re eption
Ex.: When “Classics” is selected in step 5
Continued on the next page
EN08-15_PDR61_003A_4.indd 9EN08-15_PDR61_003A_4.indd 9 12/31/07 11:09:59 AM12/31/07 11:09:59 AM

ENGLISH
10
either lights up or flashes on the display.
If lights up, the unit temporarily will switch to
Traffic Announcement (TA), if available, from any
source other than AM.
The volume changes to the preset TA volume level if
the current level is lower than the preset level (see
page 30).
If flashes, TA Standby reception is not yet
activated. Tune in to another station providing the
RDS signals.
To dea tivate TA Standby Re eption, press T/P
again. goes off.
PTY Standby Re eption
1
2
3 Sele t a PTY ode.
4 Exit from the setting.
either lights up or flashes on the display.
If lights up, the unit temporarily will switch
to your favorite PTY programme from any source
other than AM.
If flashes, PTY Standby reception is not yet
activated. Tune in to another station (or service)
providing the RDS signals.
To dea tivate PTY Standby Re eption, select “Off”
in step 2. goes off.
When a DAB tuner is connected, TA/PTY Standby
Reception also searches for services. (See also
page 23.)
The unit will not switch to Traffic Announcement or
PTY programme when a call connection is established
through “BT-PHONE.”
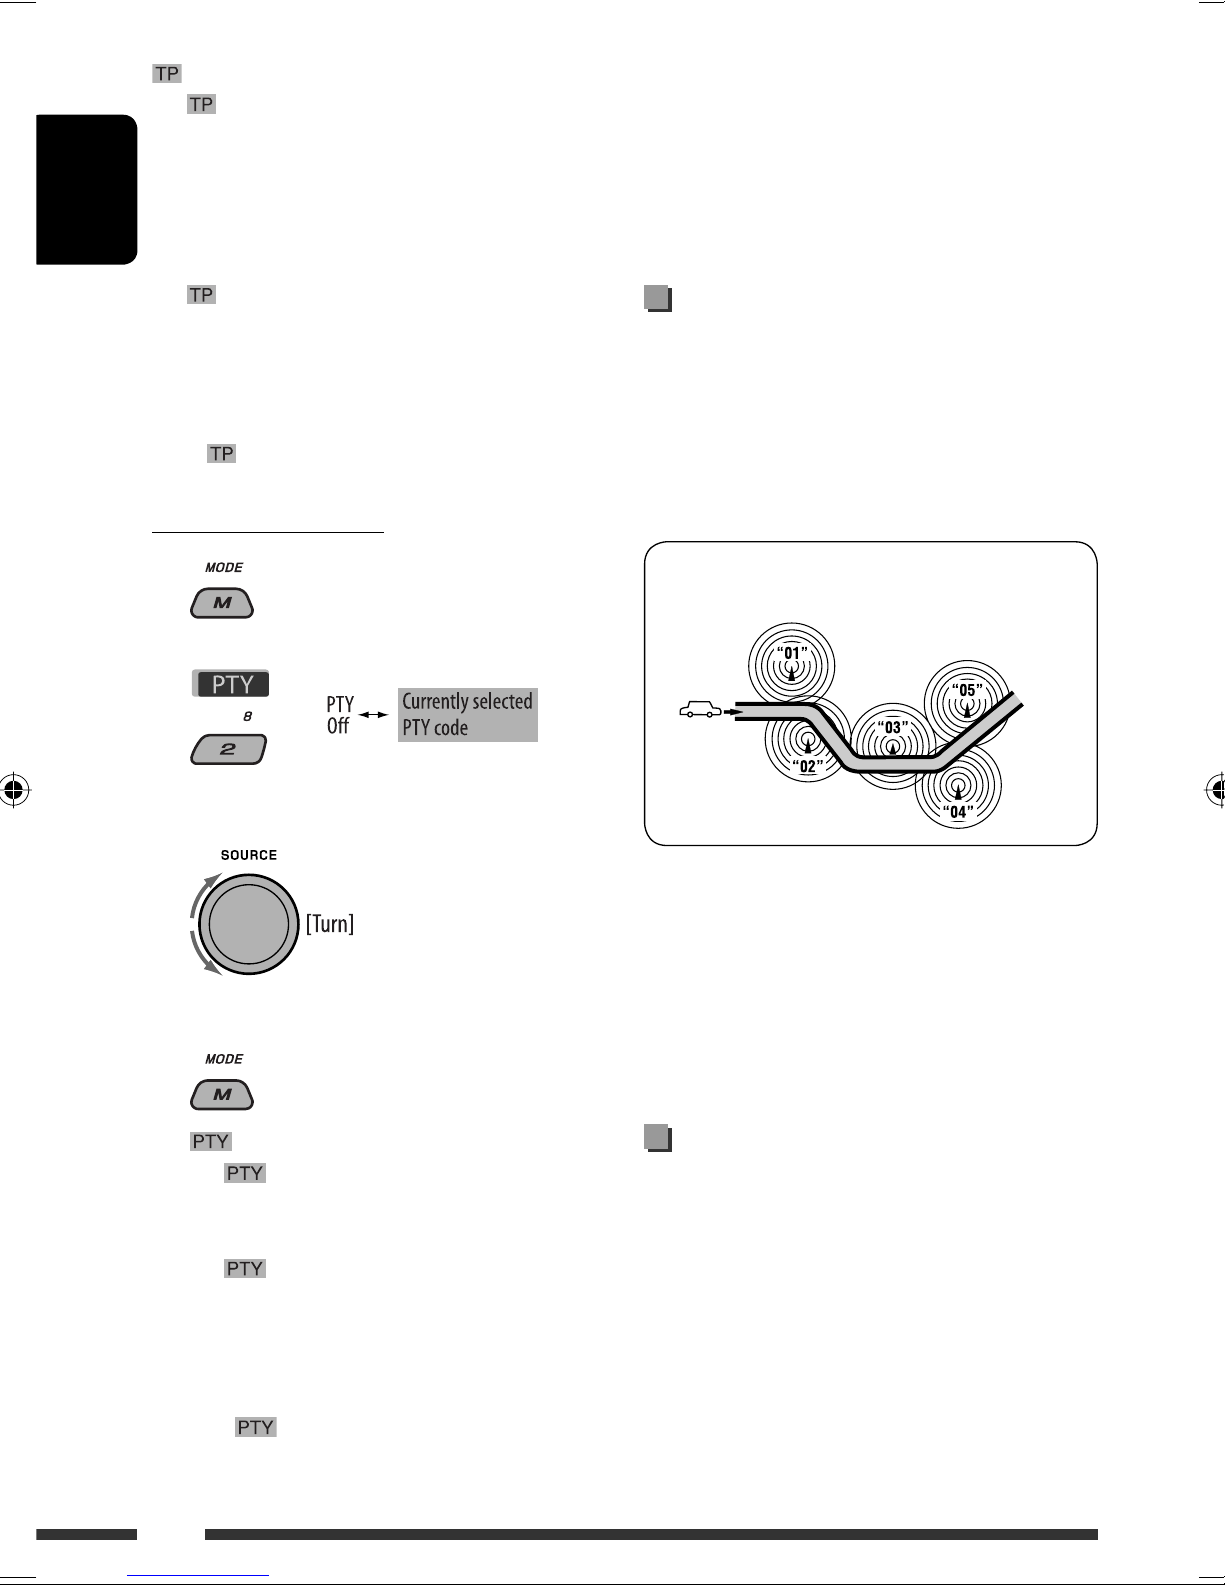
Tra ing the same programme—
Network-Tra king Re eption
When driving in an area where FM reception is not
sufficient enough, this unit automatically tunes in to
another FM RDS station of the same network, possibly
broadcasting the same programme with stronger
signals (see the illustration below).
Programme A broadcasting on different frequency
areas (01 – 05)
When shipped from the factory, Network-Tracking
Reception is activated.
To hange the Network-Tra king Re eption
setting, see “AF-Regn’l” on page 30.
When the DAB tuner is connected, refer to “Tracing
the same programme—Alternative Frequency
Reception (DAB AF)” on page 24.
Automati station sele tion—
Programme Sear h
Usually when you press the number buttons, the preset
station is tuned in.
If the signals from the FM RDS preset station are not
sufficient for good reception, this unit, using the AF data,
tunes in to another frequency broadcasting the same
programme as the original preset station is broadcasting.
The unit takes some time to tune in to another
station using programme search.
See also page 30.
EN08-15_PDR61_003A_4.indd 10EN08-15_PDR61_003A_4.indd 10 12/31/07 11:10:01 AM12/31/07 11:10:01 AM

ENGLISH
11OPERATIONS
Pressing (or holding) the following buttons allows you
to...
[Press] Select track
[Hold] Reverse/fast-forward
track
MP3/WMA: Select folder
(Number buttons) *2
Locate particular folder *3
(for MP3/WMA disc) or track
directly
*1 By holding either one of the buttons, you can display
the Folder List (see page 12).
*2 Press to select nu ber 1 to 6; hold to select nu ber
7 to 12.
*3 It is required that folders be assigned with 2-digit
nu bers at the beginning of their folder na es—01,
02, 03, and so on.
To stop play and eje t the dis
Press SOURCE to listen to another playback source.
Prohibiting dis eje tion
To an el the prohibition, repeat the same
procedure.
Continued on the next page
All tracks will be played repeatedly until you change the
source or eject the disc.
Caution:
Make sure to detach the USB device before opening
the control panel, as it might block the opening
mechanism.
To detach the USB device, see page 13.
After pressing M MODE, press the following buttons to...
Skip 10 tracks
MP3/WMA: Within the same folder
Repeat Tra k:
Repeat current track
Repeat Folder:
MP3/WMA: Repeat current folder
Random Folder:
MP3/WMA: Randomly play all tracks
of current folder, then tracks of next
folders
Random Dis :
Randomly play all tracks
You can also cancel the playback mode by selecting
“Off” or press number button 4 ( ).
*1
Disc operations
EN08-15_PDR61_003A_4.indd 11EN08-15_PDR61_003A_4.indd 11 12/31/07 11:10:04 AM12/31/07 11:10:04 AM

ENGLISH
12
Sele ting a folder/tra k on the list
(only for MP3/WMA file)
When is shown on the display, you can
move back to the previous screen by pressing number
button 3.
1
2 Sele t “LIST.”
3 Sele t the list type.
4 Sele t an item.
You can move to the other lists by pressing
number button 5 ( ) or 6 ( )
repeatedly.
5 Change to the sele ted item.
A If File List is selected
The list disappears and playback
starts.
B If Folder List is selected
If the current folder is selected, File List
appears, then repeat steps 4 and 5 A to
start playback.
If another folder is selected, playback starts
from the 1st file of the selected folder.
Ex.: When “File” is selected in step 3
EN08-15_PDR61_003A_4.indd 12EN08-15_PDR61_003A_4.indd 12 12/31/07 11:10:06 AM12/31/07 11:10:06 AM

ENGLISH
13OPERATIONS
Listening to the USB device
You can connect a USB mass storage class device such as a USB memory, Digital Audio Player *, portable HDD, etc. to
the unit.
• You can also connect an Apple iPod to the USB input ack. For details of the operations, see pages 20 and 21.
This unit can play MP3/WMA/WMA-DRM10 */WAV tracks stored in a U B device.
* You can connect both MTP (Media Transfer Protocol) devices and USB mass storage class devices. See also page 3 .
All tracks will be played repeatedly until you change the source or detach the USB device.
12
USB memory
If a U B device has been attached...
Playback starts from where it has
been stopped previously.
• If a different USB device is
currently attached, playback starts
from the beginning.
To stop play and detach the U B device
Straightly pull it out from the unit.
• Press SOURCE to listen to another playback source.
You can operate the USB device in the same way you
operate the files on a disc. (See pages 11 and 12.)
• You can listen to WAV files by following the MP3/
WMA files operations listed on pages 11 and 12.
Cautions:
• Avoid using the USB device if it might hinder your
safety driving.
• Do not pull out and attach the USB device repeatedly
while “Reading” is shown on the display.
• Do not start the car engine if a USB device is
connected.
• This unit may not be able to play the files depending
on the type of USB device.
• Operation and power supply may not work as
intended for some USB devices.
• You cannot connect a computer to the USB input
terminal of the unit.
• Make sure all important data has been backed up to
avoid losing the data.
• Do not leave a USB device in the car, expose to direct
sunlight, or high temperature to avoid deformation
or cause damages to the device.
• Some USB devices may not work immediately after
you turn on the power.
• For more details about USB operations, see page 36.
USB input ack
EN08-15_PDR61_003A_4.indd 13EN08-15_PDR61_003A_4.indd 13 12/31/07 11:27:48 AM12/31/07 11:27:48 AM

ENGLISH
14
Registering using “Open”
Preparation: Operate the device to turn on its
Bluetooth function.
1 Sele t “BT-PHONE” or “BT-AUDIO.”
2 Sele t “NEW.”
3 Enter setting menu.
4 Sele t “Open.”
5 Enter a PIN (Personal Identifi ation Number)
ode to the unit.
You can enter any number you like (1-digit to
16-digit number). [Initial: 0000]
To enter a PIN code less than 4-digit, firstly
delete the initial PIN code (0000) by pressing
number button 5 ( ) .
* So e devices have their own PIN code. Enter the
specified PIN code to the unit.
1 Move to the next (or previous) number
position.
Using the Bluetooth ® devices
For Bluetooth operations, it is required to connect the
Bluetooth Adapter (KS-BTA200) to the CD changer
jack on the rear of this unit.
Refer also to the instructions supplied with the
Bluetooth adapter and the Bluetooth device.
Refer to the list (included in the box) to check
the countries where you may use the Bluetooth ®
function.
To use a Bluetooth device through the unit
(“BT-PHONE” and “BT-AUDIO”) for the first time,
you need to establish Bluetooth wireless connection
between the unit and the device.
Once the connection is established, it is registered in
the unit even if you reset your unit. Up to five devices
can be registered in total.
Only one device can be connected at a time for each
source (“BT-PHONE” and “BT-AUDIO”).
Registering a Bluetooth devi e
Registration (Pairing) methods
Use either of the following items in the Bluetooth menu
to register and establish the connection with a device.
Select “BT-PHONE” or “BT-AUDIO” as the source to
operate the Bluetooth menu.
Open Make the unit ready to establish a new
Bluetooth connection.
Connection is established by operating the
Bluetooth device.
Sear h Make the unit ready to establish a new
Bluetooth connection.
Connection is established by operating
the unit.
When is shown on the display, you can
move back to the previous screen by pressing number
button 3.
EN08-15_PDR61_003A_4.indd 14EN08-15_PDR61_003A_4.indd 14 12/31/07 11:10:09 AM12/31/07 11:10:09 AM

ENGLISH
15
EXTERNAL DEVICES
2 Sele t a devi e you want to onne t.
3 • For available devi es...
1 Enter the specific PIN code of the device to
the unit.
Refer to the instructions supplied with the
device to check the PIN code.
2 Use the Bluetooth device to connect.
Now connection is established and you can
use the device through the unit.
• For spe ial devi e...
Use “Open” or “Sear h” to onne t.
Conne ting/dis onne ting/deleting a
registered devi e
1 Sele t “BT-PHONE” or “BT-AUDIO.”
2 Sele t a registered devi e you want to
onne t/dis onne t/delete.
3 Enter setting menu.
4 • Sele t “Conne t” or “Dis onne t” to
onne t/dis onne t the sele ted devi e.
2 Select a number or blank space.
3 Repeat steps 1 and 2 until you finish
entering a PIN code.
4 Confirm the entry.
“Open...” flashes on the display.
6 Use the Bluetooth devi e to sear h and
onne t.
On the device to be connected, enter the same
PIN code you have just entered for this unit.
“Connected (and device name)” appears on the
display.
Now connection is established and you can use the
device through the unit.
The device remains registered even after you
disconnect the device. Use “Conne t“ (or activate
“Auto Conne t”) to connect the same device from
next time on. (See the following and page 33.)
Conne ting a devi e
Perform steps 1 – 3 on page 14, then...
1 • Sele t “Sear h” to sear h for available
devi es.
The unit searches and displays the list of the
available devices.
If no available device is detected, “Device Not
Found” appears.
• Sele t “Spe ial” to onne t a spe ial devi e.
The unit displays the list of the preset devices.
Continued on the next page
EN08-15_PDR61_003A_4.indd 15EN08-15_PDR61_003A_4.indd 15 12/31/07 11:10:11 AM12/31/07 11:10:11 AM

ENGLISH
16
• Select “Delete,” then confirm the selection.
You can set the unit to connect the Bluetooth device automatically when the unit is turned on. (See
“Auto Connect” on page 33.)
Using the Bluetooth cellular phone
1Select “BT-P ONE.”
2Enter Bluetooth menu.
3—Establish the connection with a device, then make a call (or settings
using the Bluetooth menu).
Press num er utton 3 to
select “No” or return to the
previous screen.
When a call comes in....
The source is automatically changed to “BT-PHONE.”
When “Auto Answer” is activated....
The unit answers the incoming calls automatically, see
page 33.
• When “Auto Answer” is deactivated, press any
utton (except /control dial) to answer the
incoming call.
To end the call
Hold any utton (except /control dial).
• You can adjust the microphone volume level (see
page 33).
When an SMS comes in....
If the cellular phone is compati le with SMS (Short
Message Service) and “Message Info” is set to “Auto”
(see page 33), the unit rings and “Received Message”
appears on the display to inform you of the message
arrival.
EN16-21_PDR61_003A_4.indd 16EN16-21_PDR61_003A_4.indd 16 12/31/07 11:07:52 AM12/31/07 11:07:52 AM

ENGLISH
17
EXTERNAL DEVICES
Continued on the next page
Making a call
You can make a call using one of the Dial Menu items.
• When is shown on the display, you can
move ack to the previous screen y pressing num er
utton 3.
1 Select “BT-P ONE.”
2 Enter setting menu.
3 Select “Dial Menu.”
4 Select the method to make a call.
• Redial *: Shows the list of the phone num ers
you have dialed. Go to the following step.
• Received *: Shows the list of the received calls.
Go to the following step.
• Phonebook *: Shows the phone ook of the
connected cellular phone. Go to the following
step.
• Missed *: Shows the list of the missed calls. Go
to the following step.
• Number: Shows the phone num er entry
screen. See “How to enter phone num er” on the
right column.
• Voice Dial (Only accessi le when the connected
cellular phone has the voice recognition system):
Speak the name (registered words) you want to
call.
* Displayed only when your cellular phone is
equipped with these functions.
– If not displayed, try to transfer the phone ook
memory of the cellular phone to this unit.
(Refer to the instruction manual supplied with
your cellular phone.)
– With some cellular phones, the phone ook
memory is transferred automatically.
5 Select the name/phone number you want to
call.
ow to enter phone number
Select a num er.
Move the entry position.
Confirm the entry.
EN16-21_PDR61_003A_4.indd 17EN16-21_PDR61_003A_4.indd 17 12/31/07 11:07:58 AM12/31/07 11:07:58 AM

ENGLISH
18
• Refer also to pages 15 and 16 for connecting/
disconnecting/deleting a registered device.
Bluetooth Information:
If you wish to receive more information a out
Bluetooth, visit the following JVC we site: <http://
www.jvc-victor.co.jp/english/car/>.
Using the Bluetooth audio player
• Operations and display indications differ depending on their availa ility on the connected audio player.
Select “BT-AUDIO.”
If play ack does not start automatically, operate the Bluetooth audio player to start play ack.
Using voice command
1 “Say...” appears on the display.
2 Speak the name (registered words) you want
to call.
• You can also use voice command from the Dial
Menu. Select “Voice Dial” from the Dial Menu.
• If your cellular phone does not support the voice
recognition system, “Error” appears on the
display.
Presetting the phone number
You can preset up to six phone num ers.
• When is shown on the display, you can
move ack to the previous screen y pressing num er
utton 3.
1 Display the phone number you want to
preset by using one of the “Dial Menu” items.
2 Select a phone number.
You can also enter a new phone
num er (see also “How to enter
phone num er” on page 17) to store.
3 Select a preset number to store.
To call a preset number
While in Bluetooth phone....
Reverse skip/forward skip
Start/pause play ack
Enter setting menu (Device list)
EN16-21_PDR61_003A_4.indd 18EN16-21_PDR61_003A_4.indd 18 12/31/07 11:08:00 AM12/31/07 11:08:00 AM

ENGLISH
19
EXTERNAL DEVICES
Listening to the CD changer
It is recommended to use a JVC MP3-compati le CD changer with your unit. You can connect a CD changer to the
CD changer jack on the rear of the unit.
• You can only play conventional CDs (including CD Text) and MP3 discs.
Preparation: Make sure “Changer” is selected for the external input setting, see page 30.
1Select “CD-C .”
2Select a disc to start playing.
[Press] For selecting disc num er 1 – 6.
[Hold] For selecting disc num er 7 – 12.
[Press] Select track
[Hold] Reverse/fast-forward track
MP3: Select folders
* By holding either one of the buttons, you can display
the Disc List (see page 12).
To select a disc/folder/track on the list
See “Selecting a folder/track on the list (only for MP3/
WMA file)” on page 12.
Select “Disc” in step 3 to display the Disc List of the CD
changer.
After pressing M MODE, press the following uttons to...
Skip 10 tracks
MP3: Within the same folder
Repeat Track:
Repeat current track
Repeat Folder:
MP3: Repeat all tracks of current
folder
Repeat Disc:
Repeat all tracks of the current disc
Random Folder:
MP3: Randomly play all tracks of
the current folder, then tracks of the
next folder
Random Disc:
Randomly play all tracks of current
disc
Random All:
Randomly play all tracks of the discs
in the magazine
• You can also cancel the play ack mode y selecting
“Off” or press num er utton 4 ( ).
*
EN16-21_PDR61_003A_4.indd 19EN16-21_PDR61_003A_4.indd 19 12/31/07 11:08:02 AM12/31/07 11:08:02 AM

ENGLISH
20
Listening to the iPod
You can play songs in an Apple iPod y:
– Connecting it with the USB ca le supplied with your iPod to the USB input jack on the control panel.
– Connecting the Interface adapter for iPod, KS-PD100 (separately purchased) to the CD changer jack on the rear of
the unit.
Preparation: Make sure “Changer” is selected for the external input setting, see page 30.
• You can control play ack from the unit.
• Disconnecting the iPod will stop play ack. Press SOURCE to listen to another play ack source.
• For details, refer also to the manual supplied for your iPod.
Caution:
• Avoid using the iPod if it might hinder your safety while driving.
• Make sure all important data has een acked up to avoid losing the data.
1
—
Connect an iPod to the USB input jack or through KS-PD100.
Play ack starts automatically from where it had een paused previously.
• If an iPod has een connected, press SOURCE to select “USB-iPod” or “iPod” as
the play ack source.
2Select a track.
3—Adjust the volume and sound as you want. (See pages 26 and 27.)
Playback control from the unit
Button For iPod connected through KS-PD100 For iPod connected to the USB input jack
[Press] Go to the next or previous track
[Hold] Fast-forward or reverse the track
during play ack
[Press] Go to the next or previous track
[Hold] Fast-forward or reverse the track
during play ack
[Press] Enter main menu when you press 5.
Pause/resume play ack when ∞ is
pressed.
[Hold] Enter main menu
[Press] Go to the top menu of “Playlists,”
“Artists,” “Al ums,” “Songs,”
“Podcasts,” “Genres,” “Composers,” or
“Audio ooks” in the main menu.
• Pressing the num er uttons (1 – 6)
or holding 1 (7) and 2 (8) can also
select the preset top menus.
— [Press] Pause/resume play ack.
EN16-21_PDR61_003A_4.indd 20EN16-21_PDR61_003A_4.indd 20 12/31/07 11:08:04 AM12/31/07 11:08:04 AM
Other manuals for KD-PDR61
1
Table of contents
Other JVC Car Receiver manuals