JVC KW-AVX726 Guide

1
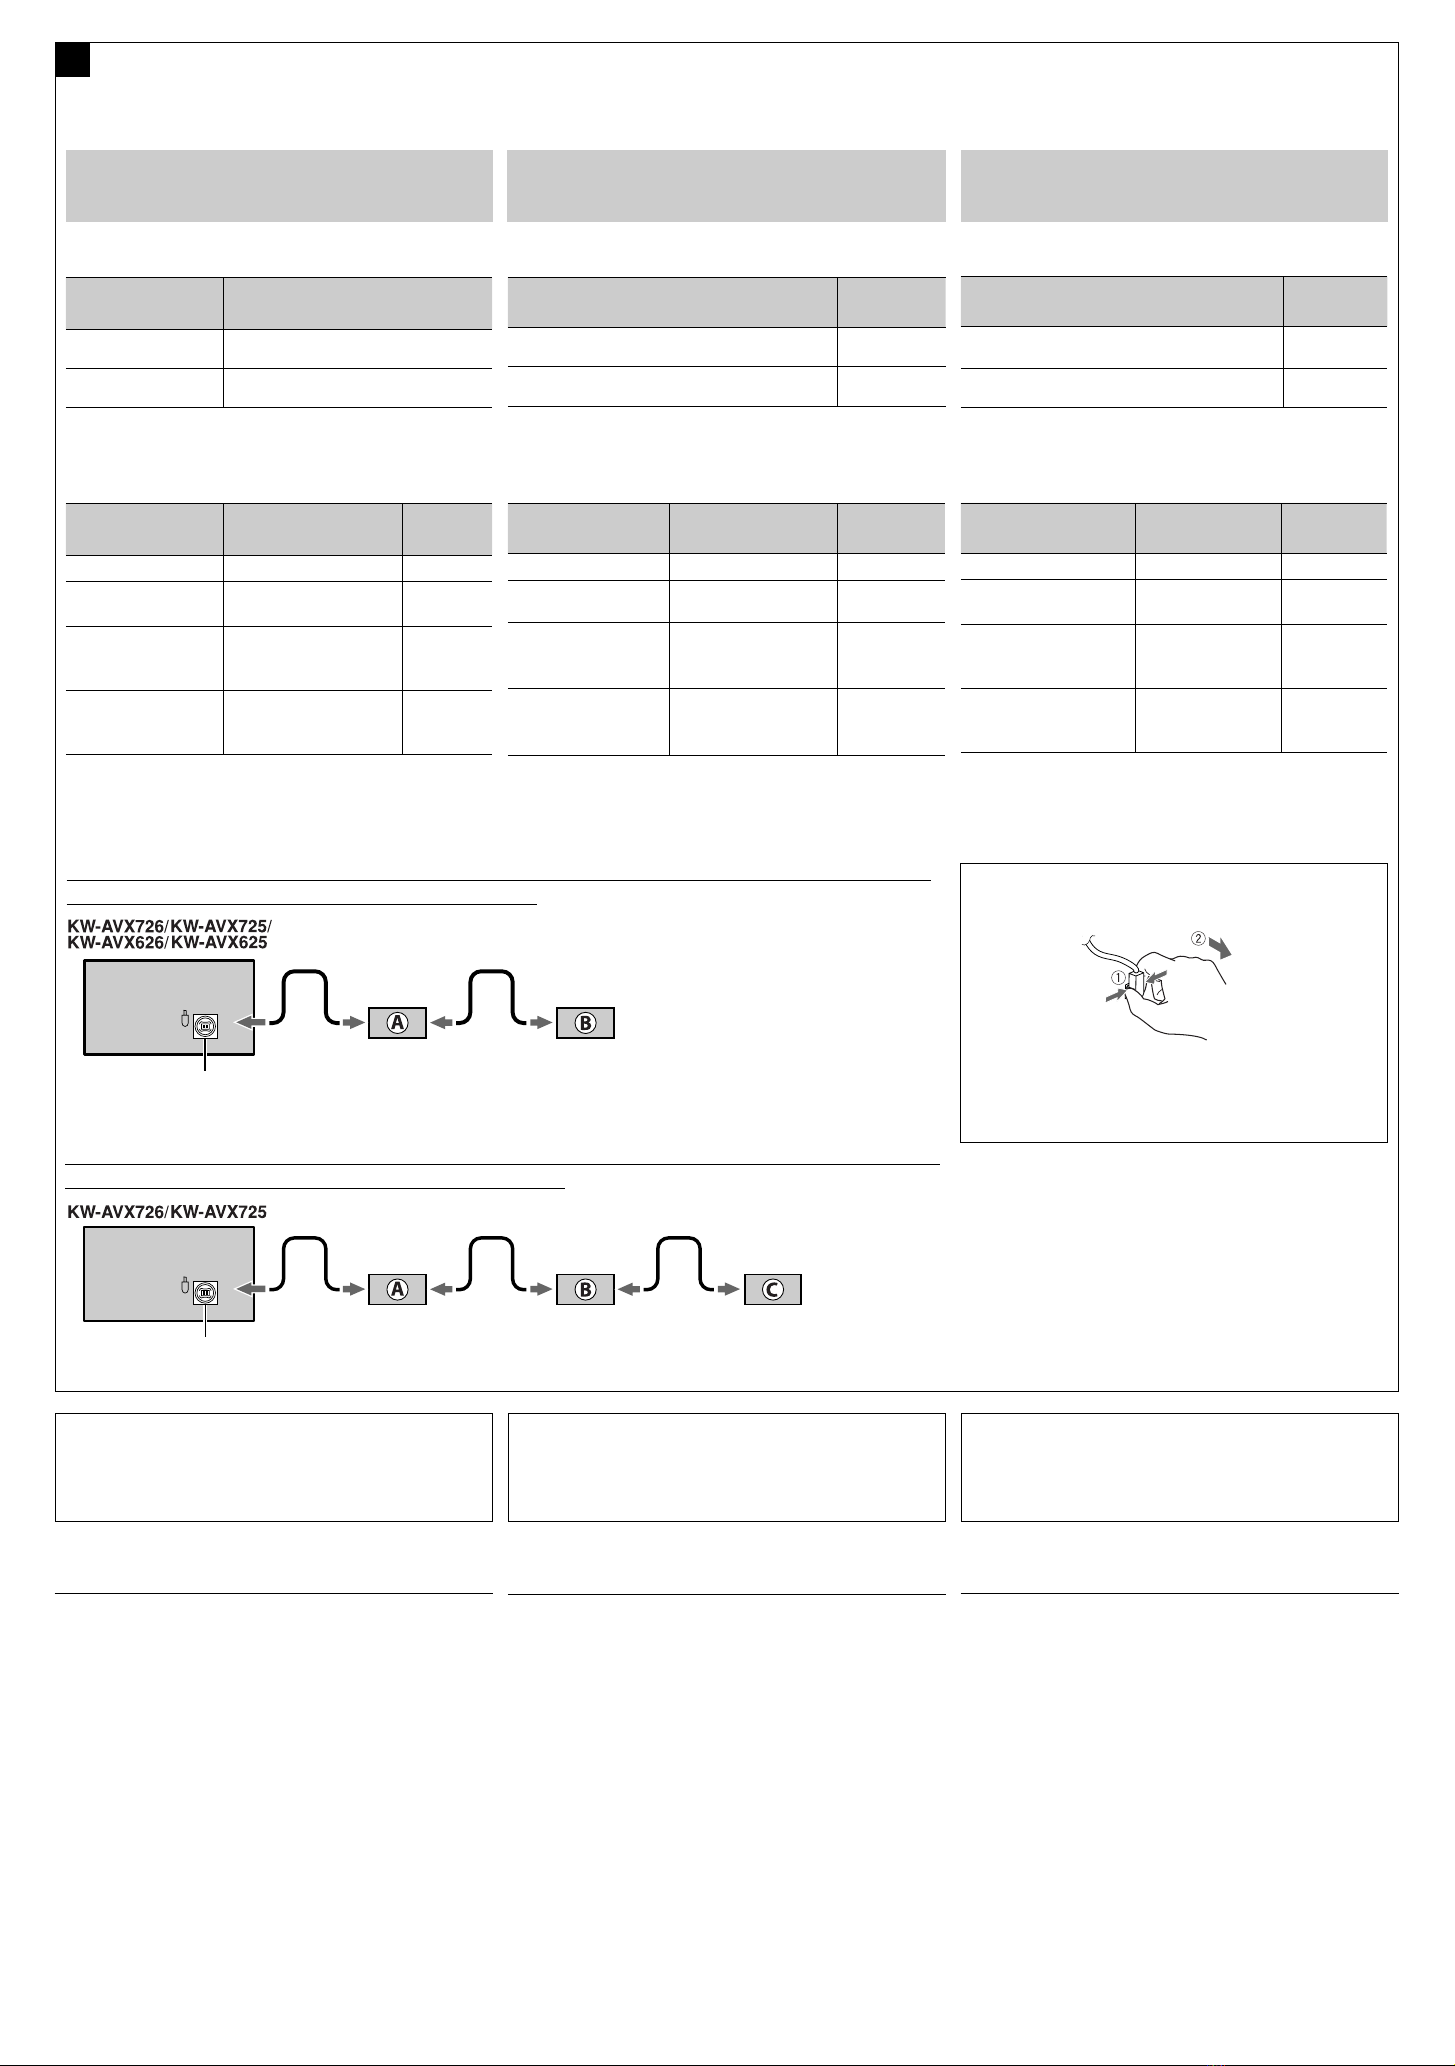
KW-AVX726/KW-AVX725/
KW-AVX626/KW-AVX625
Installation/Connection Manual
Manuel d’installation/raccordement
Руководство по установке/подключению
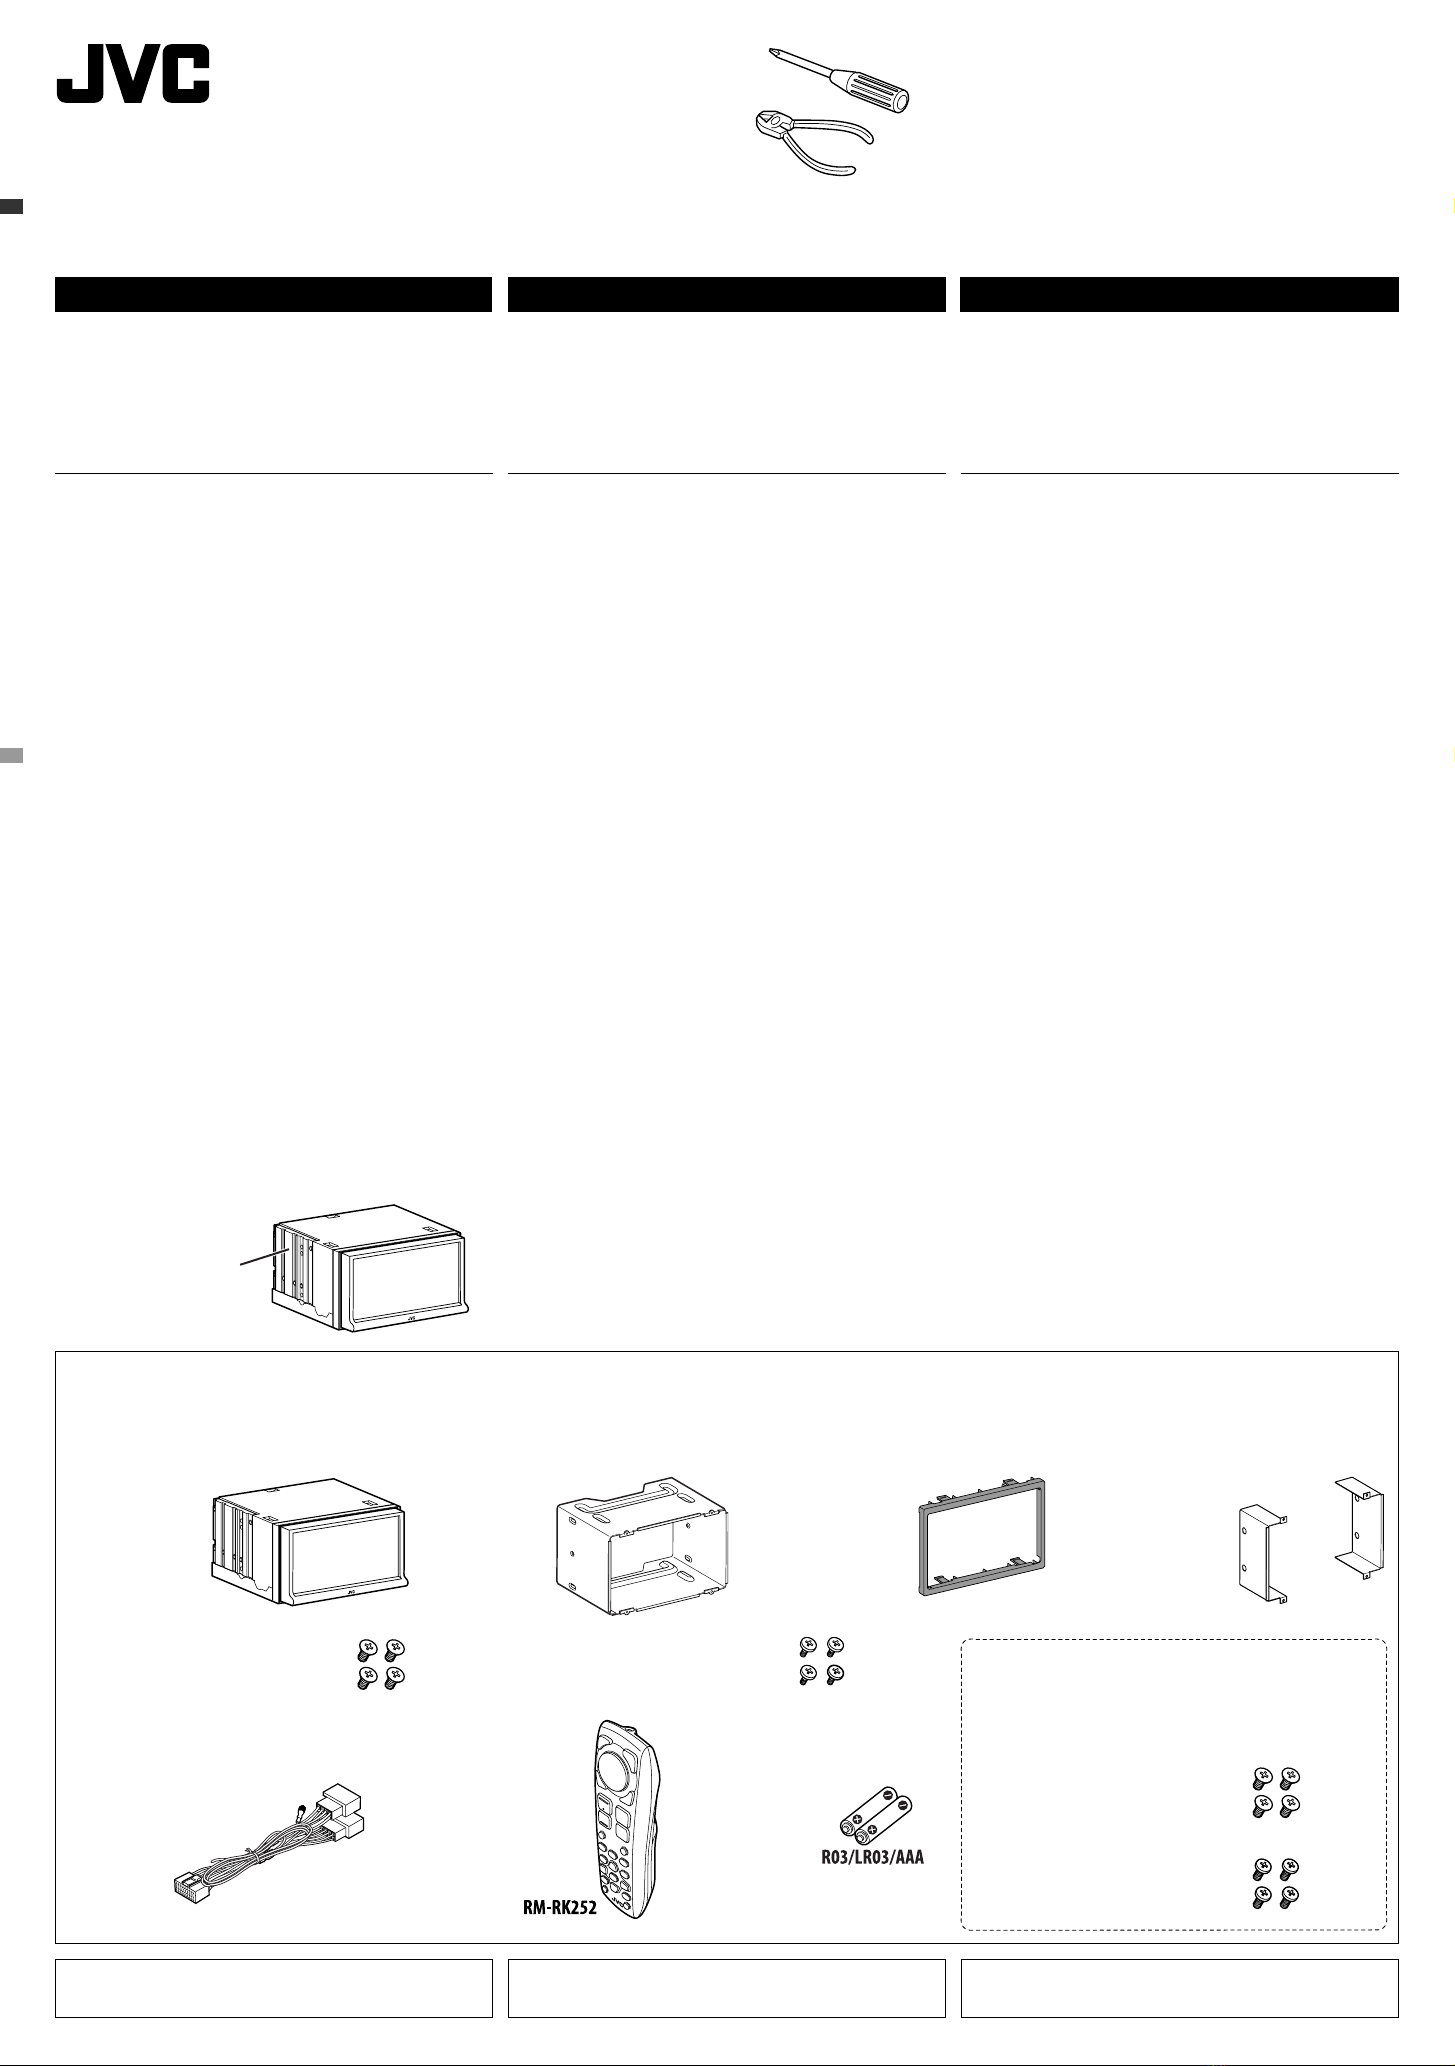
Parts list for installation and connection
If any item is missing, consult your JVC IN-CAR
ENTERTAINMENT dealer immediately.
ENGLISH
This unit is designed to operate on 12 V DC, NEGATIVE ground
electrical systems. If your vehicle does not have this system, a
voltage inverter is required, which can be purchased at JVC IN-CAR
ENTERTAINMENT dealers.
WARNINGS
• DO NOT install any unit or wire any cable in a location where;
– it may obstruct the steering wheel and gearshift lever operations,
as this may result in a traffic accident.
– it may obstruct the operation of safety devices such as air bags, as
this may result in a fatal accident.
– it may obstruct visibility.
• DO NOT operate any unit while manipulating the steering wheel, as
this may result in a traffic accident.
• The driver must not watch the monitor while driving. It may lead to
carelessness and cause an accident.
• If you need to operate the unit while driving, be sure to look around
carefully or you may be involved in a traffic accident.
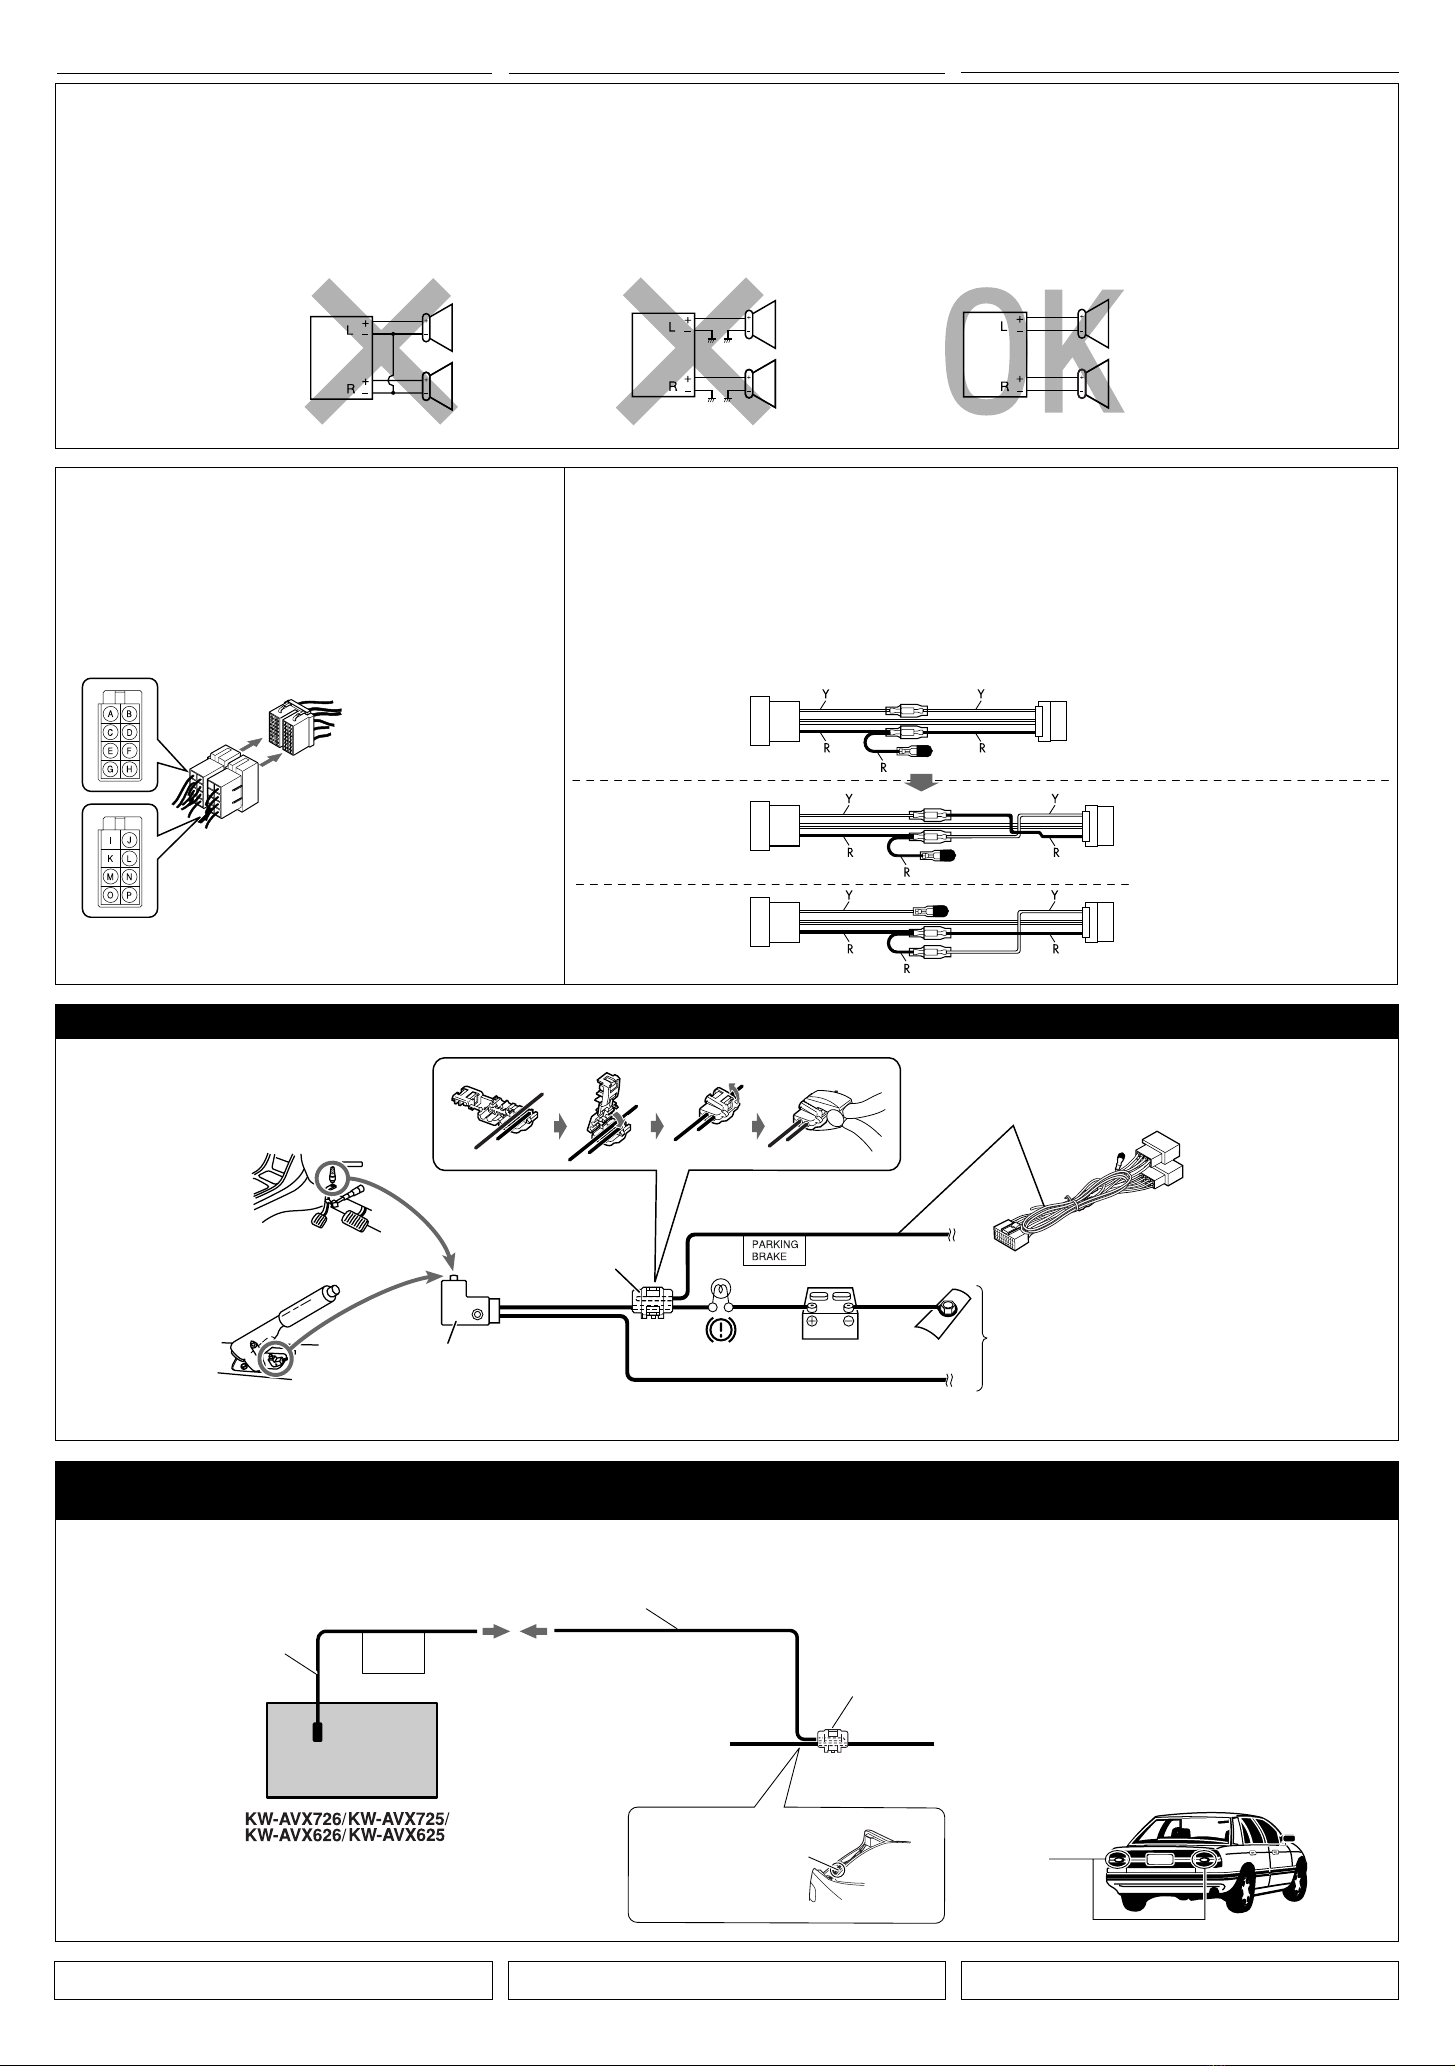
• If the parking brake is not engaged, “Parking Brake” appears on the
monitor, and no playback picture will be shown.
– This warning appears only when the parking brake wire is
connected to the parking brake system built in the car.
To prevent short circuits, we recommend that you disconnect the
battery’s negative terminal and make all electrical connections before
installing the unit.
• Be sure to ground this unit to the car’s chassis again after
installation.
Notes on electrical connections:
•Replace the fuse with one of the specified rating. If the fuse blows
frequently, consult your JVC IN-CAR ENTERTAINMENT dealer.
•It is recommended to connect speakers with maximum power
of more than 50 W (both at the rear and at the front, with an
impedance of 4 Ω to 8 Ω).
If the maximum power is less than 50 W, change <Amplifier Gain>
setting to prevent the speakers from being damaged (see page 21 of
the INSTRUCTIONS).
•To prevent short circuits, cover the terminals of the UNUSED leads
with insulating tape.
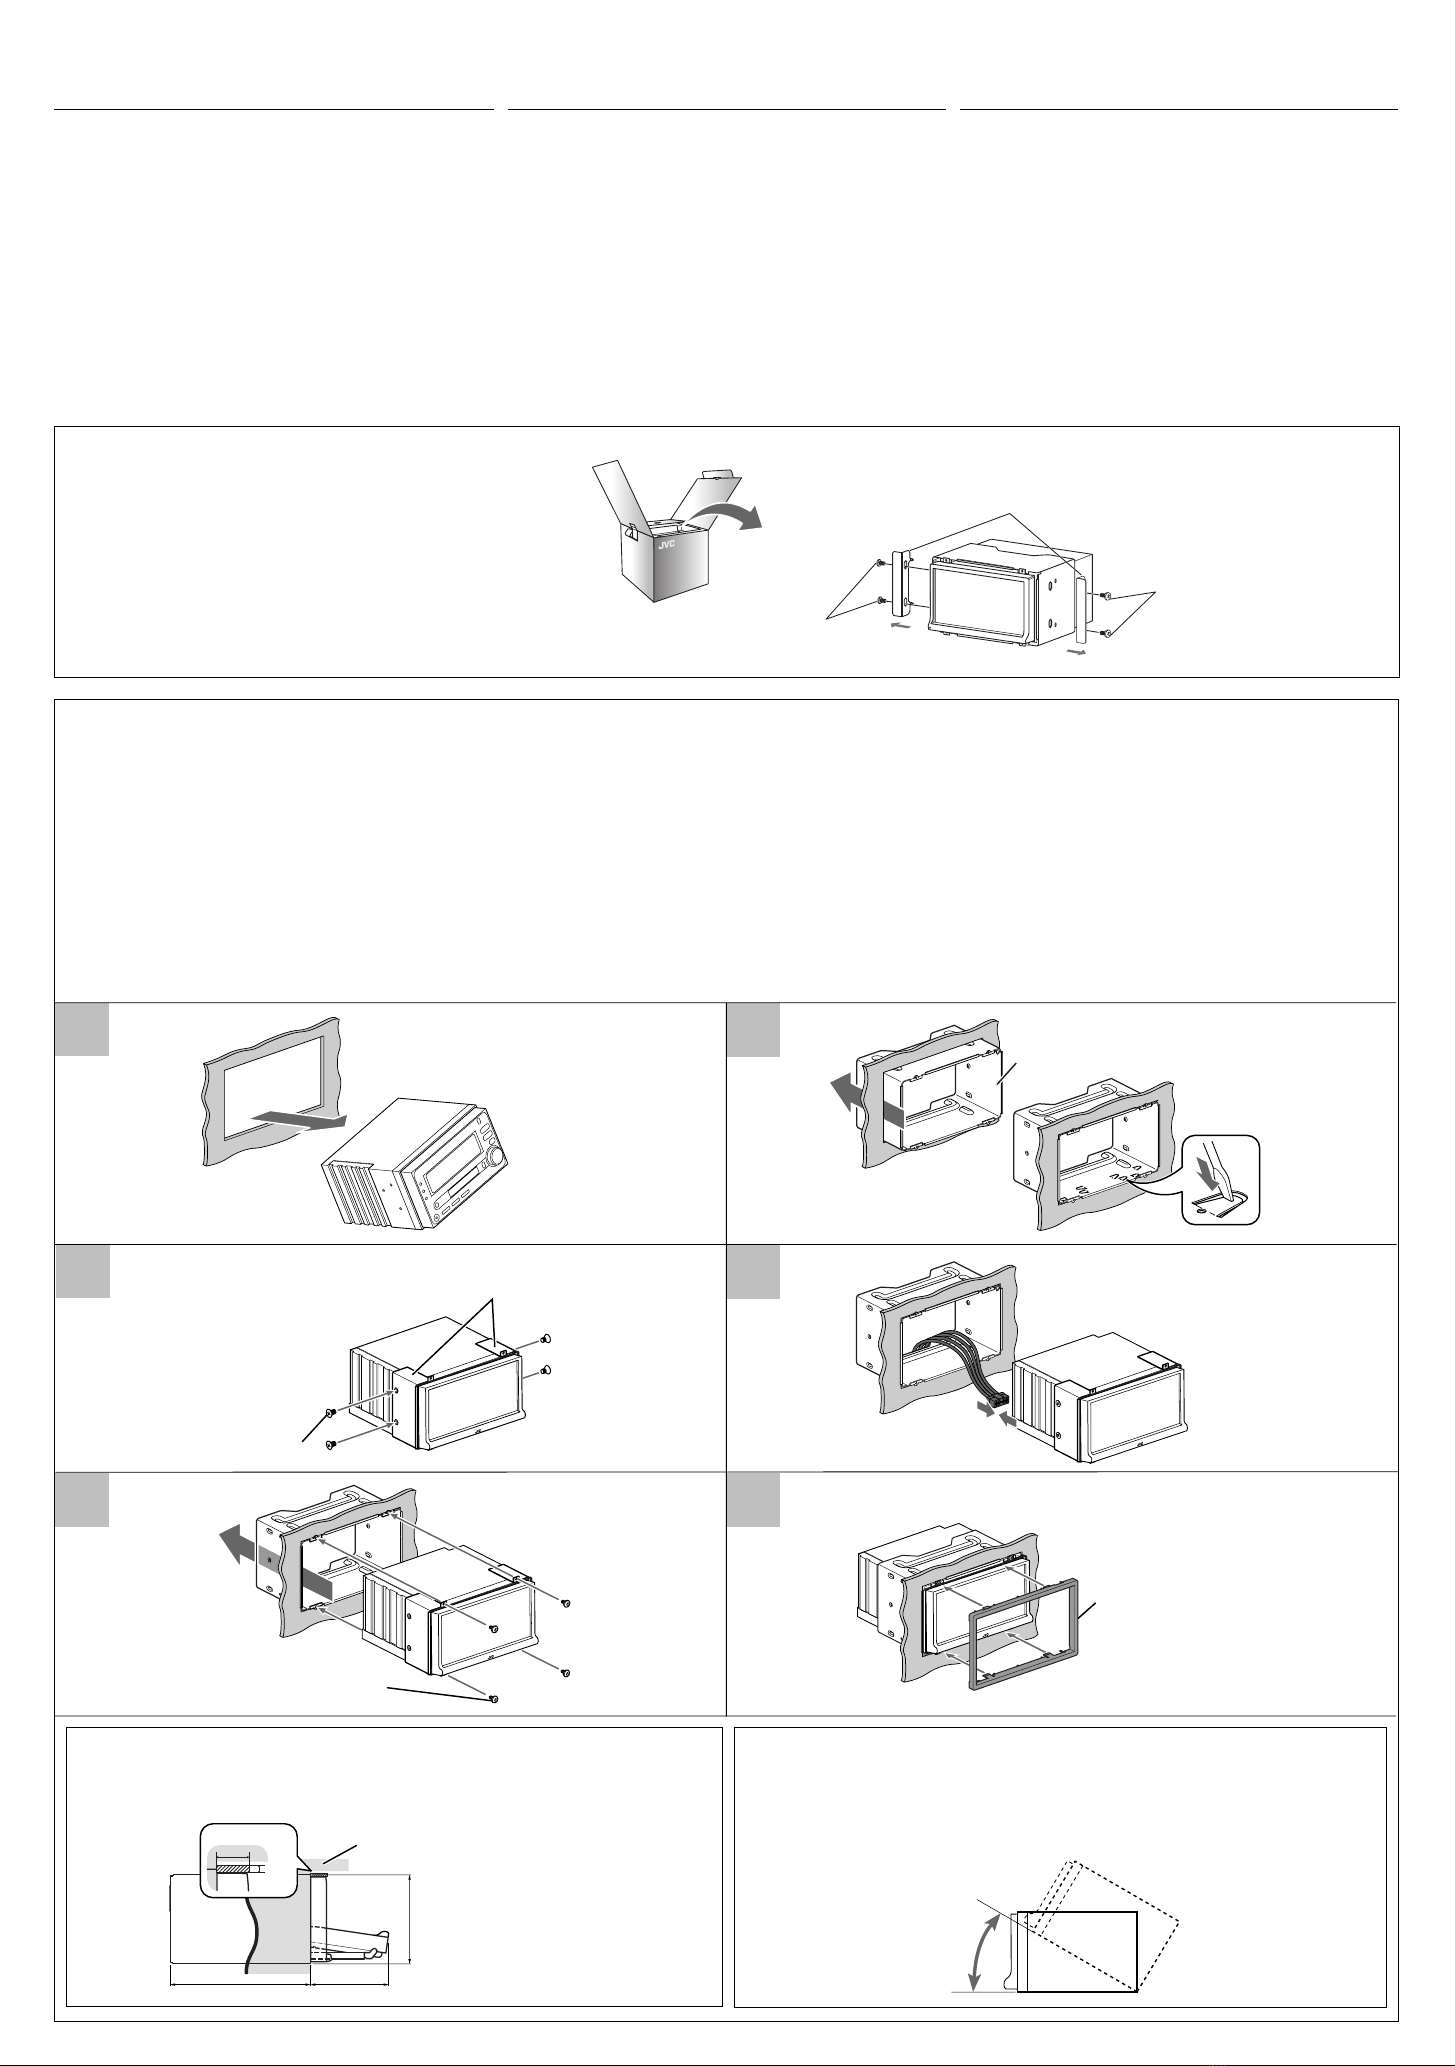
•The heat sink becomes very hot after use. Be careful not to touch it
when removing this unit.
Main unit
Appareil principal
Главное устройство
Power cord
Cordon d’alimentation
Кабель питания
Batteries
Piles
Бaтapeйкa
Heat sink
Dissipateur de chaleur
Радиатор
GET0605-011B
[EU]
0509DTSMDTJEIN
EN, FR, RU
© 2009 Victor Company of Japan, Limited
Sleeve*1
Manchon*1
Муфта*1
Trim plate
Plaque d’assemblage
Декоративную панель
Brackets*1
Supports*1
Декоративную панель*1
Round head screws*1, *2(M2.6 ×3 mm)
Vis à tête ronde
*1, *2(M2,6 ×3 mm)
Болты с круглой головкой*1, *2(M2,6 ×3 мм)
Flat head screws
*1, *2(M5 ×8 mm)
Vis à tête plate
*1, *2(M5 ×8 mm)
Болты с плоской головкой*1, *2(M5 ×8 мм)
Round head screws (M5 ×8 mm)
Vis à tête ronde (M5 ×8 mm)
Болты с круглой головкой (M5 × 8 мм)
Flat head screws (M5 ×8 mm)
Vis à tête plate (M5 ×8 mm)
Болты с плоской головкой (M5 × 8 мм)
РУССКИЙ
Это устройство разработано для эксплуатации на 12 В
постоянного напряжения с минусом на массе. Если Ваш
автомобиль не имеет этой системы, требуется инвертор
напряжения, который может быть приобретен у дилера
автомобилнего специалиста JVC.
ПРЕДУПРЕЖДЕНИЯ
• НЕ устанавливайте устройства и не прокладывайте провода
в местах, где:
– возникает препятствие для функционирования руля и
рычага переключения скоростей, так как это может
привести к аварии;
– возникает препятствие срабатыванию устройств
безопасности, например, пневмоподушки, что может
привести к несчастному случаю со смертельным исходом;
– может ухудшиться обзор.
• НЕ используйте устройство, когда управляете рулем; это
может привести к аварии.
• Водителю не следует смотреть на монитор во время
вождения. Это может быть опасно и может стать причиной
аварии.
• Если данное устройство используется во время поездки на
автомобиле, следует, не отвлекаясь, следить за дорогой, иначе
может произойти дорожно-транспортное происшествие.
• Если стояночный тормоз не включен, на мониторе появляется
сообщение “Parking Brake” и изображение воспроизведения
отображаться не будет.
– Это предупреждение появляется только в том случае,
если провод стояночного тормоза подключен к стояночной
тормозной системе автомобиля.
Для предотвращения коротких замыканий мы рекомендуем
Вам отсоединить отрицательный разъем аккумулятора и
осуществить все подключения перед установкой устройства.
• После установки обязательно заземлите данное
устройство на шасси автомобиля.
Примечания по электрическим подключениям:
• Заменяйте предохранитель другим предохранителем
указанного класса. Если предохранитель сгорает слишком
часто, обратитесь к дилеру автомобилнего специалиста JVC.
•
Рекомендуется подключать динамики с максимальной мощностью
более 50 Вт (к задней и передней панели устройства, с полным
сопротивлением от 4 Ω до 8 Ω).
Если максимальная мощность динамиков менее 50 Вт, перейдите
в режим <Amplifier Gain>, чтобы предотвратить их повреждение
(cм. ИНСТРУКЦИИ ПО ЭКСПЛУАТАЦИИ на стр. 21).
• Для предотвращения ороткого замыкания заклейте
НЕИСПОЛЬЗУЕМЫЕ концы изолирующей лентой.
• Радиатор во время использования сильно нагревается.
Старайтесь его не трогать во время удаления устройства.
Liste des pièces pour l’installation et
raccordement
Si quelque chose manquait, consultez votre revendeur autoradio
JVC immédiatement.
Список деталей для установки и
подключения
При отсутствии какого-либо элемента немедленно свяжитесь
с дилером автомобильного специалиста JVC.
FRANÇAIS
Cet appareil est conçu pour fonctionner sur des sources de courant
continu de 12 V à masse NEGATIVE. Si votre véhicule n’offre pas
ce type d’alimentation, il vous faut un convertisseur de tension, que
vous pouvez acheter chez un revendeur d’autoradios JVC.
AVERTISSEMENTS
• N’INSTALLEZ aucun appareil ni aucun câble dans un endroit où:
– où il peut gêner l’accès au volant ou au levier de vitesse car cela
peut entraîner un accident de la circulation.
– où il peut gêner la manipulation de dispositifs de sécurité tels
que les airbags car cela peut entraîner un accident fatal.
– où il peut gêner la visibilité.
• NE COMMANDEZ pas l’appareil lors de la manipulation du volant
car cela peut entraîner un accident de la circulation.
• Le conducteur ne doit pas regarder le moniteur lorsqu’il conduit.
Cela peut lui faire perdre sa concentration et causer un accident.
• Si vous souhaitez opérer l’appareil pendant que vous conduisez,
assurez-vous de bien regarder autour de vous afin de ne pas
causer un accident de la circulation.
• Si le frein à main n’est pas engagé, “Parking Brake” (Frein à Main)
s’affiche sur le moniteur et aucune image de lecture n’apparaît.
– Cet avertissement apparaît uniquement quand le fil du
frein de stationnement est connecté au système de frein de
stationnement intégré à la voiture.
Pour éviter tout court-circuit, nous vous recommandons de
débrancher la borne négative de la batterie et d’effectuer tous les
raccordements électriques avant d’installer l’appareil.
• Assurez-vous de raccorder de nouveau la mise à la masse de
cet appareil au châssis de la voiture après l’installation.
Remarques sur les connexions électriques:
• Remplacer le fusible par un de la valeur précisée. Si le fusible
saute souvent, consulter votre revendeur d’autoradios JVC.
• Il est recommandé de connecter des enceintes avec une
puissance de plus de 50 W (les enceintes arrière et les enceintes
avant, avec une impédance comprise entre 4 Ω et 8 Ω).
Si la puissance maximum est inférieure à 50 W, changez
<Amplifier Gain> pour éviter d’endommager vos enceintes (voir
page 21 du MANUEL D’INSTRUCTIONS).
• Pour éviter les court-circuits, couvrir les bornes des fils qui ne sont
PAS UTILISÉS avec de la bande isolante.
• Le dissipateur de chaleur devient très chaud après usage. Faire
attention de ne pas le toucher en retirant cet appareil.
*1Fitted to the main unit when shipped.
*2Keep for installation use if necessary.
*1Fixé à l’appareil lors de l’expédition.
*2À conserver pour être utilisé si nécessaire pour une installation.
*1Закреплено на основном устройстве при поставке.
*2При необходимости сохраните для использования при установке.
Use these screws when installing the unit without the supplied sleeve.
Utilisez ces vis lors de l’installation de l’appareil sans le manchon
fourni.
Используйте эти болты при установке устройства без
поставляемой муфты.
Remote controller
Télécommande
диcтaнциoннoго yпpaвлeния
Install1_KW-AVX726_011B_ff.indd 1Install1_KW-AVX726_011B_ff.indd 1 5/20/09 12:42:51 PM5/20/09 12:42:51 PM

2
161 91.3
111
30˚
20
4
INSTALLATION
(IN-DASH MOUNTING)
The following illustration shows a typical installation. However, you
should make adjustments corresponding to your specific car. If you
have any questions or require information regarding installation kits,
consult your JVC IN-CAR ENTERTAINMENT dealer or a company
supplying kits.
• If you are not sure how to install this unit correctly, have it installed
by a qualified technician.
Before installing the unit
• When mounting the unit, be sure to use the screws provided, as
instructed. If other screws are used, parts could become loose or
damaged.
• When tightening screws or bolts, be careful not to pinch any
connection cord.
1Remove the audio system originally installed in the car, together
with its mounting brackets.
Note: Be sure to keep all the screws and parts removed from
your car for future use.
2Install the sleeve in the dashboard of the car.
3Attach the brackets to the main unit.
• Make sure to use the supplied flat head screws (M5 ×8 mm). If
longer screws are used, they could damage the unit.
4Do the required electrical connections.
• See pages 3 – 6.
5Install the main unit in the sleeve.
6Attach the trim plate.
Install the unit at an angle of less than 30˚, taking it into account that the monitor would eject
when in use.
Installez l’appareil avec un angle de moins de 30°, en tenant compte du fait que le moniteur
doit être déployé lors de son utilisation.
Установите устройство под углом менее 30 °, принимая во внимание то,что при
использовании монитор будет выдвигаться.
Required space for installation and the monitor ejection
Espace nécessaire pour l’installation et l’éjection du moniteur
Необходимое пространство для установки и извлечения монитора
Unit: mm
Unité: mm
Единицы измерения: мм
Round head screws (M2.6 ×3 mm)
Vis à tête ronde (M2,6 ×3 mm)
Болты с круглой головкой (M2,6 × 3 мм)
Trim plate
Plaque d’assemblage
Декоративную панель
Flat head screws (M5 ×8 mm)
Vis à tête plate (M5 ×8 mm)
Болты с плоской головкой (M5 ×8 мм)
Sleeve
Manchon
Муфта
12
34
56
УСТАНОВКА (УСТАНОВКА В
ПРИБОРНУЮ ПАНЕЛЬ)
На следующих иллюстрациях показана типовая установка.
Однако необходимо выполнить настройки, соответствующие
конкретному автомобилю. Если у Вас есть какие-либо
вопросы, касающиеся установки, обратитесь к Вашему дилеру
автомобильных систем JVC или в компанию, поставляющую
соответствующие принадлежности.
• Если Вы не знаете точно, как следует устанавливать это
устройство, обратитесь к квалифицированному специалисту.
Предостережение во время установки
• При установке устройства используйте только прилагаемые
болты в соответствии с инструкцией. В случае использования
других болтов существует вероятность, что детали могут
быть ненадежно закреплены или повреждены.
• Аккуратно затягивайте болты,чтобы не пережать
соединительные кабели.
1Извлеките аудиосистему, изначально установленную в
автомобиле, вместе с монтажными кронштейнами.
Примечание: Не теряйте винты и детали, извлеченные
из автомобиля, поскольку они будут использоваться в
дальнейшем.
2Вмонтируйте муфту в приборную панель автомобиля.
3Прикрепите кронштейны к главному устройству.
• Используйте болты с плоской головкой (M5 ×8 мм),
которые входят в комплект поставки. При использовании
более длинных болтов можно повредить устройство.
4Выполните необходимые электрические соединения.
• См. стр. 3 – 6.
5Установите главное устройство в муфту.
6Прикрепите декоративную панель.
INSTALLATION (MONTAGE DANS LE
TABLEAU DE BORD)
L’illustration suivante est un exemple d’installation typique.
Cependant, vous devez faire les ajustements correspondant à votre
voiture. Si vous avez des questions ou avez besoin d’information
sur des kits d’installation, consulter votre revendeur d’autoradios
JVC ou une compagnie d’approvisionnement.
• Si vous n’êtes pas sûr de pouvoir installer l’appareil correctement,
faite-le installer par un technicien qualifié.
Avant d’installer l’appareil
• Lors du montage de l’appareil, assurez-vous d’utiliser les vis
fournies, de la façon indiquée. Si vous utilisez d’autres vis,
certaines pièces peuvent être perdues ou endommagées.
• Lorsque vous serrez des vis ou des boulons, faites attention de ne
pas pincer un cordon de connexion.
1Retirez le système audio d’origine installé dans la voiture en
même temps que les supports de montage.
Remarque: Assurez-vous de conserver toutes les vis et pièces
détachées de votre voiture pour une utilisation dans le future.
2Installez le manchon dans le tableau de bord de la voiture.
3Attachez les supports à l’appareil principal.
• Assurez-vous d’utiliser les vis à tête plate fournis—
(M5 ×8 mm). Vous risquez d’endommager l’appareil si vous
utilisez des vis plus longues.
4Réalisez les connexions électriques requises.
• Référez-vous aux pages 3 – 6.
5Installez l’appareil principal dans le manchon.
6Fixez la plaque d’assemblage.
Dashboard
Tableau de bord
Приборная панель
Remove the protection metal plates before installation:
• Keep the round head screws (M5 × 8 mm) for installation use if necessary.
Retirez les plaques métalliques de protection avant l’installation:
• Conservez les vis à tête ronde (M5 × 8 mm) afin de pouvoir les utiliser si
nécessaire pour une installation.
Перед установкой извлеките металлические пластины:
• При необходимости сохраните болты с полукруглой головкой
(M5 × 8 мм) для использования при установке.
Round head screws (M5 ×8 mm)
Vis à tête ronde (M5 ×8 mm)
Болты с круглой головкой (M5 × 8 мм)
Round head screws (M5 ×8 mm)
Vis à tête ronde (M5 ×8 mm)
Болты с круглой головкой (M5 × 8 мм)
Protection metal plates
Plaques métalliques de protection
Защитные металлические пластины
Brackets
Supports
Декоративную панель
Install1_KW-AVX726_011B_ff.indd 2Install1_KW-AVX726_011B_ff.indd 2 5/25/09 5:53:56 PM5/25/09 5:53:56 PM

3
ELECTRICAL CONNECTIONS
Y:
Yellow
Jaune
Желтый
R:
Red
Rouge
Красный
If your car is equipped with the ISO connector /
Si votre voiture est équippée d’un connecteur ISO /
Если автомобиль оснащен разъемом ISO
• Connect the ISO connectors as illustrated.
•Connectez les connecteurs ISO comme montré sur l’illustration.
• Подключите разъемы ISO, как показано на рисунке.
View from the lead side
Vue à partir du côté des fils
Вид со стороны выводов
Original wiring
Câblage original
Исходная схема
соединений
Modified wiring 1
Câblage modifié 1
Преобразованная схема
соединений 1
Use modified wiring 2if the unit does
not turn on.
Utilisez le câblage modifié 2si
l’appareil ne se met pas sous tension.
Если приемник не включается,
используйте преобразованную схему
соединений 2.
Modified wiring 2
Câblage modifié 2
Преобразованная схема
соединений 2
You may need to modify the wiring of the supplied power cord as illustrated.
• Contact your authorized car dealer before installing this unit.
Vous aurrez peut-être besoin de modifier le câblage du cordon d’alimentation fourni comme montré sur l’illustration.
•Contactez votre revendeur automobile autorisé avant d’installer l’appareil.
Возможно, потребуется изменить схему соединений для прилагаемого шнура питания, как показано на рисунке.
•Перед установкой приемника обратитесь к авторизованному агенту по продажам автомобильных систем.
For some VW/Audi or Opel (Vauxhall) automobiles / Pour certaine voiture VW/Audi ou
Opel (Vauxhall) / Для некоторых автомобилей VW/Audi или Opel (Vauxhall)
ISO connector of the supplied power cord
Connecteur ISO pour le cordon d’alimentation fourni
Разъем ISO шнура питания, входящего в комплект
поставки
From the car body
De la carrosserie de la voiture
От корпуса автомобиля
Parking brake lead (light green)
Fil du frein de stationnement (vert clair)
Провод стояночного тормоза (зеленого цвета)
To metallic body or chassis of the car
Vers corps métallique ou châssis de la voiture
К металлическому корпусу или шасси автомобиля
Parking brake switch (inside the car)
Commutateur de frein de
stationnement (intérieur de la voiture)
Переключатель стояночного тормоза
(внутри автомобиля)
Parking brake
Frein de stationnement
Стояночный тормоз
PRECAUTIONS on power supply and speaker connections:
• DO NOT connect the speaker leads of the power cord to the
car battery; otherwise, the unit will be seriously damaged.
• BEFORE connecting the speaker leads of the power cord to the
speakers, check the speaker wiring in your car.
RACCORDEMENTS ELECTRIQUES
PRECAUTIONS sur l’alimentation et la connexion des
enceintes:
• NE CONNECTEZ PAS les fils d’enceintes du cordon
d’alimentation à la batterie; sinon, l’appareil serait
sérieusement endommagé.
• AVANT de connecter les fils d’enceintes du cordon d’alimentation
aux enceintes, vérifiez le câblage des enceintes de votre voiture.
Connecting the parking brake lead / Connexion du fil de frein de stationnement / Подключение провода стояночного тормоза
ПРЕДОСТЕРЕЖЕНИЯ по питанию и подключению
громкоговорителей:
• НЕ подключайте провода громкоговорителей к
аккумулятору автомобиля, иначе устройство будет
повреждено.
• ПЕРЕД подключением проводов громкоговорителей к кабелю
питания громкоговорителя проверьте схему соединений
громкоговорителей в Вашем автомобиле.
ЭЛЕКТРИЧЕСКИЕ ПОДКЛЮЧЕНИЯ
Crimp connector *2
Raccord à sertir*2
Обжимной соединитель *2
REVERSE
GEAR
SIGNAL
Locate the reverse lamp lead in the trunk.
To car battery
À la batterie de la voiture
К аккумулятору автомобиля
Extension lead *2
Fil prolongateur*2
Удлинитель *2
Crimp connector *2
Raccord à sertir*2
Обжимной соединитель *2
Purple with white stripe
Violet avec bande blanche
Фиолетовый с белой полосой
Reverse lamps
Feux de recul
Задние фары
To reverse lamp
Aux feux de recul
К задней фаре
Reverse lamp lead
Fil des feux de recul
Провод задней фары
Localisez le fil des feux de recul dans le coffre. Найдите лампу заднего хода в ящике.
Connecting the reverse gear signal lead (for rear view camera) / Connexion du fil de signal de marche arrière (pour la caméra de recul) /
Подключение провода сигнала заднего хода (для камеры заднего вида)
*2Not supplied for this unit. *2Non fourni avec cet autoradio. *2Не входит в комплект.
Install1_KW-AVX726_011B_ff.indd 3Install1_KW-AVX726_011B_ff.indd 3 5/20/09 12:43:14 PM5/20/09 12:43:14 PM

4
ENGLISH
Before connecting: Check the wiring in the vehicle carefully.
Incorrect connection may cause serious damage to this unit.
The leads of the power cord and those of the connector from the car
body may be different in color.
1Cut the ISO connector.
2Connect the colored leads of the power cord in the order
specified in the illustration below.
3Connect the aerial cord.
4Finally connect the wiring harness to the unit.
Connections without using the ISO connector / Connexions sans utiliser le connecteur ISO / Подключение без использования разъемов ISO
15 A fuse
Fusible 15 A
Предохранитель
15 A
Ignition switch
Interrupteur d’allumage
Переключатель зажигания
To metallic body or chassis of the car
Vers corps métallique ou châssis de la voiture
К металлическому корпусу или шасси автомобиля
To an accessory terminal in the fuse block
Vers borne accessoire du porte-fusible
К вспомогательному разъему в блоке предохранителя
To the remote lead of other equipment (200 mA max.)
Au fil de télécommande d’un autre appareil (200 mA max.)
К удаленному проводу другого оборудования (макс. 200 мА)
Fuse block
Porte-fusible
Блок предохранителя
To cellular phone system
À un système de téléphone cellulaire
К системе сотового телефона
To car light control switch
À l’interrupteur d’éclairage de la voiture
К контрольному переключателю освещения автомобиля
Crimp connector *1
Raccord à sertir*1
Обжимной соединитель *1
To parking brake (see page 3)
Au frein de stationnement (voir page 3)
К стояночному тормозу (см. стр. 3)
Yellow *2
Jaune*2
Желтый *2
Red
Rouge
Красный
Orange with white stripe
Orange avec bande blanche
Оранжевый с белой полосой
Black
Noir
Черный
Light green
Vert clair
Зеленого цвета
Brown
Marron
Коричневый
Blue with white stripe
Bleu avec bande blanche
Синий с белой полосой
Left speaker (rear)
Enceinte gauche (arrière)
Левый громкоговоритель (задний)
Right speaker (front)
Enceinte droit (avant)
Правый громкоговоритель (передний)
Left speaker (front)
Enceinte gauche (avant)
Левый громкоговоритель (передний)
Right speaker (rear)
Enceinte droit (arrière)
Правый громкоговоритель
(задний)
Gray with black stripe
Gris avec bande noire
Серый с черной полосой
White
Blanc
Белый
White with black stripe
Blanc avec bande noire
Белый с черной полосой
Green with black stripe
Vert avec bande noire
Зеленый с черной полосой
Gray
Gris
Серый
Green
Vert
Зеленый
Purple with black stripe
Violet avec bande noire
Пурпурный с черной полосой
Purple
Violet
Пурпурный
Rear ground terminal / Borne arrière de
masse / Задний разъем заземления
To external components
(see diagram )
Aux appareíls extérieurs
(voir le diagramme )
К внешним устройствам
(см. схему )
VIDEO IN
(see diagram / voir le
diagramme / см. схему )
DIGITAL OUT
(see diagram / voir le
diagramme / см. схему )
LINE IN
(see diagram / voir le
diagramme / см. схему )
REAR OUT
(see diagram / voir le
diagramme / см. схему )
(see page 3 / voir page 3 / см. стр. 3)
Position data output / Sortie des données de position / Положение выхода данных
SUBWOOFER—Only for KW-AVX726/KW-AVX725 / Seulement pour le KW-AVX726/
KW-AVX725 / Только для KW-AVX726/KW-AVX725
(see diagram / voir le diagramme /см. схему )
VIDEO OUT
(see diagram / voir le
diagramme / см. схему )
Avant de commencer la connexion: Vérifiez attentivement le
câblage du véhicule. Une connexion incorrecte peut endommager
sérieusement l’appareil. Le fil du cordon d’alimentation et ceux des
connecteurs du châssis de la voiture peuvent être différents en couleur.
1Coupez le connecteur ISO.
2Connectez les fils colorés du cordon d’alimentation dans l’ordre
spécifié sur l’illustration ci-dessous.
3Connectez le cordon d’antenne.
4Finalement, connectez le faisceau de fils à l’appareil.
Перед началом подключений: Тщательно проверьте
проводку в автомобиле. Неправильное подключение может
привести к серьезному повреждению устройства.
Жилы силового кабеля и жилы соединителя от кузова
автомобиля могут быть разного цвета.
1Обрежьте разъем ISO.
2Подсоедините цветные провода шнура питания в
указанном ниже порядке.
3Подключите кабель антенны.
4
В последнюю очередь подключите электропроводку к устройству.
Aerial terminal / Borne de
l’antenne / Разъем антенны
To a live terminal in the fuse block connecting to the car battery (bypassing the
ignition switch) (constant 12 V)
A une borne sous tension du porte-fusible connectée à la batterie de la
voiture (en dérivant l’interrupteur d’allumage) (12 V constant)
К разъему фазы в блоке предохранителя (минуя блок зажигания)
(постоянный 12 В)
*1Not supplied for this unit.
*2Before checking the operation of this unit prior to installation, this lead
must be connected, otherwise power cannot be turned on.
*1Non fourni avec cet autoradio.
*2Pour vérifier le fonctionnement de cet appareil avant installation,
ce fil doit être raccordé, sinon l’appareil ne peut pas être mis sous
tension.
ISO connector
Connecteur ISO
Разъем ISO
Power cord
Cordon d’alimentation
Кабель питания
FRANÇAIS РУССКИЙ
*1Не входит в комплект.
*2Перед проверкой работы устройства подключите этот провод,
иначе питание не включится.
This terminal is used for controlling an external device by using the touch panel of this unit. This unit outputs the
positional information detected on the touch panel through the POSITION OUT terminal. Refer to the instruction
manual of the external device for details. JVC does not guarantee proper operations for the external device connected
to the POSITION OUT terminal.
Cette prise est utilisée pour la commande d’un périphérique extérieur en utilisant le panneau tactile de cet
appareil. Cet appareil sort l’information de la position détectée par le panneau tactile par la prise POSITION
OUT. Référez-vous au mode d’emploi du périphérique extérieur pour les détails. JVC ne garantie pas un
fonctionnement correct pour le périphérique extérieur connecté à la prise POSITION OUT.
Этот разъем используется для управления внешним устройством с помощью сенсорной панели данного
устройства. Данное устройство передает информацию о местонахождении с сенсорной панели через разъем
POSITION OUT. Подробные сведения см. в руководстве по работе с внешним устройством. Компания JVC не
гарантирует надлежащей работы внешнего устройства, подключенного к разъему POSITION OUT.
Only for KW-AVX726/KW-AVX725 / Seulement
pour le KW-AVX726/KW-AVX725 / Только для
KW-AVX726/KW-AVX725 (see diagram /
voir le diagramme / см. схему )
Install2_KW-AVX726_011B_ff.indd 4Install2_KW-AVX726_011B_ff.indd 4 5/25/09 5:34:32 PM5/25/09 5:34:32 PM

5
AConnecting the external amplifier and/or subwoofer / Connexion d’amplificateurs extérieurs et/ou d’un caisson de grave / Подключение
внешних усилителей и/или низкочастотного динамика
You can connect an amplifier to upgrade your car stereo system.
• Connect the remote lead (blue with white stripe) to the remote
lead of the other equipment so that it can be controlled through
this unit.
• Disconnect the speakers from this unit, connect them to
the amplifier. Leave the speaker leads of this unit unused.
• You can switch off the built-in amplifier and send the audio
signals only to the external amplifier(s) to get clear sounds and to
prevent internal heat built-up inside the unit. See page 21 of the
INSTRUCTIONS (separate volume).
Rear speakers
Enceintes arrière
Задние громкоговорители
JVC Amplifier
JVC Amplificateur
JVC-усилитель
Remote lead *3/ Fil d’alimentation à distance*3/
Провод внешнего устройства*3
Remote lead (blue with white stripe)
Fil d’alimentation à distance (bleu avec bande blanche)
Провод внешнего устройства (cиний с белой полосой)
To the remote lead of other equipment or automatic antenna if any
Au fil de télécommande de l’autre appareil ou à l’antenne automatique
s’il y en a une
К удаленному проводу другого оборудования или антенны
Front speakers
Enceintes avant
Передние громкоговорители
Subwoofer
Caisson de grave
Низкочастотный динамик
*3Not supplied for this unit.
*4Signal cord (not supplied for this unit).
*5Audio cord (not supplied for this unit).
*6Firmly attach the ground wire to the metallic body or to the chassis of
the car—to the place uncoated with paint (if coated with paint, remove
the paint before attaching the wire). Failure to do so may cause damage
to the unit.
*7Cut the rear speaker leads of the car’s ISO connector and connect them
to the amplifier.
*8When using the cable, make sure <iPod (Off)> is selected for
<AV Input> (see page 18 of the INSTRUCTIONS).
iPod is a trademark of Apple Inc., registered in the U.S. and other countries.
iPod est une marque de commerce d’Apple Inc., enregistrée aux États-Unis et dans les autres pays.
iPod является торговой маркой Apple Inc., зарегистрированной в США и других странах.
External component
Appareil extérieur
Внешнее устройство
BConnecting the external components / Connexion des appareils extérieurs / Подключение внешних устройств
AV amplifier or decoder
Amplificateur AV ou décodeur
Усилитель или декодер AV
Digital optical cable *3
Câble optique numérique*3
Цифровой оптический кабель*3
Video cord *3
Cordon vidéo*3
Видеокабели*3External monitor
Moniteur extérieur
Внешний монитор
KV-CM1*3
Rear view camera
Caméra de recul
Камера заднего вида
Only for KW-AVX726/KW-AVX725 / Seulement pour le KW-AVX726/KW-AVX725 /
Только для KW-AVX726/KW-AVX725
USB cable (approx. 1.2 m)
Câble USB (environ 1,2 m)
Кабель USB (прибл. 1,2 м)
USB device
Périphérique USB
Устройство USB
Only for KW-AVX726/KW-AVX725 / Seulement pour le KW-AVX726/KW-AVX725 / Только для KW-AVX726/KW-AVX725
You cannot connect a computer to the USB ( ) terminal of the unit.
Vous ne pouvez pas connecter un ordinateur à la prise USB ( ) de l’appareil.
Вы не можете подключить компьютер к терминалу USB ( ) устройства.
Connecting the iPod/iPhone to the USB terminal / Connexion du iPod/
iPhone à la prise USB / Подключение iPod/iPhone к разъему USB
You can connect the iPod/iPhone to the USB terminal using the following cables:
• To listen to the music: USB 2.0 cable (supplied for the iPod/iPhone)
• To watch the video: USB Audio and Video cable for iPod/iPhone—KS-U30 (not supplied)*8
Vous pouvez connecter le iPod/iPhone à la prise USB en utilisant les câbles suivants:
• Pour écouter la musique: Câble USB 2.0 (fourni pour le iPod/iPhone)
•
Pour regarder une séquence vidéo: Câble USB Audio et Vidéo pour iPod/iPhone—KS-U30 (non fourni)
* 8
Можно подключить iPod/iPhone к разъему USB с помощью следующих кабелей:
• для прослушивания музыки: кабель USB 2.0 (поставляется с iPod/iPhone)
• для просмотра видеозаписей: кабель USB Audio и Video для iPod/iPhone—KS-U30 (не входит в
комплект поставки)*8
Vous pouvez connecter un amplificateur pour améliorer votre
système autoradio.
• Connectez le fil de commande à distance (bleu avec bande
blanche) au fil de commande à distance de l’autre appareil de
façon qu’il puisse être commandé via cet appareil.
•
Déconnectez les enceintes de cet appareil et connectez-les à
l’amplificateur. Laissez les fils d’enceintes de cet appareil inutilisés.
• Vous pouvez mettre hors service l’amplificateur intégré et
envoyer les signaux audio uniquement sur un ou plusieurs
amplificateurs extérieurs afin d’obtenir un son clair et d’éviter
tout échauffement interne de l’autoradio. Voir page 21 du
MANUEL D’INSTRUCTIONS (volume séparé).
Можно подключить усилители для обновления автомобильной
стереосистемы.
•
Подсоедините провод внешнего устройства (синий с белой
полосой) к проводу внешнего устройства другого оборудования
так, чтобы им можно было управлять с этого устройства.
•
Отсоедините громкоговорители от данного устройства,
подключите их к усилителю. Оставьте провода
громкоговорителей данного устройства неиспользованными.
• Для получения более чистого звука и предотвращения
внутреннего перегрева устройства можно отключить
встроенный усилитель и использовать для усиления
аудиосигнала только внешние усилители. См. стр. 21
ИНСТРУКЦИЙ (отдельный документ).
Y-connector *3/ Connecteur Y*3/ Разъем Y *3
*3Non fourni avec cet appareil.
*4Cordon de signal (non fourni avec cet appareil).
*5Cordon audio (non fourni avec cet appareil).
*6Attachez solidement le fil de mise à la masse au châssis métallique
de la voiture—à un endroit qui n’est pas recouvert de peinture
(s’il est recouvert de peinture, enlevez d’abord la peinture avant
d’attacher le fil). L’appareil peut être endommagé si cela n’est pas fait
correctement.
*7Coupez les fils des enceintes arrière du connecteur ISO de la voiture
et connectez-les à l’amplificateur.
*8Lors de l’utilisation de ce câble, assurez-vous que <iPod (Off)> est
choisi pour <AV Input> (voir page 18 du MANUEL D’INSTRUCTIONS).
*3Не входит в комплект.
*4Кабель сигнала (не входит в комплект).
*5Аудиокабель (не входит в комплект).
*6Плотно прикрепите заземляющий провод к металлическому кузову
или шасси автомобиля—в месте, не покрытом краской (если оно
покрыто краской, удалите краску перед тем, как прикреплять
провод). Невыполнение этого требования может привести к
повреждению данного устройства.
*7Обрежьте выводы задних динамиков для разъема ISO автомобиля
и подсоедините их к усилителю.
*8При использовании кабеля убедитесь в том, что выбрано значение
<iPod (Off)> для настройки <AV Input> (см. ИНСТРУКЦИИ ПО
ЭКСПЛУАТАЦИИ на стр. 18).
USB devices / Périphériques USB / Устройства USB
JVC Amplifier
JVC Amplificateur
JVC-усилитель
Rear speakers
Enceintes arrière
Задние громкоговорители
Apple iPod/iPhone
iPod Apple/iPhone
Apple iPod/iPhone
KS-U30
USB 2.0 cable
Câble USB 2.0
Кабель USB 2.0
Apple iPod/iPhone
iPod Apple/iPhone
Apple iPod/iPhone
iPhone is a trademark of Apple Inc.
iPhone est une marque de commerce de Apple Inc.
iPhone является товарным знаком корпорации Apple Inc.
Install2_KW-AVX726_011A_f.indd 5Install2_KW-AVX726_011A_f.indd 5 2/25/09 12:16:19 PM2/25/09 12:16:19 PM

6
Connecting the external components to the CD changer jack / Connexion des appareils extérieurs au changeur de CD / Подключение
внешних устройств к разъему устройства автоматической смены компакт-дисков
When connecting the external components, refer also to the
manuals supplied for the components and adapter.
CAUTION:
Before connecting the external components, make sure that the
unit is turned off.
You can connect the following JVC components to the CD changer
jack.
JVC component Model name
CD changer (CD-CH) CH-X1500, etc.
JVC DAB tuner KT-DB1000
*9
You can also connect the following components through the various
JVC adapters.
• Connection cords may need to be purchased separately.
Component Adapter Model
name
Bluetooth device Bluetooth adapter KS-BTA200
iPod Interface adapter for iPod KS-PD100
Portable audio player
with line output jacks
Line input adapter KS-U57
Portable audio player
with 3.5 mm stereo
mini jack
AUX input adapter KS-U58
When connecting more than one component (maximum: three),
it is recommended that you connect the components in series as
explained below.
C
To disconnect the connector / Pour déconnecter le
connecteur / Отключение разъема
Hold the connector tightly (
1), then pull it out (2).
Tenez fermement le connecteur par-dessus ( 1) et tirez vers l’extérieur
( 2).
Крепко удерживая разъем (1), извлеките его (2).
When connecting two components in series / Lors de la connexion de deux appareils en série /
Последовательное подключение двух устройств
AKS-BTA200 / KT-DB1000*9
B*10 CD-CH / KS-PD100 / KS-U57 / KS-U58
CD changer jack / Konector CD changer / Разъем
устройства автоматической смены компакт-дисков
*10
Lors de la connexion des appareils extérieurs, référez-vous aussi aux
manuels fournis avec les appareils et les adaptateurs.
PRECAUTION:
Avant de connecter les appareils extérieurs, assurez-vous que
l’appareil est hors tension.
Vous pouvez connecter les appareils JVC suivants à la prise de
changeur de CD.
Appareil JVC Nom du
modèle
Changeur de CD (CD-CH) CH-X1500, etc.
Tuner JVC DAB KT-DB1000*9
Vous pouvez aussi connecter les appareils suivants en utilisant
divers adaptateurs JVC.
• Vous pouvez avoir besoin d’acheter certains cordons de
connexion séparément.
Appareil Adaptateur Nom du
modèle
Périphérique Bluetooth Adaptateur Bluetooth KS-BTA200
iPod Adaptateur d’interface
pour iPod
KS-PD100
Lecteur audio portable
avec prises de sortie
de ligne
Adaptateur d’entrée de
ligne
KS-U57
Lecteur audio portable
avec mini fiche stéréo
de 3,5 mm
Adaptateur d’entrée
auxiliaire
KS-U58
Lors de la connexion de plus d’un appareil (maximum: trois), il est
recommandé que vous connectiez les appareils en série comme
nous l’expliquons ci-dessous.
При подключении внешних устройств см. также руководства,
поставляемые для устройств и адаптера.
ПРЕДОСТЕРЕЖЕНИЕ:
Перед подключением внешних компонентов убедитесь в том,
что устройство выключено.
К разъему устройства автоматической смены компакт-дисков
можно подключать указанные ниже устройства JVC.
Устройство JVC Название
модели
Устройство автоматической смены
компакт-дисков (CD-CH)
CH-X1500 и
т. д.
Тюнер DAB JVC KT-DB1000*9
Указанные ниже устройства можно также подключать с
помощью различных адаптеров JVC.
• Кабели подключения могут быть приобретены отдельно.
Компонентный Адаптер Название
модели
Устройство Bluetooth Адаптер Bluetooth KS-BTA200
iPod
Интерфейсный адаптер
для проигрывателя iPod
KS-PD100
Портативный
аудиопроигрыватель с
разъемами линейного выхода
Адаптер линейного
входа
KS-U57
Портативный
аудиопроигрыватель со
стерео мини-разъемом 3,5 мм
Адаптер входа AUX KS-U58
При подключении нескольких устройств (максимум: трех)
рекомендуется подключить устройства последовательно, как
описано ниже.
*9Pour le KW-AVX726/KW-AVX725.
Si vous disposez du KS-BTA200, connectez-le à la position Aet
connectez le KT-DB1000 à la position B.
*10 Pour utiliser ces appareils, réglez l’entrée extérieure correctement
(voir page 19 du MANUEL D’INSTRUCTIONS).
*9For KW-AVX726/KW-AVX725.
If KS-BTA200 is available, connect it to position Aand connect
KT-DB1000 to position B.
*10 To use these components, set the external input setting correctly (see
page 19 of the INSTRUCTIONS).
*9Для KW-AVX726/KW-AVX725.
Если устройство KS-BTA200 доступно, подключите его к A, а
устройство KT-DB1000 — к B.
*10 Чтобы использовать данные устройства, необходима
правильная настройка внешнего входа (см. ИНСТРУКЦИИ ПО
ЭКСПЛУАТАЦИИ на стр. 19).
TROUBLESHOOTING
• The fuse blows.
*Are the red and black leads connected correctly?
• Power cannot be turned on.
*Is the yellow lead connected?
• No sound from the speakers.
*Is the speaker output lead short-circuited?
• Sound is distorted.
*Is the speaker output lead grounded?
*Are the “–” terminals of L and R speakers grounded in common?
• Noise interfere with sounds.
*Is the rear ground terminal connected to the car’s chassis using
shorter and thicker cords?
• This unit becomes hot.
*Is the speaker output lead grounded?
*Are the “–” terminals of L and R speakers grounded in common?
• This unit does not work at all.
*Have you reset your unit?
EN CAS DE DIFFICULTES
• Le fusible saute.
* Les fils rouge et noir sont-ils racordés correctement?
• L’appareil ne peut pas être mise sous tension.
* Le fil jaune est-elle raccordée?
• Pas de son des enceintes.
* Le fil de sortie d’enceinte est-il court-circuité?
• Le son est déformé.
* Le fil de sortie d’enceinte est-il à la masse?
* Les bornes “–” des enceintes gauche et droit sont-elles mises
ensemble à la masse?
• Interférence avec les sons.
* La prise arrière de mise à la terre est-elle connectée au châssis de
la voiture avec un cordon court et épais?
• L’appareil devient chaud.
* Le fil de sortie d’enceinte est-il à la masse?
* Les bornes “–” des enceintes gauche et droit sont-elles mises
ensemble à la masse?
• Cet appareil ne fonctionne pas du tout.
* Avez-vous réinitialisé votre appareil?
BЫЯВЛЕНИЕ НЕИСПРАВНОСТЕЙ
•Сработал предохранитель.
*Правильно ли подключены черный и красный провода?
•Питание не включается.
*Подключен ли желтый провод?
•Звук не выводится через громкоговорители.
*Нет ли короткого замыкания на кабеле выхода
громкоговорителей?
•Звук искажен.
*Заземлен ли провод выхода громкоговорителей?
*Заземлены ли разъемы “–” правого (R) и левого (L)
громкоговорителей?
•Шум мешает звучанию.
*Соединен ли находящийся сзади зажим заземления с шасси
автомобиля с помощью более короткого и тонкого шнуров?
•Устройство нагревается.
*Заземлен ли провод выхода громкоговорителей?
*Заземлены ли разъемы “–” правого (R) и левого (L)
громкоговорителей?
•Приемник не работает.
*Выполнена ли перенастройка приемника?
When connecting three components in series / Lors de la connexion de trois appareils en série /
При подключении трех устройств последовательно
CD changer jack / Konector CD changer / Разъем
устройства автоматической смены компакт-дисков
*10
AKS-BTA200
BKT-DB1000
C*10 CD-CH / KS-PD100 / KS-U57 / KS-U58
Install2_KW-AVX726_011A_f.indd 6Install2_KW-AVX726_011A_f.indd 6 2/25/09 12:16:25 PM2/25/09 12:16:25 PM
Other manuals for KW-AVX726
3
This manual suits for next models
3
Table of contents
Other JVC Car Receiver manuals

JVC
JVC KD-S25 - MP3/WMA/CD Receiver With Remote Guide

JVC
JVC KD-G827 Guide

JVC
JVC KD-G521 User manual

JVC
JVC KD-SV3704 User manual

JVC
JVC KD-PDR35 User manual

JVC
JVC EXAD KD-LHX601 User manual

JVC
JVC EXAD KD-SHX851 User manual

JVC
JVC EXAD KD-LHX551 Guide

JVC
JVC KD-R951BT User manual

JVC
JVC KD-AVX77 - EXAD - DVD Player User manual
Popular Car Receiver manuals by other brands

Pioneer
Pioneer FH-S709BT owner's manual

freightliner
freightliner Audio 15 operating instructions

Panasonic
Panasonic CQ-C8405N Service manual

Boss Audio Systems
Boss Audio Systems CD-3090R user manual

Clarion
Clarion CZ202 Owner's manual & installation manual

Pioneer
Pioneer Premier DEH-P640 installation manual