JVC KW-XC550J User manual

CD/CASSETTE RECEIVER KW-XC550
ENGLISH
ESPAÑOL
RADIOCASSETTE/CD KW-XC550
INSTRUCTIONS
MANUAL DE INSTRUCCIONES
MANUEL D’INSTRUCTIONS
For customer Use:
Enter below the Model No. and
Serial No. which are located on
the top or bottom of the cabinet.
Retainthisinformationforfuture
reference.
Model No.
Serial No.
VNN3828-631
[J]
FRANÇAIS
For installation and connections, refer to the separate manual.
Para la instalación y las conexiones, refiérase al manual separado.
Pour l’installation et les raccordements, se référer au manuel séparé.
KW-XC550
40w 4
78910
11 12
CD / CASSETTE RECEIVER
MULTI MODE SPECTRUM ANALYZER
COMPACT
DIGITAL AUDIO
/ ATT
SA
SOUND
SEL
AUX
AUX
SPECTRUM
ANALYZER
SOUND
CONTROL
MEMORY
CD CHANGER CONTROL
TUNER
BAND
CD
CD-
CH
TAPE
PROG
DISP
MO
RPT B.SKIP
RND SCAN
DOLBY B NR
DIRECT
SOURCE
SELECT
S
S
M
COMPACT
DIGITAL AUDIO
RECEPTOR-REPRODUCTOR
DE CD-CASSETTE KW-XC550
00.COVER.KW-XC550[J] 98.12.22, 3:49 PM3

2
ENGLISH
INFORMATION (For USA)
This equipment has been tested and found to comply with the limits for a Class B digital
device, pursuant to Part 15 of the FCC Rules. These limits are designed to provide
reasonable protection against harmful interference in a residential installation. This
equipment generates, uses, and can radiate radio frequency energy and, if not installed
and used in accordance with the instructions, may cause harmful interference to radio
communications However, there is no guarantee that interference will not occur in a
particularinstallation.Ifthisequipmentdoescauseharmful interferencetoradioortelevision
reception, which can be determined by turning the equipment off and on, the user is
encouraged to try to correct the interference by one or more of the following measures:
– Reorient or relocate the receiving antenna.
– Increase the separation between the equipment and receiver.
– Connecttheequipmentintoanoutleton acircuitdifferent fromthattowhichthereceiver
is connected.
– Consult the dealer or an experienced radio/TV technician for help.
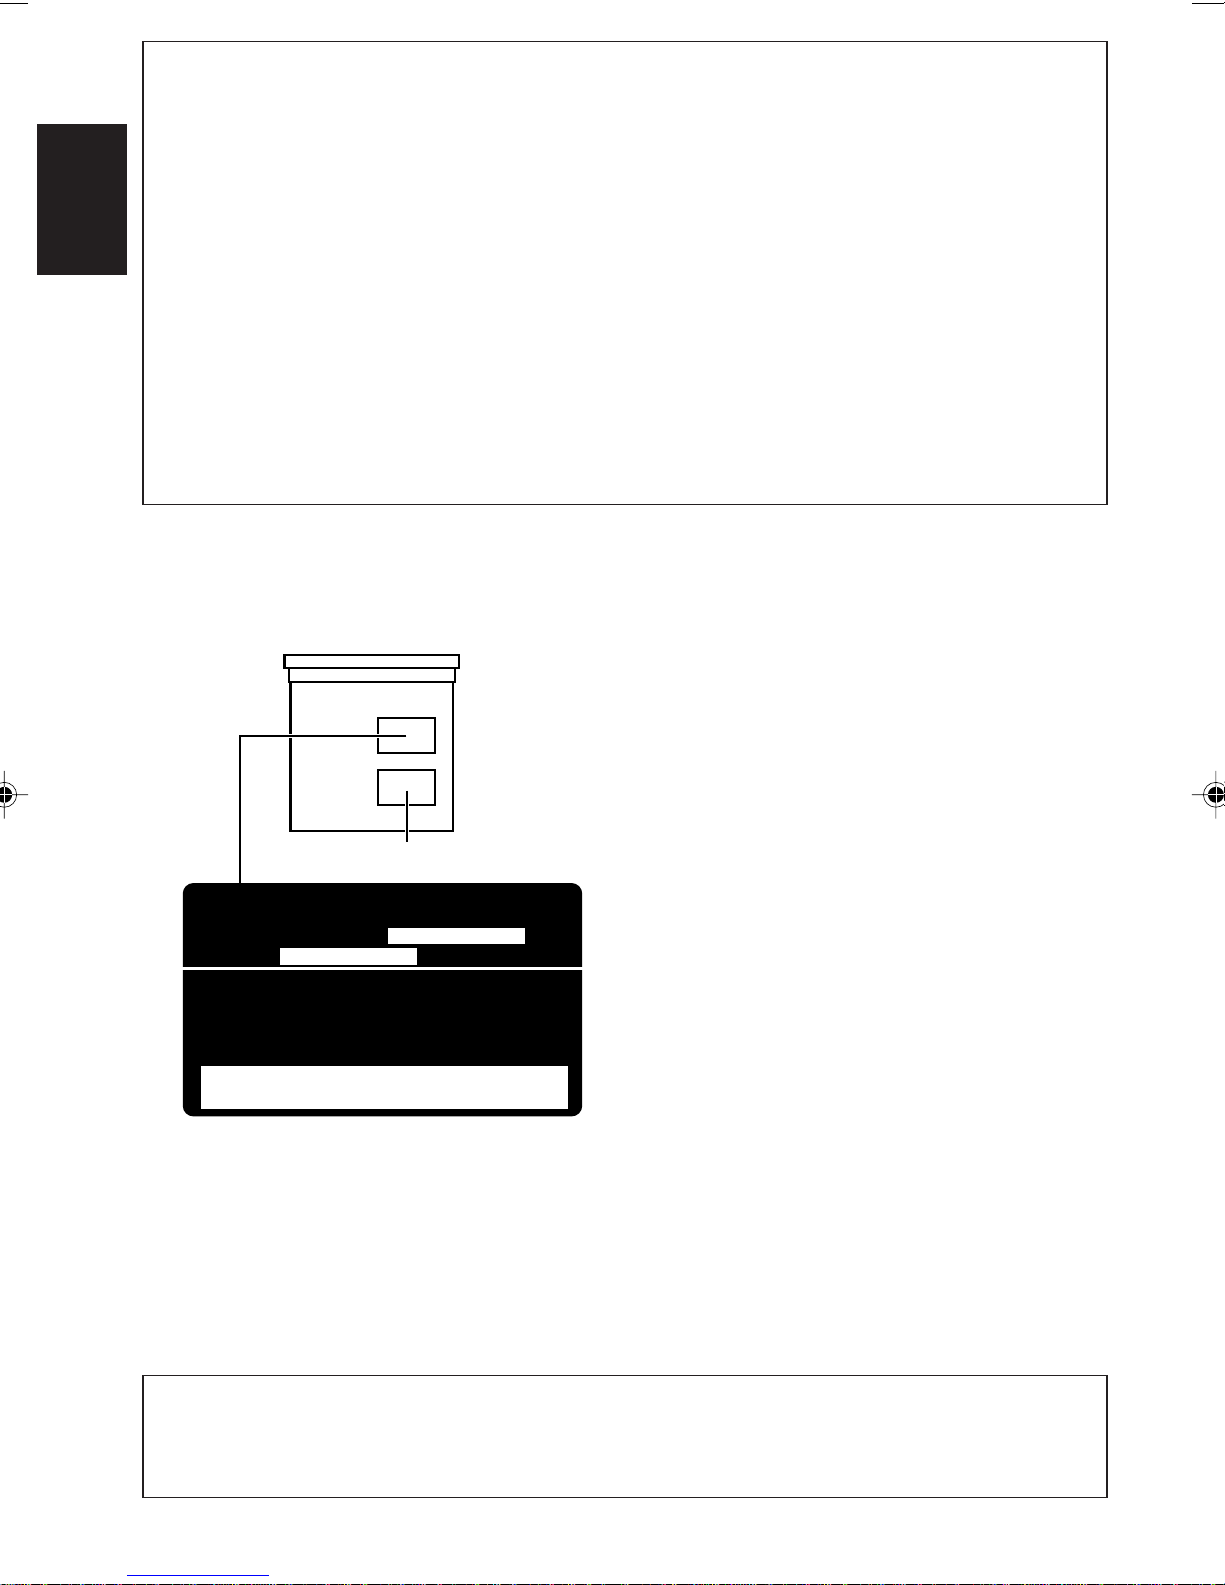
Identification and
Certification Labels IMPORTANT FOR LASER
PRODUCTS (For USA only)
Precautions:
1. CLASS 1 LASER PRODUCT
2. DANGER: Invisible laser radiation when
openandinterlockfailedordefeated.Avoid
direct exposure to beam.
3. CAUTION: Do not open the top cover.
Thereare no user-serviceableparts inside.
Leave all servicing to qualified service
personnel.
4. CAUTION: This CD player uses invisible
laser radiation, however, is equipped with
safety switches to prevent radiation
emission when unloading CDs. It is
dangerous to defeat the safety switches.
5. CAUTION: Use ofcontrols,adjustmentsor
performance of procedures other than
those specified herein may result in
hazardous radiation exposure.
Bottom of the main unit
Notes:
*1 The date of manufacture.
*2 The ID code of manufacturing plant.
*3 Marking of country origin.
NAME/RATING PLATE
US JVC CORP. 41 SLATER DRIVE
ELMWOOD PARK, N.J. 07407
MANUFACTURED AT
MADE IN
Product complies with DHHS Rules 21
CFR Subchapter J in effect at date of
manufacture.
MANUFACTURED
*2
*3
*1
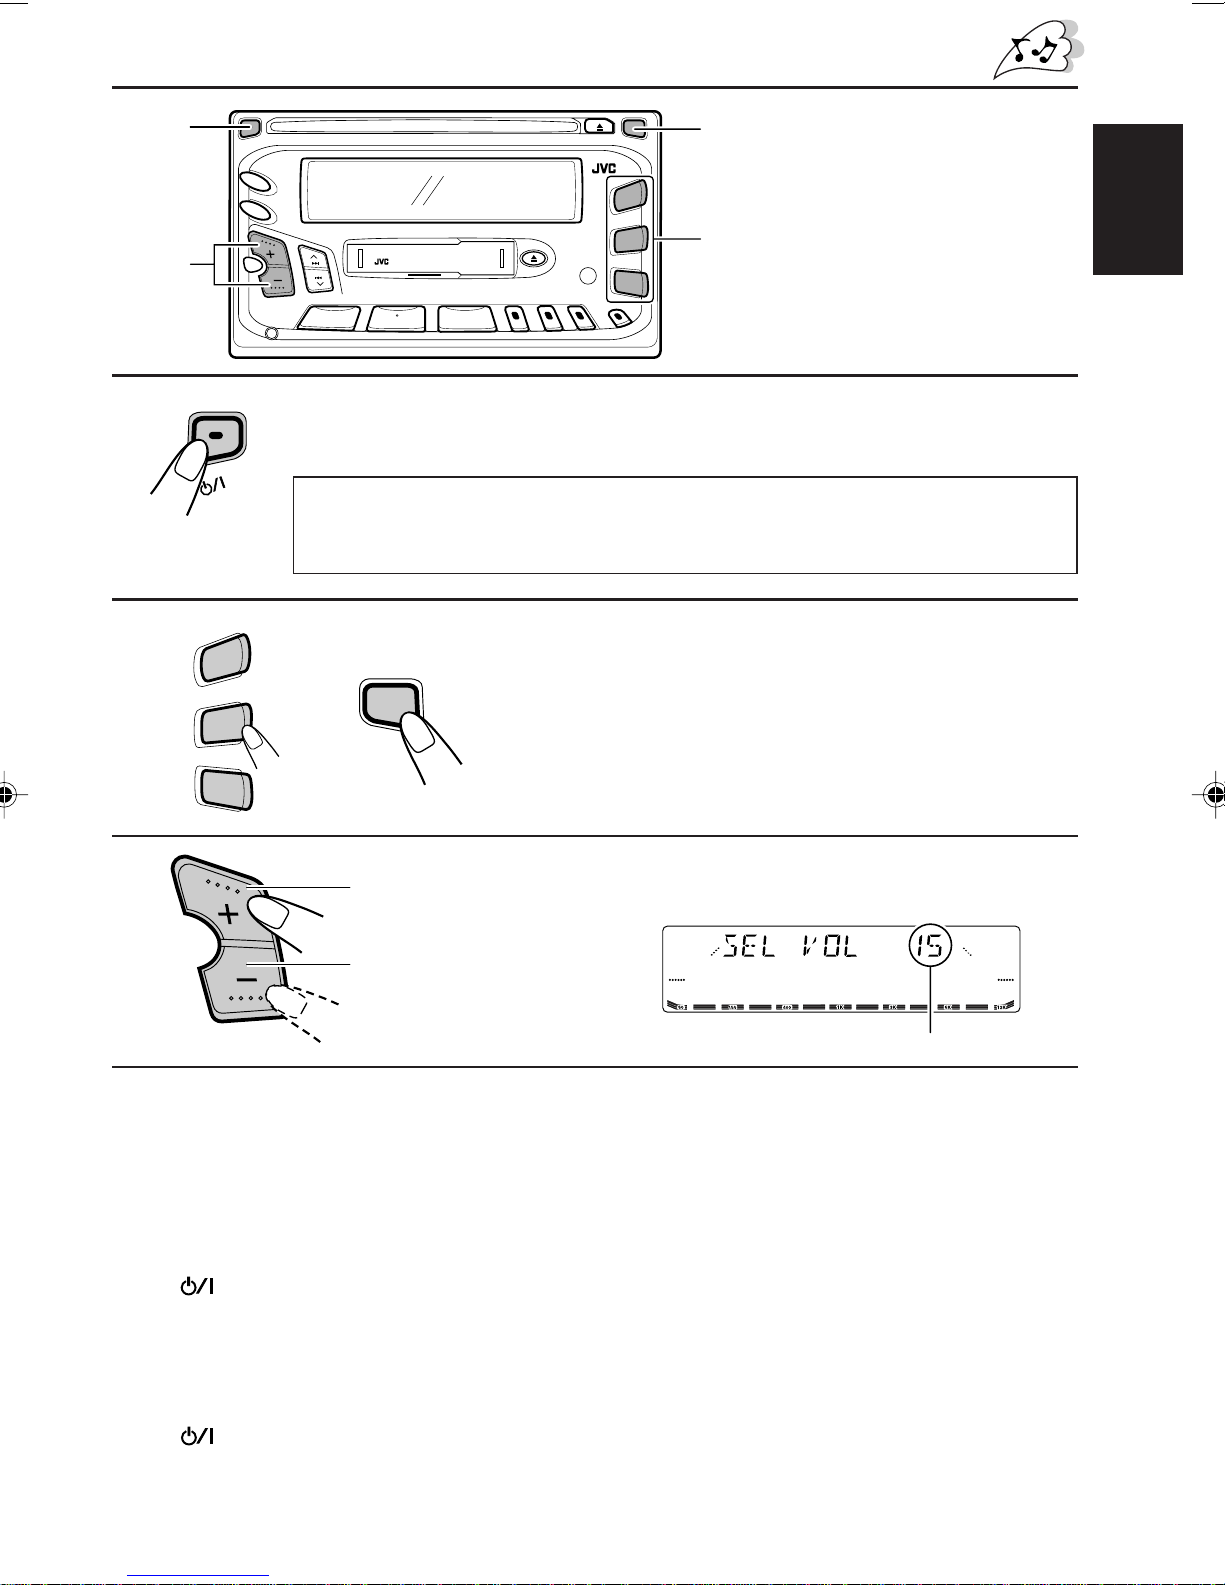
CAUTION on Volume Setting
CDs produce very little noise compared with other sources. If the volume level is adjusted for the
tuner,forexample,the speakersmay bedamagedbythesuddenincreaseinthe output level.Therefore,
lower the volume before playing a CD and adjust it as required during playback.
EN02-05.KW-XC550[J]/f 98.12.22, 4:00 PM2

ENGLISH
3
Thank you for purchasing a JVC product. Please read all instructions carefully before operation, to
ensure your complete understanding and to obtain the best possible performance from the unit.
CONTENTS
BASIC OPERATIONS ....................................................5
RADIO OPERATIONS ...................................................6
Listening to the radio .....................................................................6
Storing stations in memory............................................................7
FM station automatic preset: SSM ...............................................7
Manual preset.............................................................................. 8
Tuning into a preset station ...........................................................9
Other convenient tuner functions................................................10
Scanning broadcast stations ......................................................10
Selecting FM reception sound....................................................10
CD OPERATIONS ....................................................... 11
Playing a CD .................................................................................11
Locating a track or a particular portion on a CD .....................12
Selecting CD playback modes......................................................13
TAPE OPERATIONS .................................................... 14
Listening to a tape ........................................................................14
Finding the beginning of a tune...................................................16
Other convenient tape functions..................................................17
Skipping the blank portions on the tape.....................................17
Playing the current tune repeatedly ...........................................17
SOUND ADJUSTMENTS .............................................18
Selecting preset sound modes ......................................................18
Adjusting the sound......................................................................19
Storing your own sound adjustments .........................................20
SPECTRUM ANALYSER ...............................................21
Selecting spectrum analyzer patterns .........................................21
CONTINUED TO THE NEXT PAGE
EN02-05.KW-XC550[J]/f 98.12.22, 4:00 PM3

4
ENGLISH
OTHER MAIN FUNCTIONS .........................................23
Changing general settings (PSM)................................................23
Setting the clock ........................................................................ 23
Selecting the name of the auxiliary source ................................24
Turning on or off the key-touch tone function.............................24
Selecting the dimmer mode .......................................................25
Changing the AM/FM channel intervals .....................................25
REMOTE OPERATIONS...............................................26
Installing the batteries..................................................................26
Using the remote controller .........................................................26
CD CHANGER OPERATIONS ......................................27
Playing CDs ...................................................................................27
Selecting CD playback modes......................................................29
LISTENING TO AN EXTERNAL DEVICE ........................ 30
Listening to the auxiliary source .................................................30
MAINTENANCE......................................................... 31
Handlings cassettes .......................................................................31
Handling CDs................................................................................32
How to Reset your unit .............................................................. 32
TROUBLESHOOTING .................................................33
SPECIFICATIONS .......................................................35
BEFORE USE
* For safety....
• Do not raise the volume level too much, as this will
block outside sounds, making driving dangerous.
• Stop the car before performing any complicated
operations.
* Temperature inside the car....
If you have parked the car for a long time in hot
or cold weather, wait until the temperature in the
car becomes normal before operating the unit.
EN02-05.KW-XC550[J]/f 98.12.22, 4:00 PM4

ENGLISH
5
BASIC OPERATIONS
Note on One-Touch Operation:
When you select a source in step 2 below, the power automatically comes on.
You do not have to press this button to turn on the power.
To turn up the
volume
/ ATT
TUNER
BAND
CD
CD-
CH
TAPE
PROG
1
Turn on the power.
2
Select the source.
To operate the tuner, see pages 6 – 10.
To operate the CD player, see pages 11 – 13.
To operate the tape deck, see pages 14 – 17.
To operate the CD changer, see pages 27 – 29.
To operate an external device, see page 30.
3
Adjust the volume.
4
Adjust the sound as you want (see pages 18 – 20).
• If you need to change the spectrum analyser pattern, see page 21.
To drop the volume in a moment
Press / ATT briefly while listening to any source.“ATT” starts flashing on the display, and
the volume level will drop in a moment.
To resume the previous volume level, press the button briefly again.
To turn off the power
Press / ATT for more than 1 second.
AUX
To turn down
the volume
1
3
2
2
Volume level appears.
Note:
When you use this unit for the
first time, set the built-in
clock correctly, see page 23.
or
EN02-05.KW-XC550[J]/f 98.12.22, 4:00 PM5

6
ENGLISH
RADIO OPERATIONS
Listening to the radio
1
Select the band (FM1, FM2, FM3 or AM).
You can select any one of FM1, FM2, and FM3 to listen to an
FM station.
2
Start searching a station.
When a station is received, searching stops.
To search stations of
higher frequencies
FM1 FM2 FM3 AM
To stop searching before a station is received, press the same button you have pressed
for searching.
To tune in a particular frequency manually:
1Press TUNER/BAND repeatedly to select the band (FM or AM).
2Press and hold ¢or 4until “MANU” flashes on the display.
Now you can manually change the frequency while “MANU” is flashing.
3Press ¢or 4repeatedly until the frequency you want is reached.
• If you hold down the button, the frequency keeps changing until you release the button.
TUNER
BAND
To search stations of
lower frequencies
1
2
EN06-10.KW-XC550[J]/f 98.12.22, 4:01 PM6

7
ENGLISH
Storing stations in memory
You can use one of the following two methods to store broadcasting stations in memory.
• Automatic preset of FM stations: SSM (Strong-station Sequential Memory)
• Manual preset of both FM and AM stations
FM station automatic preset: SSM
You can preset 6 local FM stations in each FM band (FM1, FM2, and FM3).
FM1 FM2 FM3 AM
1
Select the FM band number (FM1, FM2 or
FM3) you want to store FM stations into.
2
Press and hold both buttons for more than 2
seconds.
Local FM stations with the strongest signals are searched and stored automatically in the
band number you have selected (FM1, FM2 or FM3).These stations are preset in the number
buttons — No. 1 (lowest frequency) to No. 6 (highest frequency).
When automatic preset is over, the station stored in number button 1 will be automatically
tuned in.
TUNER
BAND
S
S
M
“SSM” appears, then disappears when automatic
preset is over.
1
2
EN06-10.KW-XC550[J]/f 98.12.22, 4:01 PM7

8
ENGLISH
Manual preset
You can preset up to 6 stations in each band (FM1, FM2, FM3 and AM) manually.
EXAMPLE: Storing an FM station of 88.3 MHz into the preset number 1 of the FM1 band
1
Select the FM1 band.
2
Tune into a station of 88.3 MHz.
See page 6 to tune into a station.
3
Press and hold the button for more than 2
seconds.
4
Repeat the above procedure to store other stations into other
preset numbers.
Notes:
• A previously preset station is erased when a new station is stored in the same preset number.
• Preset stations are erased when the power supply to the memory circuit is interrupted (for example,
during battery replacement). If this occurs, preset the stations again.
TUNER
BAND
“P1” flashes for a few seconds.
1
2
\
3
EN06-10.KW-XC550[J]/f 98.12.22, 4:01 PM8

9
ENGLISH
1
Select the band (FM1, FM2, FM3 or AM) you
want.
2
Selectthenumber(1–6)forthepresetstation
you want.
TUNER
BAND
2
1
FM1 FM2 FM3 AM
Tuning into a preset station
You can easily tune into a preset station.
Remember that you must store stations first. If you have not stored them yet, see pages 7
and 8.
EN06-10.KW-XC550[J]/f 98.12.22, 4:01 PM9

10
ENGLISH
SCAN
MO
RPT
SCAN Ÿ
MO RPT
J
Lights up when receiving an FM broadcast in stereo.
When using this unit in an area other than North or South America:
You need to change the AM/FM channel intervals. See “Changing the AM/FM channel
intervals” on page 25.
Other convenient tuner functions
Scanning broadcast stations
When you press SCAN Ÿwhile listening to the radio, station scanning
starts.(“SCAN”appears on the display.) Each time a broadcast is tuned in,
scanning stops for about 5 seconds (tuned frequency number flashes on
the display), and you can check what program is now being broadcasted.
If you want to listen to that program, press the same button again to stop
scanning.
Selecting FM reception sound
When an FM stereo broadcast is hard to receive:
Press MO RPT (Monaural/Repeat) while listening to an FM stereo broadcast.The sound you
hear becomes monaural but reception will be improved.
To restore the stereo effect, press the same button again.
EN06-10.KW-XC550[J]/f 98.12.22, 6:40 PM10

11
ENGLISH
CD OPERATIONS
Playing a CD
1
Insert a disc into the loading slot.
The unit turns on, draws a CD and starts playback
automatically.
• Insert the CD with the printed face facing upside.
Note on One-Touch Operation:
When a CD is already in the loading slot, pressing CD/CD-CH turns on the unit and starts
playback automatically.
40w4
7
SEL
SA
SOUND
1
\
Total playing time of
the inserted disc
Total track number
of the inserted disc
\
Elapsed playing time
Current track
To stop play and eject the CD
Press 0.
CD play stops and the CD automatically ejects from the loading slot (“CD EJECT”appears on
the display).The source changes to the last selected source.
If you change the source, the CD play also stops (without ejecting the CD this time).
• If the ejected disc is not removed for about 15 seconds, the disc is automatically inserted again into
the loading slot to protect it from dust. (CD play will not start this time.)
• You can eject the CD even when the unit is turned off.
EN11-13.KW-XC550[J]/f 98.12.22, 4:09 PM11

12
ENGLISH
To fast-forward or reverse the track
Press and hold ¢while playing a CD, to fast-forward the track.
Press and hold 4while playing a CD, to reverse the track.
To go to the next track or the previous track
Press ¢briefly while playing a CD, to go ahead to the beginning of
the next track.Each time you press the button consecutively, the beginning
of the next track is located and played back.
Press 4briefly while playing a CD, to go back to the beginning of the
current track. Each time you press the button consecutively, the beginning
of the previous track is located and played back.
To go to a particular track directly
Press the number button corresponding to the track number to start its
playback.
• To select a track number from 1 – 6:
Press 1 (7) – 6 (12) briefly.
• To select a track number from 7 – 12:
Press and hold 1 (7) – 6 (12) for more than 1 second.
AUX
Number buttons
Locating a track or a particular portion on a CD
78910
11 12
¢
4
EN11-13.KW-XC550[J]/f 98.12.22, 4:09 PM12

13
ENGLISH
To play back tracks at random (Random Play)
You can play back all tracks on the CD at random.
Each time you press B.SKIP RND (Blank Skip/Random) while playing a
CD, CD random play mode turns on and off alternatively.
When the random mode is turned on, the RND indicator lights up on the
display and a track randomly selected starts playing.
To play back tracks repeatedly (Repeat Play)
You can play back the current track repeatedly.
Each time you press MO RPT (Monaural/Repeat) while playing a CD, CD
repeat play mode turns on and off alternatively.
When the repeat mode is turned on, the RPT indicator lights up on the
display.
B.SKIP
RND
CD
CD-
CH
To prohibit CD ejection
You can prohibit the CD ejection and can “lock” a CD in the loading slot.
Press and hold CD and 0for more than 2 seconds.“EJECT” flashes on
the display for about 5 seconds, and the CD is “locked.”
To cancel the prohibition and “unlock” the CD, press and hold CD
and 0for more than 2 seconds again.“EJECT”flashes on the display for
about 5 seconds, and the CD is “unlocked.”
(at the same time)
MO
RPT
Selecting CD playback modes
MO RPT B.SKIP RND
EN11-13.KW-XC550[J]/f 98.12.22, 4:09 PM13

14
ENGLISH
TAPE OPERATIONS
Listening to a tape
3
21
1
Insert a cassette.
The unit turns on and tape play starts automatically.
When one side of the tape reaches its end during play, the
other side of the tape automatically starts playing. (Auto
Reverse)
2
Turn on or off the Dolby B NR* as needed.
Each time you press the button, the Dolby B NR turns on and
off.
3
Select the tape direction.
Each time you press the button, the tape direction changes
alternatively.
7891011
Note on One-Touch Operation:
When a cassette is already in the cassette compartment, pressing TAPE/PROG turns on the
unit and starts tape play automatically.
SCAN
*Dolby noise reduction manufactured under license from Dolby Laboratories Licensing
Corporation. “Dolby” and the double-D symbol Ÿare trademarks of Dolby Laboratories
Licensing Corporation.
TAPE
PROG
This indicator
lights up when
the Dolby B NR
is turned on.
j
EN14-17.KW-XC550[J]/f 98.12.22, 4:10 PM14

15
ENGLISH
To stop play and eject the cassette
Press 0.
Tape play stops and the cassette automatically ejects from the cassette compartment.
If you change the source, the tape play also stops (without ejecting the cassette this time).
• You can also eject the cassette with the unit turned off.
To fast-forward and rewind a tape
• Press ¢for more than 1 second to fast-forward the
tape.
When the tape reaches its end, the tape is reversed and
playback starts from the beginning of the other side.
• Press 4for more than 1 second to rewind the tape.
When the tape reaches its end, playback of the same side
starts.
To stop fast-forward and rewind at any position on the tape, press TAPE/PROG.
Tape play starts from that position on the tape.
About Automatic Tape Type Detection
With the Automatic Tape Type Detection mechanism provided for this unit, you can listen to
type I, II and IV tapes without changing any settings.
To prohibit tape ejection
You can prohibit the tape ejection and can“lock”a tape in the cassette
compartment.
Press and holdTAPE/PROG and 0formorethan 2 seconds.“EJECT”
flashes on the display for about 5 seconds, and the tape is “locked.”
To cancel the prohibition and “unlock” the tape, press and hold
TAPE/PROG and 0for more than 2 seconds again.“EJECT” flashes
on the display for about 5 seconds, and the tape is “unlocked.”
Tape direction
Tape direction
TAPE
PROG
(at the same time)
EN14-17.KW-XC550[J]/f 98.12.22, 4:10 PM15

16
ENGLISH
During playback
1
Specify how many tunes ahead of or
before the current tune the tune you
want is located.
Each time you set the tune, the number changes
up to ±9.
When the beginning of the specified tune is located, playback starts automatically.
Notes:
• While locating a specified tune:
– If the tape is rewound to its beginning, playback starts from the beginning of that side.
– If the tape is fast-forwarded to the end, it is reversed and played from the beginning of the other
side.
• In the following cases, Multi Music Scan may not operate correctly.
– Tapes with tunes having long pianissimo passages (very quiet parts) or non-recorded portions
during tunes.
– Tapes with short non-recorded sections.
– Tapes with high level noise or humming between tunes.
– The Dolby NR setting does not match. For example, if the tape is recorded with the Dolby C NR.
1
Finding the beginning of a tune
Multi Music Scan allows you to automatically start playback from the beginning of a specified
tune.You can specify up to 9 tunes ahead or before the current tune.
Tolocateatuneahead
of the current tune on
the tape
Tolocate atune before
thecurrenttune onthe
tape
EN14-17.KW-XC550[J]/f 98.12.22, 4:10 PM16

17
ENGLISH
Other convenient tape functions
MO RPT B.SKIP RND
Skipping the blank portions on the tape
You can skip blank portions between the tunes. (Blank Skip)
Each time you press B.SKIP RND (Blank Skip/Random) while playing a
tape, the blank skip function turns on and off alternatively.
When this function is on, the B.SKIP indicator lights up on the display and
the unit skips blank portions of 15 seconds or more, fast-forwards to the
next tune, then starts playing it.
• When the tape reaches its end while fast-forwarding, the tape direction will be
changed automatically.
Playing the current tune repeatedly
You can play the current tune repeatedly. (Repeat Play)
Each time you press MO RPT (Mono/Repeat) while playing a tape, Repeat
Playturnsonand offalternatively.Whenthisfonctionison,the RPTindicator
lights up on the display.
B.SKIP
RND
MO
RPT
Note:
In the following cases, Blank Skip and Repeat Play may not operate correctly.
– Tapes with tunes having long pianissimo passages (very quiet parts) or non-recorded portions during
tunes.
– Tapes with short non-recorded sections.
– Tapes with high level noise or humming between tunes.
– The Dolby NR setting does not match. For example, if the tape is recorded with the Dolby C NR.
EN14-17.KW-XC550[J]/f 98.12.22, 4:10 PM17

18
ENGLISH
SOUND ADJUSTMENTS
Selecting preset sound modes
You can select a preset sound adjustment suitable to the music genre.
1
Select the sound mode you want.
Each time you press the button, the sound mode changes
as follows.
Indication For: Preset values
Bass Treble Loudness
SCM OFF (Flat sound) 00 00 On
BEAT Rock or disco music +02 00 On
SOFT Quiet background music +01 –03 Off
POP Light music +04 +01 Off
Notes:
• You can adjust the preset sound mode to your preference, and store it in memory.
If you want to adjust and store your original sound mode, see“Storing your own sound adjustments”
on page 20.
• To adjust the bass and treble reinforcement levels or to turn on/off the loudness function temporarily,
see “Adjusting the sound” on page 19.
SOUND
1
Sound mode indicators
EN18-20.KW-XC550[J]/f 98.12.22, 4:36 PM18

ENGLISH
19
Adjusting the sound
You can adjust the sound characteristics to your preference.
1
Select the item you want to adjust.
Indication To do: Range
BAS Adjust the bass –06 (min.) — +06 (max.)
(Bass)
TRE Adjust the treble –06 (min.) — +06 (max.)
(Treble)
FAD Adjust the front and rear speaker R06 (rear only) — F06 (front only)
(Fader)* balance
BAL Adjust the left and right speaker L06 (left only) — R06 (right only)
(Balance) balance
LOUD Turn on or off the loudness function** ON — OFF
(Loudness)
VOL Adjust the volume 00 (min.) — 50 (max.)
(Volume)
Notes:
*If you are using a two-speaker system, set the fader level to “00” (center).
** The loudness function can boost low and high frequencies to produce a well-balanced sound at
low volume levels. When the loudness function is “ON,” the LOUD indicator lights up.
2
Adjust the level.
Note:
Normally the + and – buttons work as the volume control buttons.
So you do not have to select “VOL” to adjust the volume level.
SEL
2
1
EN18-20.KW-XC550[J]/f 98.12.22, 4:36 PM19

20
ENGLISH
1
Call up the sound mode you want to adjust.
See page 18 for details.
2
Select “BAS (bass),”“TRE (treble)” or “LOUD
(loudness).”
3
Adjust the selected item.
See page 19 for details.
4
Pressandhold SOUND until“MEMO”flashes
on the display.
Your setting is stored in memory.
5
Repeat the same procedure to store other settings.
To reset to the factory settings
Repeat the same procedure and reassign the preset values listed in the table on page 18.
Within
5 seconds
Within
5 seconds
Within
5 seconds
SOUND
SEL
SOUND
Storing your own sound adjustments
You can adjust the sound modes (BEAT, SOFT, POP: see page 18) to your preference and
store your own adjustments in memory.
2
1,4
3
EN18-20.KW-XC550[J]/f 98.12.22, 4:36 PM20
Other manuals for KW-XC550J
1
This manual suits for next models
1
Table of contents
Other JVC Car Receiver manuals