KegLand FermZilla Tri-Conical 27L User manual

FermZilla Tri-Conical 27L and 55L Instruction Manual
Page 1of 12 www.KegLand.com.au Last Updated 2/03/2022 3:06 PM
FermZilla Tri-Conical
27L and 55L
Instruction Manual
This instruction sheet contains vital information that is related to the safe usage and handling of the
FermZilla Uni Tank. It is vital that you read this instruction sheet from front to back before using the
product! THIS IS FOR YOUR OWN SAFETY
Ferment, Clarify, Dispense. The uni tank that does it all with ease.

FermZilla Tri-Conical 27L and 55L Instruction Manual
Page 2of 12 www.KegLand.com.au Last Updated 1/30/2018 8:44 PM
WARNINGS
1. Do not loosen the tri-clover clamps when the FermZilla is under pressure. Purge all pressure
in the FermZilla and the collection container before loosening the tri-clover clamps.
2. When not under pressure do not expose to liquids above 55°C (131°F). Only clean, wash or
sanitise the fermenter with cold water.
3. When under pressure do not expose to any temperatures above 35°C (95°F).
4. Keep the fermenter out of direct sun or heat. Do not expose to UV rays of any sort.
5. If you are using a heat belt to warm the fermenter then only have the heat belt sitting below
the liquid level. Do not use an unregulated heat source, only use heat sources which are
plugged into a temperature controller.
6. Under no circumstances apply more than 2.5bar (35PSI) to the fermenter tank and do not
connect an unregulated pressure source. If you connect external pressure source ensure it
has independent PRV pre-set to 35psi or below.
7. A spunding valve set below 35psi must always be connected to the FermZilla when
fermenting under pressure or connected to the recipient keg when performing a closed
transfer.
8. Do not tamper with the pressure relief valve. Only use the red or yellow coloured pressure
relief valve supplied by KegLand.
9. If a vigorous fermentation is experienced and krausen or wort has contacted the PRV, ensure
to remove the PRV and clean it before putting the FermZilla under pressure.
10. If the fermenter is scratched, damaged or has been under any physical duress; do not use
the fermenter under pressure.
11. If you use the fermenter under pressure hydro test the fermenter every 24 months to
ensure it is safe to use.
12. Only use chemical cleaners and sanitizers that are approved by Kegland. These include: a)
Super Kill Ethyl Sanitiser Spray (effective for sanitising the exterior of the FermZilla)
(KL05371) b) StellarSan (mixed to the correct specification) (KL05357) c) StellarClean (not to
be left in the FermZilla for more than 30 minutes) (KL05494) … Or contact
https://www.kegland.com.au/ for more information regarding other compatible chemical
cleaning products.
13. Keep the butterfly valve always open during fermentation. Only close the butterfly valve
once fermentation has ceased and hydrometer readings are stable for 3 consecutive days.
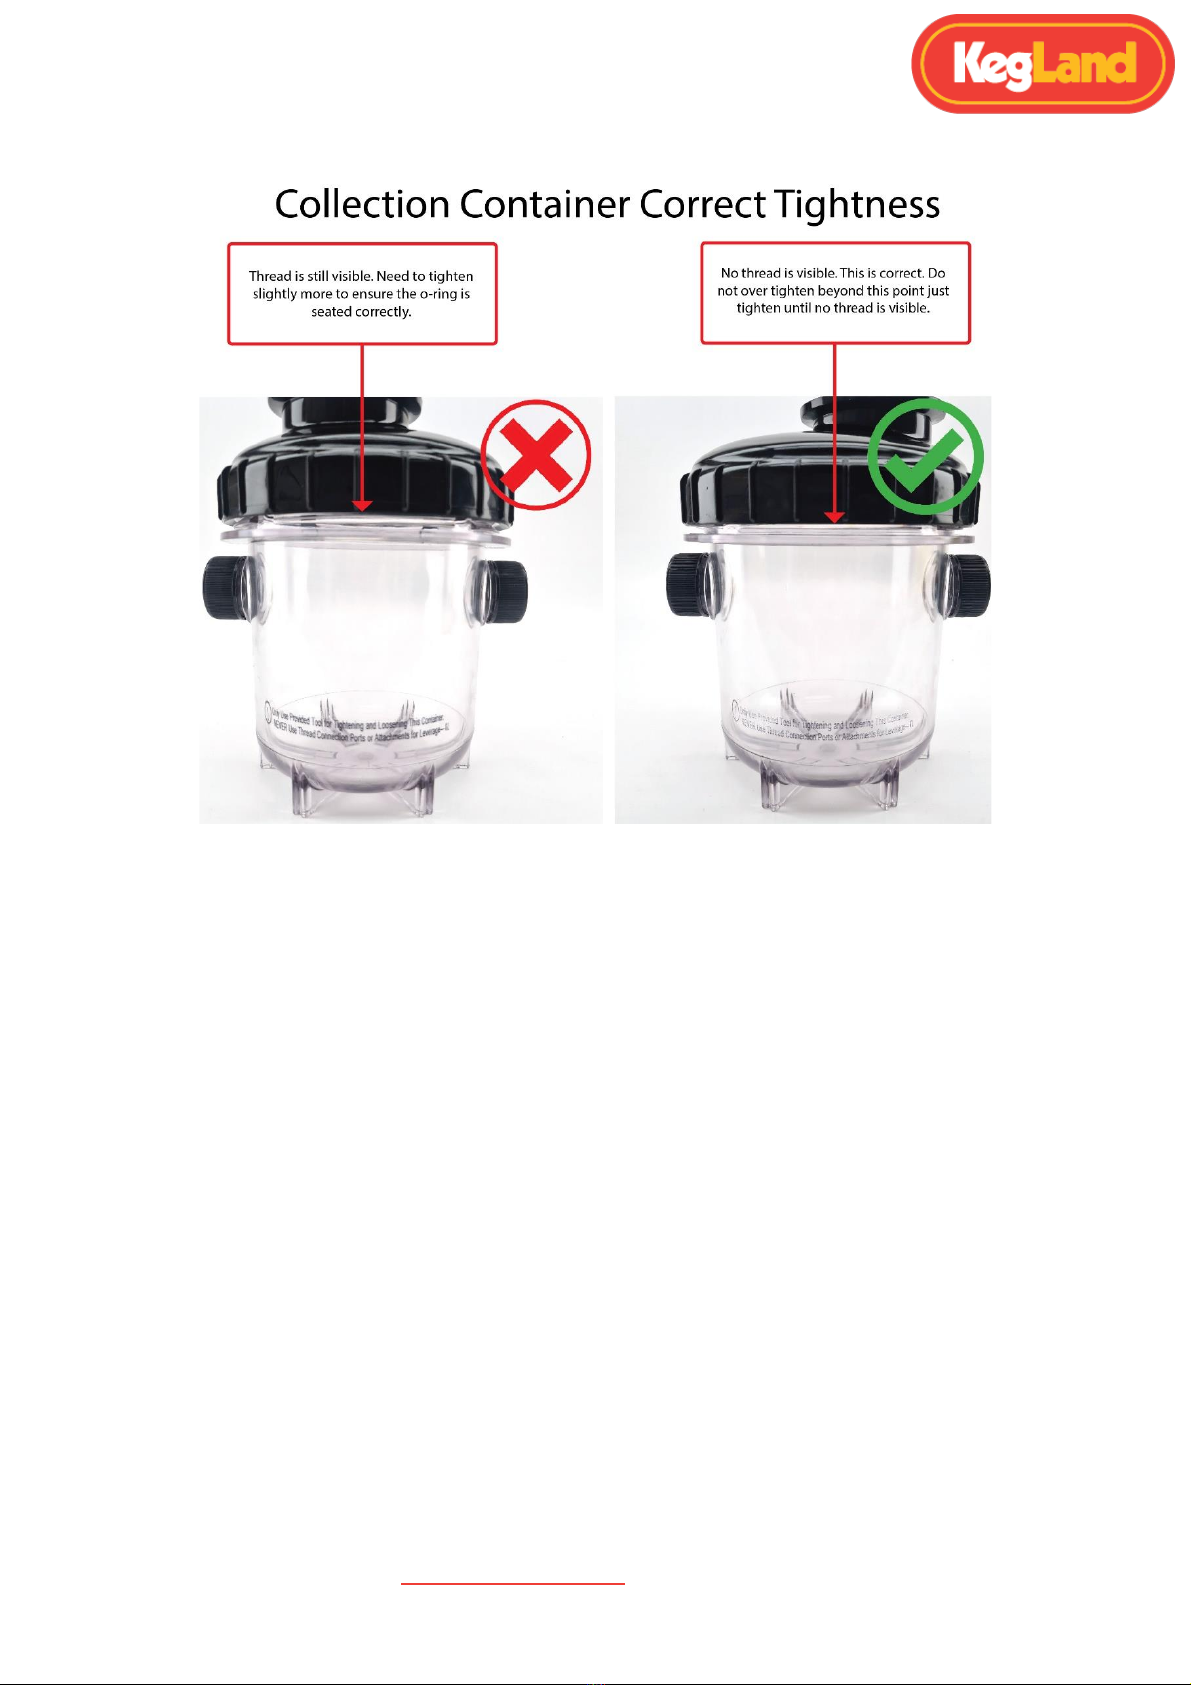
14. Open the butterfly valve and ensure the system (including the collection container) is
depressurized prior to removing the collection container.
15. Do not over tighten carbonation caps onto the threads of the lid or collection container,
doing so could result in the thread being stripped. We recommend using the plastic
carbonation and line cleaning caps (KL10788).
16. Do not over tighten the stainless-steel handles onto the neck of the FermZilla.
17. Avoid lifting the FermZilla while full. If filled with wort avoid moving the FermZilla to prevent
sticky wort from preventing the PRV from operating.
18. Always conduct a leak test prior to beginning fermentation.
What’s Included

FermZilla Tri-Conical 27L and 55L Instruction Manual
Page 3of 12 www.KegLand.com.au Last Updated 2/03/2022 3:06 PM
1 x FermZilla Tri-Conical Tank with Metal Neck Ring
1 x Stainless Steel Stand with Swing Handles
1 x Stainless Steel Handle Assembly
1 x Lid assembly including threaded lid ring, flat lid with RED 35psi PRV and lid o-ring
1 x Grommet PCO1881 Black Cap + 1 x Blank PCO1881 Black Cap for Lid
1 x Three Piece Airlock
1 x Strip Stick on Thermometer
1 x Level Indicator Sticker (Litres and Gallons)
1 x 3 Inch tri-clover to 2 Inch tri-clover Butterfly Valve
1 x 3 Inch tri-clover 3 Piece Clamp
1 x 3 Inch tri-clover Beaded Seal
1 x 1000mL Collection Container with 2 x Blank PCO1881 Black Caps
1 x 2 Inch tri-clover Lid for Collection Container
1 x 2 Inch tri-clover Beaded Seal
1 x 2 Inch tri-clover Clamp
1 x Spare Lid O-ring
1 x Spare Collection Container O-ring

FermZilla Tri-Conical 27L and 55L Instruction Manual
Page 4of 12 www.KegLand.com.au Last Updated 2/03/2022 3:06 PM
FermZilla –Lid Assembly
1. Ensure the lid assembly has the o-ring attached.
2. Apply some food grade lubricant to the o-ring to extend the life of this o-ring and threads.
Adding lubricant will also improve the sealing ability of the o-ring.
3. Place the lid onto the neck of the tank and screw down the threaded lid ring.
4. Use one of the bottle caps to close of one of the holes in the lid.
5. Ensure the Red PRV is placed into the pressure relief valve.
6. Push the three-piece air-lock into the silicone bung then push both parts into the remaining
hole in the lid.

FermZilla Tri-Conical 27L and 55L Instruction Manual
Page 5of 12 www.KegLand.com.au Last Updated 2/03/2022 3:06 PM
FermZilla –304 Stainless Steel Handles Assembly
1. Insert a bolt into a hole of each of the handles.
2. Screw a nut onto the bolt. Don’t tighten this nut yet.
3. Place the handles around the collar of the FermZilla as shown in the image below.
4. Insert the second bolt into the remaining holes on the handle and screw the remaining nut
onto this bolt.
5. Tighten the two nuts while holding the bolts to prevent them from spinning. Do not
overtighten as it can warp the opening of the FermZilla. The handles should be able to freely
rotate around the neck of the FermZilla. If they cannot rotate then it is too tight.
NOTE: It is suggested to orientate the handle during assembly such that the exposed thread of the
bolt furthest away from you is oriented to the left so that when undoing the collar of the FermZilla it
reduces the risk of hitting your hand on this exposed thread of the bolt. This orientation is shown to
the right.
FermZilla –Butterfly (Dump) Valve Assembly
Place the 3” tri-clover seal and butterfly valve onto the 3” tri-clover ferrule on the tank. Fasten the
butterfly valve in place onto the vessel using the 3” tri-clover 3-Piece clamp, ensuring that the seal is
seated in the groove on the butterfly valve and tank.
Note: It is a good idea to lubricate tri-clover seals using food-grade lubricant to help form a hermetic
seal.

FermZilla Tri-Conical 27L and 55L Instruction Manual
Page 6of 12 www.KegLand.com.au Last Updated 2/03/2022 3:06 PM
FermZilla –Butterfly (Dump) Valve Disassembly
IMPORTANT: Depressurise the vessel prior to disassembling the butterfly dump valve. To release
the pressure in the vessel, pull the ring on the PRV on the lid until there is no audible hissing heard.
Once the vessel is depressurised the butterfly valve can be removed by loosening the 3” tri-clover
clamp which holds the butterfly valve in place.
FermZilla –Collection Container
The collection bottle has several uses. Its primary function is to collect and harvest yeast however it
can also be used for other purposes such as:
1. Reagent Bottle
2. Dry Hopping Bottle
3. Beer Sampling Bottle
4. Collection and disposal of unwanted trub or hop material
5. Carbonation of small samples of product
6. Yeast culturing container
The FermZilla collection container has also conveniently manufactured with heat resistant Tritan
plastic meaning it’s not only robust and chemical resistant, but also heat resistant and will handle
extended contact in hot water 100°C (212°F)
FermZilla –Collection Container Assembly
1. It is suggested to first apply food-grade lubricant to the o-ring on the collection container.
Suitable lubricant can be sourced on our website (KL07221).
2. Screw the lubricated collection container into the thread on the bottom of the 2-inch tri-
clover lid and tighten with a collection container removal tool (KL14250). Make sure to not
overtighten, tighten just enough to form a leak-proof seal.
3. Install a 2” tri-clover onto 2”tri-clover lid and secure to the butterfly valve using a 2” tri-
clover clamp, ensuring that the seal is seated in the groove on the collection container lid
and butterfly valve.

FermZilla Tri-Conical 27L and 55L Instruction Manual
Page 7of 12 www.KegLand.com.au Last Updated 2/03/2022 3:06 PM
FermZilla –Collection Container Removal
It is extremely important that if you have wort in the collection container attached that you keep
the butterfly valve open during the entirety of the fermentation process. The butterfly valve should
only be closed once fermentation has ceased which is to be determined by three consecutive days of
the same Specific Gravity Reading.
To remove the collection container once fermentation has ceased it is important to depressurise
the entire system. To release the pressure in the vessel, open the butterfly valve and pull the ring on
the PRV until there is no audible hissing from the PRV. It is also a good idea to loosen one of the
carbonation caps on the collection vessel to ensure the collection vessel is completely depressurised.
Once the system is depressurised the butterfly valve can then be closed if there is liquid in the
FermZilla. Then the lid and collection container can be detached from the butterfly valve by
loosening the tri-clover clamp which holds the 2” tri-clover lid in place.

FermZilla Tri-Conical 27L and 55L Instruction Manual
Page 8of 12 www.KegLand.com.au Last Updated 2/03/2022 3:06 PM
Yeast Harvesting and Trub Dumping
1. In order to harvest yeast simply screw the yeast collection bottle onto the tri-clover Butterfly
Valve. You can insert this bottle right from the start of fermentation.
2. Fermentation is no different to any other fermenter. Once the wort is inside the fermenter
pitch yeast as you would normally.
3. Once the collection bottle has been fitted open the butterfly valve yeast can fall down into
the collection bottle. The butterfly valve is open when the handle is facing in the vertical
direction and it’s off when it’s in the horizontal position.
4. By chilling the fermenter this will accelerate the process of the yeast falling out of
suspension and it will greatly speed up the clarification process. The easiest way to chill the
FermZilla is by fermenting in a dedicated fermentation fridge. Ensure that there is some
pressure in the FermZilla when chilling to prevent a vacuum forming.
5. Once the bottle is full of yeast you can re-cap and store in the fridge for your next brew or
discard, rinse and sanitise if you just want to dump the trub.
Low Oxygen Dry Hopping
The introduction of oxygen into the beer post fermentation is undesirable as it results in oxidation of
your beer causing what is described as a cardboard off flavour to your final product. Oxidation also
results in loss of hop flavour and aroma and hence low oxygen dry hopping is great for hoppy beer
styles such as NEIPAs, XPAs, Pale Ales and IPAs where you want a punchy hop aroma and flavour.
The FermZilla Tri-conical offer low oxygen dry hopping capability with very few extra required parts
and is quite easy and quick to introduce into your normal fermentation schedule.
To perform a low oxygen dry hop you will need to replace at least one of the PCO1881 Black Caps on
the collection container with a carbonation cap. This will allow you to connect a CO2 cylinder,
regulator, gas hose and gas ball lock disconnect to your collection vessel allowing you to pressurise it
and purge the oxygen from the collection container.
1. Sanitise your collection vessel and place your dry hops into the collection vessel.
2. Attach the collection vessel and 2”tri clover lid to the butterfly valve on the FermZilla Tri-
Conical vessel.
3. Set your regulator to between 5-10psi and connect your ball lock disconnect to the
carbonation cap to pressurise the collection container with CO2.
4. Disconnect the ball lock disconnect and purge the pressure in the collection container by
slightly loosening the carbonation cap. Then retighten the carbonation cap and repeat step
three at least 3 more times to purge as much oxygen as possible.
5. Once collection container has been successfully purged open the butterfly valve to allow the
beer to flow into the collection container.

FermZilla Tri-Conical 27L and 55L Instruction Manual
Page 9of 12 www.KegLand.com.au Last Updated 2/03/2022 3:06 PM
Cleaning the FermZilla:
1. Release all pressure from the FermZilla vessel and collection container.
2. Remove the FermZilla collection container, tri-clover butterfly Valve and the lid.
3. Rinse the walls of the FermZilla vessel, collection container, lid and butterfly valve
(including the external face of the butterfly valve) with cold water. A garden hose is
particularly useful for rinsing and dislodging yeast/hop matter.
4. Use a non-abrasive cloth to remove any stuck on particulate matter from the walls of
the FermZilla, lid, collection vessel and butterfly valve.
5. Reattach the butterfly valve and close the valve, leaving the collection vessel
unattached.
6. Rinse the collection vessel by filling it with cold water and Stellarclean according to the
instructions on the tub, attach the lid and shake to dislodge any yeast/hop matter.
7. Then fill the FermZilla with cold water and the correct dosage of StellarClean according
to the instructions on the tub. After 30 minutes of soaking with StellarClean, gently
wipe away any soiling with a soft cloth. Make sure not to use harsh scrubbers that
may scratch the plastic and create ideal places for batch-ruining bacteria to hide.
8. If there is a large amount of hops or yeast coating the walls of the fermenter it is best to
perform a longer overnight wash using StellarOxy. Do not leave StellarClean in the
vessel for longer than 30 minutes as this can damage the tank.
9. Remove the lid and drain the StellarClean/StellarOxy solution by opening the butterfly
valve and then rinse using cold water.
10. Fill the FermZilla and collection vessel with cold water again and add StellarSan
according to the instructions on the bottle. Reattach the lid and shake the full FermZilla
to coat all surfaces.
11. StellarSan can be left in the vessel until the next fermentation.
Cleaning the PRV:
If krausen or sticky wort has contacted the PRV you will need to clean the PRV to ensure it still
activates at 35psi.
This can be easily done by releasing the pressure in the FermZilla by pulling on the ring pull until no
pressure is left in the vessel, then unscrew the PRV.
Submerge this PRV in StellarClean solution to remove any sticky residue. Once all the residue has
been removed, sanitise the PRV with StellarSan or ethyl kill solution and screw back in to the
pressure lid.

FermZilla Tri-Conical 27L and 55L Instruction Manual
Page 10 of 12 www.KegLand.com.au Last Updated 2/03/2022 3:06 PM
Using the FermZilla without pressure:
The FermZilla’s were designed to be used optimally with a source of CO2pressure. While they were
not designed with gravity-only operation in mind, there is some workaround that will allow you to
get most of the FermZilla’s benefits without a source of CO2.
Taking hydrometer samples and bottling:
By attaching a ball lock post to the bottom of the collection jar, you now have a variety of removable
options at your fingertips. You can connect a sanitised picnic tap (KL00963) mounted to a disconnect
(to allow to take hydrometer samples. Simply slip some 10mm hose over the end of this and you
now have a simple bottling gun! Just make sure the FermZilla is elevated so that gravity can carry
your beer down to the bottle. You may need to squirt out some of the trub and yeast sediment
before getting clear beer. Crash cooling will make the trub compact faster.
Using the FermZilla under pressure:
Performing a Leak Test
If you intend to use FermZilla under pressure it is strongly advised to perform a leak test prior to
commencing fermentation.
This will require access to an external pressure source such as a CO2 cylinder with a Type 30 MK4
regulator. To thoroughly pressure test the FermZilla it is best to perform a pressure decay leak test
test.
Pressure Decay Leak Test Procedure
1. Pressurise the FermZilla to a minimum of 15psi (but not more than 35psi).
2. Turn the CO2cylinder off and leave to sit for a few hours.
3. Check of the pressure within the vessel has decreased.
If the pressure in the FermZilla has dropped from the original set pressure then there is a leak
occurring from somewhere on the FermZilla.
This could be occurring from the carbonation caps, the lid, butterfly valve assembly or the collection
container assembly.
To Identify the source of the leak it is best to spray or sponge soapy water over all potential leak
sites and look bubbles being produced.
Fermenting under pressure:
Some people believe that beer that is naturally fermented under pressure is the traditional and best
way to ferment. Almost all large commercial breweries inherently ferment under some degree of
pressure due to the fact that they have tall tanks and the pressure at the bottom of the tank is
significant even if no pressure has been applied to the headspace of the tank. With the FermZilla it’s
possible to ferment at higher temperatures, faster speeds and produce cleaner beers. Not all beer
styles should be fermented under pressure, as some beer styles such as saisons and Belgian ales
benefit from non-pressure fermentation to produce the ester and phenolic flavours classic to these

FermZilla Tri-Conical 27L and 55L Instruction Manual
Page 11 of 12 www.KegLand.com.au Last Updated 2/03/2022 3:06 PM
beer styles. In order to perform pressure fermentation, you will need to purchase the following
additional parts:
-2 x Carbonation caps. We would advise getting one red plastic carbonation cap (KL10788)
and one yellow carbonation cap so you can differentiate which carbonation cap has the dip
tube attached to it.
-1 x Silicone dip tube with stainless float (KL09241).
-1 x Duotight –Blowtie 2 Spunding Valve (KL15042) or Blowtie Spunding Valve kit (KL09706).
This blowtie spunding valve should be set at your desired fermentation pressure and should not be
set above 35psi. When the vessel is under pressure do not expose it to temperatures greater than
35°C (95°F).
When fermenting under pressure you must not close the butterfly valve during fermentation if you
have wort in the collection vessel which has not finished fermenting. Only close the butterfly valve
once fermentation has ceased and hydrometer readings are stable for 3 consecutive days.
When removing the collection container for example when dumping trub or yeast make sure to
open the butterfly valve and ensure the system (including the collection container) is depressurized
prior to removing the collection container.
Pressure Transfers:
Easily avoid oxygen getting into your beer and staling it prematurely by transferring under CO2
pressure in a closed loop system straight to your kegs! Oxygen is the enemy of beer, by going
straight from the floating dip tube on the FermZilla to the liquid post on your keg, you can be sure
your precious beer won’t come into any contact with the outside out.
A pressure transfer will require an external CO2source such as a CO2cylinder(KL01489 or KL01496)
and a MK4 regulator (KL07429) or a Sodastream cylinder (KL08631) and mini 360 core actuator
regulator (KL15868).
It is best to attach a spunding valve to the gas (IN) post of the keg and set a small pressure difference
between the FermZilla and keg at the start of the pressure transfer to avoid excess foaming of the
beer during the transfer. Later in the pressure transfer you can increase the pressure difference
between the keg and FermZilla by opening the spunding valve further to release more pressure.

FermZilla Tri-Conical 27L and 55L Instruction Manual
Page 12 of 12 www.KegLand.com.au Last Updated 2/03/2022 3:06 PM
GREAT TIPS TO GET YOU STARTED
1. No need to do a whirlpool in your kettle
Due to the fact that you now have a conical fermenter there is no need to do a whirlpool in
your kettle. Once your wort has cooled you can dump all trub and hop material from your
boil into your fermenter. The boiled hops and trub will settle out in the cone quickly and
you can easily dump this directly from the butterfly valve. The clear tank wall will enable
you to separate clear wort from trub far more easily than in your kettle and collect the trub
into the collection jar.
2. Dry hop without compromise
Traditionally, most home brewers who want to dry hop are forced to remove the lid of the
fermenter to insert hops. Removing the fermenter lid increases the risk of contamination
and it also introduces significant amounts of oxygen to your fermented beer. You can avoid
these issues by dry hopping with the collection bottle. After yeast has been collected and
the butterfly valve is clear of debris, simply fill the collection bottle with your favorite hop
and re-fit this to the butterfly valve. The hops will float up through the beer and introduce a
fantastic hop aroma.
Note: If you have a CO2 cylinder you can also purge the oxygen out of the hops before
connecting to the butterfly valve.
3. Make yeast starters in the collection container
You can make up to 900ml starters in the microwave, boiled directly in the collection jar!
Simply remove the collection jar o-ring (not microwaveable and needs to be removed to
allow for steam to exit) and any lube, put your starter wort in there and rest the lid on top of
the jar (don’t screw the lid down and make sure you’re using plastic bottle caps on the
accessory ports) before microwaving on a lower power setting. After boiling for a minute in
the microwave, remove, add back on the o-ring, throw in a sanitised stir bar and place some
sanitised foil over the opening before allowing to cool. Pitch yeast and place onto stir plate.
This manual suits for next models
1
Table of contents