Kemppi Zeta W200 User manual

Operating
manual
Operating manual – Brugsanvisning – Gebrauchsanweisung – Manual
de instrucciones – Käyttöohje – Manuel d’utilisation – Manuale d’uso –
Gebruiksaanwijzing – Bruksanvisning – Instrukcja obsługi – Manual de
utilização – – Bruksanvisning – 操作手册
Zeta W200
Zeta W200x
1922050
R00

© Kemppi Oy 2022
1
2
3
4
5
9
810
67
1

Zeta W200/W200x
2
15
18
16
11 12 13
17
3
45
14

4© Kemppi Oy 2022
1. Introduction
1.1 Zeta W200 and W200x
Zeta W200 and W200x welding helmets are designed for
arc welding (MMA, MIG/MAG, TIG), grinding, gouging and
plasma cutting.
Zeta W200 and W200x welding helmets provide the users
with protection for the eyes and face. The helmets are
equipped with auto-darkening lter ADF SA 60Z, and the
Zeta W200x model has also integrated LED work lights.
1.2 About this manual
Read this manual carefully before using the equipment for
the rst time. Pay particular attention to the safety instruc-
tions.
Note Gives the user a piece of
information of particular
importance.
Caution Describes a situation that
may result in damage to the
equipment or system.
Warning Describes a potentially dangerous
situation that may result in
personal damage or fatal injury.
1.3 Disclaimer
While every eort has been made to ensure that the infor-
mation contained in this guide is accurate and complete,
no liability can be accepted for any errors or omissions.
Kemppi reserves the right to change the specication of
the product described at any time without prior notice. Do
not copy, record, reproduce or transmit the contents of this
guide without prior permission from Kemppi.
2. Safety
Warning:
• It is strictly forbidden to use any other than Kemppi
branded parts or accessories with Kemppi’s person-
al protection equipment. If you do not respect this
safety regulation, serious damage for your health
may occur.
• We recommend a usage period of 5 years. The
period of use depends on various factors such as
use, cleaning, storage and maintenance. Inspect the
helmet before each use. Replace damaged or worn
parts.
• Use all adjustment features for maximum protection.
• Never weld with the welding visor up or without the
• welding lter.
• If the auto-darkening lter (ADF) does not darken
when the arc ignites, stop welding immediately.
Inspect the ADF and its power supply. Change if
necessary.
• Always use welding lters together with suitable pro-
tection plates.
• Never use welding lter without inner protection
plates.
• Never use a scratched or damaged welding lter and
ocular.
• Materials which may come into contact with the
wearer’s skin may cause allergic reactions to suscep-
tible individuals.
• Only operate this product within the temperature
range -5...+55 °C.
• The product is not intended for use in environments
with a risk of explosion.
• The helmet does not protect against explosive
devices or corrosive liquids.
• The helmet is not suitable for laser welding and
oxyacetylene welding/cutting processes.
• The helmet gives designed protection against high
speed particles only at room temperature (EN175
designation B) and only when all helmet components
are properly attached, as described in the manual.
• When helmet is worn over any spectacles, they may
transmit the impact of high speed particles, thus
creating a hazard to the wearer.
• If the symbols of the marking are not common to
dierent parts of the protection equipment, the
lower protection level shall be assigned to the
complete protection equipment.
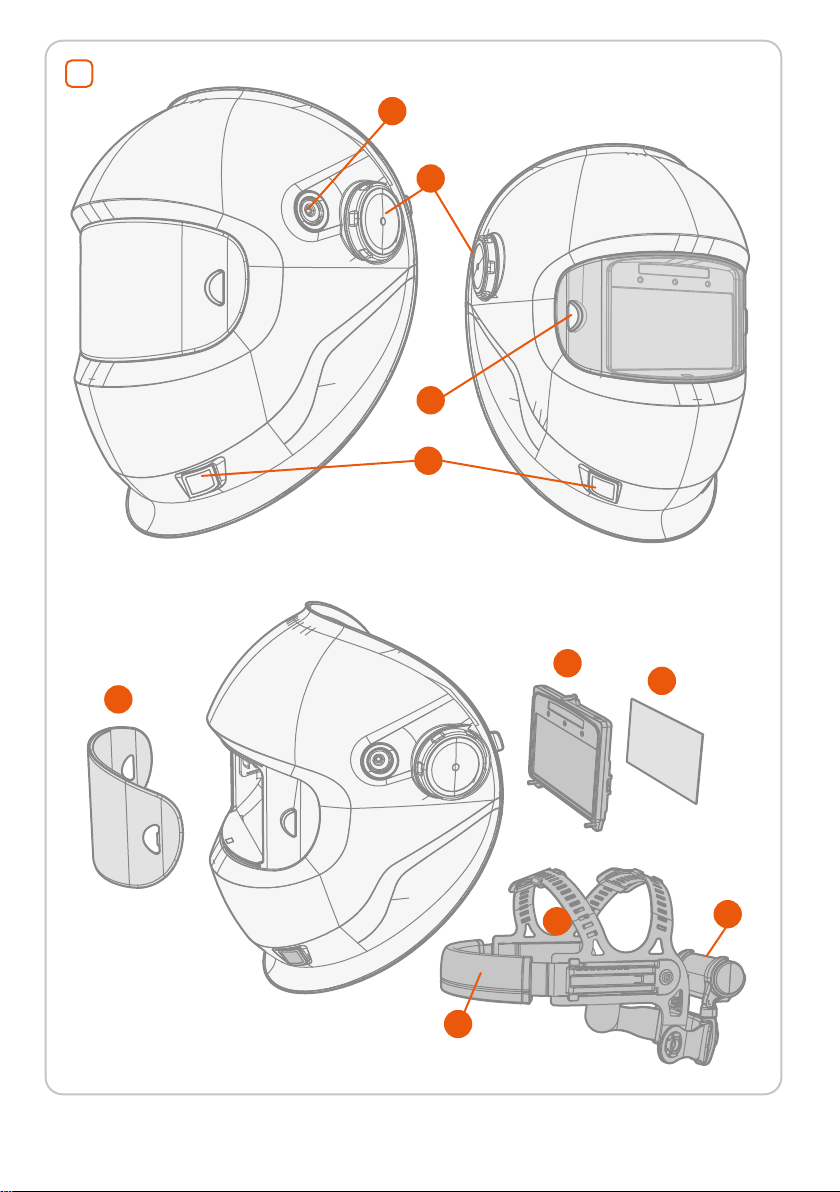
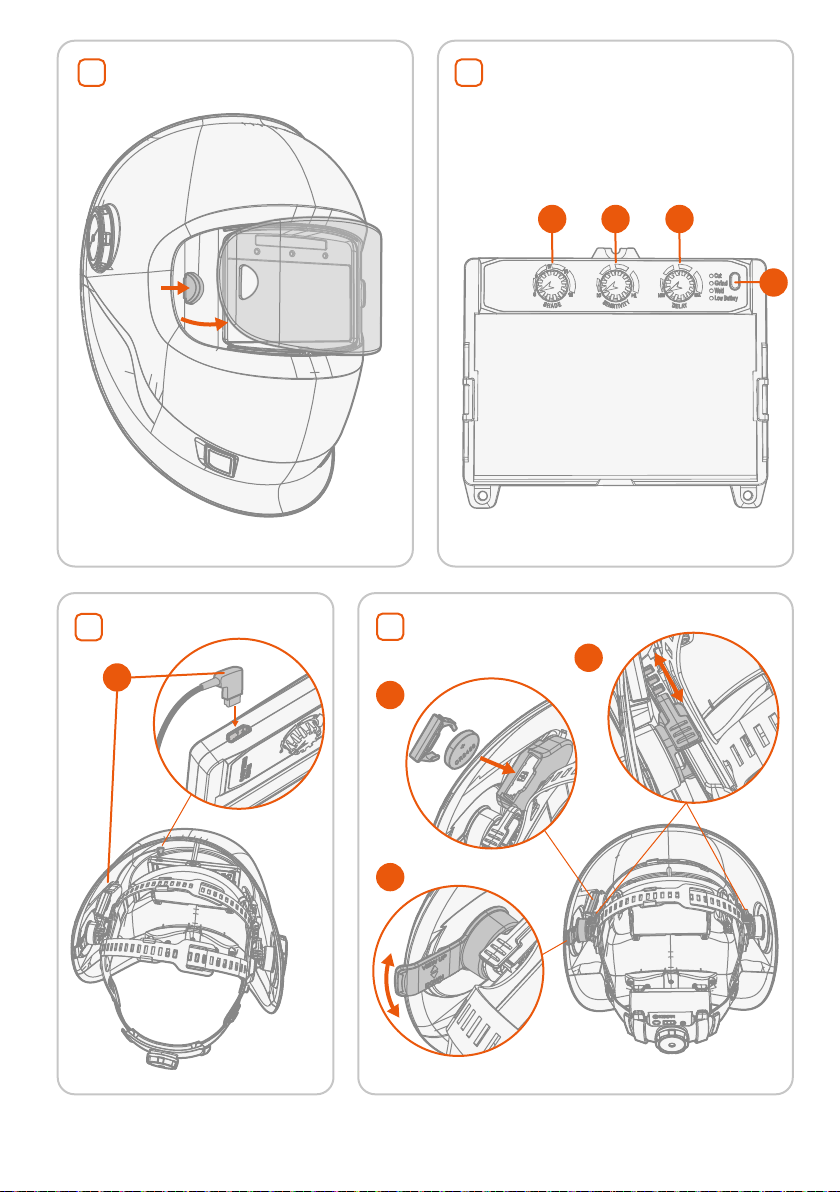
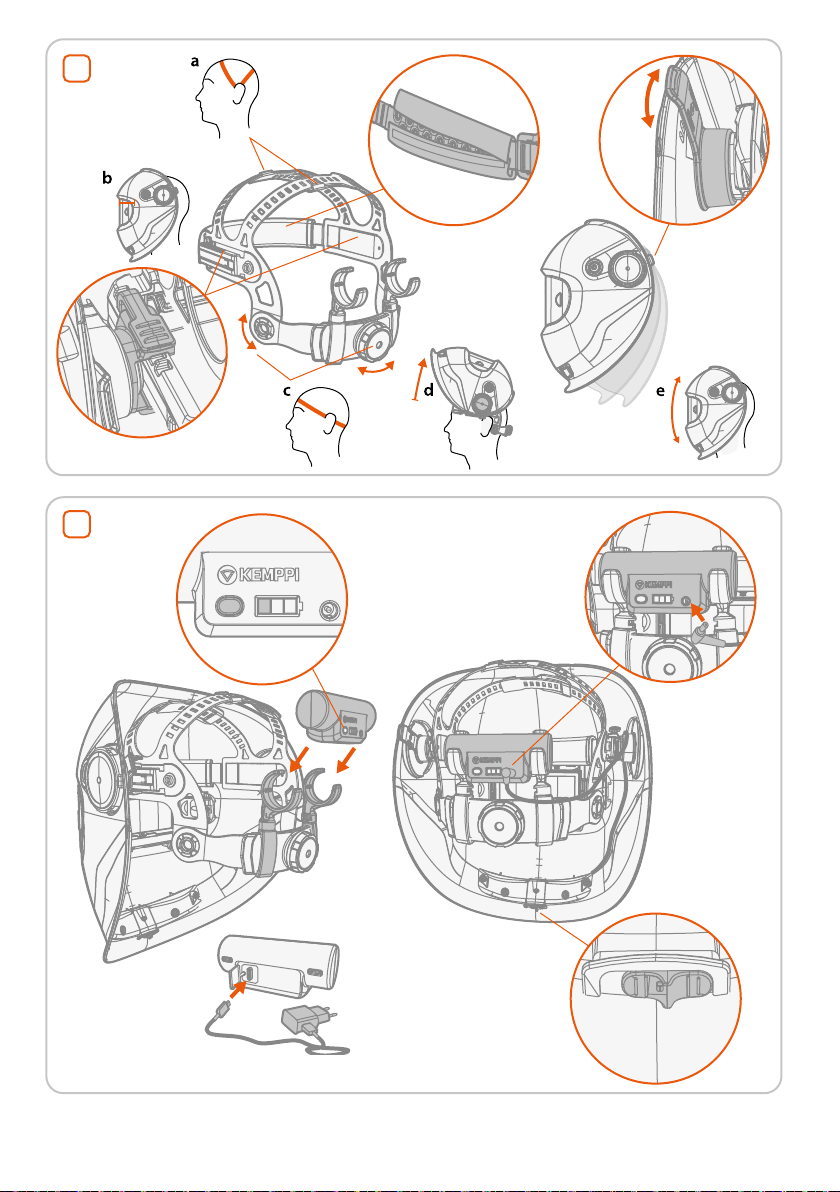
3. Parts 12345
1. Opening/closing tightness adjuster
2. Grinding mode (clear view) button
3. LED work lights (W200x model only)
4. Protection plate release button
5. Protection plate
6. Auto-darkening welding lter (ADF SA 60Z)
7. Inner protection plate
8. Headband, adjustable
9. Sweatband, washable
10. LED work light Li-ion battery unit (W200x model
only)
11. ADF: Shade adjustment
12. ADF: Sensitivity adjustment
13. ADF: Delay adjustment
14. ADF: Operation mode selector (Cut/Grind/Weld)
15. ADF: Battery connection
16. ADF battery and battery holder
17. Distance slide adjusters (connect the headband to
the helmet and adjust the distance of the helmet
from the face)
18. Viewing angle adjuster.
ENGLISH

5Zeta W200/W200x
4. Using helmet features
4.1 Taking into use 6
1. Adjust the helmet for your head:
A. Use the top bands to adjust how deep the
helmet sits (a).
B. Use the distance slide adjuster to change the
distance of the helmet from your face (b).
Ensure that the helmet is comfortably as close
as possible to your face and that both sides
are equally positioned.
C. Turn the knob in the rear to tighten and
secure the headband (c).
2. Adjust the helmet's opening/closing tightness if
needed (d).
3. Turn the viewing angle adjuster to tilt the viewing
angle upwards or downwards (e).
4.2 Using work lights (W200x) 7
Zeta W200x helmet has LED work lights that are powered
by a rechargeable Li-ion battery unit on the neckband.
1. Pressthebatterytestbuttononthebatteryunittocheck
the battery level.
2. For charging, remove the battery unit from the
helmet and charge the battery using the unit's
USB-C connection and charging cable (charger not
delivered with the product).
3. Insert the battery unit into the battery holder in the
headband and connect the LED work light cable to it.
4. Use the OFF/AUTO/ON selector to turn the lights on
and o. The AUTO mode turns the lights o in bright
conditions (e.g. during welding) and then back on.
Caution: Never use a damaged battery unit.
The LED light battery unit is not waterproof.
Avoid exposure to extreme temperatures, direct
sunlight, moisture, sand and dust.
Observe the battery unit while charging. If the
battery unit becomes hot, smokes or there are
visible deformations in the battery unit during
charging, stop charging immediately.
4.3 Using quick grinding view 8
The Zeta W200/W200x helmet's auto-darkening welding
lter (ADF SA 60Z) can be switched to the grinding mode
also by long-pressing the weld/grind mode button on the
side of the helmet.
To return to welding mode, only short press is needed.
5. Replacing parts
5.1 Removing headband 5
1. Press and hold down the distance slide adjuster (17).
2. Push the headband connector forwards, out of the
distance slide adjuster.
5.2 Attaching headband 5
1. Bring the headband connector in front of the dis-
tance slide adjuster (17).
2. Press down the slide adjuster button while pushing
the headband connector through the distance slide
adjuster.
3. Slide the headband connector in place so that the
slide adjuster pin locks into one of the grooves in the
headband connector.
4. Adjust the helmet distance from your face.
5.3 Replacing outer protection plate 2
1. To remove the outer protection plate, press the
fastener release button on the right and pull the
protection plate out.
2. To install the outer protection plate, place it on the
left fastener rst and then snap the right side in
place.
Note: Make sure both sides are properly
aligned and in place.
5.4 Replacing inner protection plate 9
1. To remove the ADF inner protection plate, pull the
bottom of the plate out slightly and slide the plate
out from below.
2. To install the inner protection plate, slide the plate
up into the grooves in the ADF. Make sure the plate
snaps into place properly.
6. Maintenance
Inspect the helmet after each use. Replace worn or dam-
aged parts.
6.1 Cleaning
• Clean the protection plate with mild soap, lukewarm
water and a soft cloth.
• Wipe the welding lter lens with a soft, clean cloth,
if necessary.
• Detach and wash the sweatband, if necessary.
7. Storage
Store the Zeta helmet in an environment with temperature
between -20...+50 °C and humidity < 80 % Rh.
Store and transport the helmet and the accessories in the
original bag or package.
ENGLISH

6© Kemppi Oy 2022
8. Technical data
Welding helmet Zeta W200/W200x
Compliant with standards: Regulation 2016/425
EN 175:1997-08, Personal protection. Equipment for eye and face
protection during welding and allied processes
EN 166:2002-04, Personal eye protection, specications
AS/NZS 1337.1:2010
AS/NZS 1338.1:2012
Type inspected by: ECS European Certication Service GmbH. Hüttfeldstraße 50,
73430 Aalen, Germany. Notied Body No. 1883.
UKCA; SGS United Kingdom Limited, Rossmore Business Park Ellesmere
Port South Wirral Cheshire CH65 3EN. Approved Body No. 0120
SAI Global Certication Services Pty Limited. 680 George Street,
Sydney NSW 2000, GPO Box 5420 Sydney NSW 2001, Australia.
Manufacturer: Kemppi Oy
PL 13, Kempinkatu 1, 15801 Lahti, Finland
Operating temperature: -5...+55 °C
Recommended humidity for use: < 80 % Rh
Storage temperature: -20...+50 °C
Materials: Plastics: PA, PP, PC, ABS, POM
Sweatband material 100 % cotton, padding foam plastic
Weight: Zeta W200: 517 g, Zeta W200x: 658 g
LED work light Zeta W200x only
Battery cell type: Li-ion 3.65 V, 4 Ah, 14.6 Wh, rechargeable
Charging connector type: USB-C
Battery life: 8 hours
Battery charging temperature: 0...+45 °C
Welding lter ADF SA 60Z
Welding lter type: Auto-darkening, factory-installed
Operating temperature range: – 5 ... + 55 °C <80% Rh
Storage temperature range: – 20 ... + 50 °C <80% Rh
Manufacturer: Kemppi Oy
PL 13, Kempinkatu 1, 15801 Lahti, Finland
ADF switching time: 0.1 ms
ADF light state: Shade 2.5
ADF UV/IR protection: Protection at all times
Battery, replaceable: 1 x CR2450
Materials: Plastics: PA, PC; Glass
ENGLISH

7Zeta W200/W200x
9. Helmet and ocular markings
Eg. 2.5/8-12 KMP 1/1/1/1/379
2.5 Light state scale number
8Lightest dark state scale number
12 Darkest state scale number
KMP Identication of the manufacturer
1Optical class
BSymbol for mechanical strength
CE CE marking (European Conformity)
UKCA UKCA marking (UK Conformity)
EN 175 Standard reference
EN 166 Standard reference
10. Ordering codes
Part Ordering code
Headband SP009023
Sweatband 2 pcs SP9873018
Comfort band padding 5 pcs SP013231
Protection plate 5pcs SP022579
Inner protection plate 5 pcs SP023221
200x LED light battery unit SP022617
ADF SA 60Z auto-darkening welding lter SP9873076
Magnifying lens holder SP023179
Magnifying lens 1.0x 9873260
Magnifying lens 1.5x 9873261
Magnifying lens 2.0x 9873262
Magnifying lens 2.5x 9873263
Helmet bag, small SP023780
Universal neck protector SP015579
ENGLISH

© Kemppi Oy 2022
6
7
OFF AUTO ON

Zeta W200/W200x
9
8

userdoc.kemppi.com
Welding helmet weight Svejsehjelmens vægt Gewicht der Schweißerschutzmaske Peso
de la máscara de soldadura Hitsauskypärän paino Poids du masque de soudage Peso
del casco per saldatura Gewicht lashelm Sveisemaskevekt Masa przyłbicy Peso da
máscara de soldagem Svetshjälmens vikt 电焊帽重量
See information supplied by the RPD manufacturer – Se oplysningerne fra RPD-producenten
– Siehe die vom RPD-Hersteller bereitgestellten Informationen – Véase la información
suministrada por el fabricante de la unidad RPD – Katso hengityksensuojaimen valmistajan
toimittamat tiedot – Voir les informations fournies par le fabricant du RPD – Vedere le informazioni
fornite dal produttore RPD – Zie de informatie die is verstrekt door de RPD-fabrikant – Se informasjon
som leveres av RPD-tilvirker – Patrz informacje podane przez producenta zaworu – Veja as informações
fornecidas pelo fabricante do RPD – . ,
– Se information från RPD-tillverkaren – 请参见 RPD 制造
商提供的信息
Declarations of Conformity – Overensstemmelseserklæringer –
Konformitätserklärungen – Declaraciones de conformidad –
Vaatimustenmukaisuusvakuutuksia – Déclarations de conformité –
Dichiarazioni di conformità – Verklaringen van overeenstemming
– Samsvarserklæringer – Deklaracje zgodności – Declarações
de conformidade – – Försäkran om
överensstämmelse – 符合性声明
MMA
(E-Hand)
MIG, Ss MIG, AI MAG, CO TIG Gouging Plasma
cutting
15 A 9
20 A 9 10
30 A
40 A 10 10 11
60 A 10 10
80 A
11 11 11
100 A
11 11 12
125 A 12 10
150 A
12
175 A
12 12 12 13 13 11
200 A
225 A 12
250 A
13 14 13
275 A 13
300 A
13 13 14
350 A
14 14
400 A
450 A
15 15
500 A 14 14 15
550 A 15 15
600 A
This manual suits for next models
1
Table of contents
Other Kemppi Motorcycle Accessories manuals
Popular Motorcycle Accessories manuals by other brands

Nolan
Nolan N53 Safety and instructions for use

Rivco
Rivco CA400C installation instructions

Nolan
Nolan X Series Instructions for use

Parkside
Parkside PSH 3 A1 Installation, operating and safety information, Translation of the original instructions

yasuni
yasuni TUB651 Assembly instructions

Jula
Jula KAYOBA 004435 operating instructions