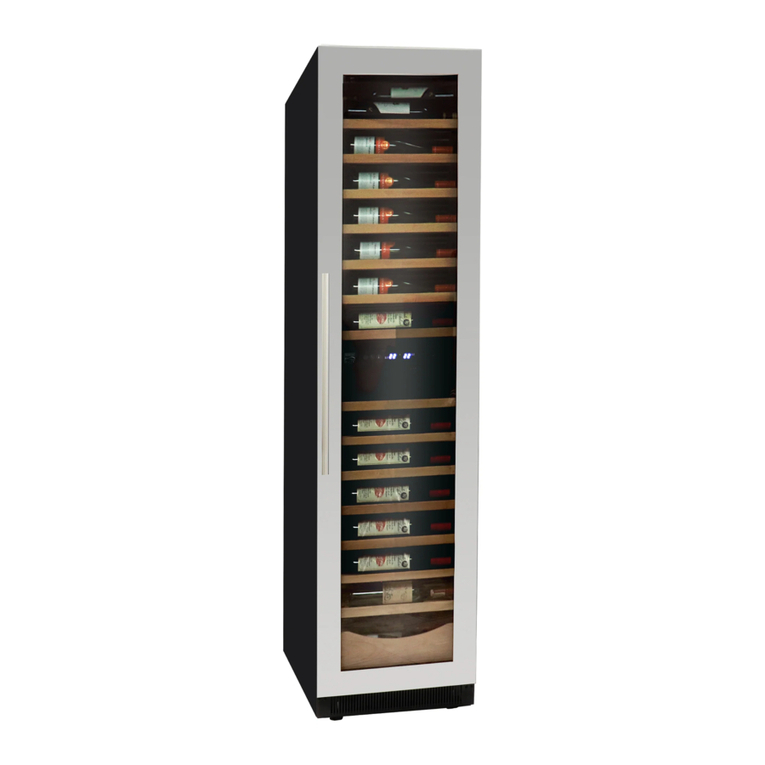
Kenmore Elite KKEWCBDZ112 User manual

112-bottle
Wine Fridge
Single Zone
08/2023-v2 H1S387
Refroidisseur
à vin
112 bouteilles
Zone simple
KKEWCBDZ112
Use & Care Guide
Guide d'utilisation et d'entretien
Customer Assistance
Service à la clientèle
1-800-265-8456
www. koolatron.com
WARRANTY / GARANTIE
5Limited Warranty
Year
5
Garantie limitée
Ans
FOR FIVE YEARS from the date of sale this product is warranted against defects in material or workmanship.
WITH PROOF OF SALE a defective product will be repaired or replaced free of charge.
The Kenmore brand is used under license. Direct all claims for warranty service to Koolatron Customer
Assistance, call 1-800-265-8456 or email service@koolatron.com
This warranty covers manufacturer’s defects including electrical and mechanical defects provided the
appliance is correctly assembled, operated and maintained according to the supplied instructions. It does not
cover damage caused by accident, misuse or abuse including overheating, unauthorized repairs or
alterations, or use with a voltage converter or aftermarket accessories, and it does not apply to scratches,
stains, discoloration or other surface damage that does not impair the product function. This warranty is void
if the appliance is ever used for purposes other than private household use.
PENDANT CINQ ANS à compter de la date d’achat d’origine ce produit Kenmore sera exempt de défauts de
matériaux ou de fabrication.
Un produit défectueux sera réparé ou remplacé gratuitement, AVEC PREUVE DE VENTE.
Le nom de marque Kenmore est utilisé sous licence. Adressez toutes les demandes de service de garantie à
Service à la clientèle du Koolatron, au 1-800-265-8456 ou en envoyant un courriel à service@koolatron.com
La présente garantie couvre les défauts de fabrication, y compris les défauts électriques et mécaniques, à
condition que l’appareil soit correctement assemblé, utilisé et entretenu conformément aux instructions
fournies. La présente garantie ne couvre pas les dommages causés par un accident, une mauvaise utilisation
ou un abus, y compris la surchaue, les réparations ou modications non autorisées, ou l’utilisation avec un
convertisseur de tension ou des accessoires de rechange, et elle ne s’applique pas aux rayures, taches,
décoloration ou autres dommages de surface qui n’aectent pas le fonctionnement du produit. La présente
garantie est nulle si l’appareil est utilisé à des ns autres que l'usage domestique privé.
Kenmore and the Kenmore Elte logo are registered trademarks to Transform SR Brands Management LLC
and are used under license by Koolatron Corporation
Kenmore et le logo Kenmore Elite sont des marques déposées de Transform SR Brands Management LLC
et sont utilisées sous licence par Koolatron Corporation
Koolatron Corporation
4320 Federal Drive, Batavia, NY 14021 U.S.A.
139 Copernicus Blvd., Brantford, ON N3P1N4 Canada

2 3
IMPORTANT SAFEGUARDS IMPORTANT SAFEGUARDS
1. READ ALL INSTRUCTIONS BEFORE USE.
2. Do not attempt to operate the appliance by any method other than as described in this manual.
The warranty is invalid if the appliance is not used according to instructions.
3. Before using the wine cellar for the rst time, remove any packaging material, promotional
labels, and stickers. Safely dispose of plastic bags or small pieces that could present a suocation
or choking hazard to young children.
4. This wine cooler is intended to be used exclusively for the storage of wine or beverages. It is
recommended only for indoor household use.
5. This wine cellar is not intended for use by persons, including children, with reduced physical,
sensory or mental capabilities, or lack of experience and knowledge, without supervision and
instruction by a person responsible for their safety. Never allow children to operate, play with, or
crawl inside the appliance.
6. RISK OF CHILD ENTRAPMENT AND SUFFOCATION: Junked, abandoned, and improperly stored
appliances pose a signicant danger to children at all times. To reduce the risk, before disposing
of or storing your wine cellar: (1) REMOVE THE DOOR; and (2) leave all shelves in place to prevent
children from easily climbing inside.
7. Before using, check that the voltage of the wall outlet corresponds to the one shown on the
rating plate. Never attempt to use the wine cellar with a voltage converter or an extension cord.
8. GROUNDING PLUG: This wine cellar is equipped with a 3-prong grounding plug which must be
used with a properly grounded 3-hole receptacle. DO NOT attempt to alter the plug for use in a
2-prong receptacle or alter a 2-prong receptacle to make the 3-prong plug t. Doing so will void
your warranty and could cause re or electrical shock. If the plug will not t into your outlet, have
the proper receptacle installed by a qualied electrician.
9. Do not attempt to operate the wine cellar if there is damage to the cord or plug, after it has
malfunctioned or been damaged in any way, or if it is not operating properly. Contact the nearest
authorized service facility for examination and adjustment or repair.
10. The electrical plug must be accessible at all times. To ensure the plug is accessible, release the
electric cord before moving the wine cellar to its nal location.
11. To protect against electrical shock, avoid contact between any electrical components and
water or any other liquid. Never touch the plug with wet hands. Always unplug the wine cellar
from the power source before cleaning. To unplug, grasp the plug and pull it from the electrical
outlet. Never unplug by pulling on the power cord.
12. This wine cellar contains a ammable refrigerant. To reduce the risk of re or explosion,
observe the following safeguards:
a. Use extreme caution during transportation to avoid damaging the cooling pipework.
b. Never place ammable or explosive items (ie. aerosol cans) in, on, or near the wine cellar.
c. Do not store or use ammable vapors or liquids (ie. gasoline) near the wine cellar.
d. Never clean the wine cellar body or parts with ammable uids as residual fumes could create
a risk of re or explosion.
13. Ensure the oor on which the wine cellar is placed is strong enough to support the total
weight of the unit when it is fully loaded.
14. The wine cellar should be positioned to prevent people from touching the compressor.
15. Place the wine cellar away from heat sources (ie. stove, heater, radiator) as these may increase
electricity consumption and away from direct sunlight which could aect the acrylic coating.
16. To protect against electric shock or damage to the unit, avoid placing the wine cellar in a moist
or very humid area.
17. Extreme cold ambient temperatures may cause the wine cellar to not perform properly.
18. Once the wine cellar is in place, adjust the front leveling leg to stabilize the unit.
19. Before connecting the wine cellar to a power source, let it stand upright for at least 6 hours to
reduce the possibility of a malfunction in the cooling system from handling during transporta-
tion.
20. Keep all ventilation openings clear of obstruction at all times.
21. Do not cover shelves with aluminum foil or any other material that could impair air circulation.
22. Do not move the wine cellar while loaded with wine as this could distort the body.
23. DO NOT OVERLOAD: Maximum capacity of this wine cellar is 111 standard Bordeaux bottles.
24. To protect against electrical shock or damage to the unit, store wine sealed bottles.
25. Open the door all the way before pulling out shelves to avoid damaging the door gasket.
Never try to pull out more than one shelf at a time.
26. Do not use mechanical devices or other means to accelerate the defrosting process and do not
use electrical appliances inside the wine cellar, other than those recommended by the manufac-
turer. Aftermarket attachments or accessories not recommended by Kenmore will void your
warranty and may cause re, electrical shock, or injury.
27. For any maintenance other than cleaning, call or email Koolatron Customer Assistance.
SAVE THESE INSTRUCTIONS!
with handle
740 mm
77
1800
450
700
4 5
FEATURES BEFORE FIRST USE
- Single Zone Wine Fridge made for those who love to entertain
- Capacity : 112 bottles
- Touch pad temperature control with LED Display
- Temperature range : 5-20°C / 41-68°F
- Reversible dual pane glass door
- LED interior surround lighting
- Front venting allows for built-in or freestanding installation
- Compressor based cooling system with fans
1. Carefully remove the exterior and interior packing and check that all parts and accessories are
present. Remove any promotional labels or stickers and safely dispose of plastic bags or small
pieces that could present a suocation or choking hazard.
2. Let the wine cellar stand upright for at least 6 hours before connecting it to a power source. This
will reduce the possibility of a malfunction in the cooling system from handling during transit.
3. Wipe the interior surfaces with a clean, damp cloth to remove any dirt or dust and dry thoroughly.
Do not use abrasive cleansers or scouring pads.
4. When deciding where to place the wine cellar, observe the following safeguards:
- Make sure the oor is strong enough to support it when it is lled to capacity.
- The electrical plug must be accessible and an extension cord must not be used.
- Place it away from heat sources and out of direct sunlight.
- Avoid placing it where it will be exposed to moisture or extreme cold.
WARNING
The wine cellar is extremely heavy. To reduce the risk of injury,
two people are needed to move the unit and/or reverse the door.
- 15 beechwood shelves, smooth
rolling on ball-bearing tracks
- 1 beechwood drawer
6. Once the wine cellar is in place, adjust the front leveling foot to stabilize the unit.
5. Measure the space carefully when preparing for built-in installation.

6 7
WARNING - The door is very heavy. Two people are needed to remove
or replace the door assembly. To reduce the risk of injury or damage,
one person should hold the door while the other removes the hinges.
REVERSING THE DOOR
2. Open the wine cellar door and locate the
upper and lower hinge covers. Using a at
head screwdriver, pry o the hinge covers to
expose the hinge pins and set aside.
4. With one person holding the door securely,
locate the opening for the upper hinge pin on
the top edge of the door. Using a 3/32” hex
key/Allen key, unscrew and remove the upper
hinge pin.
6. Using a hex key/allen key, remove the six
mounting screws and detach the hinges from
the cabinet. Carefully pry o the plastic hole
covers on the opposite side of the cabinet and
replace them in the holes left by the mount-
ing screws you just removed.
7. Exchange the hinges and reinstall them on
the diagonally opposite side of the cabinet
(the upper hinge from the right side will
become the lower hinge on the left and vice
versa).
8. Unscrew the magnetic latch from the
bottom of the door. Flip the door over so the
bottom is now the top and vice versa and
install the magnetic latch over the guide
holes on the new bottom.
9. Align the notches in the door with the hinges
and push the door straight back towards the
cabinet into place.
10. Install the upper door hinge pin and tighten
it with a hexagon wrench.
11. Install the lower door hinge pin then replace
the hinge covers.
3. Carefully pry up the lower hinge pin with
the screwdriver, remove and set aside.
5. Pull the door away from the cabinet straight
towards you to remove it and set it aside on a
padded surface.
REVERSING THE DOOR
NOTE - All parts removed must be saved to do the reinstallation of door
1. Gather the following items before starting:
- at head screwdriver
- Phillips head screwdriver
- 3/32”hex key / Allen key
- stepstool
HEXAGON KEY
UPPER HINGE
SHAFT
SCREWDRIVER
LOWER
DOOR
HINGE
UPPER
DOOR
HINGE
SCREWS
SCREWS
MAGNET
HEXAGON
KEY
UPPER
HINGE
SHAFT
LOWER
HINGE
SHAFT

gasket
screw
locker washer
at washer
stainless steel
handle
door frame
8 9
1. Locate the screw holes on the inside of the door and carefully pull the rubber gasket out to
expose them completely.
2. Align the door handle with the screw holes. Loosely attach the rst screw and washers. Attach
the second screw and washers, tightening fully, and then tighten the rst set. Do not overtighten,
as this could damage the handle and the door frame.
3. Return the door gasket to its original position, using a at screwdriver to gently push it into
place if needed.
WARNING
To avoid damaging the door gasket, make sure the door is
completely open when removing shelves from the cabinet.
Your wine cellar was designed to hold up to 112 standard Bordeaux bottles, 7 on each shelf.
Larger and irregularly shaped bottles can be accommodated by removing shelves, which will
reduce the total capacity.
For best results when loading the wine cellar:
- Spread the bottles out evenly so the weight is not concentrated in one area.
- Do not group bottles at either the top or bottom of the cabinet.
- Make sure the bottles do not touch the interior walls of the cabinet.
INSTALLING THE DOOR HANDLE
1. Pull the shelf out as far as it will go.
2. Using a slim stick or at head screwdriver, press the plastic strip on the left side up and pull the
left side of the shelf slightly outwards. Press the plastic strip on the right side down and pull the
right side of the shelf slightly outwards.
3. Carefully remove the shelf.
REMOVING SHELVES
LOADING THE WINE CELLAR
1. Power ON/OFF : Press and hold for 3 seconds to power the wine cellar on or o.
2. °C / °F Selector : Touch to change the temperature display between Celsius and Fahrenheit.
3. Set / Change Temperature : Touch to display the current programmed temperature and enter
temperature setting mode. After 5 seconds without a button being pressed, the display will
change back to the actual interior temperature.
4. Temperature Display : LED display shows either the selected temperature (in temperature
setting mode) or actual interior temperature.
5. Temperature +/- : During temperature setting mode, touch + to increase and - to decrease by
1 degree from a minimum of 5° to a maximum of 20°. The control panel will automatically lock
after 3 minutes without a button being pressed. Press and hold the + and - buttons at the same
time for 3 seconds to unlock.
6. Light ON/OFF : Touch to turn the interior light on or or o. The light will also turn on automati-
cally when the door is opened.
CONTROL PANEL
top view

CHARCOAL FILTRATION SYSTEM
Wine is a living object that breathes through the cork of its bottle. In addition to maintaining
wines at an optimal temperature, this wine cellar is equipped with a charcoal ltration system
to ensure air purity, cooling eciency, and to maintain an odor free cabinet. To keep the ltration
system working at peak eciency, the lter should be changed every 12 months. The lter
assembly is located at the rear panel inside your cellar.
To replace the lter:
1. Remove the bottles of wine from the two shelves in front of the lter. Remove the two shelves
and set them aside.
2. Rotate the lter 45 degrees counterclockwise to unlock and remove it.
3. Position the new lter in the opening and rotate 45 degrees clockwise to lock it in place.
4. Replace the shelves and wine that you removed.
CLEANING THE WINE CELLAR
1. Power o and unplug the wine cellar and then remove all bottles and shelves.
2. Wash the interior surfaces with a soft cloth or sponge and a mixture of warm water and baking
soda (approximately 2 tbsp of baking soda to 1 qt of water). Wring out any excess water before
wiping the control panel. Dry thoroughly.
3. Wash the shelves with a soft cloth or sponge and a mild dish soap. Rinse and dry thoroughly.
4. Wipe the exterior with a soft cloth or sponge and a mild dish soap, being extremely careful to
avoid liquid contacting any electrical components. Rinse well and wipe dry with a clean soft cloth.
5. Replace the shelves and bottles that you removed.
POWER INTERRUPTIONS
Most power failures are corrected within a few hours and will not aect the temperature of the
wine cellar, especially if you avoid opening the door while the power is o. Wait 3-5 minutes
before restarting the wine cellar after it has been unplugged, powered o, or experienced a
power failure; the wine cellar will not operate if you attempt to restart it before that time.
NOTE - If the power is going to be out for an extended period, you may need to nd alternate
storage for your wine.
10
CARE & MAINTENANCE CARE & MAINTENANCE
MOVING THE WINE CELLAR
To reduce the risk of property damage or damage to the wine cellar while moving it, observe the
following safeguards:
- Remove all bottles of wine. Moving the wine cellar while loaded could distort the body.
- Remove shelves or place foam between them to prevent them from moving during transit.
- Turn the adjustable leg up to the base.
- Tape the door shut.
- Protect the outside of the wine cellar with a blanket or similar items.
- If possible, keep the wine cellar in an upright position during transit.
DISPOSING OF THE WINE CELLAR
Before disposing of this wine cellar, observe the following safeguards:
- Disconnect from power outlet, cut o the power cord and discard it.
- Protect the outside of the wine cellar with a blanket or similar items.
- If possible, keep the wine cellar in an upright position during transit.
- Remove the door and leave all shelves in place to reduce the risk of children climbing inside and
becoming trapped and/or suocated.
11
WARNING
The wine cellar is extremely heavy. To reduce the risk of injury,
two people are needed to move the unit and/or reverse the door.
This symbol on the product, or in its packaging, indicates that this
product may not be treated as household waste. Instead, it should be
taken to the appropriate waste collection point for recycling of electrical
and electronic equipment. By ensuring this product is disposed of
correctly, you will help prevent potential negative consequences for the
environment and human health, which could otherwise be caused by
the inappropriate waste handling of this product. For more detailed
information about recycling of this product, please contact your local
council, or your household waste disposal service.
CORRECT DISPOSAL OF THS PRODUCT

12
TROUBLESHOOTING
PROBLEM
Wine cellar does not operate
Wine cellar is not cold enough
Wine cellar turns o and on frequently
Interior light does not turn on
Excessive vibration
Excessive noise
Door does not close properly
POSSIBLE CAUSES
Power cord is not plugged in.
Wine cellar is powered o.
Tripped circuit breaker or blown fuse.
Temperature is set too high.
High ambient temperature.
Door is being opened too frequently.
Door is not closed completely.
Door gasket does not seal properly.
Ambient temperature is higher than usual.
Cabinet overloaded.
Door is being opened too frequently.
Door is not closed completely.
Door gasket does not seal properly.
Light is turned o.
Bulb is burnt out.
Power cord is not plugged in.
Wine cellar is powered o.
Tripped circuit breaker or blown fuse.
Door gasket does not seal properly.
Wine cellar is not level.
Rattling sounds from the ow of refrigerant
are normal.
Gurgling sounds as each cycle ends are normal.
Popping and/or crackling noises may be caused
by contraction and expansion of the inside walls.
Wine cellar is not level.
Door was reversed but not properly reinstalled.
Dirt or debris caught in the door gasket.
One or more shelves are out of position.
You can solve many common appliance problems easily, saving you the cost of a possible service
call. Try the suggestions below to see if you can solve the problem before calling the servicer.
13
CONSIGNES DE SÉCURITÉ IMPORTANTES
1. LIRE TOUTES LES CONSIGNES AVANT D'UTILISER L'APPAREIL
2. N'essayez pas de faire fonctionner l’appareil par une méthode autre que celle décrite dans ce
manuel. La garantie est invalide si l'appareil n'est pas utilisé conformément aux instructions.
3. Avant d'utiliser le refroidisseur à vin pour la première fois, retirez tout matériel d'emballage,
étiquettes promotionnelles et autocollants. Jetez en toute sécurité les sacs en plastique ou les
petits morceaux qui pourraient présenter un risque de suocation ou d'étouement pour les
jeunes enfants.
4. Ce refroidisseur à vin est destiné à être utilisé exclusivement pour le rangement de vin ou de
boissons. Il est recommandé uniquement pour un usage domestique à l'intérieur.
5. Ce refroidisseur à vin n’est pas destiné à être utilisé par des personnes (y compris des enfants)
ayant des capacités physiques, sensorielles ou mentales réduites, ou un manque d’expérience et
de connaissances, sauf si elles sont supervisées ou ont été formées par une personne responsable
de leur sécurité. Ne laissez jamais les enfants d'utiliser, de jouer avec, ou de ramper à l'intérieur de
l'appareil.
6. RISQUE DE PIÉGEAGE ET D'ÉTOUFFEMENT DES ENFANTS : Les appareils jetés, abandonnés et
mal entreposés présentent un grand danger pour les enfants à tout moment. Pour réduire les
risques, avant de jeter ou de ranger votre refroidisseur à vin : (1) RETIREZ LA PORTE ; et (2) laissez
toutes les clayettes en place pour empêcher les enfants de grimper facilement à l'intérieur.
7. Avant d’utiliser le mélangeur, vériez que la tension de la prise murale correspond à celle
indiquée sur la plaque signalétique. N'essayez jamais d'utiliser le refroidisseur à vin avec un
convertisseur de tension ou une rallonge.
8. FICHE DE MISE À LA TERRE : Ce refroidisseur à vin est équipé d'une che de mise à la terre à 3
broches qui doit être utilisée avec une prise à 3 trous correctement mise à la terre. N'essayez PAS
de modier la che pour l'utiliser dans une prise à 2 broches ou de modier une prise à 2 broches
pour l’adapter la che à 3 broches. Cela entraînera la nullité de votre garantie et pourrait provo-
quer un incendie ou un choc électrique. Si la che ne s’insère pas dans la prise, demandez à un
électricien qualié d’installer une prise appropriée.
9. N'essayez pas de faire fonctionner le refroidisseur à vin si le cordon ou la che est endommagé,
après qu'il a mal fonctionné ou a été endommagé de quelque manière que ce soit, ou s'il ne
fonctionne pas correctement. Contactez le centre de service agréé le plus proche pour examen et
réglage ou réparation.
10. La che électrique doit être accessible à tout moment. Pour vous assurer que la che est acces-
sible, débranchez le cordon électrique avant de déplacer le refroidisseur à vin à son emplacement
dénitif.
11. Pour vous protéger contre les chocs électriques, évitez tout contact entre les composants
électriques et l'eau ou tout autre liquide. Ne touchez jamais la che avec les mains mouillées.
Débranchez toujours le refroidisseur à vin de la source d'alimentation avant de le nettoyer. Pour
débrancher, saisissez la che et retirez-la de la prise électrique. Ne débranchez jamais l’appareil en
tirant sur le cordon d'alimentation.
12. Ce refroidisseur à vin contient un réfrigérant inammable. An de réduire le risque d'incendie
ou d'explosion, respectez les mesures de sécurité suivantes :
a. Soyez extrêmement prudent pendant le transport pour éviter d'endommager la tuyauterie de
refroidissement.
b. Ne placez jamais d'objets inammables ou explosifs (c'est-à-dire des bombes aérosols) dans,
sur ou à proximité du refroidisseur à vin.
Table of contents
Other Kenmore Kitchen Appliance manuals

Kenmore
Kenmore Haier HBF05E User manual

Kenmore
Kenmore ELITE 141.16732900 User manual

Kenmore
Kenmore KKEWCBDZ111 User manual

Kenmore
Kenmore 99283 User manual

Kenmore
Kenmore KKFSDC User manual

Kenmore
Kenmore Kenmore 564.8815023 User manual

Kenmore
Kenmore 461.99100 User manual

Kenmore
Kenmore KKSC7QSS User manual

Kenmore
Kenmore 91589 User manual

Kenmore
Kenmore KKSK12Grey User manual