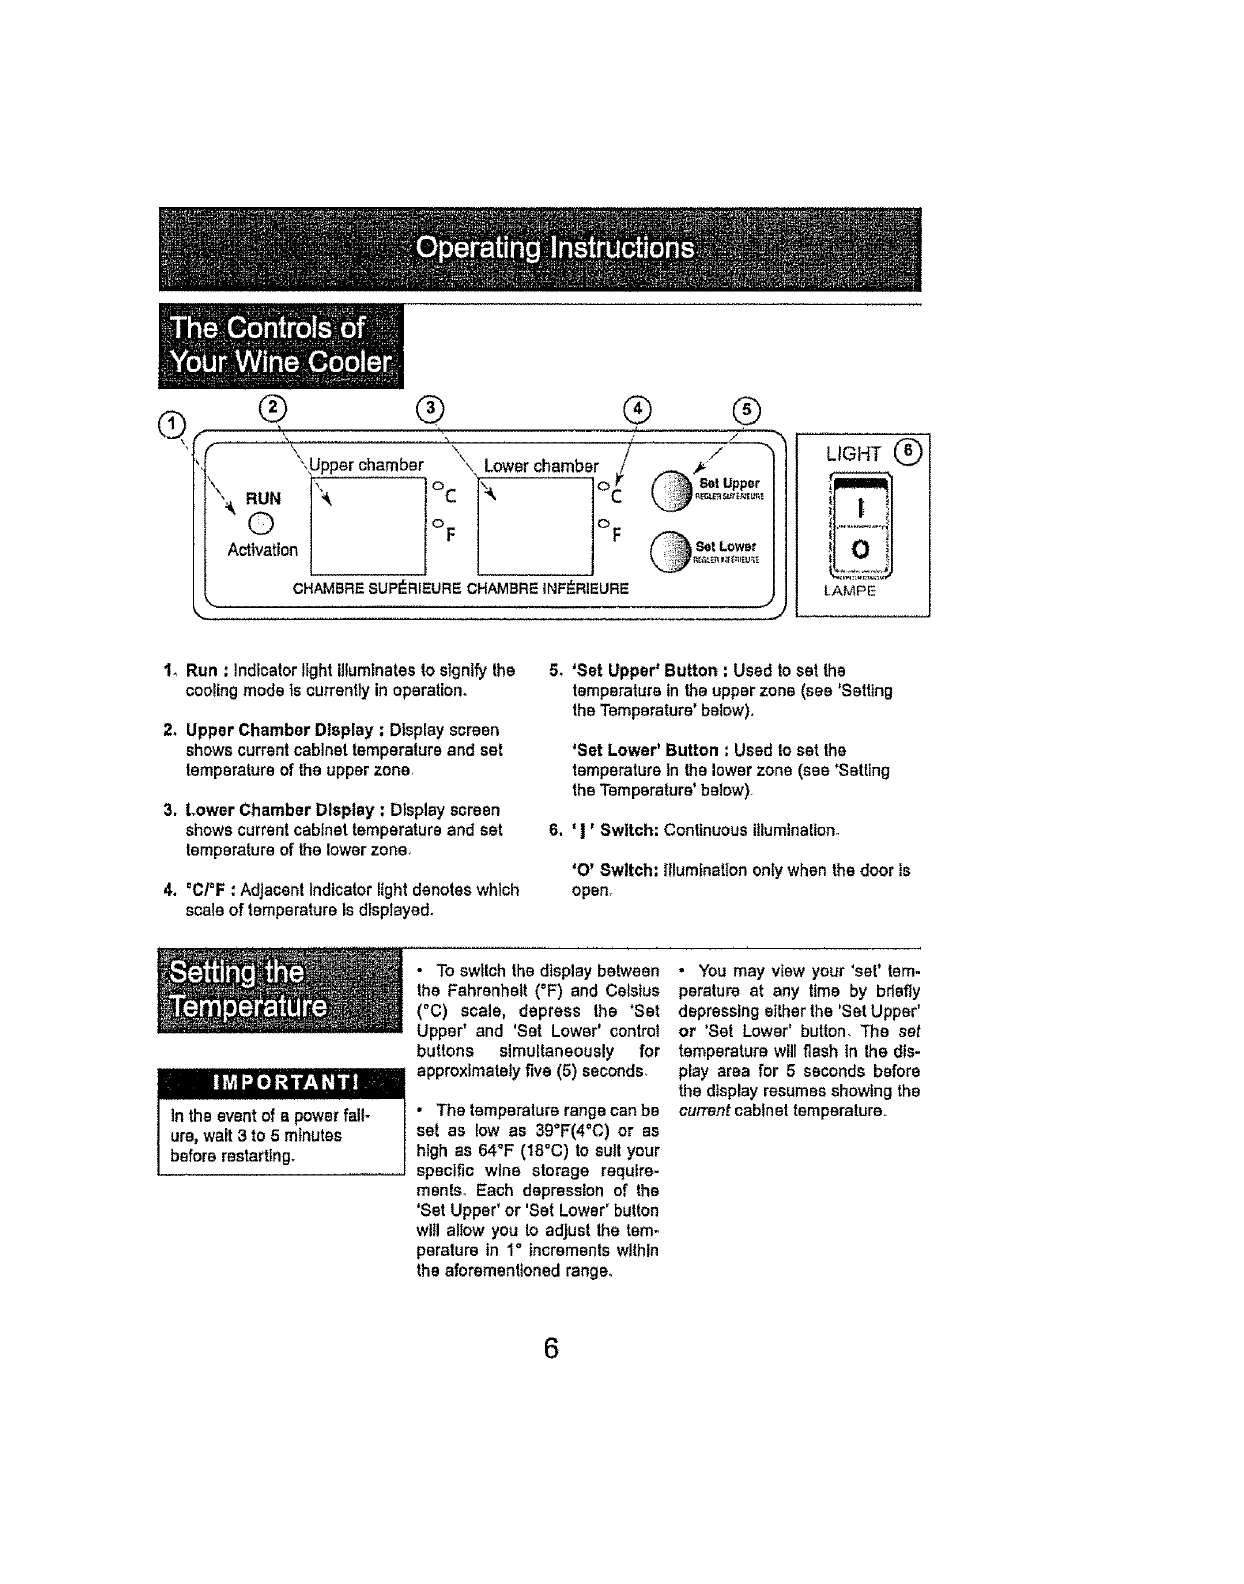
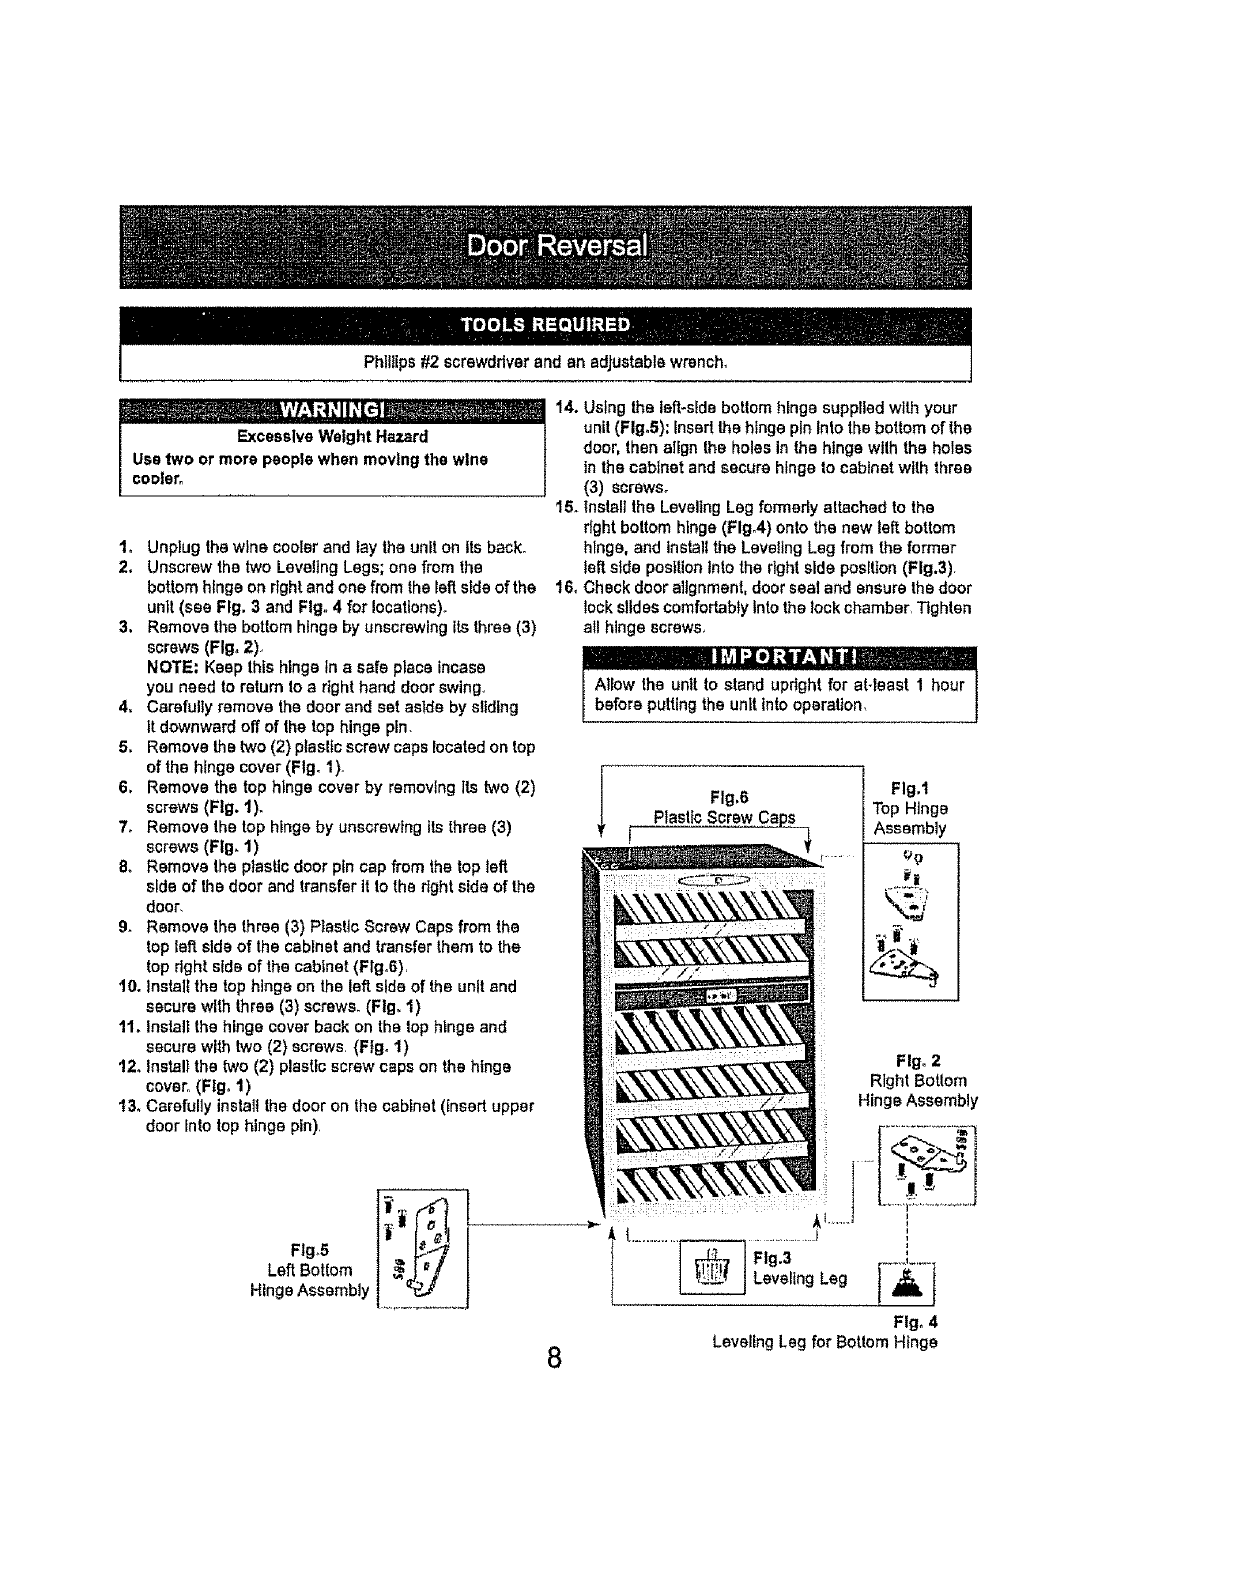
Kenmore 461.99130 User manual

OWNER'SMANUAL
GUIDEDUPROPRt_TAIRE
MANUAt.DELUSUARIO
461.99130
CAUTION:
ReadandFollowAll SafetyRulesand
OperatingInstructionsBeforeFirst
UseofThisProduct,
A'FFENTION:
AvantdefairefonclIonnercette
machine,Iisezetsuivezroutesles
constgnesdes_curit_de ceguideen
)remiertieUr
ATENCI6N:
Leay BigaTodasIaslndicacfonesde
SegurtdadydeOperact6nAntesde
UtItizarEsteProducto,
Table of Contents .................... 1
Table des matt_res .................. 13
Indice ................................ 25
1-800-4MY-HOME
1-800-469-4663
Sears, Roebuck and Co,, Hoffman Estates, IL 60179 U.S.A
Sears Canada Inco, Toronto, Ontario, Canada M5B 2B8
yer_n 2.8,07

Important Safety Information
Safety Precautions
Grounding Instructions
Location
3
4
4
Operating Instructions
Features of Your Wine Cooler
The Controls of Your Wine Cooler
Setting the Temperature
Wine Storage
Shelf Instructions
5
6
6
7
7
Door Reversal
Care and Cleaning
Helpful Hints
How to Clean the Inside
How to Clean the Outside
9
9
9
Trouble Shooting
Before You Call For Service
Warranty 10
tl

This owner's manual provides
information necessary for the
proper care and maintenance of
your new appliance. If properly
maintained, your Wine Cooler wtll
give you many years of trouble
free operation° To avoid difficulties,
read these Instructions completely
before starting.
For easy reference, you want to
attach acopy of your sales receipt
to this page. This information is
needed when you contact a
Customer Service Representative.
Start Here!...Before using your Wine Cooler
Write down the date of purchase and serial number in the spaces pro-
vided below_The serial number is located on a white label on the back
of the Wine Cooler.
Modelnumber: 461,99130
Serialnumber:
Datepurchased:
Before you call for service,
there are a few things you can
do to help us serve you
better...
Read this manual
It containsinstructionstohelp
you use and matntatn your
applianceproperly_
If you received a
damaged appliance...
Immediately contact the
dealer (or builder) that said
you the Wine Cooler.
Save time and money
Check the Trouble Shooting
section before calltng. This
section helps you solve
common problems that may
occur°
if you do need service, you
can relax knowing help Is only
aphone call eway_
Tel', 1-800-4MY-HOME
2

READ ALL SAFETY INFORMATION BEFORE USING
An empty refrigerator Is a very dangerous attraction to children Remove either the
gasket, latches, lids, lock andtor doors from unused or discarded appliances, or take
some other action to guarantee it harmless
DON'T WAITpDO IT NOWl
To avoid Installationloperatlon difficulties, read these instructions thoroughly
•Thisappliancemust be
grounded Connect onlyto a
properly grounded outlet
See "Grounding Instructions"
sectionon page4
• Do not operate this appliance
ifft has a damaged power cord
or plug,ifIt isnot working
properly,or If the appliancehas
been damaged or dropped
• Do not splice the power cord
thatisequipped with thisapplt-
ante.
• Keep power cord away from
heated surfaces
•Do not Immerse powercord,
plug or the appliance itselfIn
water
•Do not use this productnear
water-for example, In awet
basement, near a swfmmlng
pool or near a sink_
•Do not use corrosive
chemicalsor vapors inthis
appliance
•Use this appliance only for
it's Intended use, asdescrtbed
in this manual.
• Do not store perishable food
Items such as (but not limited
to) meats and dairy products
In your wine cooler
• Store wine in sealed bottles
only
• See door surface cleaning
instructionsin the Care and
Cleaningsection(s)of this
manual
•Do not cover or block any
openings on the appliance
•ThisapplianceIs intendedfor
household use only Do not
attemptto operate or store this
applianceoutdoors°
•Thisapplianceshouldbe
serviced only by qualified serv-
Ice personnel Contact the
nearest authorized so.Ice
facility for examination, repair
or adjustment
SAVE THESE INSTRUCTIONS
3

Improper use of the ground*
fngplug can result in a riskof
electrical shock.
"-4__
f27 mm
Allow 13 I/4" (33,7 ore) of
apace between the {hinge)
side ofthe door and any
adjacentwall to
accommodatedoor swing.
This appliancemust be
grounded. In the event ofan
electrical shortcircuit,ground-
Ing reduces the risk of electric
shockby providingan escape
wire for the electric currenL
Forbest operation, plug this
applianceintoItsown electri-
cal outletto preventflickering
of lights,blowingoffuseor
trippingof circuitbreaker.
This applianceIs equlpped
witha powercord having a
groundingwirewith a ground-
ing plug. The plug must be
plugged intoan outlet thatis
properly Inslalled and ground-
edr
Consult aqualified electrician
or service techniciantfthe
grounding Instructions are not
completely understood,or If
doubt exists as towhether the
appliance ts properly ground-
ed.
if Ihe outlet ts a standard 2-
prong wall outlet, it is your per-
sonal responsfbliity and obliga-
tion to have tt replaced with a
properly grounded 3-prong
wa!] outlet,
Do not under any circum-
stancescutor remove the
third (ground)prong from the
power cord.
Do not usaan adapterplug
withthisappliance.
Do not usa an extension
cordwith thisappliance, _fthe
power cord is tooshort, have
aqualified electricianor sew-
Ice technicianInstall an outlet
near the appliance,,
DOn., DO NOR,.
•Selecta location with a
strong, level floor
•Allow 5Inches of space
between the back ofthe
applianceand any adjacent
wall,.
•Avoid direct sunlightand
heat,, Direct sunlight may
affect the acrylic coating,
heat sourcesnearby will
cause higher electricity
consumptlom
• Use thla appliance
outdoors: This appliance Is
intended for householduse
only. Do not attempt to
operate or storethis
applianceoutdoors
-Build this appliance
Into an enclosure: This
appliance isdesigned for a
free-standing appllsafion
only and is not intended to
be "bullt4n".
4

®
1 Child Proof Lock with Key 4, Stainless Steel Trim Racks
2. Magnetic Door Gaskets; T_ghtfitting
seals retain all the coolingpower and
humidity levels_
5_ Dual Electronic Controls: For Individually
regulatingthe temperature for boLh
compartmentsof Ihewine cooler,
3. Tempered Glass Door: Tinted for UV
protectionwhile stillallowingfor easy
interiorviewing.
6. Leveling Legs
Wfdth 1944 in,,/493 mm
Height 33,06 in./840 mm
Depth 24,13 in.16t3 mm
Net Wefght

Q® ® ® ®
",,Upper chamber \Lowerchamber /_ ,_
l o_ "I",7 lot ,,q_ _.uppo,
O oF] I°F
Activation | j _ ...... ,......
CHAMBRE SUP_RIEURE CHAMBRE INFI_RIEURE
LIGHT @
m
LAMPE
1, Run :indicatorlight illuminatesto signify the
cooling mode ts currentlyin operation,
2. Upper Chamber Display : Display screen
shows currentcabinettemperature and set
temperature of the upper zone,
3. [,ower Chamber Display ; Display screen
shows currentcabinettemperature and set
temperature of the lower zone,
4. _C/°F:Adjacent Indicator light denotes which
scale of temperature isdlsplaye&
5, 'Set Upper' Button : Used toset the
temperaturein theupper zone (see 'Setting
the Temperature' below).
'Set Lower' Button : Used to set the
temperatureIn Ihe lower zone (see 'Setting
the Temperature'below)
6. 'I_Switch: Continuous illumination.
'O' Switch: Illumination only when the door is
open,
IIIIIIIIIIIi_1_[ ];tlr;_lJid
In the event of apowerfail-
ure,wait3to 5 minutes
before restarting.
• Toswttchthe display between
the Fahrenheit (°F) and Celsius
(°C) scale, depress the 'Set
Upper' and 'Set Lower' control
buttons simultaneously for
approximately five (5) seconds,
•The temperature range can be
set as low as 39°F(4°C) or as
high as 64°F (I8°C) to suit your
specific wine storage require-
ments, Each depression of the
'Set Upper' or 'Set Lower' button
will allow you to adjust the tem_
perature in 1° incrementswithin
the aforementioned range,
•You may view your 'set' tem-
perature at any time by bdefiy
depressing either the 'Set Upper'
or 'Set Lower' button, The set
temperature will flash In the dis-
play area for 5 seconds before
the display resumes showing the
currentcabinettemperature..
6

Store wine in sealed bottles
only.
The maximum* wine capaci-
ty of your wine cooler Is 38
(750 ml) bottles.
*Whenstockedes per tnstruc-
_nso
In order to achieve the maxi-
mum capacityof thirty-eight
(38) botUes,itwill be neces*
sary topositionthe bottles
alternately on the upperfour
(4) racks, as shown inFig. A
Thiswillallowfor the storage
of seven(7) 750 ml botties
per racktn each of the top
four (4) racks,and five (5)
bottles on the bottomtwo (2)
racks(Ftg. B)
tf humidity conditions ere low,
itwlttbe necessary to use the
humtdor-Ftltthe humidor
about3/4 ful! withfresh water,
and place one humidor on the
bottom rack ofeach compart-
ment. Check the water Isvet
occasionally and refill as nec-
essary,
NOTE: The use of the humi-
dors will reduce the storage
capacityofthe racks onwhich
theyare placed by one bottle.
i
rl
L
Fig, A
Full depth racks(x4)
35
M
u4
Half depthracks (x2
Fig, B
Do not cover racks with alu=
minum foil or any other mete-
dal that will preventadequate
air circulationwithin the cabi-
net.
Toremove arack from Its
locked position, tiltthe rack as
shown in Fig. C and pull out-
ward
To re-Install, ensure the rack
is resting securely on the sup-
pod brackets and push the
rack inward until it locks Into
place, Fig. C

Phlliips #2 screwdriver and an adjustablewrench,
W.'I ;| _II _[_ rmlU_WmBumm
IExcessiveWeight Hazard
Usetwo or more peoplewhen moving the wine
cooler,
1. Unplug the wine cooler and lay the uniton its back.
2. Unscrew the two Leveling Lags; one from the
bottom hinge on rightand one from the left side of the
unit (see Fig. 3and Fig. 4 for locations).
3. Remove the bottom hinge by unscrewing itsthree(3)
screws (Fig, 2),
NOTE; Keep this hinge tn a safe place incase
you need to return to aright hand door swing,,
4, Carefully remove thedoor and set aside by sliding
it downward off of the top hinge pin,
5, Remove the two (2) plastic screwcaps rocatadon top
ofthe hinge cover (Fig. 1).
6, Remove the top hinge cover by removing its two (2)
screws (Fig, 1).
7o Remove the top hinge by unscrewing its three (3)
screws (Fig. 1)
8, Remove the plasUodoor p(ncap from the top left
side of the door and transfer it tothe right side of the
door,
9, Remove the three (3) Plastic ScrewCaps from the
lop left,side of the cabinetand transferthem tothe
toprightsideof the cabinet(Fig.6),
10. Installthe tophinge on the leftside ofthe unit and
secure with three(3) screws. (Fig, 1)
11. Install the hinge cover back on the top hinge and
secure with two (2) screws, (Fig. t)
12. instalt the two (2) plastic screw caps on the hinge
cover,_(Fig. 1)
13, Carefully install the door on the cabinet (Insert upper
door intotop hinge pin),
14. Using the left-side bottom hinge suppliedwith your
unit (FlgoS):Insert the hinge pin Into the bottom of the
door,then align the holes in the hinge with the holes
in the cabinet and secure hinge to cabinetwith three
(3) screws°
15. lnsta!l the LevelingLeg formedy attachedto the
right bottom hinge(Flgo4)onto the new left bottom
hinge, and installthe Leveling Leg from the former
left side position intothe dght side position (Fig.3),
16, Check door aflgnment, door seal and ensure the door
lock slides comfortably Into the lock chamber, Tighten
al! hinge screws,
Allow the unit to stand upright for at-least 1 hour
before putting the unit intooperation,
Fig.6
PlasticScrew Ca
Fig,1
Top Hinge
Assembly
og
Fig° 2
Right Bottom
Hinge Assembly
¸
Flg,5 ! J
Left Boftom
Hinge Assembly ............ Flgo4
8LevelingLeg for Bottom Hinge

Be certain the power is off before cleaning any part of this appliance,
Allow the winecooler door to
remain open for a few mtnutss
after manual ctsaningto air cut
and dry the Insldeof thewine
cooler cabtneL
Never use any commercialor
abrasive cleaners or sharp
objects on any part of the
wine cooler,
Wails, Floor, Inside
Window, and Shelves
Water deposits and dustcan
be removed wl_hadamp cloth.
Humidors
Wash carefully tn warm, sudsy
water, The humidor can be
broken If dropped,
IMPORTANT;
Toavoid breakage, do not
placeHumtdor Into hot water
Immediately upon removing
from achtlled wine cooler cabi-
net.
Do not use cleaners contain-
tng ammonla or alcohol on
the wine cooler.
Ammonia oralcehol can dam-
age the appearance of the
appliance.
Outer Case
It's Important to keep the area
clean where the door seals
against the cabinet, Clean Ihls
area with a sudsy clolh,, Rinse
and Ihen dry,
Door surface
Use only mltd, non-abrasive
detergents appliedwflh aclean
spongeor soft cloth. Rinse
well.
Control Panel and
Door
Wtpa with edamp cloth and
dry thoroughly.Do not use
cleaningsprays,large
amountsof soapand water,
abrasive or sharpobjects on
the panel, they can damage It.
Some paper towels may also
scratchIhe controlpanel and
doorglass,
9

Before You Call For Service
Problem Possible Cause What to do
No Power. Afuse in yourhome may Replace fuse or resetclrcutt breaker,
be blown or thecircuit
breaker tripped,
Power surge Unplug the wine cooler, wait a few
seconds and then plug it back In.
Plug not fullyInserted into Make sure the3-preng plugon the
walloutlet wine cooler Is fully insertedintooutlet,
Cabinet Temperature
too High Temperature setting Verify the temperature control setting.
Adjust if neccessary
Door not shut properly
oropened excesslvaIy EnsureIhat the door Is fully closed
and thai the gasket is sealing
againstthe cabinet. Open the door
only as needed and for short periods
of tlme.
RecenUyadded a large
quantity ofwarm bottles
to the cabinet
Limit the quantityofwarm bottles
being introducedto the cabinet at the
same time Attempt to phase tn the
load IntroducJJonif possible°(i.e. load
no more than 6warm bottles at once-
3percompartment)
"C|lcklng" Noise
CondensaUon on the
cabinet endlor doors
Normaf sound
High humidityconditions
in the home
No user intervention ls required as
thissound isnormal during the opera-
tionof the appliance Thts audible
'clicking' noise may be heard as the
wine cooler endsor begins a cooling
cycle.
The condensation wil! subside once
humidity conditionsreturn to normal
Door not shut properly
or opened excessively Ensure that the door ts fully closed
and that the gasket Is sealing
against the cabinet. Open the door
only as needed and for shortperiods
of time.
If none of the above reclines the situationplease contact our customer care depart-
ment at 1-800-4MY-HOME (1-800-469-4663)
10

Kenmore Appliance Warranty
One Year Limited Warranty
Wheninstalled,operatedandmaintainedacsudiagthaUinstructionssuppttsdwiththeprcducl,ilIbisappliancefWieduelo adetectiomeledalorwerkmanship
withinoneyearfromthedotselpurchase,callFBOO-4-_Y-HOME@Isarrangeforfreerepairli thisapplianceisusedetherthantotpiN,sisfamilypurposes.
thlswarrantyapptieebrentygOdaysimm[hedateofporuhass
TERMSOFWARRA_P/
ThiswarrantysaversonlydefectstnmaterielandworkmanshipSearswiltNOTpayfor:
I Expendableilsmslhatcanwearcutfromnormaluseincludingbutnotr_milsdIsliI_em,bolts,IighlhWhs,andbags.
2Asen/icetechniciantoinstructIhsuserinco_;sslprodaclaasemh_/opstalinnatmainlena_e
3 AserviceiechnicbnIodeanormsthlainthisproducL
4DamageIoorleilum_fIbisproductil iIisnslassembled,operaledormothtainsdaccordthgtoalli_Iruciionssuppliedwilhthe
pred_cl
5. Dama_jeIoorlaiinwofthispresetresultingIruma_idsnl_abuse,mLsu_oruseforolherthanitsin_sndedpwpoas
B DamageIsorrailersofthispraduclcausedbytheusaofdola_j_nls,cieenePsts_em_alsorutensilsolhsrt_n thoserecommendedInall
insiruslienasuppliedwiththeproduct
?DamageIsatrailerse{partsorsystemsresellingfromunauthorizedm_d_atiensmadetoIbisproduct
EXCLUSIONS
Disclelmefofimplindwarranlies;limitollonofremedies
Customer'ssoleendexclusiveremedyunderthislimitsdwarranlyshallheproductrepo_asprovidedhemthImpl_dwarranties,includiegwarmnliesel
memheniabililyorIllnessforapaJ'tioWarpurpose,amlimiledIsoneyearorthesherieslpedsdaI_vsdbyla_'1Searsaf'_fInolbeliableforincidenlalor
conssqueatlaIdamagesSomeslWasandprovincesdonola_,_tlheexclusionorlimilationofincidentalorsonssqusnti_ldamages,orIimiWIionaonlheduration
el _ptiedwarrentiesalmsrchaniehilityorlitnsss,selhsse_xelusienaorlimilationsmR notapp,/toyou
ThiswarmnlyappliesonlywfltlsthisapplianceIs usedtntheUnitedStalesandCanadaThtswarrantygivesyouapesfflslegalfights,andyoumay
alsohaveotherfightswhichvan/ImmaisleIostale,
Warranty Servler__
In Home
Sears,Roebuck endCo. Depl 817WA,HolfmanEstates,IL 60179
Sears Canada lne_,Toronto,Ontario, Canada M58 2B8
o8/o7


Informations de s6curit6 importantes
Precautions
Instructions de mise & la terre
Emplacement
15
16
16
Instructions de fonctionnement
Caract6ristiques de votre refroidisseur de vin 17
Commandes de votre refroidisseur de vin 18
R_glage de la temp6rature 18
Entreposage des Vins t9
Instruction pour tablette t9
Inversion du sens d'ouverture de la porte
Soin et nettoyage
Conseils utiles
Comment nettoyer I'int_rieur
Comment nettoyer I'extSrieur
21
21
21
En cas de panne
Avant de placer un appel de service 22
Garantie 23
13

Ce manuel du propd_talre
fournlt t'lnformatton n_ces-
salre pour prendre sotnet
entretenir votre nouvel
appareil managero Avec un
entreUen ad_quat votra cabi-
net & vln vous servlra durant
de longues ann_es sans
ennu]so
Pour _viter les ennu}s, llsez
ces instructions au complet
event de I'utlllser.
Pour vous sarv_rde
r,_f_renceencasde beso]n,
vous pourdezvoulolrattach-
erune cople de votre re_u
d'achat _ cette page.
Ceux-cl seront requls sl vous
avez besoin de contacter un
repr_sentant de service.
Point de daparto..AVANT d'utiliser votre Cabinet & Vin
Enregistrez Ict tea num_ros de rood-
hie et de s_de_Ces num_ros se
trouvent sur l'_tlquette au dos de
I'apparelL
Num_.rode module 461.99130
Num_ro de sarie
Date d'achat
Voiciquelquescontributions
qua vouspouvezeffectuer
avantde faireun appelde
service,pour nousaider
mieuxvous servir :
Lisez ce guide
tlcomprenddesinstructions
pourvousassister&l'utilisao
lion etl'entrettenad_quatsde
votrerefroidisseurde vin.
Stvotreappareilneuf est
avari_
Communiquezimm_diatement
aveclerevendeur(ou le man-
u[acturier)
I_pargneztempset argents
Avant de faire unappel de
service,r_visezle chapitre
lntitu{_"Oapannage"Ce
chapitrevous aidera& so_u-
tionnerdes probl_mescom-
munsqutpourraientslJrvenir.
Si une raparationest requ{se.
vouspouvezavoir l'esprittran-
quilleparceque de l'aide ne
sereI'affairequa d'unappel
t@l@phonique.
TaI,: 1-800-469-4663
14

LISEZ TOUTES LES INFORMATIONS DE S¢:CURIT
AVANT DE FAIRE FONCTIONNER L'APPARE1L
IIIIIIIIIIIIIII IIIIIIIIIIIIIIIIIIIIIIIIIII,,q
't
La cavil6 d'un refroldlsseur & vln vide est une attraction tr6s dangereuse pour lee enfants. En sit-)
uatlon de miss au rancart, retirez sol! le joint d'6tanch61t6, tout verrou ou Ioquet, la porte ou cou- l
vercle de tout apparett craux ou prenez d'autres mesur es pour assurer qu't! solt lnoffenstfo )
N'ATTENDEZ PASI FAITES-LE DI_S QUE MtS AU RANCARTI j
Pour eSvlterles dlfficultds durant t'lnstallatlon et/ou Is fonctionnement, life ces direc-
tives attentlvement,
. N'immersezpas(ecordoneusa
fichedensaucunliquids
•Cet appareUdoil _tre mis _ let-
(errs Branchez te seu(emenl dens
une pdse correclemen[ miss _ la
terra R_f_rezwous au chapilreinlit-
u(_"Instruc!ions de m(se _ (alerre"
(apage 16
•Ne [ailespas foncUonner cet
appareii s]l a un cordon ou fiche
_)ectdque endommag_,s'it ne fonc-
(ienne pas correctemenLou si
l'apparei] a _1_endommag_ ou
_chapp6
,N'_pissez pas le cordon 61ecWque
• Gardezle cordon QlecWque
_bign_ des sources de chaIeur
• Nulilisez pascet appareil p_s de
basslns d'eau, par exampledens un
sous-sol d_lremp_, pros d'une
piscine ou d'un _vier
•NuUlisez pasde produils
ch(miques ou vapeurs corrosives
dens/prOs de cat appare((
•N"ulilisezcet appareUqua pour
(esfins auxquel(esi(es[ con;u
comma indiqu8 dens ce guide
• Ne placez pas les arUcles p_tiss-
ables de nouniture dens volta
refro}disseur de vine. (Pour exam-
piem,(as viandes el les produils
lai!iers)
• En[reposez (evin dans des
bouleiIles scell_es seullemen!
• R_f@rez-vousaux(nslrucUonsde
netloyagedufinide taporteselrou-
rant eu(x)chapitre(s)deSoinset
netloyagedeceguide
'Ne recouvraz pas ou n'obstruez
aucuna ouvedure de I'eppareiI
,Get appareilest con_;:upour un
usage domeslique ,_I'int_deur
seutement N'enlreposez ni n'u-
tilisezpas cat appareil _ Fext_deu_
• Cat apparetlne devrait _tre r_p_r_
qua Far du personnef quaIUi_ Pour
lout examen, reparalion ou r6glage,
conlactez vob'e cenlre de service le
plusmpproch_
SAUVEGARDEZ CES INSTRUCTIONS
15

Cat apparalldolt_tre mls & la
terra. Densi'_,ventuallt_ d'un
coud-ctrcuit,lamiss & la terra
procure unchemin direct de
contoumement du courent
pour pr_ventr l'_lectrocutlon
des manipulateurs de l'ap-
parelL
Cat appareUsat munl d'un cor-
don comprenantune fiche et
fit de mtse _ ta tarra_
La fiche dolt §Ire branch_e
dane une pdsecorrectement
install_eet miss _ la terra
Si tee dtrecltves damtse _ la
terra ne sent pas tout &feit
comprises ou en cas de tout
doule ralatift=la miss _ la
terra approprl_e de I'apparefl,
faites appet &un _lectrlclen ou
un technicianqua!lfi_.
Si la pdsemurals est une
prise A 2 branches, c'est votra
obltgatlan, st la rasponsabilJt_
vous en tncombe,de la fairs
remplecar par une prise btrois
branches ad_quatemant mfsa
ta terra,
Pour un meillaur rendement at
pour dviter que lee ampoules
d'_clairaga de ta r_s}dence
sotent affect_esd'un affafsse-
ment de tension,ou qua le
fusible ou disJoncteur du circuit
ne gdlls oune sa d_clenche,
d_diez un circuit Individual
d'altmentallon & ta machtne
gla_ons (prise (double) unique
surte circuit),
Sous attcun pretexts il eat
parrots de couper ou d'enlever
la troistbme brancha (miss _ la
ten'e) de la fiche du cordon
_lectrique,
N'utllisez pas d'adeptateur
defiche avac cat appareii,
N'utlllsez pas de cordon dB
rallonge avac cat apparetL SI
lecordon _lectrtqua de rap-
parell ne rejolnt pas la prise
murals, faites installeruna
prise plusrappmch_e par un
_lectricien ouun technician
qualtfi_.
AFAIRE : NE PAS FAIRE :
Laissez 13W' 133,7cm1d'e
space entre la cSt_,da la
pode (charnl_re) et tout mur
adjacentpour permettre You-
verture de la pods.
• Cheislr unendrolt avec un
plancher sotfdeet au
niveau,,
• Laisser un espace de 13 cm
(5 pc) entre rarri_ra de
I'apparetl et tout mur
adlaca2t.
• _viter Iexposition au soletl
direct et _ la chaleur.Le
soleildirect peut affecterla
couche d'acryItqua.Lss
saumesde chateur
proximit6 peuvent causer
une ptus grands
consommafion d'_lectdcit_,
16
• Utlllser cet apparell
t'ext_rleur: Cat apparel!a
_t_ congupourusage
domestlque seulement NB
pas fairs foncttonner ou
entreposer cat epparetl
I'ext_deur,
•Incorporer cat apparell
dens une armoire: Cat
apparellest con_upour une
ufiltsation autonome
seulement et n'estpas
pr_vu pour_tre encastr_

®
®
1. Varrou ii I'dpreuve des enfants
2. Joint I_tanche Magn6tlqus: Le joint
6tanche permetde conserverte niveau de
temp6ratureet d'humldtt6_ l'int6rlsur du
cabinet.
3. Portes en Verre Tramp6: Te|nt_ pour
protdgercontrelss rayons UV tout en
permettantde voir facllement tecontenudu
cabinet
4. Tabtetta avec garniture en aclar
Inoxydable
5. Double commands 61ectronlqus ; Pour
ajuster tatemperature des deux
compartimentsdu refroldtsseur de vin
Individualism ent.
6. Pleds AdJustables
Pmfondaur
493 rnm (19,44 po)
840 mm (33,06 po)
613 mm (24,!3 pc)
Poidsnet
-. maximum) 39 2~64.4°F /4~18°C
44 kg (97 Ib)
17

C®\\",Upper chamber
_'_ RUN@ I'_,
AoUvatlon
k._,, ,
%.......
@ ® @
\\ 7
°C ,Lower chamber ,// eel Up_r
oFoF_ sotLo_r
CHAMBRESUPf:RIEURECHAMBREINF_R_EURE
................................................. ),,J
1. Activation : Le voyants'allume pour Indiquer
qua la cycle de rafroldtssement est
presentment en mamhe.
2, Afflchage du Chambra Sup6rleure : L'6cran
afftohe Is temp6ralurecauranta du chambre
sup6deura et la temp6ratura demand6a par
r_glaga_
3. Affichage du Chambre Inf6rlaure : L'6cran
amche le temp6raturacourantedu chambre
Inf6rlaureet la temperaturedemand_e par
r_glage.,
4. C°IF°:Le voyant sftu6s &c616,d6note quelfa
balance de la lemp6rature est reentrY,e,
LIGHT @
LAMPE
'R6glage Sup6rleure' : R6glaz la temperature
du chambra sup6rieure par lntarvalla de un
degrd (r_f6raz-vousau "R6gtaga du
tsmp6rature"cl-dessous).
'R6glags Inf6rleura' : R_,glezta temp6rature
du chambre lnf_rieurapar intarvalfe de un
degr6 (r6f6rez-vous au "R6gtage du
temp6ratura" cFdessous),
60 Commutateur =I• : Illumination continue
Commutateur • O • :Illumination saulement
quand la porte est ouva_e.
En eas de panne de courant,attain
dez de 3&5minutes event de red6-
marrer.
• Pour changer t'af_chaga
entre la temperature an
Celsius ("C) et la temp6rature
en Fahrenheit (°F) appuyez
sur las bouton de control
'R6glaga Sup6rleure' et
'R_glage lnf6rleure' en mSme
tamps pour environ 5 secom
des,
• La temp6rature pour la
compa_ment paul 6ire
aJust6eausst bases qua 39_F
(4°C) ou aussi haul qua 64°F
(I 8°C) pour satisfalra A yes
besotn sp_clfiques pourvotre
entreposage de vim Cheque
presslon du bouton com-
mands 'R6glage Sup6rleura'
ou 'R6glaga Inf6rleure' vous
18
permettra d'ajuster la tam-
p6rature par Intentalle de un
degr6 (10) dans la marge
mentlonn6e ci-dessus
•Pourvotrle r_gIage de ia
temp6rature (peu importsla
moment), appuyez sur te
bouton de control'R6gtage
Sup6deure' our 'R_glaga
inf6rieura'. La temp6rature
regl6ecllgnoteradens la
fan6tre d'afftchaga pendant
environ 5 secondes et revfen-
draators automaUquamant
raffichaga de la temperature
amblantede la plSca.

Ent_'eposez{evtndensdes
boutellssstall,asssu_lsment
La cabinet&vlnpeutaccepter
un maximum* de tronte-huit
(38) bouteilles de vln de 750
ml.
*Lorsqus charg_es salon/as
Instruct/one
Pour attatndre la capacitd maxi-
mum de trente huit (38)
boutellles, vousdevrez placer les
boutefilas de fa_on alternativesur
lea quatre (4) lablettes du haut,
tel qu'lllustr_ darts Fig. A. Csci
permettra ts stockage de sept (7)
bcuteitlasde 750 ml par tablette
sur chacune des quatre (4)
tablettas du haut, st clnq (5)
boutellles sur tes daux (2)
tabtattas du bas (FIg.B).
St le taux d'humtdttd eat bas, II
sere ndcessalre d'uUHserI'humld-
iftcateur. L'humldlflcateurdolt _tre
rempll d'eau fraTcha aux trois
quarts (¾)0putsplac6 sur cheque
section de la tablette du bas- tl
faut v_dfler le nivsau d'sau _ I'oc-
caston et rempllrde nouveau sl
ndcessaira.
REMARQUE : L'uUl]sationd'hu-
mtdIHcetaurs rdduira la capacltd
de stockaga d'une boutellte sur
las tablettes sur lesque!tes ils
sentplaces.
Tablettes de pleine pro-
fondeur (x4)
4
Fig. A
Tablettes do demt pro-
fondeur (x2)
Fig, B
Ne recouvrez PAS les
dtagi_resde feuilles d'alu-
minium ou de tout autre
membrane qul pr_vtendrait
la circulation de I'air & l'in-
t_rieur du cabinet.
Pour eniever une tabtette de la
position verrouil;da, incline l'd-
tagdro comma montrd darts la
flgue C et tire_ rextdrtsur.
Pourr_installer, assurez l'dtag_re
se repose sur les supports et
pouss_e la tablette vers I'In-
tdrtaurjusqu'&ce qu'alla soitvar-
routtlde en place
-i ,l
FlgoC
19
Other manuals for 461.99130
1
Table of contents
Languages:
Other Kenmore Wine Cooler manuals

Kenmore
Kenmore Wine cellar 13355 User manual

Kenmore
Kenmore 461.99130 User manual

Kenmore
Kenmore 14242 User manual

Kenmore
Kenmore 46-99130 User manual

Kenmore
Kenmore 461.99610 User manual

Kenmore
Kenmore 461.99619 User manual

Kenmore
Kenmore Kenmore 13485 User manual

Kenmore
Kenmore 255.99249 User manual

Kenmore
Kenmore 255.99269 User manual

Kenmore
Kenmore 9910 - 126 Can Beverage Center User manual