Kenmore 9910 - 126 Can Beverage Center User manual

OWNER'SMANUAL
GUIDE DU PROPRII_TAIRE
MANUALDELUSUARIO
461.99100
CAUTION:
ReadendFollowAllSafetyRulesend
OperatingInstructionsBeforeFirst
UseofThisProducL
ATTENTION:
Avantdefairs fonclionnercette
machine,lteezetsufvezroutesles
constgnesdes_eurft_deeeguideen
premierlieu
ATENCI6N:
LeaySlgaTodaalaslndlcactonesde
Ssguridady deOperacibnAntesde
UltffzarEsteProducfo-
Table of Contents .................... 1
Table des matibres .................. 13
Indice ................................ 25
1-800-4MY-HOME
1-800-469-4663
Sears, Roebuck and Co. Hoffrnan Estates, IL 60179 US.A
Sears Canada Inc., Toronto, Ontario, Canada M5B 2B8
wn_on 2_8,07

Important Safety Information
Safety Precautions
Grounding Instructions
Location Requirements
3
4
4
Operating Instructions
Features of Your Beverage Centre 5
The Controls of Your Beverage Centre 6
Setting the Temperature 6
Beverage Storage 7
Shelf Instructions 7
Door Reversal
Care and Cleaning
Helpful Hints
How to Clean the Inside
How to Clean the Outside
9
9
9
Trouble Shooting
Before You Call For Service
Warranty 10
11

This owner's manual provides
information necessary for the
proper care and maintenance of
your new appliance, If properly
maintained, your Beverage Centre
will g_veyou many years of trouble
free operation. To avoid di_culties,
read these instructions completely
before starting.
For easy reference, you want to
attach a copy of your sales receipt
to this page, This information ls
needed when you contact a
Customer Service Representative.
Start Here!...Before using your Beverage Centre
Write down the date of purchase and serial number in the spaces pro-
vided below° The sedal number ls located on a white label on the back
of the appliance.
Model number: 461,99100
Datepurchased:_
Serialnumber:
Before you call for service,
there are a few things you can
do to help us serve you
better;..
Read this manual
it contains instructionsto help
you use and maintain your
appliance properly.
If you received a
damaged appliance...
Immediately contact the
dealer (or builder) that sold
you the appt[ance.
Save time and money
Check the Trouble Shooting
section before calling. This
section helps you solve
common problems that may
occur.
If you do need service, you
can relax knowing help ts only
a phone call away.
Tel: 1-800-4MY-HOME

READ ALL SAFETY INFORMATION BEFORE USING
An empty beverage centre is a very dangerous attraction to children. Remove either
the gasket, latches, lids, tock and/or doors from unused or discarded appliances, or
take some other action to guarantee tt harmless_
DON'T WAIT, DO IT NOWl
To avoid Instailatlonloperatlon difficulties, read these Instructions thoroughly.
• This appilance must be
grounded.Connectonly to a
properly grounded outlet.
See "Grounding Instructions"
sectionon page 4.
•Do not operate this appliance
if It has adamaged power cord
or plug, if It is not working
properly, or if the appliance has
been damaged or dropped.
• Donot splicethe power cord
that ts equippedwith thisapplF
ance_
• Keep power cord away from
heated surfaces
•Do not Immerse power cord,
plug or the appliance itself tn
walero
. Do not usa thisproductnear
water-for example, ina wet
basement, near a swimming
pool or near aslnk_
• Do not usa corrosive
chemicalsor vapors Inthis
appliance.
• Use thisapplianceonly for
It's intendeduse, asdescribed
In this manual
, Donot storeperishablefood
items suchas (but not ifmited
to) meats and dairy products
in your beverage centre.
•Store beverages in seated
bottlesonly.
. See door surface cleaning
Instmctlonsinthe Care and
Cleaning section(s)of this
manual.
•Do not cover or block any
openings on the appliance.
•This appliance is intended for
household use only Do not
attempt to operate or store this
appliance outdoors
• This applianceshould be
serviced onlyby qualified sew-
ice personnel. Contact the
nearest authorizedservice
facltlty for examlnaUon, repair
or adjustmenL
SAVE THESE INSTRUCTIONS
3

improper use of the ground-
Ing plug can result In a riskof
electrical shock.
Thisappliancemust ba
grounded.In the event of an
electrical short circuit,ground-
ing reduces the risk of electric
shockby pmvidtngan escape
wire for the electric currenL
For bast operaUon,plug this
applianceintoIts ownefectrl-
oat outlet to prevent flickering
of ltghls, blowing of fuse or
trippingof circuit breaker.
This appliancets equipped
wllh a power cord havinga
groundingwirewith aground-
ing plug. The plugmustbe
plugged into an outlet that Is
properly Installed end ground-
ed.
Consult aqualified electrician
or service technicianif the
grounding Instructions are not
completelyunderstood, or tf
doubt existsas towhether the
appliancets properly ground-
ed.
If the ouflet is astandard 2-
prong wall outlet,It is your per-
sonal responsibilityand obliga-
tiontohave tt replaced with a
properIy grounded 3-prong
well ouflair
Do not under anycircum-
stancescut or removethe
third(ground) prong from the
power cord°
Do not use an adapter plug
withthis appliance.
Do not use an extension
cordwith thisappliance, Ifthe
power cord is tooshort,have
aqualified electrtctan or serv-
ice technicianInstall an cutter
near the appliance.
DO_m_ DO NOT..
• Select alocafion withe
strong, levelfloor.
•Allow 5 inchesof space
betweenthebackofthe
appliance and any adjacent
wall
• Avoid direct sunlight and
heat. Direct sunlight may
affect the acryliccoating,
heat sources nearby will
cause higherelectricity
consumption.
• Use this appliance
outdoors: This appliance is
intendedfor householduse
only. Do not attemptto
operate or storethis
applianceoutdoors
•Build this app|tance
Into an enclosure: This
appliance is designed for a
free-standing application
only and is not intendedto
be "buitFtn"
Allow 13 It4" (33°7 cm) of
space betweenthe (hinge)
side of thedoor and any
adjacent wall to
accommodate door swing. 4

®
1_ Electronic Display and Controls: For
viewingand regulatingthe temperature of
the Beverage Center.
2_ Child Proof Lock with Key
3, Interior Light Toggle Switch; To
manuallyillumInataiaxtlngu]shthe interior
lights,while doorremainsclosed
4oTempered Glass Door: Tintedfor UV
protactlonwhtIa still aliowirig for easy
Intedorviewing.
5, Stainless Steel Trim Shelves
6. Wine Rack: AI(owsforstorageof up to
seven (7) bottlesof'wins
7. Leveling Legs
8, Magnetic Door Gaskets: Tightfitting
seals retainall thecoolingpower and
humiditylevats_
Width 19444)n. 1493 mm
Height 33.06 In_1840 mm
Depth 2413 in. /613 mm
(Minimum ,- 39"2"_64'4°F/4-18°C
Net Weight 97 lbs /44 kg
5

\,TEMP.SET
\,, RuNi'_
Activation [
¢ ¢ ®
'\\\DISPLAY /_'_
@v
RI_GLAGE DE TEMR AFFICHAGE
LIGHT C_
LAMPE
1. Run : Indicator lightIlluminates to signify the
coolingmode is currentlytn operation,
2, Set Temperature Display: Displayscreen
showsthe temperaturesetting (se_'Se_ngthe
Temperature'below)
3. Cabinet Temperature Display: Display
screen shows the current cabinettemperature,
4o °C/°F :Adjacent indicatorlight denotes which
scale oftemperatureIs displayed.
5. 'UP(+)' Button: Used to raisethe temperalure
(warmer) in 1° degree increments.
'DOWN(-)' Button: Used to decreasethe
temperature (cooler) In 1° degree Increments,
6. 'I' Switch: Continuous illumination.,
'O' Switch: Illumination only when the dooris
open.
mIh,tl'.=.];_,r-l_l,m
In the event of a power fail-
ure, walt3 to5 minutes
before restarting.
•To switch the display
between the Fahrenheit (°F) and
Celsius (°C) scale, depress the
UP(+) and DOWN(-) control
buttons simultanously for
approxfmateiy five (5) seconds
•The temperature range can
be set as low as 39°F (4°C) or
as high as 64°F (18°C) to suit
your specific storage require-
ments. Each depression of the
UP(+) or DOWN(-) button will
allow you to adjustthe tempera-
ture In 1°degree Increments
within the aforementioned
range° 6

The maximum* capacity of
the 461.99100 Is t24 (350
m{) cans or 88 cans and 7
(750 ml) wine bottles
*Whenstockedeeper
fnstlttctlons.
Store beverages In sealed
bottles oniy.
Top Shelf:
Holds 18 cans laying
on theirsides-
2ndand 3raMiddle
Shelves;
Each holds 35 cans
(70 total) standlng verti-
cally.
Base (wlth Wine Rack):
Holds up to7 wine
bottles
Baee (without wine
Rack):
Holds 36 cane, when the
cans are stacked laytngl
on theireldeSr
Do not cover shelveswith
aluminumfoil or any other
matedel thatwill prevent
adequate air circulation
wlthlnthe cabinet,,
Toremove a shelffrom Its
locked position,tiltthe shelf
as shown InFig. A and pull
outward,,
To re-install, ensure the shelf
is resting securely on the
support brackels and push
the shelfinwarduntil tt locks
Into place
FIg. A
Note: The bottom wine rack
te not secured in place
(locked). Do not attemptto
pull on the rack when tt Is
stocked,
7

Phltlips#2 screwdriver and an adjustablewrench.
Excessive Weight Hazard ]
Usetwo or more people when movingthe beverage
centre.
13.
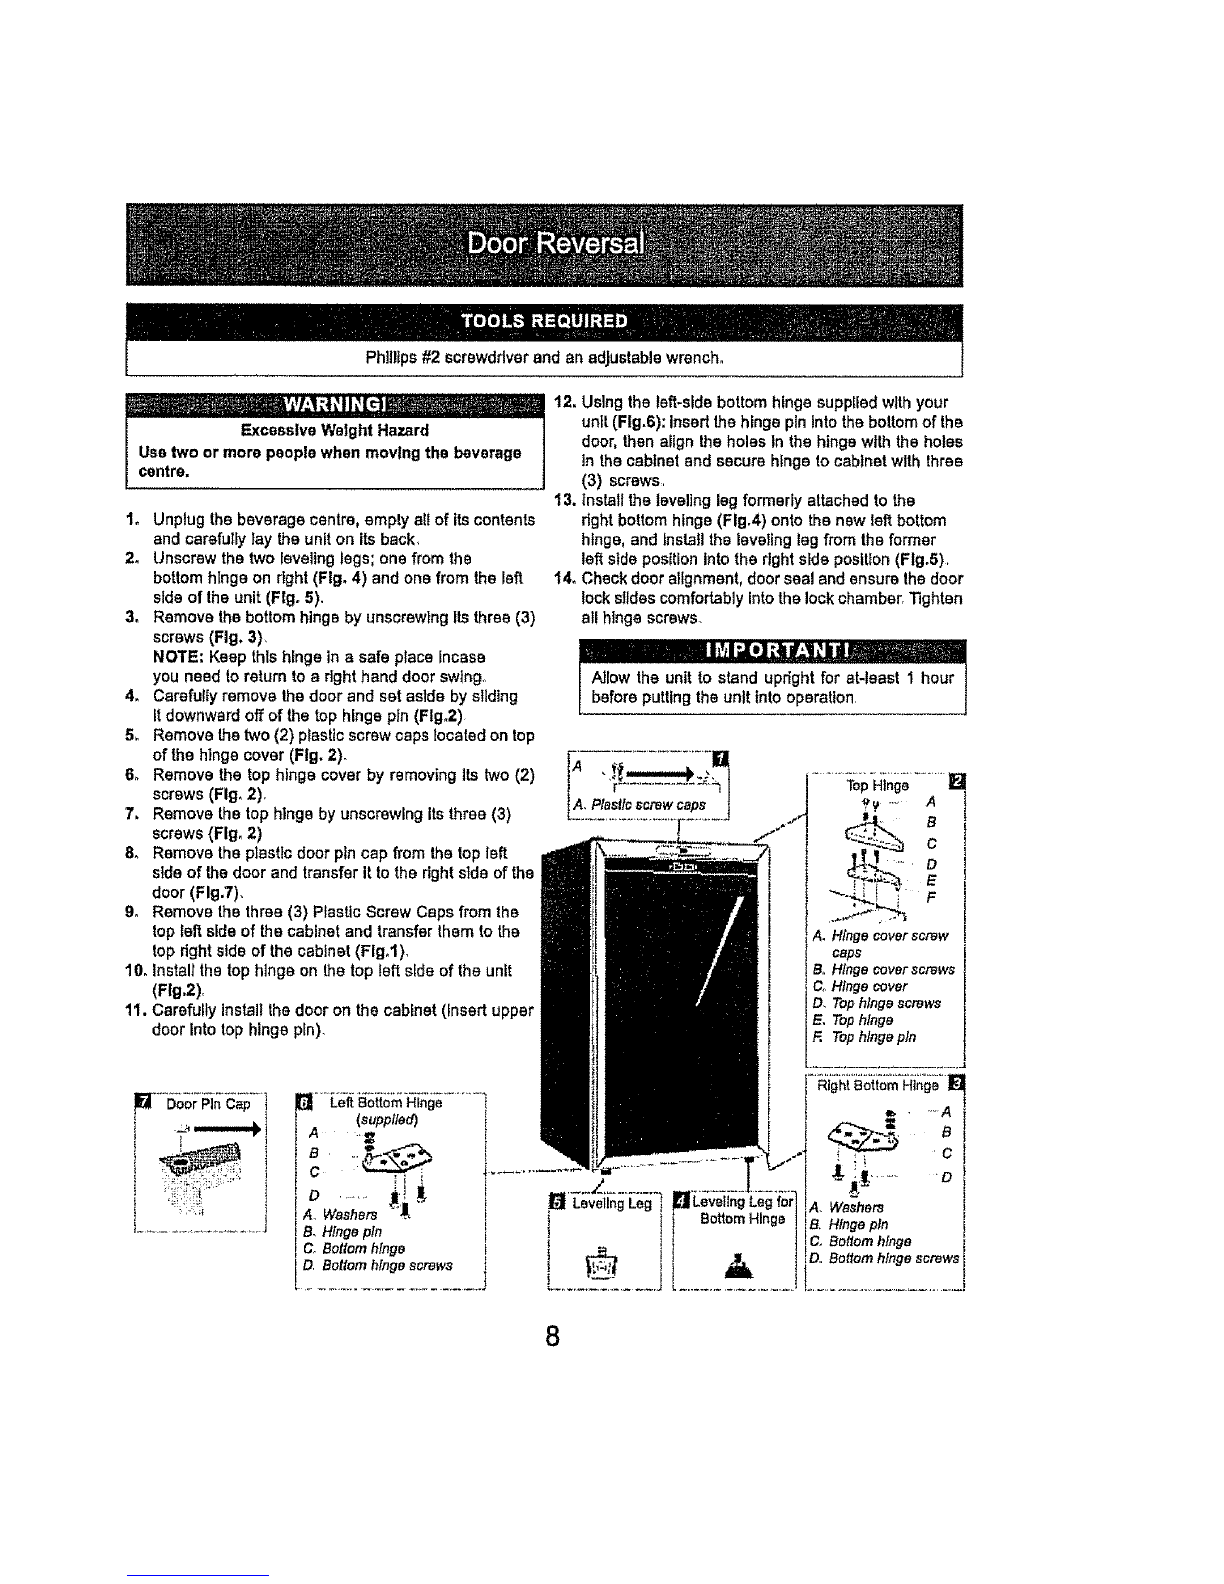
1, Unplug the beverage centre, empty all of itscontents
and carefullylay theuniton its back,
2, Unscrew the two levelinglegs; one from the
bottom hinge on right(Fig, 4) and one from the left.
sideof the unit (Fig. 5).
3. Remove the bottom hinge by unscrewing itsthree (3)
screws (Fig, 3)_
NOTE: Keep thishinge in a safe place incase
you need to returntoa right hand doorswing°
4, Careful;yremove the doorand set aside by sliding
itdownwardoff of the tophingepin (Flgo2)
5, Removethe two(2) plasticscrewcaps locatedon top
ofthe hingecover (Fig, 2)_
6, Remove the top hinge cover by removing its two(2)
screws (Fig, 2),
7, Remove the top hinge by unscrewing its three (3)
screws (Fig, 2)
8. Remove the plasticdoor pin cap from the top left
side ofthe door and transfer it to the right sideof the
dear (Fig.7).
9° Remove the three (3) Plastic Screw Caps from the
top left side of the cabinet and transfer them to the
topdght staleof the cabinet (Flgol).
10. Instalt the top hinge on thetop left side of the unit
(Ftg,2).
1t. Carefully installthe door on the cabinet (insert upper
door into top hinge pin).
t4o
Using the left-sidebottom hinge suppiledwithyour
unit (Fig.6); insertthe hinge pin into the bottom of the
door, then align the holes In the hinge with the holes
in the cabinetand secure hinge tocabinetwith three
(3) screws,
install the levelingleg formerly attached tothe
dght bottom hinge (Fig.4) onto the new leftbottom
hinge, and installthe leveling leg from the former
left side position intothe right side posttton (Fig.5),
Check door alignment, door seal andensure the door
lock slides comfortably intothe lock chamber. Tighten
all hinge screws.
I_'tl;J[o];,b#.'l_bd-- - _
AIlow the unit to stand upright for at-least 1 hour l
before puttingthe unitInto operation. J
$_-._ A
A. Hinge cover screw
cap_
B, Hinge cover screws
C_Hingecover
D, Top hingescrews
E. Top hinge
F. Top hinge pin
, iiiii7¸<.......!
I.......i¸;171............l
tl!A"Le-f{i3_7i{7_-H'T_';,+_..........
(supriied)
i j _ ,._
..... i!i
IB, Hinge ptn
! _ Bottomhinge
! °- .......
8

AIIow the door to remain open
for a few minutes after manual
cleaning to air out and dry the
fnslde of thecabinet.
Never use any commemla!or
abrasive cleaners or sharp
objects on any partof the bev-
erage center,
Walls, Floor, Inside
Window, and Shelves
Water deposits and dust can
be removed witha damp cloth
Do not usa cleaners contain-
ing ammonia or alcohol
Ammonia or alcoholcan dam-
age the appearance of the
appliance.
Outer Case
It's important to keep the area
clean where the door seals
against the cabinet, Clean this
area with asudsy cloth, Rinse
and then dry.
Door surface
Use only mlid, non-abrasive
detergents appliedwith a clean
sponge or soft croth, Rinse
well,
Control Panel and
Door
Wipe with a damp cloth and
dry thoroughly.Do not use
cleaning sprays, targe
amounts of soap and water,
abrasive or sharp objects on
the panel, they can damage it.
Some paper towels may also
scratch the control panel and
door glass,
9

Before You Call For Service
Problem Possible Cause What to do
No Power. Afuse inyour home may
be blown orthe circuit
breaker tripped,
Replace fuse or reset circuitbreaker,
Power surge, Unplug the beverage centre, wait a
few seconds and then plug it back in,
Plug not fully inserted lnto Make sure the 3-prong plug on the
wall outlet beverage centre ts fulIy inserted Into
outlet,
Cabinet Temperature
too High Temperature setting Verify the temperaturecontrol setltng_
Adjust ifneccessary,
Door(s) not shut properly
or opened excessively Ensure that the doors are fully closed
and that thegaskets are sealing
against the cabinets Open the doors
only as needed and for short periods
of time
Recentlyadded a large
quantity ofwarm bottles
tothe cabinet
Umit the quantity of warm botlles
being Introduced to the cabinet at the
same tlme_Attempt to phase in the
load introductionifpossible°
"Clicking" Noise
Condensation on the
cabinet andlor doors
Normal sound
High humidity conditions
In the home
No user interventionisrequired as
thissound isnormal during the opera.
lion ofthe appliance. Th_saudible
'clicking' noise may be heard as the
appliance ends or begins acooling
cycle,
The condensationwill subside once
humldtty conditions return tonormal
Door(s)not shut properly
or openedexcessively Ensure thatthe door Is fully closed
and thatthe gasket is sealing against
thecabinet Open the door only as
needed and forshort periods of time.
tf none of the above rectifies the situation, please contact our customer care depart-
ment at 1-800-4MY-HOME (1-800-469-4663)
10

Kenmore Appliance Warranty
One Year Limited Warranty
Wheni_lafled,operaledandmslnlainsdaccordingIoallinslruclionssuppliedwilhtheproduct_if{hisappIia,',,c,_IsiTsduelea dafeclinmaledalorwe[kmanship
wi_inoneyearItemthedaleelpurchase,callI-BDO-4..MY..HOME(_IaarrangeforhoerepairIfthisapplianceisusedelherthanlotpdveleiam_pu{poBes,
lhis,_vstranlyappliesletonly90daysItemlhedateelpurchase
TERMSOFWARRANTY
ThiswaFrantyc_wereonlydefectsin materialandworkmanship.SeatswillNOTpayfor:
I Expendableilemslhalcanwea/eelf_-amnorms{usa,includingbuleelIkni[edtolifters,bells,lightbulbs,andbags
2 Ase_icetechnicianIoinslrucllheuserineO.rreclpfo_uolassembly,operationermalelenaece
3A serv]oetschn_iarlIo cleanermaintainthisproduct
4, DamageIoetfsilulBe([hiepioduelifiliseele_semblod,operaledormeinlainedaccordingtoallinslruofionssuppliedv;ilhthe
producl
5 Damag_toerlaifumofIbisp_oducIresultingfromaccident,abuse,misuseoruseforolherlhanilsinlendedpaipsse
B DamagetoerfailureelIbispmdusleaussdbytheassofdelergsflls,e!ea_rs,chemicelsorulensiIaotherthenlhos_recommendedInel_
lesllu1:|ionssupplledvAIhtheproduct
7Damagereor[sirraofparisDrsyslemstesullin;lfromuesulhedzedmodificationsmadetothisproduct
EXCLUSIONS
Dier,lsimerefimpliedwertsnlioe;limilalionofremedies
Customer'ssoleandexclusivemme_ underth_limilo__'arr_nlyshe_b_p_oductrepairasprovidedhereinImpi_dwsnanlies,includingws_ntiasel
merahanlabililyofIllnessforeparlk:ularpurpose,erel_miledtooneyearellheshe|lestperiodall_vedbyla_vSeatsshallnotbe_sbleforinc{denlalor
consequenlialdamagesSomeslaleeandprovincesdonetsllov_theexclasienorIimilaIionolincidenta_ofconsequentialdameges,erIimilet_esonthedural]on
ofimpliedwarrantieselmemhenl_bililyertilness,so_heeeexeiss_onsorlimilaflonsmaynot@plyteyou
ThiswaRantyappliesoelywhilet_ieapplianceleusedIntheUnliedaislesendCenadaThlewarrantygivesyouspecificlegaltights,andyoumay
etsohaveolherrightswhichveryfromelsietostete_
Warranty Service
In Home
Sears,Roebuckand Co, Oepl B17WA,Holfman Estates,IL 80179
Soars CanadaIns., Toronto, Ont_rfe_C_nadaMBB2B8
08t07


informations de s6curit6 importantes
Pr6cautions
Instructions de mise & la terre
Extgences de Iocalisatlon
15
16
16
Instructions de fonctionnement
Caract6ristiques de votre centre de breuvages !7
Commandes de votre centre de breuvages 18
R_glage de la temperature 18
Entreposage des boissons 19
Instructions pour tablettes 19
Inversion de porte
Soin et nettoyage
Conseils utiles
Comment nettoyer I'int6rieur
Comment nettoyer t'ext_rieur
21
21
21
En cas de panne
Avant de placer un appel de service 22
Garantie 23
13

Ce manueldu propd_talre
foumlt I'informattonn_ces-
salre pour prendre soIn et
entretenirvotre nouvel
apparell m_nagec Avec un
entreUenad_quatvotre cen-
tre de breuvages vous servl-
ra durant de longuesann6es
sans annuls,
Pour _viter les annuls, Itsaz
ces Instruotlons au compiet
event de f'utlllser.
Pourvous servirde
r6f6rence en cas de besoln,
vouspourdezvoulotrattach-
er une copie de votre ra;u
d'achat & cette page.
Ceux-clserontrequlsslvous
avez besolnde contacterun
repr6sentantde servlce.
Point de d6part_.AVANT d'utiliser votre Centre de Breuvages
Inscrlvezla date de I'achatet lenum6ro de s_rie dans lee espacespr_,vus
cFdessous. Le num_ro de s_rte est situ6 sur l'6tfquette bianche& I'arrt_re
de I'appareilm_nager.
Num6ro de mod61e 461o99100
Date d'achat
Num6ro de s_rle
Voiclquelquescontribut;ons
qua vous pouvezeffectuer
avantde faire un appelde
service,pournousaider
mieuxvous servir :
Lisezce guide
II comprenddes instructions
pour vousassister_ t'utilisa-
tionet l'entretienad_quatsde
votre appareil,
Sivotre appareil neuf est
avari_
Communiquezimm6diatement
avecte revendeur(oule man*
uracturier)
t_pargneztempset argents
Avant defaire unappelde
service,r_visezle chapitre
intilut6"D6pannage"_Ce
chapitrevous aidera_ solu-
tionnerdesprobtOmescom-
munsqui pourraientsurvenir,,
Si uner6parationestrequise,
vous pouvezavoir I'esprittran-
quille parceque de I'aide ne
seraI'affairequa d'unappel
t_l_phonique.
T_I,: 1-800-469.4663
14

LISEZ TOUTES LES INFORMATIONS DE SI CURIT¢:
AVANT DE FAIRE FONCTIONNER L'APPAREIL
IIIIIIIIIIIIIIIIIIIIIIll IIIIIIq I'll = _ .....
La cavi(_ d*un centre do brouvages vide est una attraction tr_s dangereuse pour los anfants. En
situation de miss au rancart, reUrez salt le jotnt d'dtanchdlt_, tout verrou ou Ioquet, la ports ou cou-
]vercle de tout apparall creux ou prenez d'autres mesures pour assurer quql salt tnoffsnstf
N'ATFENDEZ PAS! FAITES-LE D_S QUE MIS AU RANCARTI
Pour dvtter lee dlfficult6s durant l'tnstallatlon et/ou Is fonctlonnement, lira ces direc-
tives attsntlvement.
•Cot apparei! doit i}{ramis _ ]oF
terra Branchez Is seolement dens
une pdsecorrec[emenim[se _ la
terra R_ferez-vous au chapitreinlJt-
uI8"Instructions de miss _ la lerre"
la page 16
• Ne faites pas fonctionner cot
apparei] s'il a un co_donoe fiche
eleclrique endommag_, s'it ne fonc-
tionnepascorreclement,ou si
l'appare[I a_t_ endemmag@ou
_chapp_
• N'eplssez pasle cordon _leclrique
•Gardez le cordon _lecWque
_Ioign_ des sources de chaleur
•N'immersezpesle cor_onousa
f_chodaneaucunliquids
,N'ut{lisez pas cot appareil pros de
basains d'eau, par exempts dens un
seus-sol d_lremp_, pros d'une
piscine ou d'un _vier.
.N'otilisez pasde produi[s
chimiques ou vapeurscorrosives
dans/pr_s de col appareil.
•N_utilisezcot appareil qua pour
lee finsauxquelIes il eat con_:u
comme indiqu_ dane ce guide
, Ne placezpastes a[ticles p_riss-
shies de nourdlure dane volre
Centre de 8reuvages (Pour exam-
plato, los viandes et teeproduits
laitiers)
• Entreposez Ies boissons dens des
bouleilles scail_es seuIlement
•Ref_rez-vous aux instruclionsde
netloyage du fini de la podsse tree-
vent au(x) chapitre(s) de Soin et net_
loyage de ce guide
• Ne recouvrezpasou n'obstruaz
aucuneouveduredel'appereil
• Cot appareit eat con_:upour un
usage domestique ,_rint_fieur
seulemsnt. N'enlreposez ni n'u-
[fiisez pas cat appareU_t'ext_deur
• Cat appareil ns devrail _tre r_par_
que par du personnel qualifi_ Pour
lout examen, reparalion ou r_glag_,
cen[aclez volre caninede service le
plus rapproch_
SAUVEGARDEZ CES INSTRUCTIONS
15

m:gt,v,rI ::IV:I
fiche miss & la torte pout con-
stltuer un danger d'_lectrocu-
tlono
Cet appareti dolt _tre mis _ la
terra. Dana F_ventuali[_ dun
court-circuit, la miss _ la terre
procure un chemin direct de
contoumement du ccurant
pour pr_venir F_tecbocutton
des manipu_ateurs de rap-
paretl
Cet apparel! est raunl d'un cor-
don camprenant une fiche et
fil de raise _,_alerre
La fiche dolt _tre branch_e
dens une prize correctement
install_e el raise _ la terra
St lea directives de mise _ la
terre ne sont pas tout _Fait
comprises ou en cas de tout
doute reiatif _ la raise _ Ia
terre appropri_e de Fapparetl.
fattes appef aun electricten ou
un technicten quallfi&
St ta prise murele est une
prise & 2 branches, c'esl votre
obltgallon, et la reapensabifit_
vous an incorabe, de la faire
rempEacer par une prise _ trois
branches ad_quateraent raise
la torte.
AFAIRE :
Pour un meitleur renderaent et
pour 6viier que les ampoules
d'Sclairage de ta rSsidence
soient affect_ea d'un affaiase-
ment de tension, eu qua _e
fusible ou dlsjoncteur du circuit
ne gril_e ou ne se declenche,
dedtez un c_rcu]t individual
d'allmentaUon & Famachine
gla(;:ona (prise (double) unique
our le ctrcu_t)
Sous aucun prStexte il est
perm,s de couper ou denlever
la troisiSme branche (miss & la
terra) de la fiche du cordon
_lectdqua
Wutlllsez pas dadaplateur de
fiche evec cot apparetl
N'utiltsez pas de cordon de
raHonge avec cet appareil St
te cordon 6_ectrique de l'ap-
pareit ne rejoint pas _aprise
mutate, faites installer une
prise plus rapproch_e par un
6Iectdcien ou un technicien
qualifY6
A NE PAS FAIRE :
Laissez 13V4"{33,7cm) d'e-
space entre Is c_ld de ta
pods (chaml_re) st tout mur
adjacent pour permettre I'ou-
verture de la porte,
Choislr un endroft avec un
plancher sol,de et au
n_veau,
Laissar un espaca de t2.7
cm (5 pc) entre l'arrt_re de
I'apparetl et tout mur
adjacent,
_viter I'expos_tton au soletl
direct et _ la chaleur, Le
aolell direct pout affecter la
coucha d'acry_lque Lee
sources de chalaur
proximlt_ peuvent causer
une plus grands
consommation d'_lectrtclt&
•Utillser cet appsrell &
l'extSrteur :Cot apparella
_t_ con_upourusage
domesUque seu!ement. Ne
pas felts fonctionnar ou
entreposercot apparatl
I'ext_deur,
•Incorporer cot apparetl
dana uno armoire : Cot
apparellsetcon_upour une
uUltsatlonautonome
seulementat n'est pas
pr_vu pour§tre ancastr&
16

®
1,Afflchage et Controls I--=lectronlques:
Af_chaga at r_fage de la tempdraturedu
centreau breuvages_
2oVerrou bI'_preuve des anfants
3. Interrupteur _Bascule : Manueilement
Uluminarou _te[gnaz leslum]bres
tnt8deures tandls qua las portes rastant
farrn_eso
4. Portes en Verre Tramp6 :Teint_ pour
protdger contrelee rayons UV touten
permettantde voltfactiemant Is contenudu
cabinet,
5. Tablette avee garniture sn eclat
Inoxydab!a
6_ Supports De VIn : Pour entreposer
environ 7 bouteiUes de vim
7, PIsds AdJustables
8_ Joint _tanche Magn6tlque : Ls Joint
dtanche psrmet de conserver le niveau de
tempdratursat d'humldttdbIlntddeur du
cabinet,
I_cartde temperature
Largeur 493 mm (19,44 po) (minimum-maximum)
Hauteur 840 mm (33,06 po) Potdsnet
Profondeur 613 mm (24,13 po)
4-18 _C(39,2-64A_F
44 kg (97 Ib)
17

® ®
\\ TEMP.SET _\\DISPLAY
Activation
R{_GLAGE DE TEMF_ AFFICHAGE @v
LIGHT (_
LAMPE
1o Activation :Le voyant s'aliume pour
indlquer que te cyclede refrotdissemanl est
presentmenten marche,
2o R_glagede la temp#rature: L'_cranamche
la lemp_ralure demand_e par r_glage
(r6f6rez-vous au "R_glage du temperature"
cl-dessous).
3, Temperaturedecabinet, L'_cran affichela
temp6rature courantedu cabinet
4o C° IF° : Ls voyantsitues &c5t6, d6note
quella balance de la temperature est montr_e
5, 'HAUT(+)' bouton de commands :
Augmenter la temperature(plus chaud) par
Interva_lede undegr_
'BAS(-)' bouton de commands : Dlminuer la
tempdrature (plus froid) par intervalle de un
degr&
6o Commutateur • f _ : I!lumlnattoncontinue
Commutateur =O}:illumination seulement
quand la porteeel ouverte.
• Pour changer I'afi_chage
entre la temperatureen
Celsius (°C) et tala temp6ra-
lureen Fahrenheit (°F)
appuyez Bur lee bouton de
control "+" et %" en m6me
tempe pour environ 5 secon-
des.
•La temp,_ralure peut 61re
ajust6e aussi basse qua 39°F
(4°C) ou aussl haut que 64"F
(18°C) pour saUsfaire _ vos
besotn sp_ciftquespour votre
entreposage. Cheque pres-
ston du bouton commands
=+" ou "-" vous permettra d'a-
justar le temperaturepar
tntervalle de undegr6 darts la
marge menttonn_e cl-dessus,
18

La capaciteoptimale* du module
46199100 eatde 124 canneries
(de 350 ml) ou 88 canneltss st 7
bouleilles de vin (de 750 ml)
"Lorsqueremlstmssalonleainstruc-
tions
Enlreposez les boissons dens des
bouteiIlesscell6es ssuflement
I_tagSre supdrleure :
Contlenl 18 cannettes
remlsdes & I'horizontele,,
21bme et 31_me 6tagSres
du milieu ;
Chacune contlent 35 can-
nettes (70 au total)
remis6as _ la ve_cele.
Base (avec porte-
boutellles de vln) : con-
tientjusqu'&7 boutetlles de
vIn.
Base (sans porte.
boutelllea de vln) :
ConUent36 canaries
quand lea canettes sont
remis_es_,l'horizontale.
Ne recouwez PAS les
_tag_res de feuilles d'alu-
mtnium ou de tout autre
membranequl pr6vtendrait
la circulationde I'a[r & Mn-
t6deurdu cabinet,
Pour enlever une tablettede la
positionverroulil_e, Incline 1'6-
tag_re comma montr6dana la
flgue A et tire _ t'ext6risur.
Pour r6Installer, assurez t'_-
tag_re se repose sur lea sup-
ports et pouss6e Ia tablette
vers I'int_,rfeur jusqu'_ ce
qu'elle solt verrouiil6e en place
Fig. A
i iiii; m=i ii :_ :
Note :Le support de vin n'est
pas lIx_es en place (varrouiI-
16een place), N'essayez pas
de ttrer sur le support quand
site eat stock_,e avec du vLn.
19
This manual suits for next models
1
Table of contents
Languages:
Other Kenmore Wine Cooler manuals

Kenmore
Kenmore 255.99249 User manual

Kenmore
Kenmore 461.99610 User manual

Kenmore
Kenmore Kenmore 13485 User manual

Kenmore
Kenmore 461.99130 User manual

Kenmore
Kenmore 255.99269 User manual

Kenmore
Kenmore 461.99130 User manual

Kenmore
Kenmore 46-99130 User manual

Kenmore
Kenmore 255.99279 User manual

Kenmore
Kenmore Wine cellar 13355 User manual

Kenmore
Kenmore 461.99619 User manual