Kenwood EW7307KM User manual

RADIADORES ELÉCTRICOS DE ACEITE
INSTRUCCIONES PARA EL USO
REPASE Y GUARDE ESTAS INSTRUCCIONES
ELECTRIC OIL FILLED RADIATOR
INSTRUCTIONS FOR USE
SAVE THESE INSTRUCTIONS
MODELO/TYPE:
EW7307KM
CALEFACTOR DE AMBIENTE/HEATER
MARCA/BRAND: KENWOOD
MODELO/MODEL: EW7307KM
ESPECIFICACIONES ELECTRICAS/ELECTRICAL CHARACTERISTICS:
120 V ~ 60 Hz 1 500 W
HECHO EN/MADE IN: CHINA
ANTES DE USAR EL PRODUCTO LEA EL INSTRUCTIVO Y CONSER-
VELO PARA FUTURAS REFERENCIAS/BEFORE USING THE PRO-
DUCT READ THE INSTRUCTION MANUAL AND KEEP IT HANDY
FOR FUTURE REFERENCE
SUJETACABLES "Y" SI EL CORDON DE ALIMENTACION ES
DAÑADO, DEBE SER REEMPLAZADO POR EL FABRICANTE O SU
AGENTE DE SERVICIO O POR PERSONAL CALIFICADO PARA EVI-
TAR RIESGO
IF THE SUPPLY CORD IS DAMAGED, IT MUST BE REPLACED BY
THE MANUFACTURER, ITS SERVICE AGENT IN ORDER TO
AVOID A HAZARD.
Servicios Home Depot, S.A. de C.V.
RICARDO MARGAIN ZOZAYA 555 ED. A
SAN PEDRO GARZA GARCIA, N.L.
66267 MEXICO, TEL. 81 55 70 00
RFC SHD-940509-I58

INSTRUCCIONES IMPORTANTES
Cuando use aparatos eléctricos, tome siempre las precauciones básicas para reducir el riesgo de
incendio, electrocución y lesiones a las personas, observando lo siguiente:
1. Lea todas las instrucciones antes de usar el calentador.
2. Si el radiador tiene una cinta de polietileno que se usa como manija para trasladarlo, quítela
antes de conectar el aparato a un tomacorriente.
3. Este calentador se calienta durante el uso. Para evitar quemaduras, procure no tocar superficies
calientes con la piel sin protección. Use la manija para desplazar este calentador. Mantenga el
material combustible, tal como muebles, almohadas, ropa de cama, papeles, prendas y cortinas,
a una distancia de al menos 90 cm. de la parte frontal y superior del aparato, así como de los
costados y de la parte trasera del radiador.
4. Ponga extremo cuidado cuando use cualquier calentador cerca de niños o inválidos y cuando el
calentador se deje funcionando sin vigilancia.
5. Siempre desconecte el calentador cuando no lo esté usando.
6. Si el cable de alimentación está estropeado, el fabricante o su servicio de asistencia técnica, o
en cualquier caso, una persona con una cualificación similar deberá sustituirlo para eliminar
cualquier riesgo.
7. No haga funcionar ningún calentador con el cable o enchufe averiado o si éste funcionara
mal, por haberse caído o averiado en algún modo. Si el calentador pierde aceite, no lo use y
póngase en contacto con el centro de servicio técnico indicado en el folleto de instrucciones.
Lleve el calentador a un centro de servicio de asistencia autorizado para que lo examinen,
para los ajustes eléctricos o mecánicos o para su reparación.
8. No use el aparato a la intemperie.
9. EI calentador no se debe de usar en baños, lavaderos y otros locales similares. Nunca coloque
el calentador en donde se pueda caer en la bañera o en cualquier otro recipiente con agua.
10. No pase el cable por debajo de la alfombra. No cubra el cable con tapetes, alfombras o simi-
lares. Ponga el cable lejos de zonas transitadas y donde no pueda provocar tropezones.
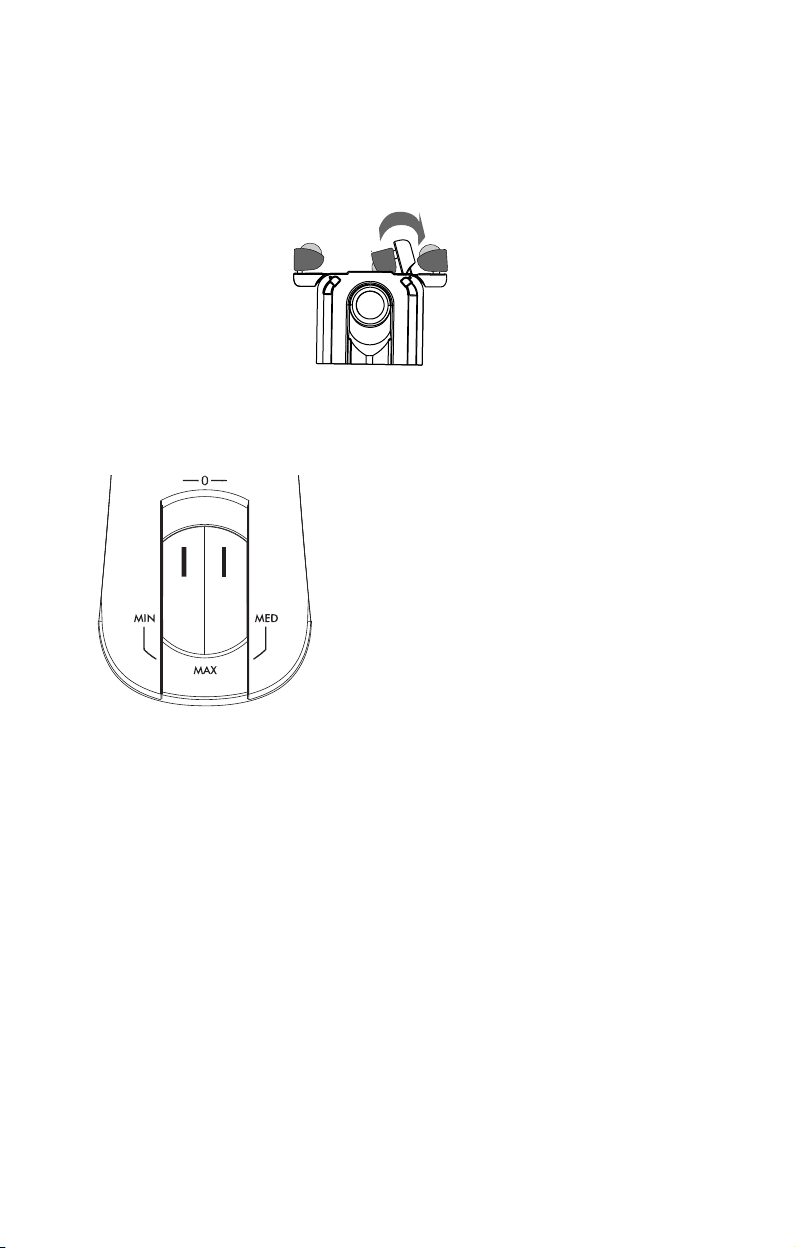
11. Para desconectar el calentador, apague los mandos y luego desenchúfelo.
12. Conecte el aparato solamente en tomacorrientes debidamente polarizados.
13. No introduzca ni permita que entre ningún objeto extraño en la ventilación o salida de aire,
porque esto puede causar una descarga eléctrica, incendio o avería del calentador.
14. Para evitar incendios, no cubra las entradas o salidas de aire de ninguna manera.
No use el calentador sobre superficies blandas, como una cama, en donde las aberturas se
podrían bloquear.
15. Un calentador tiene adentro partes calientes o que causan chispas. No lo use en zonas donde
se use o almacene gasolina, pintura o líquidos inflamables.
16. Use este calentador sólo como se indica en este folleto. Todo otro uso que no sea aquel reco-
mendado por el fabricante puede causar incendios, descarga eléctrica o lesiones a las personas.
17. Para prevenir una sobrecarga de corriente y que se quemen los fusibles, verifique que no haya
otros aparatos conectados en el mismo tomacorriente o en otro tomacorriente conectado en el
mismo circuito.
18. Es normal que el enchufe y el cable de alimentación del aparato se sientan calientes al tacto. Sin
embargo, si el enchufe o el cable están calientes o se deforman, puede ser debido a un tomacor-
riente gastado. Los tomacorrientes o enchufes gastados se deben sustituir antes de seguir utili-
zando el radiador. Si se conecta un aparato en un tomacorriente deteriorado, el cable de ali-
mentación podría llegar a provocar un incendio.
19. Este calentador no se debe usar con un cable de extensión, porque podría recalentarse y provo-
car un riesgo di incendio. Sin embargo, si fuera necesario usar un cable de extensión, este tiene
que ser tamaño N° 14 AWG como mínimo y debe soportar un mínimo de 1875 vatios de
potencia. Además, tiene que ser usado solo para alimentar este radiador.
20. Controle que el enchufe esté bien conectado y que el tomacorriente sea adecuado. Recuerde que
los tomacorrientes se deterioran con el tiempo y el uso continuo. Controle periódicamente si el
enchufe muestra signos de recalentamiento o deformación. En tal caso, no utilice el tomacorrien-
te y llame inmediatamente a un electricista.
21. Controle que el aparato y el cable de alimentación no hayan sufrido daños durante el transporte.
22. Controle que entre un elemento y otro del aparato no hayan quedado residuos de poliestireno u
otras materiales de embalaje. Podría ser necesario pasar el aspirador sobre el aparato.
23. Al encender el aparato por primera vez, déjelo funcionar durante alrededor de dos horas a la
potencia máxima, para eliminar el olor desagradable. Ventile muy bien el local donde se
encuentra el aparato durante tal operación. Es normal que el radiador produzca ligeros crujidos
cuando usted lo encienda por primera vez.
ATENCIÓN: para prevenir descargas eléctricas haga coindicir la espiga plana del enchufe con la
entrada ancha e introdúzcalo hasta el fondo.
CONSERVE ESTAS INSTRUCCIONE
2

MODELOS CON EL SISTEMA “EASY WHEEL”
Vuelque el radiador, apoyándolo sobre una alfombra o sobre otra superficie blanda para
no arruinar la pintura.
Gire hacia afuera los soportes de las ruedas hasta el fin de carrera (fig. 1).
Coloque el radiador en posición vertical.
TENGA PRECAUCIÓN
Operar sólo en posición vertical (las ruedas abajo, los controles arriba).
1. POSICIÓN
Ponga el calentador en el piso junto a la ventana más fría del cuarto o donde usted guste. Su
calentador reducirá el efecto de corrientes de aire frío. El aparato no debe estar colocado inme-
diatamente debajo de un tomacorriente.
No utilice este radiador en habitaciones que tengan una superficie menor de 4 m2
2. CONEXIÓN
EI calentador debe estar conectado a un tomacorriente polarizado de 110/120 V AC
que funcione perfectamente. Mantenga las telas o ropas de cama, muebles y materiales inflama-
bles a distancia del tomacorriente donde el calentador esté enchufado.
3. ENCENDIDO DE LOS MODELOS DE DOS INTERRUPTORES
Gire el termostato hacia la derecha hasta la posición máxima. Encienda los dos interruptores. Las
luces de los interruptores permanecen encendidas independientemente del ciclo del termostato.
Cuando el cuarto alcance la temperatura deseada, gire el botón del termostato muy lentamente
hacia la izquierda hasta que oiga un chasquido. Así ajustará la unidad automáticamente en el
ciclo de encendido-apagado a la temperatura configurada deseada. Nota: normalmente se
requieren alrededor de 15 minutos para alcanzar la temperatura de funcionamiento.
Las luces pilotos encendidas indican que el aparato está encendido.
ECONOMIZADOR DE VATIOS
Para un uso más económico, los interruptores
de mín. o med. se pueden usar individualmen-
te, después de que la unidad ha alcanzado la
temperatura de funcionamiento.
COMO USAR SU CALENTADOR
fig. 1
3

4. USO DEL TERMOSTATO
EI termostato funciona según la temperatura de la habitación y no según la temperatura del radia-
dor.
Hacia la derecha - número más bajo, temperatura más baja.
Hacia la izquierda - número más alto, temperatura más alta.
Función anticongelación:
Gire el mando del termostato hacia la posición y presione los interruptores. El aparato manten-
drá una temperatura mínima de 5°C (42°F) así impidiendo la formación de hielo, con un consumo
mínimo de energía.
Nota
Para apagar completamente la unidad, los interruptores ENCENDIDO / APAGADO (MIN/MED)
deben ponerse en la posición de APAGADO (MED).
Dispositivo de seguridad
Un dispositivo de seguridad apaga el radiador en caso de recalentamiento. Para encenderlo de
nuevo, llame a su Centro de Asistencia más cercano.
5. MANTENIMIENTO Y SERVICIO
Desconecte el cordón eléctrico y permita que se enfrie el radiador. Limpie el radiador con un
trapo suave y húmedo, no use detergentes ni cosas que lo puedan rayar.
Si el radiador no se usa por un período de tiempo manténgalo en un lugar seco.
Este aparato se ha fabricado para brindar muchos años de servicio sin problemas.
En caso de mal funcionamiento ó de duda, no intente arreglar (reparar) el radiador por si mismo.
Dirigirse al Servicio Post-Venta más cercano (ver la lista de Servicios Post-Venta adjunto).
4

GARANTIA CALEFACTOR MODELOS: EW7307KM
Garantizamos todo producto DE´LONGHI por defectos de fabricación, material y
mano de obra. Nuestra obligación dentro de ésta garantía es proporcionar gra-
tuitamente las refacciones y el servicio durante un año a partir de la fecha de com-
pra. Esta garantía se aplicará únicamente sí el producto se utiliza de acuerdo con
las instrucciones anexas del fabricante y con un circuito de corriente alterna (ca).
Esta garantía reemplaza a cualquier otra garantía y acuerdo, expreso o implícito y
a todas las demás obligaciones o responsabilidades de nuestra parte. No autor-
izamos a ninguna otra persona o compañía a asumir nuestras responsabilidades
relacionadas con la venta y el uso de nuestro producto. Esta garantía no implica
ninguna responsabilidad de parte nuestra en relación con la venta o el uso de nue-
stro producto.
Esta garantía no se hará válida en los siguientes casos:
a) Cuando el producto se hubiese utilizado en condiciones distintas a las normales
b) Cuando el producto no hubiese sido operado de acuerdo con el instructivo de
uso que se le acompaña.
c) Cuando el producto hubiese sido alterado o reparado por personas no autor-
izadas por el fabricante nacional, importador o comercializador responsable
respectivo.
Para hacer efectiva la garantía o si se necesitan reparaciones o refacciones, com-
ponentes, combustibles y accesorios llame, con su garantía sellada por el establec-
imiento, al Centro Nacional de Servicio para proporcionarle una cuenta de men-
sajería con la cual deberá remitir el producto y garantía. Los gastos que se deriven
del cumplimiento de la presente garantía deberán ser absorbidos por el Centro
Nacional de Servicio De´Longhi.
Obtención de servicios de garantía
Si las reparaciones son necesarias, vea la información de contacto que aparece a
continuación:
Residentes de los Estados Unidos:
Por favor contactar a nuestra línea telefónica gratuita, al 1-800-322-3848 o ingrese
a nuestro sitio en el Internet www.delonghi.com.
Para todos los accesorios, piezas de repuesto o de reemplazo, por favor contactar a
nuestra división de piezas, al 1-800-865-6330.
Residentes de Canadá: Por favor contactar a nuestra línea telefónica gratuita, al 1-
888-335-6644 o ingrese a nuestro sitio en el Internet www.delonghi.com
<http://www.delonghi.com/>.
Residentes de México: Por favor contactar a nuestra línea telefónica gratuita, al 01-
800-711-88-05 (lada sin costo) / 5543 1447 / 5543 8116 (D.F.) o ingrese a nue-
stro sitio en el Internet www.delonghi.com <http://www.delonghi.com/>.
Centro Nacional de Servicio:
Fiducia Italiana S.A. de C.V.
FECHA DE COMPRA:
Pestalozzi 814 Col. Del Valle
México D.F., C.P. 03100
_______________________
5

IMPORTANT SAFEGUARDS
When using electrical appliances, basic precautions should always be followed to reduce
risk of fire, electric shock, and injury to persons, including the following:
1. Read all instructions before using this heater.
2. If your radiator is equipped with a polythene tape used as carry handle, remove it before
connecting appliance to the outlet.
3. This heater is hot when in use. To avoid burns, do not let bare skin touch hot surfaces.
Use handle when moving this heater. Keep combustible materials, such as furniture, pil-
lows, bedding, papers, clothes, and curtains at least 3 feet (0,9 m) from the front and top
of the heater and keep them away from the sides and rear.
4. Extreme caution is necessary when any heater is used by or near children and whenever
the heater is left operating unattended.
5. Always unplug heater when not in use.
6. If the power cord is damaged, it must be replaced by the manufacturer, its service agent or
similarly qualified persons in order to avoid a hazard.
7. Do not operate any heater with a damaged cord or plug or after the heater malfunctions, has been drop-
ped or damaged in any manner. If the heater has leaked any oil, discontinue using the heater and con-
tact a service center as indicated in the instruction leaflet. Return heater to an authorized service facility for
examination, electrical or mechanical adjustment, or repair.
8. Do not use outdoors.
9. This heater is not intended for use in bathrooms, laundry areas and similar indoor loca-
tions. Never position heater where it may fall into a bathtub or other water container.
10. Do not run cord under carpeting. Do not cover cord with throw rugs, runners, or the like.
Arrange cord away from traffic area and where it will not be tripped over.
11. To disconnect heater, turn controls to off, then remove plug from outlet.
12. Connect to properly polarized outlets only.
13. Do not insert or allow foreign objects to enter any ventilation or exhaust opening as this
may cause an electric shock, fire, or damage the heater.
14. To prevent a possible fire, do not block air intakes or exhaust in any manner. Do not use
on soft surfaces, like a bed, where openings may become blocked.
15. A heater has hot or arcing or sparking parts inside. Do not use it in areas where gaso-
line, paint, or flammable liquids are used or stored.
16. Use this heater only as described in this manual. Any other use not recommended by the
manufacturer may cause fire, electric shock, or injury to persons.
17. To prevent overload and blown fuses, be sure that no other appliance is plugged into the
same outlet (receptacle) or into another outlet (receptacle) wired into the same circuit.
18. It is normal for the heater’s plug and cord to feel warm to the touch. A plug or cord which becomes hot
to the touch or becomes distorted in shape may be a result of a worn electrical outlet. Worn outlets or
receptacles should be replaced prior to further use of the heater. Plugging heater into a worn outlet
(receptacle) may result in overheating of the power cord or fire.
19. Do not use an extension cord because it may overheat and cause a risk of fire. However, if you have
to use an extension cord, the cord shall be No. 1 4 AWG minimum size and rated not less than
1875 watts, and has to be used only for supplying power to this heater.
20. Be sure that the plug is fully inserted into an appropriate outlet. Please remember that outlets also deterio-
rate due to aging and continuous use: check periodically if signs of overheating or deformations are evi-
denced by the plug. Do not use the outlet and CALL your electrician.
21. Check that neither the appliance nor the power cable have been damaged in any way
during transportation.
22. Make sure that no pieces of polystyrene or other packaging material have been left
between one element of the appliance and another. It may be necessary to pass over the
appliance with a vacuum cleaner.
23. When switching on the appliance for the first time, allow it to run at full power for about two
hours to get rid of the unpleasant smell. Make sure that the room in which the appliance is
located is well ventilated during this operation. It is normal for the appliance to emit small
cracking sounds when you turn it on for the first time.
SAVE THESE INSTRUCTIONS
6

CAUTION
Always operate the heater in upright position only (wheels on the bottom, controls on
top). Any other position could create a hazardous situation!
1. LOCATION
Place heater on the floor beneath the coldest window in the room, or any other location. Your hea-
ter will reduce the effect of cold drafts.
The heater should not be placed immediately below a power outlet.
Do not use this radiator in rooms with a floor area of less than 43 square feet (4 sq. m.).
2. CONNECTION
The radiator should be connected to a properly polarized A/C 110/120 V household outlet in
perfect working condition.
Keep loose clothing or bedding, furniture and flammable material away from the heater’s wall
outlet.
3. TURNING ON TWO-SWITCH MODELS
Turn the thermostat clockwise to its maximum position. Push down both switches. The switch lights
stay on independently of the thermostat cycling. When room reaches the desired temperature, turn
the thermostat knob counter-clockwise very slowly and carefully until you hear a click. This should
set your heater to maintain the desired temperature by cycling on and off as required. Note: The
heater normally requires about 15 minutes to reach the desired temperature.
With pilot lights ON, the heater is ON!
WATTS ECONOMIZER
For more economical use, the Min. or Med. Watt
switches may be used individually, after unit has
reached the operating temperature.
HOW TO USE YOUR HEATER
fig. 1
MODELS WITH “EASY WHEEL”SYSTEM
Turn the radiator upside-down on a rug or a soft surface in order to prevent damaging
the paint finish. Fully unfold the castors by turning them outwards (Fig. 1).
Turn the radiator back to its upright position.
7

8
4. USE OF THERMOSTAT
The thermostat operates according to room air temperature, rather than radiator temperature.
Turning it counter-clockwise to smaller numbers would decrease the temperature; clockwise to
greater numbers would increase the temperature.
Antifreeze function
Turn the thermostat dial to the position and push the switches on. The appliance will maintain a
minimum room temperature of approximately 42°F (5°C), thus preventing freezing while conser-
ving energy.
REMINDER
To completely shut the heater off, MIN and MED switches must be set in the OFF position.
A safety device
Asafety device switches the heater off in the event of overheating. To restart the heater, call the
nearest service center.
5. MAINTENANCE AND SERVICE
Always unplug the heater from the power outlet and allow the radiator to cool. Wipe radiator with
a soft damp cloth; do not use detergents and abrasives.
Should the radiator not be in use over a certain length of time, roll the cable around the holder
and store it in a dry place.
This appliance has been built to last for many years of trouble-free service.
In case of malfunction or doubt, do not try to repair the heater by yourself: this might increase the
risk of fire and electric shock.
Call nearest Service Center. Visit www.delonghi.com for a complete list of Service Centers (U.S. Only).

9
GUARANTEE FOR RADIATOR MODEL: EW7307KM
We guarantee all DE’LONGHI products against manufacturing, material and manual
defects. Under the terms of the guarantee, we provide repairs and the service free of
charge for a year from the date of purchase. This guarantee is only valid providing
the product is used according to the manufacturer’s instructions and with an AC
wiring system. This guarantee replaces all other guarantees and agreements,
whether express or implicit, and all of our other obligations or responsibilities. We
do not authorize other people or companies to take on our responsibilities with
regard to the sale and use of our product. This guarantee does not involve any liabil-
ity on our part with regard to the sale or use of our product.
The guarantee shall be forfeited in the following cases:
a) When the product is used in conditions other than normal ones.
b) When the product is not serviced as per the instructions provided.
c) When the product is altered or repaired by people not authorized by the national
manufacturer, importer or respective retailer.
To make the guarantee valid, and in the case you need repairs, components, fuel
and accessories, please contact, with the guarantee stamped by the retailer, the
National Service Centre to provide an address to which the product and guarantee
can be delivered. The expenses incurred during execution of the guarantee must be
covered by the De’Longhi National Service Centre.
Obtaining the guarantee services
Contact details for requesting repairs:
Residents in the United States:
Please contact us on the free-phone number 1-800-322-3848 or visit our website
www.delonghi.com.
For all accessories and spare parts, please contact our Spare Parts division at 1-800-
865-6330.
Residents in Canada: Please contact us on the free-phone number 1-888-335-6644
or visit our website www.delonghi.com
<http://www.delonghi.com/>.
Residents in Mexico: Please contact us on the free-phone number 01-800-
711-88-05 (no charge) / 5543 1447 / 5543 8116 (D.F.) or visit our website
www.delonghi.com <http://www.delonghi.com/>.
National Service Centre:
Fiducia Italiana S.A. de C.V. PURCHASE DATE:
Pestalozzi 814 Col. Del Valle
México D.F., C.P. 03100
_______________________

De’Longhi America, Inc.
Park 80 West, Plaza One
Saddle Brook, NJ 07663
1-800-322-3848
De’Longhi Canada, Inc.
6150 McLaughlin Road
Mississauga, Ontario
L5R 4E1 Canada
1-888-335-6644
FIDUCIA ITALIANA S.A DE C.V
Pestalozzi #814
Col. Narvarte
Del. Benito Juarez
C.P. 03100
tels: 5543 1447
lada sin costo: 01 800 711 8805
www.delonghi.com
5710810161/10.09
Printed in China
Table of contents
Languages:
Other Kenwood Electric Heater manuals
Popular Electric Heater manuals by other brands

Harvia
Harvia KM60SE Instructions for installation and use

Goldair
Goldair GEOR260 operating instructions

Bradford White
Bradford White Convection Heater Installation and operating instruction manual

Dimplex
Dimplex Alta Series installation guide

Heatzilla
Heatzilla SYCLC90 user manual

Lervia
Lervia KH 1510 operating instructions

TPI
TPI Infraworld HOTLINE V2 Instructions for installation and use

Detroit Radiant Products
Detroit Radiant Products ELX Series installation manual

Harvia
Harvia TRC90EE Instructions for installation and use

Vornado
Vornado AVH4 owner's guide

EHC
EHC DSR solaris Series Installation & operating instructions

Fenix
Fenix Ecosun 300 U+ user manual