KERR DemiPlus User manual
Instructions For Use
Your practice is our inspiration.
®
960863, Rev. A
U.S. Patent Numbers: 6,692,251; 6,200,134; 10,215,210
C 169378 US
CAUTION
For dental use only.
Federal law restricts this device to sale by or on the order of a dentist.
TRANSPORT AND STORAGE
Ambient Temperature: -4˚F to 104˚F (-20˚C to +40˚C)
Relative Humidity: 10% to 85%
Atmospheric Pressure: 0.5 atm to 1.0 atm @ 500 hPa to 1060 hPa
Made in U.S.A.
Manufactured by:
Kerr Corporation
3225 Deming Way, Suite 190
Middleton, WI 53562 USA
(800) KERR-123
kerrdental.com
Kerr Distribution Facilities:
Kerr Australia Pty. Ltd.
Unit 10
112-118 Talavera Road
North Ryde 2113
New South Wales, Australia
+61 2 8870 3000
Sybron Dental Specialties Japan, Inc.
29-24 Honkomagome 2-chome
Bunkyo-ku, Tokyo
113-0021 Japan
Toll Free: +0120-18-3126
サイブロン・デンタル株式会社
〒113-0021
東京都文京区本駒込2丁目29番24
Kerr Japan TEL : 03-5977-3127
kerr-japan.com
European Union Representative:
Kerr Italia S.r.l.
Via Passanti, 332
I-84018 Scafati
(SA) Italy
TEL: +39-081-850-8311
kerrhawe.com
Kerr Distribution Facilities:
KerrHawe SA
Via Strecce 4
6934 Bioggio, Switzerland
CH-6934 Bioggio, Switzerland
TEL: +41-91-610-0505
FAX: +41 91 610 05 14
kerrhawe.com


3
Table of Contents
ENGLISH ..........................................................................................................................................................................................5
FRANÇAIS........................................................................................................................................................................................9
ESPAÑOL........................................................................................................................................................................................13
DEUTSCH .......................................................................................................................................................................................17
ITALIANO .......................................................................................................................................................................................21
DANSK ...........................................................................................................................................................................................25
PORTUGUÊS (BRASIL)...................................................................................................................................................................29
PORTUGUÊS ..................................................................................................................................................................................33
NEDERLANDS................................................................................................................................................................................37
SUOMI............................................................................................................................................................................................41
ΕΛΛΗΝΙΚΑ .....................................................................................................................................................................................45
NORSK ...........................................................................................................................................................................................50
SVENSKA .......................................................................................................................................................................................54
ČESKÝ............................................................................................................................................................................................58
EESTI ..............................................................................................................................................................................................62
MAGYAR ........................................................................................................................................................................................66
LIETUVIU........................................................................................................................................................................................70
LATVIEŠU.......................................................................................................................................................................................74
POLSKI...........................................................................................................................................................................................78
ROMÂNEŞTE..................................................................................................................................................................................82
РУССКИЙ.......................................................................................................................................................................................86
БЪЛГАРСКИ..................................................................................................................................................................................91
SLOVENSKÝ...................................................................................................................................................................................96
SLOVENSKO................................................................................................................................................................................ 100
SRPSKI........................................................................................................................................................................................ 104
TÜRKČE....................................................................................................................................................................................... 108
TIẾNG VIỆT................................................................................................................................................................................. 112
中文体 ......................................................................................................................................................................................... 116
中文版 ......................................................................................................................................................................................... 120
日本語 ......................................................................................................................................................................................... 124
한국어......................................................................................................................................................................................... 129
ภาษาไทย......................................................................................................................................................................................... 134
ﻲﺑﺮﻋ ............................................................................................................................................................................................... 138

4
Fig. 1 Fig. 2
Fig. 9
Fig. 8Fig. 7
Fig. 6Fig. 5Fig. 4
Fig. 3
Illustrations
1.
2.
1.
2.

5
ENGLISH
DemiPlus L.E.D Curing Light
Operator Manual
MADE IN USA
DESCRIPTION
The DemiPlus L.E.D. (Light Emitting Diode) curing light is a visible curing unit intended
for polymerization of light-cured materials by dental professionals.
IMPORTANT: Batteries must be fully charged prior to use. Refer to the CHARGETHE
BATTERY(IES) section. There are no user serviceable parts inside. Do not open or
tamper with the batteries.
SPECIFICATIONS AND EQUIPMENT CLASS
AC Supply connection: 100-240V AC/0.8-0.4A 47-63 Hz
Power input: 12VA, nominal
Equipment class:
Class II
Safety: IEC 60601-1
EMC (Electro-Magnetic Compliance): IEC 60601-1-2
Protection from electric shock:
Type BF
Protection from ingress of liquids: IXP0 (ordinary equipment)
Operation:
Continuous operation patient application,
duty cycle 20 seconds ON/1 minute OFF.
OPERATING ENVIRONMENT
Note: Take caution when using this product in the presence of a ammable anesthetic
mixture or an oxidizer such as oxygen or nitrous oxide.
· Ambient temperature: 60˚F to 104˚F (16˚C to 40˚C)
· Relative humidity: 10% to 80%, non-condensing
· Atmospheric pressure: 0.5-atm to 1.0-atm (500 hPa to 1060 hPa)
TRANSPORT AND STORAGE ENVIRONMENT
· Ambient temperature: -4˚F to 104˚F (-20˚C to 40˚C)
· Relative humidity: 10% to 85%
· Atmospheric pressure: 0.5 atm to 1.0 atm (500 hPa to 1060 hPa)
· Battery performance: Handpiece will generate 500, ve-second cures with a fully
charged battery
· Battery over-current protection: Electronic and Resettable polyfuse
· Light Emitting Diodes: An array of four LEDs die-mounted on a substrate.
· Output peak wavelength range: 450 - 470 nanometers
· Baseline output: 1,100 mW/cm2
· Standard light guide(s): Part Number 902495, 13mm to 8mm Extended Light Guide
Unit handpiece dimensions: Length: 9.25 in (23.5 cm);Width: 1.2 in (2.9 cm)
Charger dimensions: Length: 6.0 in (16.0 cm);Width: 4.63 in (11.1 cm)
Unit weight: Handpiece and battery: 5.5 oz (155 g); Battery charger: 12.4 oz (352 g)
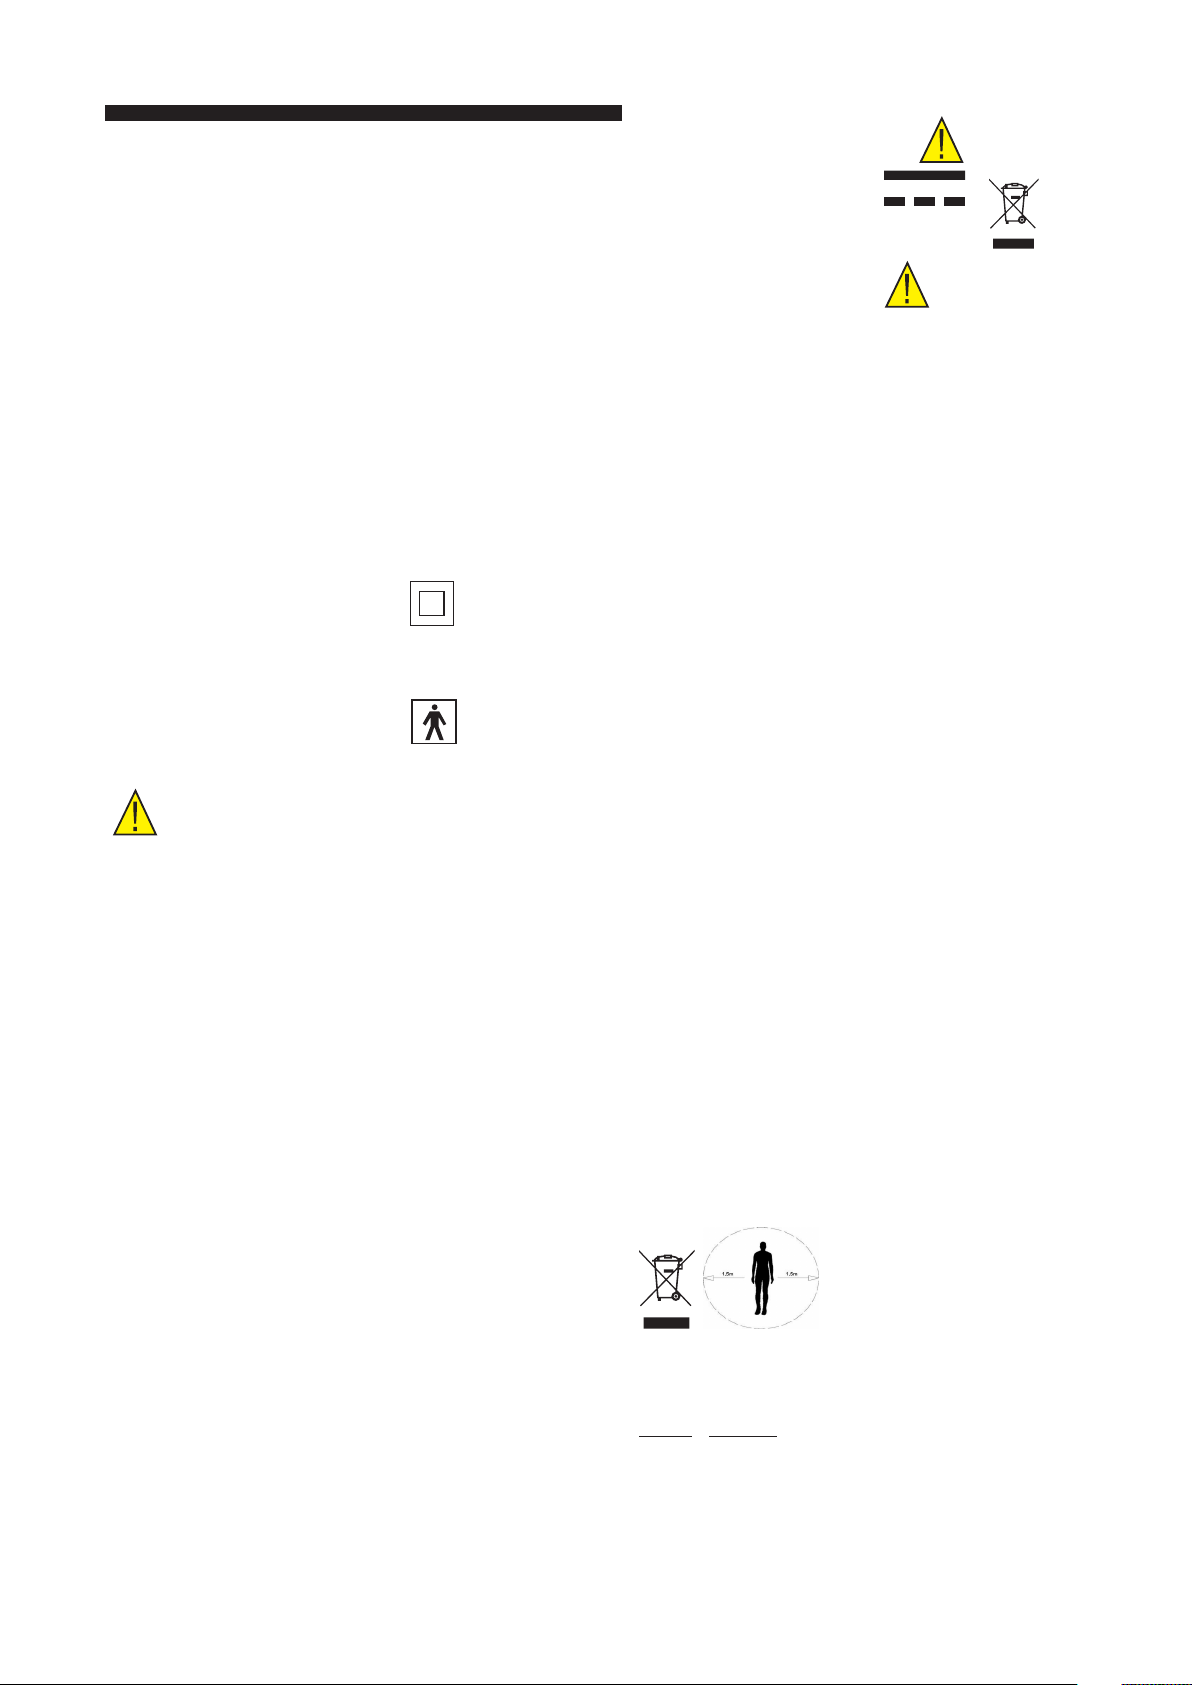
SYMBOLS
Attention, consult accompanying documents:
DC power:
Waste Electrical and Electronic Equipment (WEEE):
SAFETY PRECAUTIONS
sterilized prior to patient contact. For sterilization instructions, refer to the
MAINTENANCE: CLEANING/DISINFECTING/STERILIZATING section.
in curing energy is possible compared with equipment previously used. It is
important to observe the following precautions and procedures:
this device without suitable eye protection for the operator, assistant and
patient. Refer to the ACCESSORIES AND REPLACEMENT PARTS section for
suitable eye protection.
photosensitizing drugs should not be exposed to light from this unit.
product in the presence of a ammable
anesthetic mixture or an oxidizer such as oxygen or nitrous oxide.
standards, including U.S., Canada, and Europe, to be safe and eective for all
dental applications.
Plus requires special precautions regarding EMC and must be installed
and put into service according to the Guidance and Manufacturer’s Declaration
for EMC included in this manual.
Plus.
Reference the Guidance and Manufacturer’s Declaration for EMC included in this
manual.
We are certain that you will receive many years of exceptional service from the
DemiPlus product. However, it is inevitable that at some time in the future you
will need to dispose of it.When that time comes, we encourage you to return it
to Kerr in its original packaging for environmentally sound recycling. Kerr will
be glad to bear the cost of the return shipping. Please contact your sales rep for
details.TheWaste Electrical and Electronic Equipment (WEEE) Directive forbids
the disposal of waste electrical and electronic equipment as unsorted municipal
waste and requires that they be collected and recycled or disposed of separately.
Hazardous substances are present in electrical and electronic equipment and
present potential risks to human health and the environment if disposed of in
municipal landlls which are not designed to prevent migration of substances
into the soil and groundwater. By properly disposing of this waste, you will be
contributing to the advancement of reuse, recycling, and other forms of recovery,
as well as the prevention of pollution at a very local level.
NOTE:The dimensions in the gure represent the minimum patient environment (1.5 meters).
The DemiPlus charger base should not be stored within this patient environment.
ASSEMBLY/MOUNTING
The box contains:
Qty. Description
1 DemiPlus curing light handpiece
1 Protective light shield
1 Plug-in power supply
1 Battery charger
1 Battery pack
1 Operator manual
1 Demi/DemiPlus disposable barrier

6
OPERATION
BATTERY CHARGER/BATTERIES
The battery pack contains Lithium ion cells. A new battery pack should be charged for
16 hours prior to its rst use.
ATTACH THE ADAPTER TO THE POWER SUPPLY
The power supply is a universal-input unit that accepts 100V - 240V AC nominal. Note:
Only Kerr-supplied power supplies (part number 921656) are to be used to power the
DemiPlus battery charger. There are two types of power supplies available as shown in
Figure 1 and 3.The power supplies dier slightly in appearance, but operate the same
both electrically and mechanically.
I. Select the proper adapter (as shown in Figure 2 and 3).Their applications are as
follows:
· 120V US —Type A
· Euro —Type C
· UK —Type G
· Australian —Type I
II. Each adapter also has a slot into which the retaining latch on the power supply ts.
III. With the slot oriented toward the power supply, place the adapter onto the
power supply so that the tabs on the adapter are aligned with their respective
slots on the power supply.
IV. Pressing down on both ends of the adapter (Figure 4), slide the adapter into
the power supply until a click is heard and the adapter is locked in place. Note:
Pressing down on the adapter during installation assures that all the tabs are
held by the retainers on the power supply. If the adapter feels loose, remove the
adapter and re-install.
V. Figure 5 shows the adapter locked in place on the power supply.
VI. To remove the adapter from the power supply, press on the latch retainer button
(7.), slide the adapter away from the power supply, and remove the adapter.
VII. Retain unused adapters for future use.
INSTALL THE BATTERY ONTO THE WAND
I. The battery will only t onto the wand in one orientation. If you have diculty
tting the battery to the wand, do not force it.
II. Orient the battery (Figure 6) so that the broad at area (1.) is toward the side of
the wand that contains the switches.
III. Slide the battery and wand together until a click is heard and the battery is
locked in place.
IV. To remove the battery (Figure 6), press the textured indents (2.) on both sides of
the battery and slide the battery free.
CHARGE THE BATTERY(IES)
Plug the power supply into the charger base.The socket is located at the back of the
charger base (Figure 7).
I. Plug the power supply into an electrical outlet.
II. Insert the battery and/or curing unit with battery into the opening(s) of the
battery charger.
a. The charger can charge any combination of two batteries or wands (in
diering states of charge) at the same time.
b. The lighted rings (Figure 7, 2.) that surround the openings in the charger
base indicate the state of charge of each battery as follows:
· Green light—battery is charged.
· Yellow light—battery is charging.
· BlinkingYellow Light (with battery or wand in the charger) —
indicates a fault condition. Please call Customer Service.
Note: If the battery is below room temperature, allow the battery to come up to room
temperature and try again; otherwise, replace the battery.
Battery pack life: 300 full charge/recharge cycles. Output: 3.7-Volts nominal @ 2.1A-H
capacity.
BATTERY DISPOSAL: The battery pack contains a Lithium ion (Li-ion) battery. Recycle or
dispose of batteries according to national, state and local regulations.
RECOMMENDED CURING TIME
The DemiPlus is a high-output curing unit. Kerr testing indicates the following
recommended curing times:
Material Recommended
Curing Time
Universal composite shades A3 and lighter (2 mm depth) 5 seconds
Universal composite shades A3.5 and darker 10 seconds
Bonding agents, universal resin luting cements and Self-
etch, self-adhesive cements.
5 seconds
Note: It is highly recommended that curing capability be tested using a Hardness Disk
to ensure a complete cure.
HANDPIECE:The DemiPlus is intended for all-day use without changing the battery. A
fully charged battery will yield 500, ve second cures.
The DemiPlus is a wand-style curing light used for the polymerization of light-cured
dental material and is powered by a rechargeable Lithium ion battery pack.
Note: When new, the battery pack must be charged prior to using the DemiPlus Curing
Light.The unit employs proprietary Periodic Level Shifting (PLS), patent pending. PLS
is a constant periodic cycling of the output from a predetermined base level to a higher
level for a short duration of time.The PLS technology provides faster, deeper cures
without overheating.
DEMIPlus PARTS AND CONTROLS
The following components are used by the operator during the curing process (Figure 8):
I. Curing Mode LEDs (1.) Three LEDs represent the three curing modes; from left
to right these are: 5 second, 10 second, and 20 second cycles.
II. Mode Selection Switch (2.) Pressing this switch sequentially toggles the unit
through the three curing modes. If the unit is in Sleep mode, pressing this switch
awakens the unit in the curing mode last used.
III. Trigger Switch (3.) Pressing (and releasing) this switch initiates the chosen
curing cycle. If the unit is in Sleep mode, pressing this switch awakens the unit in
the curing mode last used.
IV. Battery Power LED (4.) This LED indicates the state of charge of the battery in
the following way:
a) If the light is unlit, the battery is either CHARGED or the unit is in Sleep
mode.
b) If the light is yellow, the battery has a LOW charge.
Note:The curing light will operate normally in this mode. Recharge the
battery at the next available opportunity.
c) If the light is red, the battery is DISCHARGED (dead-battery) and will
need to be recharged.
So that no curing cycles are interrupted, when the battery voltage drops below
the dead-battery threshold during a curing cycle, the curing cycle will complete
and the battery status LED will not change to red until the curing cycle is
completed.
V. Lithium-Ion Battery Pack (5.) Use to power the curing wand. Can be removed
by pressing the indents and pulling the battery free.
VI. Light Guide Assembly (6.) The output of the Curing Light LED is emitted from
the end of this piece.*
VII. Light Shield (7.)This shield protects the eyes of the operator from the light
emitted from the Light Guide when in use.
*Other light guides that may yield dierent outputs are available for the DemiPlus.

7
DEMIPlus CURING LIGHT OPERATING STATES
There are three distinct operational states when operating the wand:
I. Idle: The unit is Idle when it is not Curing or in Sleep mode and the battery
is CHARGED or LOW. The user may cycle between 5 second, 10 second, and
20 second curing modes by pressing the mode switch. Curing cycles are also
initiated when the unit is in the Idle state.
II. Curing: A Curing cycle is initiated by pressing, and releasing, the trigger switch
while the unit is Idle. A 5 second, 10 second, or 20 second cycle will be started,
depending on the status indicated by the Curing Mode LEDs. Once a Curing cycle
is started, the Curing Light LED will be turned on and a tone sounds. Depending
upon which mode was selected, a tone will sound every ve seconds until the
cycle is complete, at which time a nal, longer duration, tone sounds.
Note: Pressing theTrigger Switch for a second time during a Curing cycle
immediately interrupts the Curing cycle and causes the nal tone to sound,
regardless of how much time has elapsed since beginning the cycle (pressing the
Mode Selection Switch during a Curing cycle has no eect).
III. Sleep: The DemiPlus goes to Sleep mode to conserve battery life after
approximately 8 minutes of no activity. It can be awakened by pressing either the
mode or trigger switch once, at which time the unit will be in the Idle state.The
unit will reect the last cure mode chosen.The mode or trigger switches can then
be pressed to switch between modes or to initiate a cure.While in Sleep mode,
all LEDs are turned oand the curing light goes into a low power state. Battery
life (if left uncharged and unused after receiving a full charge) is approximately 6
months whether the battery is in the handpiece or not.
OPERATE THE DEMIPlus CURING WAND
I. Selectthedesiredcuring modebypressingtheMode Selection Switch(Figure 9, 1.)
II. Place the Light Guide (2.) over the tooth, as close to the tooth as possible without
touching it. Press and release theTrigger Switch (3.).The unit will sound a tone at
5 second intervals as previously described.
MAINTENANCE:
CLEANING / DISINFECTING / STERILIZING
I. Fiber-Optic Light Guide:
a) Immerse/thoroughly drench light guide in a surface decontaminate cleaner
(soap and water cleaning solution).
b) After 10 minutes, scrub with an instrument cleaning brush until visibly free
of debris.
c) Rinse all parts with warm water.
II. Fiber-Optic Light Guide - Sterilizing:
a) Sterilize in a steam autoclave using distilled water at a temperature of
270°F (132°C) for 20 minutes.
b) Do not add chemical solutions to the autoclave.
c) Do not use a chemical autoclave.
III. Optics Maintenance Kit (PN 21042) – After numerous autoclave cycles, a brown
or gray discoloration can accumulate on the polished ends of the light guide.
This is a residue that forms during the autoclave drying cycle. It is recommended
that the Optics Maintenance Kit be used every 50 autoclave cycles. Following the
instructions included in the kit helps promote optimum curing performance.
To remove composite that adheres to the tip of the light guide:
· Soak gauze in alcohol.
· Wrap the gauze around a razor blade.
· Rub the tip of the light guide with the gauze-protected razor blade until
the composite is removed.
Note: Never use a blunt instrument to remove composite because it will
scratch the glass.
IV. Handpiece and Battery Charger – Plastic parts can be cleaned following these
guidelines:
a) All plastic parts may be wiped with CaviWipes™ following the direction on
the package. A quaternary ammonium compound product like CaviCide™/
CaviWipes™ or similar is recommended (containing 20% alcohol or less).
b) Do not use: Denatured alcohol, Lysol®, phenol, ammonia complex or iodine
complex solutions.
c) Wipe, do not spray, solution onto plastic parts. Prevent liquids from
entering openings on unit.
CAUTION: Do not immerse the plastic parts in solutions. Use of solutions other
than those recommended may damage plastic parts and will void product warranty.
This unit is not autoclaveable.
INFECTION CONTROL MEASURES
CAUTION:To prevent cross-contamination, a disposable plastic sleeve must be
used over the DemiPlus with each use.
WARRANTY
Kerr hereby warrants that for a period of three years (one year for batteries) from
the date of purchase, this instrument shall be free from defects in material and
workmanship and will perform satisfactorily under normal use and service.
To register your warranty, complete the online warranty registration within 30 days of
purchase at www.kerrdental.com/warranty. If multiple units have been purchased, ll
out one registration form per unit. Please have your dealer invoice available.You can
also register your warranty by calling 1.800.KERR.123 (1.800.537.7123).
THEWARRANTY STATED HEREIN IS THE SOLEWARRANTY APPLICABLE TO KERR
PRODUCTS. KERR EXPRESSLY DISCLAIMS ANY AND ALL OTHERWARRANTIES EXPRESSED
OR IMPLIED, INCLUDINGWARRANTIES OR MERCHANTABILITY OR FITNESS FOR A
PARTICULAR USE. KERR’S LIABILITYWITH RESPECT TO ITS PRODUCTS IS EXPRESSLY
LIMITEDTOTHE REMEDIES SET FORTH ABOVE.THE REMEDIES ARE THE BUYER’S
EXCLUSIVE REMEDIES. KERR SHALL UNDER NO CIRCUMSTANCES BE LIABLE FOR
INCIDENTAL OR CONSEQUENTIAL DAMAGES.THE WARRANTY DOES NOT APPLY
TO ANY DAMAGE OR DEFECT CAUSED BYTHE USER’S FAILURETOTHE FOLLOWING
INSTRUCTIONS FOR USE ORTHE OTHER USER ERROR IN OPERATING OR MAINTAINING
THE INSTRUMENT. ALTHOUGH KERR OFFERS SERVICESTO REPAIR INSTRUMENTS AND
PROVIDES REPLACEMENT PARTS AFTERTHE EXPIRATION OF THEWARRANTY, KERR ONLY
GUARANTEESTHE AVAILABILITY OF SUCH SERVICES AND REPLACEMENT PARTS FORTWO
YEARS AFTERTHE INSTRUMENT MODEL HAS BEEN DISCONTINUED.
ACCESSORIES AND REPLACEMENT PARTS
Part No. Fiber Optic Light Guides
21020 8 mm CurvedTurbo Light Guide
921551 11 mm CurvedTurbo Light Guide
20812 13 mm Curved Light Guide
Part No. Eye Protection
20816 Protective Light Shield
Part No. Accessories
21042 Optics Maintenance Kit
20399 Disposable Hardness Disk, (pack of 6)
910726 Handheld LED radiometer
Part No. Replacement Parts
921918-1 Replacement Kit, Battery, DemiPlus
921919-1 Replacement Kit, Charger, DemiPlus
921920-1 Replacement Kit,Wand, DemiPlus
921656 Plug-in Universal Power Supply
8
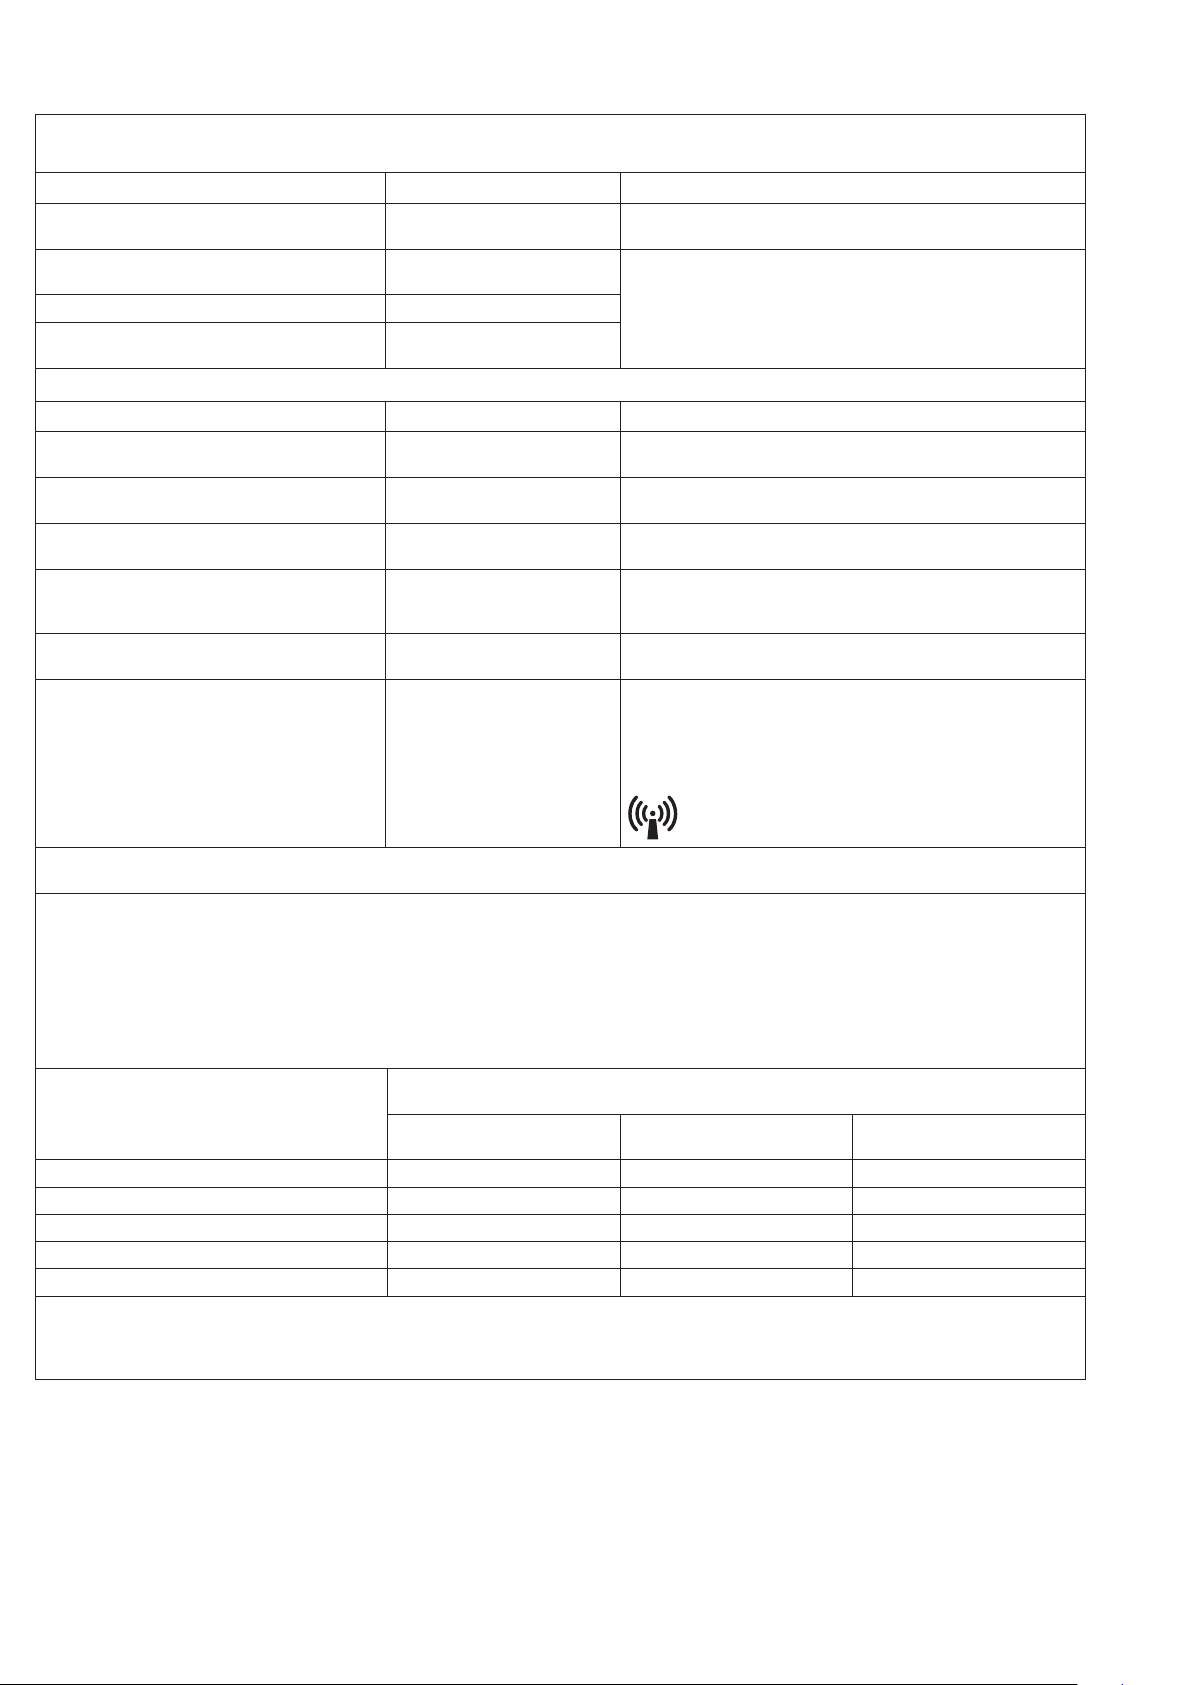
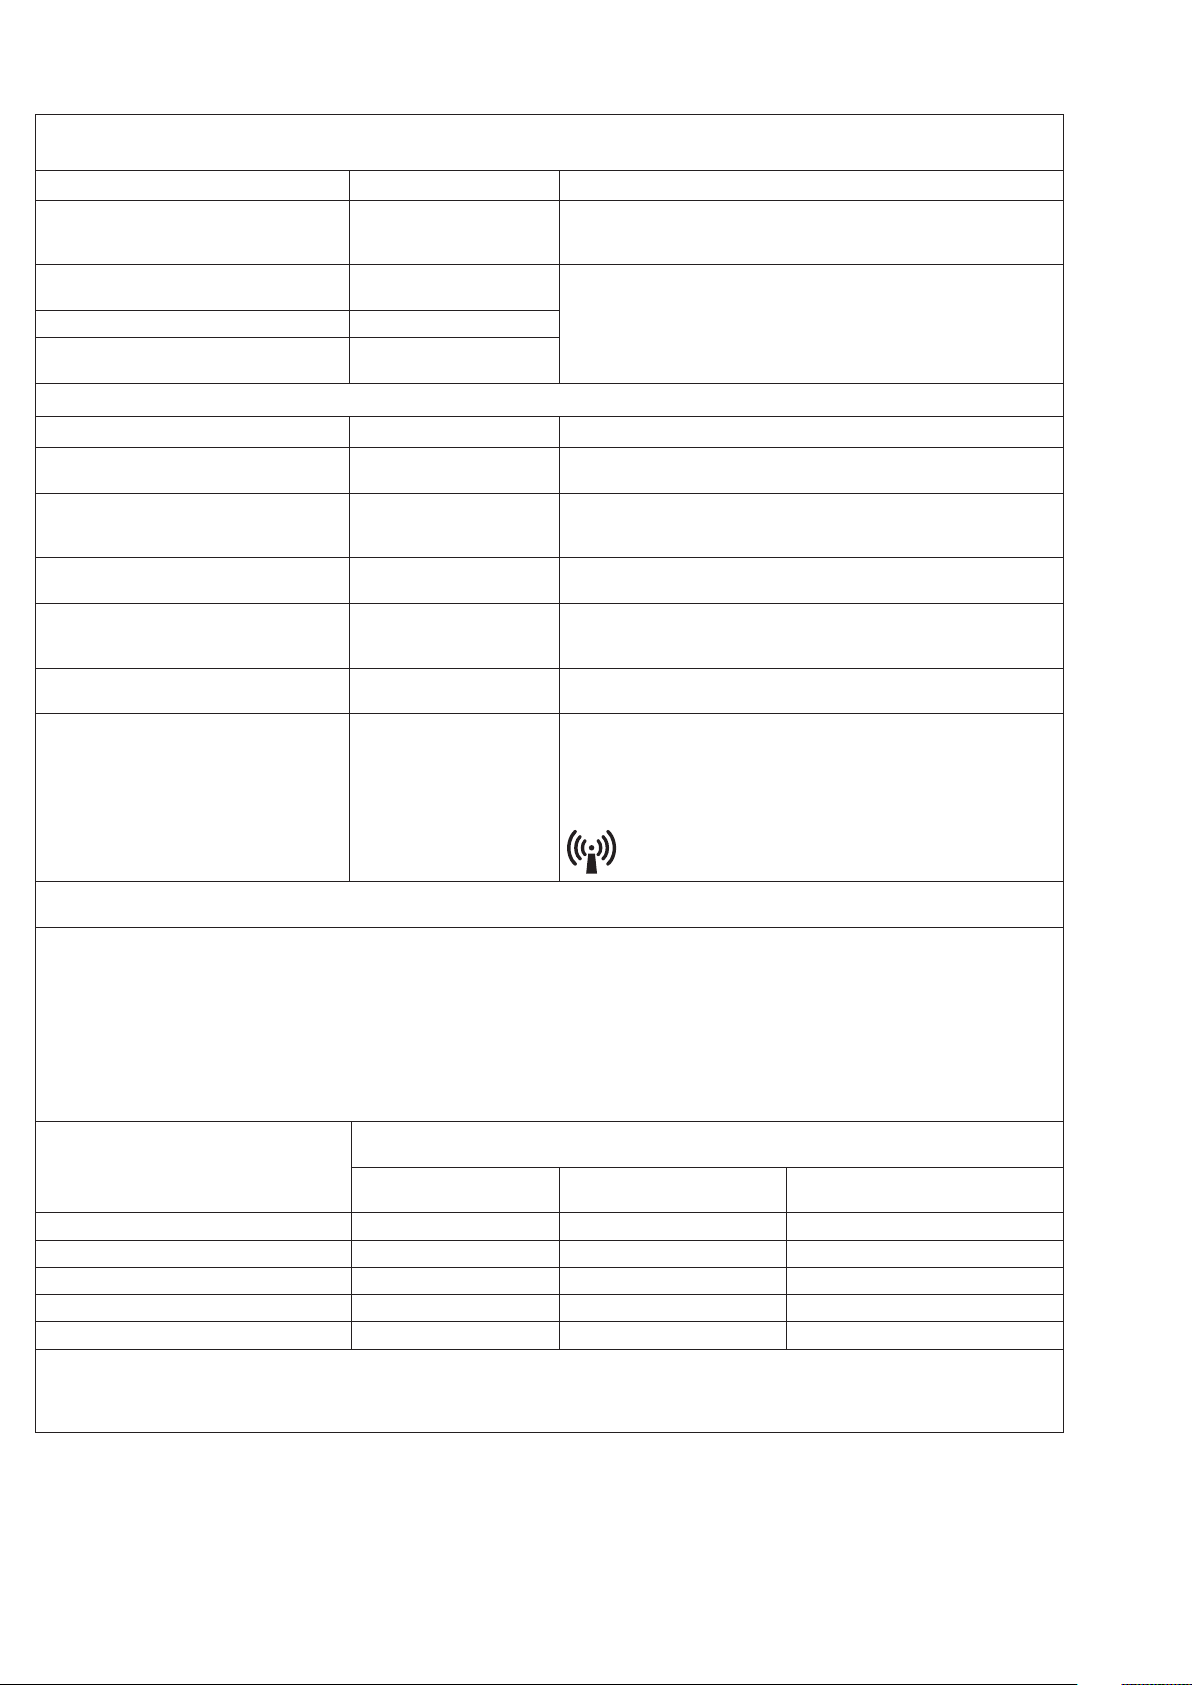
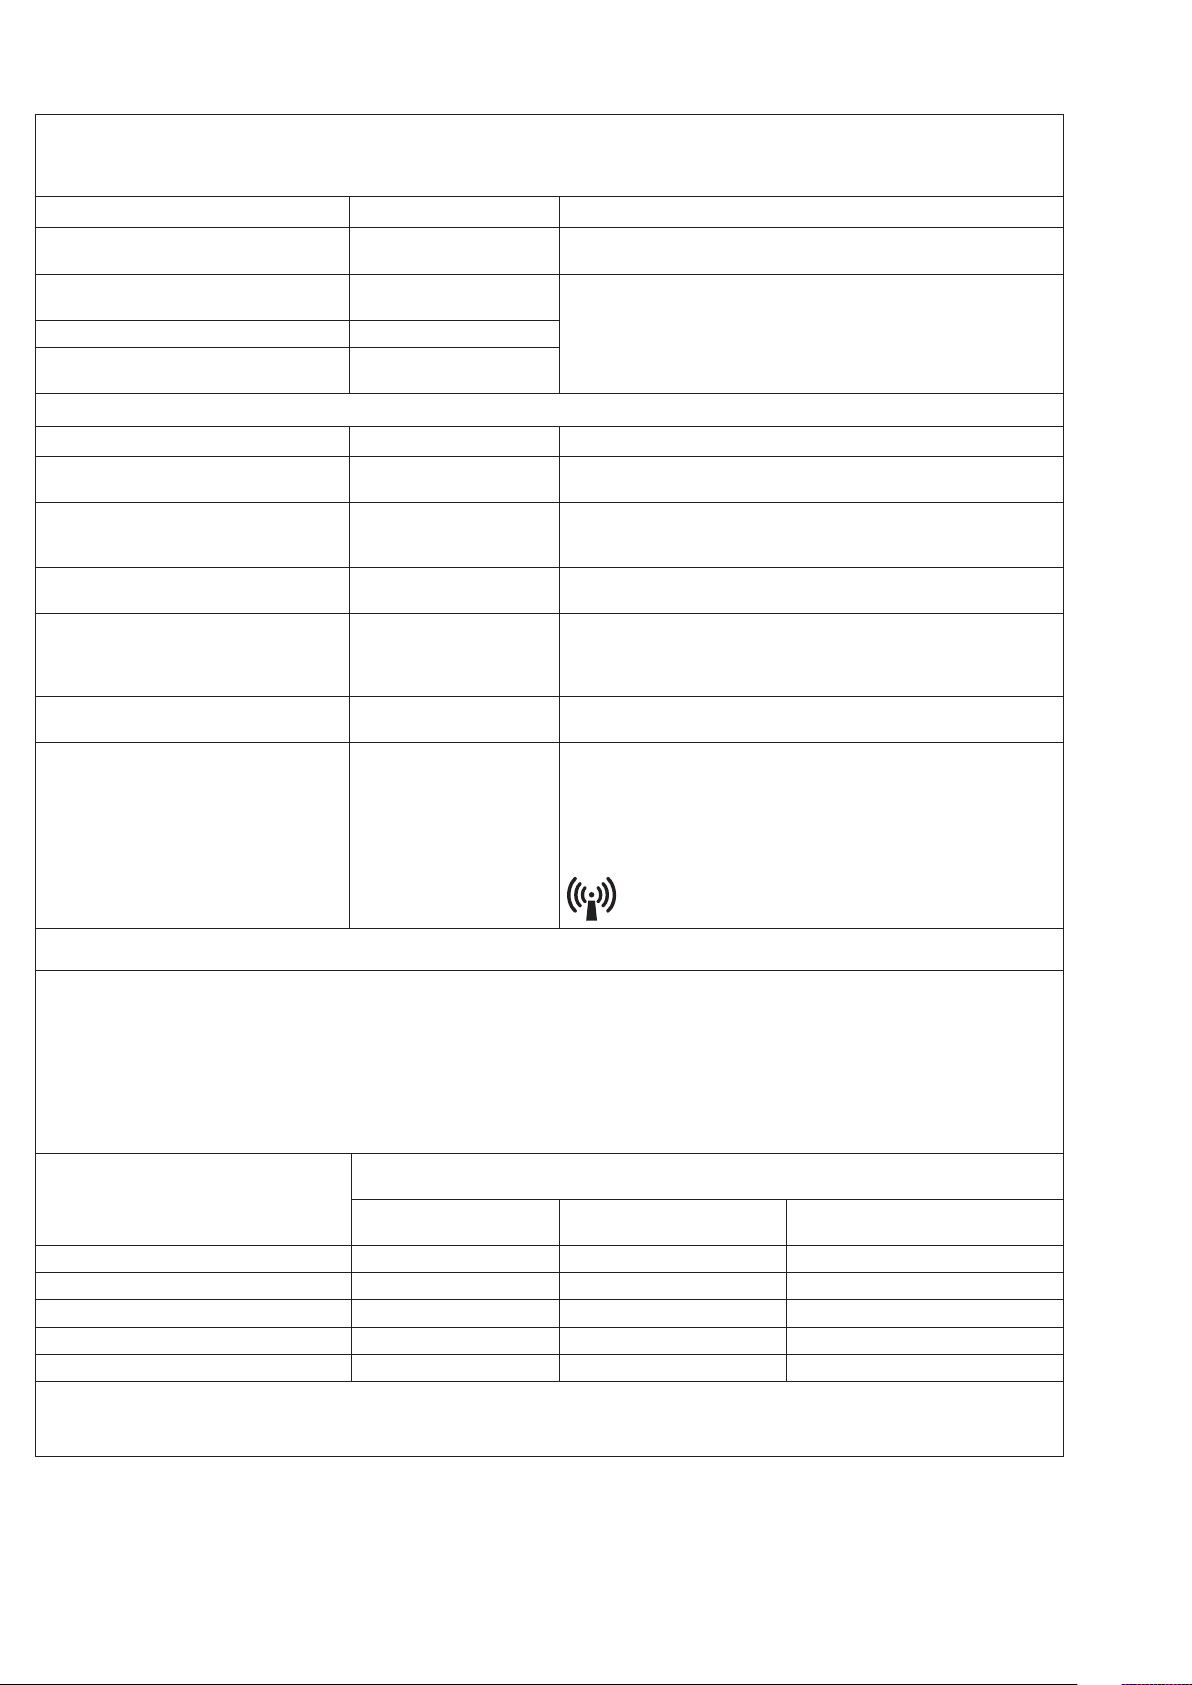
The DemiPlus is intended for use in the electromagnetic environment specied below. The customer or user of the DemiPlus shall insure it is used in such an environment.
Guidance and manufacturer’s declaration – electromagnetic emissions
EMISSIONS TEST COMPLIANCE LEVEL ELECTROMAGNETIC ENVIRONMENT -GUIDANCE
RD emissions
CISPRA 11
Group I The DemiPlus uses RF energy only for its internal function. Therefore, its RF emissions are very
low and not likely to cause any interference in nearby electronic equipment.
RD emissions
CISPRA 11
Class B
The DemiPlus is suitable for use in all establishments, including domestic establishments and
those directly connected to the public low-voltage power distribution network that supplies
buildings or for domestic purposes.
Harmonic emissions Class A
Voltage uctuations/icker emissions
IEC 60601-3-3
Complies
Guidance and manufacturer’s declaration – electromagnetic immunity
IMMUNITYTEST COMPLIANCE LEVEL ELECTROMAGNETIC ENVIRONMENT -GUIDANCE
Electrostatic discharge (ESD)
IEC 61000-4-2
+/-4kV contact
+/-8kV air
Floors should be wood, concrete, or ceramic tile. If oors are covered with synthetic material,
the relative humidity should be at least 30%.
Electrical fast transient/burst
IEC 61000-4-4
+/-2kV for power supply lines
+/-1kV for input output lines
Mains power quality should be that of a typical commercial or hospital environment.
Surge
IEC 61000-4-5
+/-1kV for dierential mode
+/-1kV for common mode
Mains power quality should be that of a typical commercial or hospital environment.
Voltage dips, short interruptions and
Voltage variations on power supply input lines
IEC 61000-4-11
30% UT for 0.5 cycle
60% UT for 5 cycles
<5% UT for 5 sec
Mains power quality should be that of a typical commercial or hospital environment.
Note: UT is the AC mains voltage prior to the application of the test level.
Power frequency (50/60Hz) magnetic eld
IEC 61000-4-8
3 A/m Power frequency magnetic eld should be at levels characteristic of a typical commercial or
hospital environment.
Conducted RF
IEC 61000-4-6
Radiated RF
IEC 61000-4-3
10Vrms
150 KHz t0 80 MHz
10V/m
80MHz to 2.5GHz
Portable and mobile RF communications equipment should be used no closer to any part of
the DemiPlus including the power supply and cable than the recommended separation distances
calculated from the equation applicable to the frequency of the transmitter.
Field strength from xed RF transmitters, as determined by an electromagnetic site survey,1
should be less than the compliance level in each frequency range 2.
Interference may occur in the vicinity of equipment marked with the following symbol:
Note 1: At 80Mhz and 800Mhz the higher range applies
1Field strengths from xed transmitters, such as base stations for radio (cellular/cordless) telephones and land mobile radio, amateur radio, AM and FM broadcast and TV broadcast cannot be predicted theoretically with
accuracy.To assess the electromagnetic environment due to xed RF transmitters, an electromagnetic site survey should be considered. In the measured eld strength in the location in which the DemiPlus is used exceeds
the applicable RF compliance levels above, the DemiPlus should be observed to verify normal operation. If abnormal performance is observed, additional measures may be necessary, such as reorienting or relocating the
DemiPlus.
2Over the frequency range of 150Khz to 80Mhz, eld strengths should be less than 10V/m.
The DemiPlus is intended for use in an electromagnetic environment in which radiated RF disturbances are controlled. The customer or user of the DemiPlus can help prevent electromagnetic distance between portable and
mobile RF communications equipment (transmitters) and the DemiPlus as recommended below according to the maximum power output of the communications equipment.
Recommended separation distances between portable and mobile RF communications equipment and the DemiPlus
Radiated Maximum output power of transmitter
W
Separation distance according to frequency
m
150 KHz to 80Mhz
d = 0.4√P
80 MHz to 800 MHz
d = 0.4√P
800 MHz to 2.5 GHz
d = 0.7√P
0.01 0.1 0.1 0.1
0.1 0.2 0.2 0.3
1 0.4 0.4 0.7
10 1.3 1.5 2.2
100 4.0 4.0 7.0
For transmitters rated at a maximum output power not listed above, the recommended separation distance din meters (m) can be determined using the equation applicable to the frequency of the transmitter, where P
is the maximum output power of the transmitter in watts (W) according to the transmitter manufacturer.
Note 1: At 80Mhz and 800Mhz the separation distance for the higher frequency range applies

9
FRANÇAIS
Lampe à Polymériser DEL DemiPlus
Manuel d’Utilisation
FABRIQUE AUX Etats-Unis
DESCRIPTION
Lalampe à polymériser DEL (Diodeélectroluminescente)DemiPlus àlumière visibleestconçue
pourpolymériserdesmatériauxphotopolymérisables par des professionnelsdentaires.
IMPORTANT : Les batteries doivent être totalement rechargées avant utilisation.
Référez-vous au paragraphe RECHARGER LA/LES BATTERIE(S).
Aucune pièce interne n’est réparable par l’utilisateur. N’ouvrez pas ou n’altérez pas les
batteries.
SPÉCIFICATIONS ET CLASSE D’ÉQUIPEMENT
Branchement de l’alimentation CA : 100-240V CA/0,8-0,4A 47-63 Hz
Puissance d’entrée : 12VA, nominal
Classe d’équipement :
Classe II
Sécurité : IEC 60601-1
CEM (Compatibilité Electromagnétique) : CEI 60601-1-2
Protection contre les chocs électriques :
Type BF
Protection contre la pénétration de liquides : IXP0 (équipement ordinaire)
Fonctionnement :
Traitement du patient en fonctionnement
continu, temps de mise sous tension de 2 0
secondes, hors tension de 1 minute.
ENVIRONNEMENT DE FONCTIONNEMENT
Remarque: Prenez soin lors de l’utilisation de ceproduit en présence de mélange
anesthésique inammable ou d’oxydant comme l’oxygène ou l’oxyde nitreux.
· Température ambiante : De 16˚C à 40˚C (60˚F à 104˚F)
· Humidité Relative : De 10 à 80 % sans condensation
· Pression atmosphérique : De 0,5-atm à 1,0-atm (de 500 hPa à 1060 hPa)
TRANSPORT ET ENVIRONNEMENT DE STOCKAGE
· Température ambiante : De -20˚C à 40˚C (-4˚F à 104˚F)
· Humidité Relative : De 10% à 85%
· Pression atmosphérique : De 0,5 atm à 1,0 atm (de 500 hPa à 1060 hPa)
· Fonctionnement de la batterie : Une pièce à main permet de réaliser 500
polymérisations de cinq secondes avec une batterie totalement chargée
· Protection contre les surintensités de la batterie : Fusible multiple réarmable et
électronique
· Diodes électroluminescentes : Un faisceau de quatre DEL serties sur un support.
· Gamme de longueurs d’onde maximales de sortie : Nanomètres de 450 - 470
· Puissance de sortie : 1100 mW/cm2
· Guide(s) de Lumière Standard : Numéro de Pièce 902495, Guide de Lumière
Prolongé 13mm à 8mm
Dimensions de la pièce à main de l’unité : Longueur : 23,5 cm (9,25 pouces) ;
Largeur : 2,9 cm (1,2 pouces)
Dimensionsdu chargeur : Longueur : 16 cm (6 pouces) ; Largeur : 11 cm (4,63 pouces)
Poids de l’unité : Pièce à main et batterie : 155 g (5,5 onces) ; Chargeur de batterie :
352 g (12,4 onces)
SYMBOLES
Attention, consultez les documents d’accompagnement :
Courant DC :
Déchets d’Equipements Electroniques et Electriques (DEEE) :
PRÉCAUTIONS DE SÉCURITÉ
avant tout contact avec le patient. Pour des instructions de stérilisation, référez-
vous au paragraphe : MAINTENANCE/NETTOYAGE/DÉSINFECTION/STÉRILISATION.
respecter les précautions et procédures suivantes :
de la peau non protégée.
l’énergie de polymérisation.
N’utilisez pas cet appareil sans protection oculaire adaptée pour l’utilisateur,
l’assistant et le patient. Référez-vous au paragraphe ACCESSOIRES ET PIÈCES
DE RECHANGE pour une protection oculaire adaptée.
ou qui prennent des médicaments photosensibilisants ne doivent pas être
exposés à la lumière de cette lampe.
anesthésique inammable ou d’oxydant comme l’oxygène ou l’oxyde nitreux.
électriqueinternationales, ycompriscellesdesEtats-Unis,duCanadaetdel’Europe,
pour être utilisés en toute sécurité et ecacité pour toutes les applications dentaires.
Plus nécessite des précautions spéciales concernant la CEM et doit être
installée et mise en service conformément à la Directive et la Déclaration du
Fabricant concernant la CEM comprise dans ce manuel.
DemiPlus. Consultez la Directive et la Déclaration du Fabricant concernant la CEM
comprise dans ce manuel.
Plus vousfourniraunservice
exceptionnelpendantde nombreuses années.Toutefois, ilestinévitableque,à un
momentouunautre,vousaurezàvousen débarrasser. Nousvous encourageons
àleretourner aumomentopportundanssonemballaged’origineà Kerr, quise
chargeradele recyclerdemanière écologique. Kerrse feraun plaisirde prendreàsa
chargelesfraisd’expéditionderetour.Veuillezcontacter votrereprésentantpourde
plusamplesdétails.La directive européenneportantsurlesdéchetsd’équipements
électriques etélectroniques(DEEE)interditlamiseaurebutdesDEEEen tantque
déchetsmunicipauxnontriésetexigequ’ilssoientramassésetrecyclésouéliminés
séparémentdesautrestypEneet,leséquipementsélectriquesetélectroniques
comportentdes substancesdangereusesprésentantdesrisques potentiels pour la
santéet l’environnements’ilssontmisaurebutdansdesdéchargesmunicipalesne
permettantpasd’éviterquecessubstEnéliminantcesdéchetscomme ilconvient,
vousparticiperezauxprogrèsdelaréutilisation,durecyclageetdes autresformesde
récupération des déchets et de la prévention de la pollution au niveau local même.
chargeur de la DemiPlus ne doit pas être stocké dans cet environnement du patient.
ASSEMBLAGE/MONTAGE
La boîte contient :
Qté. Description
1 Pièce à main de la lampe à polymériser DemiPlus
1 Ecran photoprotecteur
1 Alimentation enchable
1 Chargeur de batterie
1 Bloc de batteries
1 Manuel d’Utilisation
Plus

10
FONCTIONNEMENT
CHARGEMENT DE LA BATTERIES/DES BATTERIES
Le bloc de batterie contient des cellules lithium-ion. Un bloc de batterie neuf doit être
chargé pendant 16 heures avant sa première utilisation.
FIXATION DE L’ADAPTATEUR À L’ALIMENTATION ÉLECTRIQUE
L’alimentation électrique est une entrée universelle qui accepte un courant CA nominal
de 100V - 240V. Remarque:Seules les alimentations fournies par Kerr (numéro de
pièce 921656) doivent être utilisées pour alimenter le chargeur de batterie DemiPlus. Il
existe deux types d’alimentation disponibles comme montré sur la Figure 1 et 3. Les
alimentations dièrent légèrement en apparence mais fonctionnent de la même façon
électriquement et mécaniquement.
I. Sélectionnez le bon adaptateur (comme montré sur la gure 2 et 3). Leurs
applications sont les suivantes :
· 120V Etats-Unis —Type A
· Euro —Type C
· RU —Type G
· Australie —Type I
II. Chaque adaptateur dispose également d’une encoche dans laquelle s’enclenche
le loquet de retenue de l’alimentation électrique.
III. Avec l’encoche orientée vers l’alimentation, placez l’adaptateur dans
l’alimentation an d’aligner les languettes sur l’adaptateur avec leurs encoches
respectives sur l’alimentation.
IV. Enappuyantàlafoissurlesdeuxextrémitésdel’adaptateur(Figure4),faitesglisser
soitverrouillé.Remarque:Appuyez surl’adaptateurpendantl’installation
pours’assurerquetoutesleslanguettessoient maintenuesparlesxationssur
l’alimentation.Sil’adaptateurestdesserré,retirezl’adaptateuretréinstallez-le.
V. La gure 5 montre l’adaptateur verrouillé sur l’alimentation électrique.
VI. Pour retirer l’adaptateur de l’alimentation, appuyez sur le bouton des xations du
verrou (7), faites glisser l’adaptateur et retirez-le hors de l’alimentation électrique.
VII. Conservez les adaptateurs inutilisés pour une future utilisation.
INSTALLATION DE LA BATTERIE SUR LE BRAS
dicultés pour installer la batterie sur le bras, ne forcez pas.
II. Orientez la batterie (Figure 6) pour que la partie plate large (1.) soit vers le côté
du bras qui contient les interrupteurs.
que la batterie soit verrouillée.
IV. Pour retirer la batterie (Figure 6), appuyez sur les rainures (2.) de chaque côté de
la batterie et libérez la batterie.
CHARGEMENT DE LA/DES BATTERIE(S)
Branchez l’alimentation sur le socle du chargeur. La prise se situe au dos du socle du
chargeur (Figure 7).
I. Branchez l’alimentation dans la prise électrique.
II. Insérez la batterie et/ou l’unité de polymérisation avec la batterie dans la ou les
orice(s) du chargeur de batterie.
a. Le chargeur peut charger toute combinaison de deux batteries ou de bras
(à diérents stades de charge) en même temps.
b. Les anneaux lumineux (Figure 7, 2) entourant les ouvertures sur le socle du
chargeur indiquent l’état de charge de chaque batterie comme suit :
· Lumière verte—la batterie est chargée.
·
· LumièreJauneClignotante (avecbatterieoupièceàmaindansle
chargeur)— indique un étatdepanne.Veuillez appeler le ServiceClient.
Remarque: Si la température de la batterie est inférieure à celle de la pièce, laissez la
batterie atteindre la température ambiante et réessayez ; sinon, remplacez la batterie.
Durée de vie du bloc de batterie : 300 cycles de charge/recharge complets. Sortie :
3,7-Volts nominal à une capacité de 2,1A-H.
MISE AU REBUT DE LA BATTERIE : La bloc de batterie contient une batterie Lithium ion (Li-
TEMPS DE POLYMÉRISATION RECOMMANDÉ
La DemiPlus est une unité de polymérisation à haute puissance. Les tests de Kerr
indiquent les temps de polymérisation recommandés suivants :
Matériau Temps de Polymérisation
Recommandé
Teintes de composite universelles A3 et plus claires
(profondeur de 2 mm)
5 secondes
Teintes de composite universelles A3.5 et plus foncées 10 secondes
Agents de liaison, ciments de scellement en
résine universels et ciments auto-adhésifs, auto-
mordançants.
5 secondes
Remarque: Il est fortement recommandé de vérier la capacité de polymérisation en
utilisant un disque de dureté an de garantir une polymérisation complète.
PIÈCE À MAIN : La DemiPlus
sans changer la batterie. Une batterie totalement chargée permet de réaliser 500
polymérisations de cinq secondes.
La DemiPlus est une lampe à polymériser à pièce à main qui sert à la polymérisation de
matériau dentaire photopolymérisable léger et est alimentée par un bloc de batteries
Lithium-ion rechargeables.
Remarque: Lorsqu’il est neuf, le bloc de batterie doit être chargé avant d’utiliser la
Lampe à Polymériser DemiPlus . L’appareil utilise la technologie dénommée PLS (Periodic
Level Shifting - translation de niveau périodique), en attente de brevet. La technologie
PLS transforme lors de cycles périodiques constants la puissance d’un niveau de base
prédéterminé en un niveau supérieur pendant une brève durée.. La technologie PLS
permet d’obtenir des polymérisations plus profondes et plus rapides sans surchaue.
PIÈCES ET COMMANDES DE LA DEMIPlus
Les composants suivants sont utilisés par l’opérateur pendant le processus de
polymérisation (Figure 8) :
I. DELdemode de polymérisation(1.) TroisDELreprésentent lestroismodesde
polymérisation;degaucheàdroite: Cyclesde5secondes,10 secondes et 20 secondes.
II. Interrupteur de sélection de mode (2.) Une pression sur cet interrupteur
permet de faire passer l’instrument à un autre mode de polymérisation. Si l’unité
est en modeVeille, appuyez sur l’interrupteur pour remettre l’unité au dernier
mode de polymérisation utilisé.
III. InterrupteurdeDéclenchement (3.) Appuyez(etrelâchez)cetinterrupteur pour
démarrerlecycledepolymérisationchoisi.Sil’unitéestenmodeVeille,appuyezsur
l’interrupteurpourremettrel’unitéauderniermode depolymérisationutilisé.
IV. DEL d’Alimentation de Batterie (4.) Cette DEL indique l’état de charge de la
batterie de la façon suivante :
a) Silevoyantestéteint, la batterieest soit CHARGÉE ou l’unitéestenmodeVeille.
b) Si le voyant est jaune, la batterie est FAIBLE.
Remarque:La lampe à polymériser fonctionnera normalement dans ce
mode. Rechargez la batterie à la prochaine occasion possible.
c) Si le voyant est rouge, la batterie est DECHARGÉE (batterie morte) et
devra être rechargée.
An de ne pas interrompre un cycle de polymérisation, lorsque la tension de
la batterie baisse en dessous du seuil de batterie morte pendant un cycle de
polymérisation, le cycle de polymérisation s’achèvera et la DEL d’état de la batterie
ne s’allumera pas en rouge tant que le cyle de polymérisation n’est pas terminé.
V. Bloc de Batterie Lithium-Ion (5.) Sert à alimenter le bras de polymérisation.
Peut être retiré en appuyant sur les encoches et en tirant la batterie pour la libérer.
VI. Assemblage du Guide de Lumière (6.)La puissance de la DEL de la lampe à
polymériser est émise à l’extrémité de cette pièce.*
VII. Ecran de protection de la lampe (7.) Cet écran protège les yeux de l’opérateur
de la lumière émise lorsque la lampe guide est utilisée.

11
*D’autres guides de lumière qui supportent des puissances diérentes sont disponibles
pour la DemiPlus.
ETATS DE FONCTIONNEMENT DE LA LAMPE À POLYMÉRISER DEMIPlus
Trois stades de fonctionnement sont possibles pendant le fonctionnement du bras :
I. Pause : L’unité est en Pause lorsqu’elle n’est pas en mode de polymérisation ou
Veille et que la batterie est CHARGÉE ou FAIBLE. L’utilisateur peut passer du mode
de polymérisation 5 secondes, au mode 10 secondes et 20 secondes en appuyant
sur l’interrupteur de mode. Les cycles de polymérisation démarrent également
lorsque l’unité est en mode Pause.
II. Polymérisation : Un cycle de polymérisation débute en appuyant et en
relâchant le déclencheur lorsque l’unité est en mode Pause. Le cycle 5 secondes,
10 secondes ou 20 secondes démarrera en fonction de l’état indiqué par les DEL
de mode de polymérisation. Une fois le cycle de polymérisation commencé, la
DEL de la lampe à polymériser s’allumera et un signal sonore retentira. Selon le
fon du cycle, alors qu’un signal sonore de plus longue durée retentira.
Remarque: Une deuxième pression sur le déclencheur pendant un cycle
de polymérisation interrompt immédiatement le cycle de polymérisation et
déclenche le signal sonore de n, indépendament du temps écoulé depuis le
début du cycle (le fait d’appuyer sur l’Interrupteur de sélection de mode pendant
un cycle de polymérisation n’a aucun eet).
III. Veille : La DemiPlus semetenmodeVeilleande prolongerladuréedeviedela
batterieaprèsenviron8 minutesd’inactivité. Ellepeutêtre réveillé enappuyantune
foissoit surl’interrupteurde mode oule déclencheur, cequifera basculerl’unitéen
modePause.L’unitéachera ledernier modedepolymérisationchoisi.L’interrupteur
modeouledéclencheurpeutensuiteêtre enfoncé pourbasculerentre lesmodes
oupourdémarrerunepolymérisation. EnmodeVeilletoutes lesDELsontéteintes
etlalampeàpolymérisersemetenétat d’économied’énergie.La durée deviede la
batterie(siellen’estpasrechargéeniutiliséeaprèsavoirétécomplètementchargée)
est d’environ 6 mois que la batterie soit ou non dans la pièce à main.
FONCTIONNEMENT DU BRAS DE POLYMÉRISATION DEMIPlus
I. Sélectionnez le mode de polymérisation souhaité en appuyant sur l’Interrupteur
de Sélection de Mode (Figure 9, 1.)
II. Placez le guide de lumière (2) sur la dent, aussi près que possible de la dent sans
la toucher. Appuyez et relâchez le Déclencheur (3.). L’unité émettra un signal
sonore à des intervalles de 5 secondes comme précédemment décrit.
MAINTENANCE :
NETTOYAGE / DÉSINFECTION / STÉRILISATION
I. Guide de lumière à bre optique :
a) Immergez/trempez soigneusement le guide de lumière dans un nettoyant
désinfectant (eau savonneuse).
ce qu’il n’y ait plus de débris.
c) Rincez toutes les pièces à l’eau chaude.
II. Guide de lumière à bre optique - Stérilisation :
a) Stérilisez dans un autoclave à vapeur en utilisant de l’eau distillée à une
température de 132°C (270°F) pendant 20 minutes.
c) N’utilisez pas d’autoclave chimique.
III. Kit de maintenance optique (PN 21042) – Après de nombreux cycles d’autoclave,
une décoloration marron ou grise peut s’accumuler sur les extrémités polies du
guide de lumière. C’est un résidu qui se forme au cours du cycle de séchage de
l’autoclave. Il est recommandé d’utiliser le Kit de maintenance optique tous les
50 cycles d’autoclave. Respectez les instructions incluses dans le kit pour réaliser
des performances de polymérisation optimales.
Pour retirer le composite qui adhère à l’extrémité du guide de lumière :
· Trempez de la gaze dans de l’alcool.
· Enroulez la gaze atour d’une lame de rasoir.
· Frottez l’extrémité du guide de lumière avec la lame de rasoir protégée par
Remarque:
composite car il rayera le verre.
IV. Pièce à Main et Chargeur de Batterie - Les pièces en plastique peuvent être
nettoyées en procédant comme suit :
a) En suivant les instructions sur l’emballage, toutes les pièces plastiques
peuvent être essuyées avec des lingettes CaviWipes™. Un composé
d’ammonium quaternaire tel que CaviCide™/CaviWipes™ ou un produit
semblable est recommandé (contenant 20% ou moins d’alcool).
b) N’utilisez pas : De l’alcool dénaturé, Lysol®, phénol, solutions de complexe
d’ammoniac ou de complexes d’iode.
c) Essuyez, ne vaporisez pas de solution sur les pièces en plastique. Empêchez
tout liquide de pénétrer dans les orices de l’unité.
ATTENTION : N’immergez pas les pièces plastiques dans des solutions.
L’utilisation de solutions autres que celles recommandées peut endommager les pièces
en plastique et annulera la garantie. Cet appareil n’est pas autoclavable.
MESURES DE CONTRÔLE D’INFECTION
ATTENTION : Pour empêcher toute contamination croisée, un manchon
Plus à chaque utilisation.
GARANTIE
Kerr garantitparlaprésentepourunepériodedetroisans(unanpourlesbatteries)àcompter
deladated’achatquecetinstrumentseraexemptdevicesdematièreetdefabricationet
fonctionneradefaçon satisfaisantedans desconditionsd’utilisationetderéparationnormales.
Pourenregistrervotregarantie,remplissezleformulairedegarantieenlignedansles30
remplissezunformulaireparunité.Veuillezconserverlafacturedevotrevendeur.Vouspouvez
égalementenregistrervotregarantie encomposantle1.800.KERR.123(1.800.537.7123).
LAGARANTIEINDIQUÉEDANSLES PRÉSENTESESTLASEULEGARANTIEAPPLICABLEAUX
PRODUITSKERR.KERREXCLUTEXPRESSEMENTTOUTEAUTREGARANTIEEXPRESSEOUTACITE
NOTAMMENTLESGARANTIESDECOMMERCIALISATIONETD’ADÉQUATIONAUNUSAGE
PARTICULIER.LARESPONSABILITÉDEKERRCONCERNANTSESPRODUITSESTEXPRESSEMENT
LIMITÉEAUXRECOURSEXPRIMÉSDANSLESPRÉSENTES.LESRECOURSSONTLESRECOURS
EXCLUSIFSDEL’ACHETEUR.KERRNESERATENURESPONSABLESOUSAUCUNECONDITIONPOUR
TOUTDOMMAGEACCIDENTELOUCONSÉQUENTIEL.LAPRÉSENTE GARANTIE NE S’APPLIQUEÀ
AUCUNDOMMAGEOUDÉFAUTCAUSÉPARLENON-RESPECTDESINSTRUCTIONSSUIVANTES
PARL’UTILISATEUROUPARTOUTEERREURD’UTILISATIONOUD’ENTRETIENDEL’INSTRUMENT
PARUNAUTREUTILISATEUR.BIENQUEKERRPROPOSESESSERVICESDERÉPARATION
D’INSTRUMENTSETDEREMPLACEMENTDESPIÈCESAPRÈSEXPIRATIONDELAGARANTIE,
KERRNEGARANTITLADISPONIBILITÉDECESSERVICESOUDECESPIÈCESDERECHANGEQU’AU
COURS DES DEUX ANS QUI SUIVENT L’ARRÊT DE PRODUCTION D’UN MODÈLE D’INSTRUMENT.
ACCESSOIRES ET PIÈCES DE RECHANGE
N° de Pièce Guides de lumière à bre optique
21020 Guide de lumièreTurbo courbé 8 mm
921551 Guide de lumièreTurbo courbé 11 mm
20812 Guide de lumière courbé 13 mm
N° de Pièce Protection Oculaire
20816 Ecran photoprotecteur
N° de Pièce Accessoires
21042 Kit de maintenance optique
910726 Radiomètre DEL portatif
N° de Pièce Pièces de Rechange
921918-1 Kit de Rechange, Batterie, DemiPlus
921919-1 Kit de Rechange, Chargeur, DemiPlus
921920-1 Kit de Rechange, Bras, DemiPlus
921656 Alimentation Universelle Enchable
12
La DemiPlus est conçue pour être utilisée dans l’environnement électromagnétique indiqué ci-dessous. Le client ou l’utilisateur de la DemiPlus doit s’assurer qu’elle sera bien utilisée dans un tel environnement.
Directive et déclaration du fabricant - émissions électromagnétiques
TEST D’ÉMISSIONS NIVEAU DE CONFORMITÉ ENVIRONNEMENT ÉLECTROMAGNETIQUE - DIRECTIVE
Émissions RD
CISPRA 11
Groupe I La DemiPlus n’utilise l’énergie RF que pour son fonctionnement interne. Par conséquent, ses émissions
RF sont très faibles et peu susceptible de provoquer d’interférence sur des équipements électroniques
à proximité.
Émissions RD
CISPRA 11
Classe B
La DemiPlus peut être utilisé dans tous les types de bâtiments, notamment dans les habitations et les
bâtiments reliés au réseau de distribution électrique à basse tension.
Emissions harmoniques Classe A
Fluctuations de tension/émissions icker
CEI 60601-3-3
Conforme
Directive et déclaration du fabricant - immunité électromagnétique
TEST D’IMMUNITÉ NIVEAU DE CONFORMITÉ ENVIRONNEMENT ÉLECTROMAGNETIQUE - DIRECTIVE
Décharge électrostatique (ESD)
CEI 61000-4-2
+/-4kV contact
+/-8kV air
Les sols doivent être carrelés, en bois ou en béton. Si les sols sont revêtus de matériau synthétique,
l’humidité relative doit être d’au moins 30 %.
Augmentation brusque/transitoire électrique rapide
CEI 61000-4-4
±2 kV pour lignes d’alimentation en
courant
±1 kV pour lignes d’entrée et de sortie
La qualité de I’alimentation secteur doit être de type commercial ou hospitalier.
Surtension
CEI 61000-4-5
±1 kV mode diérentiel
±1 kV mode commun
La qualité de I’alimentation secteur doit être de type commercial ou hospitalier.
Chutes de tension, brèves interruptions et
Variations de tension des lignes de l’alimentation électrique
CEI 61000-4-11
30% UT pendant 0.5 cycle
60% UT pendant 5 cycles
<5% UT pendant 5 sec
La qualité de I’alimentation secteur doit être de type commercial ou hospitalier.
UT est la tension de secteur c.a. avant l’application du niveau de test.
Champ magnétique (50/60Hz) de la fréquence du courant
CEI 61000-4-8
3 A/m Le champ magnétique de la fréquence du courant doit se situer à des niveaux caractéristiques d’un
environnement hospitalier ou commercial habituel.
RF par conduction
CEI 61000-4-6
RF par radiation
CEI 61000-4-3
10Vrms
De 150 KHz à 80 MHz
10V/m
De 80MHz à 2.5GHz
Un équipement de communication RF portable ou mobile ne doit pas être utilisé près de toute partie
de la DemiPlus y compris sa source et son câble d’alimentation à une distance inférieure à la distance de
séparation recommandée calculée à partir de l’équation applicable à la fréquence du transmetteur.
La force du champ des émetteurs RF xes, telles que déterminées par une étude électromagnétique du
site,1 doivent être inférieures au niveau de conformité dans chaque bande de fréquences 2.
Des interférences peuvent se produire à proximité de l’équipement portant le symbole suivant :
Remarque 1 : A 80Mhz et 800Mhz le niveau le plus haut s’applique
On ne peut théoriquement pas estimer avec précision les forces de champs d’émetteurs xes, tels que stations de base pour radiotéléphones (portables/sans l) et les radios terrestres mobiles, radios amateur,
chaînes de radio AM/FM et chaînes de télévision. Pour évaluer l’environnement électromagnétique dû à des émetteurs RF xes, une étude électromagnétique sur site devrait être envisagée. Si la force de champ
mesurée sur le lieu d’utilisation de la DemiPlus excède la conformité RF applicable, lefonctionnement normal de la DemiPlus doit être vérié. Si des anomalies sont observées, des mesures supplémentaires peuvent
être nécessaires, telles que la réorientation ou la relocalisation de la DemiPlus.
Dans la bande de fréquence de 150 kHz à 80 MHz, les forces de champ sont inférieures à 10V/m.
La DemiPlus est prévue pour une utilisation dans un environnement électromagnétique dans lequel les perturbations par radiation RF sont contrôlées. Le client ou l’utilisateur de la DemiPlus peut contribuer à
empêcher les interférences électromagnétiques en respectant une distance minimale entre les systèmes de communication portables et mobiles RF (émetteurs) et la DemiPlus comme recommandé ci-dessous, en
fonction de la puissance de sortie maximale du système de communication.
Distances de séparation recommandées entre un équipement de communication RF portable et mobile et la DemiPlus
Puissance de sortie maximale irradiée du transmetteur
W
Distance de séparation en fonction de la fréquence
m
De 150 KHz à 80Mhz
d = 0.4√P
De 80 MHz à 800 MHz
d = 0.4√P
De 800 MHz à 2.5 GHz
d = 0.7√P
0.01 0.1 0.1 0.1
0.1 0.2 0.2 0.3
1 0.4 0.4 0.7
10 1.3 1.5 2.2
100 4.0 4.0 7.0
Pour les émetteurs avec une puissance de sortie nominale maximale non indiquée ci-dessus, la distance de séparation recommandée den mètres (m) peut être évaluée au moyen de l’équation applicable à la
fréquence de l’émetteur, où Pest la puissance de sortie maximale de l`émetteur en watts (W) selon le fabricant de l’émetteur.
Remarque 1 : A 80Mhz et 800Mhz la distance de séparation de niveau le plus haut s’applique
13
ESPAÑOL
Unidad de fotopolimerización DemiPlus con
L.E.D (diodo emisor de luz)
Manual del usuario
FABRICADA EN EE. UU.
DESCRIPCIÓN
La unidad de fotopolimerización DemiPlus con L.E.D. (diodo emisor de luz) es una
unidad de polimerización visible indicada para la polimerización de materiales
fotopolimerizables por parte de dentistas.
IMPORTANTE: Las pilas deben cargarse totalmente antes de usar. Consulte la sección
CARGA DE LA(S) PILA(S).
Este aparato carece de piezas internas en las que el usuario pueda realizar tareas de
servicio técnico. No abra ni manipule las pilas.
ESPECIFICACIONES Y CLASE DE EQUIPO
Conexión a alimentación de CA: 100-240V AC/0.8-0.4A 47-63 Hz
Potencia de entrada: 12VA, nominal
Clase de equipo:
Clase II
Seguridad: IEC 60601-1
CEM (cumplimiento electromagnético): IEC 60601-1-2
Protección contra descarga eléctrica:
Tipo BF
Protección contra entrada de líquidos: IXP0 (equipo normal)
Funcionamiento:
Aplicación de funcionamiento continuo
para pacientes, ciclo de funcionamiento 20
segundos ENCENDIDO/1 minuto APAGADO.
ENTORNO DE FUNCIONAMIENTO
Nota: Tenga cuidado cuando use este producto en presencia de una mezcla anestésica
inamable o un oxidante como oxígeno u óxido nitroso.
· Temperatura ambiente: 16˚C a 40˚C
· Humedad relativa: 10% al 80% (sin condensación)
· Presión atmosférica: De 0,5 atm a 1,0 atm (de 500 hPa a 1060 hPa)
ENTORNO DE ALMACENAMIENTO Y TRANSPORTE
· Humedad relativa: 10% a 85%
· Presión atmosférica: De 0,5 atm a 1,0 atm (de 500 hPa a 1060 hPa)
· Rendimiento de la pila: La pieza de mano generará 500 polimerizaciones de cinco
segundos con una pila totalmente cargada
· Protección de la pila por sobretensión: Polifusible electrónico y reseteable
· Intervalo de longitud de onda máxima de salida: 450 - 470 nanómetros
· Salida de baselina: 1.100 mW/cm2
· Guía(s) de luz estándar: Número de pieza 902495, guía de luz extendida de 13
mm a 8 mm
Dimensiones de la pieza de mano de la unidad: Longitud: 9,25 pulg. (23,5 cm);
Anchura: 1,2 pulg. (2,9 cm)
Dimensionesdelcargador:Longitud: 6,0 pulg. (16,0 cm); Anchura: 4,63 pulg. (11,1 cm)
Peso de la unidad: Pieza de mano y pila: 5,5 oz. (155 g); Cargador de pilas: 12,4 oz (352 g)
SÍMBOLOS
Alimentación CC:
Residuos de aparatos eléctricos y electrónicos (RAEE):
PRECAUCIONES DE SEGURIDAD
esterilizarse antes de entrar en contacto con el paciente. Para instrucciones de
esterilización, consulte la sección MANTENIMIENTO: LIMPIEZA/DESINFECCIÓN/
ESTERILIZACIÓN.
energíasdepolimerizaciónconsiderablementemáselevadasque conequiposutilizados
anteriormente.Esimportanteseguirlassiguientes precaucionesyprocedimientos:
polimerización.
No utilice este dispositivo sin la protección ocular adecuada para el
dentista, el ayudante y el paciente. Consulte la protección ocular adecuada
en la sección ACCESORIOSY PIEZAS DE REPUESTO.
utilicen medicamentos fotosensibles no deberán exponerse a la luz
procedente de esta unidad.
anestésica inamable o un oxidante como oxígeno u óxido nitroso.
internacionalesdeseguridadeléctrica,incluidaslasdeEstadosUnidos,CanadáyEuropa,
yhandemostradosu seguridad y ecacia paratodaslas aplicaciones odontológicas.
Plus requiere precauciones especiales sobre compatibilidad
electromagnética (EMC) y debe instalarse y ponerse en funcionamiento conforme
a la Guía y declaración del fabricante para compatibilidad electromagnética
incluida en este manual.
unidad DemiPlus. Consulte la Guía y declaración del fabricante respecto de la
compatibilidad electromagnética, incluida en este manual.
Plus.
Sinembargo,esinevitablequeenalguna ocasión en elfuturo necesitarádesecharla.Cuando
recicladomedioambientalmenteseguro.Kerrestará encantadadecargarcon elcostedel envío
devuelta.Porfavor póngase encontactocon surepresentantedeventasparaobtenermás
información.LaDirectrizsobreDesechosdeEquiposEléctricosy Electrónicos(WasteElectrical
and ElectronicEquipment,WEEE) prohíbedesecharlos equipos eléctricosyelectrónicos
comoresiduosmunicipalesnoclasicados,y requiere queéstosseanrecogidosyreciHay
sustanciaspeligrosaspresentes enlosequiposeléctricosy electrónicos,lascualespresentan
riesgospotenciales alasaludhumanay al medioambientesifuerana desecharseen terrenos
correctamente,usted estarácontribuyendoalavancedelareutilización,elrecicladoy otras
formas de recuperación, así como a la prevención de la contaminación en un nivel muy local.
NOTA: Las dimensiones de la gura representan el ambiente mínimo del paciente (1,5 metros). La base del cargador DemiPlus
no se guardará dentro del espacio del paciente.
ENSAMBLAJE/MONTAJE
Cantidad Descripción
1 Pieza de mano de fotopolimerización DemiPlus
1 Pantalla protectora contra la luz
1 Unidad de alimentación
1 Cargador de pilas
1 Paquete de pilas
1 Manual del usuario
1 Barrera desechable Demi/DemiPlus

14
FUNCIONAMIENTO
PILASY CARGADOR
El paquete de pilas contiene pilas de ión litio. Un paquete nuevo de pilas debe cargarse
durante 16 horas antes de usarlo por primera vez.
CONECTE EL ADAPTADOR A LA FUENTE DE ALIMENTACIÓN
La alimentación es una unidad de entrada universal que acepta 100V - 240V AC
nominales. Nota: Sólo deben usarse las fuentes de alimentación suministradas por
Kerr (número de referencia 921656) para alimentar el cargador de pilas DemiPlus.
Hay dos tipos de fuentes de alimentación tal como se muestran en las Figuras 1 y 3.
Las fuentes de alimentación tienen un aspecto ligeramente diferente entre sí, pero
funcionan de igual manera, eléctrica y mecánicamente.
I. Seleccione el adaptador adecuado (tal como se muestra en las Figuras 2 y 3). Sus
aplicaciones son las siguientes:
· 120V EE. UU. —Tipo A
· Euro —Tipo C
· Reino Unido —Tipo G
· Australia —Tipo I
de la fuente de alimentación.
III. Con la ranura orientada hacia la fuente de alimentación, coloque el adaptador
en la unidad de alimentación de forma que las lengüetas del adaptador estén
alineadas con sus respectivas ranuras en la fuente de alimentación.
IV. Presione los dos extremos del adaptador (Figura 4), deslícelo en la fuente de
lugar. Nota: Presionar el adaptador durante la instalación asegura el que todas
VI. Pararetirareladaptadordelaunidaddealimentación,presioneelbotóndelretenedor
(7.),extraigael adaptador de la fuentedealimentaciónyretireeladaptador.
VII. Conserve los adaptadores que no haya utilizado para emplearlos más adelante.
INSTALACIÓN DE LA PIEZA EN LA VARILLA
I. La pila sólo entrará en la varilla en una sola orientación. Si tiene dicultades para
introducir la pila en la varilla, no la fuerce.
II. Oriente la pila (Figura 6) de forma que la zona plana ancha (1.) quede orientada
hacia el lateral de la varilla que tiene los interruptores.
en su lugar.
IV. Para retirar la pila (Figura 6), presione las indentaciones texturizadas (2.) a
ambos lados de la pila y extraiga la pila.
CARGA DE LA(S) PILA(S)
Enchufe la fuente de alimentación en la base del cargador. El receptáculo para el
enchufe está situado en la parte posterior de la base del cargador (Figura 7).
I. Enchufe la fuente de alimentación a una toma de corriente eléctrica.
II. Inserte la pila y/o la unidad de fotopolimerización con la pila en la(s) apertura(s)
del cargador de la pila.
a. El cargador puede cargar cualquier combinación de dos varillas o dos pilas
(en diferentes estados de carga) al mismo tiempo.
b. Los anillos iluminados (Figuras 7, 2.) que rodean las aberturas en la base
del cargador indican el estado de carga de cada pila como se muestra:
· Luz verde: La pila está cargada.
· Luz amarilla: La pila se está cargando.
· El parpadeo de la luz amarilla (con la batería o la varilla en el
cargador) - indica una condición de fallo. Por favor póngase en
contacto con el Servicio de atención al cliente.
Nota
la temperatura ambiente e inténtelo de nuevo. De lo contrario, cambie la pila.
Duración del paquete de pilas: 300 ciclos de carga completa/recarga. Salida: 3,7 voltios
nominal a 2,1 A-H de capacidad.
ELIMINACIÓN DE LAS PILAS: El paquete de pilas contiene una pila de ión litio (ión Li).
Recicle o deseche las pilas según las normas nacionales, regionales y locales.
TIEMPO RECOMENDADO DE POLIMERIZACIÓN
La unidad DemiPlus es una unidad de polimerización de alta potencia. Los ensayos de
Kerr recomiendan los siguientes tiempos de polimerización:
Material Tiempo recomendado
de polimerización
Composite universal, colores A3 y más claros (profundidad 2 mm) 5 segundos
Composite universal, colores A3,5 y más oscuros 10 segundos
Adhesivos, cementos universales de enmasillado de resina y
auto-grabadores, cementos auto-adhesivos.
5 segundos
Nota: Se recomienda encarecidamente ensayar la capacidad de polimerización usando
un disco de dureza para asegurar una completa polimerización.
PIEZA DE MANO: La unidad DemiPlus
día sin necesidad de cambiar la pila. Una pila totalmente cargada permitirá 500
polimerizaciones de cinco segundos.
La unidad DemiPlus es una unidad de fotopolimerización tipo varilla que se usa para la
polimerización de material dental fotopolimerizable y está alimentada por un paquete
de pilas recargables de ión litio.
Nota: Elpaquetede pilas,cuandoestá nuevo, debecargarse antes deusarlaunidad
de fotopolimerización DemiPlus .La unidad emplealatecnologíaregistradaCambio de
NivelPeriódico(PeriodicLevelShifting, PLS),cuyapatenteestápendiente.Latecnología
PLS,queesunaalternaciónperiódicay constantede laemisión entreunnivel básico
predeterminadoy unnivelmáselevadoporunbreve intervalodetiempo.LatecnologíaPLS
permite lograr polimerizacionesconunamayor rapidezy profundidadsinrecalentamiento.
PIEZAS Y CONTROLES DE LA UNIDAD DEMIPlus
El usuario emplea los siguientes componentes durante el proceso de polimerización
(Figura 8):
I. Varios LED modo polimerización (1.) Los tres diodos emisores de luz
representan los tres modos de polimerización. De izquierda a derecha, estos son:
ciclos de 5 segundos, 10 segunods y 20 segundos.
II. Interruptor de selección de modo (2.) Al presionar este interruptor la unidad
cambiará secuencialmente por los tres modos de polimerización. Si la unidad
modo de polimerización que se utilizó la última vez.
III. Interruptor del disparador (3.) Al presionar (y soltar) este interruptor se
presionar este interruptor la unidad se despertará en el modo de polimerización
que se utilizó la última vez.
IV. LED de potencia de la pila (4.) Este LED indica el estado de carga de la pila de
la siguiente manera:
a) Si la luz no está encendida, la pila está CARGADA o la unidad está en
b) Si la luz es amarilla, la pila tiene un BAJO nivel de carga.
Nota:La luz de polimerización funcionará normalmente en este modo.
Recargue la pila en la próxima oportunidad que tenga.
c) Si la luz es roja, la pila está DESCARGADA (pila agotada) y será necesario
recargarla.
polimerización, éste se completará y el LED de estado de la pila no cambiará a
V. Paquete de pilas de ión litio (5.) Utilizar para alimentar la varilla de
polimerización. Pueden extraerse al presionar las indentaciones y tirar de la pila.
VI. Ensamblaje de la guía de luz (6.) La salida del LED de la luz de polimerización
se emite desde el extremo de esta pieza.*

15
VII. Pantalla protectora de la luz (7.)
la luz emitida de la guía de luz cuando está en uso.
*Hay otras guías de luz para la unidad DemiPlus que pueden ofrecer potencias diferentes.
ESTADOSDE FUNCIONAMIENTODELALUZDEPOLIMERIZACIÓNDEMIPlus
I. “Inactivo”: La unidad está inactiva cuando no está en los modos
puede pasar entre los modos de polimerización de 5 segundos, 10 segundos y
20 segundos presionando el interruptor de modo. Los ciclos de polimerización
II. Polimerización:
ciclode5segundos,10segundoso20segundos, dependiendodelestadoindicadopor
Dependiendodelmodoqueseseleccionó,sonará unpitidocadacinco segundoshasta
quehayaterminadoelciclo, momentoenelquesonaráunpitidonalmáslargo.
Nota: Alpresionarelinterruptordeldisparadorduranteunasegundavezduranteun
yhace quesueneunpitidonal,independientementedeltiempoquehayapasado
desdeelcomienzodelciclo(presionarelinterruptordeseleccióndelmododuranteun
III. Sueño: La unidad DemiPlus
presionando el interruptor del disparador o de selección de modo una vez.
polimerización elegido. Entonces puede presionarse el interruptor de selección
de modo o del disparador para cambiar entre modos o iniciar una polimerización.
se usa después de recibir una carga completa) es de aproximadamente 6 meses
independientemente de que la pila esté o no instalada en la pieza de mano.
FUNCIONAMIENTO DE LA VARILLA DE POLIMERIZACIÓN DEMIPlus
I. Seleccione el modo de polimerización deseado presionando el interruptor de
selección de modo (Figura 9, 1.)
II. Coloque la guía de luz (2.) lo más cerca posible del diente, sin llegar a tocarlo.
Presione y suelte el interruptor del disparador (3.). La unidad emitirá un pitido a
intervalos de 5 segundos como se describió anteriormente.
MANTENIMIENTO:
LIMPIEZA/DESINFECCIÓN/ESTERILIZACIÓN
I. Guía de luz con bra óptica:
b) Después de 10 minutos, limpie con un cepillo de limpieza de instrumental
hasta cualquier residuo visible.
c) Aclare todas las piezas con agua tibia.
II. Esterilización de la guía de luz con bra óptica:
a) Esterilice en autoclave de vapor utilizando agua destilada a una
b) No agregue soluciones químicas al autoclave.
c) No utilice autoclaves de vapor químico.
III. Kit demantenimientoóptico(n.°de ref.21042):Despuésdevariosciclosde
esterilizaciónenautoclave,esposible queaparezcaunamanchamarrónogrisenlos
extremospulidos dela guía deluz.Setratadeun residuoqueseacumula duranteel
ciclodesecadoenautoclave. Serecomiendautilizarel kitdemantenimientoóptico
cada50 ciclos deesterilizaciónenautoclave.Seguir lasinstruccionesincluidasenel
kit ayuda a conservar el rendimiento óptimo de la unidad de polimerización.
Para eliminar un composite que quede adherido al extremo de la guía de luz:
· Humedezca una gasa con alcohol.
·
·
afeitar envuelta en la gasa hasta eliminar el composite.
Nota: Nunca use un instrumento romo para retirar el composite porque
IV. Pieza de mano y cargador de pilas: Las piezas de plástico pueden limpiarse
siguiendo estas instrucciones:
a) Todas las piezas de plástico pueden limpiarse con toallitas CaviWipes™,
según las instrucciones del paquete. Se recomienda usar un compuesto de
amonio cuaternario, como CaviCide™/CaviWipes™ o un producto similar
(que tenga alcohol al 20% o menos).
c) Para limpiar, pase la toallita pero no pulverice solución sobre las piezas de
plástico. Evite que entren líquidos por las aberturas de la unidad.
la garantía del producto. Esta unidad no puede esterilizarse en autoclave.
MEDIDAS DE CONTROL DE LA INFECCIÓN
RECAUCIÓN: Para evitar la contaminación cruzada, se debe utilizar un
manguito de plástico sobre la unidad DemiPlus en cada uso.
GARANTÍA
lafechadecompra,esteinstrumentoestarálibrededefectosmaterialesydefabricación,y
tendráun rendimiento satisfactorio en condicionesnormalesde uso y mantenimiento.
Para registrar su garantía, complete la inscripción de garantía por Internet en www.kerrdental.
com/warrantyenlos30díassiguientesalacompra.Sisehancompradovariasunidades,
relleneunimpresodeinscripciónporunidad.Porfavor,tengalafacturadesudistribuidora
mano.Tambiénpuederegistrarsugarantíallamandoal1.800.KERR.123(1.800.537.7123).
LAGARANTÍAAQUÍDECLARADAESLAÚNICAGARANTÍAAPLICABLEALOSPRODUCTOSDE
KERR.KERRRECHAZAEXPRESAMENTECUALQUIEROTRAGARANTÍA,EXPRESAOIMPLÍCITA,
INCLUIDASLASGARANTÍASDECOMERCIALIZACIÓNOIDONEIDADPARAUNFINDETERMINADO.
LARESPONSABILIDADDEKERRCONRESPECTOASUSPRODUCTOSSELIMITAEXPRESAMENTE
ALOSMEDIOSDERESOLUCIÓNESTABLECIDOSANTERIORMENTE.DICHOSMEDIOSSONLOS
RECURSOSEXCLUSIVOSDELCOMPRADOR.ENNINGÚNCASOSERÁRESPONSABLEKERRDE
DAÑOSFORTUITOSNICONSIGUIENTES.LAGARANTÍANOESAPLICABLEANINGÚNDAÑO O
DEFECTOPROVOCADOPORELINCUMPLIMIENTODELASINSTRUCCIONESPERTINENTESPOR
PARTEDELUSUARIOOPORCUALQUIEROTROERRORQUEÉSTECOMETAENLAUTILIZACIÓN
OMANTENIMIENTODELINSTRUMENTO.AUNQUEOFRECESERVICIOSDEREPARACIÓNDE
INSTRUMENTOSYREPUESTOSDESPUÉSDECADUCADALAGARANTÍA,KERRGARANTIZALA
DISPONIBILIDADDEDICHOSSERVICIOSYREPUESTOSÚNICAMENTEDURANTEDOSAÑOS
DESPUÉSDEHABERDEJADODE FABRICAR ELMODELODELINSTRUMENTO.
ACCESORIOS Y PIEZAS DE REPUESTO
N.° de ref. Guías de luz con bra óptica
21020 Guía de luzTurbo curvada de 8 mm
921551 Guía de luzTurbo curvada de 11 mm
20812 Guía de luz curvada de 13 mm
N.° de ref. Protección ocular
20816 Pantalla protectora contra la luz
N.° de ref. Accesorios
21042 Kit de mantenimiento óptico
20399 Disco de dureza desechable (paquete de 6)
910726 Radiómetro portátil de LED
N.° de ref. Piezas de respuesto
921918-1 Kit de repuesto; pila, DemiPlus
921919-1 Kit de repuesto, cargador, DemiPlus
921920-1 Kit de repuesto, varilla, DemiPlus
921656 Unidad de alimentación universal
16
La unidad DemiPlusPlus debe asegurar que se utiliza en dicho
entorno.
Guía y declaración del fabricante: emisiones electromagnéticas
PRUEBA DE EMISIONES NIVEL DE CONFORMIDAD ENTORNO ELECTROMAGNÉTICO: GUÍA
Emisiones de RF
CISPRA 11
Grupo I La unidad DemiPlus utiliza sólo energía RF para su funcionamiento interno. Por consiguiente, su emisión
Emisiones de RF
CISPRA 11
Clase B
La unidad DemiPlus es apta para uso en todo tipo de establecimientos, incluidos los domicilios
abastece a los edicios de viviendas.
Emisiones armónicas Clase A
Fluctuaciones/variaciones rápidas de tensión
IEC 60601-3-3
Cumple
Guía y declaración del fabricante: inmunidad electromagnética
PRUEBA DE INMUNIDAD NIVEL DE CONFORMIDAD ENTORNO ELECTROMAGNÉTICO: GUÍA
Descargas electrostáticas (ESD)
IEC 61000-4-2
Contacto + / - 4 kV
Aire + / - 8 kV
El piso debe ser de madera, hormigón o baldosas cerámicas. Si el piso está revestido de un material
sintético, la humedad relativa debe ser por lo menos del 30%.
Ráfagas/transitorios rápidos eléctricos
IEC 61000-4-4
+/-2 kV Para líneas de suministro de
alimentación
+/-1 kV Para entradas salidas de líneas
La calidad de la red eléctrica debe ser equivalente a la de un entorno hospitalario o comercial típicos.
Sobretensiones
IEC 61000-4-5
+/-1 kV Modo diferencial
+/-1 kV Modo común
La calidad de la red eléctrica debe ser equivalente a la de un entorno hospitalario o comercial típicos.
Huecos de tensión, interrupciones cortas y
Variaciones de tensión en las líneas de entrada de la
alimentación
IEC 61000-4-11
30% UT durante 0.5 ciclos
60% UT durante 5 ciclos
<5% UT durante 5 seg
La calidad de la red eléctrica debe ser equivalente a la de un entorno hospitalario o comercial típicos.
Nota: UT es la tensión anterior de la red AC para la aplicación del nivel de comprobación.
Campo magnético inducido por la frecuencia de la red (50/60 Hz)
CEI 61000-4-8
3 A/m El campo magnético inducido por la frecuencia debería estar a niveles característicos de un entorno
comercial u hospitalario.
RF conducida
IEC 61000-4-6
RF emitida
IEC 61000-4-3
10Vrms
150 kHz a 80 MHz
10V/m
80MHz a 2.5GHz
El equipo de comunicaciones RF portátil y móvil deberá utilizarse no más cerca a cualquier parte de
la DemiPlus, incluyendo la alimentación y el cable, que a las distancias de separación recomendadas
calculadas desde la ecuación aplicable a la frecuencia del transmisor.
-
magnético, 1deberá ser inferior al nivel de conformidad en cada gama de frecuencia 2.
Pueden producirse interferencias en las proximidades de los equipos marcados con el símbolo
siguiente:
Nota 1: A 80Mhz y 800Mhz aplica la gama más alta
1
DemiPlus rebasa el nivel de conformidad de RF aplicable antes mencionado, la unidad DemiPlus deberá vigilarse para conrmar su correcto funcionamiento. Si se observa un funcionamiento anómalo, pueden requerirse medidas adicionales, como la
reorientación o cambio de ubicación de la unidad DemiPlus.
2En la gama de frecuencias de 150 kHz a 80 MHz, las intensidades de campo deben ser inferiores a 10V/m.
La unidad DemiPlus está pensada para su uso en un entorno electromagnético en el que las perturbaciones RF emitidas están controladas. El cliente o usuario de la unidad DemiPlus puede ayudar a evitar la distancia
electromagnética entre el equipo de comunicaciones RF portátil y móvil (transmisores) y la unidad DemiPlus como se recomienda en la parte inferior según la potencia de salida máxima del equipo de comunica-
ciones.
Distancias de separación recomendadas entre los equipos de comunicaciones de RF portátiles y móviles DemiPlus
Potencia nominal máxima emitida por el transmisor
W
Distancia de separación de acuerdo a la frecuencia
m
150 kHz a 80 MHz
d = 0,4√P
80 MHz a 800 MHz
d = 0,4√P
800 MHz a 2,5 GHz
d = 0,7√P
0.01 0.1 0.1 0.1
0.1 0.2 0.2 0.3
1 0.4 0.4 0.7
10 1.3 1.5 2.2
100 4.0 4.0 7.0
Para los transmisores que poseen una salida de alimentación máxima que no se lista en la parte superior, la distancia de separación recomendada den metros (m) se puede determinar, donde Pes la potencia de salida máxima del transmisor en
vatios (W) según el fabricante del transmisor.
Nota 1: A 80Mhz y 800Mhz la distancia de separación aplica la gama más alta de frecuencias

17
DEUTSCH
DemiPlus-LED-Polymerisationslampe
Bedienerhandbuch
HERGESTELLT IN DEN USA
BESCHREIBUNG
Bei der DemiPlus LED-Polymerisationslampe (LED = Leuchtdiode) handelt es sich um
ein Gerät, das von Zahnärzten für die Polymerisation von lichthärtenden Materialien
verwendet wird.
WICHTIG: Die Akkus müssen vor der erstenVerwendung vollständig aufgeladen
werden. Informationen hierzu nden Sie im Abschnitt AUFLADEN DES AKKUS.
Im Gerät benden sich keineTeile, die von Anwender selbst gewartet werden können.
Die Akkus dürfen weder geönet werden, noch dürfen unbefugte Handlungen an
ihnen vorgenommen werden.
TECHNISCHE DATEN UND GERÄTEKLASSE
Wechselstromversorgung: 100-240V AC/0.8-0.4A 47-63 Hz
Leistungseingang: 12VA, Nennwert
Geräteklasse:
Klasse II
Sicherheit: IEC 60601-1
EMC (ElektromagnetischeVerträglichkeit): IEC 60601-1-2
Schutz vor Stromschlägen:
Typ BF
Schutz vor Flüssigkeitseintritt: IXP0 (normales Gerät)
Betrieb:
DurchgehendeAnwendungamPatienten,
Betriebszyklus20 SekundenAN/1MinuteAUS.
BETRIEBSUMGEBUNG
Hinweis: Seien Sie vorsichtig, wenn Sie dieses Produkt in der Nähe eines
brennbaren Anästhetikums oder eines Oxidationsmittels, wie z. B. Sauerstooder
Distickstomonoxid, verwenden.
· Umgebungstemperatur: 16°C bis 40°C (60°F bis 104°F)
· Relative Luftfeuchtigkeit: 10 % bis 80 % (nichtkondensierend)
· Atmosphärischer Druck: 0,5-atm bis 1,0-atm (500 hPa bis 1060 hPa)
TRANSPORT- UND LAGERBEDINGUNGEN
· Umgebungstemperatur: -20°C bis 40°C (-4°F bis 104°F)
· Relative Luftfeuchtigkeit: 10 % bis 85 %
· Atmosphärischer Druck: 0,5 atm bis 1,0 atm (500 hPa bis 1060 hPa)
· Akkuleistung: Handstück kann bei einem vollständig aufgeladenen Akku 500
· Akku-Überstromschutz: Elektronische und rückstellbare Polyfuse
· Leuchtdioden:Vier auf einer Platine befestigte LEDs.
· Spitzen-Ausgangswellenlängenbereich: 450 - 470 Nanometer
· Lichtintensität: 1.100 mW/cm2
· Standardlichtleiter: Artikelnummer 902495, 13 mm bis 8 mm Erweiterter Lichtleiter
Handstückdimensionen: Länge: 23,5 cm (9,25 in); Breite: 2,9 cm (1,2 in)
Ladegerätdimensionen: Länge: 16,0 cm (6,0 in); Breite: 11,1 cm (4,63 in)
Gewicht: Handstück und Akku: 155 g (5,5 oz); Akkuladegerät: 352 g (12,4 oz)
SYMBOLE
Achtung, beachten Sie die beiliegende Dokumentation:
Gleichstrom:
Elektro- und Elektronik-Altgeräte (WEEE):
SICHERHEITSMASSNAHMEN
Patientenkontakt sterilisiert werden. Sterilisationsanweisungen nden Sie im
Abschnitt INSTANDHALTUNG: REINIGUNG/DESINFIZIERUNG/STERILISATION.
verwendeten Geräten kann erheblich höhere Polymerisationsenergie freigesetzt
werden. Die folgenden Sicherheitshinweise und -maßnahmen müssen immer
beachtet werden:
oder Haut.
Benutzen Sie dieses Gerät nicht ohne die entsprechenden Schutzbrillen für
Bediener, Assistenten und Patienten. Geeignete Schutzbrillen nden Sie im
Abschnitt ZUBEHÖR UND ERSATZTEILE.
gegen Lichtempndlichkeit einnehmen, sollten nicht dem Licht dieses Geräts
ausgesetzt werden.
brennbaren Anästhetikums oder eines Oxidationsmittels, wie z. B. Sauerstooder
Distickstomonoxid, verwenden.
Sicherheitsstandards, einschließlich denender USA,Kanadas und Europas,entsprechen
und für alle zahnärztlichen Anwendungen sicher und eektiv sind.
Plus muss besondereVorsicht im Hinblick auf elektromagnetische
Verträglichkeit (EMC) angewandt werden, und die Installation und der Betrieb muss
gemäß der diesem Handbuch beigefügten Anleitung und Erklärung des Herstellers
zur elektromagnetischenVerträglichkeit erfolgen.
DemiPlus beeinussen. Weitere Hinweise hierzu nden Sie in der diesem Handbuch
beigefügten Anleitung und Erklärung des Herstellers zur elektromagnetischen
Verträglichkeit.
Plus ProduktvieleJahre hervorragendeDienste
leisten wird. Dochauch dieses Produktmüssen Sie irgendwannentsorgen.In diesem
Fall empfehlenwir Ihnen, das Produkt inseiner Originalverpackungan Kerrzurück zu
senden,damit wir esumweltverträglichentsorgen können.Die Kostenfür denVersand
übernehmenwir gerne. ZurKlärungder Details nehmenSiebitteKontakt mit Ihrem
Kerr-Vertriebsmitarbeiterauf.Die EU-RichtlinieüberElektro-undElektronik-Altgeräte
(WEEE-Richtlinie)verbietetdie EntsorgungvonElektro- und Elektronik-Altgeräten als
unsortierten Hausmüllund verlangt,dassdieseAltgerätegetrennt gesammelt,dem
Recycling zugeführt oderentsor Elektro-und Elektronik-Altgeräte enthalten gefährliche
Substanzen, die ein potenziellesGesundheits-undUmweltrisikodarstellen,wennsie
inkommunale Mülldeponienentsorgt werden, die nichtdarauf ausgerichtet sind, das
Versickern der Substanzen indenBodenund ins Grundwasserzu verhindern.Durch
dieangemesseneEntsorgungdieser Altgerätetragen Sie zurWiederverwendung, zum
Recycling und anderenFormender RückgewinnungsowiezumUmweltschutz in Ihrer
Gemeinde bei.
HINWEIS: Die Dimensionen in der Abbildung stellen die Mindest-Patientenumgebung dar (1,5 Meter). Die DemiPlus-Ladesta-
tion sollte nicht in der Patientenumgebung aufbewahrt werden.
ZUSAMMENBAU/MONTAGE
Lieferumfang:
Menge Beschreibung
1 Handstück der DemiPlus-Polymerisationslampe
1 Lichtschutzschild
1 Steckernetzteil
1 Akkuladegerät
1 Akkupack
1 Bedienerhandbuch
1 Demi/DemiPlus-Einweghüllen

18
BETRIEB
AKKULADEGERÄT/AKKUS
Das Akkupack enthält Lithium-Ionen-Zellen. Neue Akkupacks sollten vor der ersten
Verwendung 16 Stunden aufgeladen werden.
ANBRINGEN DES ADAPTERS AN DAS NETZTEIL
Das Netzteil ist ein Universalnetzteil fürWechselstrom mit einer Nennspannung von
100V - 240V. Hinweis: Es dürfen nur von Kerr bereitgestellte Netzteile (Artikelnummer
921656) zum Betrieb des DemiPlus-Akkuladegeräts verwendet werden. Es gibt
zwei verschiedene Netzteile (siehe Abbildung 1 und 3). Die Netzteile sehen leicht
I. Wählen Sie den entsprechenden Steckdosenadapter (siehe Abbildung 2 und 3).
ZurVerfügung stehen:
· 120V USA -Typ A
· Europa -Typ C
· GB -Typ G
· Australien -Typ I
II. Jeder Adapter verfügt darüber hinaus über eine Nut, die in die Halterung des
Netzteils zur Sicherung einrastet.
III. Den Adapter mit der Nut in Richtung Netzteil auf das Netzteil aufsetzen, so dass
die Nocken auf dem Adapter in die entsprechenden Nuten des Netzteils passen.
IV. Drücken Sie den Adapteran beiden Endennachunten (Abbildung4), und schieben
Sie ihn in das Netzteil, bis er hörbar einrastet und fest verankert ist. Hinweis:
Indem Sie während der Installation auf denAdapterdrücken, wirdgewährleistet,
dass alleHaltenockendes Adapters in die Nuten des Netzteilseinrasten. Sollte der
Adapternichtfestsitzen,entfernen Sie ihn,und installieren Sie ihn erneut.
V. Abbildung 5 zeigt den auf dem Netzteil angebrachten Adapter.
VI. Um den Adapter aus dem Netzteil zu entfernen, drücken Sie auf den
Verriegelungsknopf (7.), und schieben Sie den Adapter in die entgegengesetzte
Richtung aus dem Netzteil heraus.
VII. Bewahren Sie die nicht benutzten Adapter für die spätereVerwendung auf.
INSTALLATION DES AKKUS AM HANDSTÜCK
I. Der Akku passt nur in einer Richtung in das Handstück. Sollten Sie Probleme
beim Einsetzen haben, wenden Sie keine Gewalt an.
II. Richten Sie den Akku so aus (Abbildung 6), dass die breite achere Seite (1.) in
Richtung der Schalter auf dem Handstück zeigt.
III. Schieben Sie Akku und Handstück zusammen, bis ein Klicken ertönt und der
Akku fest verankert ist.
IV. Zum Herausnehmen des Akkus (Abbildung 6) drücken Sie auf die mit Rillen
versehenen Grie (2.) an beiden Seiten des Akkus, und ziehen Sie ihn heraus.
AUFLADEN DES AKKUS
Schließen Sie das Kabel des Netzteils an der Ladestation an. Der Anschluss bendet
sich an der Rückseite der Ladestation (Abbildung 7).
I. Stecken Sie das Netzteil in eine Steckdose.
II. Stellen Sie den Akku und/oder die Polymerisationslampe mit Akku in die
Önung(en) der Ladestation.
a. Das Ladestation kann eine beliebige Kombination von zwei Akkus oder
Handstücken (in unterschiedlichen Ladestadien) gleichzeitig laden.
b. Die Leuchtringe (Abbildung 7, 2.), die die Önungen der Ladestation
· Grün - Akku ist aufgeladen.
· Gelb - Akku wird aufgeladen.
· Blinkendes gelbes Licht (mit Akku oder Handstück im Ladegerät) -
Fehlerbedingung.Wenden Sie sich an den Kundenservice.
Hinweis: Liegt dieTemperatur des Akkus unterhalb der Raumtemperatur, warten
Sie, bis der Akku sich auf Raumtemperatur erwärmt hat, und versuchen Sie es erneut.
Anderenfalls ersetzen Sie den Akku.
Lebensdauer des Akkupacks: 300 vollständige Lade-/Entladezyklen. Ausgangsleistung:
3,7V (nominal) bei 2,1A-H Kapazität.
AKKUENTSORGUNG: Das Akkupack enthält ein Lithium-Ionen-Akku (Li-ion). Entsorgen
Sie Akkus nach den geltendenVorschriften.
EMPFOHLENE POLYMERISATIONSZEIT
Das DemiPlus ist ein Hochleistungs-Polymerisationsgerät.Tests bei Kerr resultierten in
den folgenden empfohlenen Polymerisationszeiten:
Material Empfohlene
Polymerisationszeit
Universal Composite in den Schattierungen A3 und heller
(2 mm-Tiefe)
5 Sekunden
Universal Composite in den Schattierungen A3,5 und dunkler 10 Sekunden
Bonder, universelle Kompositbefestigungswerkstoe und
selbstkonditionierende, selbstklebende Zemente.
5 Sekunden
Hinweis: Es wird dringend empfohlen, die Polymerisationsleistung anhand von
Kompositdurchhärtungsscheiben zu überprüfen, um eine vollständige Aushärtung zu
gewährleisten.
HANDSTÜCK: Das DemiPlus kann den ganzenTag über ohneWechsel des Akkus
verwendet werden. Ein vollständig geladener Akku kann für 500 Aushärtungen von
Das DemiPlus ist eine Polymerisationslampe mit Handstück, die für die Polymerisation
von lichthärtenden Zahnmaterialien verwendet und durch ein wiederauadbares
Lithium-Ionen-Akkupack betrieben wird.
Hinweis: Ist das Gerät neu, muss das Akkupack vor der erstenVerwendung
des DemiPlus-Polymerisationsgeräts aufgeladen werden. Das Gerät verwendet
die proprietäre Periodic Level Shifting-Technik (PLS), das entsprechende
Patent ist angemeldet. Bei PLS handelt es sich um die ständige periodische
Leistungsumschaltung von einem festgelegten Grundpegel zu einem kurzzeitig
höheren Pegel. Mit der PLS-Technologie können schnellere und tiefere Aushärtungen
erzielt werden, ohne das die Gefahr einer Überhitzung besteht.
DemiPlus-KOMPONENTEN UND -BEDIENELEMENTE
Die folgenden Komponenten werden vom Bediener während der Polymerisation
verwendet (Abbildung 8):
I. Belichtungszeit-LEDs (1.) Drei LEDs zeigen die drei verschiedenen
Belichtungszeiten an.Von links nach rechts sind dies: 5-Sekunden-,
10-Sekunden- und 20-Sekundenzyklus.
II. Modus-Wahlschalter (2.) BeiDrückendiesesSchalterswechseltdasGerät der
ReihenachdurchdiedreiBelichtungszeiten.Bendet sich dasGerät imSchlafmodus,
wird das Gerät bei Drücken dieses Schalters im zuletzt aktiven Modus eingeschaltet.
III. Auslöseschalter (3.) Bei Drücken (und Freigeben) dieses Schalters wird der
ausgewählte Belichtungszyklus initiiert. Bendet sich das Gerät im Schlafmodus,
wird das Gerät bei Drücken dieses Schalters im zuletzt aktiven Modus
eingeschaltet.
IV. Akkustatus-LED (4.) Dieses LED zeigt den Ladestand des Akkus an:
a) Leuchtet das Licht nicht, ist der Akku entweder GELADEN oder das Gerät
bendet sich im Schlafmodus.
b) Ein gelbes Licht zeigt einen NIEDRIGEN Ladestand des Akkus an.
Hinweis: Die Polymerisationslampe kann in diesem Modus normal
betrieben werden. Laden Sie den Akku bei der nächsten Gelegenheit auf.
c) Bei rotem Licht ist der Akku LEER und muss neu aufgeladen werden.
SolltedieLadungdesAkkuswährend einesBelichtungszyklusunterdieLeer-
Schwellefallen,wirdderlaufendeZykluszuEndegeführt,bevordasLEDsichaufRot
ändert.Hierdurchwird verhindert,dassBelichtungszyklenunterbrochenwerden.
V. Lithium-Ionen-Akkupack (5.)Wird zur Stromversorgung des
Polymerisationsgeräts verwendet. Drücken Sie auf dieVertiefungen, um den
Akku zu entfernen.
VI. Lichtleiter (6.) Das Licht der LED wird am Ende dieses Bauteils emittiert.*
VII. Lichtschild (7.) Das Schild schützt die Augen des Benutzers vor dem aus dem
Lichtleiter austretenden Licht, während das Gerät in Betrieb ist.
*Andere Lichtleiter mit unterschiedlichen Lichtleistungen sind für den DemiPlus verfügbar.
19
DEMIPLUS-POLYMERISATIONSLAMPE - BETRIEBSSTATUS
Bei Betrieb des Handstücks gibt es drei unterschiedliche Betriebsstadien:
I. Ruhezustand: Das Gerät bendet sich im Ruhezustand, wenn es sich weder
im Belichtungs- noch im Schlafmodus bendet und der Akku GELADEN oder
NIEDRIG anzeigt. Der Benutzer kann durch Drücken des Belichtungszeit-Schalters
zwischen den 5-Sekunden-, 10-Sekunden- und 20-Sekunden-Modi umschalten.
Belichtungszyklen können auch im Ruhezustand ausgelöst werden.
II. Belichtung: Bendet sich das Gerät im Ruhezustand, wird ein Belichtungszyklus
durch Drücken und anschließender Freigabe des Auslöseschalters initiiert. Ein
5-Sekunden-, 10-Sekunden- oder 20-Sekundenzyklus wird abhängig vom der
durch die Belichtungszeit-LEDs angegebenen Einstellung gestartet. Bei Starten
eines Belichtungszyklus leuchtet die Belichtungs-LED auf, und es erklingt ein
Signalton. Der Signalton ertönt für die Dauer der gewählten Belichtungszeit alle 5
Sekunden. Ist das Ende der Belichtungszeit erreicht, ertönt ein längerer Signalton.
Hinweis: Bei Drücken des Auslöseschalters für eine Sekunde während einer
Belichtung wird diese unverzüglich unterbrochen, und es erklingt unabhängig
davon, wie viel Zeit seit Beginn der Belichtung verstrichen ist, ein letzterTon (das
Drücken des Modus-Wahlschalters während einer Belichtung hat keineWirkung).
III. Schlafmodus:Das DemiPlus gehtnachungefähr8Minuten ohneAktivität in den
Schlafmodusüber, umden Akkuzu schonen. Der Schlafmodus wird unterbrochen,
indem entweder der Modus-Wahlschalter oderderAuslöseschalter einmal gedrückt
wird. DasGerät bendetsichnun imRuhezustand.DasGerät zeigt diezuletzt
eingestellteBelichtungszeitan.DurchDrückendes Modus-Wahlschalters oderdes
Auslöseschalterskannzwischen den Modigewechselt oderein Belichtungszyklus
initiiert werden.BendetsichdasGerät im Schlafmodus,sindalleLEDs
ausgeschaltetund dasPolymerisationsgerät wechseltin einenBetriebsstatusmit
geringem Stromverbrauch.Wirdder Akkunacheinervollständigen Ladung erneut
geladenoderwirdes nicht verwendet,beträgt seineLebensdauer unabhängig
davon, ob sich der Akku im Handstück bendet oder nicht, ungefähr 6 Monate.
BETRIEB DES DEMIPlus-HANDSTÜCKS
I. Wählen Sie die gewünschte Belichtungszeit, indem Sie den Modus-Wahlschalter
drücken (Abbildung 9, 1.)
II. PositionierenSiedenLichtleiter(2.)sonahwiemöglichüberdenZahn,ohnediesen
dabeizuberühren.DrückenSiedenAuslöseschalter,undgebenSieihnwiederfrei(3.).
DasGerätgibtwiezuvorbeschriebeneinenSignaltonin5-Sekunden-Intervallenaus.
INSTANDHALTUNG:
REINIGUNG/DESINFIZIERUNG/STERILISATION
I. Faseroptik-Lichtleiter:
a) Legen Sie den Lichtleiter in ein Mittel zur Oberächendekontamination
(Reinigungslösung aus Seife undWasser), und tränken Sie ihn gut durch.
b) Nach 10 Minuten säubern Sie ihn sorgfältig mit einer
Instrumentenreinigungsbürste, bis alle sichtbarenVerunreinigungen
beseitigt sind.
c) Spülen Sie alleTeile mit warmenWasser ab.
II. Faseroptik-Lichtleiter - Sterilisation:
a) Sterilisieren SiedenLeiter20MinutenlangineinemDampfautoclavenunter
Verwendung von destilliertemWasser bei einerTemperatur von 132°C (270°F).
b) Geben Sie keine chemischen Lösungen in den Autoklaven.
c) Verwenden Sie keinen chemischen Autoklaven.
III. Optikwartungskit(PN21042)-NacheinerReihevonAutoclavenzyklenkönnensichdie
poliertenEndendesLichtleitersbraunoder grauverfärben.DieseRückständebilden
sichwährenddesAutoklaven-Trockenzyklus.Eswirdempfohlen,dasOptikwartungskit
Anweisungenbefolgt, wirdeine optimalePolymerisationsleistungerzielt.
So werden an der Spitze des Lichtleiters haftende Kompositreste entfernt:
· Tränken Sie Mull mit Alkohol.
· Wickeln Sie den Mull um eine Rasierklinge.
· Reiben Sie die Spitze des Lichtleiters mit der mit Mull umwickelten
Rasierklinge ab, bis alle Kompositreste entfernt sind.
Hinweis: Verwenden Sie zur Entfernung von Kompositresten niemals
stumpfe Instrumente, da dadurch das Glas verkratzt werden kann.
IV. Handstück und Akkuladestation - Die Kunststoteile können folgendermaßen
gereinigt werden:
a) Alle Kunststoteile können mit CaviWipes-TüchernÔ gemäß den der
Packung beiliegenden Anweisungen abgewischt werden. Es wird ein
quaternäres Ammoniumverbindungsprodukt wie CaviCide™/CaviWipes™
oder ein ähnliches Produkt (mit 20 % Alkohol oder weniger) empfohlen.
b) Folgendes sollte nicht verwendet werden: Brennspiritus, Lysol®, Phenol,
Lösungen, die Ammoniak oder Jod enthalten.
c) Tragen Sie die Lösung auf die Kunststoteile mit einemTuch auf. Sie
sollten nicht aufgesprüht werden.Vermeiden Sie, dass Flüssigkeiten in die
Geräteönungen eindringen.
VORSICHT:TauchenSiedieKunststoteilenichtindieLösungenein.DieVerwendung
vonnichtempfohlenenLösungenkanndieKunststokomponentenbeschädigenundführt
zumErlöschenderProduktgarantie.DiesesGerätdarfnichtineinenAutoklavengelegtwerden.
MASSNAHMEN ZUR INFEKTIONSKONTROLLE
VORSICHT: Zur Vermeidung einer Kreuzkontamination muss das DemiPlus bei
GARANTIE
Kerr garantiert hiermit, dass das Gerät für eine Zeitdauer von drei Jahren (ein Jahr
für Akkus) ab Kaufdatum frei von Material- und Herstellungsfehlern ist und unter
normalen Betriebsbedingungen einwandfrei funktioniert.
Um die Garantieansprüche zu registrieren, müssen Sie innerhalb von 30Tagen ab dem
Kaufdatum die Registrierung online unter www.kerrdental.com/warranty vornehmen.
hierzu die Rechnung Ihres Händlers bereit. Sie können Ihre Garantieansprüche auch
telefonisch registrieren, indem Sie 1.800.KERR.123 (1.800.537.7123) anrufen.
DIEHIERANGEGEBENEGARANTIEISTDIEEINZIGEAUFKERR-PRODUKTEANWENDBARE
GARANTIE.KERRDISTANZIERTSICHAUSDRÜCKLICHVONALLENANDERENAUSDRÜCKLICHEN
ODERKONKLUDENTENGARANTIEN,EINSCHLIESSLICHGARANTIENODERTAUGLICHKEIT
ODEREIGNUNGFÜREINENBESTIMMTENZWECK.KERRSHAFTUNGINBEZUGAUFSEINE
PRODUKTEISTAUSDRÜCKLICHAUFDIEOBENANGEGEBENENANSPRÜCHEBESCHRÄNKT.DIESE
ANSPRÜCHESTELLENDIEEINZIGENANSPRÜCHEDESKÄUFERSDAR.KERRISTUNTERKEINEN
UMSTÄNDENFÜRZUFÄLLIGEODERFOLGESCHÄDENVERANTWORTLICH.DIEGARANTIEFINDET
KEINEANWENDUNGAUFSCHÄDENODERDEFEKTE,DIEVOMBENUTZERAUFGRUNDDER
NICHTBEACHTUNGDERFOLGENDENGEBRAUCHSANWEISUNGENODERAUFGRUNDANDERER
FEHLERBEIMBETRIEBODERDERWARTUNGDESGERÄTSAUFGETRETENSIND.AUCHWENNKERR
DIEREPARATURDERINSTRUMENTEANBIETETUNDERSATZTEILENACHABLAUFDERGARANTIE
BEREITSTELLT,GARANTIERTKERRDIEVERFÜGBARKEITDIESERDIENSTEUNDERSATZTEILENUR
FÜRZWEIJAHRE NACHABLAUFDERLIEFERBARKEIT DIESESGERÄTEMODELLS.
ZUBEHÖR UND ERSATZTEILE
Artikelnummer Faseroptik-Lichtleiter
21020 8 mm gebogenerTurbo-Lichtleiter
921551 11 mm gebogenerTurbo-Lichtleiter
20812 13 mm gebogener Lichtleiter
Artikelnummer Augenschutz
20816 Lichtschutzschild
Artikelnummer Zubehör
21042 Optikwartungskit
20399 Einmal-Kompositdurchhärtungsscheiben (6er-Packung)
910726 LED-Radiometer
Artikelnummer Ersatzteile
921918-1 Ersatz-Kit, Akku für DemiPlus
921919-1 Ersatz-Kit, Akkuladestation für DemiPlus
921920-1 Ersatz-Kit, Handstück für DemiPlus
921656 Universal-Steckernetzteil
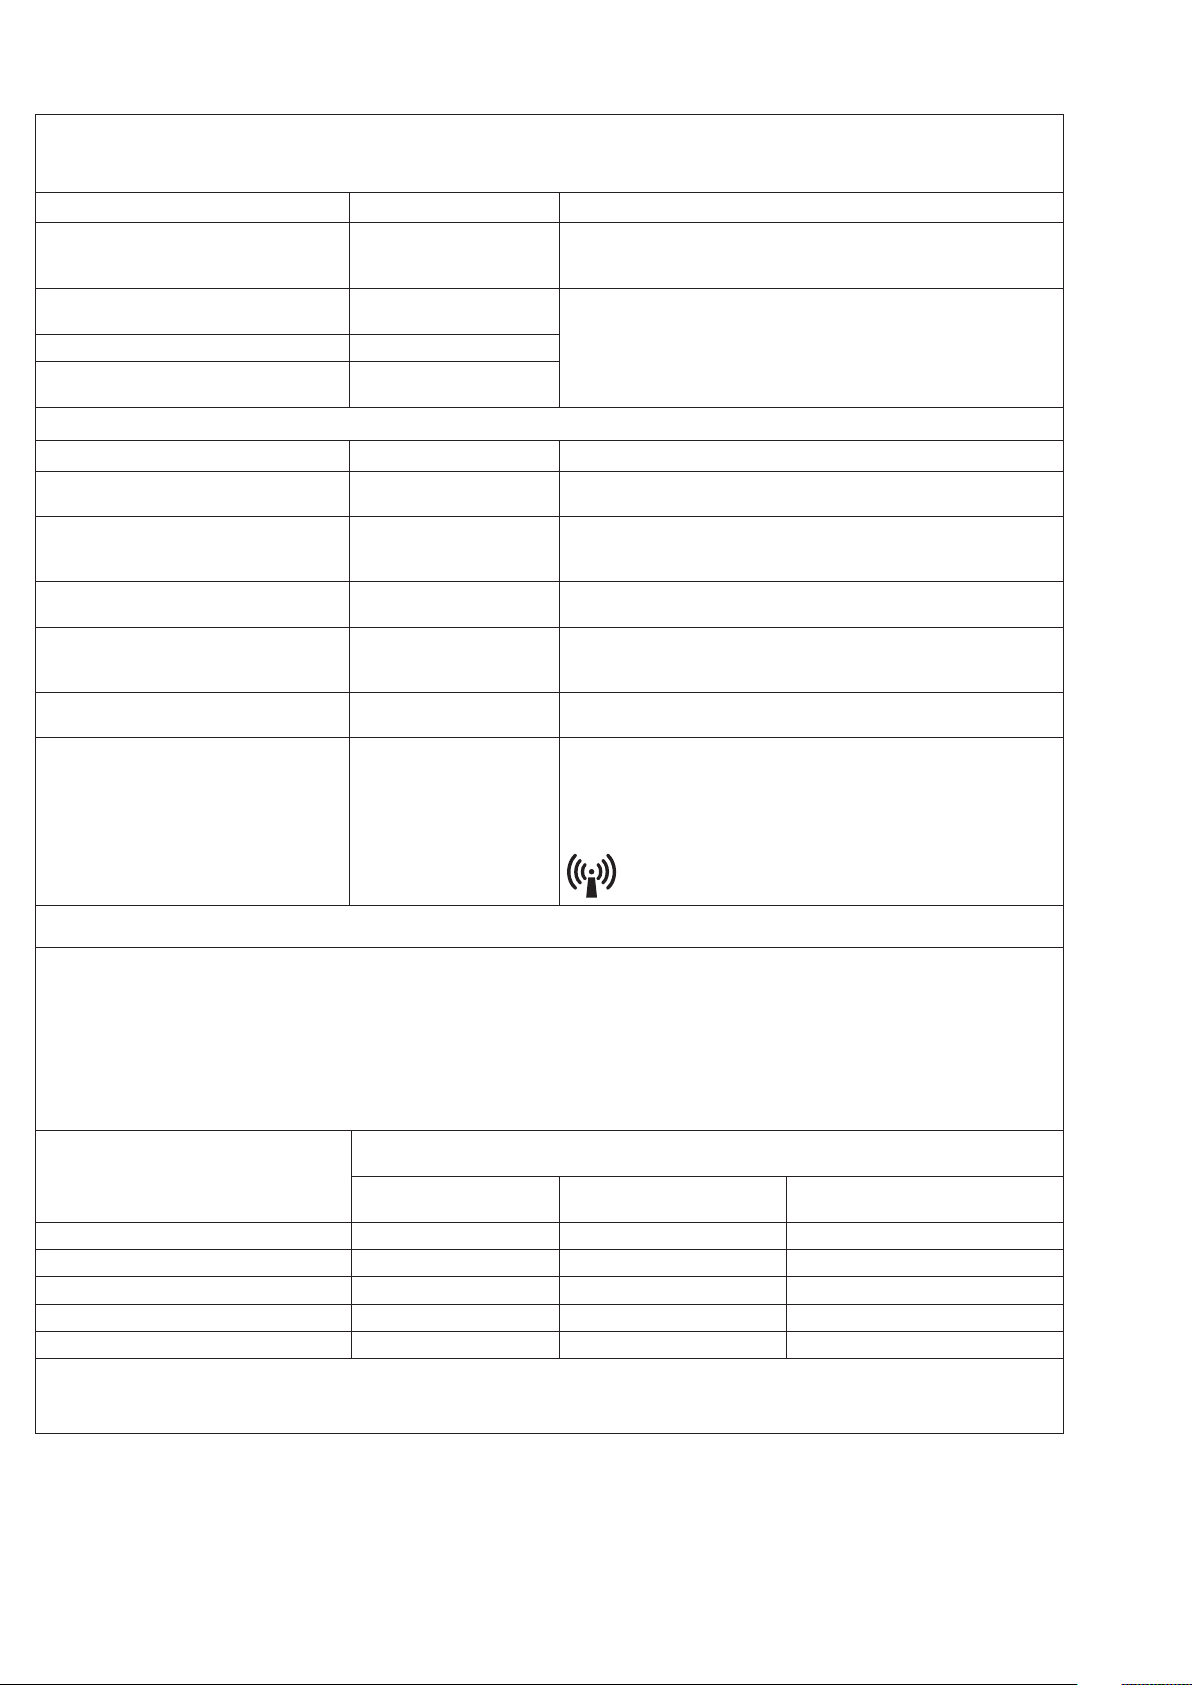
20
Das DemiPlus ist für die Verwendung in den unten angegebenen elektromagnetischen Umgebungen vorgesehen. Der Kunde oder Benutzer sollte sicherstellen, dass das DemiPlus in einer
solchen Umgebung eingesetzt wird.
Anleitung und Erklärung des Herstellers - Elektromagnetische Emissionen
EMISSIONSTEST GRENZWERTE ELEKTROMAGNETISCHE UMGEBUNG - ANLEITUNG
HF-Emissionen
CISPRA 11
Gruppe I Das DemiPlus verwendet HF-Energie ausschließlich intern. Aus dem Grund sind die HF-Emissionen
sehr gering und verursachen keine Störungen in anderen elektronischen Geräten, die sich in der Nähe
benden.
HF-Emissionen
CISPRA 11
Klasse B
Das DemiPlus ist für den Einsatz in allen Bereichen geeignet, z. B. in Wohnräumen und anderen
Räumlichkeiten, die direkt an das Niederspannungsnetz für dieVersorgung von Wohngebäuden
angeschlossen sind.
Aussendung von Oberschwingungen Klasse A
Aussendung von Spannungsschwankungen/Flicker
IEC 60601-3-3
Konform
Anleitung und Erklärung des Herstellers - Elektromagnetische Immunität
IMMUNITÄTSTEST GRENZWERTE ELEKTROMAGNETISCHE UMGEBUNG - ANLEITUNG
Elektrostatische Entladung (ESD)
IEC 61000-4-2
+/-4kV Kontakt
+/-8kV Luft
Böden sollten aus Holz, Zement oder Keramikiesen bestehen. Sind die Böden mit synthetischem
Material bedeckt, muss die relative Luftfeuchtigkeit wenigstens 30 % betragen.
Schnelle transiente elektrische Störgrößen/Bursts
IEC 61000-4-4
+/-2kV für Netzleitungen
+/-1kV für Eingangs-/Ausgangslei-
tungen
Die Qualität der Stromversorgung sollte der von gewerblichen oder medizinischen Einrichtungen
entsprechen.
Überspannung
IEC 61000-4-5
+/-1kV für Gegentaktstörungen
+/-1kV für Gleichtaktstörungen
Die Qualität der Stromversorgung sollte der von gewerblichen oder medizinischen Einrichtungen
entsprechen.
Spannungseinbrüche, Kurzzeitunterbrechungen und
Schwankungen derVersorgungsspannung
IEC 61000-4-11
30 % UT für 0,5 Zyklus
60 % UT für 5 Zyklen
<5 % UT für 5 Sek.
Die Qualität der Stromversorgung sollte der von gewerblichen oder medizinischen Einrichtungen
entsprechen.
Hinweis: UT ist die Netzwechselspannung vor der Anwendung der Prüfpegel.
Leistungsfrequenz-Magnetfeld (50/60Hz)
IEC 61000-4-8
3 A/m Der Pegel der netzfrequenten Magnetfelder sollte für einen typischen Aufstellungsort in einer typis-
chen Geschäfts- oder Krankenhausumgebung charakteristisch sein.
Geleitete HR
IEC 61000-4-6
Ausgestrahlte HF
IEC 61000-4-3
10Vrms
150 KHz bis 80 MHz
10V/m
80 MHz bis 2,5 GHz
Tragbare und mobile Funkgeräte sollten in keinem geringerem Abstand zu einemTeil des DemiPlus,
einschließlich des Netzteils und der Kabel, verwendet werden als dem empfohlenen Schutzabstand,
der nach der für die Sendefrequenz zutreenden Formel berechnet wird.
Die Feldstärke stationärer HF-Sender sollte bei allen Frequenzen gemäß einer Untersuchung vor Ort1
geringer als der Übereinstimmungspegel sein 2.
Interferenzen können in der Nähe von Geräten mit dem folgendem Symbol auftreten:
Hinweis 1: Bei 80 Mhz und 800 Mhz gilt der Schutzabstand für den höheren Frequenzbereich
1Die Feldstärken ortsfester Sender, wie z. B. Basisstationen für Radiotelefone (Mobil/Kabellos), andere Kleinfunkeinrichtungen, Amateurfunkstationen, LW/MW/KW- und UKW-Rundfunksendern sowie Fernsehsendern, lassen sich theoretisch
nicht mit Genauigkeit vorhersagen. Zur Ermittlung der elektromagnetischen Umgebung aufgrund fester HF-Sender sollte eine genaue elektromagnetische Messung vor Ort in Erwägung gezogen werden. Falls die gemessene Feldstärke am
Einsatzort des DemiPlus die zuständige HF-Konformitätsstufe (siehe oben) übersteigt, sollte das DemiPlus auf normalen Betrieb überprüft werden.Wird eine anormale Leistung festgestellt, sind möglicherweise weitere Maßnahmen erforderlich,
wie z. B. die Neuausrichtung oder Neupositionierung des DemiPlus.
2Im Frequenzbereich von 150 Khz bis 80 Mhz sollte die Feldstärke weniger als 10V/m betragen.
Das DemiPlus ist für die Verwendung in einer elektromagnetischen Umgebung vorgesehen, in der die HF-Störgrößen kontrolliert sind. Der Kunde oder Benutzer des DemiPlus kann zur Vermeidung elektromagnetischer
Störungen beitragen, indem er den Mindestabstand zwischen tragbaren und mobilen Funkgeräten (Sendern) und dem DemiPlus einhält. Die empfohlenen Werte nden Sie unten gemäß der maximalen Ausgang-
sleistung des Funkgeräts.
Empfohlene Schutzabstände zwischen tragbaren und mobilen HF-Funkgeräten und dem DemiPlus
Maximale Nennausgangsleistung des Senders
W
Schutzabstand gemäß der Sendefrequenz
m
150 KHz bis 80 Mhz
d = 0,4vP
80 MHz bis 800 MHz
d = 0,4vP
800 MHz bis 2,5 GHz
d = 0,4vP
0.01 0.1 0.1 0.1
0.1 0.2 0.2 0.3
1 0.4 0.4 0.7
10 1.3 1.5 2.2
100 4.0 4.0 7.0
Bei Sendern mit einer oben nicht angegebenen Nennleistung kann der empfohlene Schutzabstand din Metern (m) nach der für die Sendefrequenz zugreenden Gleichung berechnet werden. Dabei ist Pdie maximale Ausgangsleistung des
Senders in Watt (W) gemäß Angaben des Senderherstellers.
Hinweis 1: Bei 80 Mhz und 800 Mhz gilt der Schutzabstand für den höheren Frequenzbereich
Other manuals for DemiPlus
1
Table of contents
Other KERR Dental Equipment manuals

KERR
KERR EndoVac User manual

KERR
KERR Demi Ultra User manual

KERR
KERR COMPOTHIXO User manual

KERR
KERR Elements 8:1 User manual

KERR
KERR DemiPlus User manual

KERR
KERR SonicFill User manual

KERR
KERR elements IC User manual

KERR
KERR Demi L.E.D Curing Light User manual

KERR
KERR Demi Ultra User manual

KERR
KERR SonicFill 2 Manual


