KESNOS PD10A User manual

Home Dehumidifier
PD10A
Please read this manual carefully
before using the product
USER MANUAL
www.kesnos.com

FOR CUSTOMERS
Thank you for purchasing our dehumidifier.
Kesnos has been committed to developing powerful and easy-to-use
products to bring more convenience to your life. We highly recommend
you to keep this user manual for future reference in case of unexpected
problems.
Please read this user manual carefully to ensure proper use of the
dehumidifier. This humidifier is perfect for reducing humidity in family
bedrooms, bathrooms, basements, offices, storage rooms and more.
Kesnos dehumidifiers reduce the room humidity efficiently, creating a
more healthy and comfortable environment for you and your family.
If there are any problems of the product, please contact Sleavon
Customer Service at with your Purchase Order ID. support@kesnos.com
We’ll help you solve the problems as soon as possible.
REQUESTING CUSTOMER SERVICE

To protect the product from any internal damages, please keep
the product in the upright position throughout its journey.
Please take out the product and leave it standing in the upright
position for before plugging it in. 24 HOURS
BEFORE FIRST USE:

TABLE OF CONTENTS
Precautions for Use................................................................
Parts Description ...................................................................................
Control Panel..........................................................................................
Operation Instructions...................................................................... ......
Cleaning & Maintenance.................................. .....................................
Troubleshooting.....................................................................................
Special Notes ........................................................................................
Specifications...........................................................................................
Warranty Contact Us.............................................................................&
1
2
3
4
12
13
16
17
18
The graphics and functions provided in this manual maybe not the same as
the actual product.
The model shown in this manual is only for reference. Please install and
operate the machine according to the actual situations.
The company reserves the right to interpret relevant terms.

● Before cleaning the dehumidifier, please turn off the machine and unplug it from the
power source.
● Please do not place the machine near to heat or flammable goods.
● Do not put any sticks or your fingers into the air inlet or outlet.
● Please always place the machine on a flat ground, rather than uneven or slopping ones.
● Do not spray water, insecticides or flammable liquids on the machine.
● Please do not place the machine in a confined or narrow space.
● If the power cord is damaged, please contact a technician approved by the company to
replace it.
● In Dry Mode, please keep the clothes at least 15.7 inches away from the air outlet to
prevent the water entering the machine to cause damages.
● Please make sure the machine power wiring is installed in accordance with national
wiring rules. The power cord should be connected to a reliable external naught wire.
● The fixed wiring connected to the machine must be equipped with an all-pole
disconnect device (air switch) with a contact distance of at least 0.118 inch.
● The specification of the fuse: 3.15A.
● This machine should not be used by people
without civil capacity, including those who are
physically and mentally impaired, or lack
relevant knowledge and experience, unless
they are instructed by a professional.
● Please use this dehumidifier in an
environment with the temperature
range between 41℉/5℃ and 95℉/35℃.
● When using the dehumidifier, please
keep other surrounding objects at least
7.9 inches/20cm away from the machine.
As shown in the picture:
For your safety, please read this manual carefully and keep it for future
reference. This product is for home use only. Please install and use the product
according to the operations in this manual.

Back
Front
PARTS DESCRIPTION

1.Control Panel
Press this button to turn on or
turn off the machine.
Press this button to turn up or
turn down the set humidity.
Press this button to select mode. Press this button to activate the
auto start and auto stop function.
Press this button to activate or
deactivate the child-lock function.
Press this button to control
the fan speed.
Child-Lock Button
CONTROL PANEL

The dehumidifier has three working modes, namely, Dry Mode, Dehumidify Mode and
Continuously Dehumidify Mode.
When Power On, press the [Mode] button, the device will cycle through, the driving,
dehumidifying. and continuous dehumidifying modes.
In the standby state, you can press the Mode button to switch the working mode among
Dry Mode, Dehumidify Mode and Continuously Dehumidify Mode. The working mode will
switch once you press the Mode button.
Dry Mode: In this mode, the humidity and fan speed are not adjustable.
Dehumidify Mode: In this mode, the humidity and fan speed are adjustable.
Continuously Dehumidify Mode: In this mode, the humidity is adjustable while the fan
speed is not.
The humidity level can be set within the range of 30% RH to 80% RH in 5% increments.
● When the machine starts to work, it will automatically detect and show the room
humidity first. In dehumidification mode, press the "Dehumidify" button to set the
humidity in 5% increments. Then it will flash "52" and show the set humidity. Now you
can set the humidity within the range of 39% RH to 80% RH in 5% increments. If you do
not operate the machine for 5 seconds, "52" will show the actual room humidity.
● When the room humidity is higher or lower than the humidity you set, the machine will
automatically begin to work or stop.
● When the humidity level is set at 30% RH, the machine will work in continuous
dehumidification mode.
This setting is used for you to set a time when the machine will turn on and turn off
automatically.
1. Press the "TIMER" button to select the timer by 1-hour increments.
You can set the timer up to 24 hours. The machine will start to countdown when you start
the timer.
2. Press and hold the "TIMER" button for several seconds to select faster.
3. If the timer is set to 00, it will be a invalid time. If you set the timer successfully, the
light "o" will light up. The led screen will display the time for several seconds and show
the current humidity.
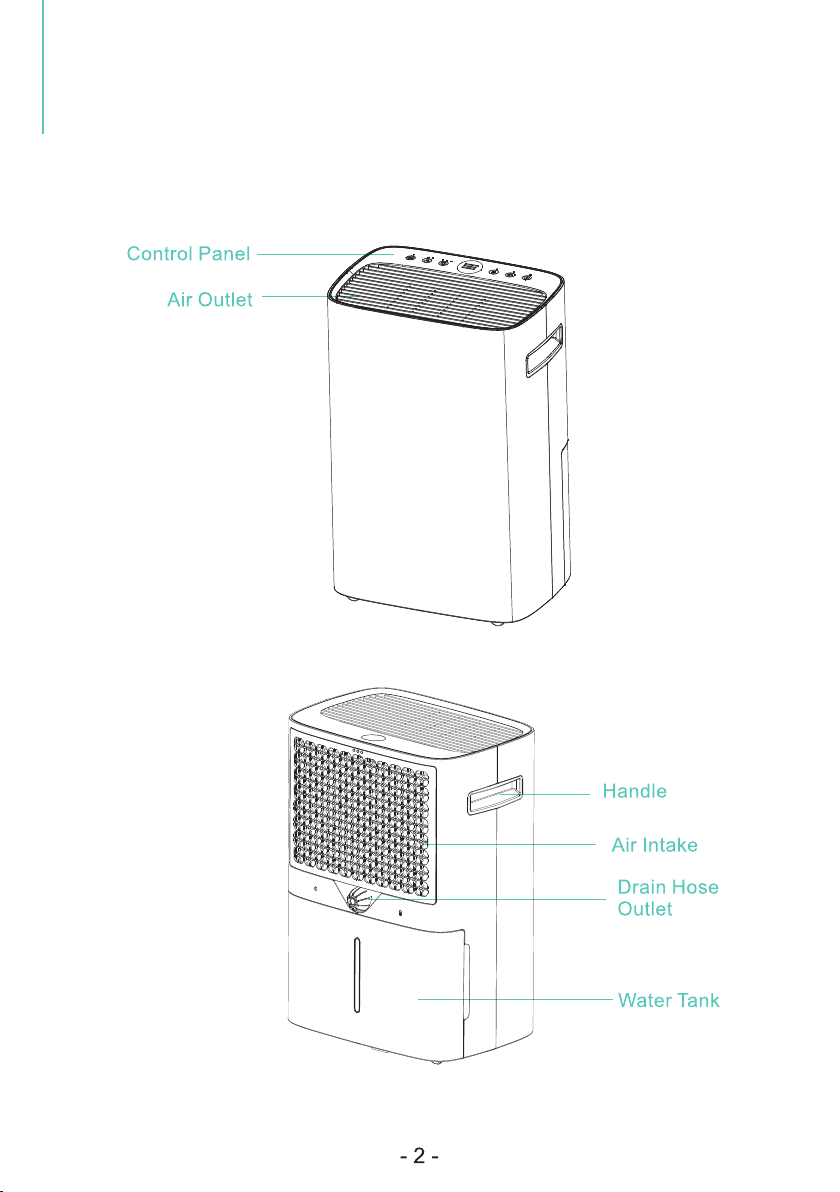
2. Settings

Press this button to control the fan speed. By press it, you can choose either High or
Low speed. Higher speed results in quicker moisture removal. So when you want to
reduce the humidity quickly, please choose the High speed; If you have reduced the
humidity or prefer quieter operation, please choose the Low speed.
Child-Lock Setting
Press and hold the " " for 3-5 seconds to lock or unlock the control panel. When the
" " function is activated, the indicator will flash and other buttons will be disabled.
You can unlock the control panel to enable the buttons again.
Memory Function
1. The machine will automatically restore to its working state when it is turned on.
2. If power outage occurs when the machine is working, the machine will keep the
previous parameters or settings when power resumes.
3. If power outage occurs when the machine is not working, the machine will not
automatically turn on when power resumes.
When the bucket is full, the indicator light will flash and the machine will turn off
automatically. When you empty the water tank, the indicator light will turn off and
the machine will restart yo work.

● If the machine is connected to a power source, the "POWER" button will light up to
indicate it is standby state.
● Timer indicator light "o": If the timer is set properly, the indicator will light up. If not, the
light will not light up.
● The lighting button "o" : This indicator will light up when using light function. Otherwise, it
will not light up.
● High-speed indicator light " " : If you set the high speed, this indicator will light up.
● Low-speed indicator light " " : If you set the low speed, this indicator will light up.
● Dry mode indicator light " " : When you select Dry Mode, this indicator will light up.
Otherwise, it will be off.
● Dehumidify mode indicator light " " : When the machine starts to dehumidify, this
indicator light will light up. When the room humidity reaches the set humidity, the light will
flash. Otherwise, it will be off.
● Continuous dehumidify mode indicator " " : When you select continuous dehumidify
mode, this indicator will light up. Otherwise, it will be off.
● Full tank indicator light " " : When the water tank is full, this indicator will flash.
● When the machine is alarming, the display panel will show alarm error. (The alarm error
and the humidity data will flash).
● When the machine is working, the display panel will show " 55 " to indicate the humidity.
When the dehumidifier is running at a lower temperature, the system will automatically
determine whether there is a presence of frost. If the machine determines there is a
presence of frost, it will defrost automatically.
Defrost Action
The fan runs at a high speed when the compressor stops working.
Defrost Status Display
In defrosting status, the power button "O" will flash.
3. Display Status Description

4. Instructions for Drying Clothes
The dehumidifier can be used for drying clothes in rainy weather.
Step 1.
Hang the washed clothes in a small space such as a cloakroom, bathroom, or
storage room.
Please keep the machine away from the water drips from the wet clothes.
Step 2.
Turn on the dehumidifier and set the humidity level at 30% RH. It is perfect if
you can let the machine air outlet blow the air to the wet clothes directly.
1. The drying effect will vary according to the clothes thickness, quantity and the
size of the drying space. Theoretically, the effect will be better if you hang few
thin clothes in a small space.
2. It will take 3-8 hours to dry the wet clothes in general. We suggest that you
should use continuous drainage when drying clothes.

If the malfunctions still exist, please don't hesitate to contact Kesnos
Customer Service at for help.support@kesnos.com
5. Faults and Solutions
Problems Solutions
Does the humidity sensor fail?
Is there some water on the
surface of the humidity sensor?
Set the humidity to 30% RH and check
if the dehumidifier can work normally.
If it does, the machine is in a good
condition.
Repair or replace the humidity sensor.
The dehumidifier can work normally.
The moisture removal effect is not
affected.
Please keep the machine working for
a while to remove the water on the
humidity sensor surface. The machine
will work normally when the water is
removed.
Repair or replace the humidity sensor.
Humidity always shows
"25% RH" but there is a
big difference from the
actual humidity.
Humidity always shows
"99% RH" but there is a
big difference from the
actual humidity.
Notice:
Before turning on the machine, please be sure to have opened the air
outlet. Otherwise, the machine will overheat. Do not unplug the power
cord directly to turn off the machine.

6. Emptying the Water Tank
There are two methods to remove the collected water in the tank.
Using the Bucket
When the water tank is full, the full tank alert indicator will light up and the
dehumidifier will automatically shut down until the tank is emptied and
placed back to the machine.
Steps to Empty the Water Tank
Pull out the water tank from
the bottom with your hands.
Open the cover of the
water tank.
Invert the water tank to
empty it.
Put the water tank back to
its original place. The full
tank indicator will turn off.

● Do not remove the float in the water tank. Otherwise, the sensor maybe
unable to identify the water level in the tank properly, thus causing water
leakage.
● If the water tank is dirty, please use cold or warm water to clean it. Do not use
any detergents, steel wools, chemically-treated dust clothes, gasoline,
benzene, thinners or other solvents. Otherwise, it may damage the water tank
and cause it to leak.
● When place the water bucket back, please use your hands to gently put it
back to its original place. If the water tank is not placed properly, the sensors
Water Tank Cover

To continuously drain, please unplug the machine from the power source first.
Then take out the water tank and open the drain cover. Now insert the drain
hose into the continuous drain port and place the water tank back to its
original place. Plug the machine into the power source to start continuous
drainage. Please make sure that the drain hose should be lower than the
continuous drain port by at least 3.9 inches. Do not bend the drain hose.
7. Continuous Drainage
Open the drain cover. Insert the drain hose into the
continuous drain port.

Please turn off the dehumidifier and unplug it from the power source
before cleaning.
A-Cleaning the Dehumidifier Body
Please use a soft and slightly damp cloth to clean the humidifier body.
B- Cleaning the Filter
Carefully insert the filter back to its original place.
If you don't use the machine for a long time, please store it according to
the following steps:
C-Dehumidifier Storage

Check the information below for troubleshooting the common problems you
may encounter in the future. These abnormal conditions that are not faults
caused by manufacturing process or material defects.
If the malfunctions still exist, please feel free to contact Kesnos customer
service for help.
Problems Possible Causes Troubleshooting
Is the full tank indicator flashing?
(The tank is full or it is in a wrong
position.)
The machine cannot work in an
overheat or cold environment. It
will automatically shutdown to
protect itself.
Please set the humidity 5%
lower than the room humidity or
set the humidity to 30% RH.
The machine is designed to work
in the humidity range of 30% RH
to 80% RH. It will not work if the
humidity is not within this range.

The room temperature is too low
or the ambient temperature is
below 41℉(5℃) (The machine
will not work or it dehumidifies
very slowly in low temperature).
Clean up the dirt on the air inlet
and outlet.
Please check to see if the filter
package is removed and it is
installed properly.
Change humidity settings or
replace the machine with a
higher-capacity dehumidifier.

The connection between the
hose and port may be loose.
The water tank is not installed
properly.
The float of the water tank has
sunk.
Move the float and make sure
it can swing freely.
Notice:

Do not insert any thin rods or
hard items into the machine to
prevent malfunctions and
dangers.
When cleaning the machine,
please use wet cloth to wipe
gently. Do not spray water on it
directly.
Please clean the filter every two
weeks. Do not use hot water
above 104°F, alcohol, gasoline
or toluene.
When using the hose to drain
continuously, please place the
hose horizontally and make
sure it is even and not winded.
After cleaning the filter,
please do not dry it under
direct sunlight to prevent it
from deforming.
When using the machine,
please do not put it on a soft
or uneven ground to prevent
vibration and movement.
When using the machine, please
keep it away from any heating
furnaces, electric kettles and
other heating sources.
When using the machine,
please close doors and
windows for the optimal
moisture removal effect.
Please do not put any objects
around the machine. The
dehumidification effect will be
affected if the ventilation is bad.
Please unplug the machine from
the power source if you do not
use it for a long time.
Please do not put any
objects on the dehumidifier.
Before moving or carrying
the machine around, please
empty the water tank first.
SPECIAL NOTES
Table of contents
Other KESNOS Dehumidifier manuals