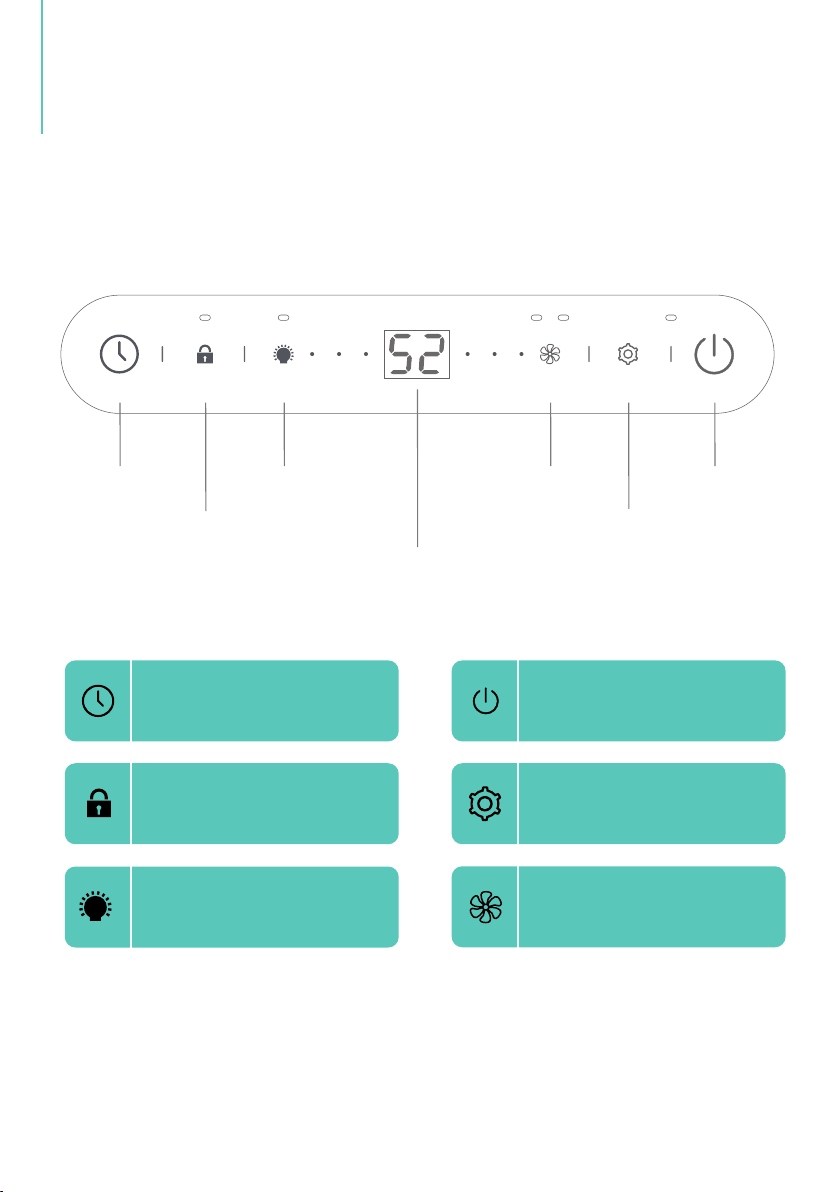
KESNOS PD220B User manual

Home Dehumidifier
PD220B
Please read the manual carefully
before using the unit
USER MANUAL
www.kesnos.com

..
Thank you for purchasing our dehumidifier.
Kesnos wishes that our products and services can bring convenience to
your work and life. We highly recommend that you keep the manual for
reference if you encounter unexpected events using the unit.
Please read the manual carefully to ensure proper use of the dehumidifier.
Our dehumidifiers are widely used in family bedrooms, bathrooms, base
ments, offices and storage rooms, etc.
The dehumidifiers from provide quick and efficient operation to Kesnos
reduce room's humidity and bring you a healthy and comfortable life.
FOR CUSTOMERS
TO ACCESS CUSTOMER SUPPORT FASTER
If there is any problem of the product, please contact Kesnos Customer
Service at with your Purchase Order ID to help you [email protected]
address the problem more effectively.

To prevent any internal damage, it is very important to keep the
unit (like this one) upright throughout its journey.
Please leave it standing as the picture shown below and outside
the box for before plugging it in.24 HOURS
BEFORE FIRST USE:

Safety Instructions ..................................................................................01
Parts Description .....................................................................................02
Control Interface......................................................................................03
Operation Instructions ............................................................................04
Cleaning & Maintenance ........................................................................12
Troubleshooting ......................................................................................13
Special Notes...........................................................................................16
Technical Parameters .............................................................................17
Warranty & Contact Us............................................................................18
TABLE OF CONTENTS
Statement
The graphics and functions provided in this manual may not be the same
as the actual product. Please always refer to the actual product.
The model of the machine on the manual is for reference only, please
check the corresponding content and operate the machine based on the
actual product.
The right to interpret the relevant terms belongs to the company.

- 1 -
Safety Notes:
For your safety, please read the manual carefully and keep the manual for future
reference. Please use this product according to the instructions of installation and
operation of this manual.
7.9"
7.9"
● Before cleaning the dehumidifier, turn off the power and unplug it from the power
outlet.
● Please do not place the machine near heat or flammable dangerous goods.
● Do not insert your fingers or sticks into the air inlet or outlet.
● Always keep the machine on even surfaces, avoid placing the machineonuneven or
sloping ground.
● Do not spray water, insecticides or flammable liquids on the unit.
● This machine should not be placed in a confined and narrow space.
● When the power cord is damaged, it must be replaced by a technician approved by
the company.
● When using the dry clothes function, the clothes should be kept at least 15.7inches
away from the air outlet to prevent water from entering the machine and damage the
machine.
● The machine power wiring must be in accordance with national wiring rules, and,
power line should be connected to the reliable external grounding line.
● Model specification of safety tube: 3.15A
● This dehumidifier is designed to operate in a
working environment between 41°F (5℃)
and 95°F (35℃).
● When using the dehumidifier, other
objects surrounding the machine need
to be kept at least a distance of 7.9 inches
(20cm) as shown in the picture on the right:
SAFETY INSTRUCTIONS

Front
Rear
Control Panel
Air Outlet
Handle
Air Intake
Continuous Drainage Port
Water Tank
- 2 -
PARTS
DESCRIPTION

TIMER LOCK LIGHTING SPEED SETTING P OWER
WATER FULL
SLOW FAST
CONTROL
INTERFACE
1. Control Panel
- 3 -
LOCK
TIMER LIGHTING
DISPALY PANEL
SPEED POWER
SETTING
Lighting Button
Control the LED panel's light
on/off
Power Button
Press to turn the dehumidifier
on/off.
Speed Button
Control the fan speed
Child Lock
Press the button and hold for 2
seconds, the control panel will
be locked.
Timer Button
Press to initiate the auto-start
or auto-stop feature.
Setting Button
Control the humidity setting
up/down

OPERATION
INSTRUCTIONS
2.Setting
Setting Humidity
Timer Setting
- 4 -
This TIMER setting function is designed for you to set a time to turn off or turn
on the machine, automatically by the timer.
1. Press the "TIMER" button to select the timer by 1-hour increment. You can
set the timer up to 24 hours. It will start to do the countdown when you start
the timer.
2. Press and hold the "TIMER" button for several seconds to make the
selection of the timer faster.
3. If the time is set to 00, this is called the invalid time.
4. If you set the timer successfully, the timer indicator " " will be on. The
LED screen will show the remaining time if you press the "TIMER" button, and
display the current humidity automatically after a few seconds.
The humidity level can be set within a range of 30%RH to 80%RH in 5%
increments.
● When it starts to work, it will first automatically detect and show the room's
humidity.
In dehumidification mode (other modes are invalid), press the "SETTING"
button, you can change the humidity selection in 5% increments, " " will flash
52
and show the setting humidity.
● When the humidity level is higher or drops to the level you have set, the
dehumidifier will automatically begin to work or stop.
● When the humidity level is set at 30%RH, the dehumidifier will be work at
continuous dehumidifying mode.
After no operation for 5s, " " will display the actual room humidity.
52
When the room humidity level is higher than your setting value, the dehumidifier
will automatically start working; when the humidity drops to what you desire, the
dehumidifier will automatically stop and the "DEHUMIDIFY" icon on the screen
will flash, indicating the wet control status.
When the humidity level is set at 30%RH, the dehumidifier will work at
continuous dehumidifying mode.

Speed Button
Control the fan speed. Press to select either FAST or SLOW fan speed.
FAST fan speed will result in quicker moisture removal. Set the speed FAST
for maximum moisture removal. When the humidity has been reduced and
quiet operation is more preferred, set the fan speed back to SLOW.
LOCK(2S)
When the unit is turned on, press the "LOCK" button " " and hold on
for 2 seconds, the control panel will be locked together with the other
buttons.To unlock the control panel, press and hold the "LOCK" button
" " again for 2 seconds.
● The device will automatically restore the working status after powered on.
● If the device is turned on and a power interruption occurred, after starting
the unit again, it will keep the previous parameters of setup.
● lf the device is turned off and power interruption occurred,the device will
still be in a power off status when turned on.
Light Function Setting
1. In the power on status, press the "LIGHTING" button to turn on or turn
off the backlight;
2. When light funtion is powered on, except the "POWER" button and the
"LIGHTING" indicators is on, other backlight indicators will be off.
Power Off Memory Function
Overflow Protection
When the water tank is full of water, the machine will turn off automatically.
The indicator light " " will flash. After you empty the water from the
tank, the indicator light " " will turn off. The machine will start to work.
- 5 -
WATER FULL
WATER FULL
Caution:
Water tank must place in right position, otherwise will cause the
waterfull alarm.
OPERATION
INSTRUCTIONS

Defrost Action
The fan runs at high wind speed when the compressor stops.
● When the device is currently powered on, before any operation, only the
"POWER" indicator will be on indicating the device is in "Standby" status.
● Timing indicator " ":If the timer is set up properly, the indicator light will
be on.
● Lighting indicator " ":When use the lighting function, this indicator will
be on, otherwise, it will be off.
Auto Defrost Feature
When the dehumidifier is running at a lower temperature, the system will
automatically determine whether there is a presence of frost. lf any frost
exists, it will defrost automatically.
3. Display Status Description
● High-speed indicator " ":if you set this unit to high speed fan mode,
this indicator will light up.
● Low-speed indicator " ":If you set this unit to low speed fan mode,
this indicator will light up.
● Dehumidification indicator " ":When the machine starts to
dehumidify, this indicator will light up.
● Water full indicator " ":When the water tank is full, this indicator
will flash to alarm.
● Lock indicator " ": This indicator will light up when the control panel
is successfully locked, otherwise it won't be on.
●5 2 When the dehumidifier works normally, " " will display the current
humidity.
- 6 -
FAST
SLOW
SETTING
WATER FULL
OPERATION
INSTRUCTIONS

4. Instructions for Drying Clothes
2. The drying process would take 3-8 hours, and we suggest that continuous
drainage mode is would be suitable when drying clothes.
The dehumidifier can be used for drying clothes in rainy weather.
Step 1.
Hang the washed clothes in a small space such as cloakroom, bathroom,
or storage room.
Note: Keep away the unit from the water drip of the washed clothes.
Step 2.
Open the dehumidifier and set the humidity level at 30%RH. It is best if
you let the air outlet of the dehumidifier to blow air to the clothes directly.
1. The drying effect will vary from the thickness of clothes, the number of
clothes and the size of the drying space. Theoretically, the effect will be
better when clothes are few, thin and space is small.
- 7 -
OPERATION
INSTRUCTIONS

- 8 -
5. Fault & Processing Methods
OPERATION
INSTRUCTIONS

6. Empty the Tank or Bucket
Two ways are available to remove the collected water.
Use the Water Tank
Pull the water tank out from
the bottom with your hand
1
When the water tank is already full, the Full Tank Alert indicator will light up,
the dehumidifier will automatically shut down until the tank has been
emptied and placed back to the unit.
Ways to Empty the Water Tank
- 9 -
Invert the water tank to
empty the water
2
Put the water tank back
in place, the water full
indicator will go out
3
OPERATION
INSTRUCTIONS

Note:
Do not remove the float from the water tank. If the float in the water tank is
removed, the sensor may not be able to determine the water level stored in
the tank properly that may lead to water overflow leak from the water tank.
If the water tank is dirty, just use cold water or warm water to clean it. Do
not use detergent, steel wool, chemically treated dust cloth, gasoline,
benzene, thinner or other solvents. Otherwise, it may damage the water
tank and cause it to leak.
When placing back the water tank, use your hands to press the tank back
in its place. If the water tank is not placed properly, sensors or protections
from water overflow may not operate as expected.
- 10 -
Water Tank
Float
OPERATION
INSTRUCTIONS

7. Continuous Drainage
Remove the power supply, use a knife or pliers and other tools to remove
the plastic cover of the continuous drainage port and insert the water hose
into the port. Connect the power supply to start the operation. The outlet of
the water hose should be lower than the continuous drainage port by more
than 3.9 inches, and can not be bent.
(Note: The diameter of continuous drainage port is 0.63 inches.)
Remove the plastic cover. Insert the water hose into the
continuous drainage port.
Continuous Drain Port
Water Tank
- 11 -
OPERATION
INSTRUCTIONS

Pull out the filter.
Clean the filter: Use a vacuum cleaner to gently remove the dust from the
surface of the filter. If the filter is very dirty, wipe it with warm water and a
mild detergent and dry it completely.
Slowly insert the filter back into the fuselage.
When you want to store the dehumidifier because you don't use it for
a long time. Please pay attention to the following steps:
1. Empty the water in the water tank.
2. Roll up the power cord and tie it up.
3. Clean the filter.
4. Place the machine in a cool and dry environment.
WARNING:
Turn the dehumidifier off and remove the plug from the wall outlet
before cleaning.
A- Cleaning the dehumidifier body
Please use only a soft and a bit wet textile or cloth to clean it.
B- Cleaning filter
C-Dehumidifier storage
CLEANING AND
MAINTENANCE
- 12 -

Check the information below for troubleshooting steps. It will save you
time to resolve issues that may happen with the unit. The list includes
most of the common cases, but not the results of defective units, crafts or
materials in the unit. If all troubleshooting steps have been exhausted and
the issue is still occurring, please feel free to reach out to Kesnos
Customer Service to get further assistance.
- 13 -
Problem Cause Solution
Dehumidifier does not work
The power cord is unplugged.
Empty the water in the water
tank and then reposition the
tank.
Is the room temperature
above 95°F (35°C)or below
41°F (5°C).
Is the room temperature
between 41°F(5°C) and
68°F(20°C) ?
The dehumidifier is in the
defrosting process.
Make sure that the unit's plug
is inserted properly into the
power outlet.
TROUBLESHOOTING
ls the Full Tank indicator
blinking? (The tank is full or
in a wrong position. )
This product does not apply to
over hot or cold environment,
the machine will automatically
enter the protection mode. It
is a normal phenomenon.
When running under lower
ambient temperature, the
machine will automatically
defrost, which is a normal
phenomenon. It will restart
dehumification again until the
defrosting process finished.
It is normal the compressor
ceases while defrosting
process. Wait until the
process finished, it will restart
dehumidification again.
Is the room humidity lower or
reaching the preset humidity
level? (When the room
humidity has reached the
preset level, the dehumidifier
will enter Standby Mode and
the indicator on LCD will
flash. )
Please set the humidity
decrease by 5% than the room
humidity or set the humidity to
30%.

Please wait for more than 3
minutes.
Room humidity is low.
Dehumidifier does not dry
the air as it should
The air filter is dirty. Clean the air filter.
Is the air inlet or air outlet
obstructed?
Remove the obstruction from
the air inlet or outlet.
The dehumidifier size is too
small for application.
Increase the quantity of
dehumidifier. Or change a
higher capacity dehumidifier.
Poor air circulation.
Please leave about
7.9inch(20cm) around the
product.
Did not allow enough time to
remove the moisture.
Allow enough time to remove
the moisture.
When first installed, allow at
least 3-4 days to maintain the
desired RH.
The room has not been sealed
properly.
Check that all doors, windows
and other openings are
securely closed.
The air filter is clogged. Wash the filter.
TROUBLESHOOTING
- 14 -
This is to prevent the frequent
start of the machine. Does the
machine stop working just now?
The dehumidifier is designed
to work in the humidity range
of 30%-80%. Above or below
this range, it will not work.
Room temperature is too low,
or below 41℉ (5℃): The
machine will not work or
undergo poor dehumifying
efficiency in low temperature.
Please wait until the
temperature rises to above
5℃ or higher.

Move the machine to a
horizontal position.
Is there blocking around the
air inlet?
The air filter is clogged.
The dehumidifier makes loud
noise when operating
Is the filter installed
correctly?
Check if the dehumidifier is in
Continuous Mode.
Room humidity is too high.
Doors and windows are open.
Ensure that all doors,
windows and other openings
are closed.
Dehumidifier operates
continuously
Put the magnet in right
position.
Hose to connector or hose
connection may be loose.
Overflow of water on floor
TROUBLESHOOTING
- 15 -
The dehumidifier is not
positioned levelly.
Clean up the dirt or lint on
the air outlet and intake.
Please check whether the
packing bag of the filter had
been removed and the filter
has been installed correctly.
Do Not set the humidity too
low. Typically, 40-50% are
good for use.
Change humidity setting. Or
change to a higher capacity
dehumidifier.
The float of water tank has
been stuck.
Move the float and let it
swing freely.
The magnet on the float has
come off.
Connect the hose with the
drainage port tightly.
The water tank has not been
installed properly. Re-install the water tank
properly.
If the dehumidifier is still not working properly as expected and the
troubleshooting steps or solutions above may not resolve the issue.
Please unplug the power and shut down the dehumidifier, then contact
Kesnos Customer Service at .support@kesnos.com

SPECIAL NOTES
1. When using, please do not put
the machine at the soft and
uneven ground, avoid vibration
and movement.
2. Do not insert thin rods and hard
objects into the fuselage to
avoid malfunction and danger.
3. When using, please keep the
machine away from heating
furnace, electric kettle and
other heat sources.
4. When using, make sure doors
and windows are closed to get
the best humidity removal effect.
5. Please do not put objects around
the body. If the ventilation is
blocked, the dehumidification
effect will be affected.
6. If do not use the product for a
long time, please unplug the
power cord.
7. When cleaning the dehumidifier
fuselage, please use wet cloth
or textile to wipe the unit's surface
gently, do not splash water on
the unit directly.
8. Please do not put any object
on the dehumidifier.
9. Please clean the filter every
two weeks (do not use hot
water above 104 F,
gasoline toluene)
10. When on continuous drainage,
make sure the drainage pipe is
placed horizontally on the ground.
Avoid the pipe to be on uneven
surface or in an arch position.
11 . After cleaning the filter, do not
dry the unit under direct sunlight
to avoid filter deformation.
12 Before moving and carrying .
the machine, please first
pour out the water in the tank.
- 16 -
Table of contents
Other KESNOS Dehumidifier manuals
Popular Dehumidifier manuals by other brands

cecotec
cecotec BIGDRY 5000 ADVANCE instruction manual

Uni-P Dry
Uni-P Dry Renegade 1400X Installation, operation & service instructions

Daitsu
Daitsu ADD12 instruction manual

Honeywell
Honeywell TrueDRY DR90 quick start guide

Sovelor
Sovelor DR26 Use and maintenance book

turbionaire
turbionaire PRO 90N instruction manual

Philips
Philips AC4091 user manual

Honeywell
Honeywell DH50W owner's manual

Uni-P Dry
Uni-P Dry Pro 200X Installation, operation & service instructions

Ingersoll-Rand
Ingersoll-Rand TZ730 user manual

Olimpia splendid
Olimpia splendid SeccoPur S Instructions for installation, use and maintenance

Dimplex
Dimplex DXDH10N Installation and operating instructions