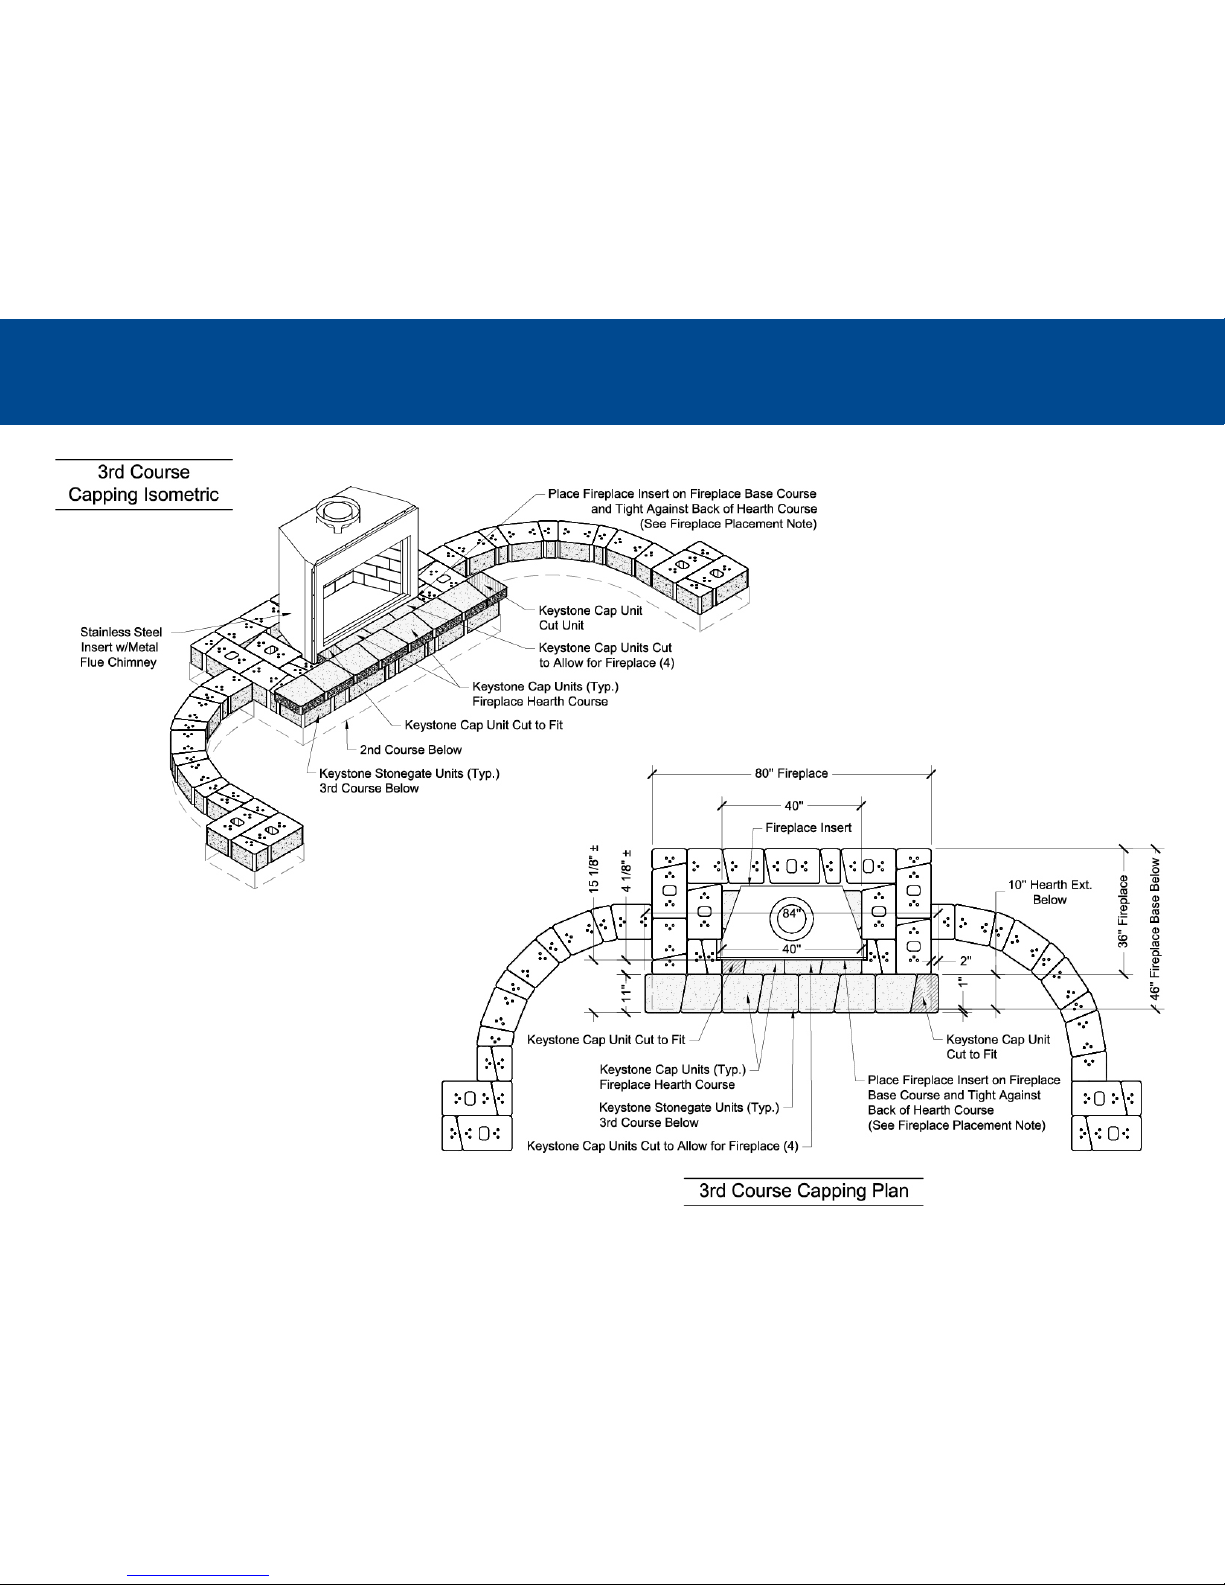
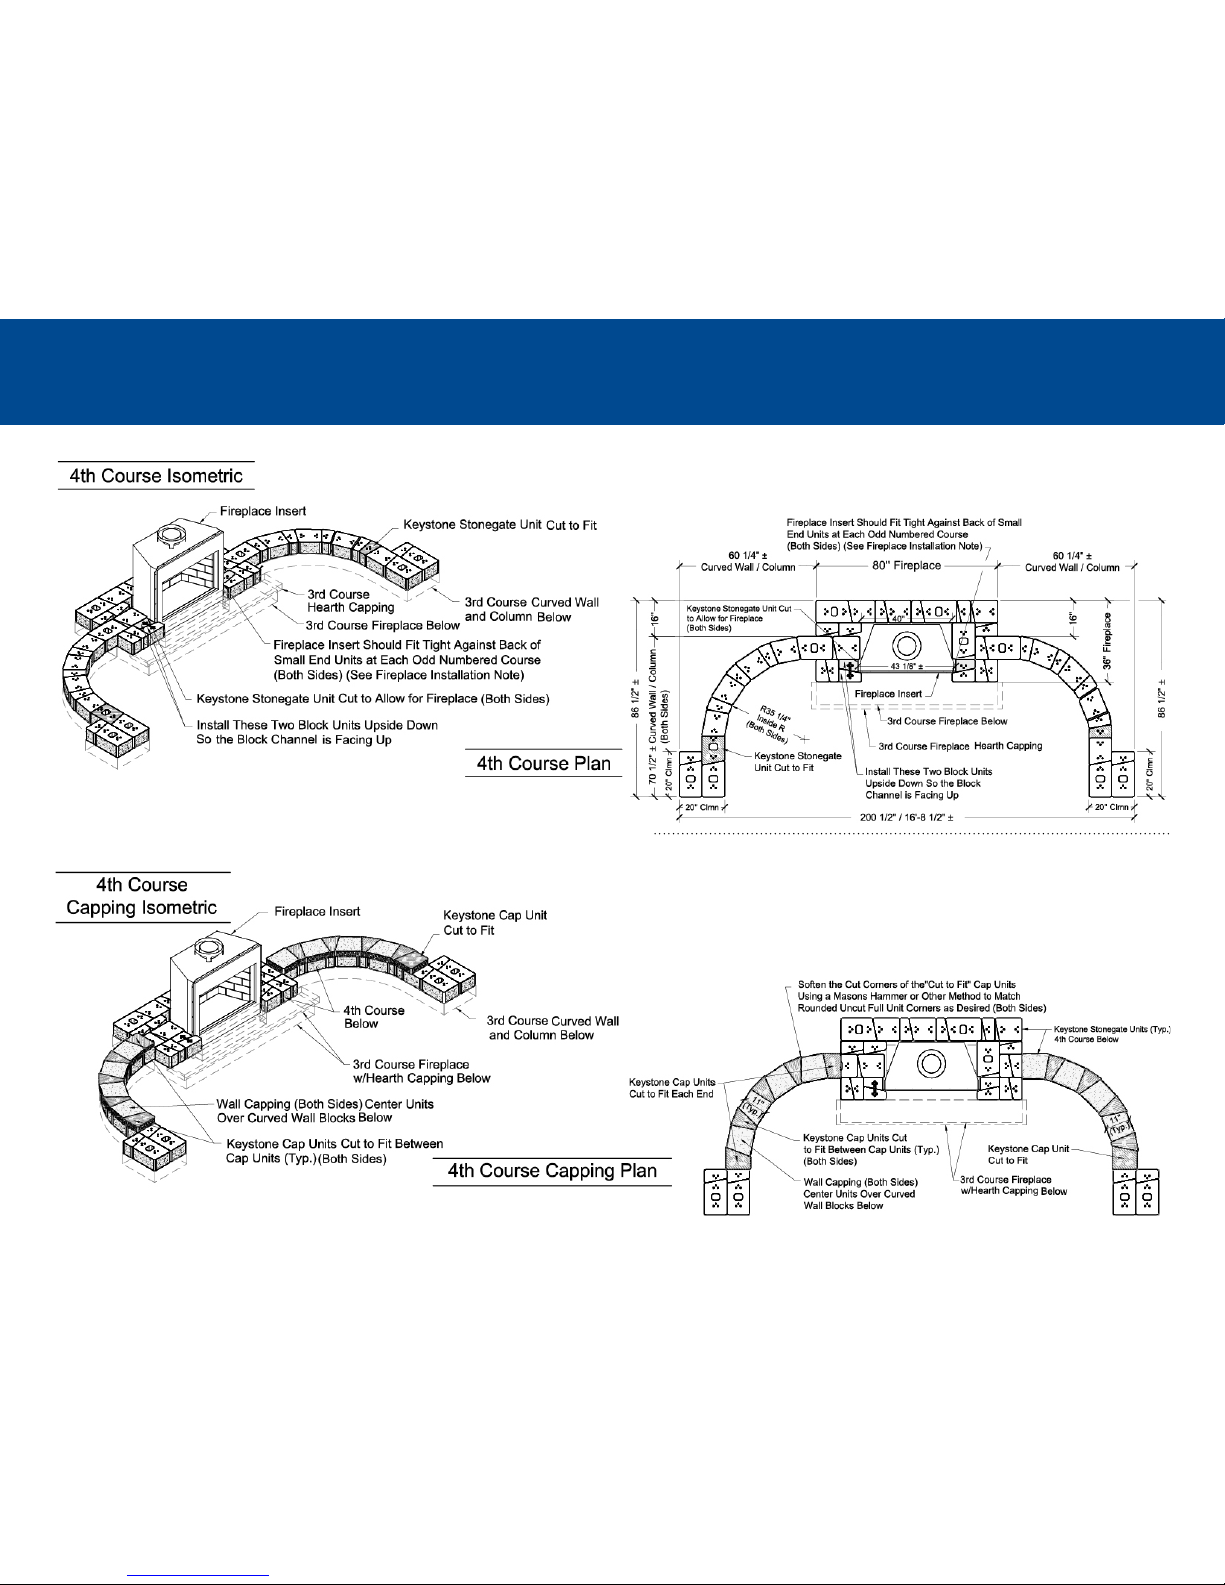
Keystone Hardscapes Stonegate Country Manor Fireplace With Curved Walls And... User manual

WOOD BURNING OUTDOOR FIREPLACE
W/CURVED WALLS & COLUMNS
Installation Instructions using Stonegate®3-pc System

2Keystone Step-by-Step Kits
FIREPLACE WITH CURVED WALLS & COLUMNS
Gloves
Exterior Grade
Construction Adhesive
Level(s)
Safety Glasses Layout Stakes
Hand Compactor
Concrete Saw
BASIC TOOLS
Shovel Wheel Barrow
safety alterations layout
finishing
leveling general
Mallet
Line
Caulking Gun
MalletStone Chisel
KIT CONTAINS
12" and 48"
Chimney Sections
Storm CollarContemporary
Termination Round
Fireplace Insert
with Grate
Steel Lintel Fireplace
Trim Piece

Keystone Step-by-Step Kits 3
www.keystonehardscapes.com
FIREPLACE WITH CURVED WALLS & COLUMNS
You will need:
139 - 16"/14"w Large units
141 - 12"/10"w Medium units
175 - 6"/4"w Small units
105 - 12"/10"w Stonegate caps
600 - Interlocking Pins (approx.)
(use where alignment allows)
25 - Tubes Exterior Grade Concrete
Adhesive (approx.) Apply two ¼"
strips of concrete adhesive on
each course.
• Mantel Piece
• Fireplace Insert (contact Keystone for
specs & retail options)
• Steel lintel - (1) 54"L angle
• Concrete slab material - 19.5 cf
• Curved Wall/Column pad material -
15.9 cf
Notes:
• All Keystone Stonegate units are 6”h x 10”d.
• Keystone recommends the use of its interlocking
pins when alignment allows. Use pins in
conjunction with concrete adhesive to maximize
stability of your structure.

4Keystone Step-by-Step Kits
FIREPLACE WITH CURVED WALLS & COLUMNS
4Keystone Step-by-Step Kits
Fireplace insert: See local codes for fireplace/chimney clearances and chimney extension above roof as required. Please refer to the installation manual that is included with the
fireplace insert for proper installation instructions.

Keystone Step-by-Step Kits 5
www.keystonehardscapes.com
FIREPLACE WITH CURVED WALLS & COLUMNS
Keystone Step-by-Step Kits 5

COURSE BY COURSE INSTRUCTIONS
6Keystone Step-by-Step Kits

COURSE BY COURSE INSTRUCTIONS
Keystone Step-by-Step Kits 7
www.keystonehardscapes.com
Note: Due to block outside face texture variances when building the fireplace courses, the outside
dimensions of the courses may get wider than desired. If required, cut an interior perimeter unit to
get the required outside dimension.
Block Cutting Note:
Using a concrete saw or wheel grinder tool w/masonry disk, cut block units as needed.
Block units to be cut due to obstruction are labeled with solid hatching.
Block units to be cut to fit are labeled with angular hatching.

COURSE BY COURSE INSTRUCTIONS
8Keystone Step-by-Step Kits
Block Cutting Note:
Using a concrete saw or wheel grinder tool w/masonry disk, cut block units as needed.
Block units to be cut due to obstruction are labeled with solid hatching.
Block units to be cut to fit are labeled with angular hatching.

COURSE BY COURSE INSTRUCTIONS
Keystone Step-by-Step Kits 9
www.keystonehardscapes.com
Cap Cutting Note:
Using a conccrete saw or wheel grinder tool w/
masonry disk, cut block units as needed
Cap units to be cut due to obstruction are
labeled with solid hatching.
Cap units to be cut to fit are labeled with angular
hatching.
Fireplace Note:
Install fireplace and chimney compo-
nents as per fireplace manufacturers
installation instructions.
Fireplace Placement Note:
Prior to placing the fireplace insert for proper
removal of the fireplace stainless steel face
protective wrap, peel back the outside portions of
the protective wrap where it will come in contact
with block units, cap units and top trim piece.
Fireplace Hearth Capping Note:
3rd course fireplace hearth capping can be
placed after 4th course is in place (not shown
here for display purposes).

COURSE BY COURSE INSTRUCTIONS
10 Keystone Step-by-Step Kits
Fireplace Note:
Install fireplace and chimney components as per
fireplace manufacturers installation instructions.
Block Cutting Note:
Using a concrete saw or wheel grinder tool w/masonry disk, cut block units as needed.
Block units to be cut due to obstruction are labeled with solid hatching.
Block units to be cut to fit are labeled with angular hatching.
Fireplace Installation Note:
The installed fireplace front outside corners of the fireplace insert face should contact the small end
units at the inside end of the two inside walls. If the fireplace insert does not contact the small units at
each side, trim the front and or side units below to allow the fireplace insert to move forward to contact
the small units at each odd numbered course. Cap Cutting Note:
Using a conccrete saw or wheel grinder tool w/masonry disk, cut block units as needed
Cap units to be cut due to obstruction are labeled with solid hatching.
Cap units to be cut to fit are labeled with angular hatching.
Curved Wall Capping Note:
4th course curved wall capping can be placed after 5th course fireplace/column is in
place (not shown here for display purposes)

COURSE BY COURSE INSTRUCTIONS
Keystone Step-by-Step Kits 11
www.keystonehardscapes.com
Fireplace Note:
Install fireplace and chimney components as per
fireplace manufacturers installation instructions.
Block Cutting Note:
Using a concrete saw or wheel grinder tool w/masonry disk, cut block units as needed.
Block units to be cut due to obstruction are labeled with solid hatching.
Block units to be cut to fit are labeled with angular hatching.

COURSE BY COURSE INSTRUCTIONS
12 Keystone Step-by-Step Kits
Fireplace Note:
Install fireplace and chimney components as per
fireplace manufacturers installation instructions.
Cap Cutting Note:
Using a conccrete saw or wheel grinder tool w/masonry disk, cut block units as needed
Cap units to be cut due to obstruction are labeled with solid hatching.
Cap units to be cut to fit are labeled with angular hatching.
Block Cutting Note:
Using a concrete saw or wheel grinder tool w/masonry disk, cut block units as needed.
Block units to be cut due to obstruction are labeled with solid hatching.
Block units to be cut to fit are labeled with angular hatching.

COURSE BY COURSE INSTRUCTIONS
Keystone Step-by-Step Kits 13
www.keystonehardscapes.com
Fireplace Top Trim PIece Placement Note:
For proper removal of the top trim piece stainless steel face protective
wrap prior to installing the top trim piece, peel back the bottom portion
of the protective wrap where it will come in contact with the top of the
fireplace. Using a Phillips head pattern screwdriver, loosen and remove
existing firebox cabinet front top screws. Place supplied top trim piece
across the front top of firebox cabinet aligning the top trim piece holes
with the existing screw holes and flush with the front face of the firebox
cabinet. Reinstall removed screws through the top trim piece and into the
existing holes and secure the top trim piece to the fireplace cabinet.

COURSE BY COURSE INSTRUCTIONS
14 Keystone Step-by-Step Kits
Fireplace Note:
Install fireplace and chimney
components as per fireplace
manufacturers installation instructions.
Block Steel LIntel Cutting Note:
Position steel lintel to allow a minimum of 1/2" space between
the steel lintel and the fireplace flue.
Prior to installing steel lintel, use a wheel grinding tool to
notch out top of block creating a level shelf to place steel
lintel, such that lintel is flush with top of cut block. Block units
to be cut for steel lintel are shown with solid hatching.
Note:
Steel lintel installer to remove the two (2) front
S.S. top spacers on supplied fireplace insert that
will conflict w/steel lintel. Remove screws and
remove brackets, they will not be needed.

COURSE BY COURSE INSTRUCTIONS
Keystone Step-by-Step Kits 15
www.keystonehardscapes.com
Fireplace Note:
Install fireplace and chimney
components as per fireplace
manufacturers installation instructions.
Block Cutting Note:
Using a concrete saw or wheel grinder tool w/masonry disk, cut
block units as needed. Block units to be cut due to obstruction are
labeled with solid hatching. Block units to be cut to fit are labeled
with angular hatching.
Cantilever Support Block for Mantel Note:
Install cantilever support blocks for the mantel upside down so the
block channel is facing up. Pin holes from underside of inverted
units should be used to attach the mantel piece w/lag bolts and
washers.
Temporary Block Support Note:
Build temporary support up from 2nd course hearth capping to
support blocks resting on steel lintel using wood or other rigid
support material until sufficient weight from courses above will
safely hold steel lintel block in place, then remove temporary
support.

COURSE BY COURSE INSTRUCTIONS
16 Keystone Step-by-Step Kits
Fireplace Note:
Install fireplace and chimney
components as per fireplace
manufacturers installation
instructions.
Mantel Note:
Mantel piece as per home owners interest.
Pin holes and channels in the cantilever blocks may be used to
attach the mantel piece.
Attach mantel piece once fireplace and chimney build out is
completed.
For Wood Mantel:
Once fireplace and chimney build out is completed, attach the
mantel to the cantilever blocks using minimum 3/8" steel lag bolts
w/washers to fasten to mantel above.

COURSE BY COURSE INSTRUCTIONS
Keystone Step-by-Step Kits 17
www.keystonehardscapes.com
Fireplace Note:
Install fireplace and chimney
components as per fireplace
manufacturers installation
instructions.
Block Cutting Note:
Using a concrete saw or wheel grinder tool w/masonry disk, cut
block units as needed. Block units to be cut due to obstruction are
labeled with solid hatching. Block units to be cut to fit are labeled
with angular hatching.

COURSE BY COURSE INSTRUCTIONS
18 Keystone Step-by-Step Kits
Fireplace Note:
Install fireplace and chimney
components as per fireplace
manufacturers installation instructions.
Block Cutting Note:
Using a concrete saw or wheel grinder tool w/masonry disk, cut block units as needed.
Block units to be cut due to obstruction are labeled with solid hatching. Block units to
be cut to fit are labeled with angular hatching.
Cap Cutting Note:
Using a conccrete saw or wheel grinder tool w/masonry disk, cut block units as needed
Cap units to be cut due to obstruction are labeled with solid hatching.
Cap units to be cut to fit are labeled with angular hatching.

COURSE BY COURSE INSTRUCTIONS
Keystone Step-by-Step Kits 19
www.keystonehardscapes.com
Fireplace Note:
Install fireplace and chimney
components as per fireplace
manufacturers installation instructions.
Block Cutting Note:
Using a concrete saw or wheel grinder tool w/masonry disk, cut block units as needed.
Block units to be cut due to obstruction are labeled with solid hatching. Block units to
be cut to fit are labeled with angular hatching.

COURSE BY COURSE INSTRUCTIONS
20 Keystone Step-by-Step Kits
Fireplace Note:
Install fireplace and chimney
components as per fireplace
manufacturers installation instructions.
Block Cutting Note:
Using a concrete saw or wheel grinder tool w/masonry disk, cut block units as needed.
Block units to be cut due to obstruction are labeled with solid hatching. Block units to
be cut to fit are labeled with angular hatching.
Cap Cutting Note:
Using a conccrete saw or wheel grinder tool w/masonry disk, cut block units as needed
Cap units to be cut due to obstruction are labeled with solid hatching.
Cap units to be cut to fit are labeled with angular hatching.
Table of contents
Other Keystone Hardscapes Outdoor Fireplace manuals

Keystone Hardscapes
Keystone Hardscapes YORKSHIRE YSFPR User manual

Keystone Hardscapes
Keystone Hardscapes ASHLAND User manual

Keystone Hardscapes
Keystone Hardscapes Stonegate Country Manor 3-pc User manual

Keystone Hardscapes
Keystone Hardscapes StoneLedge STOFP User manual

Keystone Hardscapes
Keystone Hardscapes YORKSHIRE User manual
Popular Outdoor Fireplace manuals by other brands

Allen + Roth
Allen + Roth Winthrop manual

Blumfeldt
Blumfeldt 10040243 manual

Garden Treasures
Garden Treasures GAD1435L instructions

Tepro Garten
Tepro Garten PENFIELD operating manual

Canvas
Canvas BLACKCOMB 085-1569-0 Assembly instructions

Outdoor GreatRoom Company
Outdoor GreatRoom Company Colonial-48-M-K installation instructions