KiloVault KLV2V100024VRCK User manual

产品安装手册
Product Installation Manual

Product Installation Manual
1
产品安装手册
Product Installation Manual
一安装注意事项
一Installation precautions
1 准备工作
1 Prepare work
1) 工具:14~17mm 开口扳手或活动扳手2 把;14mm 套筒扳手1 把。
注意:所有电池出厂前已荷电,所有金属安装工具使用前必须用绝缘胶
带包裹,进行绝缘处理,防止电池短路。
1) Tools:14~17mm Open-ended wrench or adjustable wrench 2 pcs;
14mm socket wrench 1 pcs.
Note: All batteries were charged before leaving the factory. All metal
installation tools must be wrapped with insulating tape before use, perform
insulation treatment, prevent short circuit of battery.
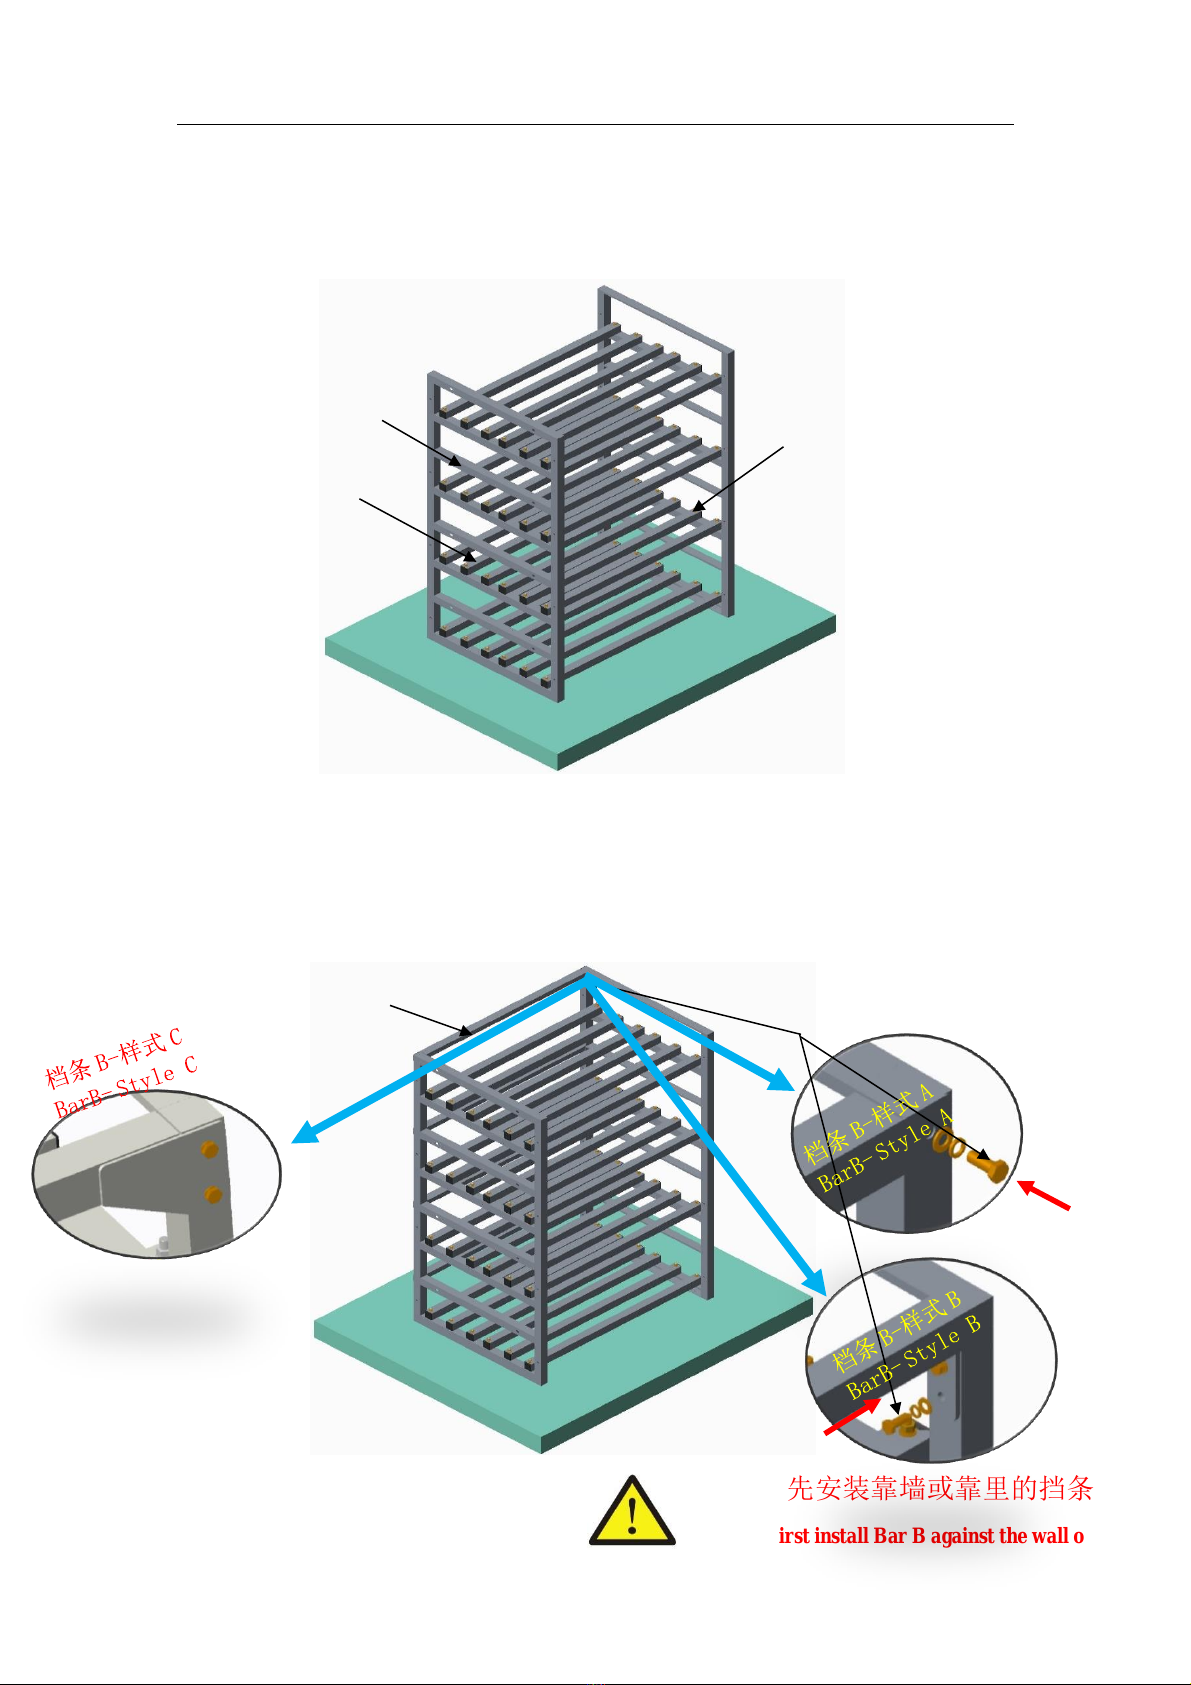
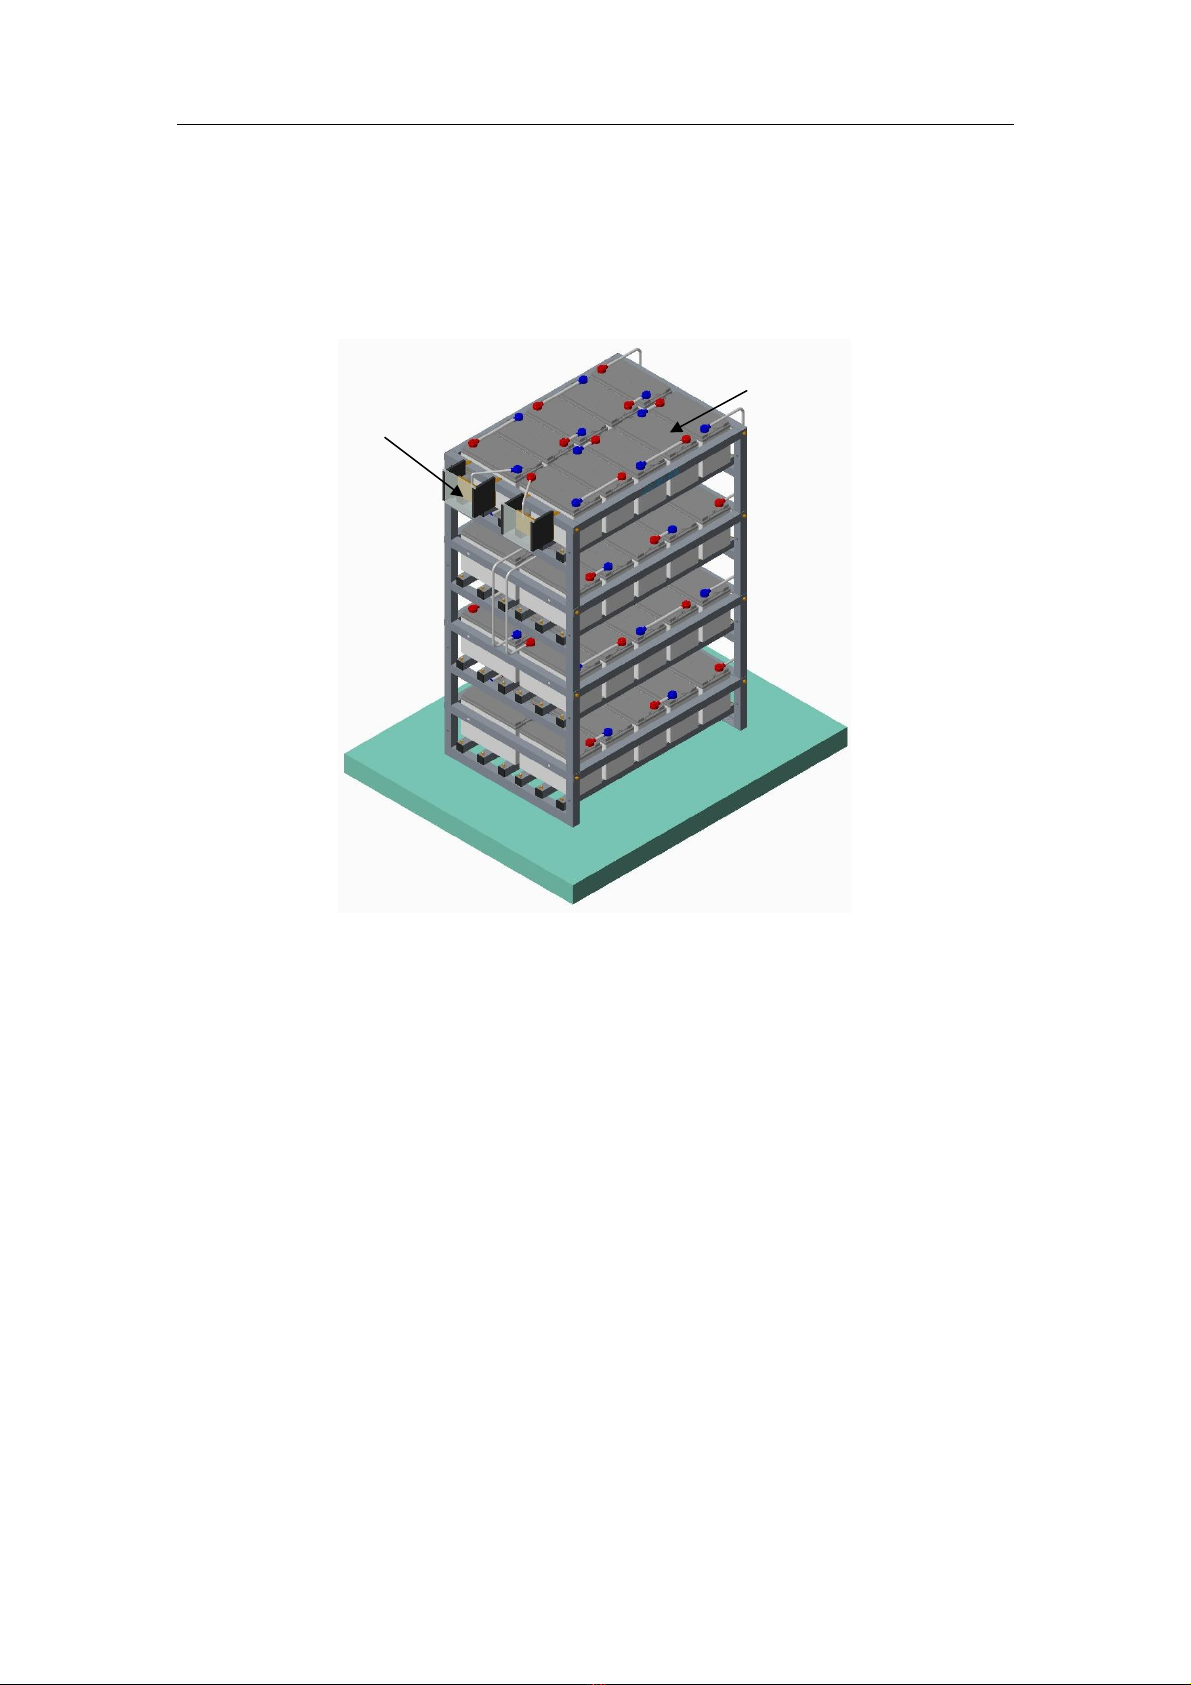
2) 安装时注意电池间间隙,建议≈10mm(或按图纸要求),保证较好的
散热条件。
2) Pay attention to the clearance between batteries during installation,
suggest ≈10mm (or as required by drawings), ensure better heat
dissipation conditions.
2 安装步骤
2 Installation step
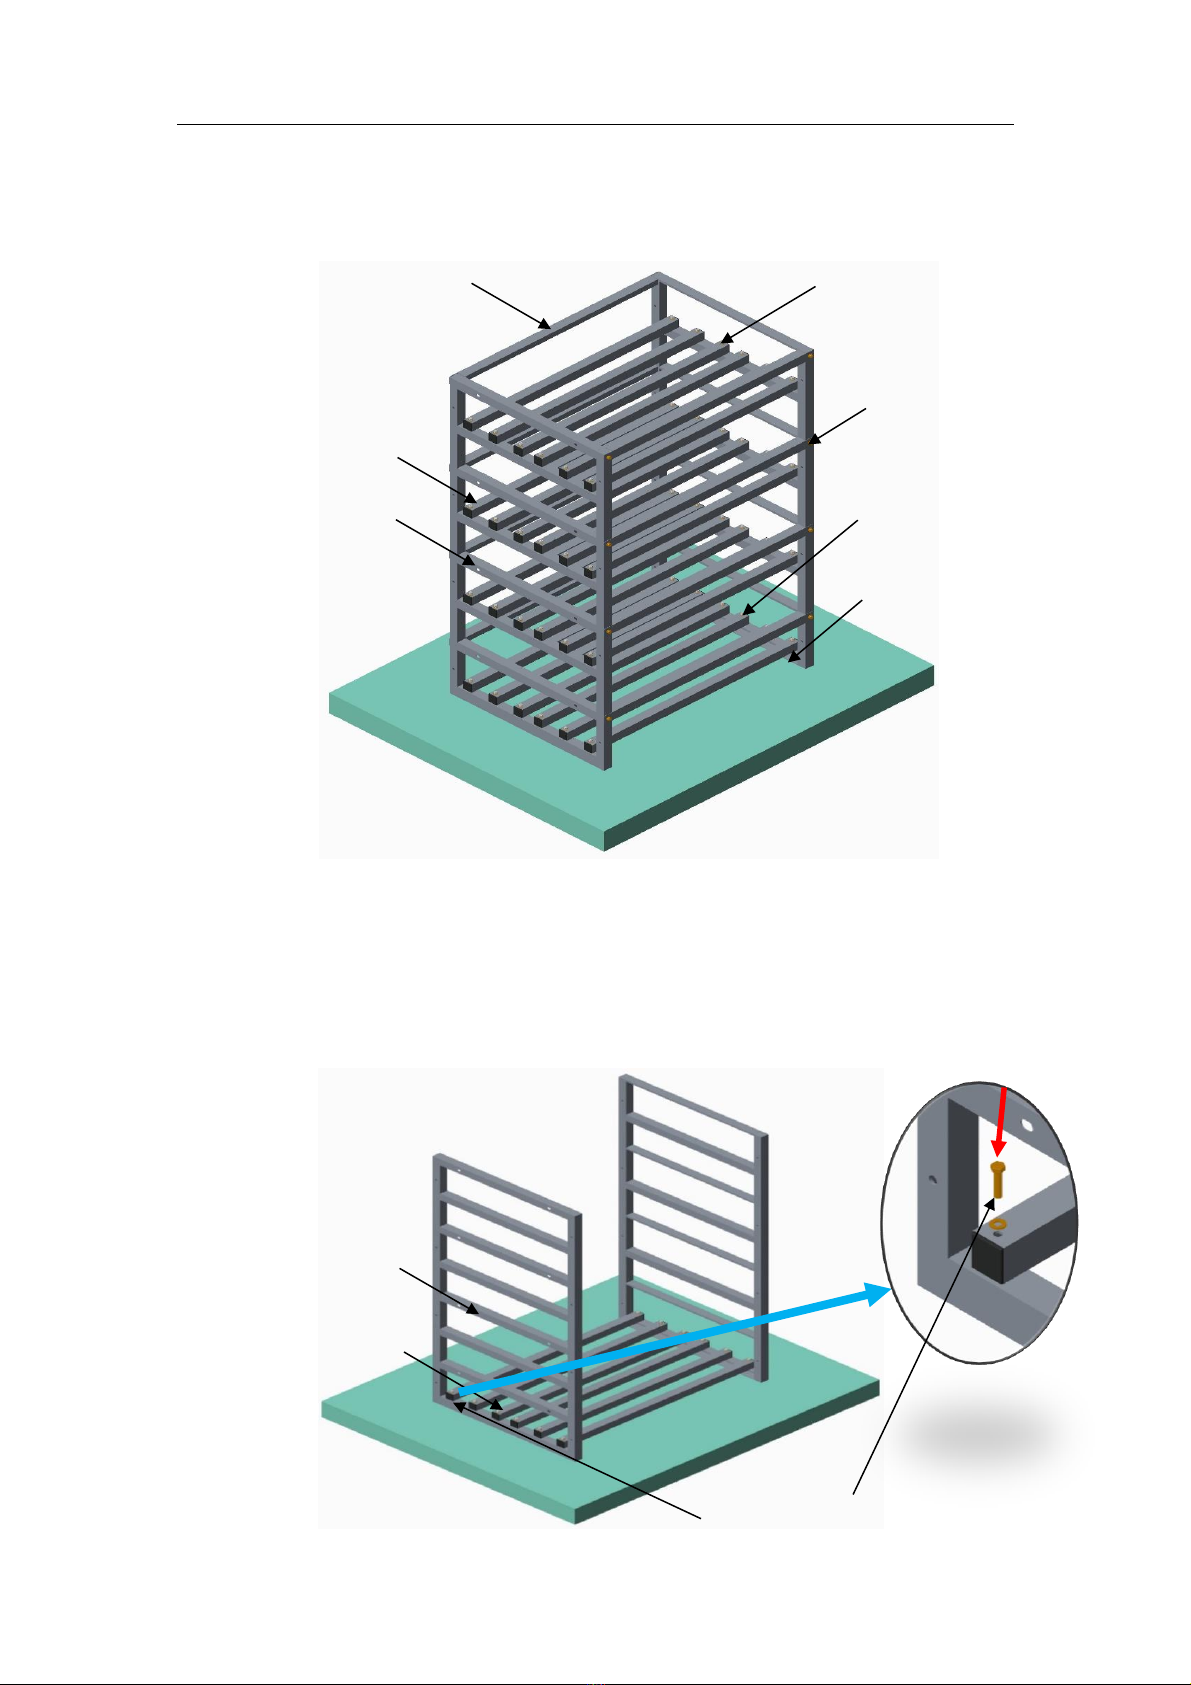
1)安装人员进行电池架的开箱检查及配件的清点,配件箱中装箱清
单、电池安装示意图、安装使用说明书等文件应收好,待安装工程
结束后交由客户公司相关部门负责保管。
1) Installation personnel shall conduct unpacking inspection of battery racks
and inventory of accessories, documents such as packing list, battery
installation schematic diagram, installation and operation instructions in the
accessory box shall be properly collected. After the installation project is
completed, the relevant departments of the customer company shall be
responsible for the custody.
2)按照施工图纸检查电池在机房的摆放位置是否合理,是否预留了维
护空间,如果不符合,应先请示用户是否修改,修改后需要有备忘录。
2) According to the construction drawings, check whether the placement of
batteries in the machine room is reasonable and whether maintenance space
is reserved? If not, please check with the user first if you can modify it, and a
memorandum is required after the revision.
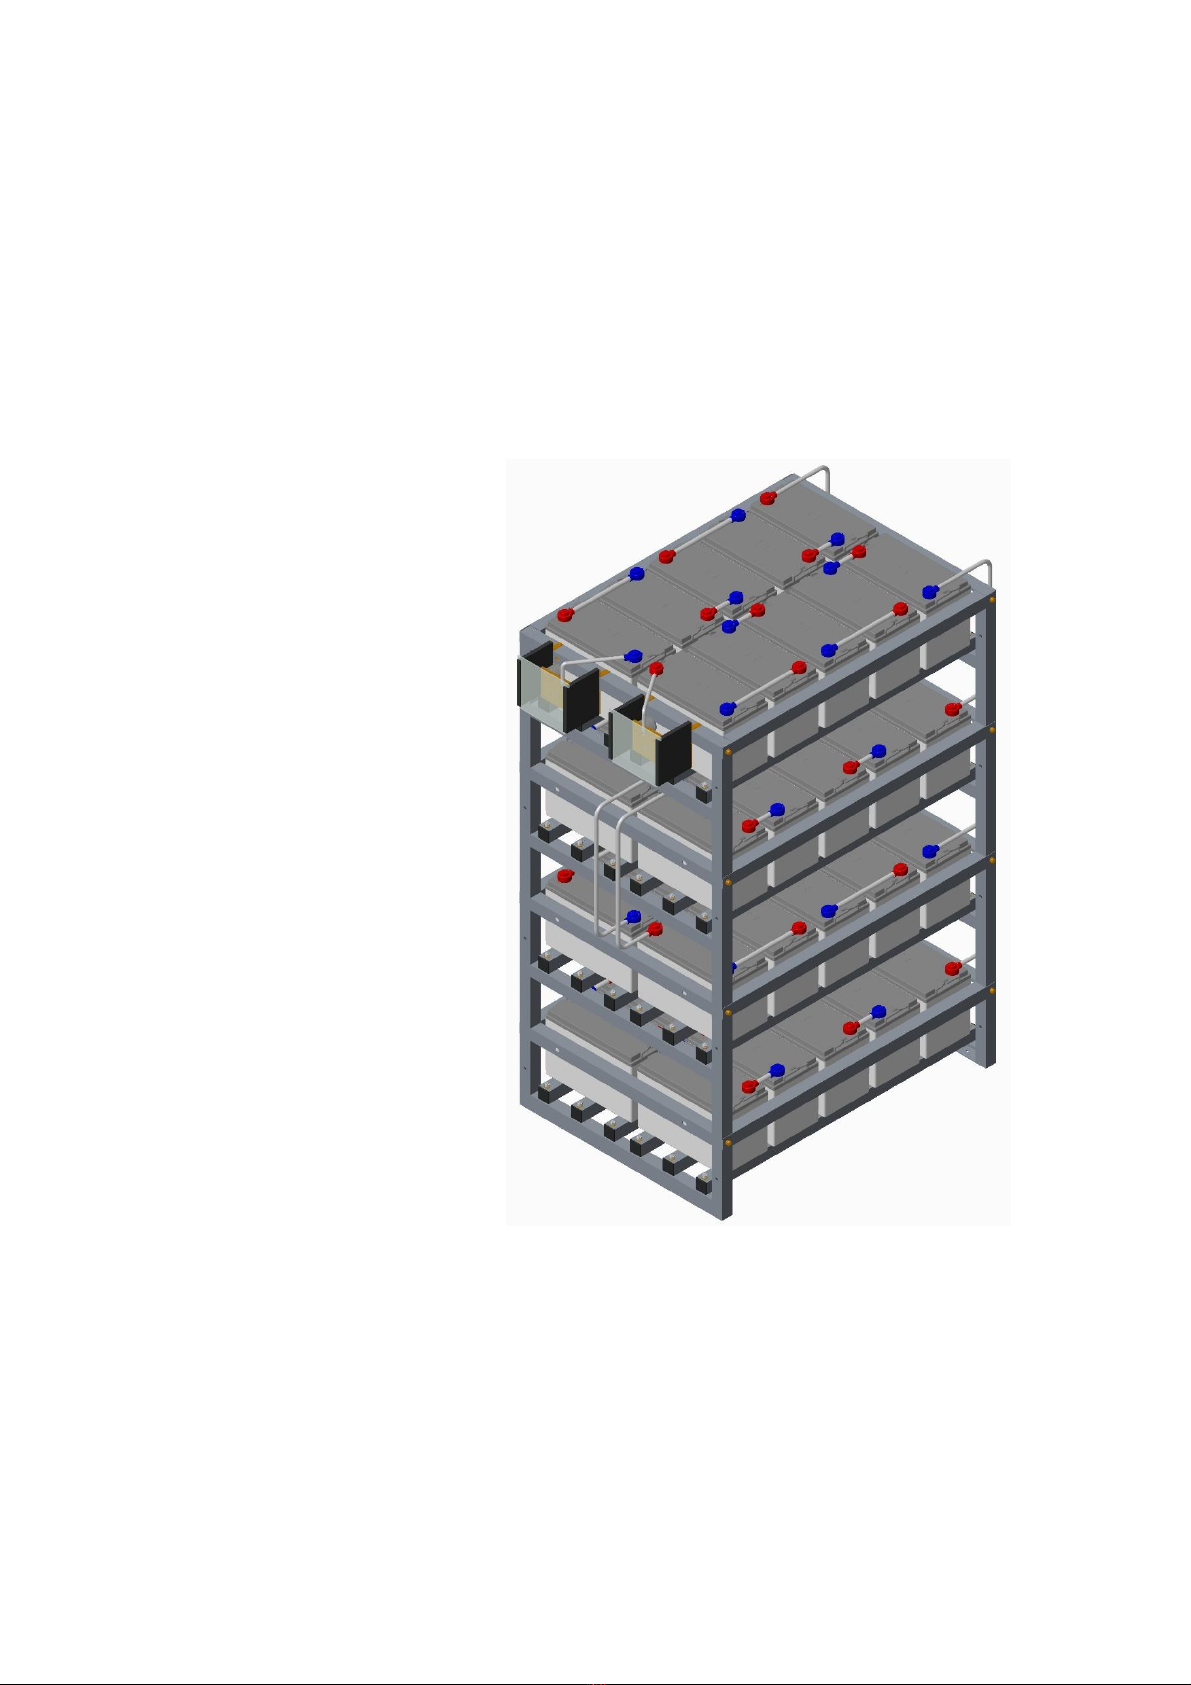
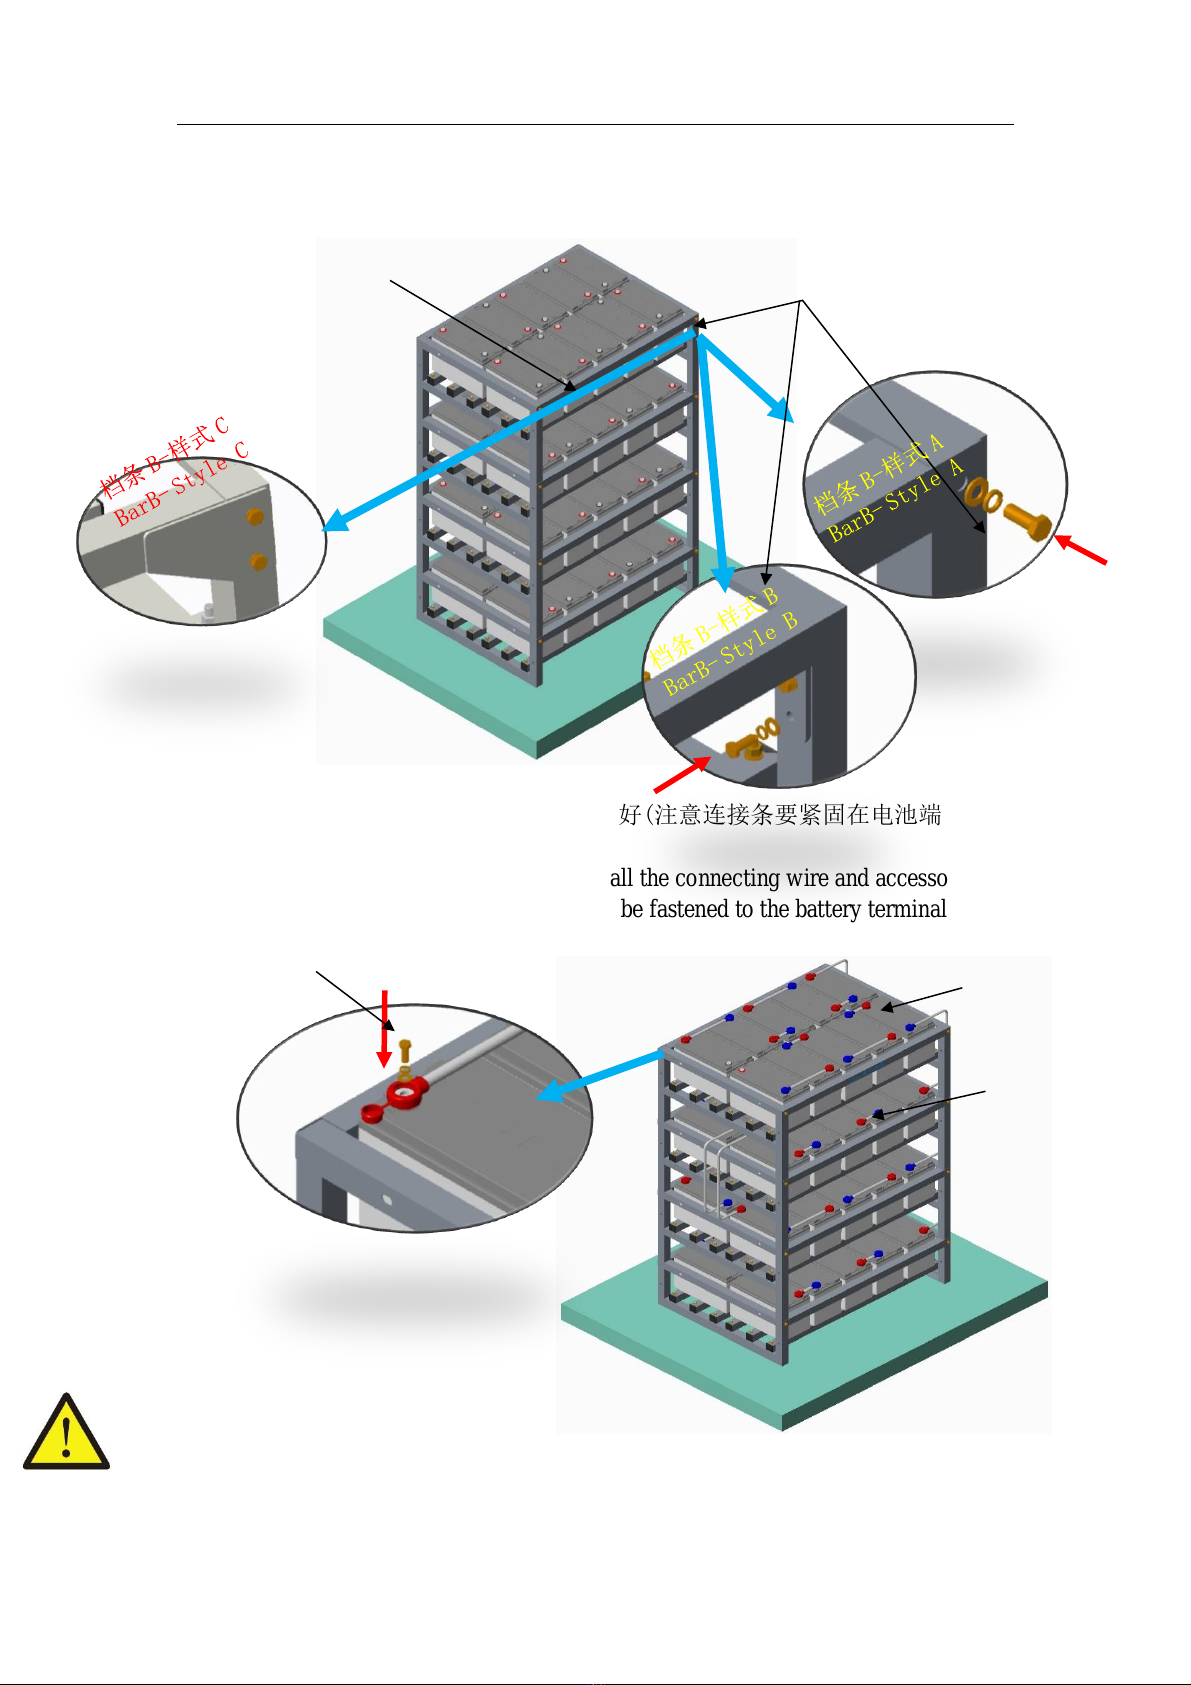
3)安装连接条前应保证极柱上的灰尘已擦干净。安装后要逐个检查所
有连接螺栓是否拧紧。要指定专人检查,专人负责,确保所有螺栓处于
拧紧状态(参考扭矩12~15N.m)。
3) Before installing the connecting strip, ensure that the dust on the pole has
been wiped clean. After installation, check whether all connecting bolts are
tightened one by one? To designate a person to check, a person responsible

Product Installation Manual
2
for ensuring that all bolts in tightening state (reference torque 12 ~ 15n.m).
二电池架示意图
二Battery rack schematic diagram
三安装步骤
三Installation step
第一步 The First step
先取电池架两个侧面平放在地上,取横档,两端用横档螺栓M8X60或
M8X40在侧面框架上固定(先不拧紧)。
Firstly, the two sides of the battery rack are laid flat on the ground, and take
rail. Both ends are fixed on the side frame with crosspiece bolts M8X60 or
M8X40 (do not tighten first).
侧面框架
Side Frame
地脚螺栓
Foundation Bolt:M8X70 or
M12X80
下层横档螺栓
Rail Bolt:M8X60 or M8X40
档条 B
Bar B
横档
Rail
上层横档螺栓
Rail Bolt:M8X100
档条 B螺栓
Bar B Bolt:M8X16
横档
Rail
侧面框架
Side Frame
下层横档螺栓
Rail Bolt:M8X60 or M8X40

Product Installation Manual
3
第二步 The Second step
取电池架横档,其它层用M8X100螺栓固定在侧面框架上(先不拧紧)。
Take the battery rack rail, other layers are fixed on the side frame with
M8X100 bolts (do not tighten them first).
第三步 The Third step
取档条B,用M8X16螺栓固定在侧面框架的立柱内侧上(先不拧紧)。先将
后面的档条B全部装好,正面的先不装。
Take Bar B, use M8X16 bolts to fix on the inside of the column of the side
frame (do not tighten it first). First, install all the rear Bars B, and do not
install the front Bars first.
注意:先安装靠墙或靠里的挡条B。
Note:First install Bar B against the wall or inside.
横档
Rail
侧面框架
Side Frame
上层横档螺栓
Rail Bolt:M8X100
档条 B
Bar B
档条 B
Bar B Bolt:M8X16

Product Installation Manual
4
第四步 The Fourth step
用卷尺对角校测架子的四角,确保架子垂直平稳、不歪斜,再把横档、
档条B与侧面框架的连接螺栓紧固;
Measure the four corners of the rack diagonally with a tape measure, make
sure that the rack is vertical, stable and not skewed. Then tighten the
connecting bolts of Rail, Bar B and Side frame.
第五步 The Fifth step
将方通架移至指定的摆放区,定好位,用钻头在4个地脚孔位打上记
号,把架移开,用冲击钻在记号处从地面垂直钻孔深55mm,用于准备安
装地脚螺栓;
Move the square frame to the designated placing area, set a good position.
Mark the 4 anchor holes with a drill bit and move the frame away. Use
percussion drill to drill a hole 55mm deep vertically from the ground at the
mark for preparing to install foundation bolts.
第六步 The Sixth step
电池架安装好后,放在已确定的安装位置,安装地脚螺栓。
After the battery rack is installed, place it in the determined installation
position and install the foundation bolts.
(1)螺母 Nut (2)弹垫 Elastic cushion (3)平垫 Flat cushion
(4)膨胀管 Expansion pipe (5)M8膨胀螺栓 M8 expansion bolt
(6)水泥地面 Cement floor
安装膨胀螺栓操作步骤
Operating Steps for Installing Expansion Bolt
步骤 1 用冲击钻在膨胀螺栓的安装孔位上打孔,打孔深度在52mm 至
60mm 之间(膨胀螺栓M8X70)。
Step 1 Punch holes in the mounting holes of expansion bolts with percussion
drills, and the drilling depth is between 52mm and 60mm (expansion bolt
M8X70)
步骤 2 将膨胀螺栓略微拧紧,垂直放入孔中。用橡胶锤敲打膨胀螺栓
直至膨胀管全部进入孔内。
Step 2 Tighten the expansion bolt slightly and place it vertically into the hole.
Beat the expansion bolt with a rubber hammer until all expansion pipes enter
the holes.
步骤 3 预拧紧膨胀螺栓。
Step 3 Pre-tighten expansion bolts
步骤 4 拧出螺栓,取下平垫和弹垫。
Step 4 Unscrew the bolts and remove the flat cushion and elastic cushion

Product Installation Manual
5
第七步 The Seventh step
参照接线示意图,依次由底层向上安装电池。
Referring to the wiring diagram, batteries are installed from the bottom layer
up in sequence.
电池
Battery
注意:检查电池极性不能装反
Note:Battery polarity cannot be reversed.

Product Installation Manual
6
第八步 The Eighth step
取正面的档条B,用M8X16螺栓固定在立柱上并拧紧。
Take the front Bar B, fix it on the upright post with M8X16 bolt and tighten it
第九步 The Ninth step
参照接线图,将连接线和配件安装好(注意连接条要紧固在电池端子
上,参考扭矩12~15N.m)。
Referring to the wiring diagram, install the connecting wire and accessories
(note that the connecting strip should be fastened to the battery terminal with
a reference torque of 12 ~ 15n. m).
档条 B
Bar B
档条 B螺栓
Bar B Bolt:M8X16
电池
Battery
连接条
Connector
电池螺栓
Battery terminal bolt
Terminal bolt M8X20 is equipped with 1 pcs flat
cushion and 1 pcs elastic cushion
注意:电池端子螺栓需要拧紧以及再
次观察电池正负极连接是否正确。
Note: the battery terminal bolts need to be tightened
and check again whether the positive and negative
electrodes of the battery are connected correctly.

Product Installation Manual
7
第十步 The Tenth step
如有线盒,参照接线图上的位置,根据接线盒安装示意图,把(附1/附2)接
线盒安装在侧面框架上的档条A及立柱上。
If there is a junction box, refer to the location on the wiring diagram. According
to the schematic diagram of junction box installation, install the junction box(1/2
Appendix)on the side frame on the Bar A and the upright post.
第十一步 The Eleventh step
电池组所有连接线及配件安装完毕后,使用万用表测量电池组电路是否
连通,电压是否正常,确认无误后正式接线通电使用,电池组安装完
毕。
After all the connecting wires and accessories of the battery pack are
installed, use a multimeter to measure whether the battery circuit is connected
and whether the voltage is normal? After confirming that there is no mistake,
the formal wiring shall be electrified for use. And the installation of battery
pack is finished.
结束 End
电池
Battery
接线盒
Junction box

Product Installation Manual
8
附1:接线盒样式1安装说明
Appendix 1: Installation Instructions
for Junction Box Style 1
1、用M10X25六角螺栓将两个高压磁瓶固定在连接板的中部;
1Fix the two high-voltage magnetic bottles in the middle of the connecting
plate with M10X25 hexagon bolts;
2、将接线铜排平行于连接板摆放,并靠近高压磁瓶,用M10X20六角螺栓
穿过铜排中部的两个孔,把铜排固定在高压磁瓶上(注意:铜排上装
M8螺栓的孔在上方,装M12螺栓的孔在下方,并将M8X25和M12X35六角
螺栓装入相应的铜排孔位上);
2Place the connection copper bar parallel to the connection plate, and is close
to the high-voltage magnetic bottle. Use M10X20 hexagon bolts to pass
through two holes in the middle of the copper bar and fix the copper bar to
the high-voltage magnetic bottle (Note: The hole for M8 bolt is above the
copper bar, and the hole for M12 bolt is below. Install M8X25 and M12X35
hexagon bolts into the corresponding copper bar holes);
3、将两块护罩支撑板垂直于连接板摆放,并靠近连接板(注意其凹槽朝
内两两相对),用M5X25沉头螺栓穿过连接板两侧对应的孔,把护罩支
撑板固定;
3Place the two shield support plates perpendicular to and close to the
connecting plate ( Note that its grooves face inward in pairs). Use M5X25
countersunk bolts to pass through corresponding holes on both sides of the
connecting plate to fix the shield support plate;
4、将接线盒提起,靠近电池架对应的位置上,用六角螺栓将其固定在电
池架上;
4Lift the junction box close to the corresponding position of the battery rack
and fix it on the battery rack with hexagonal bolts;
5、接好线后,在玻璃护罩的中部贴好+/-标帖,再把玻璃护罩插入护罩支
撑板的凹槽;
5After connecting the wires, stick+/-labels on the middle of the glass shield,
and then insert the glass shield into the groove of the shield support plate;

Product Installation Manual
9
如图1所示:
As shown in the figure 1 :
附2:接线盒样式2安装说明
Appendix 2: Installation Instructions
for Junction Box Style 2
6、现将接线盒取出,将安装底板用2颗M8X25螺栓固定在电池架的档条A上
的安装孔上(M8螺栓朝上);
6Now take out the junction box, and fix the mounting base plate on the
mounting hole of the battery rack Bar A with 2 pcs M8X25 bolts (M8 bolts
face up);
7、将M8螺母拧下,把电池端引出的输出线铜鼻子套在M8螺杆上,然后拧
紧螺母(含弹垫、平垫);
7Unscrew the M8 nut, fit the copper nose of the output wire from the battery
end onto the M8 screw, and then tighten the nut (including elastic cushion
and flat cushion);
8、将下端M10螺栓及螺母拧下,与客户设备相连的输出线的一端用M10螺
栓及螺母紧固在铜排上面;
8Unscrew the M10 bolt and nut at the lower end, and fasten one end of the
护罩
Shield
M10X25
护罩支撑板
Shield support plate
连接铜排
Connection copper bar
高压磁瓶
High-voltage magnetic bottle
连接板
Connecting plate
M5X25
M8X25
M12X35
M10X20

Product Installation Manual
10
output line connected to the customer equipment on the copper bar with
M10 bolt and nut;
9、在护罩中间贴好对应的+/-标帖,再把护罩插入底座相应的凹槽中;
9Stick the corresponding+/-labels in the middle of the shield, and then insert
the shield into the corresponding groove of the base;
如图 2所示:
As shown in the figure 2:
附3:接线盒样式3安装说明
Appendix 3: Installation Instructions
for Junction Box Style 3
1、采高压磁瓶,用M10X20六角螺栓将两个高压磁瓶固定在电池架档条A
的安装孔里;
1. Adopt high-voltage magnetic bottles, and fix the two high-voltage
magnetic bottles in the mounting holes of the battery rack bar A with
护罩
Shield
M10X30
接线铜排
Connection copper bar
电池架档条
Battery rack-Bar
安装底板
Mounting base plate
M8
M8X25

Product Installation Manual
11
M10X20 hex bolts;
2、将接线铜排平行,并靠近高压磁瓶,用M10X20六角螺栓穿过铜排中
部两边的两个孔,把铜排固定在高压磁瓶上(注意:铜排上装M8螺
栓的孔在上方,装M12螺栓的孔在下方,并将M8X35和M12X45六角螺
栓装入相应的铜排孔位上);
2Connect the copper bars in parallel and close to the high-voltage magnetic
bottle. Use M10X20 hexagonal bolts to pass through the two holes on both
sides of the middle of the copper bar to fix the copper bars on the high-
voltage magnetic bottle (Note: The hole for M8 bolt on copper bar is
above, and the hole for M12 bolt is below. And then install M8X35 and
M12X45 hexagon bolts into the corresponding copper bar holes);
3、将护罩支撑板垂直靠近电池架档条A,取挂件并靠近护罩支撑板(注
意其凹槽朝内两两相对),用M5X15沉头螺栓穿过挂件两侧对应的
孔,把护罩支撑板固定;
3Place the shield support plate vertically close to the battery rack bar A,
take the pendant and close to the shield support plate (Note that its grooves
face inward in pairs).And use M5X15 countersunk bolts to pass through
corresponding holes on both sides of the pendant to fix the shield support
plate;
4、接好线后,在玻璃护罩的中部贴好+/-标帖,再把玻璃护罩插入护罩
支撑板的凹槽内;
4After connecting the wires, stick+/-labels on the middle of the glass shield,
and then insert the glass shield into the groove of the shield support plate;
如图3所示:
As shown in the figure 3:
M5X15
电池架档条
Battery rack-Bar
护罩
Shield
护罩支撑板
Shield support plate
接线铜排
Connection copper bar
高压磁瓶
High-voltage
Magnetic bottle
固定件
Pendant
M10X20
M8X35
M12X35

Product Installation Manual
12
Lssue:A/2
Date:2021-05
Table of contents
Other KiloVault Batteries Pack manuals
Popular Batteries Pack manuals by other brands

Treasure Garden
Treasure Garden P-AKZPBATTERY Assembly and operation guide

Spypoint
Spypoint LIT-10 quick start guide

UPOWER Ecoline
UPOWER Ecoline NauticBattery NA-12LI22BL quick start guide

Jupio
Jupio BGM0003 user manual

NEC
NEC N8103-126 user guide

Comunello Automation
Comunello Automation AC51 Installation and user manual

xtpower
xtpower MP-10000 Technical Description, User's Guide

Mophie
Mophie powerstation go rugged flashlight operating instructions

Accessory Power
Accessory Power Solar Power Pak instruction manual

Black & Decker
Black & Decker LB12 instruction manual

Viking
Viking BALDUR user manual

LG
LG HBP 16H installation manual