www.kingsbottle.com (USA) | www.kingsbottle.com.au (Australia) 3
PART I IMPORTANT SAFETY INSTRUCTIONS
Please read this user manual carefully and store in a handy
place for later reference . The symbols you will see in this
booklet have these meanings:!
This symbol indicates information concerning your personal safety
This symbol indicates information on how to avoid damaging the
appliance
This symbol indicates tips and information about use of the
appliance
This symbol indicates tips and information about economical and
ecological use of the appliance
TO REDUCE THE RISK OF FIRE, ELECTRICAL SHOCK,
OR INJURY WHEN USING YOUR APPLIANCE, FOLLOW
THESE BASIC PRECAUTIONS:
1. Read all instructions before using the refrigerator.
2. DANGER or WARNING: Risk of child entrapment.
Child entrapment and suffocation are not only problems of the
past. Junked or abandoned appliances are still dangerous…
even if they will “just sit in the garage for a few days”.
3. Before you throw away your old refrigerator:
•Take off the door.
•Leave the Shelves in pieces so that children may not
climb inside easily.
4. Never allow children to operate, play with, or crawl inside
the appliance.
1. The refrigerator must be plugged into its own dedicated
110-115V, 50/60Hz AC electrical outlet .
2. The plug must be accessible when the cooler is in
position.
3. It is essential the power point is properly grounded .
Consult a qualified electrician if you are unsure .
4. Don’t use extension cords or adapter plugs with this
cooler .
5. If the power cord is damaged, have it replaced by a
qualified service technician .
6. Unplug the cooler before cleaning it, or changing the light
bulb to avoid electric shock .
7. Never clean appliance parts with flammable fluids. The
fumes can create a fire hazard or explosion.
8. Never unplug the cooler by pulling the electrical cord as
this may damage it. Grip the plug firmly and pull straight
out .
9. Choose a location for your cooler that isn’t too cold . The
ambient room temperature should be above 50°F .
10. Stand your cooler in a dry place – avoid areas of high
moisture or humidity .
11. Don’t put the cooler in frosty or unprotected areas like a
garage or on the verandah .
12. Keep the cooler out of direct sunlight .
13. Don’t locate the cooler near stoves, fires or heaters .
14. Do not store in the vicinity of any other appliance. Do not
store near gasoline or any other flammable vapors. The
fumes can create a fire hazard or explosion.
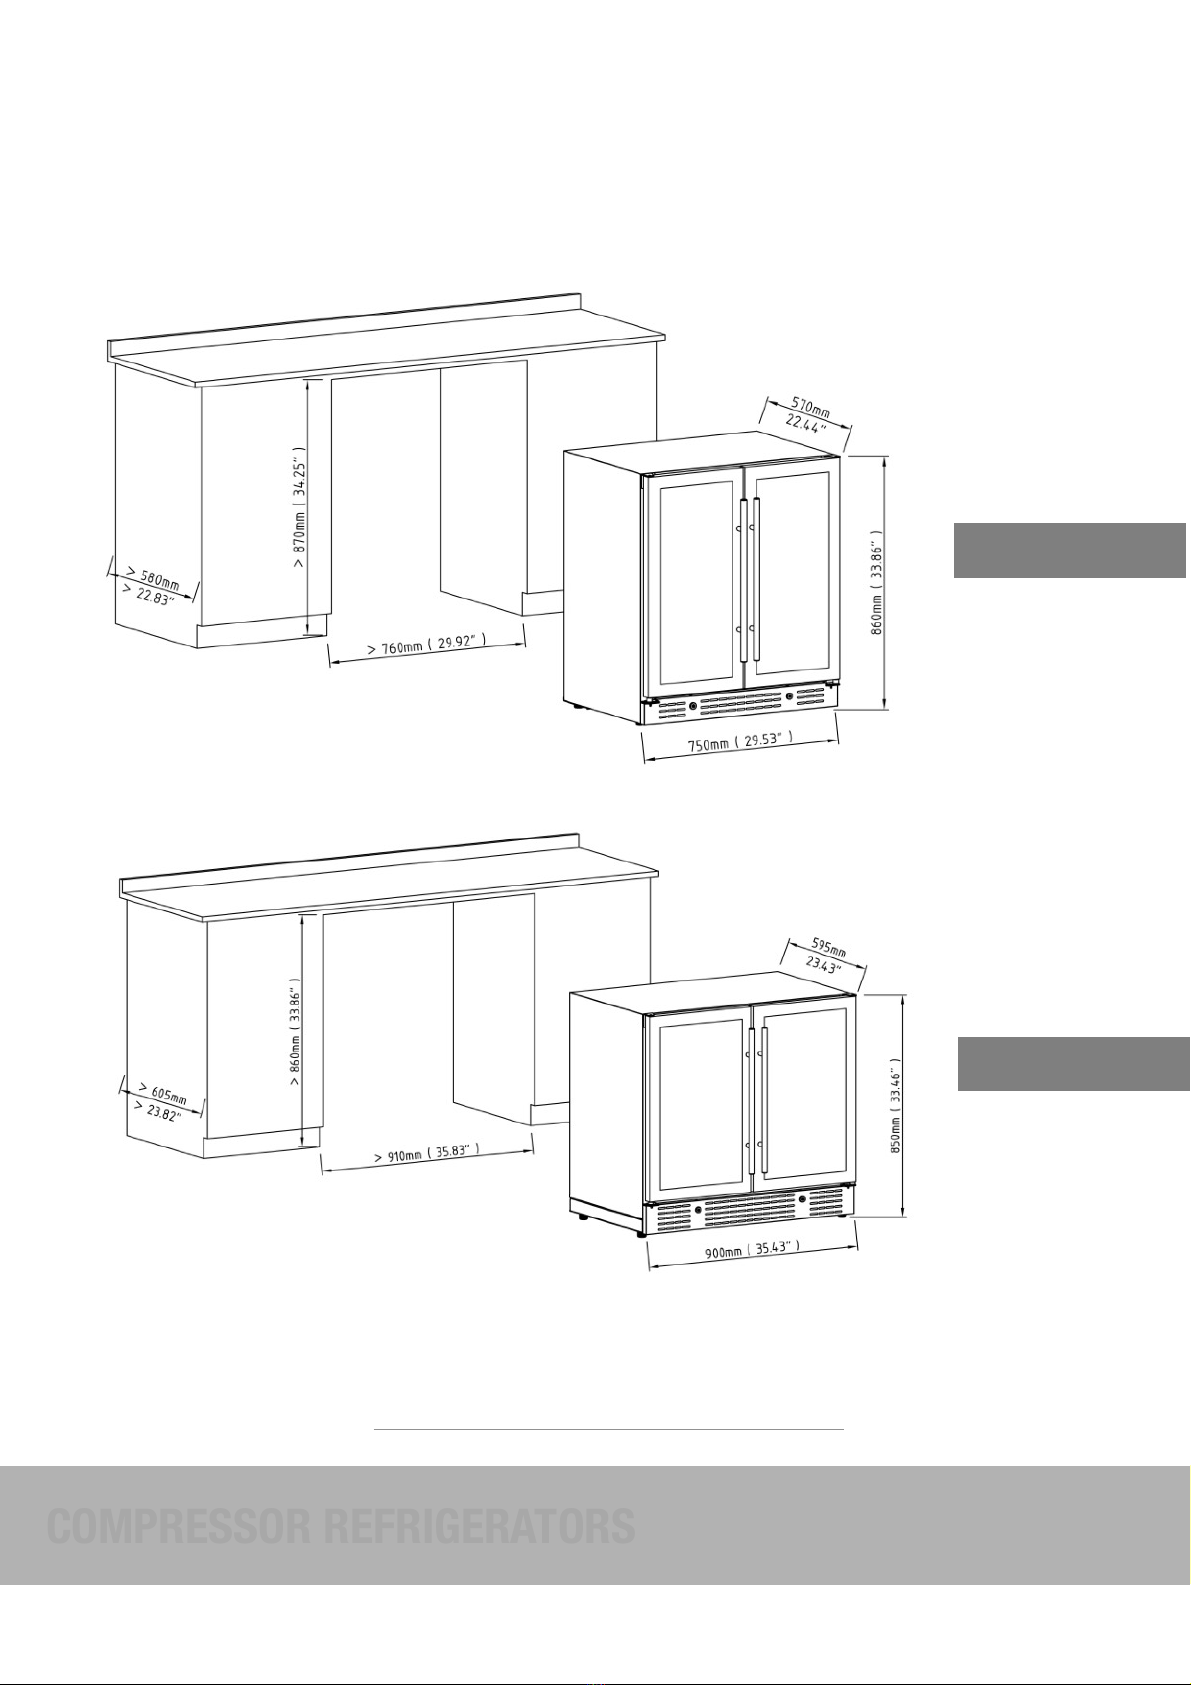
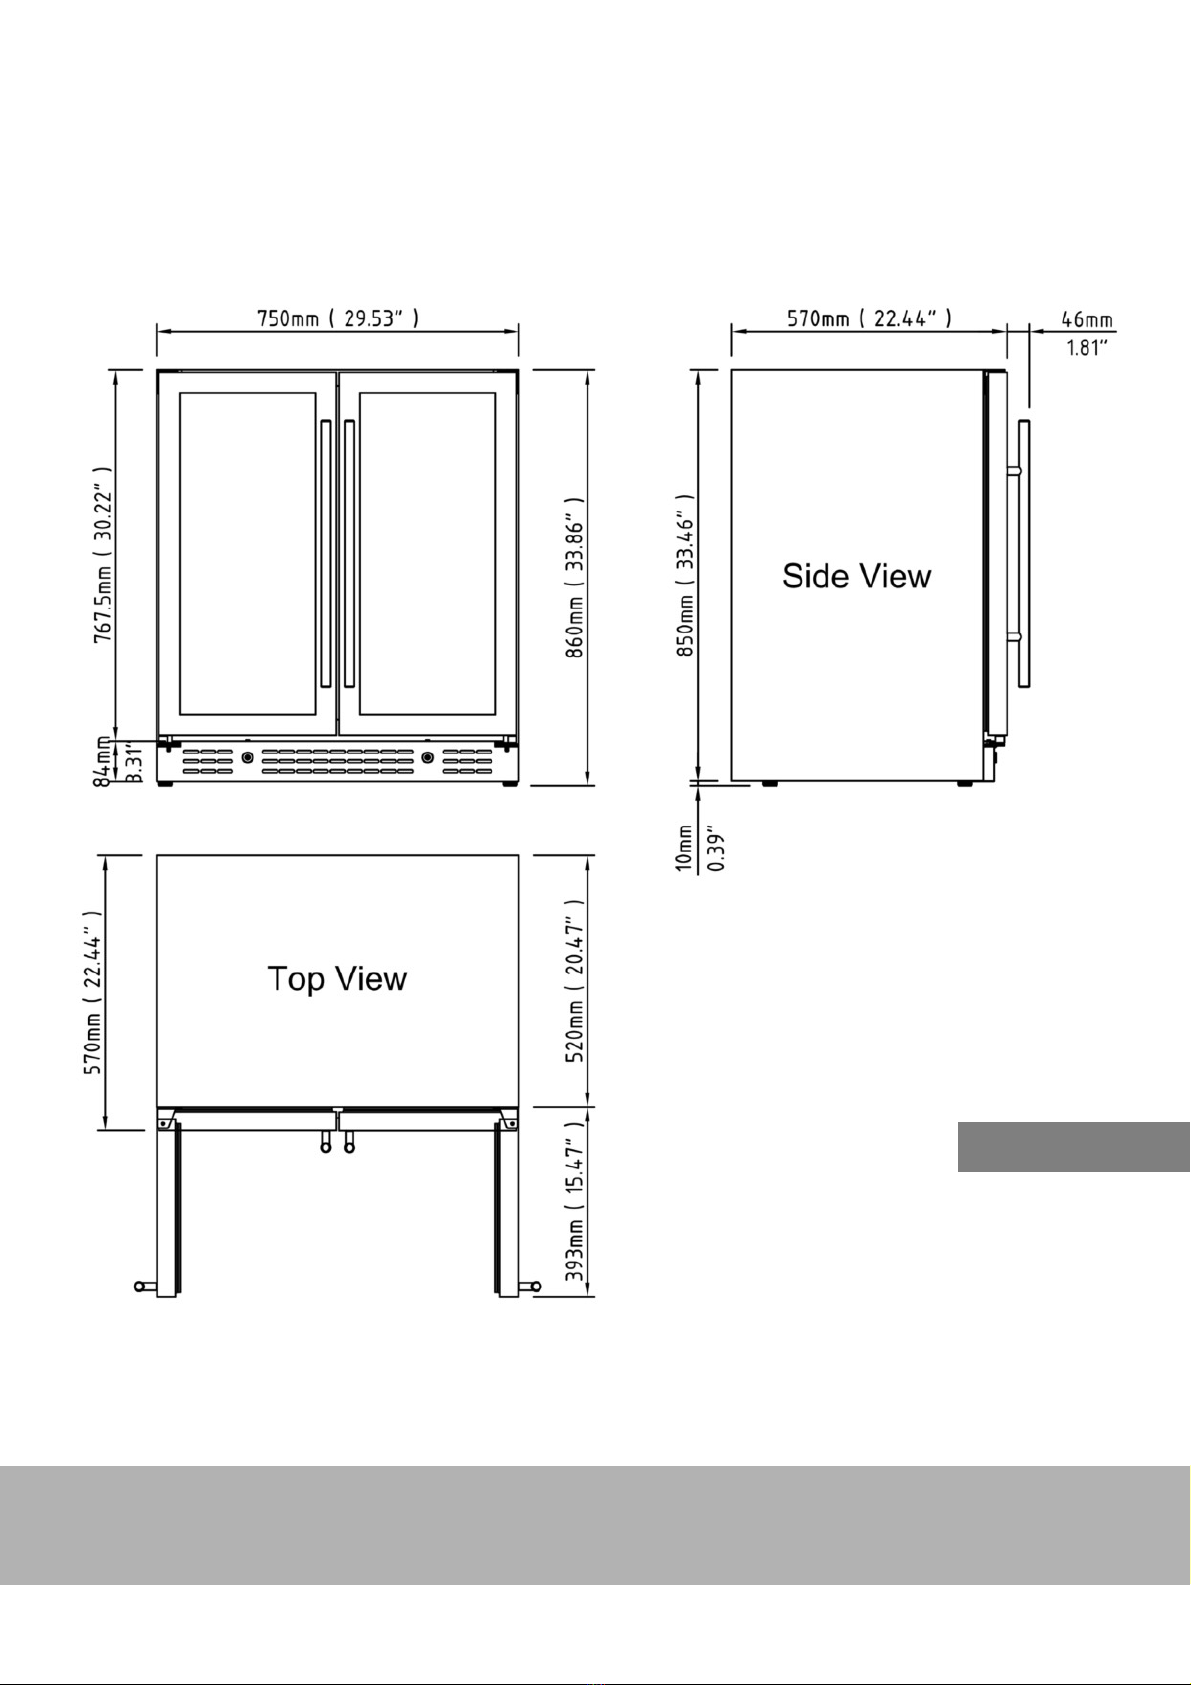
15. When installed correctly, your cooler should:
•Have adequate space at the back and sides for air
circulation. (See Page 5)
•Be aligned to the surrounding cupboards .
•Have doors that will self-close from a partially open
position
BEFORE USING YOUR REFRIGERATOR
1. Remove the exterior and interior packing.
2. Before connecting the refrigerator to the power source,
let it stand upright for approximately 24 hours. This will
reduce the possibility of a malfunction in the cooling
system from handling during transportation.
3. Clean the interior surface with lukewarm water using a
soft cloth.
place for later reference.
The symbols you will see in this booklet have these meanings:
Meanings of symbols used in this manual are shown below:
‘flammable’ and/or a small flame symbol,
do not store them inside any refrigerator or
freezer. If you do so you may cause an explosion.
remove any doors. Children can suffocate if they get
trapped inside.
blowing gases. Avoid safety hazards by carefully
disposing of this appliance.
The refrigerator must be plugged into its own
dedicated 220-240V, 50Hz AC electrical outlet.
The plug must be accessible when the refrigerator is
in position.
It is essential the power point is properly earthed to
ground.Consult a qualified electrician if you are unsure.
Don’t use extension cords or adapter plugs with this
refrigerator.
If the power cord is damaged, have it replaced by a
qualified service technician.
Unplug the refrigerator before cleaning it, or changing
the light bulb to avoid electric shock.
Never unplug the refrigerator by pulling the electrical
cord as this may damage it. Grip the plug firmly and
pull straight out.
Choose a location for your refrigerator that isn’t too cold.
The ambient room temperature should be above 10°C.
Stand your refrigerator in a dry place – avoid areas
of high moisture or humidity.
Don’t put the refrigerator in frosty or unprotected areas
like a garage or on the verandah.
Keep the refrigerator out of direct sunlight.
Don’t locate the refrigerator near stoves, fires or heaters.
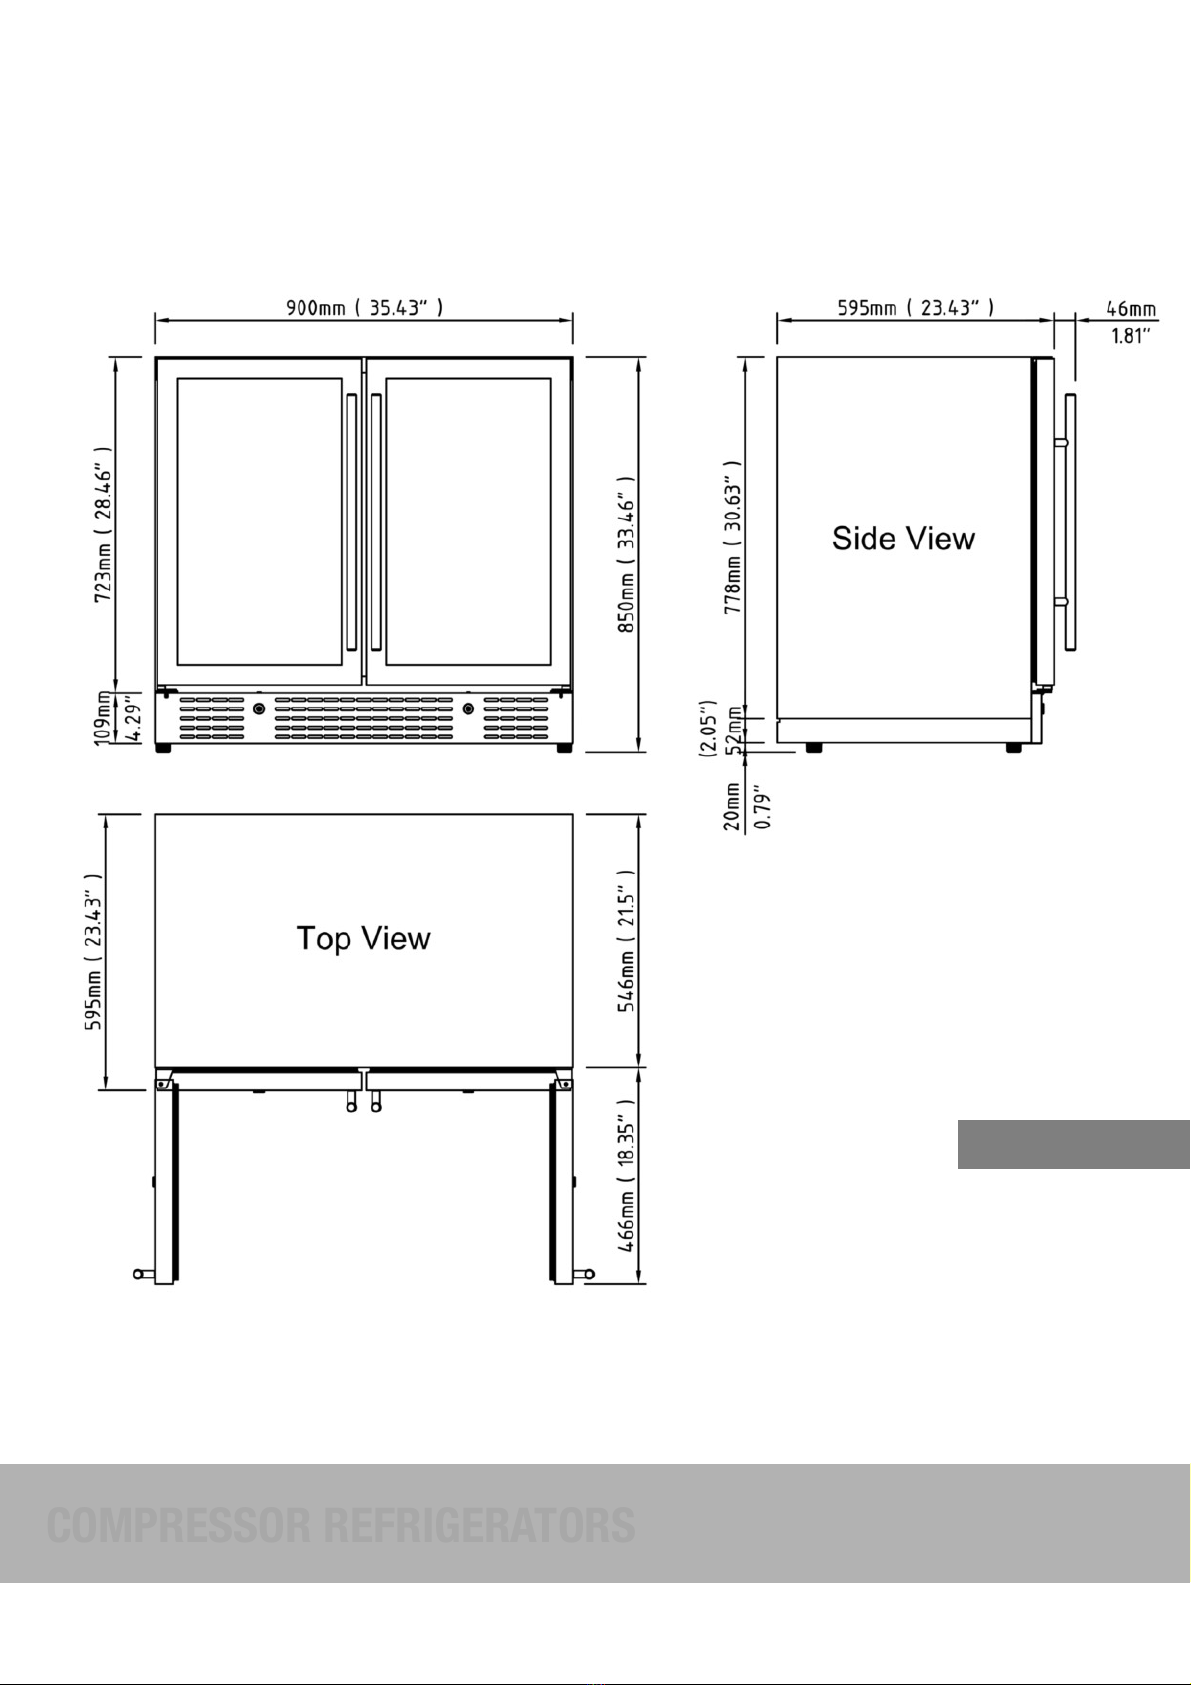
When installed correctly, your refrigerator should:
– Have adequate space at the back and sides
for air circulation (refer to page 9).
– Be aligned to the surrounding cupboards.
– Have doors that will self-close from a partially
open position.
This appliance may contain a small quantity of environmentally
friendly, but flammable, non-synthetic R600a refrigerant:
damaged during transportation and installation.
8g of refrigerant. The amount of refrigerant charged in the
appliance can be found on the rating plate on the appliance.
in the built-in structure, clear of obstruction.
accelerate the defrosting process, other than those
recommended by the manufacturer.
3
per 8g of refrigerant. The amount of refrigerant charged
in the appliance can be found on the rating plate on
the appliance.
place for later reference.
The symbols you will see in this booklet have these meanings:
Meanings of symbols used in this manual are shown below:
‘flammable’ and/or a small flame symbol,
do not store them inside any refrigerator or
freezer. If you do so you may cause an explosion.
remove any doors. Children can suffocate if they get
trapped inside.
blowing gases. Avoid safety hazards by carefully
disposing of this appliance.
The refrigerator must be plugged into its own
dedicated 220-240V, 50Hz AC electrical outlet.
The plug must be accessible when the refrigerator is
in position.
It is essential the power point is properly earthed to
ground.Consult a qualified electrician if you are unsure.
Don’t use extension cords or adapter plugs with this
refrigerator.
If the power cord is damaged, have it replaced by a
qualified service technician.
Unplug the refrigerator before cleaning it, or changing
the light bulb to avoid electric shock.
Never unplug the refrigerator by pulling the electrical
cord as this may damage it. Grip the plug firmly and
pull straight out.
Choose a location for your refrigerator that isn’t too cold.
The ambient room temperature should be above 10°C.
Stand your refrigerator in a dry place – avoid areas
of high moisture or humidity.
Don’t put the refrigerator in frosty or unprotected areas
like a garage or on the verandah.
Keep the refrigerator out of direct sunlight.
Don’t locate the refrigerator near stoves, fires or heaters.
When installed correctly, your refrigerator should:
– Have adequate space at the back and sides
for air circulation (refer to page 9).
– Be aligned to the surrounding cupboards.
– Have doors that will self-close from a partially
open position.
This appliance may contain a small quantity of environmentally
friendly, but flammable, non-synthetic R600a refrigerant:
damaged during transportation and installation.
8g of refrigerant. The amount of refrigerant charged in the
appliance can be found on the rating plate on the appliance.
in the built-in structure, clear of obstruction.
accelerate the defrosting process, other than those
recommended by the manufacturer.
3
per 8g of refrigerant. The amount of refrigerant charged
in the appliance can be found on the rating plate on
the appliance.