manuals.online logo
Brands
  1. Home
  2. •
  3. Brands
  4. •
  5. KingsBottle
  6. •
  7. Kitchen Appliance
  8. •
  9. KingsBottle KBU28LRX User manual

KingsBottle KBU28LRX User manual

www.kingsbottle.com (USA) |www.kingsbottle.com.au (Australia)
USER MANUAL
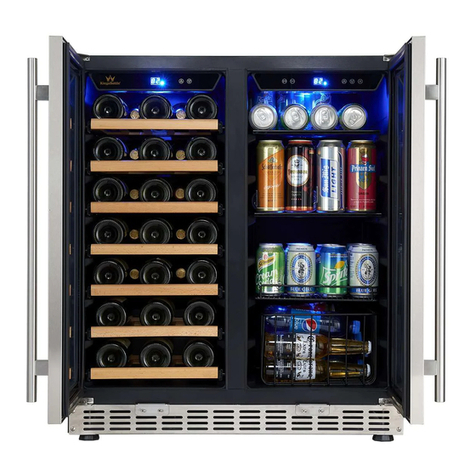
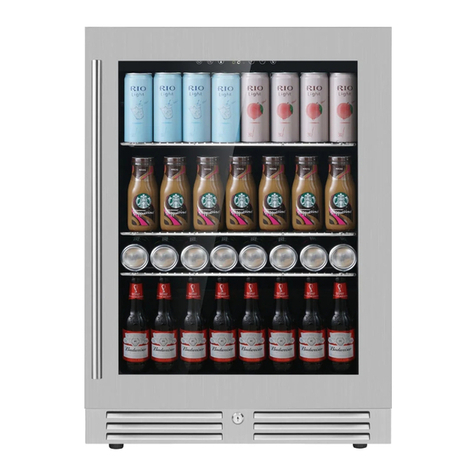
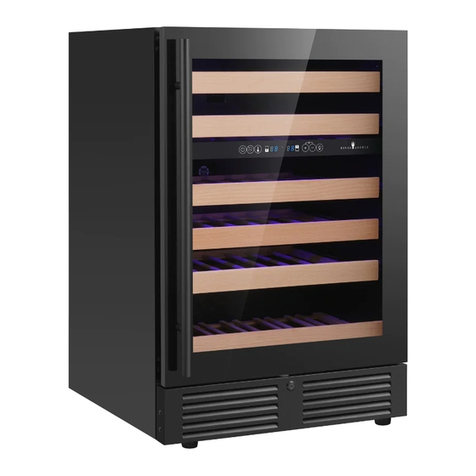
KBU28LRX BEER & WINE COOLER COMBO
COMPRESSOR REFRIGERATORS
1
Instruction Manual for
Beer – Wine Beverage Cabinet
MODEL:
CTW-28LR-SS, CTW28LR-SD
Thank for choosing our products, please read this manual carefully before using it.
PLEASE NOTE: !
EVERY TIME THE UNIT IS POWERED ON, THERE WILL BE A 6 MINUTE DELAY FOR THE COMPRESSOR TO START.!
2
CONTENTS
TABLE OF CONTENTS
Chapter
Contents
Page
Part I
Important Safety & Pre-Use Instructions
3
Part II
Diagram & Description of Refrigerator
4
Part III
Installation Instructions!
5-6
Part IV
Temperature Setting and Refrigerator Operating
7-8
Part V
Layout & Storage
9
PART VI
Maintenance
10
Part VII
Troubleshooting Guide
11
Part VIII
Technical Data
12
Part IX
Warranty Information
12
COMPRESSOR REFRIGERATORS
INTRODUCTION
Thank you for choosing KingsBottle for your
refrigeration needs. For safe use, please read this
manual carefully and follow all instructions. Store
this manual near the device for quick referral. !
We cannot guarantee safety if this applicant is used
for objects other than the intended use or used in
any way other than laid out in this manual. !
The contents of this manual can change without
notice due to improvement of performance or
function of the device. Contact our sales
representatives if there are any questions about the
information contained in this manual. No part of this
manual should be reproduced in any form without
written permission from KingsBottle. !
For important safety notices, please read pages 3.
Only qualified service personnel or an authorized
agent should install or provide maintenance for this
device. !
Only use spare parts sold by KingsBottle. If other
accessories are used, we cannot be held
responsible for any adverse consequences.
However, the user can apply for verification of third-
party accessories from KingsBottle before use. !
You should inspect and maintain the device
according to the specified time intervals found in
this manual.. !
Due to differences between each model and
improvements of the devices, the actual product
may differ from the diagrams included. !
Users have an obligation to be responsible for their
own safety.
3
SAFETY
PART I PRECAUTIONS FOR SAFE OPERATION
Use a power supply outlet that is properly grounded to
prevent electric shock. If it is not grounded, it will be
necessary to install a ground by a qualified engineer.
Don't lengthen the line randomly. If you need to use
2.5mm 2 copper line, keep the 4mm 2 lines to connect the electrical
outlet.
Be sure to install the unit on a sturdy floor, no shaking
or tilting. !
Never install the unit in a flammable or volatile location.
This may cause explosion or fire.
Never install the unit in a humid place, outdoor or a place
with direct sunlight. Deterioration of the insulation may
result which could cause current leakage or electric
shock.
CAUTION:
Failure to observe WARNING signs could result in
injury to personnel and damage to the unit or
associated property. !
•The refrigerator must be plugged into its own dedicated
110-115V / 60Hz (USA) | 220-240V/50Hz (AU) AC electrical
outlet.
•Always disconnect the power plug when the unit is not used
for long periods.
•When you request any repair or maintenance, have a safety
check sheet prepared for the safety of service personnel.
•Check all settings on the controller prior to restarting the
refrigerator.
•The refrigerator should only be used as a storage device.
•Always hold the handle while closing the door. This will reduce
the likelihood of injury to your hand.
•Locate an even and sturdy floor for installation. This will prevent
the unit from tipping or falling. Improper installation may result
in injury.
•Regularly check the filter and clean it as necessary. This will
avoid possible overheating of the unit.
•When moving the unit, do not tilt it more than 45 degrees.
Transportation should be handled with care.
PRECAUTIONS FOR USE
•Remove the exterior and interior packing.
•Before connecting the refrigerator to the power source, let it
stand upright for approximately 24 hours. This will reduce the
possibility of a malfunction in the cooling system from handling
during transportation.
•When the temperature in the refrigerator has reached the set
temperature, put the items in the refrigerator in batches. No
more than 1/3 of the volume of items should be used per batch
to avoid the temperature rising too much.
•The temperature display will show the temperature around the
sensor initially. There will be a difference between the displayed
temperature and the actual temperature in the center of the
unit at first. The center temperature will gradually approach the
displayed temperature.
•To clean the interior surface, use lukewarm water or a diluted
neutral detergent and a soft cloth. Do not use brushes, acid,
gasoline, soap powders, polish or hot water. These materials
may damage the paint surface or plastic and rubber parts. Do
not use volatile solvents to wipe plastic or rubber parts.
•If the unit is not used for long periods of time, disconnect the
plug from the power source.
4
PART II"" DIAGRAM & DESCRIPTION OF REFRIGERATOR
FEATURES
COMPRESSOR REFRIGERATORS
YOUR REFRIGERATOR ALSO INCLUDES THE FOLLOWING:
•Instruction manual
•Two keys
1 Housing!
2 Display and Control Panel!
3 Sliding metal shelf!
4 Cabinet!
5 Adjustable stand feet !
6 Top door hinge!
7 Interior Side LED Light!
8 Sliding wooden shelf!
9 Glass Door!
10 Lock
BEER & WINE COMBO REFRIGERATOR MODEL: KBU28LRX
3
1- YOUR BAR FRIDGE
5
PART III"INSTALLATION INSTRUCTIONS
INSTALLATION
4
2-IMPORTANT SAFETY INSTRUCTIONS
WARNING To r educe th e r is k o f fi r e, e l ectrical shock, or injury when
using your appliance, follow these basic precautions:
 Read all instructions before using the bar fridge
Do not attempt to touch any working or electrical parts during operation, apart from main control panel.
Never allow children to operate, play with, or crawl inside the appliance.
 Never clean appliance parts with flammable fluids.
 Don’t clean S/Steel parts with any citrus style cleaners
 Do not store or use gasoline or any other flammable vapors in the vicinity or any other appliance. The fumes
can create a fire hazard or explosion.
-Save these instructions-
3-INSTALLATION INSTRUCTIONS
Installation diagram for the built-in models
Installing unit into cavity
Allow good ventilation on the unit, it’s OK to have ventilation into side cupboards if possible
Leave at least a 15mm shadow line around unit and 10mm at rear minimum
 Always install vent if practical to do so, eg. if unit in an island bench, vent can be located at rear on opposite
side of bench, 200mmW and 50mmH is a good size.
 Having all 3 sides, top and back completely butted against walls will void any warranty, units have to breathe.
Just use common sense, place out of sunlight and away from heating appliances and give yourself as much
ventilation as practicably possible, this will ensure a long life for your unit.
21.08”
2.17”
MIN 21.47”
MIN 39.60”
38.81”
MIN 34.48”
CUTOUT DIMENSION ILLUSTRATED (MINIMUM CAVITY SPACE REQUIRED)
The cutout dimension illustrated in figure (D) allows for door swing and access to the pull-out shelves when installed as a built-in appliance.
If installing between frameless cabinets, a 1⁄2” (20mm) wide filler strip or side panel may be needed on hinge side.
The filler strip will act as a spacer between the appliance case and adjacent cabinet door swing.
Failure to allow minimum clearances will void all warranties
Figure D
6
PART III"INSTALLATION INSTRUCTIONS
INSTALLATION
COMPRESSOR REFRIGERATORS
INSTALLING YOUR REFRIGERATOR
1. Move the unit into its final position .
2. If the unit is not tilting back, minor adjustments can be made to the leveling legs.
3. Compare the alignment of the appliance to the surrounding cupboard . The top of the appliance should be level from side to side
(see diagram below) .
4. If the unit now rocks from one corner to the opposite rear corner, this means that the floor is uneven. You may need to put some
packing under the ridge to the rear of the appliance . You could use thin pieces of solid material such as thin board, vinyl floor tiles or
laminate .
5. You may now need to fine tune the installation by repeating steps 2, 3 and 4 .
6. Wipe off any dust that has accumulated during shipping and clean following the directions in Part VI ( Care & Maintenance)
7. Plug the appliance into the power point. Don’t use a double adaptor or extension cord .
8. It is recommended that you let the unit for rest an hour or two before you put any wine bottles in it . This will confirm that it is
operating correctly and make the conditions appropriate for wine storage .
Congratulations! You have successfully installed your refrigerator.
DOOR LOCK
This unit comes with an optional key lock. The keys are located inside the plastic bag that contains the user manual. To lock the door,
simply reverse the operation making sure the metal pin is engaged completely. Then remove the key and place it in a secure place for
safekeeping. To unlock the door, insert the key into the lock and turn counterclockwise.


Before you move your appliance into the place where it
will operate, check that it will have adequate clearance.
Clearance is required for air circulation and too little
clearance may affect the performance of your appliance.
We recommend minimum clearances of:



NOTE:
Doors are designed to sit proud of cabinetry (not flush).
The clearances shown above are the recommended
minimum clearances. The clearance at the rear must not
exceed 75mm.

The appliance should arrive with the front levelling feet
wound up. The appliance may need to be tilted backward
at the top by about 10-15mm from vertical (see diagram
below). This will allow the door to gravitate to the closed
position. The complete closure of the door seal is reliant on
manually pushing the door closed to provide a consistent
door seal.
CAUTION
The rollers are designed for forward or backward movement
only.They are not castors. Moving the refrigerator sideways
may damage your floor and the rollers.

1. Move the appliance into its final position.
2. If the appliance is not tilting back as described earlier,
minor adjustments can be made to the two front
levelling legs by turning the feet in an anticlockwise
direction (below). This will increase the height of
the feet. If you have difficulty turning the foot, have
someone tilt the appliance back to gain better access.
If it is not tilted back enough and the levelling legs are
fully extended, additional packing might be required
(see note 4 for appropriate materials).
3. Compare the alignment of the appliance to the
surrounding cupboard. The top of the appliance should
be level from side to side (see diagram below). If
you need to adjust the level, use the levelling feet as
detailed in step 2.
4. If the appliance now rocks from one corner to the
opposite rear corner, this means that the floor is uneven.
You may need to put some packing under the ridge to
the rear of the appliance. You could use thin pieces of
solid material such as thin board, vinyl floor tiles
or laminate.
5. You may now need to fine tune the installation by
repeating steps 2, 3 and 4.
6. Wipe off any dust that has accumulated during shipping
and clean following the directions on page 17.
 
double adaptor or extension cord.
8. It is recommended that you let the appliance for an hour
or two (three hours for a freezer) before you put any
food in it. This will confirm that it is operating correctly
and make the conditions appropriate for food storage.
Congratulations! You have successfully installed your
refrigerator/freezer.
10 –15mm
Height adjustable
front rollers

50mm (75mm max)
30mm
30mm
Recommended
airspace
CABINET
DOOR
7
OPERATION
PART IV"OPERATING YOUR REFRIGERATOR
Each refrigerator includes an operating panel on the front of the unit. This operating panel includes several features to operate and control the temperature of
both the LEFT and RIGHT zones of the refrigerator.
The operating panel includes the following features:
ON/OFF: Turns the refrigerator power on or off.
SET : Select temperature display setting from Fahrenheit to Celsius degree by pushing the “SET” button. Fahrenheit or Celsius degree indicator will appear in
blue color in the “0°C” or “0°F” window.
LIGHT: Turns the interior refrigerator light on or off.
C/F SWITCH: Switch between °C and °F
CAUTION:
BEFORE YOU START: The refrigerator should be placed in a location where the ambient temperature is between 32°F - 100°F degree Fahrenheit (1°C to
38°Ç). If the ambient temperature is above or below this range, the performance of the unit may be affected. For example, placing your unit in extreme cold or
hot conditions may cause interior temperatures to fluctuate.
SETTING THE TEMPERATURE CONTROL
1. Make sure power cord is connected to a properly grounded outlet.
2. Turn Power ON.
3. Each zone is independently controlled.
•LEFT Zone: The temperature setting can be adjusted between 34°F to 64°F
•RIGHT Zone: The temperature setting can be adjusted between 34°F to 64°F
4. Set the temperature of the LEFT Zone or RIGHT Zone as you desire by pushing the UP (+) or DOWN (-) button. When you push the two buttons for the
first time, the LED readout will show the original temperature set at previous time.
5. Once you have set the desired temperature, wait 5 seconds. The temperature shown in the both LEFT and RIGHT zone display panels will automatically
switch to show the actual temperature inside the unit. The actual temperature will always be shown until the next time you press the UP (+) or DOWN (-)
button to change the temperature settings.
NOTE: The desired temperatures may fluctuate depending on whether the interior light is ON or OFF, the ambient temperature, the location of unit and the
orientation of the bottles. The display is just a guide, be guided by how cold your drinks are at consumption. Remember units go into defrost mode and this
will show a higher display, it’s only for short periods and doesn’t have time to effect drink temperature. In general once unit has settled it will keep products
within 5°F ( 2°C ) of the set temp easily in temperatures up to and beyond 100°F ( 38°C ) .
TEMPERATURE SETTINGS FOR WINE SERVICE
Different varietals of wine require different temperature settings. The recommended temperature ranges for serving different varietals of wine are listed below.
Your refrigerator will indicate when you have set the LEFT/RIGHT zones to the below temperature ranges.
•Red Wines: 52-64°F
•White Wines: 44-51°F
•Sparkle Wines: 41-43°F
1. In the event of a power interruption, all previous temperature settings will be automatically saved and each compartment will return to the previous
temperature setting.
2. If the unit is unplugged, loses power, or is turned off, there will be a 6 minute delay for the compressor to restart after the unit is powered ON.
3. When you use the refrigerator. for the first time or restart the refrigerator after having been shut off for a long time, there will be a few degrees variance
between the temperature you select and the one indicated on the LED readout for the first few hours of operation. After a few hours of operation, the
temperature will normalize to the displayed temperature.


place for later reference.
The symbols you will see in this booklet have these meanings:
WARNING

CAUTION


TIPS & INFORMATION

ENVIRONMENTAL TIPS


Meanings of symbols used in this manual are shown below:


WARNING

‘flammable’ and/or a small flame symbol,
do not store them inside any refrigerator or
freezer. If you do so you may cause an explosion.

remove any doors. Children can suffocate if they get
trapped inside.

blowing gases. Avoid safety hazards by carefully
disposing of this appliance.
WARNING
The refrigerator must be plugged into its own
dedicated 220-240V, 50Hz AC electrical outlet.
The plug must be accessible when the refrigerator is
in position.
It is essential the power point is properly earthed to
ground.Consult a qualified electrician if you are unsure.
Don’t use extension cords or adapter plugs with this
refrigerator.
If the power cord is damaged, have it replaced by a
qualified service technician.
Unplug the refrigerator before cleaning it, or changing
the light bulb to avoid electric shock.
Never unplug the refrigerator by pulling the electrical
cord as this may damage it. Grip the plug firmly and
pull straight out.
Choose a location for your refrigerator that isn’t too cold.
The ambient room temperature should be above 10°C.
Stand your refrigerator in a dry place – avoid areas
of high moisture or humidity.
Don’t put the refrigerator in frosty or unprotected areas
like a garage or on the verandah.
Keep the refrigerator out of direct sunlight.
Don’t locate the refrigerator near stoves, fires or heaters.
When installed correctly, your refrigerator should:
– Have adequate space at the back and sides
for air circulation (refer to page 9).
– Be aligned to the surrounding cupboards.
– Have doors that will self-close from a partially
open position.
WARNING

This appliance may contain a small quantity of environmentally
friendly, but flammable, non-synthetic R600a refrigerant:

damaged during transportation and installation.

8g of refrigerant. The amount of refrigerant charged in the
appliance can be found on the rating plate on the appliance.

in the built-in structure, clear of obstruction.

accelerate the defrosting process, other than those
recommended by the manufacturer.
3
per 8g of refrigerant. The amount of refrigerant charged
in the appliance can be found on the rating plate on
the appliance.


8
COMPRESSOR REFRIGERATORS
OPERATION
ERROR CODE AND ALARM
Code
Description
Solution
C1
C1 displaying on panel, means sensor in LEFT zone is open-circuit.
Compressor stop operating and no cooling
Need engineer to check
1. Socket/plug with UP mark in PCB is bad connected.
2. The sensor is damaged, need to replace it
3. Repair or replace the PCB
C2
C2 displaying on panel, means sensor in RIGHT zone is open-circuit.
Compressor stop operating and no cooling
* This does not apply to SINGLE zone models
Need engineer to check
1. Socket/plug with DOWN mark in PCB is bad
connected
2. The sensor is damaged, need to replace it
3. Repair or replace the PCB
F2
1. If compressor keeps operating continuously for over 8 hours, the
fridge will automatically enter DEFROSTING mode and F2 display on
panel
2. F2 meaning the fridge is at defrosting mode.
3. During DEFROSTING period, evaporator fan is operating but
compressor stop.
4. F2 will disappear after 20 minutes
It’s normal, nothing need to do. Wait for 30 minutes and
check again.
U1
U1 displaying on panel, means sensor which is in the LEFT zone is short-
circuit. Compressor stop operating and no cooling
Need engineer to check
1. The sensor is damaged, need to replace the sensor
which is connected to UP socket/plug in PCB
2. Repair or replace the PCB
U2
U2 displaying on panel, means sensor which is in the RIGHT zone is
short-circuit. Compressor stop operating and no cooling
* This does not apply to SINGLE zone models
Need engineer to check
1. The sensor is damaged, need to replace the sensor
which is connected to DOWN socket/plug in PCB
2. Repair or replace the PCB
9
PART V"" LAYOUT AND STORAGE
STORAGE
YOUR CABINET WAS DESIGNED TO STORE A MAXIMUM NUMBER OF BOTTLES SECURELY. WE RECOMMEND THAT YOU
OBSERVE THE TIPS BELOW TO OPTIMIZE LOADING.
1. Disperse your bottles even so as not to concentrate weight in any one area. Also, be careful that your bottles do not touch either the
back of the cabinet or the step at the bottom.
2. Also make sure that bottles are not all grouped together either at the top or bottom of the cabinet.
3. A cooler that is full and has nice allowance for air movement will work more efficiently.
4. Never try to adjust shelf with bottles still on it.
TO REMOVE A ROLLING SHELF:
1. Remove all bottles
2. Pull the shelf out as far as possible
3. Never try to pull out more than one rolling shelf at a time.
4. Remove the shelf
PLEASE NOTE
Before modifying your cabinet’s original configuration in any way, be sure to ask your dealer for advice.
Important safety instructions . . . . . . . . . . . . . 3
Bar refrigerator with ice box features . . . . . . . . . 4
Bar refrigerator without ice box features . . . . . . . 5
Single door all refrigerator features . . . . . . . . . 6
Bar freezer features . . . . . . . . . . . . . . . . 7
Single door all freezer features . . . . . . . . . . . 8
Installing your new appliance . . . . . . . . . . . . 9
Ventilation around your appliance. . . . . . . . . 9
Installing your refrigerator . . . . . . . . . . . 9-10
Initial start-up . . . . . . . . . . . . . . . . . . . 10
Manual controls . . . . . . . . . . . . . . . . . . 10
Controlling the temperature. . . . . . . . . . . . 10
Using your appliance – Ice box models . . . . . . . . 11
Making ice . . . . . . . . . . . . . . . . . . 11
De-icing the ice box . . . . . . . . . . . . . . . 11
Freezer operation . . . . . . . . . . . . . . . . . 12
Reversing the ice box door opening direction . . . . . 13
Reversing the door opening direction WIM1000 &
WFM0700 . . . . . . . . . . . . . . . . . . . . 14
Reversing the door opening direction WIM1200,
WRM1300, WRM2400, WFM0900 & WFM1800 .15
Care and maintenance . . . . . . . . . . . . . . . .
Changing the light bulb . . . . . . . . . . . . . 16
General information . . . . . . . . . . . . . . . . 17
Cleaning the appliance . . . . . . . . . . . . . 17
Safety . . . . . . . . . . . . . . . . . . . . . 17
Switching off your appliance . . . . . . . . . . . 17
Troubleshooting . . . . . . . . . . . . . . . . . . 18
Warranty . . . . . . . . . . . . . . . . . . . . . 19
Congratulations and thank you for choosing our
refrigerator/freezer. We are sure you will find your new
appliance a pleasure to use. Before you use the appliance,
we recommend that you read through the relevant sections
of this manual, which provides a description of your
appliance and its functions.
To avoid the risks that are always present when you use
an electric appliance, it is important that the appliance is
installed correctly and that you read the safety instructions
carefully to avoid misuse and hazards.
We recommend that you keep this instruction booklet
for future reference and pass it on to any future owners.
After unpacking the appliance, please check it is not
damaged. If in doubt, do not use the appliance but contact
your local customer care centre.
TIPS & INFORMATION
 If you find
the refrigerator is damaged or marked, you must report it
within 7 days if you wish to claim for damage/marks
under the manufacturers warranty. This does not affect
your statutory rights.
ENVIRONMENTAL TIPS


dispose of those materials through your local recycling
depot or by placing them in appropriate collection
containers.

your local authorities and ask for the correct method
of disposal.


7
5-LAYOUT AND STORAGE
Your cabinet was designed to be flexible, to be able to adapt to your requirements.
HOW TO USE YOUR SHELVING
● You can put the beer bottles on the shelving any way you like, lay down or upright.
Max Weight per shelf: 25kgs
LAYOUT AND STORAGE
RECOMMENDATIONS FOR LAYOUT AND STORAGE OF YOUR FRIDGE
Your cabinet was designed to store a maximum number of bottles in total security. We recommend that you
observe the tips below to optimize loading.
-Spread your bottles out as evenly as possible over the shelves, so that weight is not concentrated in one point, Also
make sure your bottles do not touch the back of the cabinet wall, or the step at bottom.
-Also make sure that bottles are not all grouped together at the top or bottom of the cabinet.
-Observe the loading instructions provided in section 6, according to the type of storage fixtures with which your cabinet
is equipped, and never stack bottles on a shelf.
-Never try to pull out more than one shelf at a time.
PLEASE NOTE
Before modifying your cabinet’s original configuration in any way, be sure to ask your dealer for advice.
10
MAINTENANCE
COMPRESSOR REFRIGERATORS
CLEANING YOUR REFRIGERATOR
BEFORE CLEANING: Turn off the power, unplug the appliance, and remove all items including all shelves.
•Wash the inside surfaces with warm water and baking soda solution. The solution should be about 2 tablespoons of baking soda with a
quart of water.
•Wash the shelves with a mild detergent solution.
•Wring excess water out of the sponge or cloth when cleaning area of the controls, or any electrical parts.
•Wash the outside cabinet with warm water and mild liquid detergent. Rinse well and wipe dry with a clean soft cloth.
•After installation, we recommend that owners apply a thin layer of Olive Oil with a clean rag, to all exposed Stainless Steel
areas. This should then be polished in and buffed off with another clean rag to a non-oily finish. This process will aid protection against
dirt and other corrosive contaminants, by providing a temporary food-safe shield. The Olive Oil layer also makes later polishing and
removal of fingerprints easier. This process should be repeated frequently every 3-4 months. ALL stainless steel can rust, it is a myth that
stainless steel doesn’t rust.
POWER FAILURE
Most power failures are corrected within a few hours and should not affect the temperature of your appliance if you minimize the number of
times the door is opened. If the power is going to be off for a longer period of time, you need to take the proper steps to protect your
contents.
VACATION TIME
Short vacations: You may leave the refrigerator operating during vacations of less than three weeks.
Long vacations: If the appliance will not be used for several months, remove all items and turn off the appliance. Clean and dry the interior
thoroughly. To prevent mold growth, leave the door open slightly, blocking it open if necessary.
MOVING YOUR Refrigerator
1. Remove all items.
2. Securely tape down all loose items (shelves) inside your appliance.
3. Turn the adjustable leg up to the base to avoid damage.
4. Tape the door shut.
5. Be sure the appliance stays secure in the upright position during transportation. Also protect the outside of the appliance with a
blanket or similar item.
ENERGY SAVING TIPS
1. The refrigerator should be located in the coolest area of the room, away from heat producing appliances, and away from direct sunlight.
Ventilation at rear also helps a lot with energy usage, so create a positive air flow where possible, although with this range they are
designed to be fully built in.
2. When you are not using fridge during weekdays etc. it is recommended to set the temp at a higher level, so set at 64°F (18°C ) during
periods of non usage, this will not only mean less run time, it also still keeps drinks at a temp that won’t be spoiled. It saves energy also
which these days is a growing concern for most households.
3. Keep the cooler stocked, an empty cooler will run longer, believe it or not.


place for later reference.
The symbols you will see in this booklet have these meanings:
WARNING

CAUTION


TIPS & INFORMATION

ENVIRONMENTAL TIPS


Meanings of symbols used in this manual are shown below:


WARNING

‘flammable’ and/or a small flame symbol,
do not store them inside any refrigerator or
freezer. If you do so you may cause an explosion.

remove any doors. Children can suffocate if they get
trapped inside.

blowing gases. Avoid safety hazards by carefully
disposing of this appliance.
WARNING
The refrigerator must be plugged into its own
dedicated 220-240V, 50Hz AC electrical outlet.
The plug must be accessible when the refrigerator is
in position.
It is essential the power point is properly earthed to
ground.Consult a qualified electrician if you are unsure.
Don’t use extension cords or adapter plugs with this
refrigerator.
If the power cord is damaged, have it replaced by a
qualified service technician.
Unplug the refrigerator before cleaning it, or changing
the light bulb to avoid electric shock.
Never unplug the refrigerator by pulling the electrical
cord as this may damage it. Grip the plug firmly and
pull straight out.
Choose a location for your refrigerator that isn’t too cold.
The ambient room temperature should be above 10°C.
Stand your refrigerator in a dry place – avoid areas
of high moisture or humidity.
Don’t put the refrigerator in frosty or unprotected areas
like a garage or on the verandah.
Keep the refrigerator out of direct sunlight.
Don’t locate the refrigerator near stoves, fires or heaters.
When installed correctly, your refrigerator should:
– Have adequate space at the back and sides
for air circulation (refer to page 9).
– Be aligned to the surrounding cupboards.
– Have doors that will self-close from a partially
open position.
WARNING

This appliance may contain a small quantity of environmentally
friendly, but flammable, non-synthetic R600a refrigerant:

damaged during transportation and installation.

8g of refrigerant. The amount of refrigerant charged in the
appliance can be found on the rating plate on the appliance.

in the built-in structure, clear of obstruction.

accelerate the defrosting process, other than those
recommended by the manufacturer.
3
per 8g of refrigerant. The amount of refrigerant charged
in the appliance can be found on the rating plate on
the appliance.


PART VI"CARE AND MAINTENANCE
11
TROUBLESHOOTING GUIDE
PROBLEM
POSSIBLE CAUSE
Solution
Refrigerator does
not operate
1. Not plugged in
2. The appliance is turned OFF at the control panel
3. The circuit breaker has tripped or a fuse has blown out
Press ON/OFF
Check and make sure the power plug is well connected
Ask an engineer for help
Refrigerator is not
cold enough; can
not cool down to
the preset temp.
Compressor does not start
ask an engineer for help / check the connection of the compressor
Compressor self-protected and has stopped operating
The ambient temperature is too high ( over 100°F degree)
The air venting is not smooth, check that the air duct is not blocked
Fan operates slowly or is faulty and has stopped operating.
The door is not closed completely, or the door opened too long
The compressor, or its components are faulty
Fans stop working or operate at low speed
Ask an engineer for help. Power the refrigerator ON and OFF. Check the
fan and whether the voltage is normal. If the voltage is normal, then the
fan should be damaged
Evaporator ices up
Turn OFF the refrigerator for one hour and open the door. The ice on the
evaporator will melt. Check the door seal for any air gaps.
Door is not closed properly
Check the door lock, shelves, or other objects, make sure door is well
closed.
Check the rubber seal for any air gaps.
Check the door hinges, make sure they are not loose
Condenser is dusty
Wash and clean the condenser
Cooling system faulty (Gas leakage or blockage)
Ask an engineer for help
Compressor starts
and stops
frequently
The door gasket does not seal properly.
Use low heat on a hair dryer to make the door seal take shape.
The sensor connection is wrong.
Read the wiring diagram to make the correct connection of sensor
The sensor is faulty.
Replace with a new sensor
The door is opened too often.
Reduce the times / frequency of door openings.
The light does not
work.
Not plugged in, or the light button is “OFF”.
Light itself faulty.
Check and make sure the light button is ON, or ask an engineer for help.
The Refrigerator
seems to make too
much noise.
The stand feet is not leveling, vibrations lead to noise
Adjust the stand feet and ensure they are level.
Copper pipe hits other objects and makes noise
Gently adjust the position of the pipe.
When the compressor shuts down or starts, it is normal for
noise from the vibrations generated by the internal moving
parts due to inertia.
Take no action
A liquid plumbing noise may come from the flow of the
refrigerators gases, which is normal. As each cycle ends, you
may hear gurgling sounds
Take no action
The door will not
close properly.
Door is blocked by the door lock, shelves, or other objects.
Remove the barrier
Door sealing rubber is deformed
Repair or replace the rubber seal
Door hinges are not loose.
Adjust and fasten the hinges.
Ice up
Outlet / suction outlet blockage
Remove the barrier
Fans stop working or operate at low speed.
Ask an engineer for help. Power the refrigerator ON and OFF. Check the
fan and the voltage. If the voltage is normal, the fan may be damaged.
The door gasket does not seal properly;
or door is opened too often
Use low heat on a hair dryer to make the door seal take shape.
Gas leakage or cooling system blockage
Ask an engineer for help
External cabinet
seems too hot
Ambient temperature is too high, or direct sunshine
Operating conditions need to be improved
Front grill outlet / suction outlet blockage
Remove the barrier
Fans stop working or low speed operating
Ask engineer for help, power on the refrigerator, check the fan whether
the voltage is normal or not. If the voltage is normal, the fan should be
damage
Water drop on
glass door
Ambient humidity is high
Use a soft cloth to clean the water
Door is opened too often
Reduce the times / frequency of door opening.
The door gasket does not seal properly
Use low heat on a hair dryer to make the door seal take shape.
PART VII"TROUBLESHOOTING GUIDE
12
TECHNICAL DATA
PART X"" TECHNICAL DATA
PART IX"WARRANTY INFORMATION
COMPRESSOR REFRIGERATORS
MODEL NO.
KBU28LRX
GENERAL INFO:
Capacity
3.88 CF (110 Liter) *2
Bottles to Store
WINE 28 Bottles; BEER 100 Bottles/Cans
Installation Type
Built-in
Shelves
4 Wood Shelves, 4 Chromed Adjustable Shelves
Temperature zone
Dual Zone
Temperature Range
Left side: 34-64 Fahrenheit; Right side: 34-64 Fahrenheit
Climate Type
ST;N;SN
Noise Level (dB)
<43 dB
FEATURES:
Cooling System
Compressor
Control
Digital Thermostatic Control
Circulating Fans
Yes
LED Light
Blue LED
Door Type
glass Door With Stainless Steel Trim
Security Lock
yes
ELECTRICAL:
NOMINAL VOLTAGE/FREQUENCY
110-115V/60HZ (USA) | 220-240V/50HZ (AU)
Rated Power Input
200Watts
Rated Current
1.1A
Refrigerant
R600A
Energy Consumption
0.8 Kw*h/24hr
DIMENSIONS:
Unit Size
38.8"W x23.2"D x34.2"H ( 985W x590D x 860H mm)
Net Weight
181 lb (82 kg)
Please speak to your retailer before calling us if you did not purchase your refrigerator directly from KingsBottle.
WHO IS COVERED: This warranty is extended only to the original end-user purchaser or the person receiving the product as a gift, and shall not be extended
to any other person or transferee.
LIMITED WARRANTY – If your refrigerator is not operating properly, KingsBottle reserves the right to repair or replace the refrigerator. KingsBottle may
request the consumer to contact a local refrigeration company to service the refrigerator. All cost for labor and materials is covered for 2-year from the date of
receipt. If KingsBottle deems the unit not repairable, KingsBottle will use the value of your original order toward a replacement (Any replacement unit will follow
the warranty terms of the initial purchase). For customer service, please e-mail us via [email protected].
THE LIMITED WARRANTY DOES NOT COVER: Damage due to such things as an accident, misuse, abuse, mishandling, neglect, unauthorized repair or
any other cause beyond the control of the seller whether similar or dissimilar to the foregoing. Purchaser understands and acknowledges that the goods sold
here are WINE & BEVERAGE COOLERS, which house beer and other wines. Purchaser assumes all the risk of using these units, including the risk of spoilage,
humidity variations, temperature variations, leaks, fires, water damage, mold, mildew, dryness and similar perils that may occur.
SPECIAL NOTE: Warranty is only honored for the unit which is used in the countries where the unit was initially purchased. And, if your product was
purchased at any 3rd party retailer and not directly from KingsBottle, we do not offer an extended warranty policy. You MUST contact the retailer of purchase
directly. In the event your retailer does not offer an extended warranty plan, we recommend you contact a third party warranty provider. However, regardless of
point of purchase, all KingsBottle coolers are backed by a TWO YEAR manufacturer's warranty from date of sale.

Other KingsBottle Kitchen Appliance manuals

KingsBottle KBU165BW User manual

KingsBottle

KingsBottle KBU165BW User manual

KingsBottle KB50WX-FG User manual

KingsBottle

KingsBottle KB50WX-FG User manual

KingsBottle KBU-55 SERIES User manual

KingsBottle

KingsBottle KBU-55 SERIES User manual

KingsBottle KBU50DX-FG User manual

KingsBottle

KingsBottle KBU50DX-FG User manual

KingsBottle KBUSF50B User manual

KingsBottle

KingsBottle KBUSF50B User manual

KingsBottle KBU145BX User manual

KingsBottle

KingsBottle KBU145BX User manual

KingsBottle KBU-328 SERIES User manual

KingsBottle

KingsBottle KBU-328 SERIES User manual

KingsBottle KBU145DX User manual

KingsBottle

KingsBottle KBU145DX User manual

KingsBottle KBU50BX User manual

KingsBottle

KingsBottle KBU50BX User manual

KingsBottle KBUSF66BW User manual

KingsBottle

KingsBottle KBUSF66BW User manual

KingsBottle KBU-52 Series User manual

KingsBottle

KingsBottle KBU-52 Series User manual

Popular Kitchen Appliance manuals by other brands

Marta MT-1756 user manual

Marta

Marta MT-1756 user manual

DS Produkte Z 09894 instructions

DS Produkte

DS Produkte Z 09894 instructions

Summit SBC4907FRTWIN Use and care guide

Summit

Summit SBC4907FRTWIN Use and care guide

Metcalfe NS300A Installation & operating instructions

Metcalfe

Metcalfe NS300A Installation & operating instructions

Brentwood Appliances PC-482 SOCCER Operating and safety instructions

Brentwood Appliances

Brentwood Appliances PC-482 SOCCER Operating and safety instructions

Nostalgia Electrics APH200 Series Instructions and recipes

Nostalgia Electrics

Nostalgia Electrics APH200 Series Instructions and recipes

Sinbo SK 2395 instruction manual

Sinbo

Sinbo SK 2395 instruction manual

Russell Hobbs RHFS01 Instructions and warranty

Russell Hobbs

Russell Hobbs RHFS01 Instructions and warranty

AGA marvel ML24BCG0RS Installation, operation and maintenance instructions

AGA marvel

AGA marvel ML24BCG0RS Installation, operation and maintenance instructions

Koenic KMF 240 user manual

Koenic

Koenic KMF 240 user manual

Dunavox DX-16.46K instruction manual

Dunavox

Dunavox DX-16.46K instruction manual

Westmark 9777 2260 operating instructions

Westmark

Westmark 9777 2260 operating instructions

Omcan VP-CN-0971 instruction manual

Omcan

Omcan VP-CN-0971 instruction manual

MOA MF4 instruction manual

MOA

MOA MF4 instruction manual

Gallet RAT 715 instruction manual

Gallet

Gallet RAT 715 instruction manual

Tomato Saber 943 Series operating instructions

Tomato Saber

Tomato Saber 943 Series operating instructions

Global Solutions Panini GS1620 Series operating instructions

Global Solutions

Global Solutions Panini GS1620 Series operating instructions

Börner ExclusiveLine V6 instructions

Börner

Börner ExclusiveLine V6 instructions

manuals.online logo
manuals.online logoBrands
  • About & Mission
  • Contact us
  • Privacy Policy
  • Terms and Conditions

Copyright 2025 Manuals.Online. All Rights Reserved.