En 6 étapes rapides, vous vous apprêterez à préparer quelque chose de délicieux!
Pour des instructions complètes, veuillez consulter consulter le mode d’emploi.
¡En 6 pasos rápidos, usted estará cerca de preparar algo delicioso!
Para obtener las instrucciones completas, consulte su manual de “Instrucciones”.
VITE, DU JUS!
GUIDE DE DÉMARRAGE RAPIDE
COMIENCE A HACER JUGO
GUÍA RÁPIDA PARA COMENZAR
®/™ © 2014 KitchenAid. Tous droits réservés. Utilisé sous licence au Canada.®/™ © 2014 KitchenAid. Todos los derechos reservados. Usada en Canadá bajo licencia.
GET JUICING
QUICK START GUIDE
®/™ © 2014 KitchenAid. All rights reserved. Used under license in Canada.
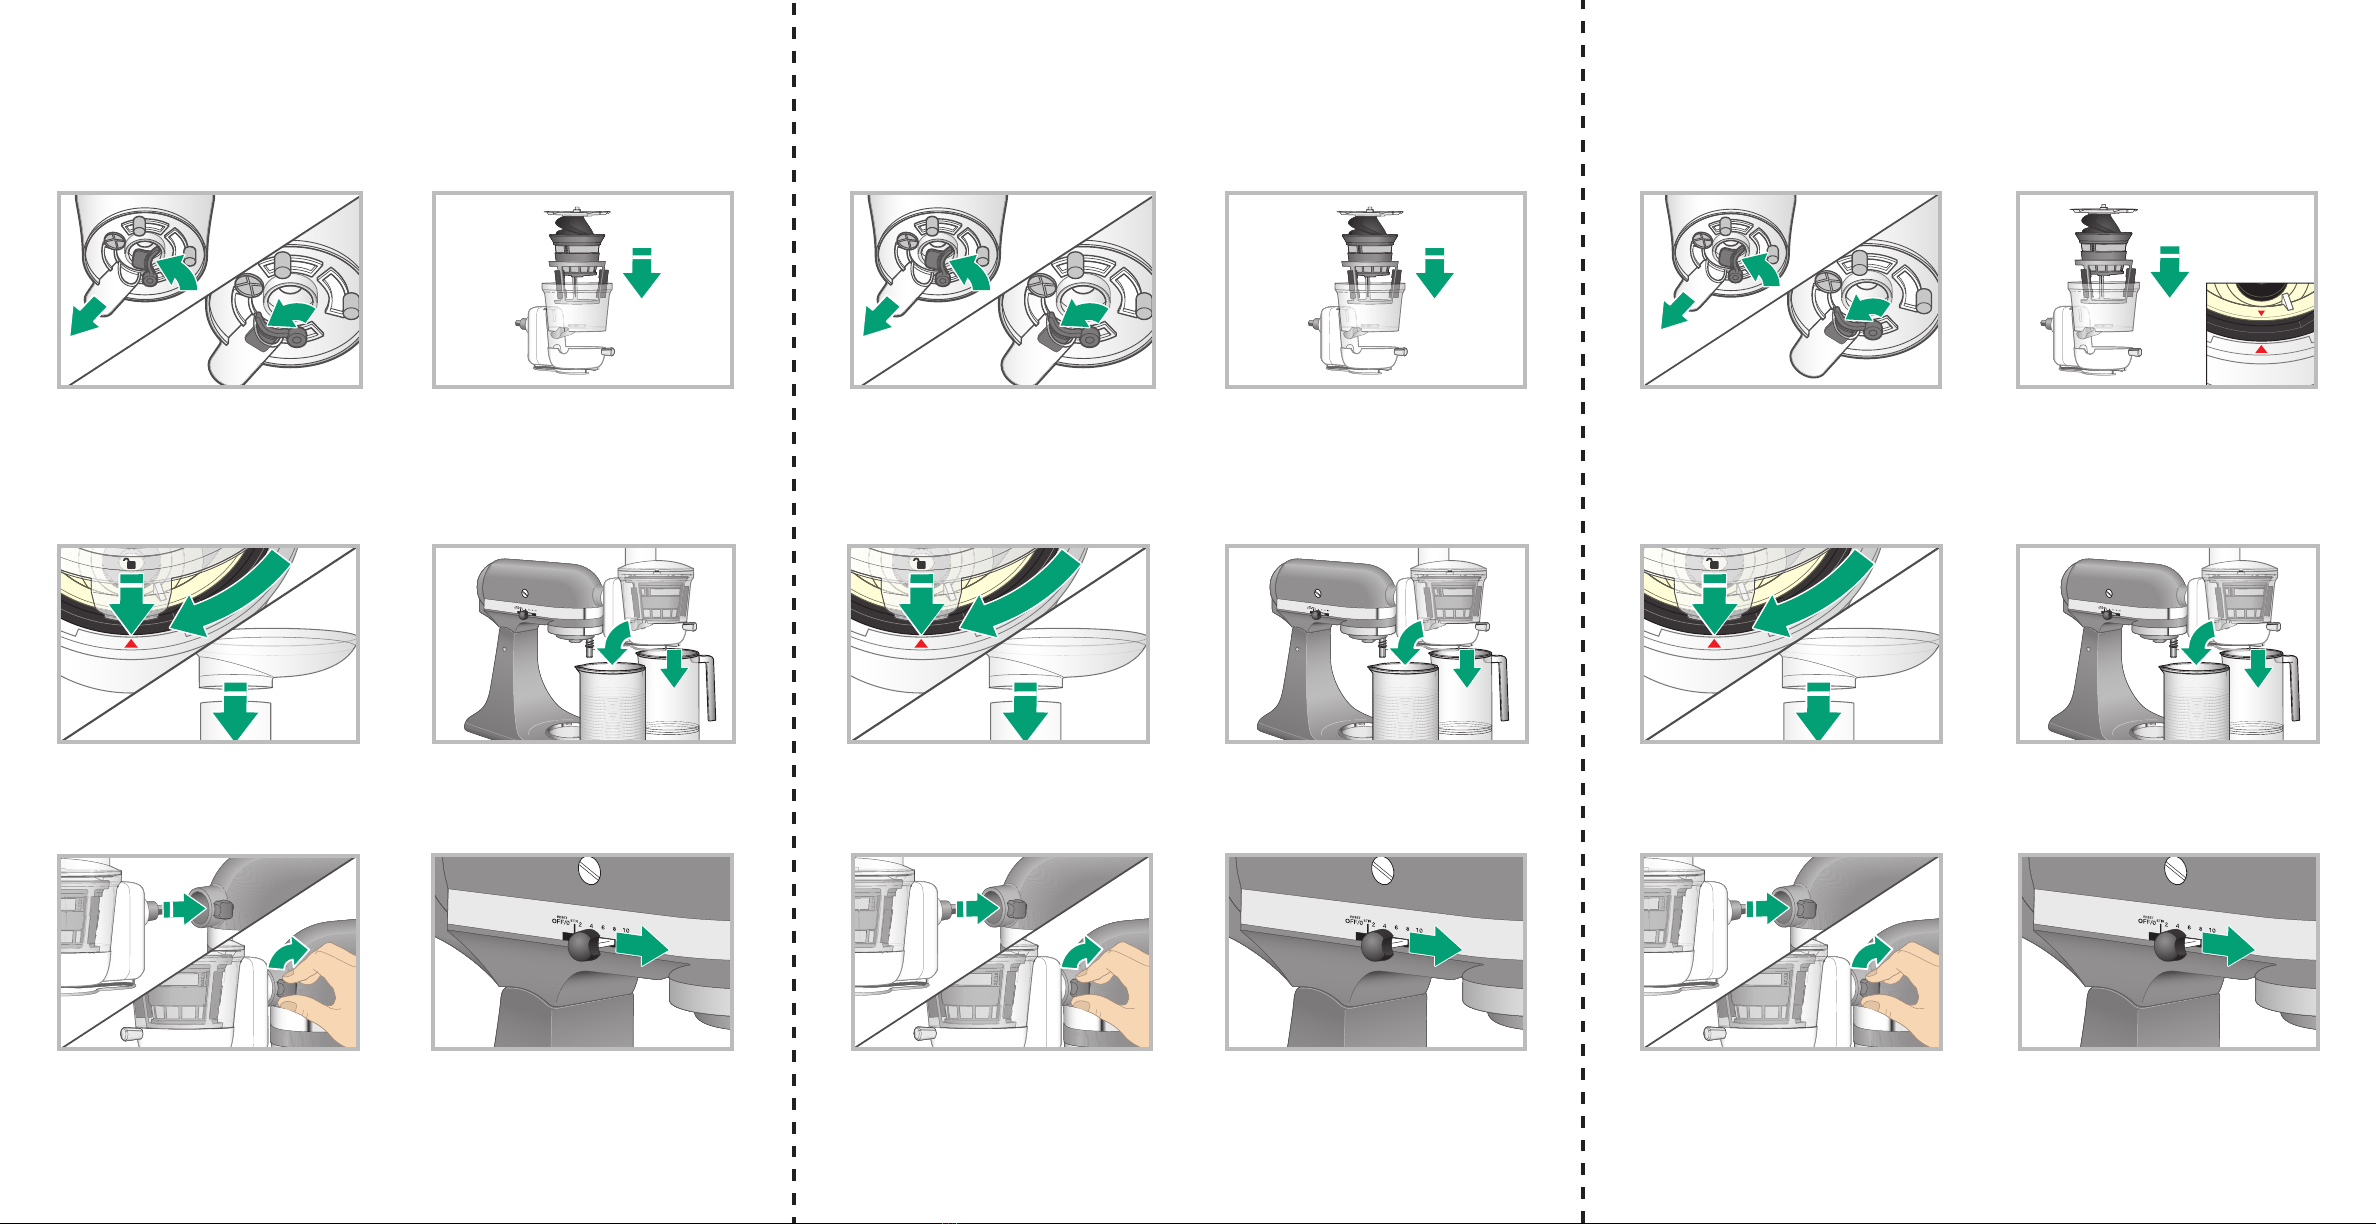
1.
Faire glisser la goulotte à pulpe vers l’extérieur et
insérer le joint d’étanchéité derrière la goulotte
tel qu’illustré.
REMARQUE : Pour extraire du jus, pousser la
goulotte à pulpe pour l’ouvrir; pour préparer des
sauces et des confitures, tirer sur la goulotte à
pulpe pour la fermer.
1.
Deslice el conducto de pulpa hacia afuera
e inserte la junta detrás del conducto como
se muestra.
NOTA: Para hacer jugo, empuje el conducto
de pulpa hacia adentro para abrirlo; para salsas
y mermeladas, jale el conducto de pulpa hacia
afuera para cerrarlo.
2.
Placer le bol à l’intérieur du bloc d’entraînement.
Placer ensuite le panier à filtre avec racleur, suivi
du tamis souhaité en alignant les repères rouges
du tamis et du bol. Terminer par installer le bloc
vis sans fin/lame..
2.
Coloque el tazón en la unidad de accionamiento.
Luego la canastilla limpiadora del filtro y después
el filtro elegido, alineando las marcas rojas en el
filtro y el tazón como se muestra. Finalmente,
coloque el conjunto de espiral y cuchilla.
5.
Insérer l’extracteur de jus sur la prise à accessoires
du batteur, et serrer le bouton à accessoires
jusqu’à ce que l’extracteur soit parfaitement fixé.
Lorsque l’accessoire est correctement positionné,
le goujon sur l’accessoire s’adapte à l’encoche du
pourtour de la prise.
5.
Inserte la juguera en el receptáculo para
aditamentos de la batidora y apriete la perilla
hasta que esté totalmente asegurada. La clavija
de la cavidad del aditamento encajará en la
muesca del borde del receptáculo cuando esté
alineada correctamente.
4.
Placer le récipient à jus sous la sortie de jus et le
récipient à pulpe sous la goulotte à pulpe.
4.
Coloque un recipiente para jugo bajo el pico de
jugo y un recipiente para pulpa bajo el conducto
de pulpa.
6.
Mettre en marche le batteur sur socle à la
vitesse 10. Vous êtes prêts à commencer!
Pour des instructions complètes concernant
le fonctionnement, consultez votre manuel
“d’instructions”.
6.
Encienda la batidora con base a velocidad 10.
¡Usted está listo para comenzar! Para obtener
instrucciones completas de funcionamiento,
consulte el manual de “Instrucciones”.
3.
Placer le couvercle sur l’extracteur de jus, en
alignant les repères tel qu’illustré. Tourner le
couvercle dans le sens horaire pour l’emboîter.
Placer la trémie au sommet de la goulotte
d’alimentation
3.
Coloque la tapa sobre la juguera alineando las
marcas como se muestra en la figura. Gire la tapa
en el sentido de las agujas del reloj para trabarla
en su lugar. Coloque la tolva sobre el conducto de
alimentación.
KSM1JAKSM1JAKSM1JA
In 6 quick steps you’ll be on your way to making something delicious!
For complete instructions, refer to the “Instructions” manual.
1. Slide pulp chute out and insert gasket behind
chute as shown.
NOTE: For juicing, push pulp chute in to
open; for sauces and jams, pull pulp chute
out to close.
2. Place bowl into drive assembly. Follow with
screen wiper basket, then with chosen
screen, aligning the red marks on the screen
and bowl as shown. Finish with auger/blade
assembly.
5. Insert juicer into attachment hub on mixer,
tightening knob until completely secured.
The pin on the attachment housing will fit
into the hub rim’s notch when properly
aligned.
4. Place juice container under the juice spout
and pulp container under the pulp chute.
6.
Turn the Stand Mixer on to speed 10. You
are ready to begin! For full instructions on
operation, see your “Instructions” manual.
3.
Place the lid on the juicer, aligning the
marks as illustrated. Rotate lid clockwise
to lock it in place. Place hopper on top of
the feed chute.
W10662213B_v01.indd 4-6 8/22/14 9:09 AM


