Homestead 11 FRONT Pitching InstPage 1 17/08/2011 4:29:52 p.m.Homestead 11 FRONT Pitching InstPage 1 17/08/2011 4:29:52 p.m.
1. Select a dry, level site
and
clear
any
sharp objects
that
may
puncture
the
floor.
Remove
the
tent
from
its
carrybag,
untie
fabric
ties
and
unroll
the
tent.
-
Save
the
fabric
ties
to
make
packing
the
tentaway
easier.
-Avoid
camping
under trees
as
sap
andbird
droppings
may
damage
the
canvas.
-
You
will
need
at
least
two
people
topitch the tentsafelyand
efficiently.
NOTE;
Read
all
tent
cant
instructions
attached
be'fore
usel
2. Take
the
frame
parts
bag
and
carefully
tip
out
the
poles.
Group
the
poles
together
in
to
the
following
pole
groups:
Side
Wall
Assembly Poles:
Centre Ridge Pole:
End
Support
Poles:
External Centre Ridge
Upright
Poles:
Internal
Centre Ridge
Upright
Pole:
Support
Poles:
Porch Poles:
Parts: #1,
#181#8,
#1
(2 Sets)
Parts: #2/1,
#181#8,
#1
(1
Set)
Parts: #5,
#4
(3 Sets)
Parts:
#48,
#SB
(1
Set)
Parts: #32,
#33
(2 Sets)
Parts: #6/2, #713 (1 Set)
Parts: #6/3, #34, #35, #358,
#34,
#613
(1
Set)
Parts: #50, #51, #10/2
(1
Set)
Parts:
#14,
#13
(1
Set)
Parts: #42B, #42 (2 Sets)
Parts: #41
B,
#41
(4 Sets) (extra
set
for
side
awning)
-
The
poles
are
coded
with a number
on
a
coloured
sticker for
easier
assembly.
The
green
poles
are
along
the
bottom
(green
for
grass),
the
blue
poles
are
the
upper
level
poles
(blue
forblue
sky)
and
the
red
poles
are
the
porch
poles.
-Although
the
stickers
should
last
well,
it
is
a good
idea
to labelthe
poles
with
the
same
coloured
insulation
tape
andapermanentmarkerfor future
reference.
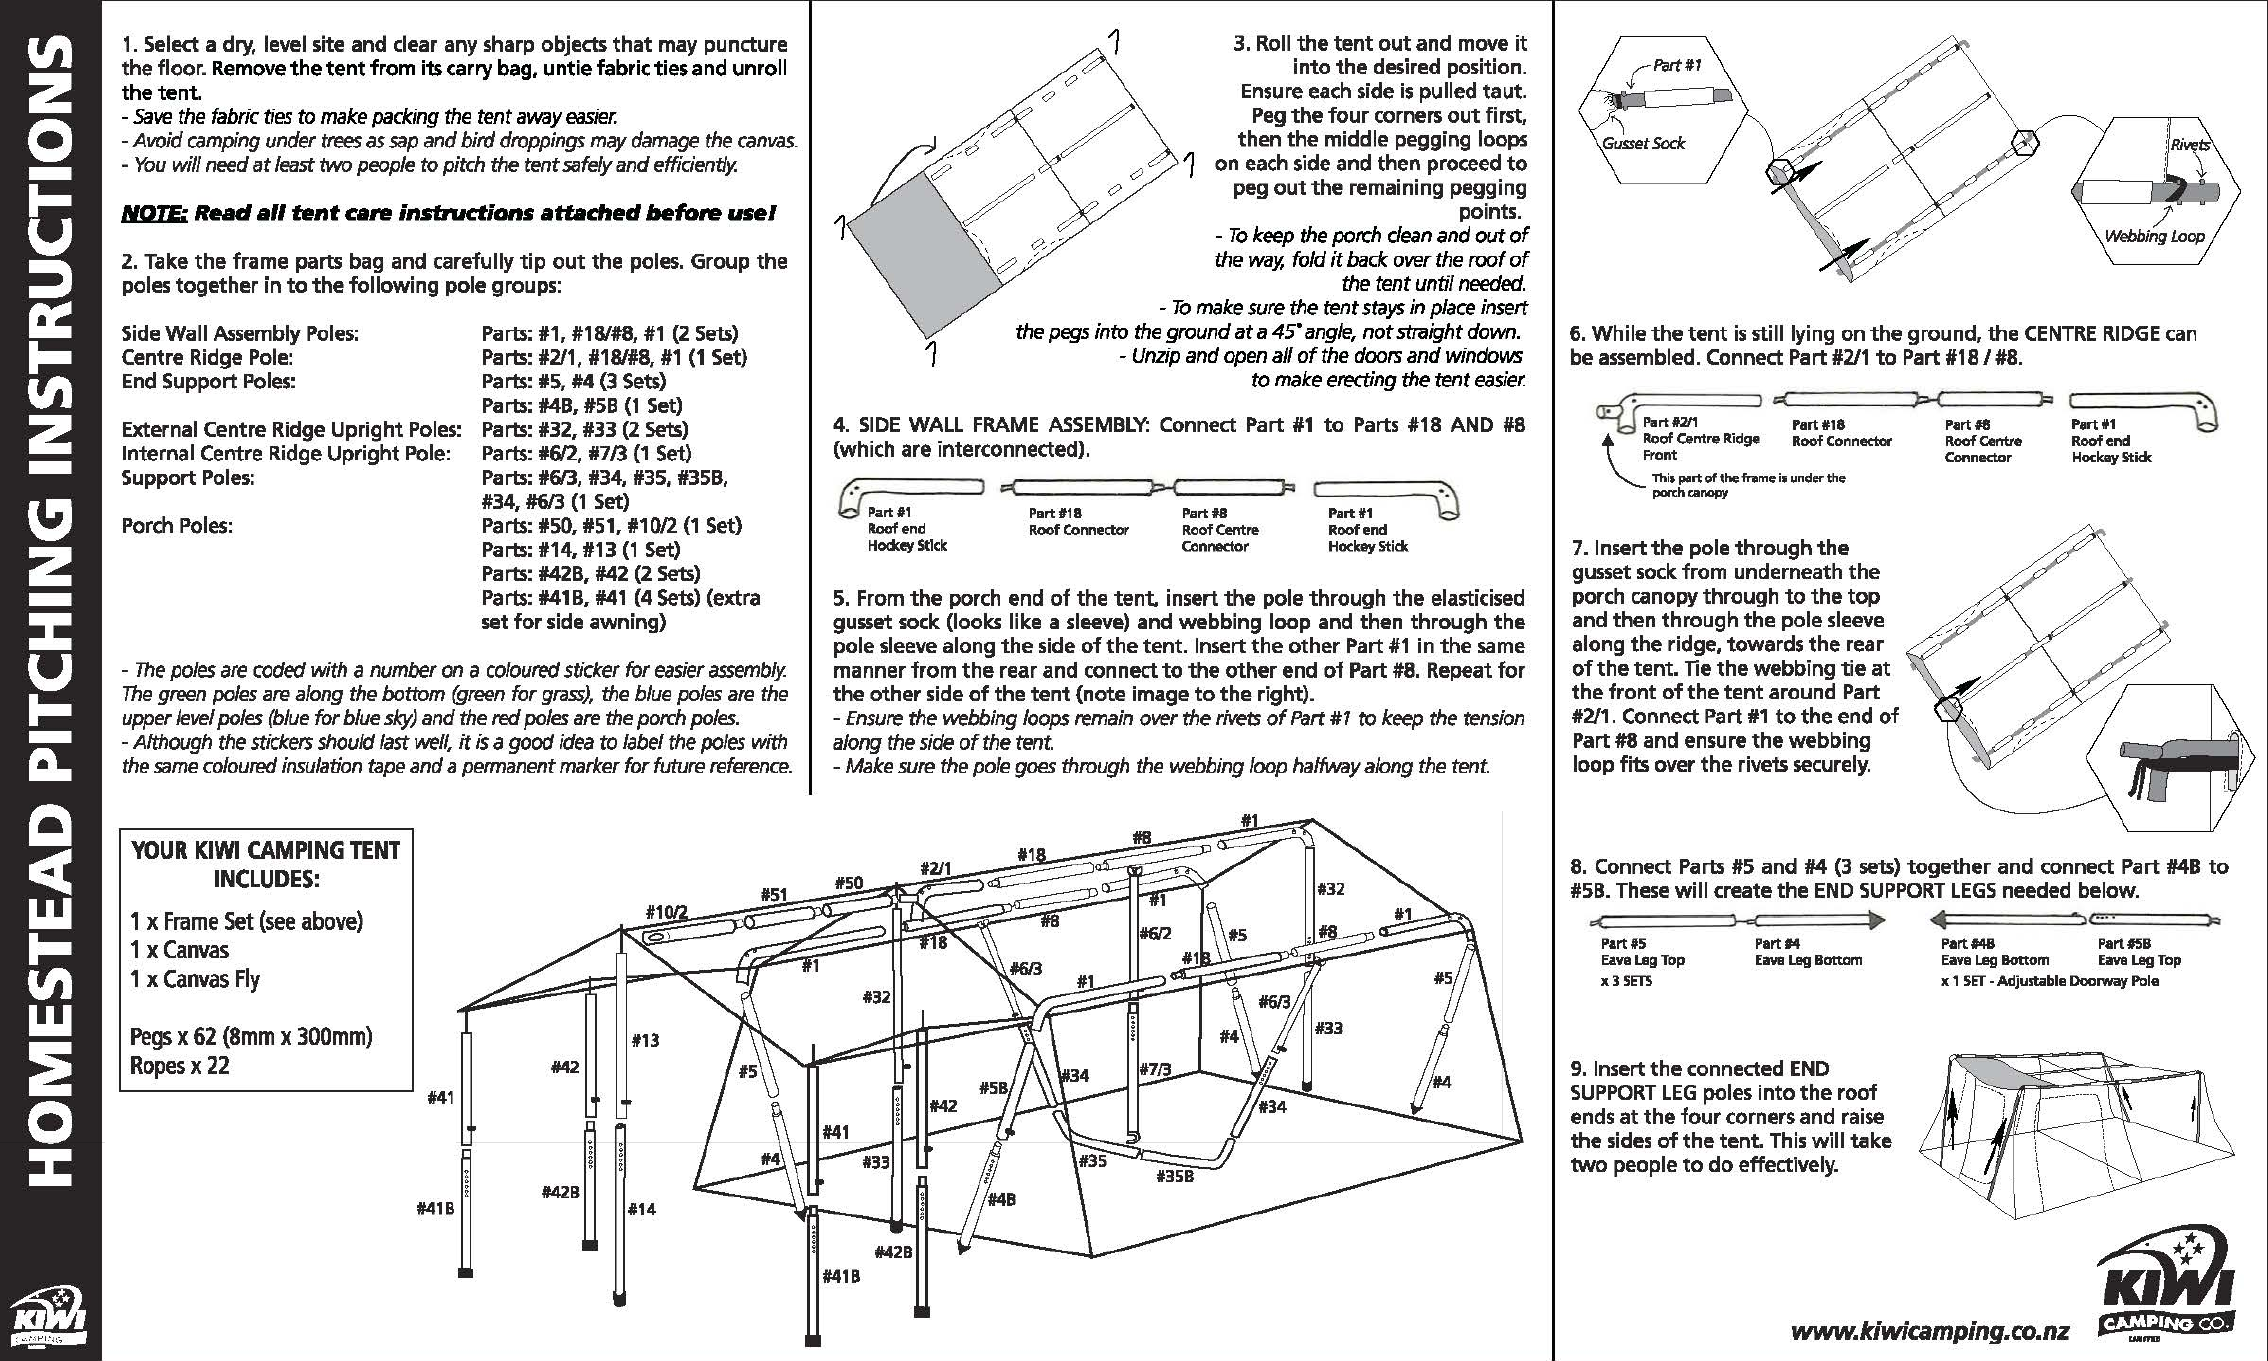
YOUR
KIWI
CAMPING
TENT
INCLUDES:
1x
Frame
Set
(see
above)
1x
Canvas
1x
Canvas
Fly
Pegs
x
62
(8mm
x
300mm)
Ropes
x
22
#41
#418
3. Roll
the
tent
out
and
move
it
into
the
desired position.
Ensure each side
is
pulled
taut.
Peg
the
four
corners
out
first,
then
the
middle
pegging
loops
1
on
each side
and
then
proceed
to
peg
out
the
remaining
pegging
points.
-
To
keep
the
porch
clean
and
out
of
the
way,
fold
it
back
over
the
roof
of
thetentuntil
needed.
-
To
make
sure
the tent
stays
in
place
insert
the
pegs
into
the
ground
at
a45•
angle,
not
straightdown.
-
Unzip
and
open
all
of
the
doors
and
windovvs
to
make
erecting the tent
easier.
4.
SIDE
WALL FRAME
ASSEMBLY:
Connect Part
#1
to
Parts
#18
AND
#8
(which
are
interconnected).
(i
Part11
Roof
end
Hodc:ey
Stick
1
p(
Part
118
b-.f,_P
_art_#ll
__
_,,R
r
..__Pa-rt-#1--~\)
RoofConnector RoofCentre Roofend
Connector Hockeystick
5. From
the
porch
end
of
the
tent.
insert
the
pole
through
the
elasticised
gusset sock (looks
like
a sleeve)
and
webbing
loop
and
then
through
the
pole
sleeve
along
the
side
of
the
tent.
Insert
the
other
Part
#1
in
the
same
manner
from
the
rear
and
connect
to
the
other
end
of
Part#8. Repeat
for
the
other
side
of
the
tent
(note
image
to
the
right).
-
Ensure
thewebbing loops
remain
over the
rivets
of
Part
# 1 to
keep
the
tension
along the
side
of
the tent.
-
Make
sure
thepole
goes
through
the
webbing loop halfwayalong
the
tent.
6.
While
the
tent
is
still
lying
on
the
ground,
the
CENTRE
RIDGE
can
be
assembled. Connect
Pa
rt
#211
to
Part #18I #8.
rr.{~
)
""'-----~P-<
p (
~
Part
#211
Part#18 Part
Ill
Part
#1
RoofCentre
Ridge
Roofconnector Roofcentre Roofend
Front Connector
Hockey
Stick
lhi5
P'rt
of
the
fnime
i5
under
the
porth
canopy
7. Insert
the
pole
through
the
gusset
sock.
from
underneath
the
porch canopy
through
to
the
top
and
then
through
the
pole
sleeve
along
the
ridge,
towards
the
rear
of
the
tent.
Tie
the
webbing
tie
at
the
front
of
the
tent
around
Part
#2/1. Connect Part
#1
to
the
end
of
Part
#8
and
ensure
the
webbing
loop
fits
over
the
rivetssecurely.
8. Connect Parts
#5
and
#4
(3
sets)
together
and
connect Part #48
to
#58. These
will
create
the
END
SUPPORT
LEGS
needed below.
...
>--ct
..
~
.
,,..
..
)::a-
Part#S
PartM
Eave
Lag
Top
Eave Leg
Bottom
x35ETS
9. Insert
the
connected
END
SUPPORT
LEG
poles
into
the
roof
ends
at
the
four
corners
and
raise
the
sides
of
the
tent.
This
will
take
two
people
to
do
effectively.
Part
#48
Partl5B
Eave
Leg Bottom
Eave
Leg
Top
x 1
SET
• Adjustable DoorwayPole
www.kiwicamping.co.nz


