Klarfit MiniBike User manual

10009710 10009732 10009733
MiniBike

2
Sehr geehrter Kunde,
zunächst möchten wir Ihnen zum Erwerb Ihres Gerätes gratulieren.
Bitte lesen Sie die folgenden Anschluss- und Anwendungshinweise sorgfältig durch und befolgen Sie die-
se um möglichen technischen Schäden vorzubeugen.
Warnung / Allgemeine Sicherheitshinweise
• Setzen Sie dieses Gerät nicht dem Regen aus. Stellen Sie keine mit Flüssigkeiten gefüllten Gefäße auf
dieses Gerät.
• Verwenden Sie ausschließlich das empfohlene Zubehör.
• Reparieren Sie dieses Gerät nicht selbst. Wenden Sie sich zur Wartung an qualiziertes Kunden-
dienstpersonal.
• Reinigen Sie das Gerät nur mit einem trockenen Tuch.
• Achtung - Stellen Sie keine Quellen oener Flammen, z.B. brennende Kerzen, auf das Gerät.
• Kleine Objekte/Verpackungsteile (Plastikbeutel, Karton, etc.): Bewahren Sie kleine Objekte
(z.B. Schrauben und anderes Montagematerial, Speicherkarten) und Verpackungsteile außerhalb der
Reichweite von Kindern auf, damit sie nicht von diesen verschluckt werden können. Lassen Sie kleine
Kinder nicht mit Folie spielen. Es besteht Erstickungsgefahr!
• Transport des Gerätes: Bitte bewahren Sie die Originalverpackung auf. Um einen ausreichenden
Schutz beim Transport des Gerätes zu erreichen, verpacken Sie das Gerät in der Originalverpackung.
• Reinigung der Oberäche: Verwenden Sie keine üchtigen Flüssigkeiten, wie Insektensprays.
Durch zu starken Druck beim Abwischen können die Oberächen beschädigt werden. Gummi- oder
Plastikteile sollten nicht über einen längeren Zeitraum mit dem Gerät in Kontakt sein. Nutzen Sie ein
trockenes Tuch.
• Lesen Sie sich diese Bedienungsanleitung vor dem Aufbauen und Benutzen des Gerätes aufmerksam
durch. Ein sicherer und eektiver Gebrauch des Gerätes kann nur erzielt werden, wenn das Gerät
ordnungsgemäß aufgebaut, gepegt und benutzt wird. Stellen Sie sicher, dass sämtliche Personen,
die dieses Gerät nutzen, über die Warnungen und Sicherheitshinweise informiert sind.
• Kinder sollten beaufsichtigt werden, um sicherzustellen, dass sie nicht mit dem Gerät spielen.
• Die Sicherheit des Gerätes kann nur gewährleistet werden, wenn das Gerät regelmäßig gepegt und
auf etwaige Schäden oder Abnutzungserscheinungen untersucht wird.
• Nutzen Sie das Gerät ausschließlich wie vorgesehen. Sollten Sie beim Aufbau oder bei der Kontrolle
defekte Komponenten entdecken oder sollten Sie während des Trainings ungewöhnliche Geräusche
am Gerät feststellen, beenden Sie umgehend das Training. Nutzen Sie das gerät erst wieder nachdem
das Problem identiziert und gelöst wurde.
• Das Gerät ist nicht für therapeuthischen Einsatz geeignet.
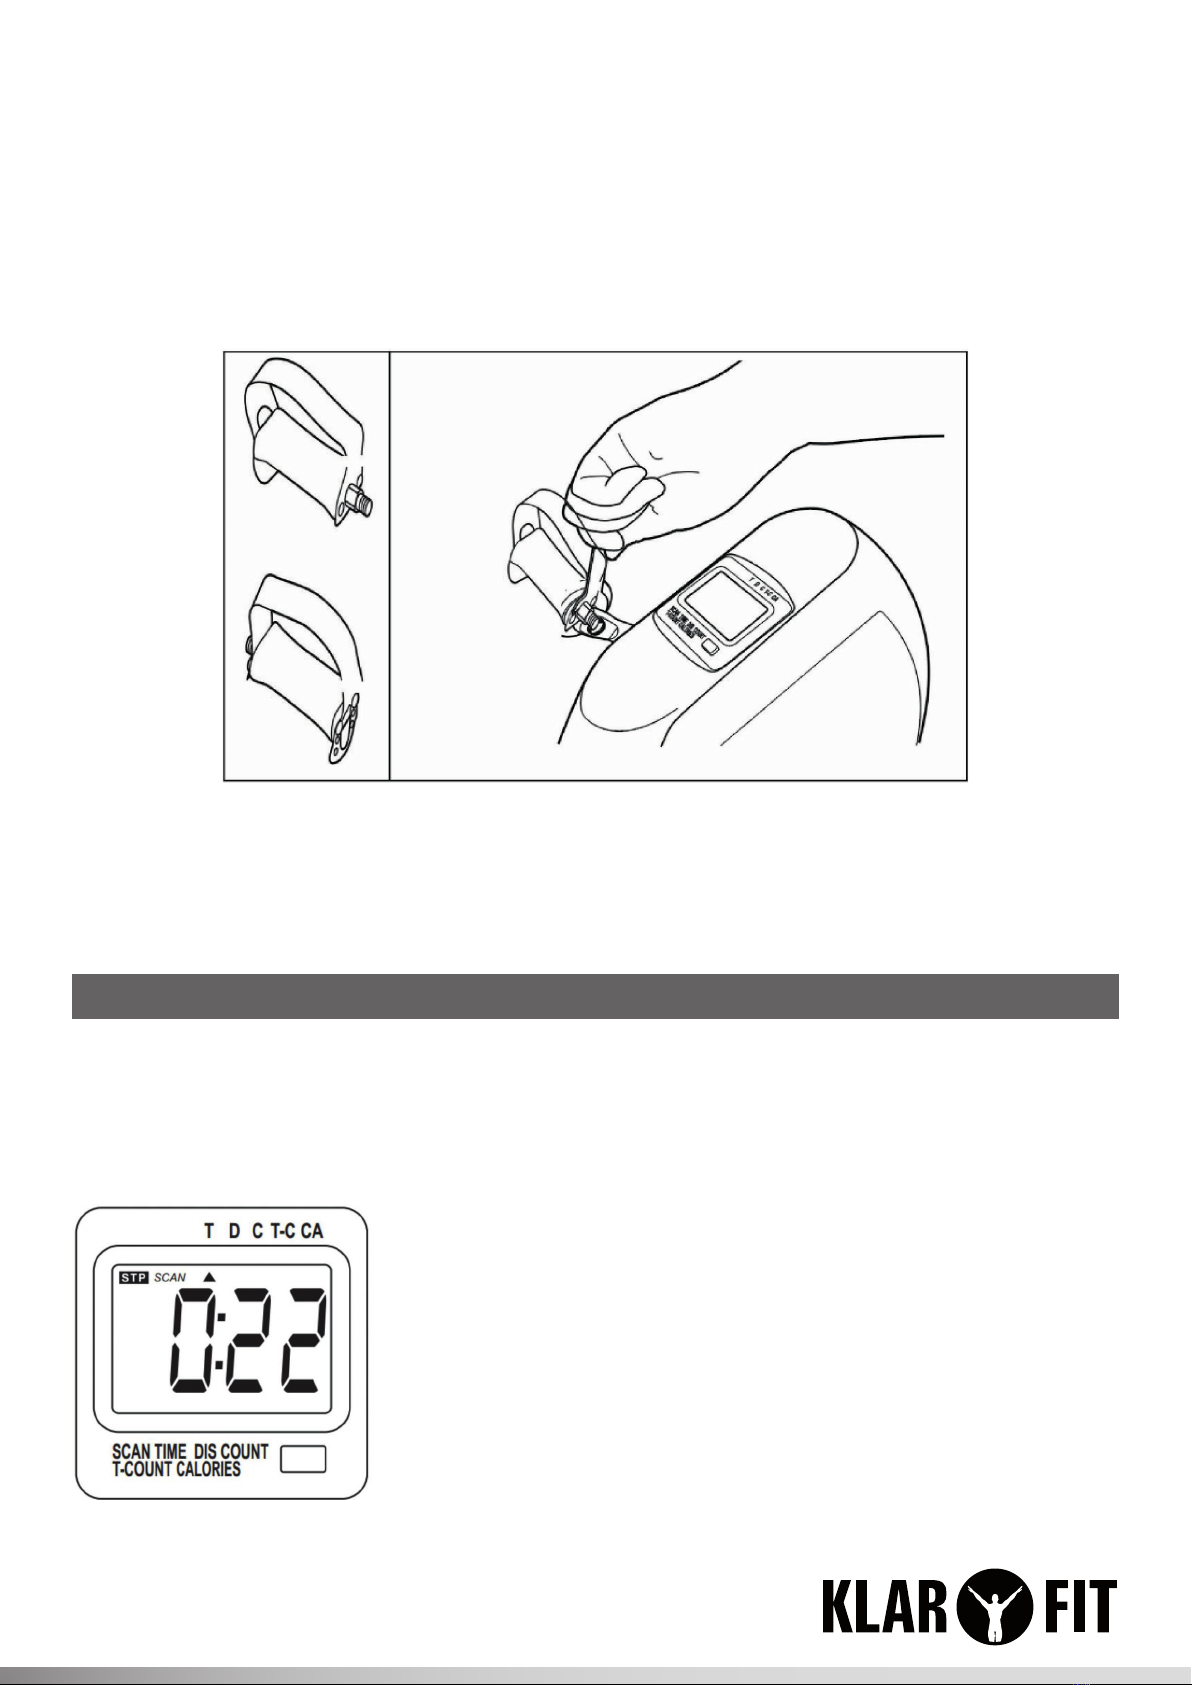
Lieferumfang und Montage
Neben dem Gerät selbst nden Sich im Versandkaton die beiden Pedale/Handgrie nebst Schrauben,
Unterlegscheiben und einem Inbus- sowie einem Maulschlüssel für die Montage:

2 3
Montage:
• Befestigen Sie den vorderen und hinteren Standfuß mit den Schrauben und Unterlegscheiben an.
Benutze Sie hierzu den Inbusschlüssel.
• Bringen Sie die Pedale/Handgrie mit dem mitgelieferten Schlüssel an. Beachten Sie die Markierun-
gen L und R für links und rechts.
Montage der Pedale/Handgrie:
• Stellen Sie das Gerät auf einen Tisch oder andere erhöhte ebene Fläche, so dass Sie bequem trainie-
ren können.
Nutzungshinweise
Widerstand einstellen: Drehen Sie den Widerstandsregler auf der Rückseite des Gerätes zum Erhöhen
oder Verringern des Widerstands.
Batterie ersetzen: Nehmen Sie die Anzeige vom Gerät. An der Unterseite der Anzeige nden Sie das
Batteriefach. Das Gerät benötigt eine Batterie vom Typ AAA. Beachten Sie beim Einsetzen die Polarität,
wie im Batteriefach angegeben.
Trainingscomputer
T = Zeit
D = Distanz
C = Zähler
T.C = Schritte/Minute
CA = Kalorien

4
Hinweise zur Entsorgung
Elektroaltgeräte
Be ndet sich die diese Abbildung (durchgestrichene Mülltonne auf Rädern) auf dem Pro-
dukt, gilt die Europäische Richtlinie 2002/96/EG. Diese Produkte dürfen nicht mit dem
normalen Hausmüll entsorgt werden. Informieren Sie sich über die örtlichen Regelungen
zur getrennten Sammlung elektrischer und elektronischer Gerätschaften. Richten Sie
sich nach den örtlichen Regelungen und entsorgen Sie Altgeräte nicht über den Hausmüll.
Durch die regelkonforme Entsorgung der Altgeräte werden Umwelt und die Gesundheit
ihrer Mitmenschen vor möglichen negativen Konsequenzen geschützt. Materialrecycling
hilft, den Verbrauch von Rohsto en zu verringern.
Konformitätserklärung
Hersteller: Chal-Tec GmbH, Wallstraße 16, 10179 Berlin, Deutschland
Dieses Produkt entspricht den folgenden Europäischen Richtlinien:
2014/30/EU (EMV)
2011/65/EU (RoHS)
Start Sobald Sie die Pedale bewegen, schaltet sich der Zähler automatisch ein
und beginnt zu zählen.
Stop
Sobald Sie stoppen, wird (STOP) für ca. 4 Sek. auf der unteren linken
Seite des Anzeige eingeblendet. Die Anzeige schaltet sich nach einigen
Minuten ab.
Zurücksetzen Zum Zurücksetzen halten Sie die taste für 3 Sekunden gedrückt.
Funktionswahl Drücken Sie die Taste um zwischen den Funktionen zu wechseln. Der
Pfeil (^) zeigt die aktuell gewählte Funktion an.
Scan
Sobald (SCAN) in der Anzeige eingeblendet wird, wechselt die Anzeige
alle 5 Sekunden zwischen Schritte/Minuten und den bei dieser Frequenz
verbrannten Kalorien.
Hinweise:
• Ist die Anzeige schlecht anzulesen, sollten Sie die Batterie wechseln.
• Falls der Zähler nicht funktioniert, entnehmen Sie die Batterie und setzen Sie diese wieder ein. Wenn
Sie die Batterie entnehmen, wird der Zähler auf „0“ gesetzt.
• Setzen Sie den Zähler vor dem Gebrauch zurück. Durch den Transport kann es sein, dass dieser nicht
„0“ anzeigt. Dies ist keine Fehlfunktion.

4 5
Dear Customer,
Congratulations on purchasing this product. Please read and follow these instructions, in order to avoid
damaging the item. We do not cover any damages that may arise from improper use of the item or the
disregard of the safety instructions.
General Safety Notice
• Read all instructions before using. Make sure that all users have read these instructions or have been
instructed by you, before using this device.
• Do not place on or near a hot gas or electric burner or in a heated oven.
• To protect against a re, electric shock or personal injury, do not immerse cord, electric plugs or de-
vice in water or other liquids.
• Do not expose the appliance to extreme temperatures. The appliance shall be used in moderate cli-
mates.
• Disconnect the appliance from the power source if it is not going to be used for a long time, if there
is a thunderstorm or if it isn‘t working properly.
• The use of attachments that are not recommended by the appliance manufacturer may result in re,
electric shock or personal injury.
• The appliance is not a toy. Do not let the children play with it. Never let children insert foreign objects
into the appliance.
• Do not use the appliance for other than intended use. This appliance has been designed solely for
domestic use; the manufacturer‘s liability shall not be engaged in the event of any professional use,
by any misuse or by any use not complying with the operating instructions.
• This device is not suitable for therapeutic use.
• Save these instructions.
Small objects: Keep small objects (i.e. screws, mou#nting material, memory cards etc.) and packaging
out of the range of children. Do not let Children play with foil. Choking hazard!
Transporting the device: Please keep the original packaging. To gain sucient protection of the device
while shipment or transportation, make sure to put it back in its original packaging.
Cleaning the surface: Do not use any volatile liquids, detergents or the like. Use a clean dry cloth.
In the Box / Mounting the Device
Besides the device, you will nd the pedals/handles in the box, as well as a set of tools and mounting
material (screws & washers):

6
Assembly:
• Attach the front and back base supports to the main unit with the washers and screws using the
included hex tool.
• Use the included wrench to install the foot pedals / hand grips. Note which pedal is on the left and
right side withthe L and R markings.
Mounting the Foot pedals / Hand grips:
• Place the Mini Cycle on a table or other at surface high enough to operate comfortably.
Operation
Adjust tension: Twist the tension valve at the back of the Mini Cycle to increase or decrease the tension.
Replacing the battery: Lift up the display from the main cycle unit. The battery is attached to the bot-
tom of the display. The device requires a type AAA battery. Please mind the correct polarity as indicated
inside the battery compartment.
Training Console
T = Time
D = Distance
C = Count
T.C = Steps/minute
CA = Calories

6
7
Environment Concerns
According to the European waste regulation 2002/96/EG this symbol on the product or on
its packaging indicates that this product may not be treated as household waste. Instead it
should be taken to the appropriate collection point for the recycling of electrical and electro-
nic equipment. By ensuring this product is disposed of correctly, you will hep prevent poten-
tial negative consequences for the environment and human health, which could otherwise
be caused by inappropriate waste handling of this product. For more detailled information
about recycling of this product, please contact your local council or your household waste
disposial service.
Declaration of Conformity
Manufacturer: Chal-Tec GmbH, Wallstraße 16, 10179 Berlin, Germany.
This product is conform to the following European directives:
2014/30/EU (EMC)
2011/65/EU (RoHS)
Start When you start exercising by turning the pedals, the power will automa-
tically turn on and the counter will start operating.
Stop
Once you stop exercise, (STOP) will be displayed at the bottom left of the
LCD screen in about 4 seconds. The power will be turned o after several
minutes.
Reset To reset the counter, press and hold the button for 3 seconds
Function selection
Tap the button until the function which you would like to display is selec-
ted. Con rm your selected function by the arrow (^) displayed at the top
of the LCD screen.
Scan
Once (SCAN) is displayed at the top of the screen, the display will be
changed every 5 seconds from current frequency, calories burnt to steps/
minute.
Hints:
• When it is di cult to see the screen display or there is no display, change the battery.
• If the counter doesn’t operate properly, take out the battery and insert it again. If you change the
battery, the count will be changed to “0”.
• Reset counter before using. Due to vibrations that occur during transportation, your counter may not
be set to “0” when you start use. This is not an indication of malfunction.

8
Cher client,
Toutes nos félicitations pour l’acquisition de ce nouvel appareil. Veuillez lire attentivement les inst-
ructions suivantes an d’éviter d’éventuels dommages.
Avertissement / Conseils généraux de sécurité
• N’exposez pas cet appareil à la pluie. Ne posez aucun récipient contenant un liquide sur cet ap-
pareil, comme des vases par exemple.
• Utilisez exclusivement les accessoires recommandés.
• Ne réparez pas cet appareil vous-même. Adressez-vous au service clients qualié pour l’entretien.
• Nettoyez l’appareil exclusivement avec un chion sec.
• Attention – ne posez aucune amme vive sur l’appareil, comme par exemple des bougies allu-
mées.
• Petits éléments / éléments d’emballage (sacs en plastique, cartons, etc.) :
S’assurer que les petits éléments (par exemple vis, matériel de montage) et éléments d’emballage
soient conservés hors de la portée des enfants pour éviter les risques d‘étouement. Ne pas lais-
ser les enfants jouer avec les emballages plastiques, ils peuvent s’asphyxier !!
• Transport de l’appareil : Veuillez conserver l’emballage d‘origine. Pour garantir la meilleure
protection de l’appareil lors de son transport, veuillez le remettre dans son emballage d’origine.
• Nettoyage des surfaces externes : Ne pas utiliser de liquides volatils tels que le spray insecti-
cide. Une pression trop forte lors de l’essuyage peut endommager les surfaces. Les matières en
plastique ou en caoutchouc ne doivent pas rester en contact avec l’appareil pendant une période
prolongée. Utiliser un chion sec.
• Lisez attentivement le mode d’emploi avant d’installer et d’utiliser l’appareil. Une utilisation sûre
et ecace de l’appareil ne peut être obtenue que lorsque l’appareil est correctement installé
entretenu et utilisé. Assurez-vous que les autres personnes susceptibles d’utiliser cet appareil
soient également informées de l’avertissement et des consignes de sécurité.
• Les enfants doivent être surveillés an de vous assurer qu’ils ne jouent pas avec l’appareil.
• La sécurité de l’appareil ne peut être garantie que s’il est régulièrement entretenu et que les éven-
tuels dommages ou usures apparentes sont examinées.
• Utilisez l’appareil uniquement aux ns prévues. Si vous découvrez des composants défectueux lors
de l’installation ou de votre vérication, ou si vous constatez des bruits inhabituels de l’appareil
pendant votre pratique, cessez immédiatement de l’utiliser. N’utilisez à nouveau l’appareil qu’après
avoir fait identier et résoudre le problème.
• L’appareil n’est pas adapté à un usage thérapeutique.
Livraison et assemblage
Dans le carton, à côté de l’appareil lui-même vous trouverez les deux pédales / poignées ainsi que
des vis, des rondelles, une clé Allen et une clé plate pour l’assemblage :

8 9
Assemblage :
• Fixez le support avant et arrière avec les vis et les rondelles. Utilisez pour cela la clé Allen.
• Installez les pédales / poignées avec la clé fournie. Soyez attentif aux marquages L et R pour gau-
che et droite.
Assemblage des pédales / poignées :
• Posez l’appareil sur une table ou toute autre surface surélevée an de pouvoir vous entraîner plus
confortablement.
Conseils d’utilisation
Réglage de la résistance : Tournez le bouton de réglage de la résistance au dos de l’appareil pour
augmenter ou réduire la résistance.
Remplacement des piles : Prenez l’écran de l’appareil. Sous l’écran vous trouverez le compartiment
à piles. L’appareil utilise une pile de type AAA. Soyez attentif à la polarité indiquée dans le compar-
timent à piles lors de l’installation.
Ordinateur d’entraînement
T = Temps
D = Distance
C = Compteur
T.C = Pas/minute
CA = Calories

10
Conseils pour le recyclage
Appareils électriques
Le pictogramme ci-contre apposé sur le produit signi e que la directive europé-
enne 2002/2006/CE (DEEE) s‘applique (poubelle à roulettes rayée). Ces produits
ne peuvent être jetés dans les poubelles domestiques courantes. Renseignez-vous
concernant les règles appliquées pour la collecte d’appareils électriques et électro-
niques. Conformez-vous aux réglementations locales et ne jetez pas vos anciens
produits avec les ordures ménagères. Le respect des règles de recyclage des vieux
produits aide à la protection de l’environnement et de la santé de votre entourage
contre les conséquences négatives possibles. Le recyclage des matériaux aide à ré-
duire l’utilisation des matières premières.
Déclaration de conformité
Fabricant : Chal-Tec GmbH, Wallstraße 16, 10179 Berlin, Allemagne.
Ce produit est conforme aux directives européennes suivantes :
2014/30/UE (CEM)
2011/65/UE (RoHS)
Start Dès que les pédales sont en mouvement, le compteur s’allume auto-
matiquement et commence à compter.
Stop
Dès que vous vous arrêtez, (STOP) s’a che pendant environ 4 se-
condes en bas à gauche de l’écran. L’écran s’éteint au bout de quel-
ques minutes.
Réinitialiser Pour réinitialiser, maintenez la touche enfoncée pendant 3 secondes.
Choix des fonctions Appuyez sur la touche pour passer d’une fonction à l’autre. La èche
(^) indique la fonction en cours.
Scan Dès que (SCAN) s’a che à l’écran, l’a chage change toutes les 5
secondes et passe des pas aux minutes et aux calories brûlées
Remarque :
• Si l’a chage est di cilement lisible, pensez à changer les piles.
• Si le compteur ne fonctionne pas, retirez les piles et replacez-les. Lorsque vous retirez les piles,
le compteur se remet à „0“.
• Replacez le compteur avant utilisation. S’il n’a che pas „0“ il se peut qu’il ait été endommagé
pendant le transport. Il s’agit d’un dysfonctionnement.
This manual suits for next models
3
Table of contents
Languages:
Other Klarfit Exercise Bike manuals

Klarfit
Klarfit Tourek User manual

Klarfit
Klarfit 10012060 User manual

Klarfit
Klarfit 10030587 User manual

Klarfit
Klarfit 10022301 User manual

Klarfit
Klarfit 10006709 User manual

Klarfit
Klarfit Mobi FX 250 User manual

Klarfit
Klarfit 10006714 User manual

Klarfit
Klarfit Cycloony Mini Bike User manual

Klarfit
Klarfit Roomik Cycle User manual

Klarfit
Klarfit Tauon Cycle 10035108 User manual