Klarstein 10031316 User manual

10031316
Joghurtbereiter

2
Sicherheitshinweise
Technische Daten
Sehr geehrter Kunde,
wir gratulieren Ihnen zum Erwerb Ihres Klarstein Gerätes. Lesen Sie die folgenden Anschluss- und
Anwendungshinweise sorgfältig durch und befolgen Sie diese, um möglichen technischen Schäden
vorzubeugen. Für Schäden, die durch Missachtung der Sicherheitshinweise und unsachgemäßen Gebrauch
entstehen, übernehmen wir keine Haftung.
Artikelnummer 10031316
Stromversorgung 220-240 V~, 50 Hz
Leistungsaufnahme 20 W
Schutzklasse II
• Heben Sie diese Bedienungsanleitung zum späteren Nachschlagen auf.
• Legen Sie das Gerät oder das Netzkabel nicht in Wasser oder eine andere Flüssigkeit. Wenn das Netzkabel
in eine Flüssigkeit gefallen ist, ziehen Sie sofort den Netzstecker. Greifen Sie nicht in die Flüssigkeit.
• Wenn das Gerät in der Nähe von Kindern betrieben wird, ist eine sorgfältige Aufsicht geboten, um
Verletzungen durch Unfälle zu vermeiden.
• Ziehen Sie den Netzstecker des Gerätes, wenn es nicht in Gebrauch ist, wenn Sie Teile abnehmen und vor
dem Reinigen. Fassen Sie beim Trennen der Stromversorgung am Netzstecker an. Ziehen Sie nicht am
Netzkabel.
• Benutzen Sie das Gerät nicht mit einem defekten Netzkabel oder Netzstecker, nachdem das Gerät eine
Fehlfunktion hatte, wenn das Gerät fallen gelassen und beschädigt wurde. Geben Sie das Gerät in dem Fall
an den Kundendienst.
• Der Verwendung von Zubehör, das vom Hersteller nicht zugelassen ist oder verkauft wird, kann zu einem
Brand, Stromschlag oder einer Personenverletzung führen.
• Das Gerät ist für die Verwendung im Haushalt konzipiert. Nicht im Freien verwenden.
• Lassen Sie das Netzkabel nicht über eine Tischkante bzw. Arbeitsplatte hängen oder eine heiße Oberfläche
berühren.

3
• Stellen Sie das Gerät nicht neben einen Gasbrenner, elektrisches Heizgerät oder einen geheizten Ofen.
Geben Sie die Teile des Gerätes nicht in die Mikrowelle.
• Betreiben Sie dieses oder andere elektrische Gerät nicht unter dem Einfluss von Alkohol oder anderen
Substanzen, die Ihre Reaktionsfähigkeit oder Wahrnehmung verändern.
• Berühren Sie nicht die Teile,die nicht zur Benutzung vorgesehen sind.
• Stellen Sie das Gerät nicht während des Betriebes um.
• Verwenden Sie dieses Gerät nicht barfuß. Berühren Sie das Gerät nicht mit nassen oder feuchten Händen.
• Reinigen Sie alle Teile des Gerätes, die mit Lebensmittel in Kontakt gekommen sind nach den Hinweisen
in dieser Bedienungsanleitung.
• Bewahren Sie das Gerät außerhalb der Reichweite von Kindern auf.
• Stecken Sie den Netzstecker in eine Wandsteckdose. Ziehen Sie zum Trennen von der Stromversorgung
den Netzstecker.
• Verwenden Sie das Gerät zu keinem anderen als dem vorbestimmten Zweck, nämlich dem Zubereiten
von Joghurt.
• Überprüfen Sie das Gerät nach dem Auspacken darauf hin, dass es unbeschädigt ist und alle Teile
vorhanden sind.
• Achten Sie vor dem Stromanschluss darauf, dass die Spannungsangaben auf dem Typenschild zur
Stromversorgung im Haushalt passen. Das Typenschild befindet sich auf der Unterseite des Gerätes.
• Die Anschlüsse im Haushalt müssen nach der Anleitung des Herstellers vorgenommen werden. Der
Hersteller ist nicht für Sachschäden, Personenschäden und Schäden an Haustieren verantwortlich, die
durch einen falschen Anschluss zustande kommen.
• Stellen Sie das Gerät nicht auf eine vibrierende Oberfläche wie einem Kühlschrank. Setzen Sie es keinem
Luftzug aus.
• Lassen Sie den Joghurt nicht länger als 10 Tage im Kühlschrank.
• Stellen Sie das Gerät nicht in den Kühlschrank.
• Berühren Sie keine heißen Flächen. Verwenden Sie die Griffe und Tasten.
• Schließen Sie das Kabel immer zuerst am Gerät an, dann in die Wandsteckdose. Stellen Sie das Gerät
immer erst über die Taste aus, bevor Sie den Netzstecker ziehen.

4
Geräteübersicht
Deckel
Timer:
Einstellbare Dauer
1-14 Stunden
LED-Anzeige:
Anzeige von 1 bis
14 Stunden
Ein-/Aus-Schalter:
Start/Stopp
Glasbecher
Gehäuse
Bedienfeld
Gerät
Bedienfeld

5
Benutzung
Vor der ersten Verwendung
1. Entfernen Sie die Schilder und Aufkleber am Gerät.
2. Waschen Sie vor der ersten Verwendung und längerer Aufbewahrung die Gehäuseoberfläche, die
Glasbecher und Deckel gründlich in einer warmen Seifenlauge. Dann gründlich spülen und trocknen
lassen.
3. Wischen Sie die Innenseite mit einem feuchten Tuch.
Herstellung von einfachem Joghurt
1. Sie brauchen einen Messbecher mit 1,5 Liter und einen Schneebesen.
Achten Sie darauf, dass alles gründlich gereinigt wurde und trocken gelagert wurde.
2. Geben Sie ca. 1,2 l Milch mit 130 ml frischem Joghurt oder 1,33 l Milch und 2 g Joghurtkultur hinein. Gut im
Messbecher verrühren. Geben Sie dann alles in 7 Glasbecher und schrauben die Deckel rauf.
Hinweis: Wenn Sie nicht pasteurisierte Milch verwenden, müssen Sie die Milch erst abkochen, um
Keime und Bakterien abzutöten. Ultrahocherhitzte Milch muss nicht gekocht werden. Um das beste
Ergebnis zu erzielen, sollte die Milch Raumtemperatur haben.
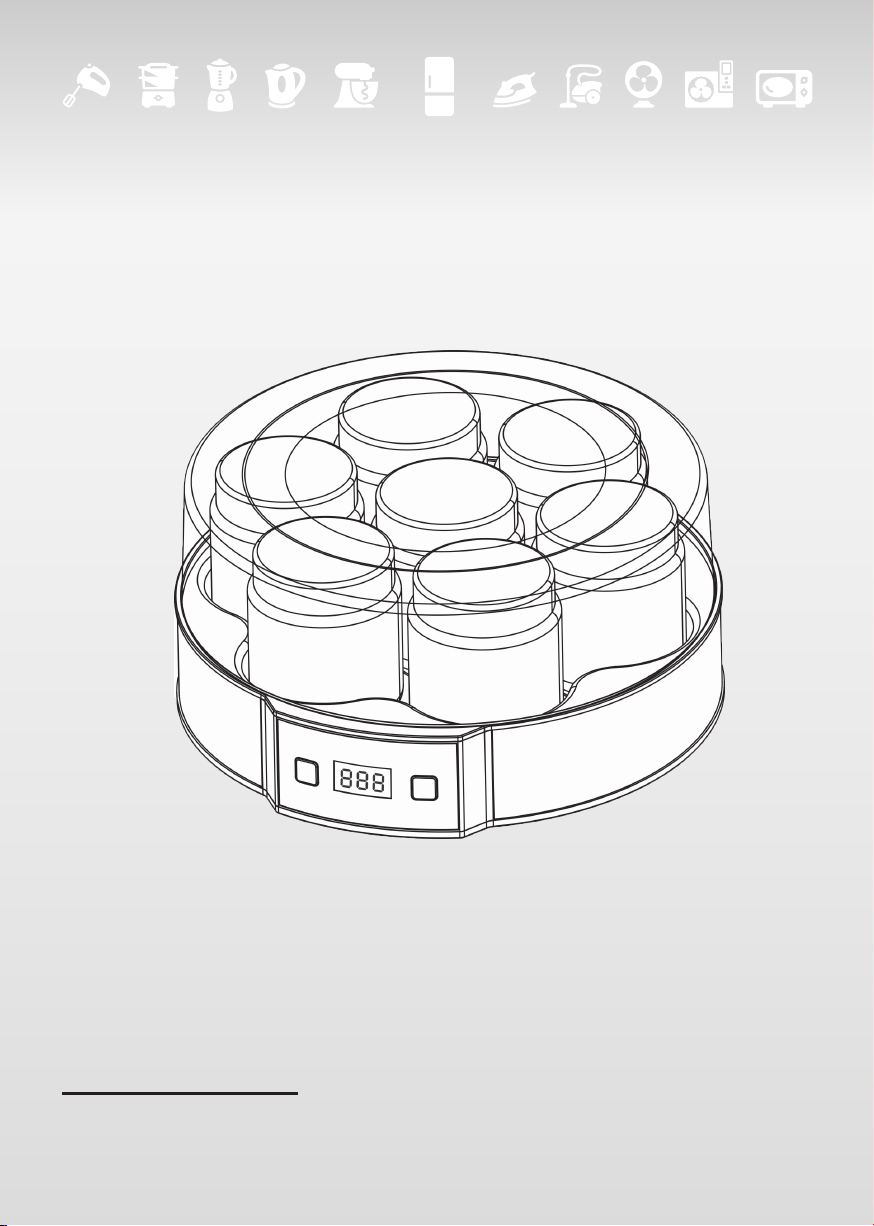
3. Stellen Sie die Glasbecher in den Joghurtbereiter und schließen Sie den Deckel.
4. Wenn das Gerät an die Stromversorgung angeschlossen ist, blinkt die LED-Anzeige eine Zeit lang und
schalten Sie dann aus.
5. Drücken Sie den Ein-/Aus-Schalter. In der Anzeige blinkt nun „10H“. Stellen Sie nun innerhalb von 5
Sekunden die passende Zeit ein. Der Joghurtbereiter startet selbständig.
Hinweis.: Sie können die Timer-Taste jederzeit drücken. Anschließend den Ein-/Aus-Schalter drücken,
um das Gerät in Gang zu setzen. Die Wahl der Zeit ist während des Betriebs aktiv. Den Ein-Schalter
drücken, um das Gerät auszuschalten. Dann ist eine erneute Wahl der Zeit möglich.
6. Nach der Auswahl geht das Gerät in Betrieb und zählt die Stunden herunter. Es schaltet sich nach dem
Ablauf der Zeit automatisch aus.
7. Lassen Sie die Gläserw etwas abkühlen. Stellen Sie die Gläser danach mindestens 3 Stunden in den
Kühlschrank.
Hinweise
Milch enthält Laktose. Sie wird durch Milchsäurebakterien (Joghurtkulturen) in Milchsäure gewandelt, was die
Bildung von Joghurt ermöglicht. Der Joghurtbereiter schafft die idealen Temperaturen zur Vermehrung der
Joghurtkulturen.
Die Milch darf keine andere Bakterien enthalten, da dies den Joghurt verunreinigt. Daher ist absolute Hygiene
erforderlich, vor allem, was Joghurt angeht. Außerdem können Sie die Milch vorher kochen und sie dann auf
ca. 40 °C abkühlen lassen, bevor Sie Joghurtkulturen hinzufügen.

6
Rezepte
Rezepte für einfachen Joghurt
Joghurtkultur für den Anfang
1. Milch: 1400 ml
2. Joghurtkultur: 2 g
Frischer Joghurt für den Anfang
1. Milch: 1200 ml
2. Frischer Joghurt: 130 ml
Anmerkung: Verwenden Sie keine abgelaufene Milch oder abgelaufenen Joghurt.
Rezeptideen für Joghurt
Sie können einfachen Joghurt verwenden, um Fruchtjoghurt oder Joghurt mit Aromen herzustellen. Ihrer
Kreativität sind keine Grenzen gesetzt. Tun Sie dies aber erst, wenn der Joghurt fertig ist, sonst gelingt Ihr
Rezept nicht.
Fruchtjoghurt:
Mengen Sie frisches Obst unter, oder Lebensmittel, die auf Obst basieren wie Marmelade.
Weitere Geschmacksrichtungen: Fügen Sie dem Joghurt Zucker, Vanille, Nüsse, Schokoladenstreusel, Nugat,
Kokosflocken und andere Aromen hinzu.
Tsatsiki
Gehackte Gurke, Knoblauch und Olivenöl hinzufügen.
Hinweise:
• Selbstgemachter Joghurt ist meistens cremiger und nicht so dick wie Erzeugnisse aus dem Handel.
• Während der Zubereitung kann sich Wasser abspalten, dies ist normal. Gießen Sie das Wasser einfach fort
oder mischen Sie es wieder unter.
• Sie können den selbst hergestellten Joghurt verwenden, um die nächste Charge zu machen. Je öfter Sie
dies tun, desto dünner wird der Joghurt. Wenn er zu dünn geworden ist, sollten Sie von vorne mit neuem
Joghurt aus dem Handel beginnen.
• Wenn Sie lediglich 900 ml Milch verwenden, machten dies den Joghurt etwas fester.
• Wenn Sie 3-4 Teelöffel Milchpulver hinzufügen, wird der Joghurt dicker.
• Der Joghurt wird auch dicker, wenn Sie ihn vor dem Verzehr einen Tag im Kühlschrank reifen lassen.
• Ultrahocherhitze Milch muss vor der Joghurtherstellung nicht gekocht werden.
• Statt Joghurtkulturen von anderen Joghurts zu verwenden, können Sie auch Joghurtpulver aus dem
Reformhaus oder aus dem Onlinehandel verwenden.

7
Reinigung
• Ziehen Sie vor der Reinigung den Netzstecker.
• Reinigen Sie die Gerätebasis und den Deckel mit einem feuchten Tuch. Vermeiden Sie den Einsatz von
Scheuermitteln.
• Tauchen Sie das Netzkabel, den Netzstecker und das Gerät nicht in Wasser oder andere Flüssigkeiten.
• Die Bechergläser sind spülmaschinenfest.
Hinweise zur Entsorgung
Befindet sich die linke Abbildung (durchgestrichene Mülltonne auf Rädern) auf dem
Produkt, gilt die Europäische Richtlinie 2012/19/EU. Diese Produkte dürfen nicht mit dem
normalen Hausmüll entsorgt werden. Informieren Sie sich über die örtlichen Regelungen
zur getrennten Sammlung elektrischer und elektronischer Gerätschaften. Richten Sie sich
nach den örtlichen Regelungen und entsorgen Sie Altgeräte nicht über den Hausmüll.
Durch die regelkonforme Entsorgung der Altgeräte werden Umwelt und die Gesundheit
ihrer Mitmenschen vor möglichen negativen Konsequenzen geschützt. Materialrecycling
hilft, den Verbrauch von Rohstoffen zu verringern.
Konformitätserklärung
Hersteller: Chal-Tec GmbH, Wallstraße 16, 10179 Berlin, Deutschland
Dieses Produkt entspricht den folgenden Europäischen Richtlinien:
2014/30/EU (EMV)
2014/35/EU (LVD)
2011/65/EU (RoHS)

8
Safety Instructions
Technical Data
Dear Customer,
Congratulations on purchasing this equipment. Please read this manual carefully and take care of the follow-
ing hints on installation and use to avoid technical damages. Any failure caused by ignoring the mentioned
items and cautions mentioned in the operation and installation instructions are not covered by our warranty
and any liability.
Item number 10031316
Power supply 220-240 V~, 50 Hz
Power 20 W
Protection class II
• Keep this user manual safe for future reference.
• To protect against risk of electrical shock, do not put the appliance or cord in water or other liquid. If ap-
pliance or cord falls into liquid unplug the cord from the outlet immediately. Do not reach into the liquid.
• To avoid accidental injury, close supervision is necessary when any appliance is used by or near children.
• Unplug from the outlet when not in use, before taking parts off, or before cleaning. To unplug, grasp plug
and pull from the electrical outlet. Never pull cord. .
• Do not operate any appliance with damaged cord or plug, or after appliance malfunctions, or after the ap-
pliance has been dropped or damaged in any way. Return appliance to and authorized service center for
examination and repair.
• The use of attachments not recommended or sold by the manufacturer may cause fire, electrical shock,
or injury.
• This appliance is designed for household use. Do not use outdoors.
• Do not let cord hang over edge of table or counter, or touch hat surface.
• Do not place on or near to hot gas or electric burner, or in a heated oven. Do not place any parts in the
microwave oven.
• Do not operate this or any other appliance while under the influence of alcohol or other substances that
affect your reaction time or perception.

9
• Do not touch the parts that are not intended for manipulation.
• Never move the appliance when it is working.
• Do not use the appliance while barefoot. Do not touch the appliance with wet or damp hands.
• After each use, clean all parts that have had contact with food by following the cleaning instructions in this
booklet.
• Store the appliance and all of its parts out of the reach of children.
• Plug cord into the wall outlet. To disconnect remove plug form wall outlet.
• Do not use appliance for other than intended uses.
• After unpacking the appliance, check that it is undamaged and that no parts are missing.
• Before connecting, check that the supply voltage details marked on the appliance agree with those of the
electrical supply. The label with this information may be found on the bottom of the appliance.
• Household electrical installation must be carried out in accordance with manufacturer’s instructions. The
manufacturer is not responsible for damage or injuries to persons, animals or objects caused by incorrect
installation.
• Do not put on top of a vibrating surface such as the top of a refrigerator or exposed to drafts.
• Do not keep yogurt in the refrigerator for more than 10 days.
• Never put the appliance in the refrigerator.
• Do not touch hot surfaces. Use handles or knobs.
• Extreme caution must be used when moving an appliance containing hot oil or other hot liquids.
• Always attached plug to appliance first, then plug cord into the wall outlet. To disconnect, turn any control
to “off”, then remove plug from wall outlet.

10
Product Description
Lid
Time button: Time
range from 1-14
hours
LED display:
display from 1H to
14H
Glas jar
Housing
Control panel
Gerät
Control panel
Power button: start
/ stop the yogurt
maker

11
Operation
Before first time use
1. Remove any labels or stickers from appliance.(beside rating label)
2. Before first use or after periods of prolonged storage, thoroughly wash cover, glass jars and lids in warm,
soapy water then rinse and dry completely.
3. Wipe the inside of yogurt maker with a damp cloth..
How to make plain yoghurt
1. You need 1.5L-2.0L container (measure cup) and a whisk.
Please ensure all that has been clean thoroughly. And keep it dry.
2. Prepare around 1.2L milk & 130ml fresh yogurt or 1330ml milk & 2g yogurt culture. And let them stirring
well in container (measure cup), Then have it in 7 glass jars, and screw the top on..
Tip : if you are using unpasteurized milk, you must boil it in advance in order to kill germs and bac-
teria, and cool down. UHT milk does not have to be boiled. To achieve an optimum result, the milk
should be at room temperature.
3. Place the jars in the yogurt maker and cover the lid .
4. When plug in the unit, you will find the LED display is flashing for while, and in off mode.
5. Press power button, “10H” will be flashing on the screen, please do select your ideal time within 5
Seconds, or the machine will be started automatically.
Hinweis.: You can select your any idea time by time button, after your selection, please press power
button to engine the unit. Any time selection is valid during the working status, you have to press
power button for 2 seconds to switch off the unit, then it allows you to re-select the time.
.
6. After selection, the unit will be in working status and count-down by hour. Automatically switch off while
the timing is end.
7. Allow the jar cool down slightly, after that please storage in refrigerator for over 3 hours.
Tips
Milk contains lactose. It is converted into lactic acid by lactic bacteria (yogurt culture), allowing yogurt to form,
so this process is successful. The yogurt maker ensures the best temperature for the yogurt cultures to easily
propagate.
The milk should not contain any other bacteria as this might contaminate the yogurt. Therefore ensure abso-
lute cleanliness, particularly where the yogurt ports are concerned. In addition, you can boil the milk before-
hand and allow it to cool down to around 40 degree before adding the yogurt culture.
Power button: start
/ stop the yogurt
maker

12
Recipes
Recipe for plain yoghurt
Yogurt culture as starter
1. Milk: 1400 ml
2. Yogurt culture: 2 g
Fresh yogurt as starter
1. Milk: 1200ml
2. Fresh yogurt: 130ml
Remark: Do not use expired milk or expired yogurt
Ideas for recipes with yogurt
You can use plain yogurt to make yogurt containing fruit or yogurt with any flavor. There are no limits to your
creativity, but do not do this until you have made the yogurt, or your recipe will not succeed.
Fruit yoghurt:
Mix in fresh fruit or a product made of fruit such as jam.
Other flavours
Add vanilla sugar, vanilla, nuts, chocolate sprinkles, nougat, coconut flakes or other flavorings to the yoghurt
Tsatsiki
Add chopped cucumber and garlic to the yogurt as well as a little olive oil. .
Notes:
• Home-made yogurt is generally more creamy and not as thick as commercial products
• Water may separate off during preparation, but this is normal. Just pour away the water or mix it back in.
• You can use the yogurt you have made to start off the next batch. The more often you do this, the thinner
your yogurt will become. If it becomes too thin, you should start afresh with a new yogurt you have bought
• If you only use 900 ml milk, this will make your yogurt a bit thicker
• If you add 3-4 tablespoons of powdered milk, this will make your yogurt thick er
• Yogurt will become thicker if you let it mature for a day in the refrigerator before eating
• UHT milk does not need to be boiled before making yogurt
• Instead of using yogurt cultures from another yogurt, you can also use yogurt powder bought from a health
food shop or online
• Yogurt can also be made with soya milk, in this case use a yogurt made with soya milk as the starter culture.

13
Cleaning
• Before cleaning, unplug the appliance.
• Clean the base and the cover with a damp cloth and avoid abrasives.
• Do not immerse the cord, plug or appliance in water or other liquids.
• The glass jars are dishwasher safe.
Disposal Considerations
According to the European waste regulation 2012/19/EU this symbol on the product or
on its packaging indicates that this product may not be treated as household waste. In-
stead it should be taken to the appropriate collection point for the recycling of electrical
and electronic equipment. By ensuring this product is disposed of correctly, you will help
prevent potential negative consequences for the environment and human health, which
could otherwise be caused by inappropriate waste handling of this product. For more de-
tailed information about recycling of this product, please contact your local council or your
household waste disposal service.
Declaration of Conformity
Producer: Chal-Tec GmbH, Wallstraße 16, 10179 Berlin. Germany
This product is conform to the following European Directives:
2014/30/EU (EMC)
2011/65/EU (RoHS)
2014/35/EU (LVD)

14
Avvertenze di sicurezza
Dati tecnici
Gentile cliente,
La ringraziamo per aver acquistato il nostro prodotto. La preghiamo di leggere attentamente le seguenti
istruzioni e di seguirle per evitare eventuali danni. Si declina ogni responsabilità per danni derivati da una
mancata osservazione delle avvertenze di sicurezza e da un uso improprio del dispositivo.
Articolo numero 10031316
Alimentazione 220-240 V~, 50 Hz
Potenza 20 W
Classe energetica II
• Conservare il manuale di istruzioni per consultazioni future.
• Non immergere il cavo di alimentazione in acqua o in altri liquidi. Se il cavo di alimentazione è caduto in
acqua, staccare immediatamente la spina dalla presa. Non mettere le mani in acqua.
• Sorvegliare i bambini se si utilizza il dispositivo in loro presenza per evitare infortuni.
• Staccare la spina dalla presa se il dispositivo non è in uso, prima di rimuovere i componenti e prima di pu-
lirlo. Non tirare il cavo di alimentazione per staccare la spina bensì afferrare la spina alla base.
• Non utilizzare il dispositivo se il cavo di alimentazione o la spina sono danneggiati, se il dispositivo presenta
dei malfunzionamenti oppure se è caduto o è danneggiato. In questo caso rivolgersi al servizio clienti.
• L´utilizzo di accessori non approvati dal produttore può comportare il pericolo di incendio, scosse elettri-
che o infortuni.
• Il dispositivo è concepito per un uso domestico. Non utilizzare il dispositivo all´aperto.
• Non far pendere il cavo di alimentazione dal tavolo e tenerlo lontano da superfici calde.
• Non collocare il dispositivo accanto ad un bruciatore a gas, ad una stufa elettrica o ad un forno riscaldato.
Non introdurre i componenti del dispositivo nel forno a microonde.
• Non azionare questo o altri dispositivi elettrici sotto l´effetto di alcool o di altre sostanze che alterano la
capacità di reazione o la percezione.

15
• Non manomettere nessuno dei componenti.
• Non spostare il dispositivo mentre è in funzione.
• Non utilizzare il dispositivo a piedi scalzi. Non toccare il dispositivo con le mani bagnate o umide.
• Lavare tutti i componenti del dispositivo a contatto con gli alimenti.
• Tenere il dispositivo fuori dalla portata dei bambini.
• Inserire la spina in una presa a muro. Staccare la spina per scollegare il dispositivo dall´alimentazione.
• Utilizzare il dispositivo solo per lo scopo previsto ovvero preparare lo yogurt.
• Dopo aver disimballato il dispositivo, accertarsi che non sia danneggiato e che tutti i componenti siano
contenuti all´interno della confezione.
• Prima di inserire la spina nella presa, accertarsi che la tensione domestica sia conforme a quella indicata
sulla targhetta identificativa posta nella parte inferiore del dispositivo.
• Il collegamento elettrico deve essere sempre eseguito seguendo le istruzioni del produttore. Si declina
ogni responsabilità per danni a cose, persone e animali derivati da un collegamento errato.
• Non collocare il dispositivo su una superficie che vibra come ad esempio un frigorifero. Non esporre il
dispositivo a schizzi d´acqua.
• Non lasciare lo yogurt in frigorifero per più di 10 giorni.
• Non mettere il dispositivo in frigorifero.
• Non toccare le superfici calde. Utilizzare le impugnature e i tasti.
• Collegare il cavo prima al dispositivo e poi alla presa a muro. Spegnere sempre il dispositivo tramite il tasto
prima di staccare la spina dalla presa.

16
Descrizione del prodotto
Coperchio
Timer: durata
impostabile 1-14
ore
Display a LED:
display da 1 fino a
14 ore
Tasto on/off:
Start/Stop
Bicchiere in vetro
Alloggiamento
Pannello dei comandi
Dispositivo
Pannello dei comandi

17
Utilizzo
Prima del primo utilizzo
1. Rimuovere le etichette e gli adesivi sul dispositivo.
2. Lavare con acqua calda e sapone le superfici, i bicchieri in vetro e il coperchio prima di utilizzare il
dispositivo per la prima volta e prima di conservarlo. Risciacquare con cura e far asciugare il dispositivo.
3. Lavare la parte interna del dispositivo con un panno umido.
Preparare uno yogurt semplice
1. È necessario un misurino da 1,5 litri e una frusta.
Assicurarsi che tutti i componenti siano stati lavati con cura e conservati all´asciutto.
2. Preparare circa 1,2 litri di latte e 130 ml di yogurt fresco oppure 1,33 litri di latte e 2 g cultura di yogurt.
Mescolare bene nel misurino. Distribuire il preparato nei 7 bicchieri in vetro e avvitare il coperchio.
Nota: se si utilizza latte non pastorizzato, è necessario prima bollire il latte per eliminare germi
e batteri. Il latte UHT non deve essere bollito. Per ottenere risultati ottimali, il latte deve essere a
temperatura ambiente.
3. Mettere i bicchieri in vetro nella yogurtiera e chiudere il coperchio.
4. Quando il dispositivo è collegato alla corrente, la spia a LED lampeggia per un po´ e poi passa in modalità
off.
5. Premere il tasto on/off. Sul display lampeggia „10H“. Impostare il tempo entro 5 secondi. La yogurtiera si
avvia automaticamente.
Nota: selezionare il tempo desiderato tramite il tasto timer. Premere il tasto on/off per azionare il
dispositivo. E´ possibile reimpostare il timer mentre il dispositivo è in funzione. Per fare ciò, premere
il tasto on/off per spegnere il dispositivo e selezionare di nuovo il tempo.
6. Una volta selezionato il tempo, il dispositivo si aziona e il timer si avvia. Allo scadere del tempo, il
dispositivo si spegne automaticamente.
7. Lasciare raffreddare un po´ i bicchieri. Mettere i bicchieri in frigorifero dopo almeno 3 ore.
Note
Il latte contiene il lattosio e viene trasformato in batteri di acido lattico (coltura per yogurt) che
consentono la preparazione dello yogurt. Il dispositivo crea la temperatura ideale per aumentare
le colture per yogurt.
Il latte non deve contenere altri batteri poiché possono contaminare lo yogurt. Pertanto è necessaria
un´igiene assoluta. Inoltre è possibile bollire prima il latte e farlo raffreddare poi a 40°C prima di
aggiungere le colture per yogurt.

18
Ricette
Ricette per yogurt semplice
Coltura per yogurt come fermento lattico
1. Latte: 1400 ml
2. Coltura per yogurt: 2 g
Yogurt fresco come fermento lattico
1. Latte: 1200ml
2. Yogurt fresco: 130 ml
Nota: non utilizzare latte o yogurt scaduti
Idee per preparare lo yogurt
E´ possibile utilizzare yogurt magro per produrre yogurt alla frutta o ad altri gusti. Non ci sono limiti alla crea-
tività. Procedere solo quando lo yogurt è pronto per ottenere il risultato desiderato.
Yogurt alla frutta:
Mescolare frutta fresca oppure alimenti a base di frutta come la marmellata.
Altri gusti: aggiungere zucchero alla vaniglia, vaniglia, noci, scaglie di cioccolato, torrone, scaglie di cocco e
altri aromi.
Tzatziki
Aggiungere cetriolo tritato, aglio e olio d‘oliva.
Note:
• Lo yogurt fatto in casa di solito è più cremoso e rispetto a quello che si acquista.
• Durante la preparazione, potrebbe essere necessario rimuovere l´acqua in eccesso. In questo caso, gettare
via l‘acqua o mescolare di nuovo.
• È possibile utilizzare lo yogurt appena fatto per la preparazione dello yogurt successivo. Se si ripete questa
operazione più volte, si ottiene uno yogurt più liquido. Se lo yogurt diventa troppo liquido, ricominciare
con un nuovo yogurt acquistato.
• Utilizzando solo 900 ml di latte, lo yogurt diventa più consistente.
• Se si aggiungono 3-4 cucchiaini di latte in polvere, lo yogurt diventa più spesso.
• Lo yogurt diventa più spesso, se lasciato un giorno in frigorifero prima di consumarlo.
• Il latte UHT non deve essere bollito prima della produzione di yogurt.
• Lo yogurt può essere fatto anche con il latte di soia, in questo caso utilizzare uno yogurt fatto con latte di
soia come fermento lattico.

19
Pulizia
• Staccare la spina dalla presa prima di eseguire la pulizia.
• Pulire la base del dispositivo e il coperchio con un panno umido. Non utilizzare prodotti abrasivi.
• Non immergere in acqua o in altri liquidi il cavo di alimentazione, la spina e il dispositivo.
• I bicchieri possono essere lavati in lavastoviglie.
Smaltimento
Se sul prodotto è presente la figura a sinistra (il cassonetto dei rifiuti mobile sbarrato), si
applica la direttiva europea 2012/19/UE. Questi prodotti non possono essere smaltiti con i
rifiuti normali. Informarsi sulle disposizioni vigenti in merito alla raccolta separata di dispo-
sitivi elettrici ed elettronici. Non smaltire i vecchi dispositivi con i rifiuti domestici. Grazie
al corretto smaltimento dei vecchi dispositivi, si proteggono il pianeta e la salute delle
persone da possibili conseguenze negative. Il riciclo di materiali aiuta a ridurre il consumo
di materie prime.
Dichiarazione di conformità
Produttore: Chal-Tec GmbH, Wallstraße 16, 10179 Berlino, Germania
Questo prodotto è conforme alle seguenti direttive europee:
2014/30/UE (EMC)
2014/35/UE (LVD)
2011/65/UE (RoHS)

20
Indicaciones de seguridad
Datos técnicos
Estimado cliente,
Le felicitamos por la adquisición de este producto. Lea atentamente el siguiente manual y siga cuidadosa-
mente las instrucciones de uso con el fin de evitar posibles daños. La empresa no se responsabiliza de los
daños ocasionados por un uso indebido del producto o por haber desatendido las indicaciones de seguridad.
Número de artículo 10031316
Suministro eléctrico 220-240 V~, 50 Hz
Consumo 20 W
Tipo de protección II
• Conserve este manual de instrucciones para consultas posteriores.
• No sumerja el aparato o el cable de alimentación en agua ni en ningún otro líquido. Si el cable cae dentro
de un líquido, desconecte el enchufe inmediatamente. No lo toque mientras esté sumergido en el líquido.
• Si el aparato se pone en funcionamiento cerca de niños, se ruega que estos se supervisen para evitar le-
siones provocadas por accidentes.
• Desconecte el enchufe del aparato si no está en uso, si desmonta piezas y antes de limpiarlo. Sujete el
enchufe antes de desconectarlo del suministro eléctrico. No tire del cable de alimentación.
• No utilice el aparato si el cable de alimentación o el enchufe están dañados, si el aparato presenta fallos
en el funcionamiento o se ha visto dañado de cualquier manera. En ese caso, contacte con el servicio de
atención al cliente.
• La utilización de complementos que no hayan sido autorizados o vendidos por el fabricante puede provo-
car un incendio, una descarga eléctrica o lesiones.
• El aparato se ha concebido para un uso doméstico. No utilice el aparato al aire libre.
• No deje que el cable de alimentación quede colgando sobre el borde de la mesa o entre en contacto con
una superficie caliente.
•
Other manuals for 10031316
1
Table of contents
Languages:
Other Klarstein Yogurt Maker manuals