Klugmann KO613TCX-PRO User manual

KO613TCX-PRO
OVEN
INSTRUCTION MANUAL
Klugmann Hausgeraete GmbH.
Gropiusstraße 7,
48163 Münster, Deutschland
service@klugmann-hausgeraete.de
www.klugmann-hausgeraete.de
408-594060250149+


GB
1
Dear Customer,
we would like to thank you and congratulate you on your choice.
This new product has been carefully designed and built using top quality materials, and
meticulously tested to ensure that it meets all your culinary requirements.
Please read and observe these simple instructions, which will enable you to achieve
excellent results from the very first time you use it. This state-of-the-art appliance comes
to you with our very best wishes.
THE MANUFACTURER
IMPORTANT
The oven’s data plate is accessible even with the oven fully installed. The plate is visible
simply by opening the door. Always quote the details from it to identify the appliance
when ordering spare parts.
TABLE OF CONTENTS
SAFETY INSTRUCTIONS....................... 2
INSTALLATION OF THE OVEN.............. 4
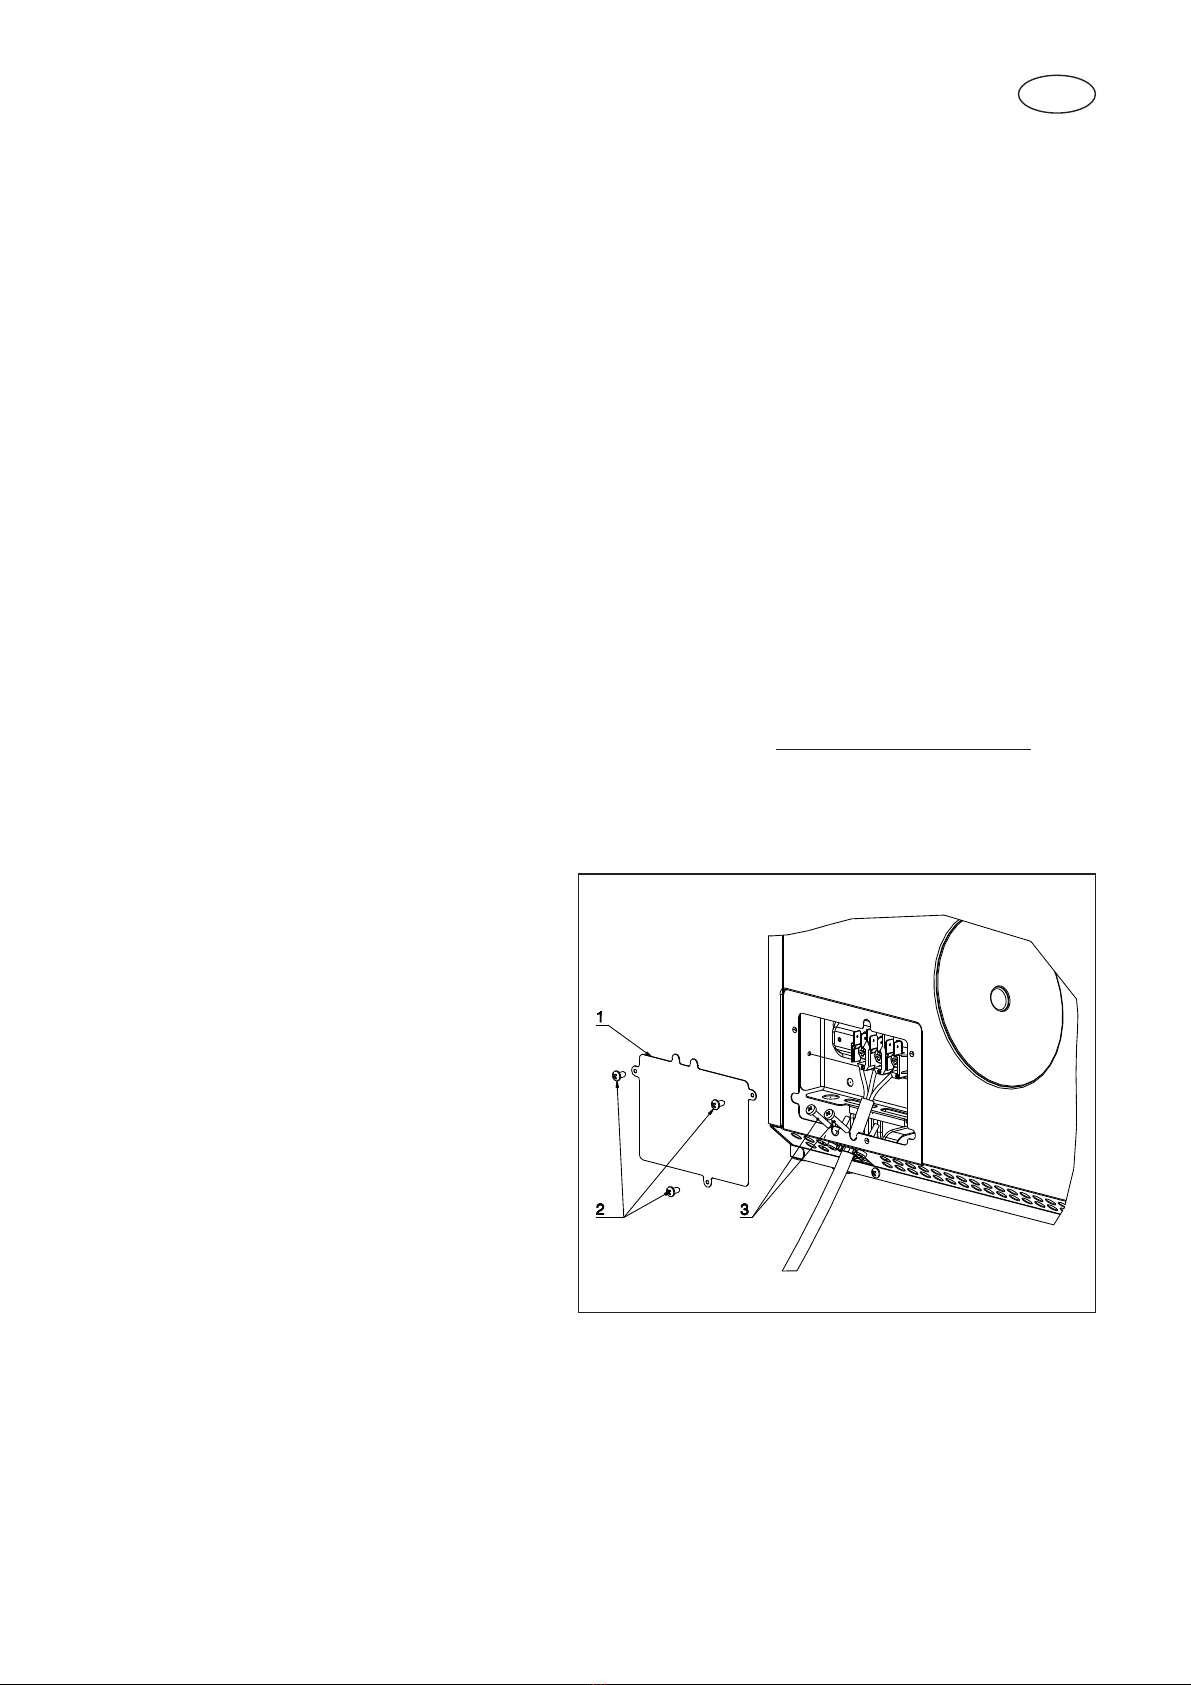
Electricals................................................ 4
Connection to the electrical
powermains.............................................7
INSTRUCTIONS FOR USE..................... 8
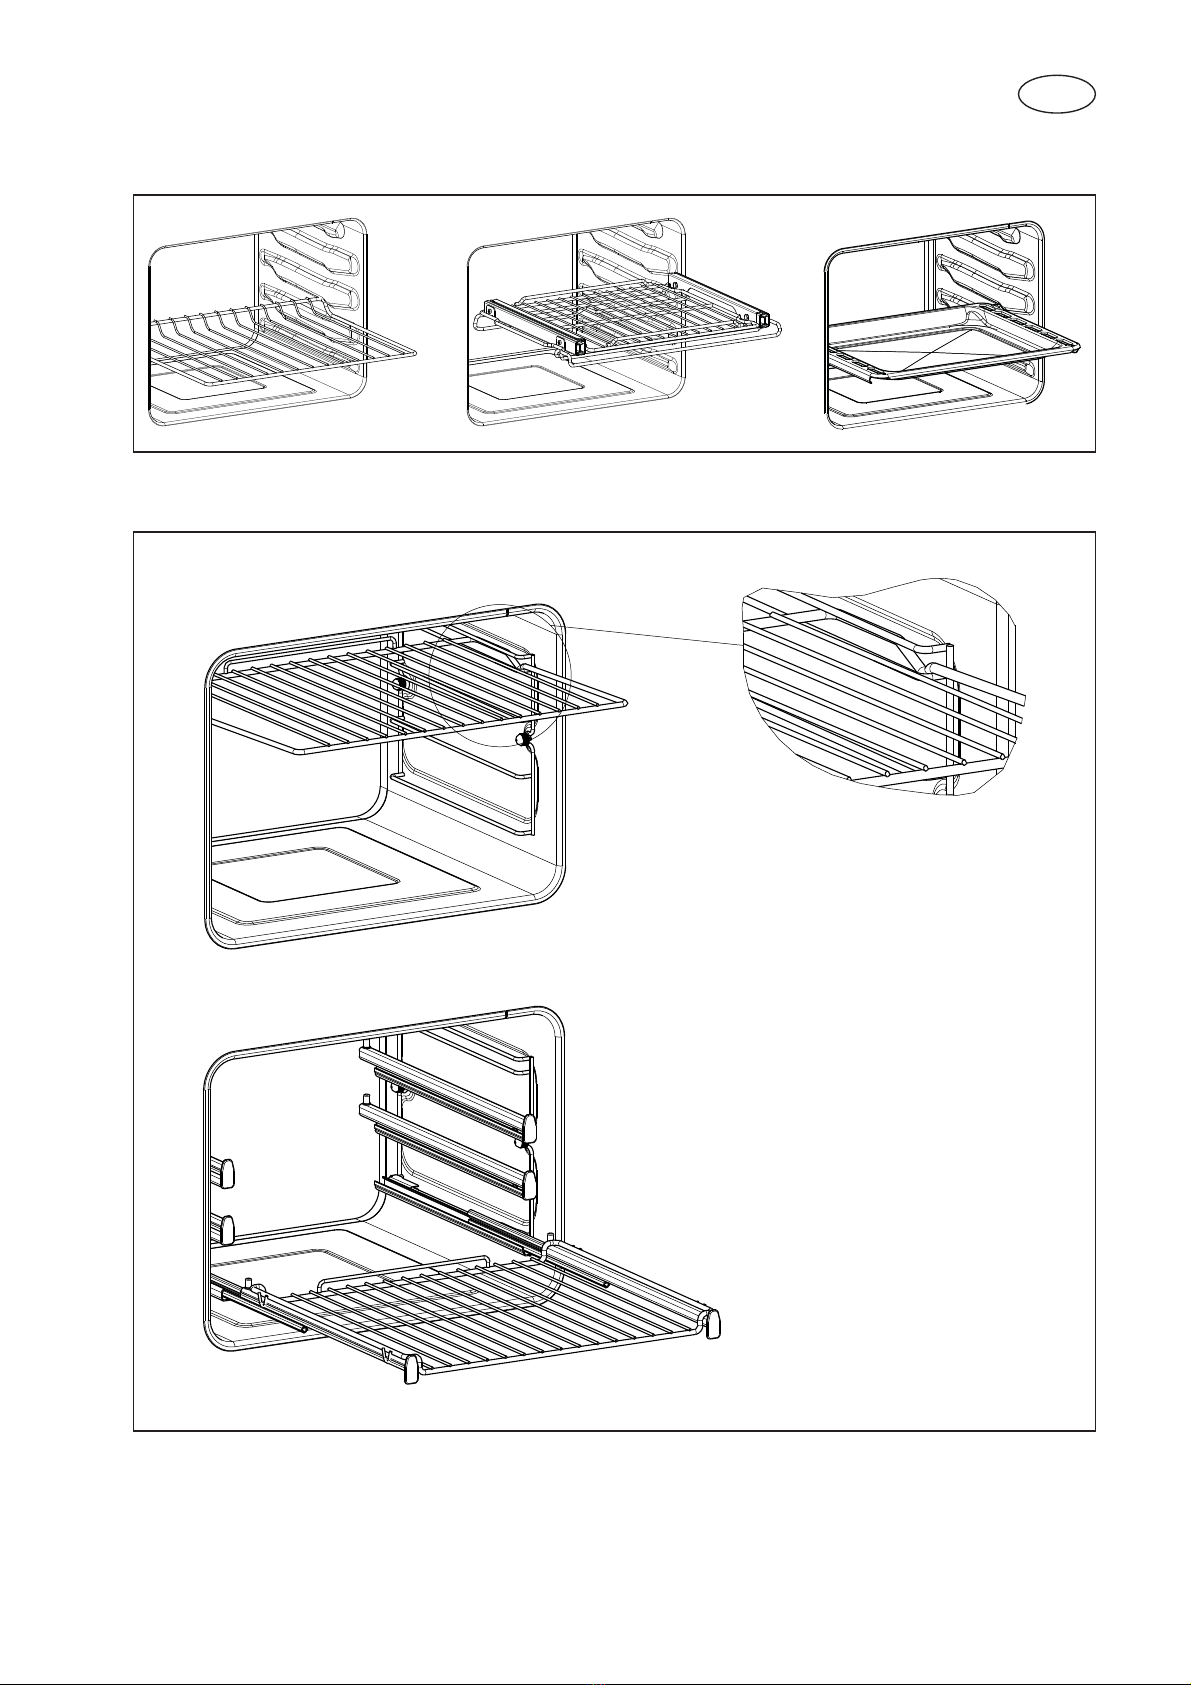
Oven Racks............................................. 8
Oven extendable racks (if present)....... 9
Removable Guides ................................ 10
Beforehook-up.......................................11
Demonstrationmode..............................11
Setting the clock..................................... 12
Actions that are possible with
the oven off........................................... 13
Turning on the oven............................. 13
Key (or child safety) function................. 14
Padlock function (door lock) (only available
in some models) ................................... 14
MAIN FUNCTIONS................................ 15
Cooking functions.................................. 15
Instructions for use................................. 18
Food probe (or probe thermometer)...... 19
Using the food probe (only available in
some models) ........................................ 20
SPECIAL FUNCTIONS......................... 24
Boost (quick preheat)............................ 24
Pizza mode........................................... 24
Self clean.............................................. 26
Oven light control................................ 27
Setting the temperature...................... 28
PROGRAMMING THE OVEN............. 29
Timer programming.............................. 30
Automatic functions.............................. 33
Cooking mode table with
preset temperatures.............................. 36
DOOR LOCKING SYSTEM................. 37
Automatic door locking during
pyrolytic cycle........................................ 37
Oven lights............................................ 37
CLEANING AND MAINTENANCE....... 38
Self-cleaning cycle (pyrolytic cycles).... 38
Oven door removal............................... 39
Removing the “FULL GLASS”
panoramic door..................................... 40
How to remove the inner glass of the
“FULL GLASS” panoramic door.......... 41
Replacement of the oven light............. 42

GB
2
SAFETY INSTRUCTIONS
- Do not disassemble any parts prior to having disconnected the oven from the
mains.
- Do not use the appliance if any part is broken (for example a glass). Disconnect
it from the mains and call service.
- Before using the oven, it is recommended to make it operate at noload at the maximum
temperature for an hour to eliminate the insulating material odour.
- In all models, leave the door closed when the grill is used.
- The cooling fan may remain in operation so long as the oven is hot, even after it has
been switched off.
- During the use the appliance becomes very hot; don’t touch the heating elements
inside the oven.
- During the oven operation, the front is heated as well; consequently keep children
clear of the oven, especially during self-cleaning.
- Parents and adults should pay particular attention when using the product in presence
of children.
- Children should be overseen so as to ensure that they don’t play with the equipment.
- Keep children under age 8 away, unless constantly supervised.
- This appliance is not intended for use by persons (including children over age 8) with
reduced physical sensory or mental capabilities, or lack of experience and knowledge,
unless they have been given supervision or instruction concerning use of the appliance
by a person responsable for their safety.
- Children may not perform cleaning and maintenance unsupervised.
- In order to avoid damage to the oven enamel coat, do not cover the oven muffle sole
with any item (e.g. aluminum foil, pans and the likes).
- Do not use harsh abrasive cleaners or sharp metal scrapers to clean the oven door
glass since they can scratch the surface, which may result in shattering of the glass.
- Abrasive detergents and steam cleaning equipment should not be used for cleaning.
- Before performing self-cleaning, take out all accessories (grills, dishes, pans) to avoid
damaging them, remove large cooking residues and then close the door, ensuring that
it is closed properly.
- The oven is cool and power to the oven has been turned off before removing the door.
Failure to do so could result in electrical shock or burns.
- Use only the meat probe supplied with the appliance.

GB
3
Refer to the figures below for the correct placement of the grills
EMBOSSED GUIDES
REMOVABLE GUIDES

GB
4
INSTALLATION OF THE OVEN
To install the oven into the kitchen a cutout should be made in accordance with the
dimensions shown in Fig. 1.
The apparatus is to be fastened to the top by means of the two screws provided in the kit
through the holes made on the oven uprights.
The cabinet in which the apparatus is installed shall be open on the back side to ensure
a sufficient air circulation and prevent overheating.
Leave a gap of at least 200 cm2 (see Fig. 1) for air circulation if the oven is installed in a
column; this is not necessary if the oven is installed under the work top.
WARNING
As the apparatus is to be fitted in your kitchen furniture, make
sure that all surfaces in contact with the oven can resist a
temperature of approx 90°C.
Electricals
- Absorbed power:
oven top element:................................................. 2400W 230V - 2400W 240V
oven bottom element: .......................................... 2100W 230V - 2100W 240V
round element (hot air): ....................................... 2500W 240V (on some models)
additional oven bottom element: ......................... 1000W 230V - 1000W 240V
(on some models)
roasting jack motor: ............................................... 4 W (on some models)
lamp: .................................................................... 25 W
hot air fan motor:................................................... 25 W
cooling fan motor:.................................................. 25 W
- Maximum absorbed power: (see data plate).
- Supply voltage: (see data plate).
NOTE
This appliance is in compliance with following European directives:
2006/95/CE (LVD), 2004/108/CE (EMC), 2011/65/CE (RoHS),
2012/19/UE (WEEE), 2002/40/CE.

GB
5
Respect for the environment
The documentation for this appliance is printed on paper bleached without
chlorine or recycled paper to contribute to protecting the environment. The
packaging was designed to prevent damage to the environment; they are
ecological products that can be recovered or recycled.
Recycling the packing saves raw materials and reduces the volume of
industrial and domestic waste.
THE PACKING MATERIAL is 100% recyclable and marked with the recycling symbol.
Dispose of in conformity with local law. The packing material (plastic bags, polystyrene
parts, etc.) must be kept out of the reach of children because it is potentially dangerous.
THIS APPLIANCE is marked in conformity with European Directive 2012/96/UE, Waste
Electrical and Electronic Equipment (WEEE). By making sure that this product is disposed
of correctly, the user contributes to preventing potential negative consequences for the
environment and health.
THE SYMBOL on the product or accompanying documentation indicates that
this product must not be treated as domestic waste but must be delivered to a
suitable collection point for the recycling of electrical and electronic equipment.

GB
6
H
Appliances A B C D E F G H
Single oven 56 55 58,5 59,5 Min
1,3 58,9 59,5 86,5
Dimensions are in centimeters
Fig. 1

GB
7
Connection to the electrical power mains
WARNING
This apparatus must be earthed.
The oven is only for domestic use.
The feed voltage and the absorbed power are as indicated on the data plate attached to
the left-hand side upright, which can be seen when the oven door is open.
Connecting must be carried out by qualified personnel and in accordance with the
regulations currently in force.
The manufacturer can not be held responsible for any damages to persons or objects
caused by failure to observe these instructions.
If the supply cord is damaged, it must be replaced by the manufacturer, its service agent
or similarly qualified persons in order to avoid a hazard.
The oven must be connected to the mains through a multipole circuit breaker with
a contact-to-contact gap of at least 3 mm, making sure that the earth wire is not
disconnected. For connecting use a flexible cable of the H05V2V2-F 3x1,5 mm2type
remembering to make it long enough to allow the oven to be removed from its housing
unit when maintenance work is required.
To connect the cable to the oven
proceed as follows (see Fig. 2):
- Remove the lid (1) by unfastening
the three screws (2). Unfasten the
two screws (3) for the cable holder
and feed the cable through the
opening immediately below the
cover.
- Remove about 12 cm of the outside
insulation from the cable and shorten
the two active wires (live and neutral)
to 6 cm, leaving long the one to be
connected to the main earth terminal
on the terminal box; remove about
1 cm of the main insulation from the
three wires and connect them correctly
to the terminal box, remembering to respect the polarities.
- Tighten the two screws (3) of the cable holder and put the lid (1) back on with the three
screws (2).
Fig. 2

GB
8
INSTRUCTIONS FOR USE
Oven Racks
WARNING
Never use aluminum foil to cover the oven racks or to line the
oven. It can cause damage to the oven liner if heat is trapped
under the foil.
WARNING
Make sure you do not force it to avoid damage to the enamel.
The oven has rack guides at four levels. Rack
positions are numbered from the bottom rack
guide (#1) to the top (#4).
Check cooking charts for best rack positions to
use when cooking.
Each level guide consists of paired supports formed
in the walls on each side of the oven cavity.
Always be sure to position the oven racks before turning on the oven. Make sure that the
racks are level once they are in position.
The racks are designed to stop when pulled forward to their limit.
To remove oven rack from the
oven (see Fig. 4):
1 Pull rack forward.
2 Lift rack up at front and then
remove it.
To replace an oven rack
(see Fig. 5):
1 Place rear of rack between
rack level guides.
2 While lifting front of rack, slide
rack in all the way while lowe-
ring the front.
Fig. 3
1
2
Fig. 4
Fig. 5
1
2
1
2
1
2
EMBOSSED GUIDES
EMBOSSED GUIDES
REMOVABLE GUIDES
REMOVABLE GUIDES

GB
9
Oven extendable racks (if present)
The extendable rack allows for easier access to cooking foods. It extends beyond the
standard flat rack bringing he food closer to the user.
WARNING
Make sute that:
• When the rack is outside of the oven, slide arms do not
lock. They could unexpectedly extend if the rack is carried
incorrectly. Extending slide arms could cause injury. Rack
should only be held or carried by grasping the sides.
• To avoid burns, pull rack all the way out and lift pan above
handle when transferring food to and from oven.
NOTE
Always remove the extendable rack before self-cleaning the oven.
DO NOT USE IN PIZZA MODE
To remove extendable rack from the oven
(see Fig. 6):
1 Lift of rack slightly and push it until the stop
release.
2 Raise back of rack until frame and stop clear rack
guide.
3 Pull rack down and out.
To replace an extendable rack (see Fig. 7):
1 Grasp rack firmly on both sides. Place rack
(including frame) above desired rack guide.
2 Push all the way in until the back of the rack drops
into place.
3 Pull both sections forward until stops activates.
Rack should be straight and flat, not crooked.
1
2
3
Fig. 7
1
2
3
Fig. 6
EMBOSSED GUIDES

GB
10
REMOVABLE GUIDES
NOTE
Always remove the removable guides before oven self-cleaning by unscrewing the
nuts (A) shown in Figure 3b.
A
Fig. 3b

GB
11
Introduction to the oven
Dear Customer, your new oven is controlled by an electronic board that constantly
monitors its operation to improve its performance.
The touch controls are state-of-the-art, precise and reliable.
The interface is elegant, orderly and discrete, more intuitive than ever!
A few buttons, many functions and no combination or sequence is difficult to enter, so
you can concentrate on following the recipe and the oven is ready in two clicks!
Installation and hook-up
Dear Customer, this oven is a sophisticated electronic appliance, classified as a durable
good. Its installation requires qualified professionals for both the hook-up of the power
line and itsplacement in the kitchen counter.
Before hook-up
When the oven is connected to the electric mains for the first time, the display will ask you
to select your language;use the buttons to select the language you want;
use the button to confirm the choice;
ITALIANO
ENGLISH
DEUTSCH
FRANCAISE
ENSPAÑOL
NEDERLANDS
PORTUGUÊS
POLSKI
(from now on, the language choice will remain fixed even when their are power
outages).
Now, it goes into demonstration mode.
Demonstration mode
This is the mode that the oven is normally in every time that there is a power failure and,
consequently, when it is first hooked-up:
the purpose is to show how you can control it with a recorded sequence of commands.
In this mode, the oven is never REALLY turned on, i.e., the heating elements are
never powered!
The control panel is INACTIVE and, so, the oven will not respond to commands!

GB
12
5 sec.!!
To disable the demonstration mode, touch the
light symbol for five seconds: the control
will go to normal operation and ready for
turning on.
Now you can set the time but it is not necessary
for turning on the oven.
Setting the clock
The oven will signal that it is connected to the power mains with a double beep.
To set the system time, press the “TIMER FUNCTIONS” button for at least 3 seconds
Each command activated is confirmed by a beep.
Set the clock with the + and - buttons: during
setting the separator dots flash, the time has
been set when the dots remain steady on.

GB
13
ACTIONS THAT ARE POSSIBLE WITH THE OVEN OFF
- Turn on oven light
The oven light is turned on/off by touching the
symbol as shown in the figure.
- Change the Language
When the oven is off, you can change the language of the display by simultaneously
selecting and the + in the lower right for at least 3 seconds.
Then use to select the language and confirm the choice with .
- Setting the “minute-counter” timer function
See the appropriate section on page 29.
TURNING ON THE OVEN
Turn the oven on by pressing the symbol
shown in figure.
to activate the oven functions, always press
except for the light and timer functions,
which are independent
The command activates all the icons by
lighting up their backgrounds.
NOTE: Remember that the oven only turns on if the key function is deactivated
The word ON appears on the display for a minute. The control is waiting for you
to select a cooking function. Otherwise, the oven assumes that it was turned on
by accident and, for safety reasons, it automatically turns off displaying the word
OFF for several seconds.

GB
14
Key function (keypad lock)
The key function is activated/deactivated by
pressing the button for at least 3 seconds.
You can activate and deactivate the operating
mode of the oven at any time.
If the key symbol is ABSENT, it means that the KEYPAD LOCK
function is not active.
If the key symbol is DISPLAYED, it means that the KEYPAD LOCK
function is active.
Padlock function (door lock) (only available in some models)
The padlock function is activated/deactivated
by pressing the key for at least 3 seconds.
You can activate and deactivate the oven
mode at any time.
The OPEN padlock symbol means that the DOOR LOCK function is
not active.
The CLOSED padlock symbol means that the DOOR LOCK function
is active.

GB
15
MAIN FUNCTIONS
Overview of the command panel
Cooking functions
Special function
Temperature
Clock
Oven ON/OFF
Lock oven ON/OFF
Programmin the
oven
Food probeKeypad lock
Door lock
The cooking functions
The provides eleven specific cooking functions!
To activate a function, just touch the corresponding symbol.
Each function has a temperature setting selected on the basis of cooking tests of
the recipes that are typically used, which can be easily changed based on your own
experience.
Attention:
“During use, the accessible parts of the oven can become very hot. Children should be
kept at a distance; you should also be careful not to touch the heating elements inside
the oven.”

GB
16
Cooking functions
Each type of oven is provided for various cooking systems.
Icon Mode Description Used for…
The light is on only. ---
In this mode only the fan inside of the
chamber is running.
This mode is used to defrost
deepfrozen food.
Only the lower (bottom) oven heating
element is activated.
This mode is used to keep foods
warm.
In this mode both upper (top)
and lower (bottom) oven heating
elements are used to heat the oven
air. However, no fan is used to
circulate the heat.
This is the traditional mode of cooking
on one shelf. Therefore only one rack
can be used when selecting the Bake
mode. Ideal for Appetizers, Biscuits,
Coffee Cakes and Cookies.
PIZZ
A
The Pizza mode uses the additional
lower heating element + the circular
heating element
located behind the fan cover in the
rear wall of the oven.
The Pizza mode has been specifically
designed so you can bake perfect
PIZZAS in a few minutes.
NOTES: in this particular cooking
mode, the temperature in the oven
reaches 350 °C.
This mode is intended to save energy.
In particular the oven cooling fan
works only when needed e.g. when
the oven is hot and the electronics
require cooling.
Ideal for frozen or precooked food,
and small portions-mealsThe preheat
time is very short and cooking tends
to be slower.It is not recommended
for heavy loads e.g. large portions or
big meal preparation.
The Convection bake mode uses the
upper (top) oven heating element, the
lower (bottom) heating element and
the convection fan inside the oven.
It can also be used for baking-cooking
Appetizers, Biscuits, Coffee Cakes
and Cookies on one or more levels.
The True Convection Bake mode
uses the circular or third heating
element hidden behind the baffle at
the back wall of the oven. The heat is
circulated throughout the oven by the
convection fan.
Consequently different foods can be
cooked simultaneously (maximum
three levels) and is suitable for
preparing a complete dinner (small
portions). Mixing of flavours is
avoided and an important energy
saving is obtained.

GB
17
Suitable for preparing a complete
dinner (small portions). Mixing of
flavours is avoided and an important
energy saving is obtained.
Ideal for steak, hamburgers, chicken
quarters or chicken breasts.
The Grill mode uses intense heat
radiated from the upper (top) heating
element.
Ideal for preparing toast, browning
and grilling.
If the spit motor is fitted the spit
roasting of a whole chicken or turkey
is possible.
The grill uses intense heat radiated
by the heating element
Ideal for toasting, browning and
grilling.
If rotisserie spit is mounted on the
motor, you can cook a whole chicken
or turkey.
The standard time is 1.30 h and can
be changed. (see page 26)
PYRO or self-cleaning mode. Here
the oven is automatically cleaned by
burning-off cooking residues at high
temperature (about 475 °C) from
1.30 h to 3 h. During the self-cleaning
cycle all fumes produced are filtered
and then expelled to ambient.

GB
18
Instructions for use
Conventional cooking
A classic system that uses upper and lower heat suitable for cooking a single dish.
It is a good idea to insert the food when the oven has reached its preset temperature, i.e.,
when the °C is locked and you have heard the beep.
If you need to lower or raise the temperature towards the end of cooking, press the most
suitable cooking symbol and adjust the temperature as you see fit.
We recommend opening the door as little as possible during cooking.
Fan cooking
In this type of cooking, a fan located in the rear part circulates warm air inside the oven,
distributing it uniformly. This cooks food faster than conventional cooking.
This system is good for cooking on several shelves and even for different types of foods
(fish, meat, etc. ).
Defrosting
When you select ventilated cooking and set the temperature to 0 °C, the fan will circulate
cold air inside the oven, favouring the rapid defrosting of frozen foods.
Pre-heating is not necessary but it is better to do it for pastries (you can increase the
temperature up to 60 °C).
Table of contents
Languages:
Other Klugmann Oven manuals

Klugmann
Klugmann KO1076TFX User manual

Klugmann
Klugmann KSO6612.5ICX User manual

Klugmann
Klugmann KO613TCX User manual

Klugmann
Klugmann KO1772TFT User manual

Klugmann
Klugmann KO611TCBM User manual

Klugmann
Klugmann KO610TCBL User manual

Klugmann
Klugmann KO610.1TCX User manual

Klugmann
Klugmann KO609TFTX User manual

Klugmann
Klugmann KO608TCP User manual

Klugmann
Klugmann KO611TCBM User manual