KOCOM KCV-S701IPOE User manual

SMART
IP VIDEOPHONE
U S E R M A N U A L
KCV-S701IPOE
Thank you for purchasing our product.
Read safety instructions and manual
carefully before using the product.
APP Download

2
Cautions for set-up
Warnings for Usage
Cautions for Repairs and Maintenance
·Do not install this unit near the water and dust, for example, in a bathroom or near the washing machine. It caused fire and electric shock.
·Do not install this unit near the fire, for example, near kitchen sink, heater or the like.
·Do not install near the noxious gar such as Hydrogen Sulfide, metal power and the like.
·Do not install near the water and chemicals.
·Do not give any damage, break and modify the plug. Overloading, heating, pulling causes the damage.
·Do not place the plug near the heater. The damaged code causes fire and electric shock. Do not pull the power code when unplugging.
·The damaged code causes fire and eclectic shock. Must pull with plug. Do not touch with wet hands. It causes the electric shock.
·Do not use any other voltage, except the marked regular voltage.
·Do not use the power terminal at the units to other electric device except the designed device.
·Do not install the units at the leaking place if it doesn’t have any waterproof mark. Do not install the unit when the power is on.
·Install the circuit breaker after checking the safety such as electric shock and leakage. Turn off the power before you install or A/S
·Check the suitability of the lines for installing when you use the exiting lines.
·Do the wiring work by using the designed material.
·Connect the electric wire with the designed ways and ground.
·Do not connect with any other devices except the designed devices to compose the system.
·Unplug electric wire and communication lines from the units before moving to another place.
For safe use, please stick to the following cautions.
Cautions for safety
·Do not use liquid or aerosol cleaners. Use a damp cloth for cleaning.
·Set the device of the wall-mounted type not to fall. Falling from an earthquake causes personal injury.
·The law limits distributing the power lines to an authorized person from government.
The work from an unaurhtorized person cause fire or electric shock.
·Place this unit securely on a stable surface. Serious damafe and/or injury may result if the unit falls.
·Do not set up this unit near the leaking place because it may expose you to dangerous voltages or other risks.
·Even if your product is water proof, do not install it slanted place of water leakage, which can a short circuit.
·Fix the product on the wall safely according to the installation guideline to prevent any damage or injury.
ㆍDon’t put any stuff in 30cm around the monitor, not to block the air hole.
·The work of distributing wires needs skills and experiences. So please, for assistance, contact your dealer or call service center.
·The communication lines should be built in being distant from the power source.
This may result in the risk of fire, electric shock and communication disorder.
·Setting the communication lines in a high humid place such as outside without any protection from rain causes the communication disorder.
·Keep the hook at the wall-mounted device safe. The hook may cause the physical injury.
·Think about the thickness and quality of wall material. The unqualified material may make the device fall.
·Keep the inside of the device clean. Having the dust inside without any cleaning for a long time causes the fire.
If necessary, contact your dealer or service center to get cleaning service.
Caution
Warning
·Unplug this device when you want to check the inside. If there is no plug, please, turn off the circuit breaker.
·Unplug this device when you try to move it to another place.
If the electric line is connected inside of the unit, please contact your dealer or service center.
·Please, save this manual after reading these instructions carefully. ·Read and understand all instructions to set up rightly.
·This Cautions for Safety may include items that are not contained in specifications of the product that consumer purchases.
·If you need assistance with the set-up or operation, please contact with A/S center.
To help our customers to understand this manual, to prevent any personal injury or property damage, some marks are used in the manual.
The marks and the drawing signs are below. Please, understand the marks before reading the manual.
Sign to show what not to do.
Sign to tell you that you should follow the instructions.
Sign to tell you that you can't disassemble this unit.
Sing to tell you that you need more attention including (high voltages, electric shock, danger, warning)
Sign to tell you that you must unplug the unit.
Mishandling the device with ignoring this sign may result in serious injury or death.
Mishandling the device with ignoring this sign may result physical injury or material damage.
The important marks in the manual.
The meaning of the drawing signs.

3
Cautions for Use
Things You Need to Know
Videophone
Cautions
Cautions for Abnormality
Safety Instructions, Warnings and Cautions of Each System
·This product is designed as a home videophone and cannot use continuously like monitor camera.
·If there is temperature difference between inner part of camera and surrounding, dew condensation occurs on camera lens and may disturb image.
If dew condensation is removed from camera lens, image quality recovers.
·White LED light examination range is narrower than camera shot range at night, so there is less amount of light at night than day.
So it is difficult to see the face in low illumination condition due to noise increase on screen, but it is not from defect.
·Monitor screen (liquid crystal panel) is not in defect when some pixels always light or black out.
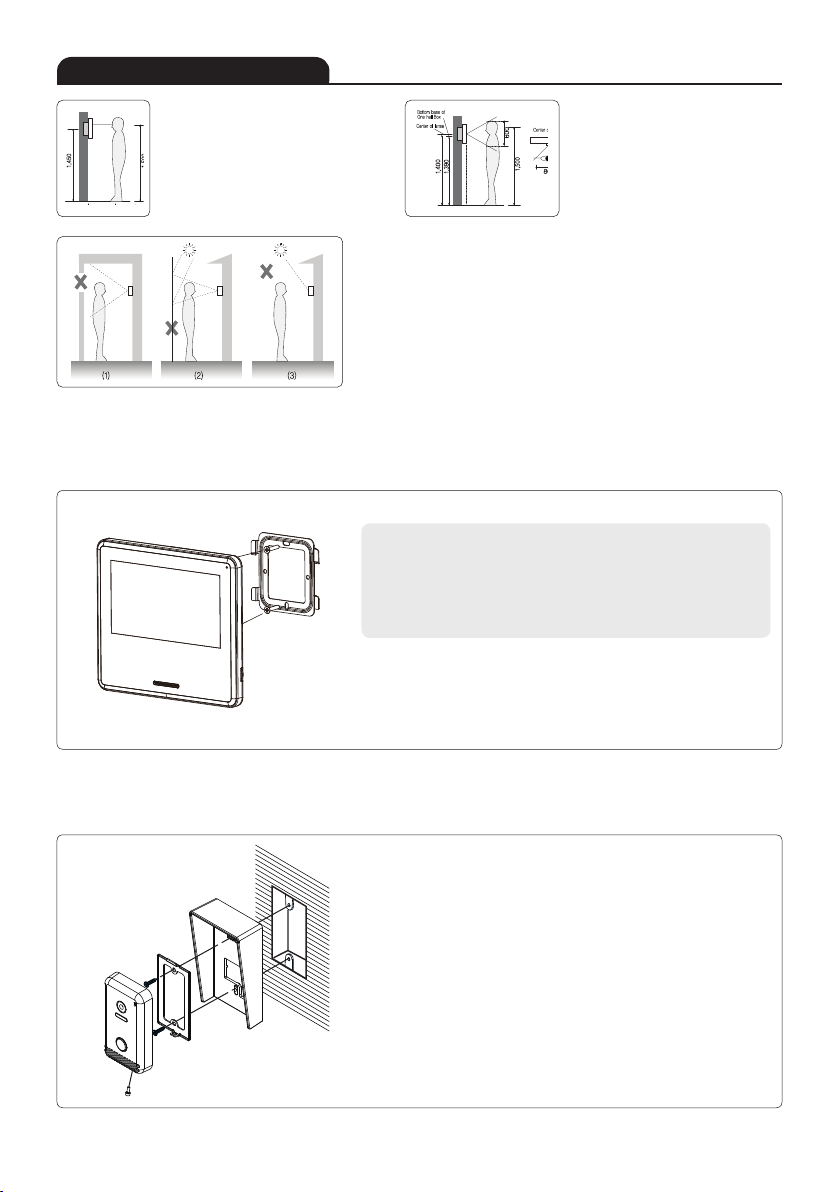
·Please install monitor and camera over 5cm away.
Also, avoid installing at a place with too much noise, because too much noise around camera causes phone call inferiority.
·Do not place an object within 20cm in front of monitor. It causes phone call inferiority, especially because microphone is installed at the top of monitor.
·If strong light such as sunlight flows into camera module, screen saturation (or strange mark) and image shaking might occur.
·This is not a defect, so please do not install camera where a direct ray of light do not flow if possible.
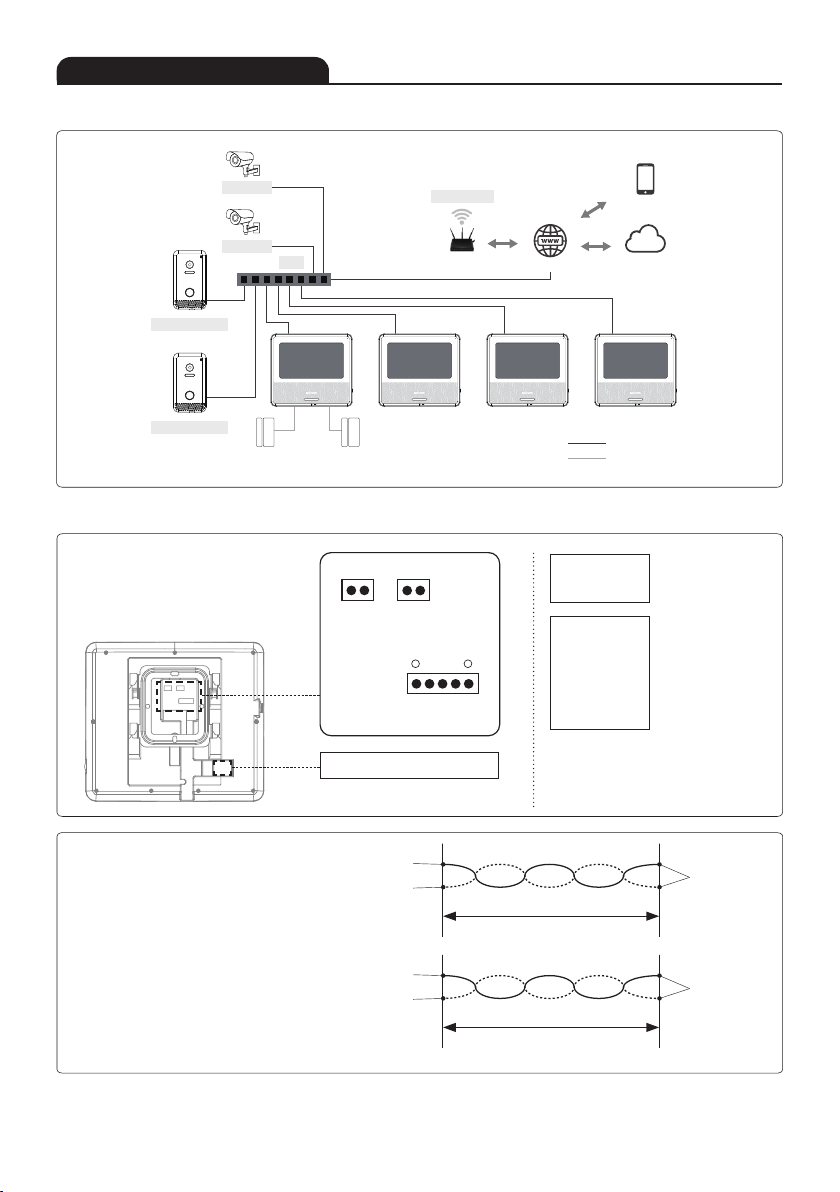
·Separate the AC/DC lines with the hook of the wall-mounted type when installing. 쪾 ·Connect the lines after peeling the wires properly.
·Do not distribute signal line with AC line. ·Use the designed driver to connect the lines to terminal.
·Do not clean the LCD with the damp cloth for cleaning. Use the only dry and soft cloth. ·Do not install the main gate monitor at the leaking place.
·In some cases there is occurrence of product destruction, malfunction, noise mixing and picture quality deterioration due to mixing of other tool's
induced. voltage or thunder with communication wiring of monitor/camera, monitor/extended monitor.
Do not wire with power line such as outdoor wiring or AC power, or phones and other tools.
·You cannot use it if you incorrectly wire the AC voltage between monitor/camera, monitor/extended monitor.
Call the store or agency where you purchased this product and consult to solve the problem.
Beware that unfixable damage might be caused due to authorizing AC voltage on communication wiring of monitor/camera, monitor/extended monitor.
·Do not ever disjoint this product. It may cause electrocution accident when touching high-voltage circuit inside this product.
·Outside power authorizing this product must be confirmed of product description and use rated voltage.
Beware that if higher voltage is authorized, unfixable damage might be caused due to product destruction.
·Power must be connected to domestic voltage (product rated voltage) consent or interior wiring.
If connected to other motive power or inverter-type power, product destruction, noise mixing, and picture distortion may occur.
·Do not drop this product. Glass is used for monitor and might break, or cause other circuit inferiority.
In such case, immediately turn down the power switch, and call to consult agency or store in which this product was purchased.
·Keep away from any conditions where water splatters or falls. Do not place anything containing water like a vase on the product.
·If installed near transmission antenna such as broadcasting station, electric wave may mix and cause picture distortion or voice mixing.
·Avoid installing near tools with strong electromagnetic waves such as microwaves and cell phones, or it may cause picture distortion.
·Do not install monitor in following places.
① Above or around water heater, rice-cooker, heater ② Place exposed to direct rays of the sun
③ Place with temperature below 0'C such as cold store ④ Place with high humidity such as bathroom, washroom, heated room
⑤ Place with a lot of gas, dust, smoke ⑥ Dangerous place with sprays of water or chemicals
·Do not wipe with insecticide, drugs or chemicals such as thinner and alcohol, or it may damage
the surface of this product.
·Beware of occurrence of image quality deterioration or malfunction from cause of humidity due to
penetration of chemicals or water into camera’s urea resins.
·As in the picture, it prevents temperature difference of camera (outside) and monitor (inside), and
removes dew condensation caused by humidity of camera window.
·Camera must be installed when wall cement is completely dry.
·When product is installed in winter below -5'C, wait for approximately 2 hours to connect. Dew formation
in monitor and camera due to temperature difference inside and outside may cause product defect.
·Avoid installing monitor and camera in place directly exposed to heat or where gas noxiousness is highly occurring.
·Do not disassemble this unit at will as this device is composed by precision parts. 쪾 ·Install the unit by following the set-up instructions of Kocom.
·Do not touch or insert any foreign substances, for example, sticker, magnetic, opener and the like.
·Make U-type at the end of wires as the rain can effect on the system by following the wires during the rainy season.
·This unit is not designed for security purpose. 쪾·Do not handle the unit with the wet hands.
·Do not place a pot with water or a small metal material on the Units.
·Do not cover the ventilating opening or put any metal material in the units. 쪾
·During thunderstorms, avoid using this unit. There may be a remote risk of an electric shock from lighting.
·Do not modify the unit. ·Open the main gate after checking ID if the image and sound system do not work. Call A/S
·Change the damaged electric code.
·Unplug this unit from plug socket and refer servicing to an authorized service center when the following conditions occur:
·If liquid has been spilled into the unit. 쪾·If the unit does not work normally by following the operating instructions.
·If the unit exhibits a distinct change in performance. ·If the unit has been dropped or physically damaged.
ㆍThe mains plug, as a disconnection device, shall remain readily accessible by the user.
·Do not disassemble the back and cabinet cover.
Caution

4
■Door Camera Installation
Sun Visor (Option)
■ Monitor Installation
■ Directly connecting cut-off power cord with power wire
1) Do not do such electric work on your own. Installing product in this way
requires reliance on electric installation man with electric work license.
2) Insulate with insulating tape while cutting off power cord and connecting with power
wire so electric wire metal does not expose. Contact between exposed electric wires
cause fire or electric shock accident.
3) Such electric work requires connection after interception of supplied power.
1) Remove wall hanger frame metal behind monitor.
2) Install wall hanger frame metal on 1 type box or wall with attached Vis.
3) Connect wiring to monitor back terminal referring to product connection diagram.
4) Hang monitor on metal wall hanger frame and fix monitor on metal wall hanger frame
5) Plug monitor`s power plug into consent and check to see if the power switch is [ON]
on the left side of monitor.
1) Install metal wall hanger frame on type 1 box or on the wall with attached screws.
2) Connect wiring to terminal on the back of door camera referring to product connection diagram.
3) Hang door camera on metal wall hanger frame and fix door camera on metal wall hanger frame
using attached screw.
Avoid heavy rain directed to the product which can cause damage since it is not waterproof.
■ Monitor installation location
·Standard monitor installation height
is about 1,500mm where screen
center is at eye level.
In this case, wall-hanging metal
center (center of piping) is 1,450mm
above ground level.
·Standard installation height
■ Caution of camera Installation
·Avoid installing camera exposed to direct ray of light (and sun).
·Beware backlight and darkness of visitor’s face, which makes identification difficult.
·Avoid installing camera in places such as the following picture.
(1) Place illuminating sky as background
(2) Place with white wall reflecting direct ray of light
(3) Place with direct ray of light
·Standard installation in height
■ Camera installation location
·Camera installation in height Standard
camera installation height is when
lens is about 1,400mm above the floor.
In this case, camera stack center
(piping box) is above 1,390mm above
ground level.
·Standard installation in height
Installation location

5
■ Door Camera
■ Wire
■ Wire
Screws for fixing hanger
frame body on the wall
Screws for fixing main
body on the wall
Lench 2.5M/M 1EA
M3X8mm 1EA
■ A Wall Hanger Frame
■ A Wall hanger frame ■ Sun Visor (Option)
■ Monitor
Specifications
Monitor
Model No. KCV-S701IPOE
Power Source PoE DC48V (IEEE 802.3af)
Power Consumption 3W(±20%)(Stand by), 7W(±20%)(Full load)
Operating Temperature 0℃ ~ +40℃
LCD 7" color LCD
Communication Systerm Handsfree Type
Wiring Door Camera : RJ45 UTP5
Mount Type Surface mount
Dimension(mm) 197(W) x 176(H) x 23(D) mm
Door
Camera
Model No. KC-S81MPOE
Power Source PoE DC48V (IEEE 802.3af)
Power Consumption Max. 3W
Operating Temperature -10℃ ~ +50℃
Dimension 70(W) x 125(H) x 21(D) mm
Angle of Lens Diagonal 110˚
■Screws
■Screws
4X25mm 4ea
4X50mm 2ea
5Pin cable for doorlock x 1ea
LAN
11Pin cable for POE x 1ea
2Pin cable for sensor x 2ea
Components of Product

6
■
Monitor
■
Door Camera (KC-S81MPOE)
·Left side ·Front
·Front
Door camera + Sun Visor (Option)
·Back
·Back
① MIC
④ Power Switch
② LCD
⑤ Terminal
③ Speaker
⑥ RJ-45 Connector
① Mic
② Camera Lens
③ LED
④ Call button
⑤ Speaker
① NC
② COM
③ NO
⑧ RX-
⑨ RX+
⑩ TX-
⑪ TX+
④ POE2_48V-
⑤ POE2_48V-
⑥ POE2_48V+
⑦ POE2_48V+
B. Camera 1/2
Selection switch
A B
2
5
6
5
1
3
4
4
3
2
1
Name and Functions of Each Part
1 11
A. Connection for POE

7
■
SYSTEM Block Diagram
■
Terminal
·Back
A. Sensor 1, 2
(non polarity)
RJ-45 Connector
B. Doorlock
① NO
② COM
③ NC
④ GND
⑤ 12V
A
B
Product Connection Diagram
*Slight reduction in image quality
may be noticed depending upon
conditions of installation environment.
DOOR CAMERA 1
DOOR CAMERA 2
IP CCTV 1
IP CCTV 2
WiFi (2.4GHz)
POE CLOUD SERVER
UTP CAT5E
Mobile phone
Internet
CLOUD SERVER
Mobile phone
Internet
Sensor 2Sensor 1
2
2
2
3
DOOR CAMERA MONITOR
Sensor
23
DOOR CAMERA
2 Wire
1 5
50Meter
80Meter
1 pair
short
1 pair
short
1
1
1
1
2
2
2
2
UTP 1 Pair DC loop resistance measurement
Resistance measurement with a tester
0.188Ω/M x 50M = 9.4Ω below
Resistance measurement with a tester
0.188Ω/M x 80M = 15.04Ω below
The total length of wiring between PoE and monitor is
limited to 80m

8
■ Booting
Booting screen is shown when you turn on power switch located on the left.
After 15 seconds, and then booting is completed. After that, screen is home screen.
Booting Screen Home Screen
■ Home Screen UI
- Home screen is the start screen where all functions of the product can be run.
- Press menu icon in Home screen to run desired functions.
① Menu setting
② Display device number
③ Monitoring button
④ Internal call button
⑤ Button for viewing the screen capture images
⑥ Button to function all of the calling melody in silence
⑦ Button for outgoing (Select sensor activation mode)
(This makes auto screen capture when calling from
outdoor.)
①
③ ④ ⑤ ⑥ ⑦
②
Instructions for Operation

9
■ Setting Menu Screen
③ Mode setting
Device ID : Setting monitor's ID.
APP : Smartphone APP connection settings.
Time Setting : System time setting.
Date Setting : System date setting.
Language : System language setting.
Sound item : Camera 1, Camera 2, Device
Calling Volume : 1
~
6
Calling Melody : 1
~
6
Talk Volume : 1
~
6
Speaker Sensitivity : 1
~
2 (Highly recommend to use in default)
MIC Sensitivity : 1
~
2
(Highly recommend to use in default)
Auto Image Capture : When you select "ON",
automatic screen capture available as per visitor's call.
Always
On Display
: When "ON" is selected, the clock always appears.
(User mode: OFF)
Absent Setting Time : You can select 15 sec, 30 sec, 45 sec, or 60 sec.
Monitoring Time : You can select 30 sec, 60 sec, 120 sec, or 180 sec.
Door Open Time : You can select 0.2sec, 1~9sec.
① General setting ② Sound setting
Instructions for Operation
①
③
④
⑤
②

10
Screen Brightness : You can adjust the brightness of the display
Modify PIN : Enter the PIN number to release the crime
prevention sensor after operation.
System Information : Display information about the current device.
Manual Download : Display QR code that connects to the
manual to be shown in your mobile phone
PIN password change (Default Password : kocom)
※Caution : You must know the changed PIN number.
Setting Device : Direct to IP CCTV Setting Screen
Brand : Select the CCTV Brand
IP : Enter the CCTV IP address
Account : Enter the account connected to CCTV
Password : Enter the passwords connected to
CCTV account
1) This product supports HIKVISION and Dahua.
2) Prior to connecting IP CCTV to Video Phone,
CCTV setting value should be changed.
(IP address/Account/Passwords)
3) Please refer to the provided manuals from
CCTV manufacturer to change the CCTV setting value.
Select the CCTV number to be connected
■ Setting Menu Screen
④ Other setting
Instructions for Operation
※Notice

11
■ Setting Menu Screen
When you select "YES", then factory mode will be
activated. (Except selected language)
⑤ Reset
Instructions for Operation
■ App download, Specification of Smart Phone and Network
Search "KOCOM Home" in Play Store(Android) or App Store(iOS).
Item Description
Recommended Spec
of Smart Phone
Andriod 8.0 version or higher.
iOS 11.4 version or higher.
Recommended Network
Delay Time
KCV-S701IPOE <-> AP within 50msec
KCV-S701IPOE <-> CLOUD within 100msec
- In case that delay time of network exceeds the abovementioned, it may not Interwork.
- It may not interwork depending upon the status of 3G, LTE and telecom.
Recommeded Network
data rates
20Mbps
Depending on network transmission speed and condition, the video or voice would be disconnected

12
■ Network Setting (Smart Phone)
The "APP" button must be activated in the
General setting.
When you select the QR code, the QR code for
downloading 'KOCOM Home APP' appears.
※ To set
WiFi mode of wireless
AP at KCV-S701IPOE, you must install APP called
"KOCOM Home" to your Android Phone / iPhone.
Please scan APP QR code on page 1 of this manual. Or you can download by following procedures.
Android : Google playstore > KOCOM Home, iOS : Appstore > KOCOM Home
Instructions for Operation
- Please proceed the following steps when the KCV-S701IPOE monitor's menu screen is on. While proceeding the
registration steps, please click the menu button to keep the screen on .
APP

13
■ How to Register 'KCV-S701IPOE' into Smart Phone
※ To register a videophone in the 'KOCOM HOME' app, your smartphone must be connected to the same
Wi-Fi router.
Instructions for Operation
- To get visitor's calling through your phone, you must register 'KCV-S701IPOE' to your smartphone.
- Only one smartphone is registered on the video phone, and additional users can register as family members
through the app and use the same.
Start KOCOM Home APP
pressing ' ' (Add device).
Device is registered.
Main screen after registration.
'KCV-S701IPOE' is
recognized automatically
and press 'Add'.
■ Call in KOCOM Home APP
① Image of visitor
② Name of current device (Videophone set)
③ End of call
④ Call connection
⑤ Voice call with visitor / End
When your phone registration to KCV-S701IPOE
is done, you can open the door or perform visual
communication with visitors through your phone's APP.
※ NOTICE :
Depending on network transmission speed and
condition, the video or voice could be disconnected.
①
③ ④ ⑤
②

14
Instructions for Operation
■ Door open in KOCOM Home APP
To check more menu,
press ' ' button.
Tap the key shape icon.
Press "Confirm" to approve
the door opening.
Activate the door open
button pressing ' '

15
③
⑦ ⑧
④
⑨ ②⑩ ③
■ Calling from Outdoor Camera
■ About Call Screen Icon (UI Function Buttons)
When calling to the monitor, you will see
visitor's image. Press call button, then calling
with visitor can be functioned.
After pressing door open button, door opens
right away. After door opening, calling will be
automatically off after 5 secs.
(Calling time : 30 secs)
① Home button
② Camera button : Connected camera
③ Camera Button : Not connected
④ Time
⑤ Brigthness control bar
⑥ Call button : Receive call
⑦ Capture button : Screen capture and save
⑧ Door open button : Door gets opened
⑨ Camera melody sound volume control bar
⑩ Monitor melody sound volume control bar
When pressing end button while talking with
visitors, calling will be off.
Press door open button then you can open the door.
(Talking time : 180 secs)
(Door opening time : Default 0.2 seconds, you
can change at the "Settings")
① End button : End of the call
② Camera calling voice volume control bar
③ Monitor calling voice volume control bar
※ While the image of 'Camera 1' is on,
press 'Camera 2' then you see the other image.
※ Touch the screen once on the camera screen
to display a bar that can adjust the brightness
and volume of the screen.
In case of extended monitors, all of the devices will receive at once when calling from the outdoor
camera. If one device gets connected, the rest will be automatically off.
How to Operate
- When calling from the outdoor camera, you can see the image of visitors, make a call, and open the door.
Press the call
button to make
a call.
※Caution
①
⑤
②
⑥ ①

16
Instructions for Operation
■ CCTV Monitoring
With the CCTV connected,
press CCTV button from the call screen, then CCTV can be monitored.
※ NOTICE :
Some CCTV may have compatibility issues, so the image won't be displayed well.

17
■ Extension Calling & Receiving Function
■ Receiving from the Other Monitor
- In case of extended monitors, you can perform extension calling.
To perform extension calling, you MUST set each device's numbering at the "Setting"
From ID #1 to #4 is available to register, you MUST register in order.
When pressing extension call
button, the menu for extension call
will be displayed.
Device number is automatically
shown If there's a same device
number already, 'ID Collision' will
be shown at 'Device 1'
When extension calling from other
monitors or interphones, extension calling
melody will be rung.Calling devices icon
will be changed to calling icon. Press
calling icon then calling gets connected.
When touching other buttons in the
middle of the described function hereby,
you will hear BUZZ sound to alarm you.
(Extension calling time : 30 secs)
Whole devices calling or each calling is
available at this stage. When pressing a
device button, that device calling will be
in operation. While calling, icon will be
changed. When pressing "Home icon" at
' ', call will be cancelled. In case of
extension interphone, the chosen interphone
& its extended monitor will be calling
together. When calling the interphone of
own monitor that you are handling, simply
press the device number of itself. When
calling the whole devices, all will be rung.
(Extension calling time : 30 secs)
Extension calling icon is shown.
Press home button and calling
will be off. When touching other
buttons in the middle of the
described function hereby, you will
hear BUZZ sound to alarm you.
(Extension talk time : 180 secs)
When the connection with calling
device is made, calling icon will be
changed into extension calling icon.
By pressing home icon, calling will
be off. When touching other buttons
in the middle of the described
function hereby, you will hear BUZZ
sound to alarm you. When only one
device is connected while calling
the whole devices, the rest will be
automatically off.
(Extension talk time : 180 secs)
The icon when there's no device
connected.
How to Operate
■ Absent Mode Function
·When pressing absent mode button,
the screen for sensor button will be
displayed. (Sensor : Magnet sensor)
※ After setting the absent mode, you must first release the absent mode to prevent an emergency alarm sound.
·Select and activate the sensor button
associated with the product, then
press the start button. Absent mode is
started according to the set time.
·Enter the password to release the
crime prevention sensor after operation.
(The initial password is set to '0000')

18
■ To View Screen Captured Images
■ QR Code for Manual
Press image view button at the home screen,
then the screen for captured images lists will be
displayed. ' ' icon at means the recent images
are being saved. Maximum 50 images can be
stored. Images will be deleted from the oldest
and then recent one gets saved.
QR code to download the manual appears after
tapping ' ' button on 'Other setting' screen.
At the image view screen, you can see stored
images. Press left or right arrow button, then you
can see other images. Press delete button and
deletion can be made right away ' ' .
Press home button at ' ' and the image lists will
be displayed.
Click the image and the selected will be displayed.
Press , you will delete the selected image
Press , you will delete the whole listed images.
Scan the QR code to check the manual.
Available to check other images with the left and
right arrow keys.
How to Operate
N

19
Memo

Warranty
Warranty Card
To receive after service, have the following ready before you contact our branches.
PRODUCT
MODEL
DATE PURCHASED
WARRANTY PERIOD
AGENCY ADDRESS
KCV-S701IPOE
1. Name of the product.
2. Model number of the product.
3. The area of problem.
4. Phone number and address at which you can be contacted.
KOCOM Warranties the original purchaser of this product as follows.
1) This product is produced under strict quality control and inspection procedures.
2) If this product breaks down during proper use as a result of product defect,
KOCOM will repair it within one year from date of purchase free of charge.
3) The following cases will be subject to charge, even during warranty period:
a. Breakdown during transport, or through careless treatment, by consumer.
b. Breakdown cause by unauthorized repair, or system modification.
c. Breakdown caused by natural disaster or power disorder.
Note: This equipment has been tested and found to comply with the limits for a Class B digital device, pursuant to
part 15 of the FCC Rules.These limits are designed to provide reasonable protection against harmful interference in
a residential installation. This equipment generates, uses and can radiate radio frequency energy and, if not installed
and used in accordance with the instructions, may cause harmful interference to radio communications.
However, there is no guarantee that interference will not occur in a particular installation. If this equipment does cause
harmful interference to radio or television reception, which can be determined by turning the equipment off and on,
the user is encouraged to try to correct the interference by one or more of the following measures:
ㆍReorient or relocate the receiving antenna.
ㆍIncrease the separation between the equipment and receiver.
ㆍConnect the equipment into an outlet on a circuit different from that to which the receiver is connected.
ㆍConsult the dealer or an experienced radio/TV technician for help.
www.kocom.com
E-mail : global
@
kocom.co.kr
This manual is based on the date as shown in the right and specifications are subject to change wihout notice for quality improvement
KCV-S701IPOE
W0713
SINCE
1976
KOREA COMMUNICATIONS CO.,LTD
Table of contents
Other KOCOM IP Phone manuals