Kogan PC600 User manual

Model: PC600
Batch: PR3496
POWER:1000W AC220-240V, 50/60Hz
For your safety, always read the instruction book carefully before using.
Introduction----------------------------------------------------------------------------------------------- 1
Important safeguards------------------------------------------------------------------------------ 1-3
Parts---------------------------------------------------------------------------------------------------------- 3
Instructions for use---------------------------------------------------------------------------------- 3-5
Operating instructions----------------------------------------------------------------------------- 5-6
Cleaning--------------------------------------------------------------------------------------------------- 6
Troubleshooting--------------------------------------------------------------------------------------- 7
Features---------------------------------------------------------------------------------------------------- 7

Introduction
1. Multi-functions, convenient to use
1) Soup, Chicken, Beef, Fish, Rice, Slow Cook, Steam and Cake preset buttons.
2) Press a preset button to enter an automatic cooking process. When finished, an alert signal will
sound and the appliance will go into keep warm mode.
3) The appliance features a 24-Hour countdown timer function; after setting a time, a countdown
will start. When the countdown reaches 0, it will start a cooking program.
2. Fast cooking, saving energy
1) Saves 20% of time and 25% of power when cooking meals, and saves 50% of power when
cooking soups.
2) The appliance features a high pressure and elevated temperature cooking system, to cook food
with less energy and within a faster timeframe.
3. Safety features
1) Safety lock: the cover will not close if it is not secured correctly and will not open if the appliance
contains high pressure inside.
2) Pressure control safety device: the appliance will switch off automatically when it reaches a
pre-set pressure temperature.
3) Pressure regulation: If the temperature and pressure reach over their maximum level, the float
valve will release pressure via the vent valve.
4) Anti-block safety device: helps to avoid blockage of the air outlet.
5) Pressure-relief safety device: to prevent a spill over.
6) Overheat safety device: when the temperature reaches limitation, the fuse will release.
7) Temperature regulation: in case of incorrect operation, the regulator will connect or disconnect
power.
Important safeguards
This User Manual contains information on the use and care of this product. Please read this User
Manual carefully before using the appliance and save it for future reference.
■ Before first use, check the device specifications and the power supply.
This appliance is intended to be used in household and similar applications such as:
•staff kitchen areas in shops, offices and other working environments;
•farm houses;
•by clients in hotels, motels and other residential type environments;
•bed and breakfast type environments.
■ Do not use if the cord or plug are damaged.
■ Keep the power cord away from sharp edges and hot surfaces.
■ Do not pull the cord. Always pull the plug. Do not reel the cord around the housing body.
■ Never attempt to disassemble and repair the appliance by yourself. If you encounter problems, please
contact customer service.

■ Using accessories or replacement parts that are not recommended or not sold by the manufacturer
may cause damage to the appliance.
■ Always unplug the appliance and let it cool down before cleaning and removing parts. Keep it
unplugged when not in use.
■ To avoid electric shock and fire, do not immerse the appliance in water or other liquids. If that occurs,
immediately unplug it and contact customer service for inspection.
■ This appliance shall not be used by children. Keep the appliance and its cord out of reach of children.
■ Place the appliance on a stable, horizontal and level surface. Position it far from flammable materials
including curtains, walls, and fabric upholstered furniture.
■ Do not place the appliance near heat-emitting devices such as heaters, cooktops or electric burners.
■ Make sure that there is enough space around the appliance, it should stand more than 15 cm far from
flammable objects such as furniture, curtains, etc.
■ Do not use the appliance near explosive objects.
■ Appliances can be used by persons with reduced physical, sensory or mental capabilities or lack of
experience and knowledge if they have been given supervision or instruction concerning use of the
appliance in a safe way and understand the hazards involved.
■ This appliance is not intended to be operated by means of an external timer or separate
remote-control system.
■ If the power cord is damaged, it must be replaced by a special cord or assembly available from the
manufacturer or its service agent.
■ Caution, hot surface. The surface is liable to get hot during use.
■ Do not move the appliance containing hot food or liquid or when the appliance is connected to the
power source.
■ Do not leave water or meals in the appliance for an extended period.
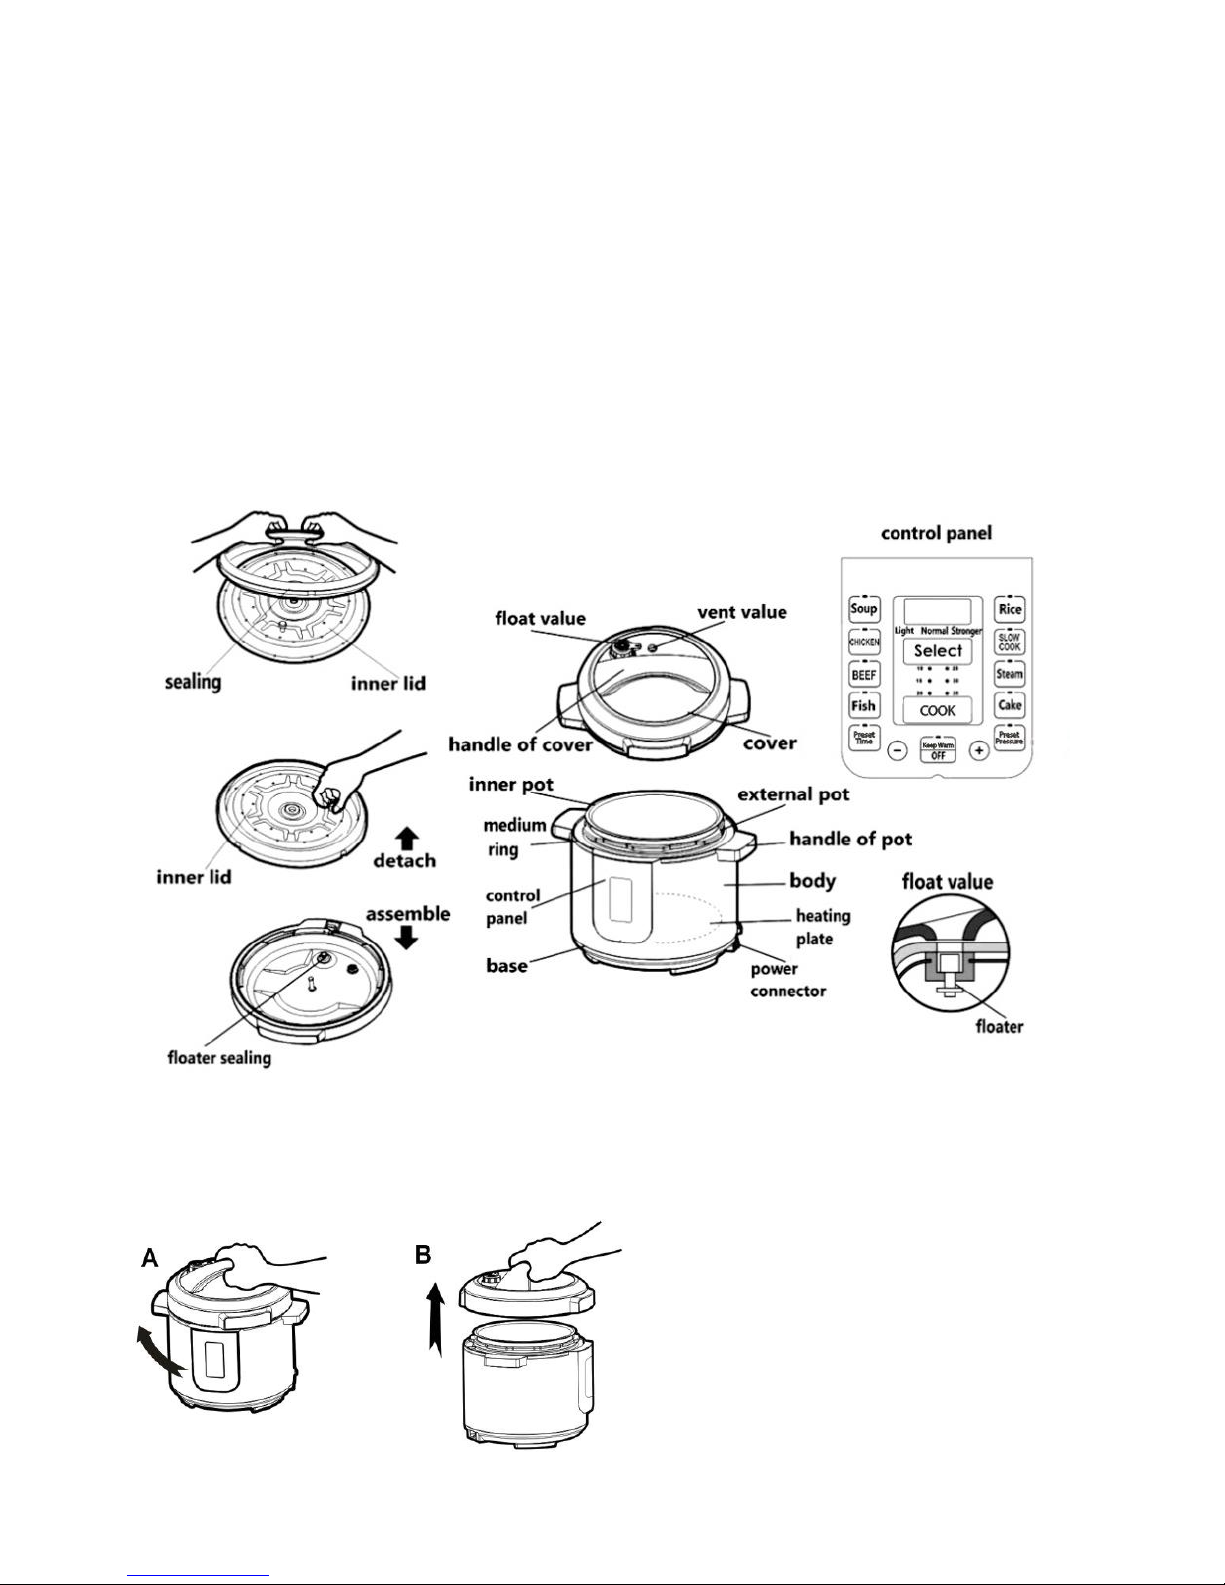
■ Pour water into the inner pot only. Never pour water into the housing body.
■ While cooking, avoid using sharp utensils which can damage the inner pot surface. Please use the
spoon which comes with the appliance. You may also use wooden, plastic or silicone utensils.
■ Always check that there are not any foreign objects between the bottom of the inner pot and the
heating plate. It may cause a burning smell, strange sounds, or cause the appliance to malfunction.
■ If any unusual sounds, odour or any other disruption happens, switch off the appliance. Check that
there are no objects or liquids between the inner pot and heating plate. If the malfunction is not
resolved, please contact customer service. Never attempt to disassemble and repair the appliance by
yourself.
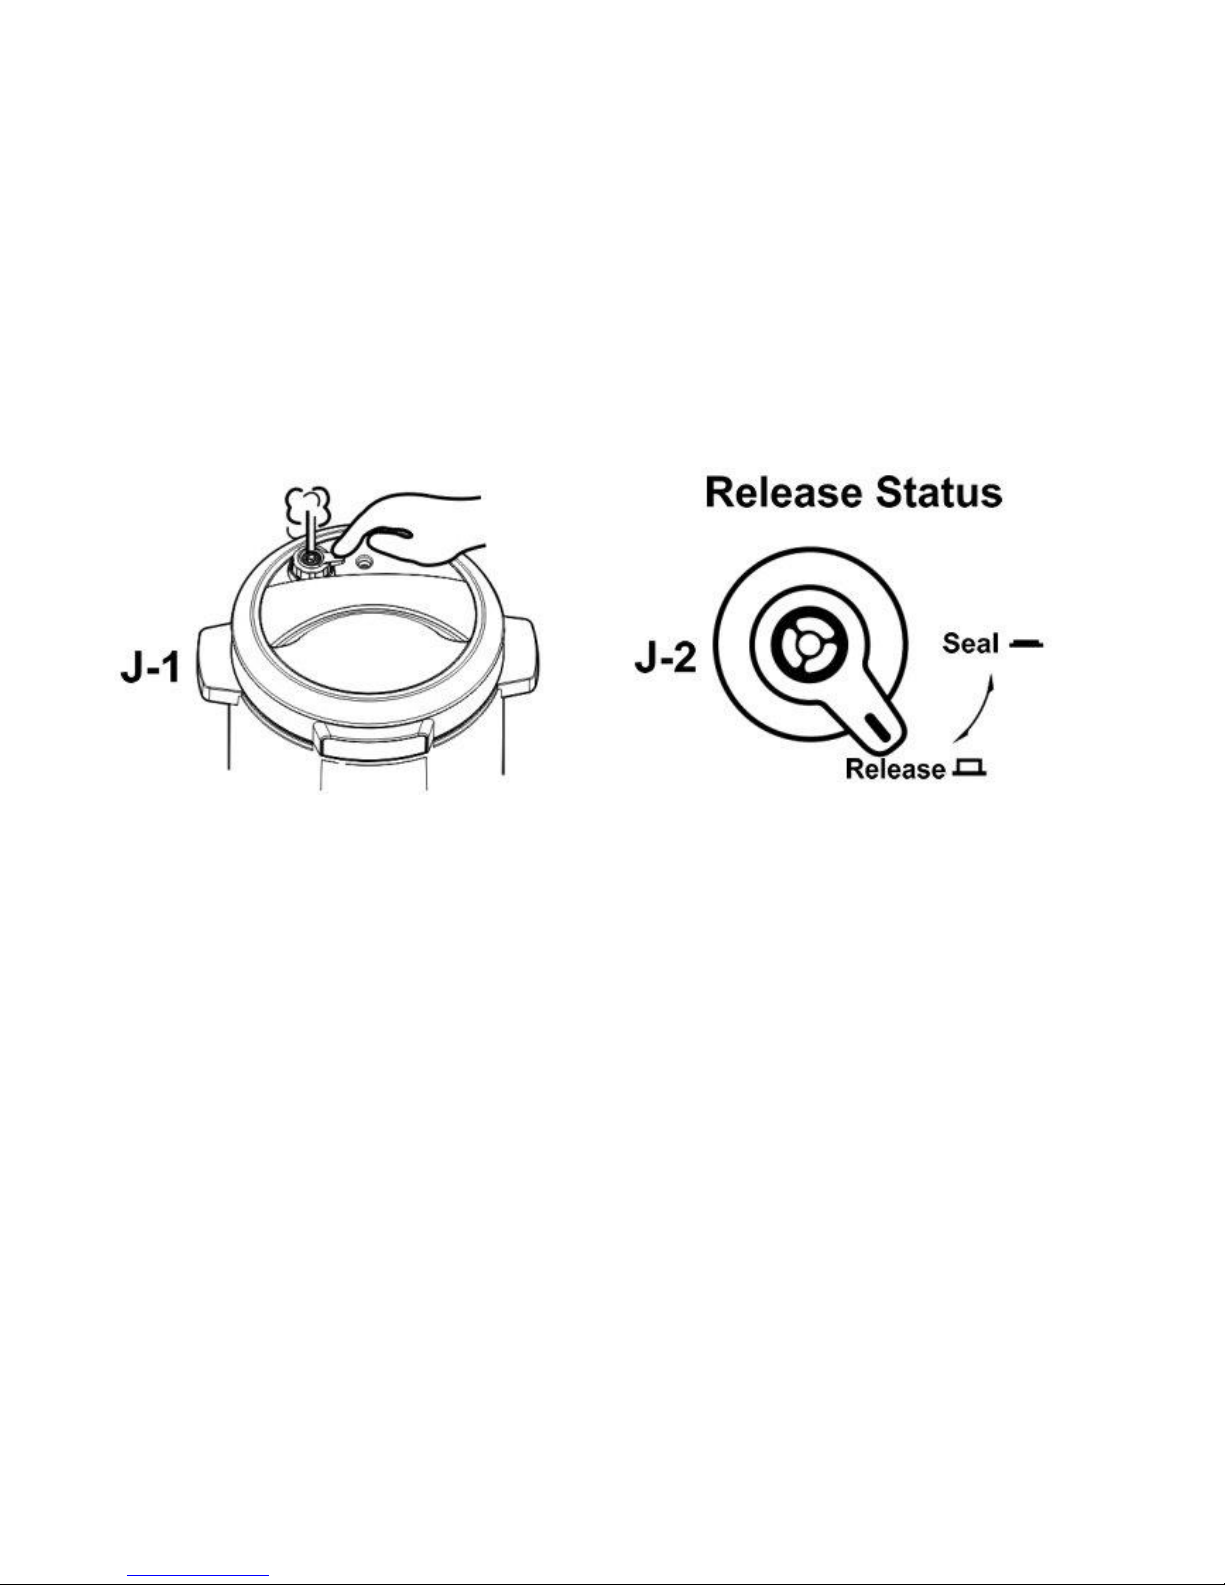
■ Do not cover the steam relief valve or the lid while the appliance is operating. It may cause a
malfunction in the appliance.
■ Do not operate the appliance with an empty pot.
■ While you are cooking, the lid and outer surface of the appliance will get hot. Handle or move the
appliance with care.
■ When you open the lid, wait for the steam to disperse before leaning over the appliance. The appliance
lid gets extremely hot while cooking and may cause burns. Always use the lid handle to remove the lid.
■Do not cover or block the steam release opening, steam relief valve, and float valve.
■Do not press on the float valve while the appliance is working.
■Do not use the appliance if the sealing ring is absent or damaged. Only use the sealing ring from this
appliance.
■Before pressure cooking, ensure that the inner pot contains water or broth. Pressure cooking needs
liquid to produce steam.

■Ensure that steam never comes out where the lid meets the appliance body.
■Never exert force to open the appliance lid- the inner pressure in the pot must be equal to the
atmosphere pressure before opening the lid.
■Only open the lid if the float valve is in a low position, when pressure inside has become normal and
safe. Beware of the hot steam that comes out of the steam release opening. Keep hands and face away
from the appliance when you open it to avoid being burnt by hot steam.
■Always check that the steam release opening is clean before using the appliance.
■Allow the inner pot to cool down before touching it.
■Always unplug the appliance after cooking and before taking out your cooked meal.
Parts
Instructions for use
Once the appliance is assembled properly, you are ready to begin cooking.
1. To remove the lid, grasp the handle, turn clockwise and lift. (Figure A,B).

2. Remove the inner cooking pot from the appliance and add the food and liquids as the recipe directs.
Note: The total volume of food and liquid must not exceed 80% of the capacity of the cooking pot.
(Figure C). For foods such as dried vegetables and beans, or rice and grains, the total volume must not
exceed 60% capacity. (Figure D). Always use at least 120 millilitres of liquid when pressure cooking. The
total volume of food and liquid must not be less than 20% of the capacity of the cooking pot. (Figure E).
3. To lock the lid in place, remove any food residue from the upper rim of the cooking pot to secure the
seal. Ensure the sealing ring is secured in place on the sealing ring supporting cover. (Figure F).
4. Wipe any water or food residue away before placing the cooking pot back into the housing body. Make
sure the inner pot is set firmly on the heating plate. (Figure G).
5. Close the cover, ensuring the inner lid covers the inner pot. Rotate the handle of the cover
counter-clockwise until it clicks into position. (Figure H-1,H-2).
6. Position the float valve and turn it to the sealed position, then check that the float valve has dropped
down. (Figure I-1,I-2). Note: The float valve does not click or lock into place. Even though it will have a
loose fit, it is safely secured. The float valve handle must be fully down to properly seal the pot before
cooking.
7. Plug the power cord into the appliance and then into the wall outlet. The LED display will show ‘— ———‘

8. With the appliance switched on and the LED display on, press the preset buttons to select the desired
cooking function. The function light will flash. The preset buttons are Soup, Chicken, Beef, Fish, Rice,
Slow Cook, Steam and Cake.
9. When the pressure inside hits the proper level, the pressure hold indicator turns on and the timer
begins counting. Pay attention, the pressure inside is very high so it needs released through the vent
valve before opening the cover.
10. When the pressure cooking cycle is finished, the unit will automatically switch to the Keep Warm
mode. Release the float valve and wait for the pressure to release completely until the floater drops
down. Then you can unplug the unit and take out the food. (Figure J-1,J-2). After entering Keep Warm
mode: if you do not want to continue this mode, you can unplug the power supply. For safety reasons,
after 12 hours of continuous Keep Warm mode, the appliance will automatically switch off to stand-by.
Operating instructions
1. When the appliance is turned on there will be a ‘BEEP’sound and the LED screen will display 00:00.
The appliance is now in stand-by and one of the preset buttons (Soup, Chicken, Beef, Fish, Rice, Slow
Cook, Steam or Cake) can be selected.
2. Once a preset has been selected, the display will show the letter P followed by the number of minutes
the meal will cook for. For example, if the display shows P25, the cooking time will be 25 minutes. Once
the time is set or adjusted, the appliance will automatically start cooking after a 5 second wait.
3. Manual pressure setting: After selecting one of the preset cooking options, pressing ‘SELECT’ again
will give the options ‘Light’, ‘Standard’ or ‘Strong’. For example, pressing the ‘Soup’ button, then pressing
the ‘SELECT’ button; ‘Standard’will show and the hold pressure time will be 25 minutes. Pressing the
‘SELECT’ button again will show ‘Strong’and the hold pressure time will be 30 minutes. Pressing the
‘SELECT’ button yet again will show ‘Strong’ and the hold pressure time will be 20 minutes.
4. Manual time setting: After selecting one of the preset cooking options, pressing ‘PRESET PRESSURE’
and then + or –will adjust the minutes. For example, pressing the ‘Soup’button, then pressing the
‘PRESET PRESSURE’ button, and finally pressing + or - will adjust the minutes up or down.

Refer to the chart below for different cooking options.
SOUP
CHICKEN
BEEF
FISH
RICE
SLOW COOK
STEAM
CAKE
Default pressure time - Light
20
10
15
6
8
1 hour
8
18
Default pressure time - Standard
25
15
20
8
12
2 hours
10
Default pressure time - Strong
30
18
25
12
15
3 hours
15
Pressure range –manually set
10-50
5-30
1-30
8-15
5-20
1-3 hours
1-30
n/a
Note: During the cooking process, the cooking timer only begins once the desired pressure has been
reached, which can take approximately 5-10 minutes.
5. Cooking times: there are 6 cooking times, P 10/ P 15 / P 20 / P 25 / P 30 / P 35. Press the ‘COOK’
button repeatedly to change between the cooking times.
6. Cooking at a future time: The appliance can be preset up to 24 hours in advance.
1) Prepare the food and place it into the inner cooking pot.
2) Secure the lid and turn it counter-clockwise to lock it in place.
3) Make sure the float valve is set to the closed position.
4) Plug in the power cord. The LED screen will display 00:00.
5) Press the ‘PRESET TIME’ button, then press + or - to adjust the delay in 30 minute increments.
6) Select the cooking preset for the food, and it will start counting down after a 5 second wait.
7. Keep warm mode: When 00:00 is shown on the LED screen after cooking, pressing the ‘KEEP WARM’
button keeps the temperature between 60°- 80°C. The appliance will give a short beep and the LED
screen will display ‘bb’. Note: Keep warm shows ‘bb’ and off shows 00:00.
8. Off: When the appliance is off, the indicator light is off. No matter what function is chosen once off,
the unit will remain in stand-by.
Cleaning
1. Unplug the power cord.
2. Clean the housing body with a soft cloth such as a paper towel or microfiber towel. Do not immerse
the housing body in water.
3. Rinse the underside of the lid, sealing ring, pressure limit valve, anti-block cover, air escape, and float
valve with warm water. Dry completely.
4. The cooking pot is dishwasher-safe. To hand-clean the cooking pot, use a soft cloth or sponge and
wipe. Be careful to not damage the inside coating. Never use harsh chemicals or scouring pads.
5. To clean the sealing ring, hold the knob on the sealing ring supporting cover and pull the sealing ring
up. After cleaning, put the sealing ring supporting cover back in place.

Troubleshooting
Problem
Possible Cause
Solution
Lid does not lock.
The ring is not properly installed.
Reinstall the ring.
The float is seized by the push rod.
Push the rod with hands.
Lid won’t open after the air
exhaust.
The float is still up.
Press the float down.
Air escapes from the rim of
the lid.
No sealing ring was installed.
Install the sealing ring.
Food residue on sealing ring.
Clean the sealing ring.
Sealing ring worn out.
Replace the sealing ring.
Lid not locked properly.
Rotate lid fully.
Air escapes from the float
valve.
Food stuck on the sealing ring of
the float valve.
Clean the sealing ring.
The sealing ring wore out.
Replace the sealing ring.
Float valve will not rise.
The pressure limit valve is not
placed properly.
Place the valve to pressure.
Not enough food and water.
Check recipe for proper quantity.
Air escaping from the rim of the
lid and the pressure limit valve.
Call our Consumer Service Center.
Display E1
Sensor control- broken circuit.
Call our Consumer Service Center.
Display E2
Sensor control- short circuit.
Wait until it cools down.
Display E3
Inner pot temperature overheats.
Call our Consumer Service Center.
Display E4
Pressure switch error.
Call our Consumer Service Center.
Features
Voltage
220-240V
Power
1000W
Capacity
6L
Diameter
22cm
Work Pressure
0-70kPa
Pressure Limit
90kPa
Keep Warm
60-80℃
Accessories
Power supply cord
Measuring cup
Spoon
Instruction book
Recipe book
Table of contents
Other Kogan Kitchen Appliance manuals

Kogan
Kogan KASLDSPNSLCA User manual

Kogan
Kogan KASMSVDC13A User manual

Kogan
Kogan KACOFNESD User manual

Kogan
Kogan KASTKSOVIDA User manual

Kogan
Kogan KA4SNDWPRSA User manual

Kogan
Kogan KAFMPIEMKRA User manual

Kogan
Kogan KAPIZZMAKGA User manual

Kogan
Kogan KAPGRSWPRSA User manual

Kogan
Kogan KAFDDHYDRTA User manual

Kogan
Kogan KACKW3PSTNA User manual

Kogan
Kogan KATH34WNCLA User manual

Kogan
Kogan KACKR4LMLTA User manual

Kogan
Kogan KACITRPRESA User manual

Kogan
Kogan KAMEATSLICA User manual

Kogan
Kogan KAPCADPTCWA User manual

Kogan
Kogan KA6TDHDTRSA User manual

Kogan
Kogan KAFDDHYDRTA User manual

Kogan
Kogan KASLCR12PCA User manual

Kogan
Kogan KAGRL2SNPRA User manual

Kogan
Kogan KA10TDHDTRA User manual