manuals.online logo
Brands
  1. Home
  2. •
  3. Brands
  4. •
  5. Kohler
  6. •
  7. Plumbing Product
  8. •
  9. Kohler 73078T-4 User manual

Kohler 73078T-4 User manual

1242390-2A-C 1
INSTALLATION INSTRUCTIONS
COMPOSED
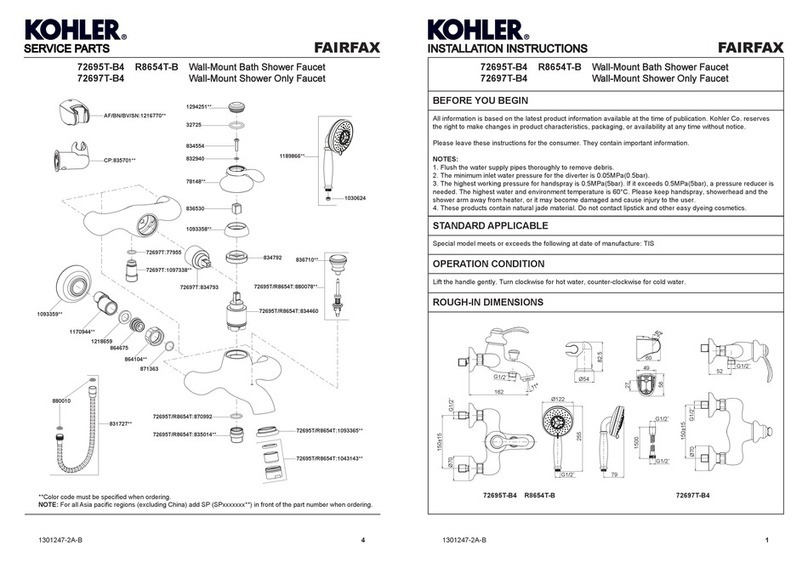
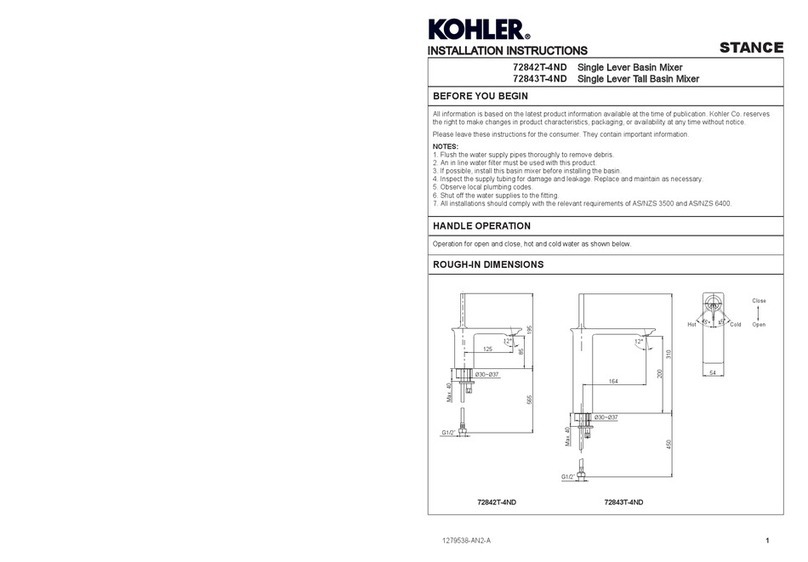
ROUGH-IN DIMENSIONS
BEFORE YOU BEGIN
All information is based on the latest product information available at the time of publication. Kohler Co. reserves
the right to make changes in product characteristics, packaging, or availability at any time without notice.
Please leave these instructions for the consumer. They contain important information.
NOTES:
1. Flush the water supply pipes thoroughly to remove debris.
2. Inspect the supply tubing for damage and leakage. Replace and maintain as necessary.
3. Observe local plumbing codes.
4. If possible, install the faucet before installing the tub.
5. The highest working pressure for handshower is 0.5MPa(5bar). If it exceeds 0.5MPa(5bar), a pressure
reducer is needed. The highest water and environment temperature is 60ºC. Please keep handshower,
showerhead and shower arm away from heater, or it may become damaged and cause injury to the user.
HANDLE OPERATION
Lift the handle gently. Turn clockwise for hot water, turn counter-colckwise for cold water. Lift the diverter knob
behind the faucet for handshower.
73078T-4
73078T-4 3 Hole Deck Mount Bath Faucet With Handshower
G1/2˝
24 28
220
9
2°
210
233
43
148
116
245
62
165
G1/2˝
100
40 Max.
50
Ø64
Ø48
Ø48
Ø34
Ø39-Ø42 Ø34-Ø40 Ø30-Ø40
Ø64 Ø64
Min. 146 Min. 146
1242390-2A-C 2
INSTALLATION
②
①
How to Install the Valve Kit
Remove the nut(3), washer(2) and
washer(1) from the valve kit. Note:
Don’t separate the escutcheon(6)
from the valve. Put the washer(5) into
the bottom groove of escutcheon. Put
the washer(1) into the groove of
washer(2).
Fit the valve kit to the hole of the bath
tub. From underside of the bath tub,
install the washer(1), washer(2) and
nut(3). Position the valve kit so that
the handle towards front. Tighten the
screws(4) to secure the valve kit.
Attach the hoses(7) to water supplies.
The hose with “COLD” mark connects
to cold water.
How to Install the Spout
Loosen the screws(9) with the hex
wrench(8), and remove the
connector(10).
Remove the plug(11) from the spout
kit(14). Loosen the screw(13) with the
hex wrench(12), and remove the
diverter kit(15) and escutcheon(16).
From underside of the bath tub, insert
the diverter kit into the hole of bath tub
and put out it as much as possible.
14
8
13
12
11
109
16
15
6
5
1
2
3
4
7
1242390-2A-C 6
1242390-2A-C 3
COMPOSED
SERVICE PARTS
**Color code must be specified when ordering.
④
③
Slide the o-ring(17) into the
bottom groove of the
escutcheon(16). Tighten the
escutcheon with the o-ring onto
the diverter kit(15), and keep it
against the bath tub. Position the
diverter kit so that the nut(20) is
on the right. Screw the nut(18).
Tighten the screws(19) to secure
the diverter kit.
Install the spout kit(14) onto the
escutcheon. Position the spout
kit so that the spout points to the
front. Tighten the screw(13) with
the hex wrench(12), and install
the plug(11).
Install the connector(10) to the
diverter kit.
Tighten the screws(9) with the
hex wrench(8).
Install the lift knob(21) onto the
connector(10), tighten the
screws(23) with the hex
wrench(22).
73078T-4 3 Hole Deck Mount Bath Faucet With Handshower
20
18
15
19
14
13
12
11
17
16
14
21
23
22
20
15
9
8
10
3006376
3022132**
834361
831289
1199166**
85549
79680
1043069
3023749**
898324**
75100
39924
1108464
50903
3023748
1229992
1249005
3023744**
833730
831289 831289
1045376
1162079
3023745**
3008523
1270437**
1046290
3023741**
1270436
1258113 66633
834404
1258088
3006148
1242389**
46112
1013800
1013801**
66637
77949
3023740**
871084
22352
1263365
3002530
831587
864718
834428
1053362
1053351
3021164
1267350**
1267351**
3025496
3025495
831587
1043069
1043069
1041450
1258115
1242390-2A-C 4
1242390-2A-C 5
INSTALLATION CHECKOUT
CLEANING INSTRUCTIONS
All Finishes: Clean the finish with mild soap and warm water. Wipe entire surface completely dry with clean soft
cloth. Many cleaners may contain chemicals, such as ammonia, chlorine, toilet cleaner etc, which could
adversely affect the finish and are not recommended for cleaning.
Do not use abrasive cleaners or solvents on Kohler faucets and fittings.
⑤
⑥
Put the washer(33) into the nut of the
hose(32). Connect the connection hose
to the diverter kit(15).
Put the washer(34) and washer(37) into
the nuts of the hose(35). Connect the
diverter kit and the connector(36) of
valve kit by the hose(35).
How to Install the Handshower
Remove the nut(27), washer(26) and
washer(25) in turn from the shank(24).
Put the washer(28) into the groove of
the escutcheon(29). Screw the
escutcheon onto the shank. Insert the
shank into the mounting hole.
From underside, install the washer(25),
washer(26) and nut(27) to the shank.
Then tighten the nut firmly.
Connect the end A of the hose(30) to
handshower(31). Slide another end of
the hose(30) through the escutcheon,
and attach to the connection hose(32).
If needed, install the accessories of the
handshower as instruction.
Ensure that all connections are tight.
Ensure that the handle is in the off
position.
Open the drain. Turn on the main
supply and check for leaks. Repair as
needed.
Remove the aerator(38) by key(39),
Remove handshower(31). Open valve
and run water through the spout to
remove any debris. Switch to
handshower to remove any debris.
Turn the valve off. Reinstall the aerator
and handshower.
39
38
31
29
24
28
A
31
30
25
26
27
32
15
33
32
35
36
34
37
30

Other Kohler Plumbing Product manuals

Kohler K-2271 User manual

Kohler

Kohler K-2271 User manual

Kohler 74053T-4E2 User manual

Kohler

Kohler 74053T-4E2 User manual

Kohler PARALLEL K-31139T-4-BL User manual

Kohler

Kohler PARALLEL K-31139T-4-BL User manual

Kohler K-4986X Assembly instructions

Kohler

Kohler K-4986X Assembly instructions

Kohler K-19909-4 Assembly instructions

Kohler

Kohler K-19909-4 Assembly instructions

Kohler STRAYT 37341-4 User manual

Kohler

Kohler STRAYT 37341-4 User manual

Kohler K-10481 User manual

Kohler

Kohler K-10481 User manual

Kohler Memoirs K-2238 Assembly instructions

Kohler

Kohler Memoirs K-2238 Assembly instructions

Kohler STANCE Series User manual

Kohler

Kohler STANCE Series User manual

Kohler K-T395 Assembly instructions

Kohler

Kohler K-T395 Assembly instructions

Kohler STEWARD ECO User manual

Kohler

Kohler STEWARD ECO User manual

Kohler K-3018 Assembly instructions

Kohler

Kohler K-3018 Assembly instructions

Kohler K-101 User manual

Kohler

Kohler K-101 User manual

Kohler K-13108 Assembly instructions

Kohler

Kohler K-13108 Assembly instructions

Kohler K-14281 User manual

Kohler

Kohler K-14281 User manual

Kohler K-4108BR User manual

Kohler

Kohler K-4108BR User manual

Kohler K-7744 User manual

Kohler

Kohler K-7744 User manual

Kohler URBANITY+ 23751Т-9 User manual

Kohler

Kohler URBANITY+ 23751Т-9 User manual

Kohler K-12286-4 Assembly instructions

Kohler

Kohler K-12286-4 Assembly instructions

Kohler Portrait K-2272 User manual

Kohler

Kohler Portrait K-2272 User manual

Kohler LOURE 97907T-4 User manual

Kohler

Kohler LOURE 97907T-4 User manual

Kohler K-307 Assembly instructions

Kohler

Kohler K-307 Assembly instructions

Kohler K-702200 Assembly instructions

Kohler

Kohler K-702200 Assembly instructions

Kohler K-T16237 User manual

Kohler

Kohler K-T16237 User manual

Popular Plumbing Product manuals by other brands

TLV SJ3V-X instruction manual

TLV

TLV SJ3V-X instruction manual

SYR HygBox Connect quick start guide

SYR

SYR HygBox Connect quick start guide

Pentair PS51-1P quick guide

Pentair

Pentair PS51-1P quick guide

Moen TS3302TB installation guide

Moen

Moen TS3302TB installation guide

Moen Chrome 84915 Illustrate parts list

Moen

Moen Chrome 84915 Illustrate parts list

Hans Grohe AXOR Starck 10402 1 Series Installation instructions / warranty

Hans Grohe

Hans Grohe AXOR Starck 10402 1 Series Installation instructions / warranty

SFA SANIPACK installation instructions

SFA

SFA SANIPACK installation instructions

Nobili SP57011/1 Using instructions

Nobili

Nobili SP57011/1 Using instructions

Graff G-4881-LM52 installation instructions

Graff

Graff G-4881-LM52 installation instructions

KEUCO Edition 11 51102 010100 Mounting instruction

KEUCO

KEUCO Edition 11 51102 010100 Mounting instruction

Tres 1.81.113 Technical Characteristics

Tres

Tres 1.81.113 Technical Characteristics

KEUCO IXMO 59509 011000 Mounting instruction

KEUCO

KEUCO IXMO 59509 011000 Mounting instruction

Brizo SENSORI T666 Series installation instructions

Brizo

Brizo SENSORI T666 Series installation instructions

baliv WT-180 manual

baliv

baliv WT-180 manual

Sanela SLU 39B Instructions for use

Sanela

Sanela SLU 39B Instructions for use

Brizo SOLNA Series installation guide

Brizo

Brizo SOLNA Series installation guide

Sunshower ONE PLUS S installation guide

Sunshower

Sunshower ONE PLUS S installation guide

Dolphin Torino 48 installation instructions

Dolphin

Dolphin Torino 48 installation instructions

manuals.online logo
manuals.online logoBrands
  • About & Mission
  • Contact us
  • Privacy Policy
  • Terms and Conditions

Copyright 2025 Manuals.Online. All Rights Reserved.