manuals.online logo
Brands
  1. Home
  2. •
  3. Brands
  4. •
  5. Kohler
  6. •
  7. Plumbing Product
  8. •
  9. Kohler PURIST 10129T-4 User manual

Kohler PURIST 10129T-4 User manual

Other manuals for PURIST 10129T-4

1

Other Kohler Plumbing Product manuals

Kohler K-1418-G Quick start guide

Kohler

Kohler K-1418-G Quick start guide

Kohler Discovery User manual

Kohler

Kohler Discovery User manual

Kohler K-1167 User manual

Kohler

Kohler K-1167 User manual

Kohler K-72218 Assembly instructions

Kohler

Kohler K-72218 Assembly instructions

Kohler K-1002-H2 Assembly instructions

Kohler

Kohler K-1002-H2 Assembly instructions

Kohler K-24804-4N-CP User manual

Kohler

Kohler K-24804-4N-CP User manual

Kohler 10742A-CP User manual

Kohler

Kohler 10742A-CP User manual

Kohler Moxie K-14292 User manual

Kohler

Kohler Moxie K-14292 User manual

Kohler ARTIFACTS 72798T User manual

Kohler

Kohler ARTIFACTS 72798T User manual

Kohler K-T8230 User manual

Kohler

Kohler K-T8230 User manual

Kohler K-13770 User manual

Kohler

Kohler K-13770 User manual

Kohler K-5293 User manual

Kohler

Kohler K-5293 User manual

Kohler 10279-4A-G Assembly instructions

Kohler

Kohler 10279-4A-G Assembly instructions

Kohler K-4919 User manual

Kohler

Kohler K-4919 User manual

Kohler K-702200 Operation manual

Kohler

Kohler K-702200 Operation manual

Kohler GEOG K-21727T-PF040-Q73 User manual

Kohler

Kohler GEOG K-21727T-PF040-Q73 User manual

Kohler K-77681 Series User manual

Kohler

Kohler K-77681 Series User manual

Kohler STRAYT 37337-4 User manual

Kohler

Kohler STRAYT 37337-4 User manual

Kohler EX28093K-8 User manual

Kohler

Kohler EX28093K-8 User manual

Kohler K-9053, K-9054 Assembly instructions

Kohler

Kohler K-9053, K-9054 Assembly instructions

Kohler 30440 User manual

Kohler

Kohler 30440 User manual

Kohler ALTERNA User manual

Kohler

Kohler ALTERNA User manual

Kohler K-7341 Assembly instructions

Kohler

Kohler K-7341 Assembly instructions

Kohler LOURE 97907T-4 User manual

Kohler

Kohler LOURE 97907T-4 User manual

Popular Plumbing Product manuals by other brands

Moen SANI-STREAM 8797 manual

Moen

Moen SANI-STREAM 8797 manual

Grohe Allure Brilliant 19 784 manual

Grohe

Grohe Allure Brilliant 19 784 manual

Cistermiser Easyflush EVO 1.5 manual

Cistermiser

Cistermiser Easyflush EVO 1.5 manual

BEMIS FNOTAB100 Installation instruction

BEMIS

BEMIS FNOTAB100 Installation instruction

Hans Grohe ShowerTablet Select 700 13184000 Instructions for use/assembly instructions

Hans Grohe

Hans Grohe ShowerTablet Select 700 13184000 Instructions for use/assembly instructions

Akw Stone Wash Basin Installation instructions manual

Akw

Akw Stone Wash Basin Installation instructions manual

Enlighten Sauna Rustic-4 user manual

Enlighten Sauna

Enlighten Sauna Rustic-4 user manual

Moen ShowHouse S244 Series quick start guide

Moen

Moen ShowHouse S244 Series quick start guide

Sanela SLWN 08 Mounting instructions

Sanela

Sanela SLWN 08 Mounting instructions

Franke 7612982239618 operating instructions

Franke

Franke 7612982239618 operating instructions

Heritage Bathrooms Granley Deco PGDW02 Fitting Instructions & Contents List

Heritage Bathrooms

Heritage Bathrooms Granley Deco PGDW02 Fitting Instructions & Contents List

Tres TOUCH-TRES 1.61.445 instructions

Tres

Tres TOUCH-TRES 1.61.445 instructions

STIEBEL ELTRON WS-1 Operation and installation

STIEBEL ELTRON

STIEBEL ELTRON WS-1 Operation and installation

Miomare HG00383A manual

Miomare

Miomare HG00383A manual

BELLOSTA revivre 6521/CR1 quick start guide

BELLOSTA

BELLOSTA revivre 6521/CR1 quick start guide

American Standard Heritage Amarilis 7298.229 parts list

American Standard

American Standard Heritage Amarilis 7298.229 parts list

BorMann Elite BTW5024 quick start guide

BorMann

BorMann Elite BTW5024 quick start guide

Moen 1225 quick start guide

Moen

Moen 1225 quick start guide

manuals.online logo
manuals.online logoBrands
  • About & Mission
  • Contact us
  • Privacy Policy
  • Terms and Conditions

Copyright 2025 Manuals.Online. All Rights Reserved.

1221390-2A-B 1
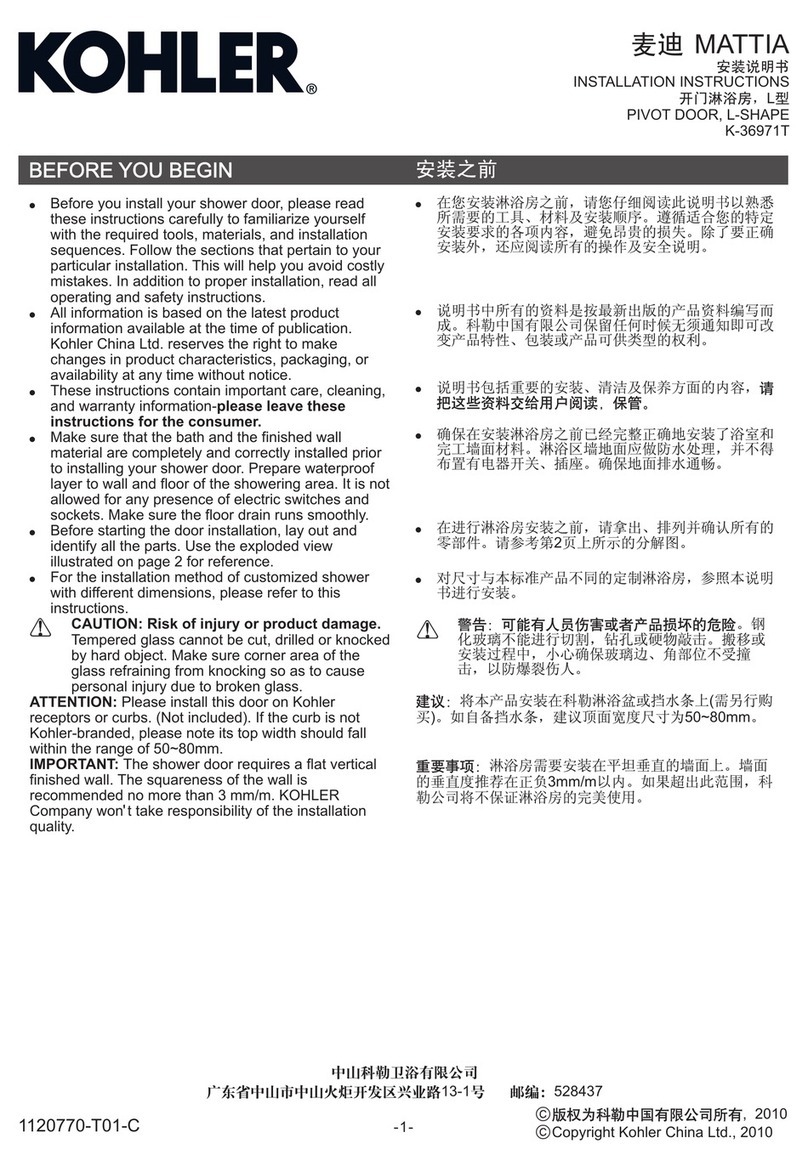
BEFORE YOU BEGIN
All information is based on the latest product information available at the time of publication. Kohler Co. reserves
the right to make changes in product characteristics, packaging, or availability at any time without notice.
Please leave these instructions for the consumer. They contain important information.
NOTES:
1. Flush the water supply pipes thoroughly to remove debris.
2. Inspect the supply tubing for damage. Replace as necessary.
3. Observe local plumbing codes.
4. The minimum inlet water pressure for the diverter is 0.05MPa(0.5bar).
5. Check for leaks before covering the pipes, repairs as needed.
6. The highest working pressure for handspray is 0.5MPa(5bar). If it exceeds 0.5MPa(5bar), a pressure reducer is
needed. The highest water and environment temperature is 60ºC. Please keep handspray, shower head and the
shower arm away from heater, or it may become damaged and cause injury to the user.
STANDARD APPLICABLE
Special model meets or exceeds the following at date of manufacture: TIS
1221390-2A-B 4
INSTALLATION INSTRUCTIONS
10129T-4 Floor-Mount Bath & Shower Faucet10129T-4 Floor-Mount Bath & Shower Faucet
PURISTPURIST
ROUGH-IN DIMENSIONS
SERVICE PARTS
**Color code must be specified when ordering
HANDLE OPERATION
Turn the handle gently. Turning for hot and cold water as shown below.
229
G1/2˝
9
28 24
88.5°
920~940
801~821
670~690
307
Bathtub
85
Min.
200
Min.
Ø120
13~33
45 44
Pre-drill Ø10
202
G1/2˝
55
148
G1/2˝
20
G1/2˝
20
113.5°
60°
30°
Ø100
Ø120
G1/2˝
G1/2˝
1500
Handle Base Assy
Hot
Cold
831727**
3008851**
835894
1092931**
1082901
1084120
835598
77955
1010167
1092965
1092926
1102045**
3002868
3013706
1096037**
79680
1082902
1082904
1092935
1205291
1092932
1010167
77955
3015503
1236624**
834705**
1142534
1229578
1093138
1093348**
(Use for uninstalling nut 1092926)
1221390-2A-B 2
1221390-2A-B 3
CLEANING INSTRUCTIONS
All Finishes: Clean the finish with mild soap and warm water. Wipe entire surface completely dry with clean soft
cloth. Many cleaners may contain chemicals, such as ammonia, chlorine, toilet cleaner etc, which could adversely
affect the finish and are not recommended for cleaning.
Do not use abrasive cleaners or solvents on Kohler faucets and fittings.
INSTALLATION
INSTALLATION CHECKOUT
How To Install The Faucet
Shut off water supply. Remove plug(2) from base. Slide up
escutcheon(8). Remove the protector(3). Install the faucet. NOTE: Keep
the faucet vertical to base, to avoid damaging the o-ring at bottom. Fix
the flange(6) on the base with screws(4) and washers(5). NOTE: Don’t
tighten the screws at the moment. Adjust the faucet, keep the spout
pointing to tub. Tighten the screws with hex wrench(7).
Ensure that all coupling nuts are tight. Ensure that the handle is in the off
position.
Turn on the main water supply, and check for leaks. Repair as needed.
Remove the handspray(19) and aerator(21). Turn on faucet handle. Run
hot and cold water through spout for about one minute to remove any
debris. Check for leaks at this time. Remove any debris. Shut off the
faucet. Reinstall the handspray and aerator.
How To Install The Base
Remove plug(2) from base(1). Remove the protector(3) from flange(6).
Rehearse the faucet installation for mounting location determination.
NOTE: Keep the faucet vertical to base, to avoid damaging the o-rings at
bottom. Slide up escutcheon(8). Connect the faucet to the base with
screws(4) and washers(5) through flange. Determine a suitable location
according to tub. Adjust the faucet: keep the spout pointing to tub, make
the blue mark facing to cold pipe(13) and the base being in the
convenient position to connect cold pipe(13) and hot pipe(12). Secure the
flange with screws by hex wrench(7).
Mark base mounting hole locations on the floor according to determined
location and base mounting dimensions (as shown page 1). Loose
screws. Remove the faucet and the connectors with o-rings. Drill holes
on the floor with Ø10 spade drill bit. Press the anchors(9) into the holes.
Screw the self-tapping screws(10) with the washers(11) into the anchors
through the base. Use a level to ensure that base is horizontal (refer to
Fig.1). Tighten self-tapping screws to secure the base.
Supply enough tape or sealant on pipe threads. Connect G1/2˝ cold and
hot water supply pipes(13, 12, not provided) to base. NOTE: The end
with blue mark is connected to cold water. If the base level is broke by
fixing pipes, readjustment is needed.
Install plug(2) onto the base. Increase hot and cold water supply
pressures to 1MPa. Inspect for leaks.
Secure protector(14) onto the base with screws(15).
Make sure the distance between bottom of protector and top surface of
tiles is within 13~33mm (top surface of tiles is between the MIN and MAX
line on the protector). Drill Ø75mm hole on the tile. Lay out the tiles. Cut
away the extending part of protector in accordance with the tile surface.
Ø10 drill bit
1
10
13
11
9
Fig.1
2
3
8
7
6
4
5
12
2
Max. 1MPa
15
14
13~33
Ø75
7
2
3
6
5
4
8
1
20
17
17
19
16
18
19
21
How To Install The Handspray
Remove the protector from diverter kit(16). Connect hose(18) to
handspray(19) with washers(17). Tighten all the connections. Hang the
handspray on the bracket(20) of the faucet.