2.
2.
D
C
D
B
1.
E
4.
E
F
1.
B
A
1.
2.
2.
D
C
D
B
1.
E
4.
E
F
1.
B
A
1.
2.
2.
D
C
D
B
1.
E
4.
E
F
1.
B
A
1.
A
B
C
D
E
F
HG
I
3.
GE
H
2.
GE
5.
3.
GE
H
2.
GE
5.
3.
GE
H
2.
GE
5.
A
B
C
D
E
F
HG
IA
B
C
D
E
F
HG
I
Adaptador
Inferior
Collier Du Tube
Inférieur
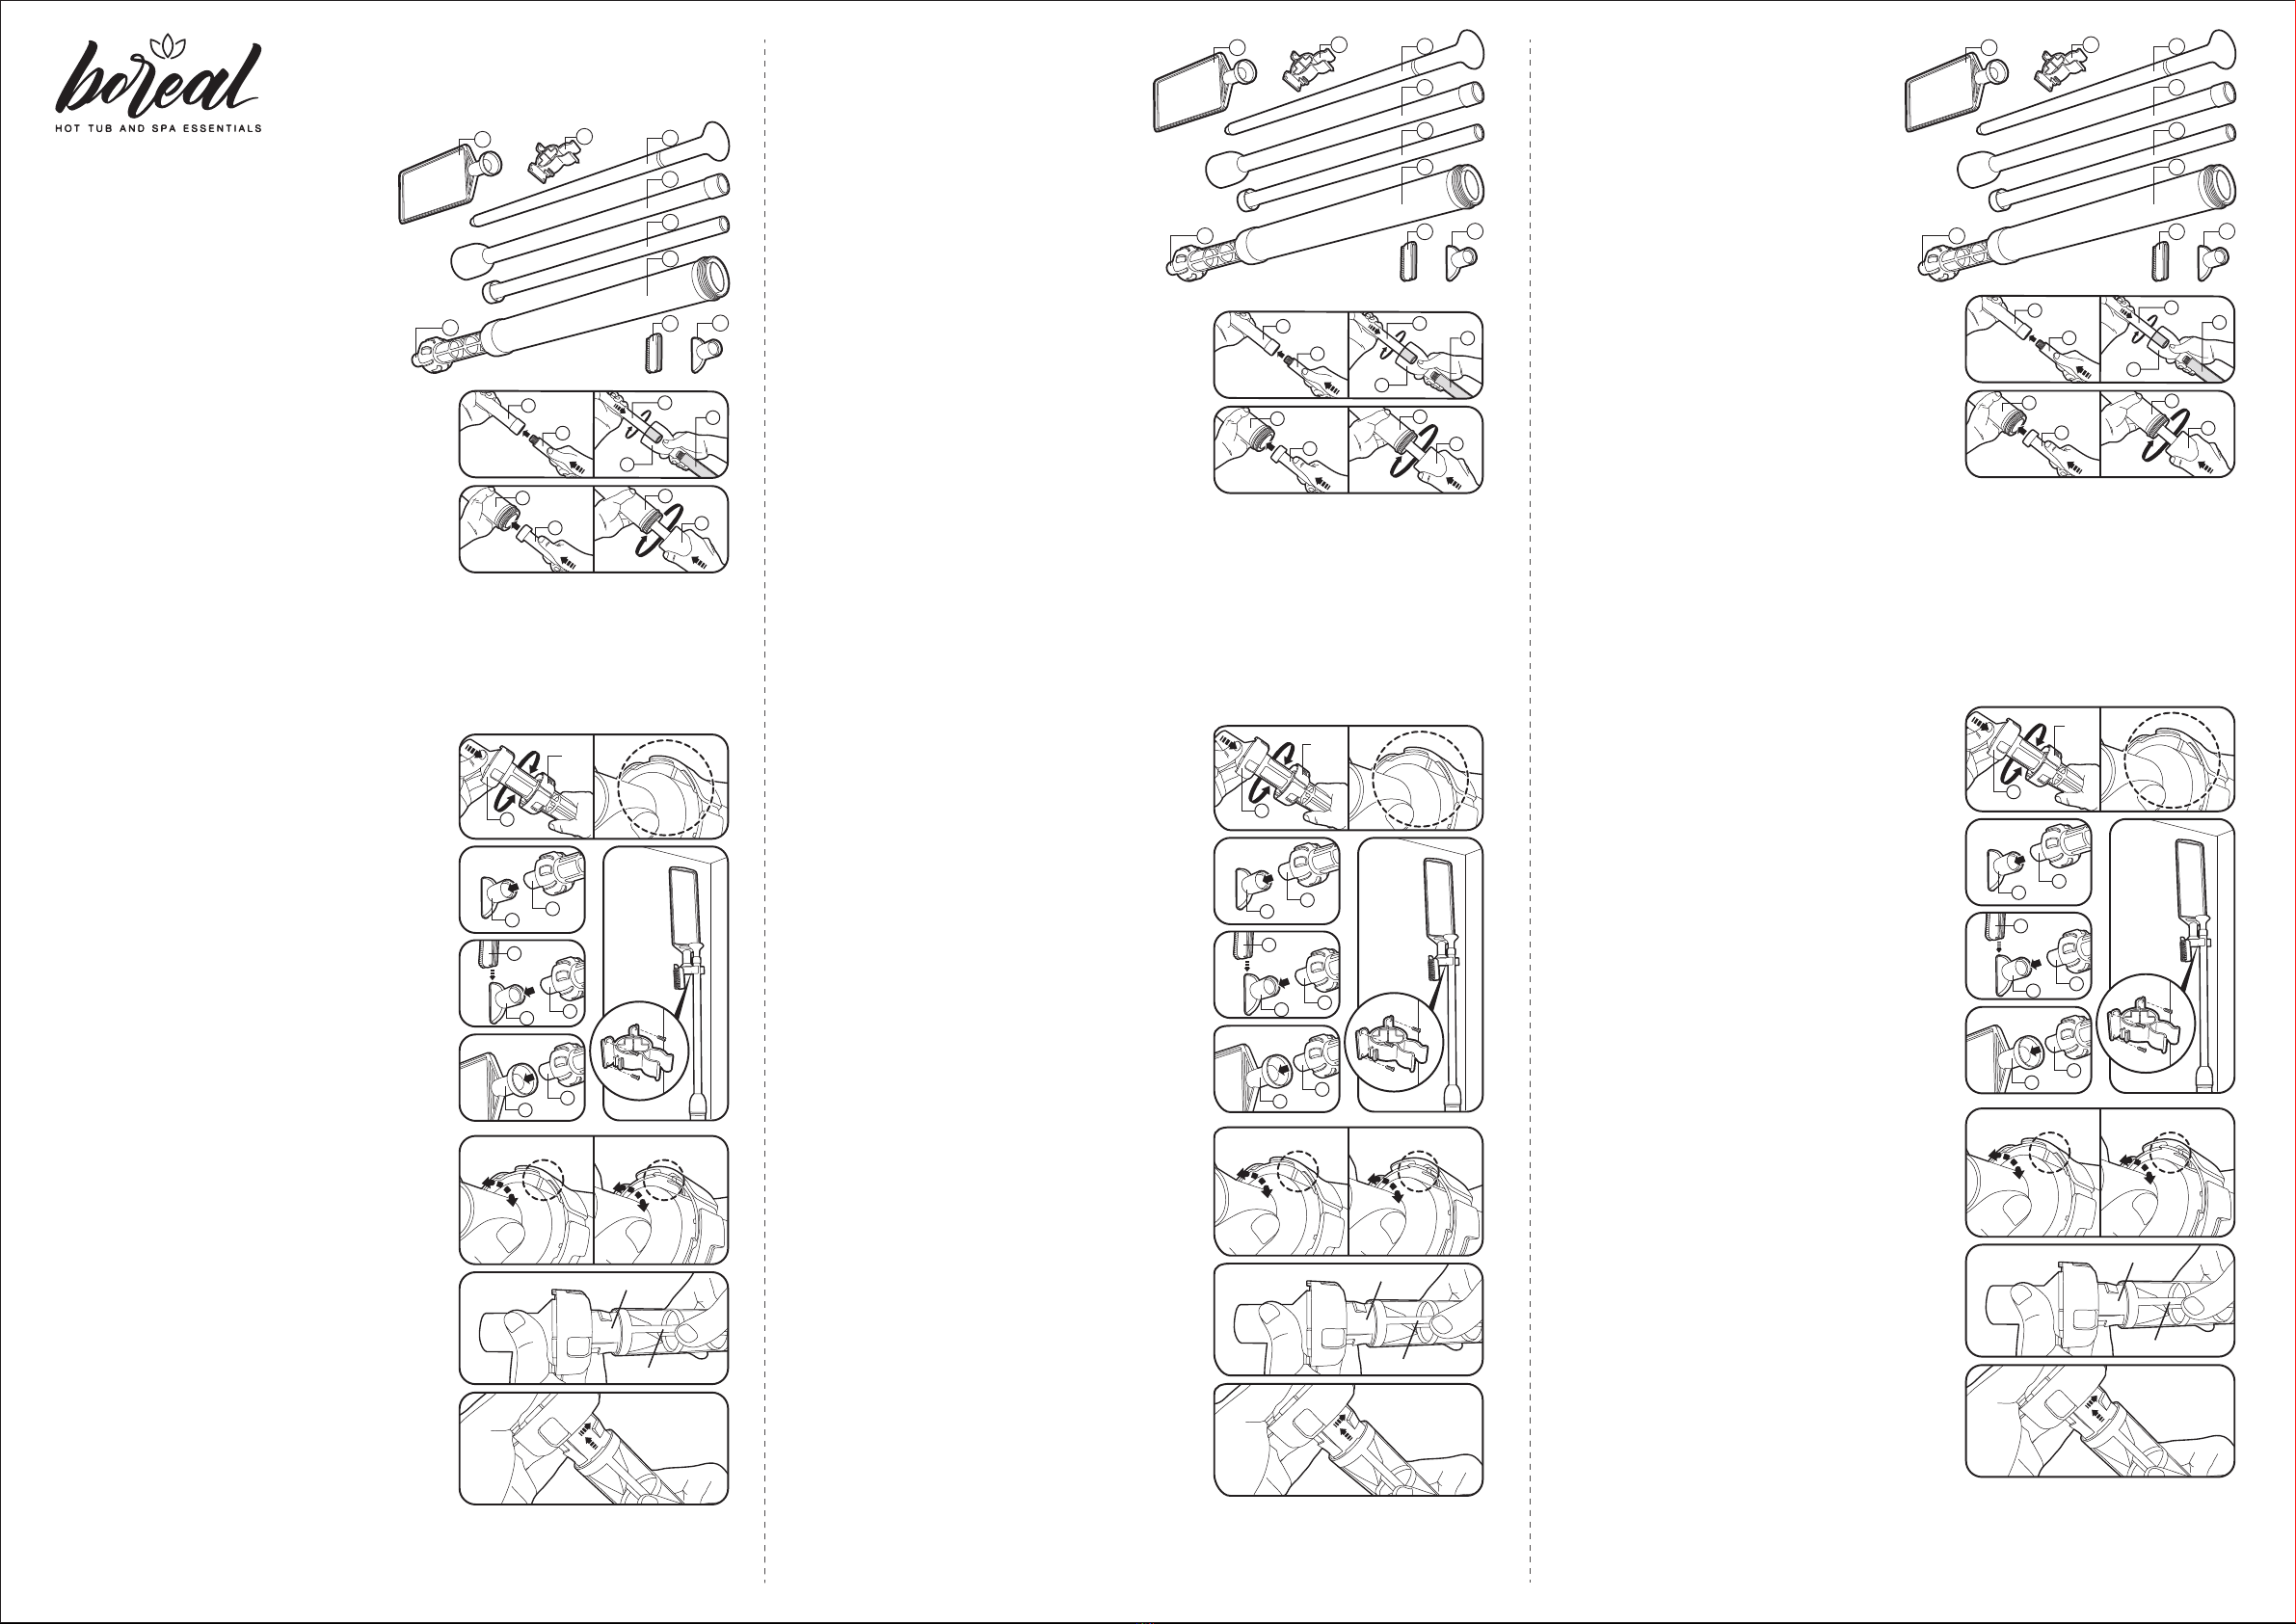
Main Units
Upper Rod
Upper Tube
Lower Rod
Lower Tube
Accessories
Suction Nozzle
(assembled with Filter Basket on bottom)
Skimmer
Wide Mouth Suction Nozzle
Wide Mouth Brush
Wall Mount Holder
INTRUCTIONS
1) Assembly of main body
Insert the upper rod inside upper tube from top to
the end of the upper tube. Connect the upper rod
with lower rod by screwing together the threaded
connector as shown.
2) Gently place the bottom of the lower rod into the
central opening of the lower tube. Slide the upper
tube inside until it meets with the lower tube screw
connector. Connect together the upper and lower
tubes by turning the upper tube clockwise.
TO CLEAN YOUR POOL OR SPA
Always start by priming the unit by placing the nozzle underneath the surface of the water.
Pump the unit’s handle in and out several times to remove air that may be trapped inside.
Then, with the handle pushed completely in, pull the handle out to draw debris in.
The vacuum comes with different accessories (suction nozzle, wide mouth suction nozzle
and brush) to help you easily clean away dirt and debris.
Use the suction nozzle to remove rocks and larger debris.
Use the wide mouth suction nozzle and brush to scrub and remove dirt from stubborn spots.
Use the skimmer to remove floating objects such as leaves.
ASSEMBLY OF ACCESSORIES
1) Suction Nozzle
Push the suction nozzle onto the lower tube collar
until it is in a locking position as shown (you will hear
a “click” sound).
2) Wide Mouth Nozzle
Position the bottom opening of the wide mouth nozzle
onto the suction nozzle. Push in the wide mouth nozzle
until it stops.
3) Brush
Slide the brush into the slot on the opening of the
wide mouth suction nozzle.
4) Skimmer
Position the bottom opening of the skimmer onto the
suction nozzle. Push the skimmer on until it stops.
5) Wall Mount Holder
Place the wall mount holder onto the wall at a height
that is high enough for hanging the complete unit.
Use screws (not included) to secure the wall mount
holder onto the wall.
WARNING! THIS IS NOT A TOY.
ALWAYS STORE THE UNIT OUT
OF THE REACH OF CHILDREN.
EMPTYING THE FILTER BASKET
1. Twist the suction nozzle clockwise or anticlockwise to
the release position, and then pull it out from the lower
tube collar.
2. Grasp the plastic area at the base of the filter basket
(DO NOT GRASP THE FILTER BASKET SCREEN).
Rotate it anticlockwise until you feel it stop and then
pull to remove it.
3.
Rinse the filter basket with water to remove any debris
caught inside.
CAUTION: DO NOT SCRAPE THE VACUUM OR
NOZZLE AGAINST ACRYLIC SPAS, AS THIS MAY
DAMAGE THE SURFACE OF THE SPA.
Replacing the Filter Basket to Suction Nozzle.
Locate the raised notches on the inside of the filter basket.
Line these up with the locking tabs on the one way valve
and then slide the filter basket onto the one way valve.
Rotate the filter basket clockwise until it locks into place.
Insert the suction nozzle into the lower tube collar of the tube.
AFTER USE, ALWAYS DRAIN WATER FROM THE
UNIT
BY REMOVING THE NOZZLE, AND DRY IT
BEFORE STORING.
DO NOT LEAVE THE UNIT IN THE POOL OR SPA WHEN NOT IN USE.
DO NOT STORE UNDER DIRECT SUNLIGHT.
DO NOT STORE OUTDOORS OR IN A LOCATION WHERE THE TEMPERATURE FALLS
BELOW FREEZING.
Lower Tube
Collar
One Way Valve
Filter Basket
Locking Position Release Position
Manual Spa Vacuum
A.
B.
C.
D.
E.
F.
G.
H.
I.
Piezas
Barra Superior
Tubo Superior
Barra Inferior
Tubo Inferior
Accesorios
Boquilla De Succión
(Ensamblado Con La Cesta)
Skimmer
Boquilla De Succión De Boca Ancha
Cepillo De Boca Ancha
Soporte De Pared
INSTRUCCIONES DE MONTAJE
1) Montaje de la estructura
Inserte la barra superior en el tubo inferior hasta el
final, después conecte la barra superior con la barra
inferior, enroscando ambas barras como se muestra
a continuación.
2) Suavemente introduzca la parte de abajo de la barra
inferior en la apertura central del tubo inferior. Deslice
el tubo superior hasta que encaje con el conector del
tubo inferior. Conecte el tubo superior con el tubo
inferior girando el tubo superior en el sentido de las
agujas del reloj.
LIMPIEZA DEL SPA O DE LA PISCINA
El primer paso que debe seguir antes de proceder a la limpieza de su spa o piscina es cebar la
unidad colocando la boquilla por debajo del nivel del agua. Deberá purgar la depuradora para
sacar todo el aire que pueda haber en el circuito. Mover la empuñadura hacia dentro y hacia
fuera varias veces para así liberar el aire que se haya podido quedar dentro. Para empezar a
limpiar deberá tener la empuñadura hacia dentro. Retire la empuñadura para permitir que las
hojas entre dentro.
El vacío viene con diferentes accesorios (boquilla de succión, Boquilla de succión boca ancha,
Cepillo de boca ancha) para facilitar la eliminación de hojas y suciedad de la manera más fácil.
Utilice la boquilla de succión para eliminar piedras y hojas.
Utilice la boquilla de succión de boca ancha y la Cepillo para quitar la suciedad más resistente.
Utilice el skimmer para retirar partículas flotantes como por ejemplo las hojas.
MONTAJE DE LOS ACCESORIOS
1) Boquilla de succión
Empuje la boquilla de succión en la abrazadera del
tubo inferior hasta que oiga un “click”.
2) Boquilla de succión de boca ancha
Situé la apertura de la boquilla de succión de boca
ancha encima de la boquilla de succión. Empuje
hasta que haga tope.
3) Cepillo
El cepillo de boca ancha se tiene que situar en una
ranura lateral de la boquilla de succión ancha.
4) Skimmer
Sitúe la abrazadera del Skimmer en el tubo con la
boquilla de succión. Presione el skimmer hasta que
haga tope.
5) Soporte de Pared
Sitúe el soporte en la pared, a una altura suficiente
para que entre todo el producto. Utilice unos tornillos
(no incluidos) para fijar el soporte en la pared.
ADVERTENCIA! NO ES UN JUGUETE.
MANTENER EL PRODUCTO FUERA
DEL ALCANCE DE LOS NIÑOS.
LIMPIEZA DEL FILTRO
1. Gire la boquilla de succión en el sentido de las agujas
del reloj o al revés y tire de la boquilla para extraerla
de la abrazadera del tubo inferior.
2. Apriete la cintas de plástico en la base del filtro
(NO APRIETE LA REJILLA DEL FILTRO).
Gire el artículo en el sentido contrario a las agujas del
reloj hasta llegar al tope y tire hasta quitarlo.
3. Limpie el filtro con agua para retirar la suciedad y las
pequeñas partículas que se hayan quedado en el filtro.
PRECAUCIÓN: EVITE ARAÑAR LOS SPAS ACRILICOS
CON EL ASPIRADOR O CON LA BOQUILLA YA QUE
PODRÁ DAÑAR LA SUPERFICIE DEL SPA.
Sustitución del filtro de la boquilla de succión.
Localice los salientes dentro del filtro. Alinéelos con las
presillas situadas en la válvula unidireccional y después
deslícelos dentro de la válvula. Gire el filtro en el sentido
de las agujas del reloj hasta que se bloquee.
Inserte la boquilla de succión en la abrazadera del tubo
inferior.
NO ES RECOMENDABLE DEJAR EL NEMO VAC DENTRO DEL AGUA CUANDO NO ESTE
EN USO.
DEBERÁ ELIMINAR Y SECAR TODO EL AGUA QUE SE HA QUEDADO DENTRO DEL CIR
CUITO DEL PRODUCTO RETIRANDO LA BOQUILLA.
Válvula Unidireccional
Filtro
Posición de Cerrado Posición de Apertura
Limpiafondos Manual para Spa
A.
B.
C.
D.
E.
F.
G.
H.
I.
Pièces Principales
Tige Supérieure
Tube Supérieur
Tige Inférieure
Tube Inférieur
Accessoires
Bec D’aspiration
(Assemblé Avec Le Panier De Filtration Sur Le Fond)
Skimmer
Bec D’aspiration À Large Bouche
Brosse Large
Support Mural
INSTRUCTIONS D’ASSEMBLAGE
1) Assemblage du corps
Insérez la tige supérieure dans le tube supérieur à partir
du dessus jusqu’à l’extrémité du tube supérieur, puis
connectez la tige supérieure à la tige inférieure en
vissant leurs connecteurs ensembles comme indiqué
sur les photos.
2) Placez doucement le fond de la tige inférieure dans
l’ouverture centrale du tube inférieur. Glissez le tube
supérieur à l’intérieur jusqu’à ce qu’il rejoigne le tube
inférieur et vissez le connecteur. Reliez le tube supérieur
et le tube inférieur en tournant le tube supérieur dans
le sens des aiguilles d’une montre.
POUR NETTOYER VOTRE PISCINES OU VOTRE SPA
Toujours commencer en amorçant l’unité en plaçant le bec sous la surface de l’eau. Pompez au
niveau de la poignée plusieurs fois afin de chasser l’air qui pourrait s’y trouver. Puis avec la
poignée complètement poussée, tirez-la pour aspirer les débris.
Le vide est livré avec différents accessoires (bec d’aspiration, bec d’aspiration à large
bouche et brosse) afin de vous aidez à nettoyer les saletés et les débris de la manière la plus
simple qu’il soit.
Utilisez le bec d’aspiration pour enlever les graviers et les gros débris.
Utilisez le bec d’aspiration à large bouche et la brosse large pour enlever les saletés et frotter les
tâches tenaces.
Utilisez le skimmer pour enlever les débris flottants comme les feuilles.
ASSEMBLAGE DES ACCESSOIRES
1) Bec d’aspiration
Poussez le bec d’aspiration sur le collier du tube
inférieur jusqu’à ce qu’il se verrouille comme montré
sur les photos. (vous entendrez un « clic »)
2) Bec à large bouche
Positionnez l’ouverture inférieure du bec à large bouche
sur bec d’aspiration. Emboitez le bec à large bouche
jusqu’à la butée.
3) Brosse
Glissez la brosse dans la fente située sur l’ouverture
du bec d’aspiration à large bouche.
4) Skimmer
Positionnez l’ouverture inférieure du skimmer sur le
bec d’aspiration. Emboitez le skimmer jusqu’à la butée.
5) Support mural
Placez le support mural sur le mur à une hauteur assez
importante pour faire tenir l’unité. Utilisez des vis (non
incluses) pour fixer le support mural sur le mur.
AVERTISSEMENT! CECI N’EST PAS UN JOUET.
TOUJOURS LE STOCKER HORS DE PORTEE
DES ENFANTS.
VIDANGE DU PANIER DE FILTRATION
1. Tournez l’embout d’aspiration et, tirez pour l’enlever
du collier.
2. Saisissez la bande de plastique à la base du panier
de filtration (NE PAS SAISIR L’ECRAN DU PANIER
DE FILTRATION).
Tournez l’élément dans le sens contraire des aiguilles d’une
montre jusqu’à ce qu’il stoppe et ensuite tirez pour l’enlever.
3.
Rincez le panier de filtration avec de l’eau pour enlever
tous les débris attrapés à l’intérieur.
ATTENTION : NE PAS ERAFLER L’ASPIRATEUR OU
L’EMBOUT CONTRE LES SPAS ACRYLIQUES CAR CECI
POURRAIT ENDOMMAGER LA SURFACE DU SPA.
Replacement du panier de filtration sur le bec d’aspiration.
Localisez les encoches à l’intérieur du panier de filtration.
Mettre dans ces dernières les étiquettes de verrouillage du
clapet anti-retour puis glissez le panier de filtration sur le
clapet anti-retour. Tournez le panier de filtration dans le
sens des aiguilles d’une montre jusqu’à ce qu’il se verrouille.
Insérez le bec d’aspiration dans le collier du tube inférieur.
APRES UTILISATION, EVACUEZ TOUJOURS L’EAU
EN ENLEVANT L’EMBOUT ET SECHEZ LE AVANT
DE LE STOCKER.
NE LAISSEZ PAS L’APPAREIL DANS LA PISCINE OU LE SPA QUAND IL N’EST PAS EN
FONCTIONNEMENT.
NE LE STOCKEZ PAS SANS PROTECTION SOUS LES RAYONS DU SOLEIL.
NE LE STOCKEZ PAS DEHORS OU DANS UN ENDROIT OU IL RISQUE DE GELER.
Clapet Anti-retour
Panier de Filtration
Position Verrouillée Position Déverrouillée
Nettoyeur Manuel pour Spa
A.
B.
C.
D.
E.
F.
G.
H.
I.
TM K738/SPA
Made in China / Fabriqué en Chine
Fabricado en China / Fatto in Cina
Hergestellt in China / Gemaakt in China
© 2020 Kokido Development Limited
20001013


