Kongskilde MultiCutter MCC GR250X User manual

MultiCutter MCC GR250X
Granulator
Operating Manual
Bedienungsanleitung
Guide d’utilisation et d’entretien
Manual operativo
Instrukcja obsługi
Brugermanual

EN
English
MultiCutter MCC GR250X
Operating Manual

1
Manual_GR250X_180123_EN
EN
Operating instructions Granulator GR 250X
GR 250X:
GR 250X has been developed for continuous cutting of paper, cardboard and plastic, e.g. edge trimming of
roll cutters and printing machines, etc. The Granulators are so that they can be built into both new and
existing pipe systems.
Standard:
Granulator GR 250X with 3,0kW motor, 3x400V, 50Hz.
Accessory:
Integrated frequency converter for 500-4000 rpm.
Gear motor for high torch
Transition piece for integration into other pipe sizes.
Oil system.
Granulator marking:
Granulator type GR 250X with product number 100820X.
The Granulator is also marked with the CE mark and an arrow showing the direction of rotation and
through-flow direction.
Manufacturer:
Lundberg Tech A/S
Foldagervej 12B, 4623 Lille Skensved, Denmark

2
Manual_GR250X_180123_EN
EN
Technical specifications:
Granulator housing
High-carbon steel.
Motor
3,00kW (4 HP) type M100
1400/2800 rpm.
Power
3 Phase, 230-460V, 50-60 Hz.
Nom. amperage
6,30A
Fuse
16 Amp.
Rotor
Hard-metal blades.
Piping
Ø200-Ø400 mm.
Transmission
Direct coupling
Weight
220 kg. (485 lbs)
Weight w/o motor
195 kg. (430 lbs)
Surface treatment
Powder lacquering
Noise level
65 dB (A)
Installation and fitting:
When pipes are being fitted on the Granulator, a fixing collar with screws must be used to ensure that the
pipe can only be removed with the aid of tools. The Granulator must be bolted to a stable plate.
During installation and inspection of pipes and machine, the motor must be disconnected from the power
supply. This can be done by activating the switch.
Before starting the GR 250X, a one-metre pipe must be mounted on each side of the Granulator for safety
reasons.
Starting and stopping:
The motor should be fitted with a lockable safety switch to enable the Granulator to be started and
stopped separately without stopping the unit, which it is connected with.
Maintenance:
The manufacturer recommends the bearings and coupling carrier plate being renewed after max. 4800
hours of operation.
It is also recommended to grind the rotor knives and fixed blades on the same occasion.
See “Replacing spare parts”.

3
Manual_GR250X_180123_EN
EN
Adjustment of the fixed knife:
The knives are adjusted by the manufacturer –i.e. this instruction shall only be used after repairs.
1) Check that the screws (pos. 3) are tightened.
2) The screws (pos. 2) are turned till “hand tight”.
3) The screws (pos. 4) are tightened sufficiently so that the fixed knife (pos. 1) is just touching the
rotor blades. During tightening the rotor is turned manually and it must be checked that the
resistance against turning is equal for all rotor knives. Rotor knives must never touch each
other while adjusting.
4) The screws (pos. 5) are tightened, and the position of the knives is checked by feeding a thin
piece of paper down between the knives, while the rotor is turned manually. It must be
checked that each rotor knife is cutting over its total length. The screws (Pos. 2) are tightened,
and the check is repeated. If the knives are not cutting evenly adjustment is made by means of
screws (pos. 4 and 5).
5) The blower is turned off at the electric control unit and the Granulator is turned on. If the
Granulator is making noise the screws (pos. 4) are loosened and the screws (pos. 5) are
tightened until the noise stops. To avoid damaging the knives adjustment, while running, must
be done with extreme care and therefore the screws (pos. 2) must never be loosened.

4
Manual_GR250X_180123_EN
EN
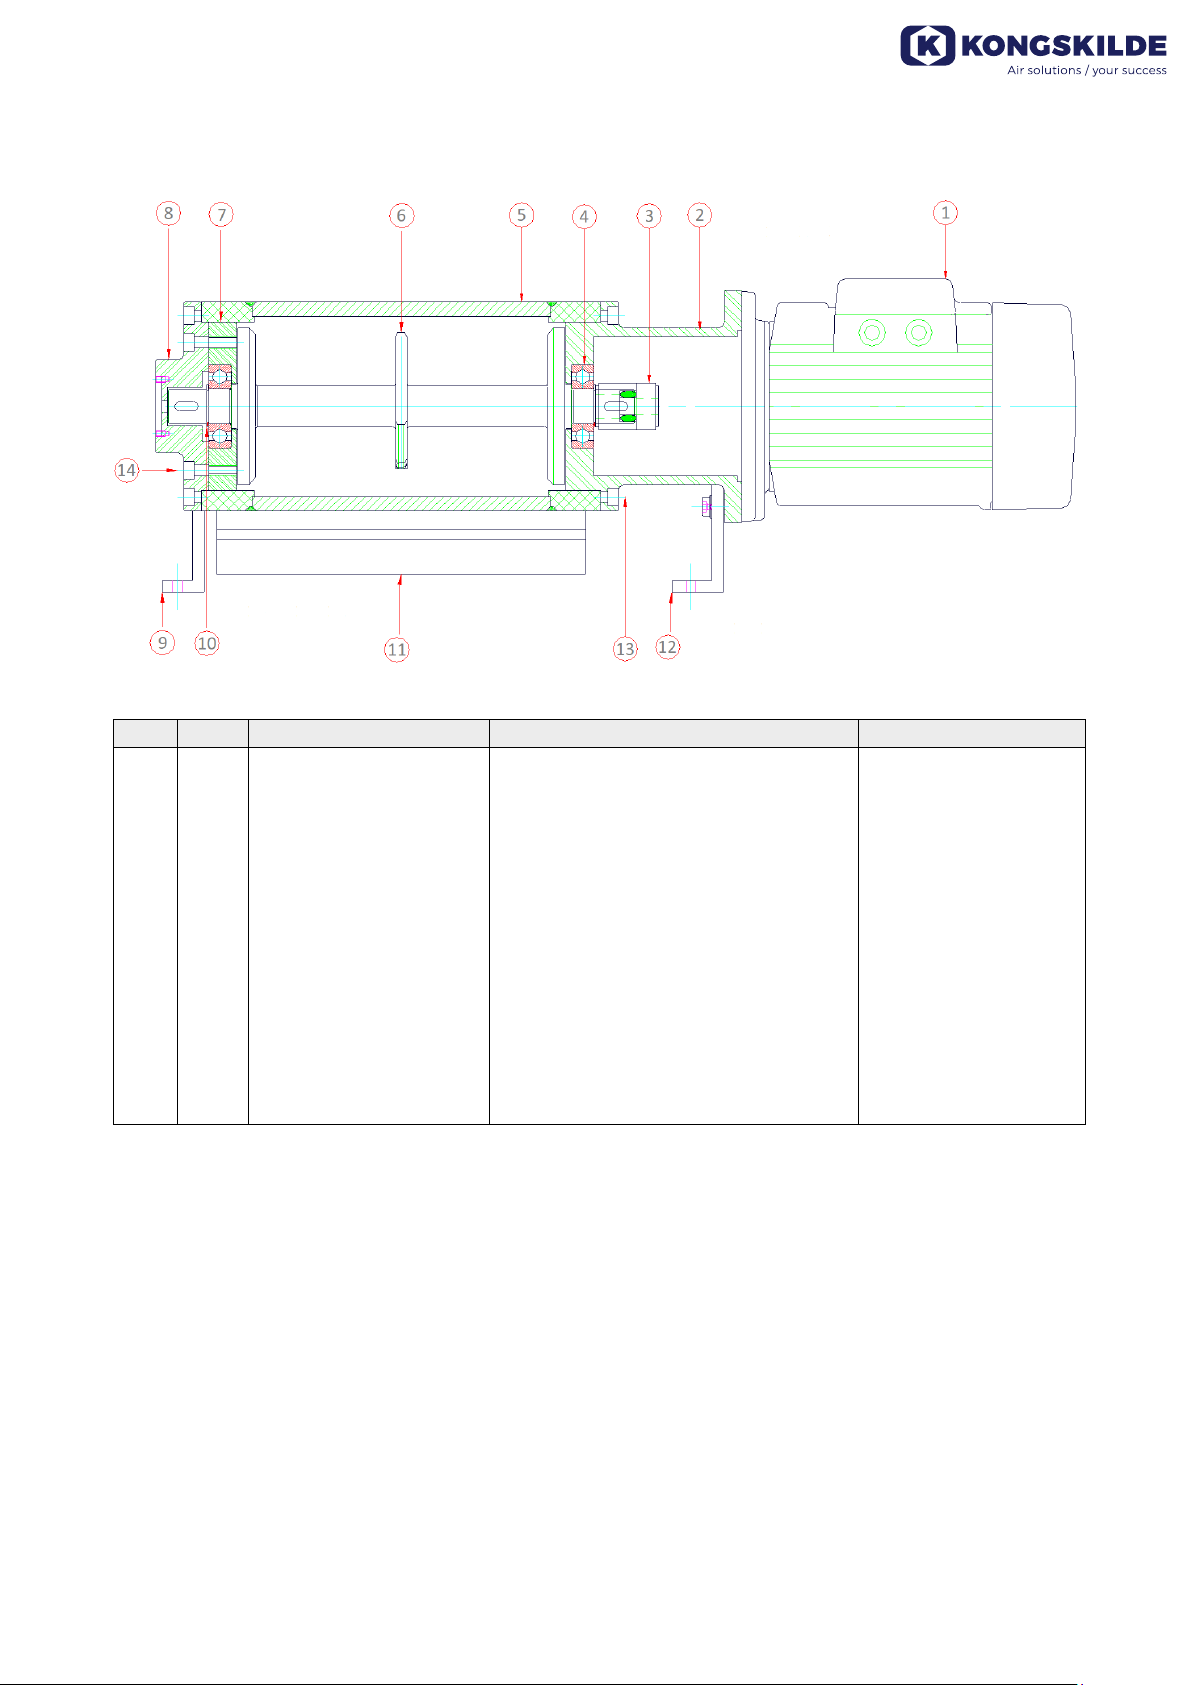
Replacing spare parts:
When spare parts are being replaced, it is recommended they are replaced by the manufacturer. If this
is not possible, these instructions should be followed:
1) The motor should be disconnected from the power supply.
2) When parts are being replaced inside the Granulator, the motor and Granulator should be separated
(see page 5) and the coupling and coupling carrier plate taken out with the motor.
3) The locking ring is first removed. The bearing housing, rotor, and bearings can then be removed
altogether.
4) When new bearings are to be fitted, pressure should be applied to the inner race to get the bearings
into position on the rotor. The bearing housing is then mounted so that rotor, bearings, and housing
form a single unit.
5) The unit is carefully put in place so that the bearings are not overloaded. The locking ring is then fixed in
position.
6) The Granulator and motor can now be assembled after it has been first checked that the coupling and
coupling carrier plate are properly seated.
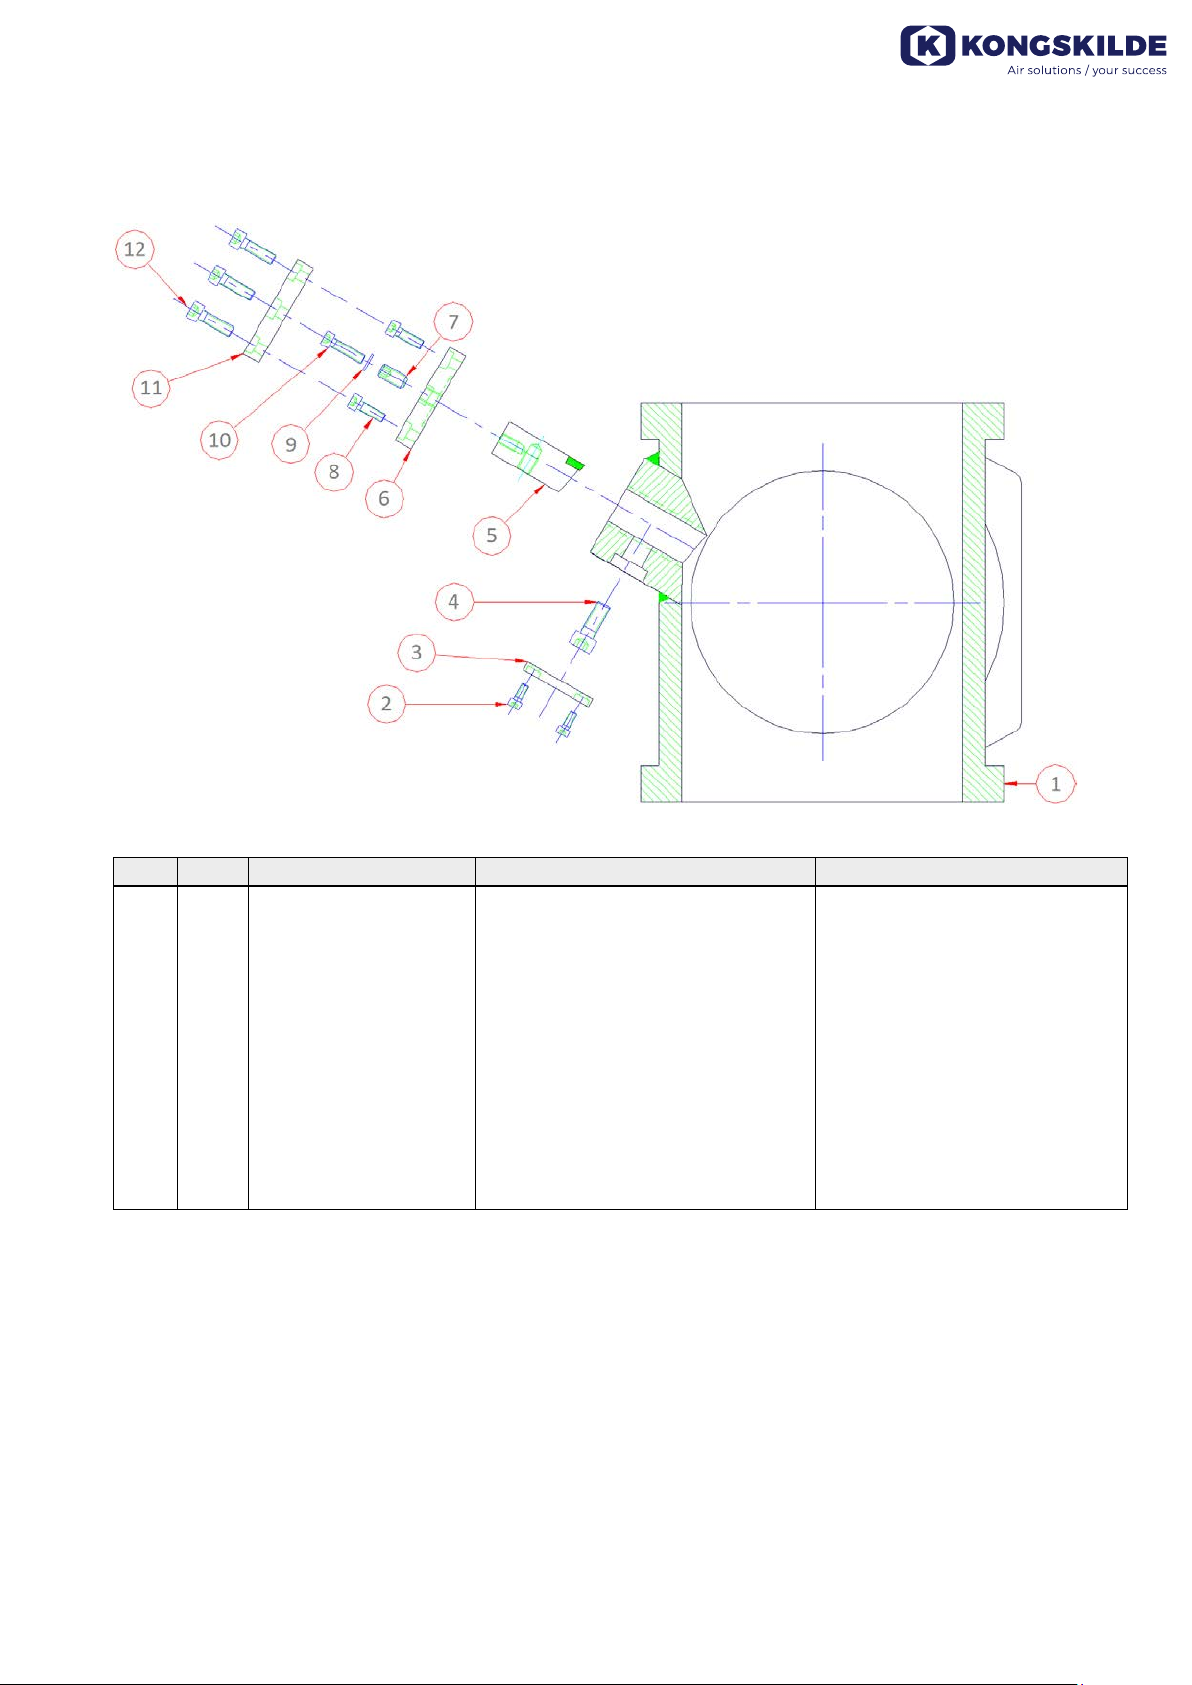
The fixed blades should be replaced from outside (see page 6).
1) The blade can be taken out by removing the cover plate, adjustment plate, and screw holding the
blade in place.
2) Important! When any part of the machine whatever has been replaced, the fixed blade should be
adjusted according to the relevant instructions.

5
Manual_GR250X_180123_EN
EN
List of parts:
Pos.
Qty.
Part no.
Name
Description
1
1
Electric motor
MG 100
2
1
Coupling Housing
10081-00
3
1
CO(M,E,R)200
Coupling
4
2
BBGR250
Bearing
6310-2RS1
5
1
GR250HR
Housing
100820
6
1
RWK(knife)GR250
Rotor complete with blades
10082-00
7
1
HFB250
Bearing Housing
GR 250 504
8
1
End cover
20127-00
9
1
Feet
40052-02
10
1
Oring
11
1
FK250
Fixed knife
31663-01
12
1
Feet
40052-01
13
27
Allen screw
M5x12
14
5
Allen screw
M8x15

6
Manual_GR250X_180123_EN
EN
List of parts:
Pos.
Qty.
Part no.
Name
Description
1
1
GR250HR
Housing
100820
2
16
Allen screw
M4x10
3
1
Cover
31660-00
4
6
Allen screw
M8x25
5
1
FK250
Fixed knife
20120-00
6
1
AP200
Adjustment plate
20120-01
7
6
Pointed screw
M8x12
8
18
Low allen screw
M5x12
9
7
Washer
M6
10
7
Allen screw
M6x16
11
1
CP250
Cover plate
20120-02
12
6
Allen screw
M6x25

7
Manual_GR250X_180123_EN
EN
Optional lubrication system:
List of parts:
Pos.
Qty.
Part no.
Name
Description
1
1
030002
Oil cover
30326
2
1
-
Valve
30258
3
1
120132
Solenoid valve 24-220V, 50Hz
40013
4
1
120133
Oil tank
30625-01
5
1
120136
Oil filling and filter
40015
6
1
120131
Plate for oil tank
30625-02
7
1
-
El-motor
MG71B2-F14Fod130
8
1
-
Granulator MS
100240
9
1
120205
Level sensor
-
10
1
120197
Lamp 230V
-
11
1
-
Junction box
-
The solenoid valve shall be connected with power 24-220V, 50Hz, so it only is open when the Granulator is
running.
The lubrication in the Granulator is adjusted by the needle valve on the Granulator, it shall be adjusted, so
there come one drop each 3 or 4 second for matrix waste and 8 or 9 second for trim waste.
The specification of the oil for the Granulator system: Silicone oil, SF 350 (Viscosity).

DE
Deutsch
MultiCutter MCC GR250X
Bedienungsanleitung

1
Manual_GR250X_180123_DE
DE
Bedienungsanleitung Granulator GR 250X
GR 250X:
Der Granulator GR 250X wurde für das kontinuierliche Zerkleinern von Papier- und Kunststoff- randstreifen
entwickelt. Die Granulatoren können in neue und in bestehende Rohrsysteme eingebaut werden.
Standard:
Granulator GR 250X mit 3,0kW motor, 3x400V, 50Hz.
Zubehör:
Integrierter Frequenzumformer für 500 bis 4000 U per Min.
Schmiervorrichtung bei leimhaltigem Material.
Anschlussteile für den Einbau in Rohrsysteme.
Kennzeichnung des Granulators:
Granulator typ GR 250X mit der Warennummer 100820X.
Auf dem Granulator ist darüber hinaus die CE-Kennzeichnung angebracht, sowie Pfeile zur Angabe der
Rotations- und Durchlaufrichtung.
Hersteller:
Lundberg Tech A/S
Foldagervej 12B, 4623 Lille Skensved, Denmark

2
Manual_GR250X_180123_DE
DE
Technische Spezifikationen:
Granulatorgehäuse
Gusseisen.
Motor
3,00kW (4 HP) type M100
1400/2800 rpm.
Elektr. Anschluss
3 Phase, 230-460V, 50-60 Hz.
Nom. Leist. Aufn.
6,30A
Sicherungsgröße
16 Amp.
Rotor
Hartmetallmesser.
Rohr-Anschluss
Ø200-Ø400 mm.
Getriebe
Direkt geschaltet
Gewicht
220 kg. (485 lbs)
Gewicht ohne Motor
195 kg. (430 lbs)
Oberflächenbehandlung
Pulverbeschichtet
Geräuschpegel
65 dB (A)
Aufstellung und Montage:
Bei der Montage der Rohre am Granulator ist eine Schraubschelle zu verwenden, so dass das Rohr nur mit
Hilfe eines Werkzeugs wieder abgenommen werden kann. Der Granulator kann durch die Rohre ohne jede
andere Stütze fest stehen, es ist jedoch eine Trägerplatte zu verwenden, wenn der Granulator z.B. unter
einem EDV-Boden liegt.
Bei der Montage und Demontage des Rohres und der Maschine darf kein Strom am Motor angeschlossen
sein.
Bevor an der Maschine der Strom eingeschaltet wird, muss aus Sicherheitsgründen mindestens ein Rohr
von einem Meter Länge an jeder Seite des Granulators angebracht sein.
Maintenance:
Es wird vom Hersteller empfohlen, Lager und Kupplungsmitnehmer nach einer Betriebszeit von maximal 3200
Stunden zu erneuern. Die regelmässige Reinigung des Rotormessers sowie des Granulatorgehäuses innen ist
je nach Materialanwendung und Nutzungsgrad der Anlage 2-monatlich oder öfter vorzunehmen.
Ebenso wird empfohlen, die Rotormesser und das feste Messer gleich bei derselben Gelegenheit zu schleifen.
Siehe auch unter „Austausch von Ersatzteilen“.

3
Manual_GR250X_180123_DE
DE
Einstellung des festen Messers:
Der Granulator wird im Werk eingestellt. Gehen Sie nur dann nach dieser Anleitung vor, wenn die Messer
aus irgendeinem Grund, z.b. bei Reparaturen oder beim Schleifen, einen Versatz haben.
1) Kontrollieren Sie, dass die Schrauben (Pos.3) angezogen sind.
2) Die Schrauben (Pos.2) von Hand anziehen.
3) Die Schrauben (Pos.4) so anziehen, dass das feste Messer (Pos.1) leicht die Rotationsmesser berührt.
Während des Anziehens wird der Rotor von Hand gedreht, wobei zu beachten ist, dass der Widerstand
beim Drehen bei allen Rotationsmessern gleich ist.
4) Die Schrauben (Pos. 5) anziehen und Messerstellung kontrollieren indem ein dünnes Blatt Papier
zwischen die Messer geschoben wird, während der Rotor von Hand gedreht wird. Beachten, dass jedes
Rotationsmesser auf der ganzen Länge schneidet. Schrauben (Pos. 2) anziehen und die Kontrolle
wiederholen. Sollten die Messer nicht gleichmäßig schneiden, ist die exakte Einstellung mittels der
Schrauben Pos. 4 und 5 vorzunehmen.
5) Im Schaltschrank das Gebläse aus- und den Granulator einschalten. Falls der Granulator Geräusche
verursacht, Schrauben (Pos. 4) etwas lösen und Schrauben (Pos. 5) leicht anziehen, bis
das Geräusch verschwindet. Um Beschädigungen an den Messern zu vermeiden, muss die Einstellung bei
laufendem Motor äußerst vorsichtig stattfinden; die Schrauben (Pos. 2) dürfen dabei unter keinen
Umstanden gelöst werden.

4
Manual_GR250X_180123_DE
DE
Teile austauschen
Wenn Teile ausgetauscht werden müssen, wird empfohlen, dass der Hersteller den Austausch vornimmt.
Ist dies nicht möglich, müssen die folgenden Anweisungen eingehalten werden:
1) Der Motor muss von der Stromversorgung getrennt werden.
2) Wenn Teile im Granulator ausgetauscht werden sollen, müssen Motor und Granulator getrennt (siehe
Seite 5) und die Kupplung und die Kupplungsträgerplatte mit dem Motor herausgenommen werden.
3) Zuerst wird der Arretierring entfernt. Das Lagergehäuse, der Rotor und die Lager können dann
zusammen entfernt werden.
4) Wenn neue Lager eingebaut werden sollen, muss Druck auf den Innenring angewendet werden, damit
man die Lager auf den Rotor bekommt. Das Lagergehäuse wird dann montiert, sodass Rotor, Lager und
Gehäuse eine Baugruppe bilden.
5) Die Baugruppe wird vorsichtig eingebaut, sodass die Lager nicht überbeansprucht werden. Der
Arretierring wird wieder angebracht.
6) Granulator und Motor können jetzt zusammengesetzt werden, nachdem geprüft wurde, ob Kupplung
und Kupplungsträgerplatte korrekt sitzen.
Die feststehenden Messer müssen von außen ersetzt werden (siehe Seite 6).
1) Das Messer kann herausgenommen werden, indem man die Abdeckplatte, die Justierplatte und die
Befestigungsschraube des Messers entfernt.
2) Wichtig: Wenn irgendein Teil der Maschine ausgetauscht wurde, muss das feststehende Messer gemäß
der entsprechenden Anleitung eingestellt werden.

5
Manual_GR250X_180123_DE
DE
Teileliste:
Pos.
Anz.
Teil Nr.
Name
Bezeichnung.
1
1
Elektromotor
MG 100
2
1
Kupplunggehäuse
10081-00
3
1
CO(M,E,R)200
Kupplung
4
2
BBGR250
Lager
6310-2RS1
5
1
GR250HR
Gehäuse
100820
6
1
RWK(knife)GR250
Rotor mit Messern
10082-00
7
1
HFB250
Lagergehäuse
GR 250 504
8
1
Endabdeckung
20127-00
9
1
Füße
40052-02
10
1
Oring
11
1
FK250
Feststehendes Messer
31663-01
12
1
Füße
40052-01
13
27
Schrauben
M5x12
14
5
Schrauben
M8x15

6
Manual_GR250X_180123_DE
DE
Teileliste:
Pos.
Anz.
Teil Nr.
Name
Bezeichnung.
1
1
GR250HR
Gehäuse
100820
2
16
Schrauben
M4x10
3
1
Abdeckung
31660-00
4
6
Schrauben
M8x25
5
1
FK250
Feststehendes Messer
20120-00
6
1
AP200
Einstellplatte
20120-01
7
6
Spitze Schraube
M8x12
8
18
Niedrige Schraube
M5x12
9
7
Waschmaschine
M6
10
7
Schrauben
M6x16
11
1
CP250
Deckplatte
20120-02
12
6
Schrauben
M6x25

7
Manual_GR250X_180123_DE
DE
Optionelles Schmiersystem:
Stückliste:
Pos.
Anz.
Teil Nr.
Name
Bezeichnung.
1
1
030002
Öldeckel
30326
2
1
-
Ventil
30258
3
1
120132
Magnetventil 24-220V, 50Hz
40013
4
1
120133
Öltank
30485-03
5
1
120136
Ölfüllung und Filter
40015
6
1
120131
Platte für Öltank
30485-02
7
1
-
El-motor
MG80A-19F165Fod
8
1
-
Granulator MS
100540
9
1
120205
Füllstandssensor
-
10
1
120197
Lampe
-
11
1
-
Anschlussdose
-
Das Magnetventil ist mit einem 24-220V, 50Hz Stromnetz angeschlossen, so ist es nur geöffnet, wenn die
Granulator ausgeführt wird.
Die Schmierung im Granulator eingestellt ist "vorsichtig" durch das Nadelventil am Granulator, wird es
eingestellt, so gibt es ein Drop jeden 8. oder 9. Sekunde, für Matrix Abfall ein Drop jeden 3. oder 4.
Sekunde.
Die Spezifikation des Öls für die Schneidmühle Systemische:
Silikonöl, SF 350 (Viskosität).

FR
Français
MultiCutter MCC GR250X
Guide d’utilisation et d’entretien

1
Manual_GR250X_180123_FR
FR
Guide d'utilisation du Broyeur GR 250X
GR 250X:
GR 250X a été développé pour le Broyage continu de papier et de plastique, tels que rognures issu de
machines de découpe à cylindre et de machines d'impression etc. Les Broyeurs peuvent être intégrés dans
les systèmes de tuyauterie existants et nouveaux.
Standard:
Broyeur GR 250X avec moteur 3,0kW, 3x400V, 50Hz.
Accessoires:
Convertisseur de fréquence intégré pour 500-4000 tours/minute.
Système de lubrification.
Raccord de réduction pour l'intégration dans d'autres tuyaux de tailles différentes.
Marquage du Broyeur:
Broyeur de type GR 250X avec numéro de produit 100820X.
Le Broyeur comporte également le marquage CE et une flèche indiquant le sens de rotation et
d'écoulement.
Constructeur:
Lundberg Tech A/S
Foldagervej 12B, 4623 Lille Skensved, Denmark

2
Manual_GR250X_180123_FR
FR
Spécifications techniques:
Boîtier du Broyeur
Fonte.
Moteur
3,00kW type M100
Puissance
3 x 230-460V, 50-60 Hz.
Intensité nominale
6,30A
Fusible
16 Amp.
Rotor
Lames en métal dur
Tuyauterie
Ø200-Ø400 mm.
Transmission
Couplage direct
Poids
220 kg. (485 lbs)
Poids sans moteur
195 kg. (430 lbs)
Traitement de surface
Peinture poudre
Niveau de bruit
65 dB (A)
Installation et raccordement:
Lorsque des tuyaux sont raccordés au Broyeur, une bague d'arrêt avec des vis doit être utilisée de manière
qu'ils ne puissent être démontés qu'à l'aide d'outils. Des tuyaux et une plaque support du moteur
retiennent le Broyeur.
Le moteur doit être débranché de l'alimentation lors de tout montage/démontage des tuyaux à la machine.
Cela peut être réalisé à l'aide d'un coupe-circuit de sécurité.
Pour des raisons de sécurité, avant de mettre le moteur sous tension, un tuyau d'un mètre doit être installé
de chaque côté du Broyeur.
Mise en marche et arrêt:
Le moteur doit être équipé d'un coupe-circuit de sécurité blocable pour permettre le démarrage/l'arrêt du
Broyeur de façon indépendante de l'arrêt de l'unité connectée.
Entretien:
Le fabricant recommande que les roulements et la plaque-support d'accouplement soient remplacés après
3200 heures maximum de fonctionnement.
Par la même occasion, il est également recommandé d'aiguiser les pales du rotor et les pales fixes.
Reportez-vous à la section "Remplacement des pièces de rechange".
Table of contents
Languages:
Other Kongskilde Industrial Equipment manuals