manuals.online logo
Brands
  1. Home
  2. •
  3. Brands
  4. •
  5. Koolatron
  6. •
  7. Pet Care Product
  8. •
  9. Koolatron LENTEK PD07 User manual

Koolatron LENTEK PD07 User manual

H1S310 Please Read These Instructions Carefully Before Use!
User Manual
Programmable
5-meal Pet Dish
PD07
3/2020 - v1
Warranty
This product is warranted to the retail customer for 90 days from date of retail purchase, against
defects in material and workmanship.
WHAT IS COVERED
• Replacement parts and labour.
• Transportation charges to customer for the repaired product.
WHAT IS NOT COVERED
• Damage caused by abuse, accident, misuse, or neglect.
• Transportation of the unit or component from the customer to Koolatron.
IMPLIED WARRANTIES
Any implied warranties, including the implied warranty of merchantability are also limited
to the duration of 90 days from the date of retail purchase.
WARRANTY
Keep the original, dated, sales receipt with this manual.
WARRANTY AND SERVICE PROCEDURE
If you have a problem with your unit, or require replacement parts, please telephone the following
numbers for assistance:
North America 1-800-265-8456
Koolatron has Master Service Centres at these locations:
U.S.A. - 4330 Commerce Dr., Batavia, NY 14020-4102
Canada - 139 Copernicus Blvd., Brantford, ON N3P1N4
A Koolatron Master Service Centre must perform all warranty work.
www.koolatron.com
©2020 Koolatron, Inc. All rights reserved.
All specification are subject to change without notice.
2
SPECIFICATIONS
3
KEY FEATURES
INSTALLATION
1. Twist the lid as picture showing to open it.
After filling in the food, place lid and twist to lock lid into place.
2. It works with AC adapter and 3 “D” batteries as an optional back up power. If you do not want
to use power adaptor, you can install and use only batteries as power source (3 new “D”
alkaline batteries). NOTE Batteries, USB cable and power adapter are not included.
3. Set the feeder as per the following instruction.
• Programming: 1 to 5 meals per day
• Dimension : L331mm x W323mm x H83mm
• Capacity: 1.6 Liter (around 1.6 lbs dry food, or 2 lbs wet food)
• Weight: 1.4 kg (without batteries & food)
• Power: Require 3 “D” batteries (not included)
Adapter 5V DC 1A with USB cable (not included)
Humanized design, easy programming
Voice recording/play at
the programmed meal time
Five separate large food compartments
for dry or wet food
Dual power supply:
battery and power adapter
Soft rubber sealing for food preservation
To open the lid:
Pull here to open the lid Vertically lift up
Find the location
letters A and B
Insert the two tabs
into slots
Press the lid down
to close
Grab hold of the lid
as shown in the picture
To lock the lid:
Make sure the power switch is at
“I” location and match positive
and negative markings.
adapter USB cable
interface
4 5
OPERATION ( cont.)
OPERATION
1. MANUAL TESTING
• Press “Manual” button for 3 seconds. If rotor rotates 1 portion, it means the machine has no problem.
You can also use this feature to feed manually.
4. Setting Lunch, Dinner or 4th Meal
• As above, press and hold “Lunch” and simultaneously press the “On/Off” button to set or not lunch.
Press and hold “Dinner” and simultaneously press the “On/Off” button to set or not dinner.
Same goes with 4th meal.
5. Voice Recording and Play (Figure 5-1)
• Recording
Keep pressing “MIC” button until LCD screen flashes, then record your voice. You can say “Bobby,
time for eating” to the microphone, release the button after recording.
• Cancel Recording
Keep pressing “MIC” button until LCD screen flashes, release the button without saying anything.
• Play Your Recording
Keep pressing “Play” button until LCD screen flashes to replay your recording. The played voice is
very low for humans, but the pet’s hearing is more sensitive than yours, so the voice should not be
too loud.
2. CURRENT TIME SETTING
• Keep pressing the “Time” button and simultaneously click the “Hour” button, then “Minute” button
to set the right time.
For example: Current time is 21:51 in the illustration below
3. BREAKFAST SETTING
• To set breakfast ON or OFF
Keep pressing the “Breakfast” button and simultaneously press the “On/Off” button.
• To set breakfast time
Keep pressing the “Breakfast” button and simultaneously press the “Hour” button, then
the “Minute” button.
manual button
Lunch:
Off= No feeding
Dinner:
On= Feeding
4th meal:
On= Feeding
long press
ON = Feeding breakfast
OFF = No breakfast
meal time
6 7
OPERATION ( cont.)
1. Disassemble the lid and food tray.
2. Hand clean these parts in warm soapy water, then dry them with a soft cloth.
WARNING! Base unit should not be submerged in water at any time, it will damage electronic
components and void the warranty.
• The “Low battery” light is flashing.
Replace the old batteries with 3 new “D” alkaline batteries. Normally 3 new “D” alkaline batteries
can last around 1 year.
WARNING!
• Requires three “D” batteries. Batteries NOT included. Use alkaline batteries only.
• Estimated life of one set of batteries is one year.
• Keep fingers and hands clear of rotating cover.
• Always turn unit off before cleaning.
• Always turn unit off before adding food.
• Always turn unit off before removing lid or food tray.
• Check the low battery light frequently to be sure the feeder has power.
• Check the level of food frequently to be sure the feeder is dispensing properly.
1. The Low Voltage indicator is on the right side of the control panel (Low battery). Before leaving
home or traveling, you should check to see if the low voltage light is on, if the unit is making a sound
or if the lights are on or flashing when food is dispensed. If so, please replace the batteries to avoid
starving your pet.
2. Do not put your fingers into the machine at any time.
3. Power switch. The power switch is located at the bottom of the product. If unit is shut down for
more than 10 seconds, the unit will be restored to factory default settings.
4. This product uses three “D” batteries. (alkaline batteries can last around 1 year.)
NOTE
- The old batteries should be dealt with according to the local regulations (familiarize yourself
with the environmental protection law).
- When the feeder is not used for a long time, remove the battery to prevent the electrolyte from
flowing out.
5. If you have any questions, please contact the dealer or manufacturer.
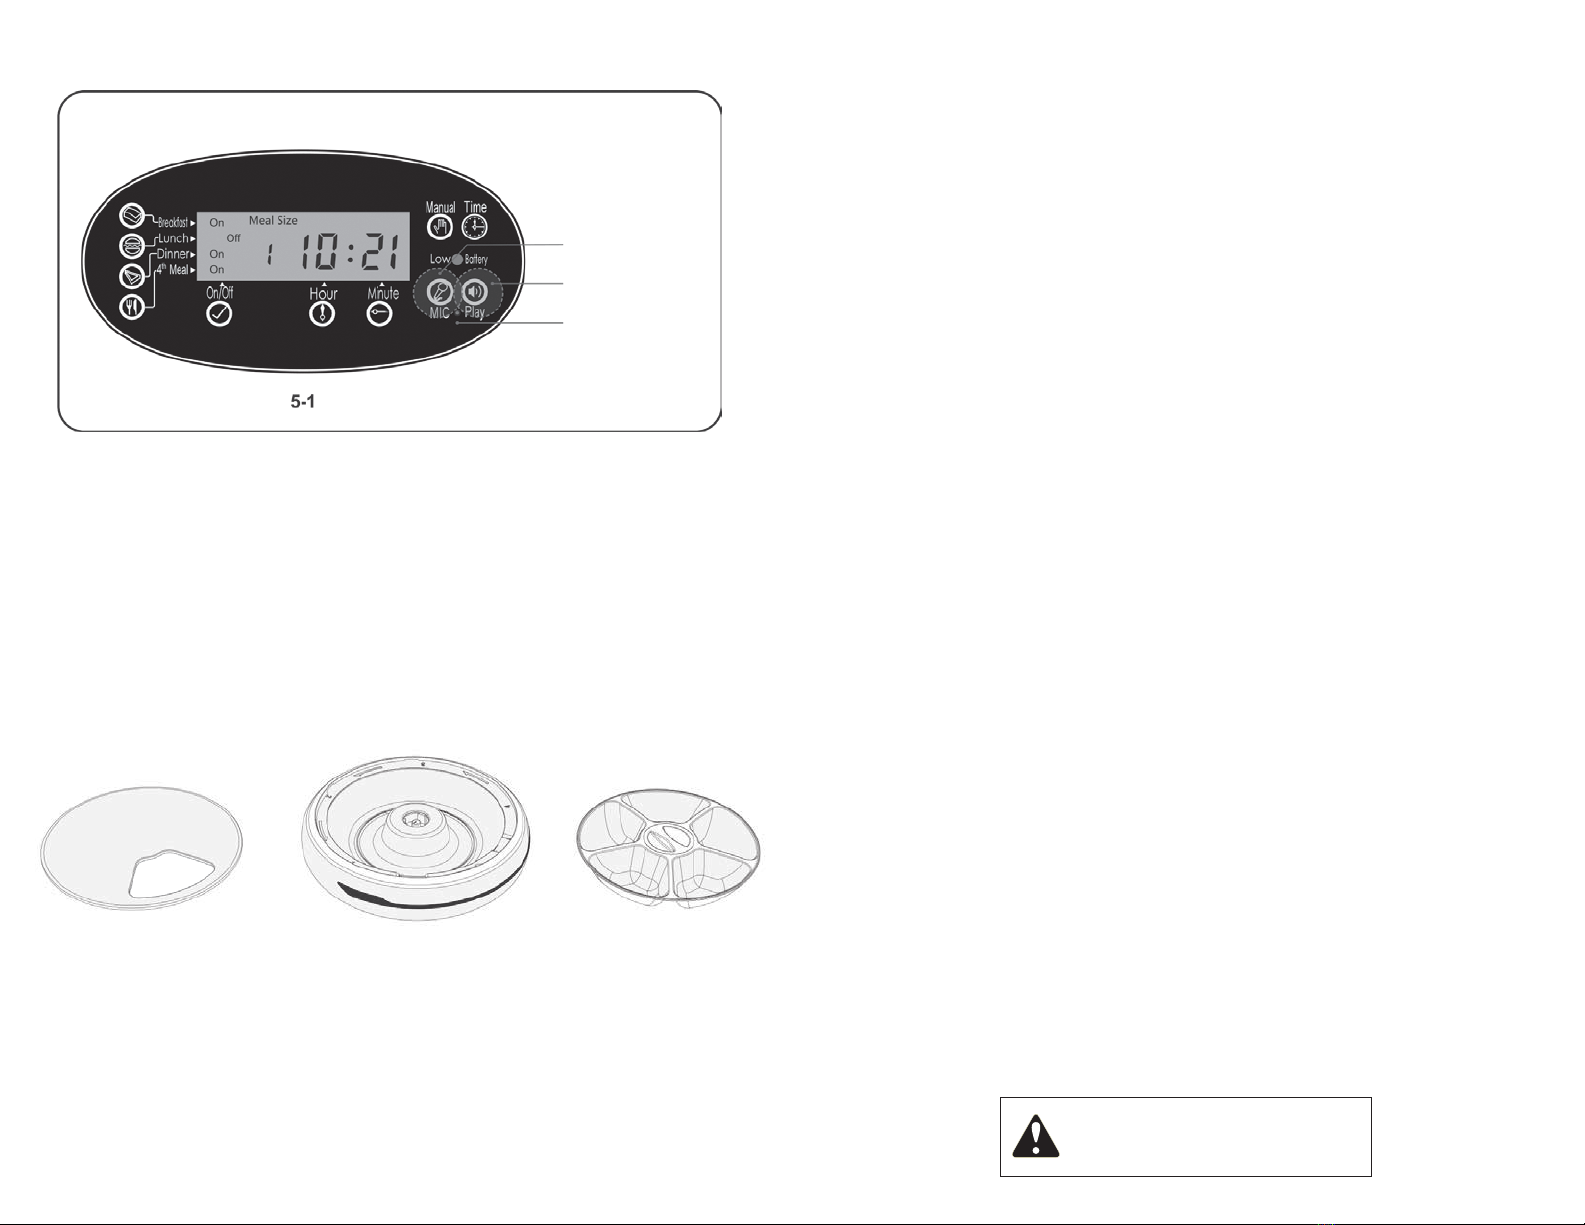
voice record
voice play
MIC location
The lid is washable. Food tray is washable.WARNING! Base unit should
not be submerged in water
CLEANING
TROUBLE SHOOTING
IMPORTANT NOTES
1. My pet feeder discharges inaccurately.
If after you use it for a period of time, this problem appears, this usually indicates that the battery
voltage is too low. Replace batteries.
2. My feeding device functions abnormally or the screen fades in an out.
If this problem appears, this usually indicates that the battery voltage is too low. Replace the batteries.
3. How do I view the parameters that I set?
fn the following order, press the breakfast button, lunch button, dinner button and the fourth meal
button so you can view the parameters you set. If you want to change the parameters, please re-set
the unit. Please note that if you replace the batteries owing to low voltage, you will need
to reprogram the feeder.
FREQUENTLY ASKED QUESTIONS
WARNING! This product contains chemicals known to
the State of California to cause cancer, and birth defects
or other reproductive harm. www.P65Warnings.ca.gov

Other manuals for LENTEK PD07

1

This manual suits for next models

1

Other Koolatron Pet Care Product manuals

Koolatron Bark Free Pro Series Manual

Koolatron

Koolatron Bark Free Pro Series Manual

Koolatron SUPER BARK FREE PC16 Manual

Koolatron

Koolatron SUPER BARK FREE PC16 Manual

Koolatron Lentek PT01 User manual

Koolatron

Koolatron Lentek PT01 User manual

Koolatron LENTEK PD07 User manual

Koolatron

Koolatron LENTEK PD07 User manual

Koolatron Super Bark Free BF02 Manual

Koolatron

Koolatron Super Bark Free BF02 Manual

Koolatron Super Bark Free BF02 pro series User manual

Koolatron

Koolatron Super Bark Free BF02 pro series User manual

Koolatron Pet Paw PP-05 Manual

Koolatron

Koolatron Pet Paw PP-05 Manual

Koolatron Super Bark Free User manual

Koolatron

Koolatron Super Bark Free User manual

Popular Pet Care Product manuals by other brands

Frisco 322625 instruction manual

Frisco

Frisco 322625 instruction manual

Hozelock Cyprio FISH FEEDER manual

Hozelock Cyprio

Hozelock Cyprio FISH FEEDER manual

Owon SPD 2100-M quick start guide

Owon

Owon SPD 2100-M quick start guide

Dogtra BALL TRAINER owner's manual

Dogtra

Dogtra BALL TRAINER owner's manual

Havahart 5125GX operating instructions

Havahart

Havahart 5125GX operating instructions

Little Cottage Cozy Cottage Kennel Assembly instructions

Little Cottage

Little Cottage Cozy Cottage Kennel Assembly instructions

Savic Hamster Plaza Assembly instructions

Savic

Savic Hamster Plaza Assembly instructions

chipdeal Reader Plus Extra Elementary user's manual

chipdeal

chipdeal Reader Plus Extra Elementary user's manual

KiSS MC-230 owner's guide

KiSS

KiSS MC-230 owner's guide

Dogtra 1900S HANDSFREE owner's manual

Dogtra

Dogtra 1900S HANDSFREE owner's manual

Zooplus Futterautomat Noma instruction manual

Zooplus

Zooplus Futterautomat Noma instruction manual

TRAVELIN K9 Pet-Pilot MAX Wicker 2019 owner's guide

TRAVELIN K9

TRAVELIN K9 Pet-Pilot MAX Wicker 2019 owner's guide

Richell 80004 instruction manual

Richell

Richell 80004 instruction manual

Premier Bark & Actvity Counter user manual

Premier

Premier Bark & Actvity Counter user manual

Premier Pet GDT00-16298 user manual

Premier Pet

Premier Pet GDT00-16298 user manual

Trixie 76080 Instructions for use

Trixie

Trixie 76080 Instructions for use

Kurgo BACKSEAT BRIDGE Instructions and care

Kurgo

Kurgo BACKSEAT BRIDGE Instructions and care

Petsafe PPA19-15794 installation guide

Petsafe

Petsafe PPA19-15794 installation guide

manuals.online logo
manuals.online logoBrands
  • About & Mission
  • Contact us
  • Privacy Policy
  • Terms and Conditions

Copyright 2025 Manuals.Online. All Rights Reserved.