CHROMATIC TUNER
CA-10
BEDIENUNGSANLEITUNG
Vorsichtsmaßnahmen
Regler und ihre Funktionen
Herzlichen Dank für den Kauf des Korg CA-10.
Stimmverfahren
Fehlersuche
Technicsche Daten
0
+20-20 MANUALAUTO
CENT
-50
CENT
+50
CALIBAUTO MANL
NOTE IN
POWER
MIC
CA-10
KORG INC.
15-12,Shimotakaido 1-chome, Suginami-ku, Tokyo, Japan
C 1997 KORG INC.
0
+20-20 MANUALAUTO
CENT
-50
CENT
+50
CALIBAUTO MANL
NOTE IN
POWER
MIC
1
2
4
7
6
5
8
3
CA-10
CE-Marke der EG-Norm
Die CE-Marke auf unseren netzgespeisten Geräten deutet auf deren Übereinstimmung mit den EMC-
und CE-Richtilinien der EG (respektive 89/336/EWG und 93/68/EWG) hin. Diese Abzeichen ist bis
zum 3. Dezember 1996 gültig.
Die CE-Marke ab 1. Januar 1997 deutet auf Übereinstimmung mit den EMC-, CE- und
Niederspannungsstrom-Richtilinien der EG (respektive 89/336/EWG, 93/68/EWG und 93/68/EWG)
hin.
Die CE-Marke auf unseren batteriegespeisten Geräten deutet auf deren Übereinstimmung mit den
EMC- und CE-Richtilinien der EG (respektive 89/336/EWG und 93/68/EWG) hin.
ACHTUNG
Alle KORG-Produkte werden entsprechend den Richtlinien der jeweiligen Länder mit allergrößter
Sorgfalt hergestellt. Sie unterliegen den Garantiebestimmungen der KORG-Vertriebsfirmen in den
einzelnen Ländern. Es ist besonders wichtig, den Service-Beleg umgehend vollständig ausgefüllt und
mit der Seriennummer des Gerätes an die Vertriebsfirma abzuschicken.
Im Interesse Ihrer eigenen Sicherheit, z. B. bei Verlust des Gerätes oder bei Funktionsstörungen, ist
bei uns die Seriennummer gespeichert.
Darüber hinaus erhalten Sie Informationen über Software-Update-Möglichkeiten sowie aktuelle
Softwareübersichten und Neuerscheinungen im KORG Professional Bereich.
Aufstellung
Betreiben Sie das Gerät nicht in folgenden
Umgebungen, da dies zu Fehlfunktionen führen
könnte:
• in direktem Sonnenlicht
• bei extremer Temperatur oder Luftfeuchtigkeit
• in extrem staubigen oder schmutzigen Umgebungen
• unter dem Einfluß starker Vibrationen
• in der Nähe eines Magnetfeldes
Stromversorgung
Verwenden Sie als Stromquelle ausschließlich
9V-Trockenbatteriezellen vom Typ 6F22 oder S-
006P(separat erhältlich).Stellen Sie den
Betriebsschalter bei Nichtgebrauch stets auf
“OFF” (aus), um die Batterie zu schonen.
Wenn Sie das
Tuner
voraussichtlich längere Zeit
nicht brauchen, sollten Sie die Batterie
herausnehmen, um eine Beschädigung durch
auslaufenden Elektrolyt zu vermeiden.
Interferenzen bei anderen Elektrogeräten
Dieses Produkt ist mit einem Mikrocomputer
ausgerüstet. Bei der Aufstellung in direkter Nähe von
Rundfunk- und Fernsehgeräten kann deren Empfang
durch Interferenzen gestört werden. Betreiben Sie
dieses Gerät deshalb in ausreichender Entfernung von
Rundfunk- und Fernsehempfängern.
Handhabung
Bedienen Sie die Schalter und Regler nicht mit übermäßiger
Kraft, um Beschädigungen zu vermeiden.
Reinigung
Wenn das Gehäuse verschmutzt ist, reinigen Sie es mit
einem trockenen, weichen Tuch. Verwenden Sie keine
flüssigen Reinigungsmittel, zum Beispiel Leichtbenzin,
Verdünner, Lösungsmittel oder brennbare Polituren.
Bedienungsanleitung
Nachdem Sie die Bedienungsanleitung gelesen haben,
sollten Sie sie für den späteren Gebrauch gut aufbewahren.
Fremdgegenstände
•StellenSiekeineBehältermit Flüssigkeit in dieNähe dieses
Geräts. Wenn Flüssigkeiten in das Gerät gelangen, könnte
dies einen Systemausfall, Brand oder Stromschlag zur Folge
haben.
• Achten Sie darauf, daß keine Metallgegenstände in das
Gerät gelangen. Sollte dies dennoch geschehen, ziehen
Sie den Wechselstromadapter aus der Netzsteckdose.
Setzen Sie sich anschließend mit dem nächstgelegenen
Korg-Fachhändler oder dem Geschäft in Verbindung, in dem
Sie das Gerät gekauft haben.
Skala: 12 Noten, wohltemperierte Stimmung
Erkennungsbereich:
A0 (27,50Hz - B7 (3591,07Hz)
Erkennungsgenauigkeit: ±3 Cents
Stimm-Modi: AUTO, MANUAL
Kalibrierungsbereich: 430 - 449Hz
(1-Hz-Schritte)
Anschlußbuchsen: INPUT-Buchse
Stromversorgung: 9V Batterie 6F22
(S-006P, separat erhältlich)
Batterie-Lebensdauer: etwa 30 Stunden
(mit Mangan Battrie, A4 Input-Buchse)
Abmessungen:
62mm (B) x 95,8mm (T) x 28,5mm (H)
Gewicht: 106g (mit Batterie)
Änderungen, die dem technischen Fortschritt
dienen, können jederzeit ohne Ankündigung
vorgenommen werden.
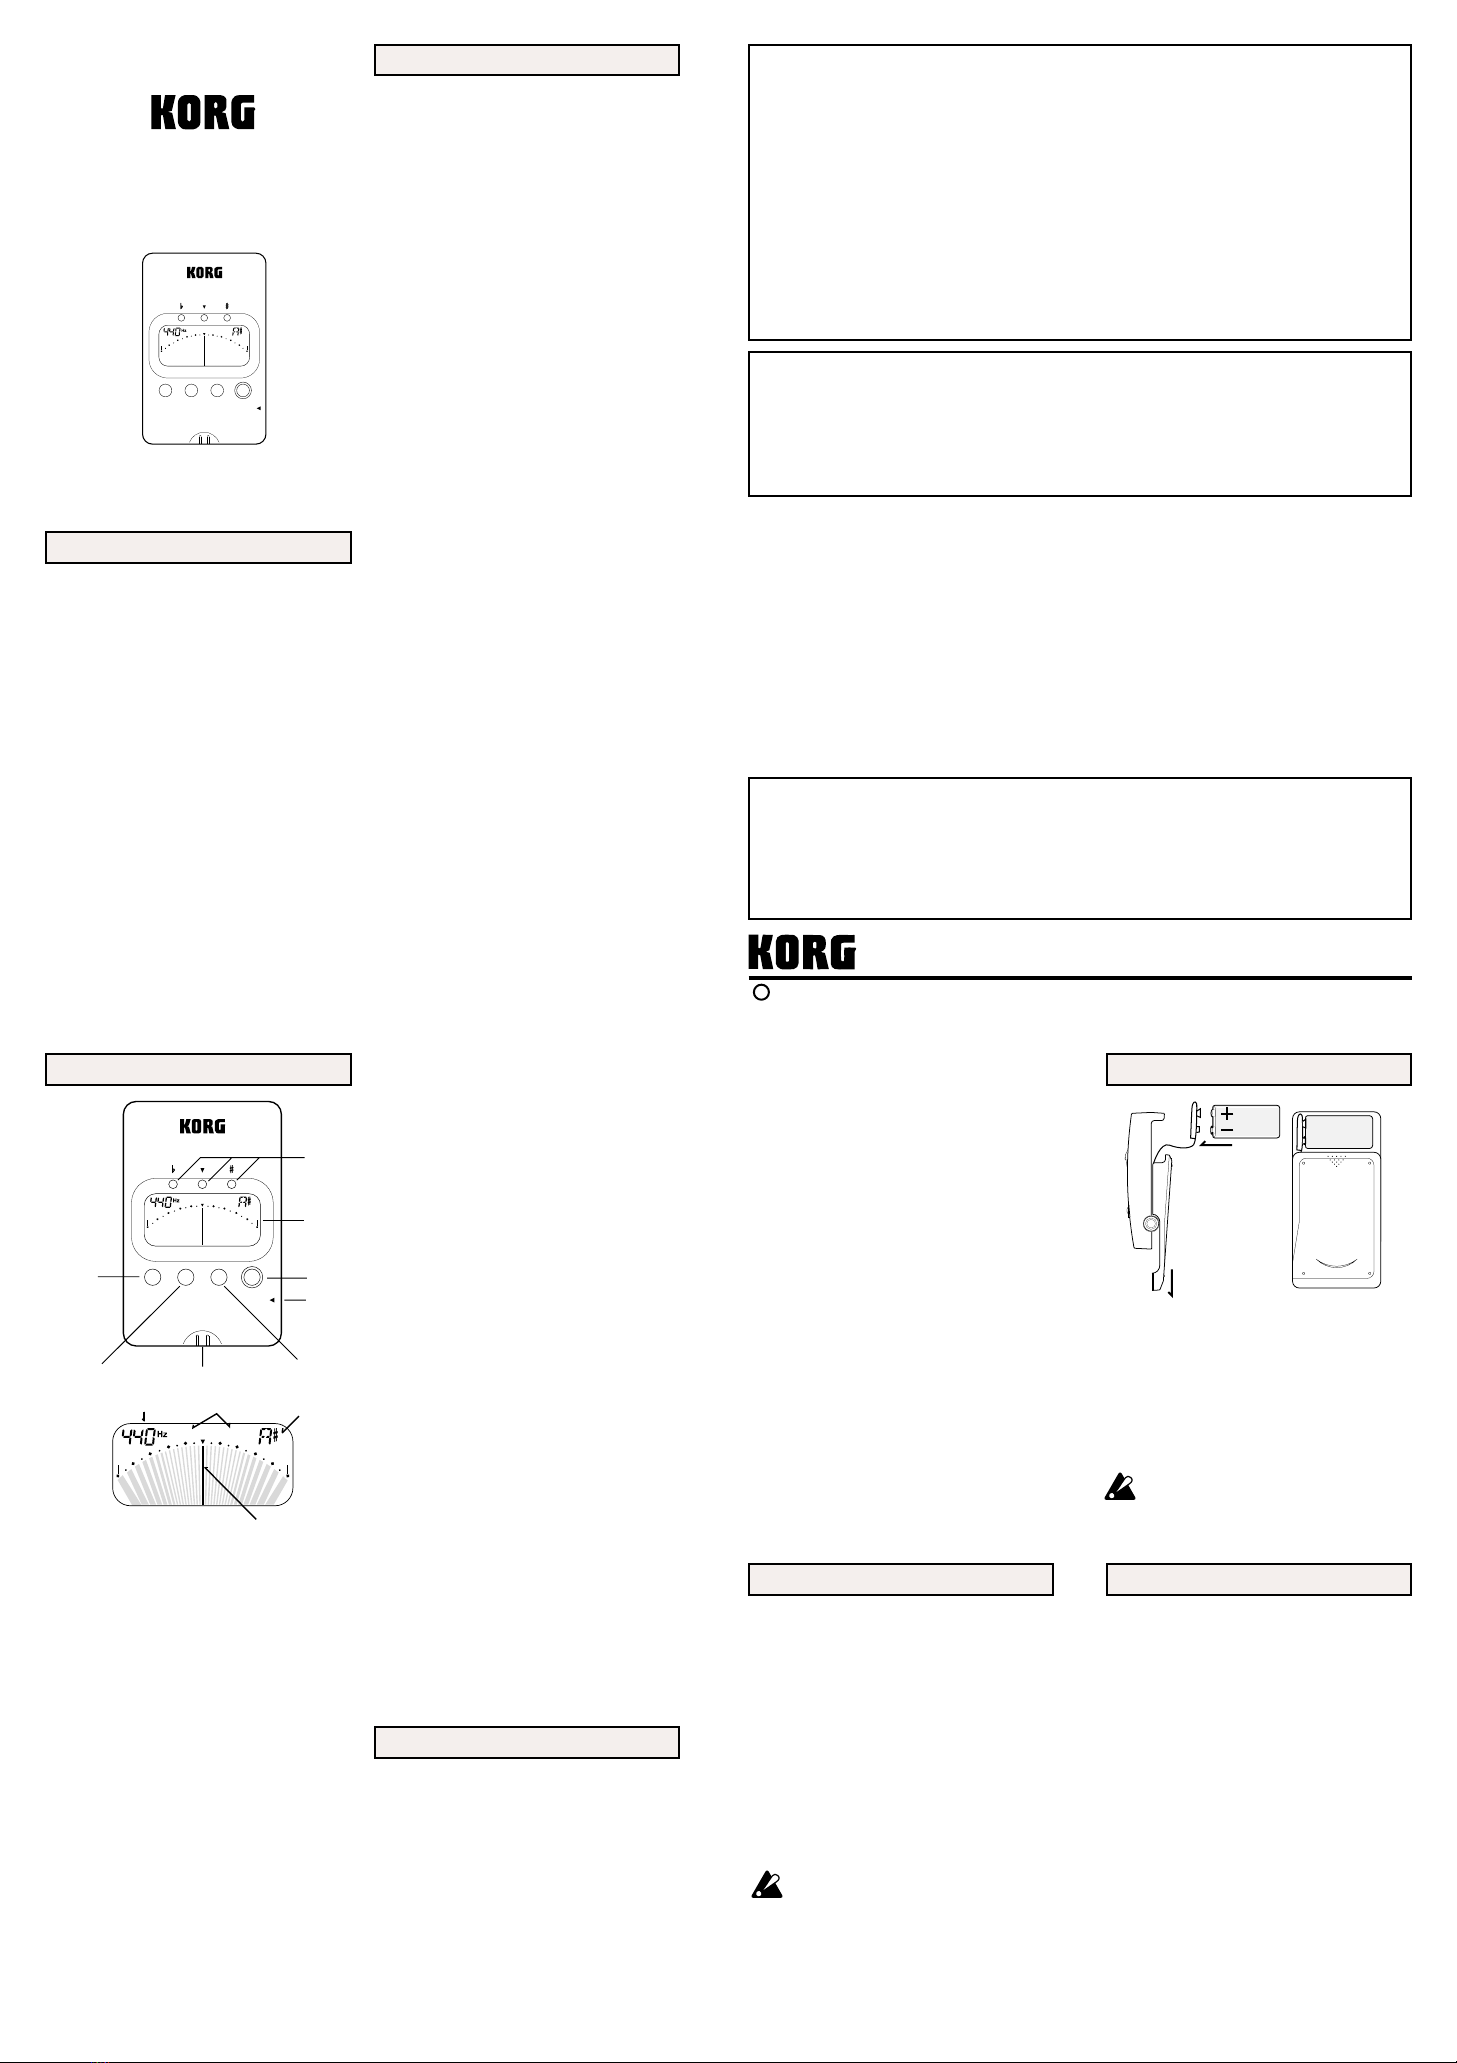
1 Netzschalter
Mit einem Druck auf dieseTaste schalten
Sie den CA-10 abwechselnd ein/aus.
Wenn Sie das Gerät 20 Minuten lang
eingeschaltet lassen, ohne es zu
bedienen, schaltet es sich automatisch
aus.
2 INPUT-Buchse
Schließen Sie hier das zu stimmende
Instrument an.
3 LCD-Bildschirm
Modus: Zeigt an, ob als aktueller Modus
AUTO oder MANUAL gewählt ist.
Notenname: Zeigt einen der Notennamen
A, A#, B, C, C#, D, D#, E, F, F#, G, G#
an.
Kalibrierung: Zeigt die momentan
gewählte Kalibrierungseinstellung an.
Nadelanzeige: Zeigt die Abweichung von der
korrektenTonhöhe an.
4 CALIB-Taste
Damit ändern Sie die
Kalibrierungseinstellung.
Die Kalibrierung läßt sich in 1-Hz-Schritten
von 430Hz bis 449Hz einstellen.
5 AUTO-Taste
Mit einem Druck auf diese Taste wählen Sie
den AUTO-Modus, in dem der Notenname,
der der gespielten Tonhöhe am besten
entspricht, automatisch zum Stimmen
angezeigt wird.
6 MANL/NOTE-Taste
Mit einem Druck auf diese Taste wählen Sie
den MANUAL-Modus.Wenn Sie
anschließend nochmals dieseTaste drücken,
wird der eingestellte Notenname gewechselt.
7 Mic
Halten Sie beim Stimmen von
Akustikinstrumenten dieses Mikrofon nahe
an denTeil des Instruments, der den Klang
abstrahlt.
Das Mikrofon ist außer Betrieb, wenn die
INPUT-Buchse belegt ist.
8 Stimmhilfe-LEDs
Wenn die Tonhöhe korrekt ist, leuchtet die
mittlere LED. Wenn die Tonhöhe zu tief ist,
leuchtet die linke LED.Wenn die Tonhöhe zu
hoch ist, leuchtet die rechte LED.
Batterie einbauen
1.Wenn Sie ein elektrisches Intrument
verwenden, schließen Sie es an die INPUT-
Buchse an.
2.Prüfen Sie die Kalibrierungsanzeige.Wenn
Sie die Einstellung ändern möchten, drücken
Sie die CALIB-Taste entsprechend oft, um
die gewünschte Einstellung vorzunehmen.
AUTO-Modus
3.Stellen Sie sicher, daß der AUTO-Modus
gewählt ist.Wenn das Gerät in den
MANUAL-Modus geschaltet ist, drücken Sie
die AUTO-Taste.
4.Spielen Sie einen Einzelton auf Ihrem
Instrument, und stimmen Sie es so, daß der
gewünschte Notenname angezeigt wird.
Achten Sie dann auf die Nadelanzeige, und
nehmen Sie Feineinstellungen an der
Stimmung vor, bis die mittlere LED der
Stimmhilfe leuchtet.Wenn Sie ein
Saiteninstrument spielen, wiederholen Sie
das Verfahren, um die anderen Saiten zu
stimmen.
MANUAL-Modus
3.Drücken Sie so oft die NOTE-Taste, bis der
gewünschte Notenname angezeigt wird.
4.Spielen Sie einen Einzelton auf Ihrem
Instrument, achten Sie auf die Nadelanzeige
und nehmen Sie Feineinstellungen an der
Stimmung vor, bis die mittlere LED der
Stimmhilfe leuchtet.Wenn Sie ein
Saiteninstrument spielen, wiederholen Sie
das Verfahren, um die anderen Saiten zu
stimmen.
1.Verschieben Sie die Gehäuserückseite
entsprechend dem obigen Diagramm.
2.Legen Sie wie im Diagramm eine 9V-
Batterie (Typ 6F22; S-006P, separat
erhältlich) ein. Achten Sie auf die
korrekte Polarität.
3.Schieben Sie das Gehäuse zurück, bis
es geschlossen ist.
Wenn der LCD-Bildschirm allmählich
dunkler wird, sollten Sie die Batterie
wechseln.
Grundlegende Konzepte des Stimmens
Das Stimmen ist unmöglich oder
schwierig.
Beim Einsatz eines elektrischen
Instruments: Ist die Lautstärke des
Instruments zurückgedreht? Oder wurde
die Lautstärke übermäßig erhöht? Stellen
Sie die Instrumentenlautstärke so ein,
daßdie Nadelanzeige sich stabilisiert.
Beim Einsatz eines akustischen
Instruments:Versuchen Sie, die
Entfernung oder den Winkel zwischen
dem eingebauten (oder externen)
Mikrofon und Ihrem Instrument zu
ändern.
Falls Funktionsstörungen auftreten
und das Problem sich durch AUS- und
EINSCHALTEN des Geräts nicht lösen
läßt, sollten Sie die Batterie entfernen
und anschließend wieder einbauen.
Über die Cent-Anzeige
“Cents”sind die kleinste relative Einheit zur
Angabe der Tonhöhe. Ein Halbton besteht aus
100 Cents, und eine Oktave besteht aus 1200
Cents. Der CA-10 zeigt den Unterschied
zwischen der eingespeistenTonhöhe und der
korrektenTonhöhe in Cent-Einheiten an. (Da 1
Cent eine extrem kleine Maßeinheit ist, stellen
Tonhöhenunterschiede von etwa ±3 Cents
normalerweise kein Problem dar.)
Kammerton und Kalibrierung
Die Stimmung eines Instruments wird
bezogen auf die Frequenz der Tonhöhe
des mittleren A eines Pianos. Diese ist
meistens A4 = 440Hz. Beim CA-10 können
Sie die Kammerton (die Frequenz von A4)
im Bereich von 430 - 449Hz einstellen.
Das Einstellen des Kammertons
bezeichnet man als “Kalibrieren”.
0
+20-20 MANUALAUTO
CENT
-50 CENT
+50
KALIBRIERUNG MODUS NOTENNAME
NADELANZEIGE